Search the Community
Showing results for tags 'tutorial'.
-
 Hi all. I've made a new video about how to build your own Armbian image with the Armbian build script. I also show how to set up virtualbox with a Ubuntu 18.04 image. Here's the video. Greetings, NicoD
 -
Panfrost instructions Armbian !!!! I made a script that does all this, check a few posts later for the script !!!!! This tutorial explains how to build an Armbian image with panfrost. And what else you need to make it work. These are early drivers. Many things don't work yet. Only OpenGL 2.1 works now. You need to build an image with kernel 5.2 or later. For this you need an x86 pc with Ubuntu 18.04 or a virtual Ubuntu 18.04 x86 image. First install git, then clone the build folder from Armbian, and enter the build directory. apt-get -y -qq install git git clone --depth 1 https://github.com/armbian/build cd build Now run the script with EXPERT=yes so you can choose to build a dev image. sudo ./compile EXPERT=yes Choose "Full OS image for flashing" Then "Show a kernel configuration menu before compilation" Choose your board. If it's not in the regular list, look in "Show SCS/WIP/EOS/TVB". Choose Development version kernel configuration -> device drivers -> graphic drivers -> panfrost Let it run until it's finished. The image will be in the /build/output/images Burn it to an SD-card/eMMC/... Now we need to install all the needed software sudo apt install flex bison python3-mako libwayland-egl-backend-dev libxcb-dri3-dev libxcb-dri2-0-dev libxcb-glx0-dev libx11-xcb-dev libxcb-present-dev libxcb-sync-dev libxxf86vm-dev libxshmfence-dev libxrandr-dev libwayland-dev libxdamage-dev libxext-dev libxfixes-dev x11proto-dri2-dev x11proto-dri3-dev x11proto-present-dev x11proto-gl-dev x11proto-xf86vidmode-dev libexpat1-dev libudev-dev gettext glmark2 glmark2-es2 mesa-utils xutils-dev libpthread-stubs0-dev ninja-build bc python-pip flex bison cmake git valgrind llvm llvm-8-dev python3-pip pkg-config zlib1g-dev wayland-protocols Download and install meson wget http://ftp.de.debian.org/debian/pool/main/m/meson/meson_0.55.3-1_all.deb sudo dpkg -i meson_0.55.3-1_all.deb Download and install mesa DRM git clone git://anongit.freedesktop.org/mesa/drm cd drm meson build --prefix=/usr ninja -C build sudo -E ninja -C build install cd .. Download and install mesa graphics git clone git://anongit.freedesktop.org/mesa/mesa cd mesa meson -Ddri-drivers= -Dvulkan-drivers= -Dgallium-drivers=panfrost,kmsro -Dlibunwind=false -Dprefix=/usr build/ ninja -C build/ sudo ninja -C build/ install REBOOT Optionally, update sdl (recommended) git clone https://github.com/SDL-mirror/SDL.git cd SDL mkdir build cd build cmake ../ make -j6 sudo make install REBOOT Only thing that works ok with it is supertuxkart, to install it. sudo apt install supertuxkart Panfrost - Linux games working from repo SuperTuxKart - Works well ExtremeTuxRacer - lots of glitches AssaultCube - lots of glitches Instructions by Salvador Liébana & NicoD
-
Hi all. I've made a new noob video on how to install Armbian on an SBC. I also show how I set up my Armbian desktop. And I show how to install Armbian onto another media. https://youtu.be/pnxUctyqx4c Greetings, NicoD
-
 How to install Puppeteer on node.js on Armbian. Tested on OrangePi Zero Plus running Ubuntu Xenial or Bionic. Should work on other boards and other builds. How to install the latest version of node.js. (at the time of writing was 12.7.0). Instructions for installing node.js on Debian and Ubuntu can be found at: https://github.com/nodesource/distributions/blob/master/README.md#deb The instructions at the time of writing were: # Using Ubuntu curl -sL https://deb.nodesource.com/setup_12.x | sudo -E bash - sudo apt-get install -y nodejs # Using Debian, as root curl -sL https://deb.nodesource.com/setup_12.x | bash - apt-get install -y nodejs Both of these methods work on Ubuntu. If you then try to install Puppeteer using "npm i puppeteer" you will discover that the version of Chrome that it installs locally is for the wrong CPU architecture. The solution to the problem is to install and use puppeteer-core instead of puppeteer. When using puppeteer core, you must define the path to Chrome or Chromium in the puppeteer script (see the test example below). First install a recent version of Chromium Browser. This will be used in headerless mode. apt-get install chromium-browser When the chromium-browser install is complete Create a folder for your Puppeteer project Let's assume that your folder is in /mnt/data/nodejs-scripts/screenshot (mine was on a mounted ntfs drive). cd /mnt/data/nodejs-scripts/screenshot npm init -y npm i puppeteer-core --save Now create a node.js test script Lets say that you call it screenshot.js Using your favorite editor insert the following lines into the file. const puppeteer = require('puppeteer-core'); (async ()=>{ const browser = await puppeteer.launch({ executablePath: '/usr/bin/chromium-browser', args: ['--no-sandbox'], headless: true }); const page = await browser.newPage(); await page.goto('https://duckduckgo.com/'); await page.screenshot({path: 'screenshot.png'}); await browser.close(); })(); Make the script executable. chmod +x screenshot.js You can now run the script cd /mnt/data/nodejs-scripts/screenshot nodejs screenshot.js If it has worked, you will find a screenshot of the DuckDuckGo page in your project folder.
 -
 because of some value changes for buster updates via apt (or buster going stable) N: Repository 'http://security.debian.org buster/updates InRelease' changed its 'Version' value from '' to '10' E: Repository 'http://security.debian.org buster/updates InRelease' changed its 'Suite' value from 'testing' to 'stable' N: This must be accepted explicitly before updates for this repository can be applied. See apt-secure(8) manpage for details. Do you want to accept these changes and continue updating from this repository? [y/N] Y N: Repository 'http://cdn-fastly.deb.debian.org/debian buster InRelease' changed its 'Version' value from '' to '10.0' E: Repository 'http://cdn-fastly.deb.debian.org/debian buster InRelease' changed its 'Suite' value from 'testing' to 'stable' N: This must be accepted explicitly before updates for this repository can be applied. See apt-secure(8) manpage for details. Do you want to accept these changes and continue updating from this repository? [y/N] Y E: Repository 'http://cdn-fastly.deb.debian.org/debian buster-updates InRelease' changed its 'Suite' value from 'testing-updates' to 'stable-updates' N: This must be accepted explicitly before updates for this repository can be applied. See apt-secure(8) manpage for details. Do you want to accept these changes and continue updating from this repository? [y/N] Y you should accept the changes to get new package-lists. If you only do (like me) a apt update in a update-script - the script will throw an error (because of the missing acceptance) and didnt load the new package-list A apt update -y will do the trick in the script or you have to start it once manually and accept with Y
 -
Hello dear experts at Armbian well the mysql_connect_error-script is a great help: It returns a string description of the last connect error ( see more infos here: https://www.php.net/manual/en/mysqli.connect-error.php ). The mysqli_connect_error() function returns the error description from the last connection error, if there is any error-note. the return value are the following ones: a. A string that describes the error. b. an empty string if no error occurred. at least this goes for the Version: PHP 5, PHP 7 well - if we run the code below we can get the info bout the option to connect to the db. What if we run this as a mysql-test-script, and what if we will want to convert it to use mysqli? Can this be done by changing mysql _query($sql); to mysqli _query($sql); ? <?PHP // the test-script that we are running. $DB["dbName"] = "emails"; $DB["host"] = "localhost"; $DB["user"] = "root"; $DB["pass"] = ""; $link = mysql_connect($DB['host'], $DB['user'], $DB['pass']) or die("<center>Howdy - be aware; There a thing happenede - An Internal Error has Occured. Please report following error to the webmaster shot him a mail now.<br><br>".mysql_error()."'</center>"); mysql_select_db($DB['dbName']); // end header connection part // function from a functions file that I run a mysql query through in any page. function executeQuery($sql) { $result = mysql_query($sql); if (mysql_error()) { $error = '<BR><center><font size="+1" face="arial" color="red">An Internal Error has Occured.<BR> The error has been recorded for review</font></center><br>'; if ($_SESSION['auto_id'] == 1) { $sql_formatted = highlight_string(stripslashes($sql), true); $error .= '<b>The MySQL Syntax Used</b><br>' . $sql_formatted . '<br><br><b>The MySQL Error Returned</b><br>' . mysql_error(); } die($error); } return $result; } // example query ran on anypage of the site using executeQuery function $sql='SELECT auto_id FROM friend_reg_user WHERE auto_id=' .$info['auto_id']; $result_member=executequery($sql); if($line_member=mysql_fetch_array($result_member)){ extract($line_member); } else { header("location: index.php"); exit; } ?> If we do replace mysql_* with mysqli_* then we will have to bear in mind that a whole load of mysqli_* functions need the database link to be passed. E.g.: the following ones. mysql_query($query) becomes mysqli_query($link, $query) I.e., lots of checking required. on the other hand side: is it suffice if we replace every mysql_* function call with its equivalent mysqli_*, when we will use the procedural API (note: there is some code based on the MySQL API, which is a procedural one - at least afaik), To help with that, the The MySQLi Extension Function Summary-manual is definitely something that will prove helpful. We can do the following: we have the following options to do that: - mysql_connect will be replaced by mysqli_connect - mysql_error will be replaced by mysqli_error and/or mysqli_connect_error, depending on the context - mysql_query will be replaced by mysqli_query ,,,, and so on and so forth. Note: For some functions, we may need to check the parameters very very carefully: Maybe there are some differences here and there -- but not that many differences. Belive me. Both mysql and mysqli-codes are based on the same library ( the great and powerful libmysql ; at least for PHP-version <= 5.2) Usage - for instance: with mysql, we have to use the mysql_select_db once connected, to indicate on which database we want to do our queries mysqli, on the other side, allows us to specify that database name as the fourth parameter to mysqli_connect.
-
 Hello reader I will report here about my experience to watch Netflix as written in the title. To do so, I got a current LE image from @balbes150 (thank you). You may be asking the same question as I do (did), why using the image from balbes and not the official one from the download page ? It is actually quite simple, balbes integrates the latest Kernel for his LE builds. While on a x86 system the kernel isn't so interesting, it is on ARM systems, because a lot of the development happens 1 or 2 year later of the release of the SoC. I have asked him about the different versions he offers for Le Potato: All versions of libreElec (LE) use the common core of aarch64 (64 bits). There is only one 32-bit library (arm) for Netflix. Therefore, I am releasing two versions of LE. ARM version = core of aarch64 + the whole ARM system. aarch64 = core aarch64 + whole system aarch64, this version runs 20-30 % faster than ARM. By the way, it would be interesting to check if Netflix works on Armbian, it may be possible to run it in the environment aarch64 + 32 bit library. So I chose this image: LibreELEC-AMLGX.arm-9.1-devel-20190604084103-a41fdf1-lepotato After writing the image on the SDcard I had to walk through the basic configuration of LE (by the way no SSH - you must use a Display and Keyboard) you find more information here: https://forum.libreelec.tv/board/38-amlogic/ https://libreelec.wiki/ YouTube A german screenshot film, that guides you through the process of installing the Netflix addon from libdev + jojo + asciidisco https://youtu.be/gyue62JWEkc Netflix addons; the Kodinerds repository is already part of LE, that saves you some time, update this first. The update and install of the Netflix addon (libdev + jojo + asciidisco), which has some dependencies, is tricky. I had repeated this process several times and a reboot once, because it would only install a few, but not all of the 9 dependencies at once. After 4 or 5 times it confirmed: installed. Now, keep following the YouTube film mentioned above. Adding your credtials to get access to Netflix. WideVine for digital rights mgmnt (DRM), is extracted from ChromeOS - this will download 2Gb Load on the hardware Press the "O" key on the keyboard when playing the video and the service information about the video will be displayed on the screen. It is Software-Decoding for Netflix. 2 cores were running at around 50% and 2 cores were idle (1280 x 720). Testing it on my TV it switched to FullHD at which point it got useless audio and picture were no longer insync. SSH (Secure Shell) During configuration you will see the SSH menu item. You can turn on SSH and you should then change the password!! However, reading the Wiki I got the feeling that this implementation is a bit weird... that said, I would turn it off if you don't need it. WiFi For to me unkown reason the binaries for the USB-WiFi Sticks were removed in 2017: https://github.com/LibreELEC/LibreELEC.tv/pull/1635 , luckily it is easy to add the driver. cd /storage/.config/ and here you do: mkdir -p firmware and now cd firmware/ unplug your USB-WiFi Stick, plug it in again and do: dmesg | tail -7 you can now see your stick and which binary is missing. Search the binary on this website and complete the line with your binary link: wget https://git.kernel.org/pub/scm/linux/kernel/git/firmware/linux-firmware... reboot no APT There is no working 'apt-get'. TIP: use XBMC's addon browser to enhance your LibreELEC system to be continued
-
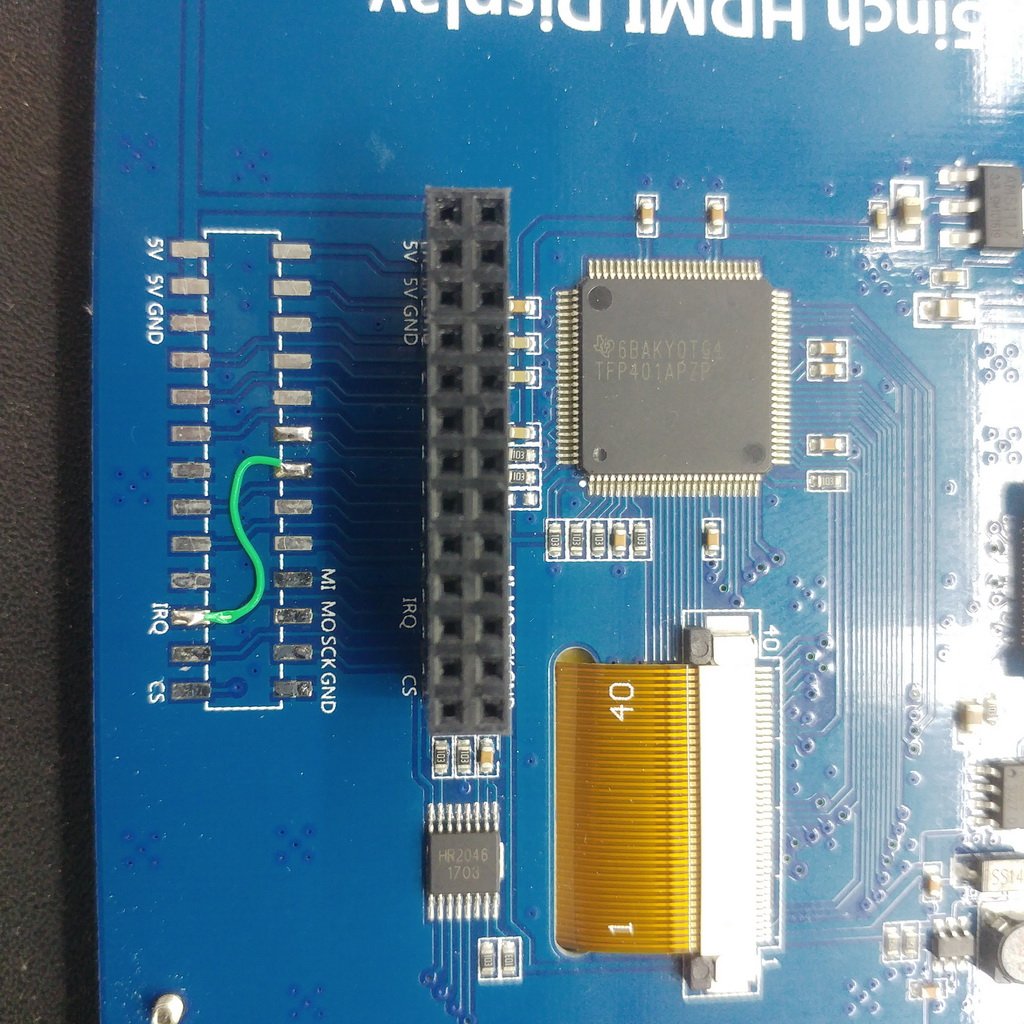
 Hello All After a lot of hours and sleepless nights I was able to get this 5" LCD to work with the BPI-M64 module. 1. Correct resolution setup + environment. A. In /Boot/armbianEnv.txt set the following: Make sure to enter overlays= spi-add-cs1 spi-spidev (this is for the touch panel to work) B. for 180 rotation: extraargs=fbcon=rotate:2 drm_kms_helper.edid_firmware=HDMI-A-1:edid/800x480.bin video=HDMI-A-1:800x480-24@60 No rotation: extraargs= drm_kms_helper.edid_firmware=HDMI-A-1:edid/800x480.bin video=HDMI-A-1:800x480-24@60 C. this info came from: https://askubuntu.com/questions/890231/adding-newmode-with-xrandr-800x480-60-00 by the way if you dont want to see the console messages during boot you can add this to the armbianEnv.txt: console=serial D. Save and close. E. Create a directory where the .desktop file will be contained: sudo mkdir -p /etc/xdg/autostart F. Create the .desktop file and make it executable: Let's call this file custom-screen-resolution.desktop: sudo nano /etc/xdg/autostart/custom-screen-resolution.desktop The content of the file custom-screen-resolution.desktop should look as: [Desktop Entry] Name=Custom Screen Resolution Exec=sh -c 'xrandr --newmode "800x480_60.00" 29.50 800 824 896 992 480 483 493 500 -hsync +vsync; xrandr --addmode HDMI-1 800x480_60.00; xrandr --output HDMI-1 --mode 800x480_60.00' Terminal=false Type=Application Categories=Application G. reboot H. After O/S is loaded go to settings => display and you be able to select the 800x480 resolution. 2. With the Touch Panel I lost some hair on my head since there were many issues to overcome. A. I had to solder the LCD TP_IRQ Pin (22) to unused Pin (13) since Pin 22 on the BPI-M64 didnt support GPIO to IRQ... and diving into the sources took a lot of time to figure out why, so the easiest way is to change the Pin. (please have a look at the attached picture. B. Also there were wrong settings in the sun50i-a64-spi-add-cs1.dtbo overly, it seems that CS1 were going to the wrong Pin ( not as the BPI_M64 page shows, it should have been going to Pin 26 - PC2 but in the overlay it did go to Pin 35- PB6) I really dont know why so I had to change the DTS file to: /dts-v1/; /plugin/; / { compatible = "allwinner,sun50i-a64"; fragment@0 { target = <&pio>; __overlay__ { spi0_cs1: spi0_cs1 { pins = "PD0"; function = "gpio_out"; output-high; }; spi1_cs1: spi1_cs1 { pins = "PC2"; function = "gpio_out"; output-high; }; }; }; fragment@1 { target = <&spi0>; __overlay__ { pinctrl-names = "default", "default"; pinctrl-1 = <&spi0_cs1>; cs-gpios = <0>, <&pio 3 0 0>; /* PD0 */ }; }; fragment@2 { target = <&spi1>; __overlay__ { pinctrl-names = "default", "default"; pinctrl-1 = <&spi1_cs1>; cs-gpios = <0>, <&pio 2 2 0>; /* PC2 */ }; }; }; The sun50i-a64-spi-add-cs1.dts & the sun50i-a64-spi-add-cs1.dtbo are also attached. Just replace the sun50i-a64-spi-add-cs1.dtbo located at /boot/dtb/allwinner/overlay with file that I have attached here. C. The next settings I have found at post here I just copy and paste so you will have all the info in one page: D) Download ads7846? touch driver (compatible with xpt2046) mkdir ds7846 cd ds7846 wget https://sourceforge.net/p/openipmi/linux-ipmi/ci/master/tree/drivers/input/touchscreen/ads7846.c?format=raw mv ads7846.c?format=raw ads7846.c E) Create a makefile (Take note that it is TABS instead of spaces before the $(MAKE)) nano Makefile Insert the below in without the ----- -------------------------------- obj-m := ads7846.o KDIR := /lib/modules/$(shell uname -r)/build PWD := $(shell pwd) all: $(MAKE) -C $(KDIR) M=$(PWD) modules clean: $(MAKE) -C $(KDIR) M=$(PWD) clean install: $(MAKE) -C $(KDIR) M=$(PWD) modules_install -------------------------------- F) Exit nano and run the following cd /usr/src/linux-headers-4.19.38-sunxi64 make scripts make modules_prepare sudo make sudo make install sudo depmod G) Download and compile and install ads7846_device cd .. git clone https://github.com/notro/fbtft_tools/ cd fbtft_tools/ads7846_device make sudo make install sudo depmod H) Load ads7846 and ads7846_device on boot sudo nano /etc/modules-load.d/ads7846.conf ads7846 ads7846_device I) Load ads7846_device options nano /etc/modprobe.d/ads7846_device.conf options ads7846_device model=7846 cs=1 gpio_pendown=234 keep_vref_on=1 swap_xy=0 pressure_max=255 x_plate_ohms=150 x_min=3900 x_max=200 y_min=3900 y_max=200 busnum=1 Note: GPIO_PENDOWN relate to the GPIO of the actual Pin number 13, With my board it is 234, If you are using other module (not BPI_M64) it could be other number, check with your module documents or do "gpio printall" in your board to see the correct Pin number. Since I use the screen in inverted mode those settings fits my needs. if you will use it in normal mode you might have to switch those parameters : swap_xy=0 or 1 x_min=3900 x_max=200 y_min=3900 y_max=200 or x_min=200 x_max=3900y_min=200 y_max=3900 I didnt really need it but you can install sudo apt-get install xinput-calibrator for fine tunning. (follow the instructions) I hope that I didnt forget anything. By the way the kernel I use is: 4.19.38-sunxi64 sun50i-a64-spi-add-cs1.dtbo sun50i-a64-spi-add-cs1.dts
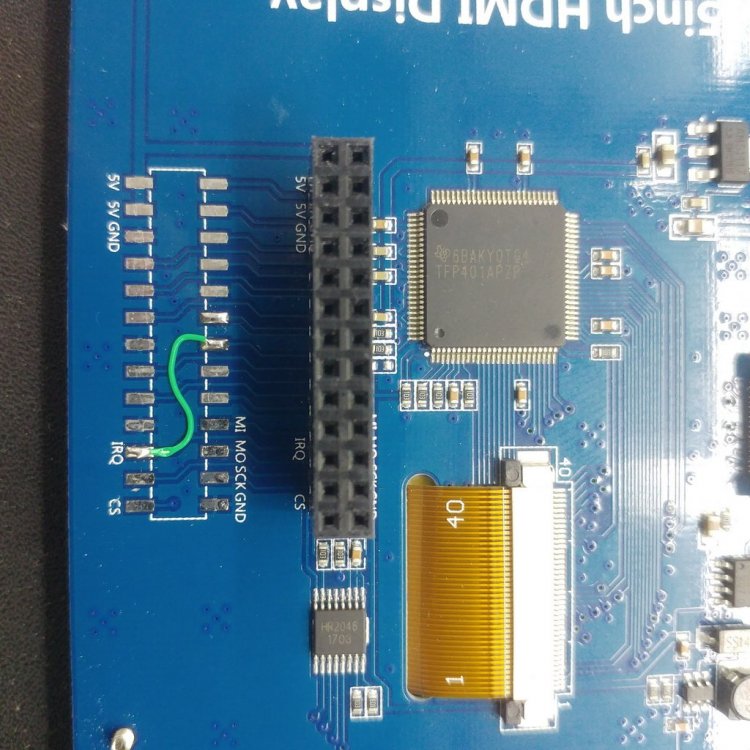
-
This weekend I was revising and testing the OV5640 for some A64 boards. To enable the Camera (OV5640) on NanoPi A64 for the mainline kernel you have to update the following: * DT * GPIO-I2C Here is the excerpt : Kernel config: CONFIG_I2C_GPIO=m CONFIG_VIDEO_OV5640=m CONFIG_VIDEO_SUN6I_CSI=m
-
Hi all. I've done a lot of tests with different desktop environments on Armbian. I wanted an as light as possible desktop environment so I'd have enough ram left to do video rendering with the NanoPi M4(2GB) I had to try a lot of things to get things working fine. So I wanted to save others that hassle. Setting up Display Manager First we need a Display Manager. NODM is installed by default. I tried lightdm but couldn't get it to work. So I went for LXDM. With NODM installed I had problems, so I also removed NODM. To be sure lxdm is configured right, I also manually configure it. sudo apt install lxdm sudo apt remove nodm sudo dpkg-reconfigure lxdm Install LXDE Desktop Next step is to install the desktop environment you want. There is a problem with some Desktop Environments and LXDM what makes you can't login to some DE's out of the box. That we will resolve later. Easiest is to install lxdm first to be able to configure the others well. And reboot. sudo apt install lxde sudo reboot Once booted you should be greeted by the Login screen. Here you can choose your different Desktop Environment. Choose LXDE and login. If you'd try xfce4, then you'd see it doesn't work. To fix this we need to change the file /usr/share/xsessions/xfce.desktop. Use your favorite text editor. I use geany. sudo geany /usr/share/xsessions/xfce.desktop Somewhere at the top of the file you'll see "Name=Xfce Session". Replace that space with a hyphen to "Name=Xfce-Session" and save the file. Now you can also login to the default XFCE4 Desktop. With other desktops this can be the same. Go the the same directory and open the file with the desktop name that doesn't work. Again replace the space with a hyphen Installing different Desktop Environments. For the Mate desktop I also needed to install the applets, else I got errors at login because of these missing applets sudo apt install mate-desktop-environment mate-applets For KDE-Plasma sudo apt install kde-full For Gnome. Modify the file sudo geany /usr/share/xsessions/gnome... sudo apt install gnome-session sudo update-alternatives --config gdm3.css I also tried LXQT. But this one didn't work. You can try others too. Remove Desktop Environment To remove a desktop environment you don't want anymore you do the remove instead of install. sudo apt remove kde-full sudo apt remove mate-desktop-environment . . . Please let me know if there's mistakes made, or if you've got advice. Source for changing the name to make them work @IgorS : Greetings, NicoD
-
I need a suggestion for a samba server (guess that is what it is called). I have an 8 TB external powered HD, and need a device that I can attach it to, so I can "see" it on the network. I had it attached to the USB 3 port on my Asus router, but it had issues, because the router did not support the 8 TB HD. I now have it connected to one of my microPCs (Tronsmart Ara X5) USB 3 ports, but I am only gettting a max of 12 MBs speed. I would like an inexpensive board that will support that drive and is easy to set up as a samba server..... thanks.
-
Mini tutorial I am putting here some notes for posterity In the current version of armbian (testing H6) I use X11 / Xorg only reaches 1024x768, but my display reaches 1440x900. To add this new resolution to the list of Settings/Display you have to give these commands: # xrandr --listmonitors (this command serves to see what it's called, the hdmi output) # cvt 1440 900 (output: # 1440x900 59.89 Hz (CVT 1.30MA) hsync: 55.93 kHz; pclk: 106.50 MHz Modeline "1440x900_60.00" 106.50 1440 1528 1672 1904 900 903 909 934 -hsync +vsync ) # xrandr --newmode "1440x900_60.00" 106.50 1440 1528 1672 1904 900 903 909 934 -hsync +vsync # xrandr --addmode HDMI-1 1440x900_60.00 # xrandr --output HDMI-1 --mode 1440x900_60.00 If it works then modify Xorg with: # sudo mcedit /etc/X11/xorg.conf.d/40-monitor.conf Section "Monitor" Identifier "HDMI-1" Modeline "1440x900_60.00" 106.50 1440 1528 1672 1904 900 903 909 934 -hsync +vsync Option "PreferredMode" "1440x900" EndSection # reboot
-
Yesterday i did install Armbian_5.86_Aml-s905_Debian_buster_default_5.1.0_20190514.img from @balbes150 on my Sunvell T95KPro (S912). While installing Pihole the Installation does break when trying to start lighttpd. After checking with journalctl -u lighttpd it turns out that the file /usr/share/lighttpd/create-mime.assign.pl is missing, because in the newer lighttpd-version of debian buster the file has be renamed to /usr/share/lighttpd/create-mime.conf.pl (see also https://discourse.pi-hole.net/t/lighttpd-does-not-start/6207/11 ) Pihole doesnt know/use the new name with debian buster, so it fails to start the lighttpd So I did find 2 ways to resolve the problem. First (quick and dirty?) way: cp /usr/share/lighttpd/create-mime.conf.pl /usr/share/lighttpd/create-mime.assign.pl or ln -s /usr/share/lighttpd/create-mime.conf.pl /usr/share/lighttpd/create-mime.assign.pl read also: Pihole breaks lighttpd on Debian Buster #2557 https://github.com/pi-hole/pi-hole/issues/2557 the second way (found it at https://forum.kuketz-blog.de/viewtopic.php?t=3067 ) is to edit /etc/lighttpd/lighttpd.conf and search for the 2 following lines and comment them out (found the 2nd one at the end of the file): #include_shell "/usr/share/lighttpd/create-mime.assign.pl" #include_shell "cat external.conf 2>/dev/null" and add the follwoing line to the file: include_shell "/usr/share/lighttpd/create-mime.conf.pl" After saving the file you should be able to restart lighttpd via sudo /etc/init.d/lighttpd restart or sudo service lighttpd restart or sudo service lighttpd stop sudo service lighttpd start BUT second way does not work good with updating or repair-install of pihole, because I think this will set the config-file to the old state (also for server.error-handler-404) So maybe the first way will work better while pihole doenst know the new file-name - or you also can do both ways BTW: If you are experience a 400 Bad Request while only using the IP for getting to the Pihole-Webpage (and the redirect should ask you if you want to use the /admin page - but it doenst) then try the follwing small resolution - edit a line in the file /etc/lighttpd/lighttpd.conf from: server.error-handler-404 = "pihole/index.php" to: server.error-handler-404 = "/pihole/index.php" lighttpd.conf
-
Hi all. I've made a new video about x11vnc. With this you can control your Linux desktop from any other PC/SBC. It even works for videos and games. Only there's no sound. I use lightdm as display manager. If you use another display manager, change the line "After=lightdm.service" with your display manager. Here's my video, To Install sudo apt install x11vnc To create a password file x11vnc -storepasswd The service script : /lib/systemd/system/x11vnc.service [Unit] Description="x11vnc" Requires=display-manager.service After=lightdm.service [Service] ExecStart=/usr/bin/x11vnc -auth guess -loop -forever -safer -shared -ultrafilexfer -bg -o /var/log/x11vnc.log ExecStop=/usr/bin/killall x11vnc [Install] WantedBy=multi-user.target Enable the service script sudo systemctl daemon-reload sudo systemctl enable x11vnc sudo systemctl start x11vnc greetings. NicoD
-
 hello dear all, I've been using the lm-sensors tool for years now - first time in Ubuntu and now i want to use it in Manjaro - my actually fav system LM-Sensors - it does a lot: It monitors CPU temperature, the fan speeds, and - additionally - also the motherboard voltages that could be measured. After using it for some time in Ubuntu - my previous fav-linux.i now want to use some advanced uses of lm-sensors - i have heard that we can use it in combination with some graphical interfaces to interact with it. first i have to do the Installation: step one: Install lm-sensors, then run it with no options to see what it does: $ sensors coretemp-isa-0000 Adapter: ISA adapter Physical id 0: +47.0°C (high = +90.0°C, crit = +120.0°C) Core 0: +45.0°C (high = +90.0°C, crit = +120.0°C) Core 1: +47.0°C (high = +90.0°C, crit = +120.0°C) Core 2: +44.0°C (high = +90.0°C, crit = +120.0°C) Core 3: +46.0°C (high = +90.0°C, crit = +120.0°C) This is on an Ubuntu PC. My Manjaro system installs it a bit different i think - and afterwards i have to take care for the configuration, on older systems - (note 10 years ago i used Ubuntu) i have followed another setup: then i go ahead: Run sensors-detect to set it up to detect the sensors and the temp of the CPU. in the past i have learned that the safest method and way to do a setup and basic configuration of lm-sensors is to accept all of the defaults by: $ sudo sensors-detect # sensors-detect revision xyz (2019-01-30 12:00:33 +0200) and.... after getting the first scan - we can the setup in modify /etc/modules: but how to go ahead now.... how to combine it the get the advanced features - and graphical output!?
 -
I made a hardware setup guide for the Pine64 Clusterboard. It's over on their forums: https://forum.pine64.org/showthread.php?tid=7077 Long and short is that it's a $99 motherboard that can accommodate 7x $30 compute modules.
-
It's *amazing* what you can find reading the Armbian documentation! I dig the shell, even old-school in a virtual terminal or minimal server type setup. Normally that means going through some squinty-eyed hoops to get the Terminus console font installed with larger sizes in the first place on large monitors. Wait - what's this? sudo dpkg-reconfigure console-setup I did this in a virtual terminal, and allowed setup to pick the right character set for me. Then I blasted the framebuffer with the largest Terminus font size allowed. Perfection! Not a big deal to most, but having this be part of the standard distribution image made my day. Soooo easy. thanks!
-
For enabling - to use stockfish/armfish-chess-engine - as a TCP service we need to configure (add the lines at the end of the file) /etc/inetd.conf #:OTHER: Other services stockfish08 stream tcp nowait guido /usr/games/stockfish stockfish10 stream tcp nowait guido /usr/games/stockfish_10_64 armfish stream tcp nowait guido /usr/games/armfish_aarch64 and add the TCP-Port - we want to use - to the /etc/services (for optical reasons after pop3s port 995/tcp) pop3s 995/tcp # POP-3 over SSL # # stockfish08 1024/tcp # stockfish 8 chess engine stockfish10 1025/tcp # stockfish 10 chess engine armfish 1026/tcp # armfish chess engine at the end we have to restart inetd (or reboot) systemctl restart inetd Additional (important?) informations: - guido is a local user on my system - you need to change the name for the /etc/inetd.conf to a local user of your system - /usr/games/stockfish is the stockfish-binary installes by apt install stockfish - the stockfish-binary we compiled for stockfish v10 64Bit in another thread from ./Stockfish-master/src/stockfish (directory of the cloned github-repository) to /usr/games/stockfish_10_64 - /usr/games/armfish_aarch64 is the (on a 64Bit PC-Linux compiled with fasmg) assembler-version of stockfish which could run twice as fast see https://github.com/lantonov/asmFish precompiled aarch64-binary as attachment (think about the chmod 755 armfish_aarch64 after the transfer ) Binary-Overview in /usr/games/ root@t95k-pro(192.168.6.62):/usr/games# ls -l insgesamt 644 -rwxr-xr-x 1 root root 128050 Mär 14 22:08 armfish_aarch64 -rwxr-xr-x 1 root root 216216 Nov 12 2016 stockfish -rwxr-xr-x 1 root root 308896 Mär 14 13:57 stockfish_10_64 armfish_aarch64
-
Normally you could install (if you use a 64Bit arm-system/OS) the 64Bit version of stockfish with apt install stockfish stockfish is a uci-chess-engine where some Chessboard-Display-Apps can conenct to (later I would show how to use this with TCP) Then you will get (at this time) the Version 8 64Bit = 8 64 = 11/2016 But the actual stockfish-engine is at Version 10 = 12/2018 ( see http://blog.stockfishchess.org/ ) So I did clone the git-master at https://github.com/official-stockfish/Stockfish as .zip After unzipping and cd to ./Stockfish-master/src you could do -make clean -make help BUT there is for arm only a ARCH=armv7 (32Bit) option When using the ARCH=general-64 option make build ARCH=general64 COMP=gcc COMPCXX=g++ then the start of the compile did fail because g++ says that he didnt knows the -m64 commandline-option I searched the Web and found there no solution So I did take a look into the Makefile and first I didnt found anything about -m64, but then I discoverd in the gcc-options the follwing part which I then deleted: else CXXFLAGS += -m$(bits) LDFLAGS += -m$(bits) after that I did create a aarch64-ARCH-section under the armv7-ARCH-section: ifeq ($(ARCH),aarch64) arch = any prefetch = yes bits = 64 endif arch = any is copied from the "general-64" section, prefetch is copied from the "armv7"-section and maybe the "bits = 64" is obsolete? Now we can compile - there are two options: dpkg -l|grep 'g++' ii g++ 4:6.3.0-4 arm64 GNU C++ compiler ii g++-6 6.3.0-18+deb9u1 arm64 GNU C++ compiler make build ARCH=aarch64 COMP=gcc COMPCXX=g++ make build ARCH=aarch64 COMP=gcc COMPCXX=g++-6 When the compile has completed you will have the executeable stockfish in your ./Stockfish-master/src directory. see stockfish_10_64 as attached binary at the end of this thread-message When started you will see: Stockfish 140319 64 by T. Romstad, M. Costalba, J. Kiiski, G. Linscott Enter uci and you will see the stockfish-info: id name Stockfish 140319 64 id author T. Romstad, M. Costalba, J. Kiiski, G. Linscott option name Debug Log File type string default option name Contempt type spin default 24 min -100 max 100 option name Analysis Contempt type combo default Both var Off var White var Black var Both option name Threads type spin default 1 min 1 max 512 option name Hash type spin default 16 min 1 max 131072 option name Clear Hash type button option name Ponder type check default false option name MultiPV type spin default 1 min 1 max 500 option name Skill Level type spin default 20 min 0 max 20 option name Move Overhead type spin default 30 min 0 max 5000 option name Minimum Thinking Time type spin default 20 min 0 max 5000 option name Slow Mover type spin default 84 min 10 max 1000 option name nodestime type spin default 0 min 0 max 10000 option name UCI_Chess960 type check default false option name UCI_AnalyseMode type check default false option name SyzygyPath type string default <empty> option name SyzygyProbeDepth type spin default 1 min 1 max 100 option name Syzygy50MoveRule type check default true option name SyzygyProbeLimit type spin default 7 min 0 max 7 uciok You could leave the stockfish chess-engine with quit I will add (these days) a tutorial for setting up stockfish as TCP-Service (via inetd) and then we could connect via Windows/Android/Linux ChessBoard-Display-Apps to play with the stockfish engine on your 64Bit ARM-System Preview-Information-Links for setting up , connecting and playing with the engine: https://somoit.net/linux/linux-create-custom-inetd-service https://jerrygreenblog.wordpress.com/2016/08/26/linux-stockfish-chess-engine-as-remote-service/ http://aartbik.blogspot.com/2012/03/connecting-chess-for-android-to-remote.html stockfish_10_64
-
You may have seen discussions around the forum regarding work being done by @adafruit using circuit python with Armbian, but I wanted to make sure this nice write-up had proper visibility. https://learn.adafruit.com/circuitpython-on-orangepi-linux/initial-setup
-
Orange Pi Zero NTP Stratum 1 PPS GPS Server with Armbian OS. Link to the Tutorial - http://schwartzel.eu3.org/ntp-stratum1.html This tutorial uses a 3.3V capable GPS module with PPS output - TOPGNSS GN-701 (u-blox 7) but other similar modules should work. This tutorial is for the Orange Pi Zero, but will probably work for other boards. I couldn't easily do a comprehensive hardware and software tutorial on this forum, so I've published it on my web server and linked from here and attached a PDF. Link to the Tutorial - http://schwartzel.eu3.org/ntp-stratum1.html Tutorial PDF ntp-stratum1.pdf If you spot any typo's or errors please let me know.

-
I like it to anounce some messages/informations via TTS ( T(text)T(o)(S)peech) . Normally I use espeak with a litte better sounding mbrola-voice (No. 6 german). But on Android you could buy - for cheap againt the PC-version - some better voices. Like my favourite german Voice "Julia" from Acapela. So I always wanted to use this voice for the informations. I did found a "server"-app for android which takes a UDP/HTTP-request to play a given string via the default TTS on the android-device (or a .MP3 stored in the memory of the android-device). Its named Home24-MediaPlayer - and can be found at (isnt anymore in the Google PlayStore for me - only the Home24-App for Smartphone or Tablet): http://www.home-24.net/index.php?page=sites/home.php&app=media http://www.home-24.net/app/Home24-MediaPlayer.apk You could give the android-device the request via HTTP or UDP from your armbian-commandline or shell-script: # HTTP samples curl http://192.168.6.12:50000/tts='This is a Test' 1>/dev/null 2>/dev/null wget http://192.168.6.12:50000/tts='This is a Test' 1>/dev/null 2>/dev/null wget http://192.168.6.12:50000/track=MySong.mp3 1>/dev/null 2>/dev/null # UDP samples echo 'tts=This is a Test'|nc -w 0 -u 192.168.6.12 50002 echo 'track=MySong.mp3'|nc -w 0 -u 192.168.6.12 50002 The Message could combine many commands in one line (also in HTTP/UDP): track=Alarm.mp3|tts=Alarm|sms=0150123456&message=Alarm see also the Wiki for the Home24-MediaPlayer: http://www.home-24.net/wiki/index.php?title=Home24-MediaPlayer On my Smartphone it also does work, but when the screen and the device goes to sleep it wouldnt work anymore. So I did think about a device without a battery and did try a Orange Pi PC (H3) with H3Droid, but this was too slow for me - because the OPi PC always did work on the SD-Card (dont know if my card was too slow). I was hoping getting a better performance with the OPi PC because of the 1GB of Ram. [EDIT] ========================================================================= It was the card After the Minix NEO X5 - which did work without problems. I did gave the OPi PC a second chance with a brandnew 32GB Sandisk EVO. With this new card the access is now MUCH snappier I installed Acaplea's Julia and the Home24-MediaPlayer and its sounds - for me - a little bit better than the Minix NEO 5. PS: old card seems to be a Fake-SONY Class 10 card (or very old and used) ========================================================================= Now I will try a "old" Android-TVBox: Mini NEO X5 ( Dual Core RK3066 Cortex A9 1.6GHz , 1GB Ram / 16GB Flash). Does any one know another Android-App with a function like this?
-
I stopped tinkering for a while but https://magicmirror.builders/ perked my interest and been grinning at such a simple project and generally think its really great. I think they have made some odd options as the server and electron browser have been lumped together which is a really strange choice for absolutely no advantage. The server does need restarts and would seem far more often than you would expect and the use of electron means armv7l only which is a shame for the 0/1 owners. You can install using chromium and you certainly don't need the load of a desktop?! Dunno been wondering. I wanted to use a zero as love that tiny footprint and price and there are loads tutorials out there that seem to have much more than necessary and electron is chromium in a java wrapper with reduced architecture offerings so why no support? But hey. Not that bothered about that but why the have made the server and browser monolithic as a server restart now causes a cool device to display a desktop and even why desktop on a mirror has me scratching my head. https://github.com/StuartIanNaylor/MagicMirror-Install-Guide-Raspberry-0-to-3 if anything it will present a different take on the install as for some reason they depart from vanilla and I actually think it works better. Shame there isn't a Banana pi zero image or is there as loving that form factor. I do know it gets hot as hell but just tinkering by a tiny mind with tiny boards. PS if there is something near working give us a shout with Armbian and BPIZ
-
Not much of a tutorial, but it is something that often needs some googling and head scratching. This is how I got my particular modem working, your mileage may vary. Step 1) Get a modem that will work. I got a Huawei E397u LTE/UMTS/GSM modem. It's Cricket branded, but I'm on Google Fi, it will work with my data SIM. Step 2) Plug it in and see that it doesn't work. Step 3a) apt update Step 3b) apt upgrade Step 4) Install usb-modeswitcher Step 4, optional part 2) install modem-manager, modem-manager-gui (for general playing around) Step 5) unplug/replug the USB modem, see that it should magically have a different VID:PID when you type lsusb. You should also have some ttyUSB's, and you can check out modem details in the modem-manager-gui Step 6) set up network connection via the network dropdown at the top right of the desktop. You will need APN information for your carrier. I put in modem-manager so I could debug. It will cause issues if you do certain things with it while connected. My modem was $15, Ebay has them. https://www.ebay.com/itm/BRAND-NEW-Unlocked-Cricket-Huawei-E397-E397u-53-4G-LTE-Mobile-Broadband-Modem/262898110276 So does amazon.
-
I did that on a NanoPi Neo with the FriendlyARM PCM5102A Hat ( https://www.friendlyarm.com/index.php?route=product/product&product_id=169 ) using kernel 4.14.87-sunxi and armbian 5.67 (or later would be only 5.65?) (before that I did use legacy kernel 3.4.x with the PCM510A) and the armbian-BuildSystem plus (THANKS to) informations in threads from @dony71 , @Christos, @Valery Rezvyakov and the the Reference-Threads you could find above ---------------------------------------------------------------------------------------------------------------------------------- BACKUP DTB (on NanoPi Neo) ---------------------------------------------------------------------------------------------------------------------------------- cp /boot/dtb/sun8i-h3-nanopi-neo.dtb /boot/dtb/sun8i-h3-nanopi-neo.dtb_org ---------------------------------------------------------------------------------------------------------------------------------- CONVERT dtb to dts (on NanoPi Neo) ---------------------------------------------------------------------------------------------------------------------------------- dtc -I dtb -O dts /boot/dtb/sun8i-h3-nanopi-neo.dtb -o /boot/dtb/sun8i-h3-nanopi-neo.dts ---------------------------------------------------------------------------------------------------------------------------------- EDIT /boot/dtb/sun8i-h3-nanopi-neo.dts ---------------------------------------------------------------------------------------------------------------------------------- nano /boot/dtb/sun8i-h3-nanopi-neo.dts - change: status from "disabled" to "okay" ---------------------------------------------------------------------------------------------------------------------------------- FROM i2s@1c22000 { #sound-dai-cells = <0x0>; compatible = "allwinner,sun8i-h3-i2s"; reg = <0x1c22000 0x400>; interrupts = <0x0 0xd 0x4>; clocks = <0x3 0x38 0x3 0x54>; clock-names = "apb", "mod"; dmas = <0x13 0x3 0x13 0x3>; resets = <0x3 0x2b>; dma-names = "rx", "tx"; status = "disabled"; phandle = <0x4e>; }; TO i2s@1c22000 { #sound-dai-cells = <0x0>; compatible = "allwinner,sun8i-h3-i2s"; reg = <0x1c22000 0x400>; interrupts = <0x0 0xd 0x4>; clocks = <0x3 0x38 0x3 0x54>; clock-names = "apb", "mod"; dmas = <0x13 0x3 0x13 0x3>; resets = <0x3 0x2b>; dma-names = "rx", "tx"; status = "okay"; phandle = <0x4e>; }; ---------------------------------------------------------------------------------------------------------------------------------- CONVERT (BACK) dts to dtb (on NanoPi Neo) ---------------------------------------------------------------------------------------------------------------------------------- dtc -I dts -O dtb /boot/dtb/sun8i-h3-nanopi-neo.dts -o /boot/dtb/sun8i-h3-nanopi-neo.dtb_I2S_okay ---------------------------------------------------------------------------------------------------------------------------------- COPY new dtb over dtb (on NanoPi Neo) ---------------------------------------------------------------------------------------------------------------------------------- cp /boot/dtb/sun8i-h3-nanopi-neo.dtb_I2S_okay /boot/dtb/sun8i-h3-nanopi-neo.dtb ---------------------------------------------------------------------------------------------------------------------------------- COPY sun8i-h3-I2S-out.dts to home (working directory on NanoPi Neo) ---------------------------------------------------------------------------------------------------------------------------------- copy sun8i-h3-I2S-out.dts --> /home/guido/ ---------------------------------------------------------------------------------------------------------------------------------- armbian-add-overlay (on NanoPi Neo) does only work if you got the kernel-headers installed for your actual kernel-version (at this time the lastest kernel-header are (via armbian-config -> Software -> Install Headers) Linux kernel headers for 4.14.84-sunxi on armhf - so NOT for kernel 4.19.y) ---------------------------------------------------------------------------------------------------------------------------------- root@npi-neo(192.168.6.24):/home/guido# armbian-add-overlay ./sun8i-h3-I2S-out.dts Compiling the overlay Copying the compiled overlay file to /boot/overlay-user/ Reboot is required to apply the changes ---------------------------------------------------------------------------------------------------------------------------------- dtbo is created (on NanoPi Neo) ---------------------------------------------------------------------------------------------------------------------------------- root@npi-neo(192.168.6.24):/home/guido# ls -l /boot/overlay-user/ insgesamt 4 -rw-r--r-- 1 root root 1323 Dez 7 19:34 sun8i-h3-I2S-out.dtbo ---------------------------------------------------------------------------------------------------------------------------------- user-overlay is created in /boot/armbianEnv.txt (on NanoPi Neo) ---------------------------------------------------------------------------------------------------------------------------------- verbosity=1 logo=disabled console=both disp_mode=1920x1080p60 overlay_prefix=sun8i-h3 overlays=usbhost1 usbhost2 rootdev=UUID=33ca90d6-130b-4d5f-a8f4-95b3b97ef5c0 rootfstype=ext4 usbstoragequirks=0x2537:0x1066:u,0x2537:0x1068:u user_overlays=sun8i-h3-I2S-out ---------------------------------------------------------------------------------------------------------------------------------- now REBOOT (on NanoPi Neo) ---------------------------------------------------------------------------------------------------------------------------------- root@npi-neo(192.168.6.24):~# lsmod|grep i2s sun4i_i2s 16384 0 snd_soc_core 118784 2 sun4i_i2s,sun8i_codec_analog snd_pcm 69632 3 sun4i_i2s,snd_pcm_dmaengine,snd_soc_core ---------------------------------------------------------------------------------------------------------------------------------- EDIT config-default.conf (on armbian-BuildSystem) ---------------------------------------------------------------------------------------------------------------------------------- cd /home/guido/build nano ./config-default.conf replace content /home/guido/build/config-default.conf with attached config-default.conf_nanopineo ./compile -> With this conf, script compilation will stop to overwrite kernel source to build patch -> At that time, overwrite original Kconfig with the one you modified above (at "Make changes to U-Boot" press ENTER to proceed) wait for "Make your changes to /home/guido/build/cache/sources/linux-mainline/linux-4.14.y then press ENTER" BUT DONT PRESS ENTER YET ---------------------------------------------------------------------------------------------------------------------------------- EDIT/SAVE Kconfig in a 2nd shell-Window (on armbian-BuildSystem) ---------------------------------------------------------------------------------------------------------------------------------- nano /home/guido/build/cache/sources/linux-mainline/linux-4.14.y/sound/soc/codecs/Kconfig the part FROM config SND_SOC_PCM5102A tristate TO config SND_SOC_PCM5102A tristate "Texas Instruments PCM5102A CODEC - I2S" ---------------------------------------------------------------------------------------------------------------------------------- NOW PRESS ENTER in the 1st shell-Windows (.compile.sh) (on armbian-BuildSystem) ---------------------------------------------------------------------------------------------------------------------------------- -> Then script compilation will stop again to ask whether you want to add pcm5102a to compile -> Default is N, so you need to enter m for module compilation Texas Instruments PCM5102A CODEC - I2S (SND_SOC_PCM5102A) [N/m/?] (NEW) m = m for module compilation After compile is complete ---------------------------------------------------------------------------------------------------------------------------------- copy (via SCP/FTP?) the .deb's from /home/guido/build/output/debs (on armbian-BuildSystem) to /home/guido/ (on the NanoPi Neo) ---------------------------------------------------------------------------------------------------------------------------------- ---------------------------------------------------------------------------------------------------------------------------------- INSTALL the .deb's (here only header and image - because it was already 5.67 (on NanoPi Neo) ---------------------------------------------------------------------------------------------------------------------------------- cd /home/guido dpkg -i ./linux-headers-next-sunxi_5.67_armhf.deb dpkg -i ./linux-image-next-sunxi_5.67_armhf.deb (image did include the .ko module for the pcm5102a) ---------------------------------------------------------------------------------------------------------------------------------- now REBOOT (on NanoPi Neo) ---------------------------------------------------------------------------------------------------------------------------------- ===================================================================================== ===================================================================================== !!!!!!!!!!!!!!!!!!!!!!!!!!!!! ATTENTION: !!!!!!!!!!!!!!!!!!!!!!!!!!!!!!! After reboot my NanoPi Neo show the following armbian-version: ARMBIAN 5.65 stable Debian GNU/Linux 9 (stretch) 4.14.84-sunxi and 2 upgrades for headers&image (without the PCM5102A support) please keep in mind to freeze the kernel-updates in armbian-config for not to loose the support (module) for the PCM5120A! armbian-config -> system -> Freeze Disable kernel upgrades ===================================================================================== ===================================================================================== ---------------------------------------------------------------------------------------------------------------------------------- BE HAPPY about a successful i2s mapping in dmesg (on NanoPi Neo) ---------------------------------------------------------------------------------------------------------------------------------- root@npi-neo(192.168.6.24):~# dmesg|grep -i i2s [ 6.911751] asoc-simple-card sound_i2s: pcm5102a-hifi <-> 1c22000.i2s mapping ok ---------------------------------------------------------------------------------------------------------------------------------- I enabled also ananlog-Codec (on NanoPi Neo) ---------------------------------------------------------------------------------------------------------------------------------- root@npi-neo(192.168.6.24):/home/guido# aplay -l **** Liste der Hardware-Geräte (PLAYBACK) **** Karte 0: Codec [H3 Audio Codec], Gerät 0: CDC PCM Codec-0 [] Sub-Geräte: 1/1 Sub-Gerät #0: subdevice #0 Karte 1: I2Smaster [I2S-master], Gerät 0: 1c22000.i2s-pcm5102a-hifi pcm5102a-hifi-0 [] Sub-Geräte: 1/1 Sub-Gerät #0: subdevice #0 ---------------------------------------------------------------------------------------------------------------------------------- /etc/asound.conf (on NanoPi Neo) - later I2S did switch automatically to card 0 ---------------------------------------------------------------------------------------------------------------------------------- pcm.!default { type hw card 1 device 0 } ctl.!default { type hw card 1 } ---------------------------------------------------------------------------------------------------------------------------------- Reference-Threads ---------------------------------------------------------------------------------------------------------------------------------- config-default.conf.mod_nanopineo sun8i-h3-I2S-out.dts