


Dara Ó hEidhin
-
Posts
2 -
Joined
-
Last visited
Content Type
Forums
Store
Crowdfunding
Applications
Events
Raffles
Community Map
Posts posted by Dara Ó hEidhin
-
-
For anyone else here's what worked for me.
1. Download latest armbian image from here
https://www.armbian.com/orangepi-5/
2. Follow the instructions at the youtube video below to install the image to EMMC. Ensure you use the armbian image. This image won't load as mentioned above3. Burn the same image to sdcard and install sdcard in pi 5b. I used Rufus on Win11 (https://rufus.ie/en/)
4. Boot up. SD card boots as default
5. Edit the armbianEnv.txt file in the /boot folder and replace the line:fdtfile=rockchip/rk3588s-orangepi-5.dts
with
fdtfile=rockchip/rk3588s-orangepi-5b.dts
6. reboot
7. NB! unmount the current /boot folder using the following command in terminalsudo umount /boot
This unmounts the current boot partition stored in the sdcard
8. use terminal to open gpartedsudo gparted9. Select the EMMC drive from the top right dropdown
10. Right-click on boot partition and mount on /boot. This mounts the boot partition of the emmc drive
11. edit txt file as per 5. above
12. shutdown and remove sdcard
13. reboot14. using terminal run the command below to setup pi. Bluetooth/Wifi were working perfectly
sudo armbian-config15. Still working on GPIO access ..... 😶🌫️. If anyone has any tips to get this working through Python please let me know.
orange pi 5 pwm all enable
in Orange Pi 5
Posted
Based on page 174 in the usermanual (https://drive.google.com/file/d/1TogN8KUzQKUH1DTtjWBQA1aFVhquG_PJ/view?pli=1)
install the python rpc library
pip install rpyclog in as root and create the following server.py file
# server.py
This can be automatically started at boot and as root using crontab
Then use the following snippet as the regular non root user
This creates a 50Hz where the pwm arguments are (pin, period, duty_cycle)
you may need to add to or edit line 8 in the server code to set up your pwm pins
PINS = {2:"pwmchip5"}
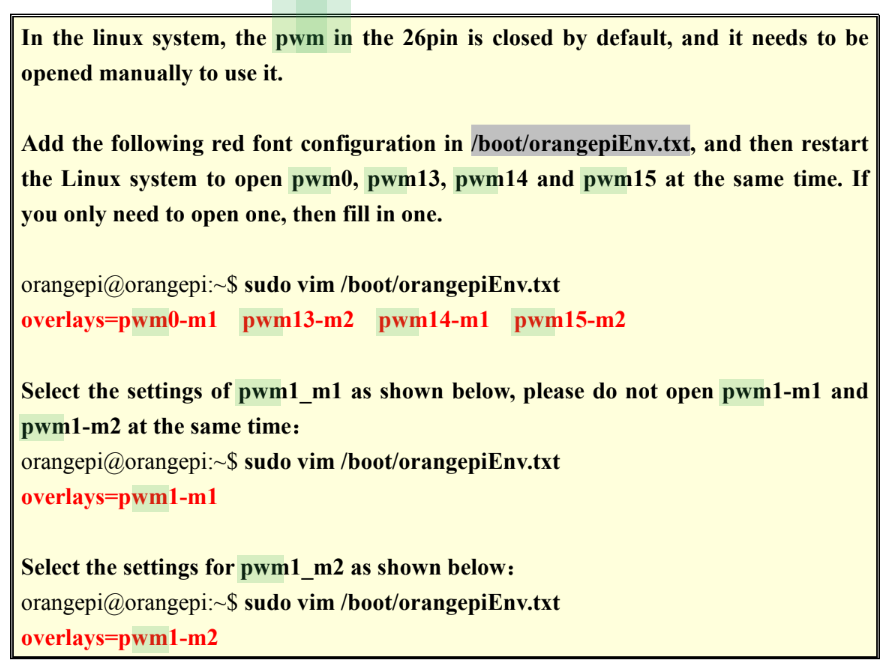
You may need to enable these pins as per page 172 of the doc above (see image below)