

jock
-
Posts
2162 -
Joined
-
Last visited
Content Type
Forums
Store
Crowdfunding
Applications
Events
Raffles
Community Map
Everything posted by jock
-
@Felipe Muniz I don't think it was a good idea to change the NAND. AFAIK, eMMC can be switched with no real software issues, but NAND chips in my opinion are way thougher because they require a software layer (the FTL) to work correctly. The proprietary NAND driver contains the FTL routines for a bunch of vendors and specific parts, so IMHO you can't put any bigger/better part and expect to work out of the box. You may boot in maskrom mode, upload a recent loader and see if rfdeveloptool/rkflashtool detect the nand parameters correctly (size, vendor, page size, ecc bits, etc...),otherwise I would not expect it to work in any way.
-
Hello, sure it won't harm other boards, but your specific problem may be due to slow voltage regulation from low to high frequency state. 0.025v increase is very minimal that may not solve your stability issues in all cases, but just enough for a limited stress testing. I'm not minimizing your finding, but perhaps the matter may be investigated a bit if you're curious you can: 1) raise the voltage only of the one or two lower frequency bins (600mhz and 800mhz) and then run the stress test and see if you gets issues 2) run the tests with "stock" voltages blocking the cpu to the highest frequency (cpufreq-set will do the job) What I have seen on different boards is that some of them have a "lazy" power regulation that takes too long to raise the voltage to reach the right level, so when there is the frequency shift, it just gets unstable.
-
I will never stress out that THESE issues reported by you are the exact reasons to chose a properly supported Single Board Computer from the officially supported list and not buy crap like supercheap tvboxes. If you don't have the time, will and skills to solve troubles, tvboxes may end up being a large source of frustration. The very same problems are the main reason tvboxes are NOT OFFICIALLY SUPPORTED and NOT ENDORSED by Armbian project; tvboxes are just a community effort to have fun with them and avoid some waste, but the mileage can vary greatly. Here are the FAQs
-
Not sure what this sentence means: did you try to install the multitool on the internal flash? Why?!? If I understand correctly, you have been able to run once the multitool regularly, do the backup, and then something wrong happened so the board does not boot anymore?
-
I don't think it could be really useful to inspect dtbs, the problem is elsewhere. The guy has to options: 1) erase the internal flash and forget it, then run armbian from sdcard 2) throw the thing in the trash bin and buy something reliable and supported
-
Because you have to change it in /sys/class/leds/working with the behaviour you'd like
-
Indeed if network manager does not work, the ethernet won't get an IP automatically. Perhaps the ssv6051 driver makes the network manager crash? (you may try to blacklist the driver). The ssv6051 driver is the same as legacy, but some things have been necessarily changed to work on mainline kernel. In your case, it is not just a problem of the detection of the chip, but there is some kind of communication issue because the driver can't read the efuse from the chip (that, in fact, is the reason of the bad detection).
-
Not until a sample happens to arrive in my hands
-
Impossibile, perhaps you did not follow the instructions correctly (ie: erase the internal eMMC first) ssv6051 driver is crap, in your particular case for some reason is not able to detect correctly the chip version and indefies it as ssv6051q, instead it is ssv6051p, but I don't know the reason. For the ethernet part, it usually just works in the uttermost majority of situations, there has never been the need to do adjustments on any board, so it sounds strange that on yours it does not work.
-
Yes, this is exactly the way I suggest to take confidence with the system: erase the internal flash to zero (does not matter if NAND or eMMC) to remove any trace of Android; then use Armbian from sdcard to bring up the system, experiment with rk322x-config to setup the board correctly so, in case of mistake, just plug the sdcard in a PC and revert the error; install packages, services, reinstall armbian from scratch with another kernel or rootfs (Debian bullseye, bookworm, Ubuntu Jammy LTS, latest Ubuntu, etc...) and do all your own experiments on the sdcard. When finally you notice that the base system is stable with the proper led-conf and you're happy with the software setup, transfer it to internal flash or install armbian on internal flash with multitool. Also, IMHO, boards with NAND have much better use with external sdcard than internal flash, since NAND are supported only with ancient 4.4 kernel and they still are problematic. Keep them erased and live easier with external sdcard.
-
@ercans probably the eMMC is gone and is in read-only mode: multitool or other tools write to eMMC, the eMMC says "ok!", but actually nothing is really written. That's a common condition when flash memories break. Your chances are: 1) short circuit the eMMC clk pin forever 2) desolder the eMMC from the board (<--- you have to be very skilled for this) 3) substitute the eMMC with another one (<--- you have to be very very skilled for this) you may also try to use dd from multitool command line shell and see if you can zero-fill the emmc or at least the first few hundred sectors to force boot from sdcard.
-
Indeed it is a scrap chip, tvboxes are often made of scrap parts; so far I have seen that chip on other boxes with rk3318, this is the first time that wifi chip appears on a box with rk322x. By the way, the image you are using is ancient! You can take a newer image with legacy 4.4 kernel here (suitable for boards with NAND) and you can should use a recent mainline kernel image from here for the box with eMCP. Note that the mainline kernel image will also work flawlessy on boards with NAND, just the NAND flash won't be available and you will have to use an external SDcard for those boxes.
-
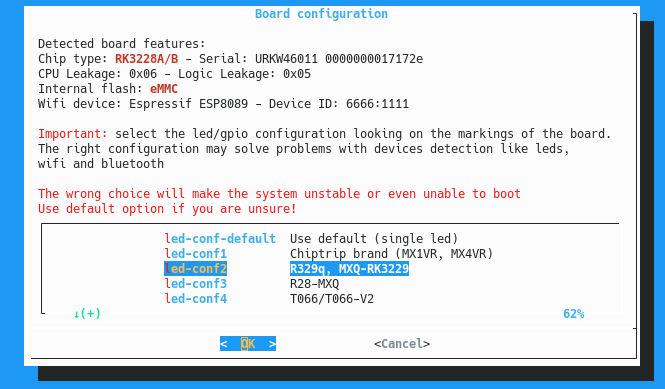
Probably your board is misconfigured with led-conf1, which are chiptrip brands. The two r329q boards should go with led-conf2 (rk322x-config tells you which led-conf to use with which board): The last board, which is unknown yet, perhaps may benefit from led-conf7 (R29), but your mileage may vary. Anyway, getting wifi properly detected with the right led-conf: 1) helps us to put your board in the list 2) prevents possible malfunction of other hardware If you pay attention (and please do!) to the Important paragraph in the above screen, it is clearly stated what is the purpose of the led/gpio configurations and what are the benefits of selecting the right one. As @RaptorSDS said, your wifi chip is a broadcom 4334, but there are several variants around so perhaps the driver is not able to correctly make it work; anyway if you get the ID of the chip in rk322x-config (as you already do), then you should be ok with the led/gpio configuration
-
When you have 4 cores, you can achieve 400% cpu usage; top reports it that way.
-
You would try an Ubuntu distro and enable the oibaf repository to get cutting edge mesa. Default mesa from debian and ubuntu is a bit older and does not contain specific fixes for mali-400/450 Oibaf repository is already set in /etc/apt/sources.list.d but the line is commented by default. Removing the comment and then running apt update && apt upgrade should do the trick. Also note that in X11 you may want to enable the vsync when possible, which turns out to perform much much better because with vsync on the driver will use page flipping, with vsync off will use buffer copy that reduces performances a lot.
-
Not the best choice, if you accept my opinion. Much better to use a proper SBC for those kind of tasks, perhaps something with rk3328 and a decent amount of eMMC, since HA is going to write its data series. On this particular board I don't even know if wifi is going to work, since it got a rk915a chip which currently is unknown.
-
It looks like u-boot is not able to detect the sdcard, the first part is missing because the bootloader uart speed is 1.5mbps and then u-boot switches to 115200kbps, but that's it, u-boot does not see the sdcard. The reason is unknown, and resides into the board internal wiring and it is not possible to debug that without the board at hand. It is still possible to boot from USB stick (with the multitool sdcard inserted): burn the multitool on as USB stick and put the legacy image there and the multitool on sdcard will do a trampoline to the multitool on USB stick.
-
Actually I forgot to update the first post: the FAT partition has now been changed to NTFS to overcome the 4GB maximum file size limitation of FAT32. I think I made a post about that, but forgot to update the first post. Sorry, I'm going to fix that right now! Despite that, the multitool works exactly the same as before.
-
Hello @lucat1, it is not the first time I see this board on the forums. I have never seen it, so I don't know which problem it could have, only the UART debug output could tell what is going on. Anyway, you should try to plug a male-to-male USB cable in the OTG port of the board and in your PC: if the board is in maskrom mode, you should be able to see the board from the PC using lsusb from Linux or AndroidTool from Windows. Once there, you can restore a previously made backup or erase the internal flash to force the board to boot from sdcard. If the board is not detected on your PC, try pressing the reset button behind the audio jack connector, and keeping it pressed for two seconds while giving power to the board and then try again with the male-to-male cable. Check the rk322x main thread on how to use rkflashtool/rkdeveloptool tools.
-
Seriously, are you thinking that thousands of log lines of the original android (I read kernel 3.10) are of any use? Paste the logs of the problematic boot, not when it goes well, damn!
-
Yes, of course; NAND also have a clock, shorting the clock pin has the same effect on eMMC and NAND devices. Still I haven't seen a serial log, without that, going further with support is a waste of time.
-
No guidance is possible without the serial logs; if people don't know what is going on, how can suggest you further steps? Next time buy an armbian properly supported SBC and you will have no troubles
-
We don't know! The board is new and it just does not work 🤷♂️ And please don't ask for solutions: proper serial logs, original device trees and firmware perhaps may help, but most we need the board in our hands to give the chance to support it.
-
Guidance is the first page of this thread. If you're unsure about a passage wrote there, explain with a post what you're unsure about.
-
@wslab wrong thread, please refer to the first page of the correct thread, everything is written in there: https://forum.armbian.com/topic/26978-csc-armbian-for-rk3318rk3328-tv-box-boards/
