Joao Cordeiro
-
Posts
10 -
Joined
-
Last visited
Content Type
Forums
Store
Crowdfunding
Applications
Events
Raffles
Community Map
Everything posted by Joao Cordeiro
-

Rupa X88 Pro 13 - RK3528 board with images
Joao Cordeiro replied to fedes_gl's topic in Rockchip CPU Boxes
@johlnx I will give it a try. The main reason i bought this board was to place it on my parrents house as a backup storage device. Thats why i wanted the 1 Gbps port. And i understand that i would never get 1Gbps lan -> disk transfer with encryption and such, but 100Mbps is 10 times less. I would be happy with 200Mbps or 300Mbps actual performance. without gigabit support its limited to 100Mbps 😕 And thanks for the reply on the github "The board lacks an external Gigabit PHY; the internal PHY supports only 4 lines, which limits the speed to 100 Mbps." I understand that its physicaly impossible. So im just saying "im sad" I can probably get more than 100Mbps using wifi -
Rupa X88 Pro 13 - RK3528 board with images
Joao Cordeiro replied to fedes_gl's topic in Rockchip CPU Boxes
@sr4armbian I know of at least 3 main issues: no wifi LAN is 100mbps limited usb is 2.0 limited Also does not look like anyone is actively developing this. Since i use this as a server, i know that HDMI works to the point of showing the console, but i have no experience on a desktop environment. If you dont yet have one of this devices, dont buy one to get a linux box. Not worth it. -
Rupa X88 Pro 13 - RK3528 board with images
Joao Cordeiro replied to fedes_gl's topic in Rockchip CPU Boxes
There was a commit 4 days ago on that repo metioned above: https://github.com/joilg/x88pro/commit/a6630814a98b39ec39dc22108c01e35f5d456395 Anyone noticed? Anyone tried it? Any change? -
Rupa X88 Pro 13 - RK3528 board with images
Joao Cordeiro replied to fedes_gl's topic in Rockchip CPU Boxes
@shexplorer Control +c should have worked after: U-Boot SPL board init U-Boot SPL 2017.09_armbian-2017.09-S93fe-Pe5fd-Hbdb5-Va5b2-Bbf55-R448a (Nov 06 2025 - 16:35:49) SPL Hotkey: ctrl+c Make sure that USB TX is well connected to RX and try to spam it. Or use another terminal emulator, like putty instead of screen on a bash terminal. Maybe control is being intercepted. -
Rupa X88 Pro 13 - RK3528 board with images
Joao Cordeiro replied to fedes_gl's topic in Rockchip CPU Boxes
@shexplorer, connect it to the internal serial port using a USB-to-serial adapter. If you don’t have one, they’re very cheap—search for CH340G on Amazon. Quick safety guide on serial adapters: 1 - Your device has 3.3v serial , check the jumper on the CH340G to make sure its on 3.3v and not 5v 2 - DO NOT CONNECT VCC/3.3v/5v Pin!!! Only connect: ground RX TX 3 - Connect ground from to ground from device Connect RX from usb to TX from device Connect TX from usb to RX from device Let us know if you are having issues with the bound rate or the pinout on your serial header in your device (send us a picture, in that case) Once you get serial, you should see the boot looping endlessly, holding control + c should stop the loop. Then you get an uboot console. there you can chainload your usb or external mmc uboot. With something similar to(ask chatgpt to help you in case of issues): usb start # starts usb devices usb tree # lists devices and partitions usb info # shows USB device info ls usb 0:1 / # lists files on partition 1 of usb 0 fatload usb 0:1 0x82000000 u-boot.bin # 0x82000000 is an example that may work. if it does not, ask chatgpt for other values # u-boot.bin is the usb uboot you want to chanload, might have another name.... ls usb 0:1 will help you find other files # go 0x82000000 # chainloads what you loaded into 0x82000000 memory address. if you change this on the previous line, change it here also. Besides trying to chainload uboot, you can also load linux kernel + initrd + dbt files directly. Again, chatgpt will help you with those commands. But i found chainloading usb uboot easier. It you reach linux console, remember that once you reboot, everything will loop again. So you need to fix what you did to the emmc before rebooting. You have 3 options to fix: 1 - Restore your full backup. -> you get manufactorer android back 2 - Restore 10MB of your backup or johlnx's backup -> you should be able to boot again from usb or external mmc 3 - You can calculate exacly what you need to copy, to maintain your emmc linux but also recover uboot. There should be some space between the partition table data and the 1st partition. Lets imagine, GPT uses 1MB and 1st partition starts at 10MB, you can copy the data between 1MB and 10MB from your backup into the space between 1MB and 10MB of your EMMC. (this is not trivial to do, but again chatgpt can help) This way, you still have a linux on the EMMC, but you have recovered the Uboot env. -
Rupa X88 Pro 13 - RK3528 board with images
Joao Cordeiro replied to fedes_gl's topic in Rockchip CPU Boxes
@shexplorer I did something similar to a tv box i had around, not this model. Generally, the cpu comes with some sort of uboot. Written in firmware not emmc. The catch is that that uboot usually writes its persistent environment on the eMMC. And most of the time its not even a file on a partition, like in (and this is an example) between bytes 2000 to 8000 of the mmc. This uboot is only visible via serial console. no hdmi output. (and its quite old) This uboot then attempts to chainload the mmc or usb uboot. And its at this phase you get image. So on my setup, i had CPU uboot but no environment (because i smashed it with my armbian image...), and that environment was needed to boot both mmc or usb. Using a serial port (and pressing control +c ) i was able to instruct uboot it to boot armbian on the usb drive. And i mean manually with command like fatload 0x1000000 usb0.1 linux.img. But every time i reloaded would go back to the endless loop. So the next step was to find a stock image of my device and dump it into the emmc, via usb booted linux. (i actually only copied like the 1st 10MB, only needed uboot env, not the chinese android) Please know that this is not the image you download from any manufacturer website, those are snap-in upgrades that only change part of the emmc, you need a image that someone extracted with dd command from the entire mmc. After that i swore to never touch that emmc again... Maybe this is your problem too Get a serial connected to your device and check if you can see the cpu level uboot. If it is the same issue, maybe someone here can give you the 1st 10MB of their device, if you create a new thread asking for it. Edited to place the "e" on emmc. tnx johlnx for the fix -
Rupa X88 Pro 13 - RK3528 board with images
Joao Cordeiro replied to fedes_gl's topic in Rockchip CPU Boxes
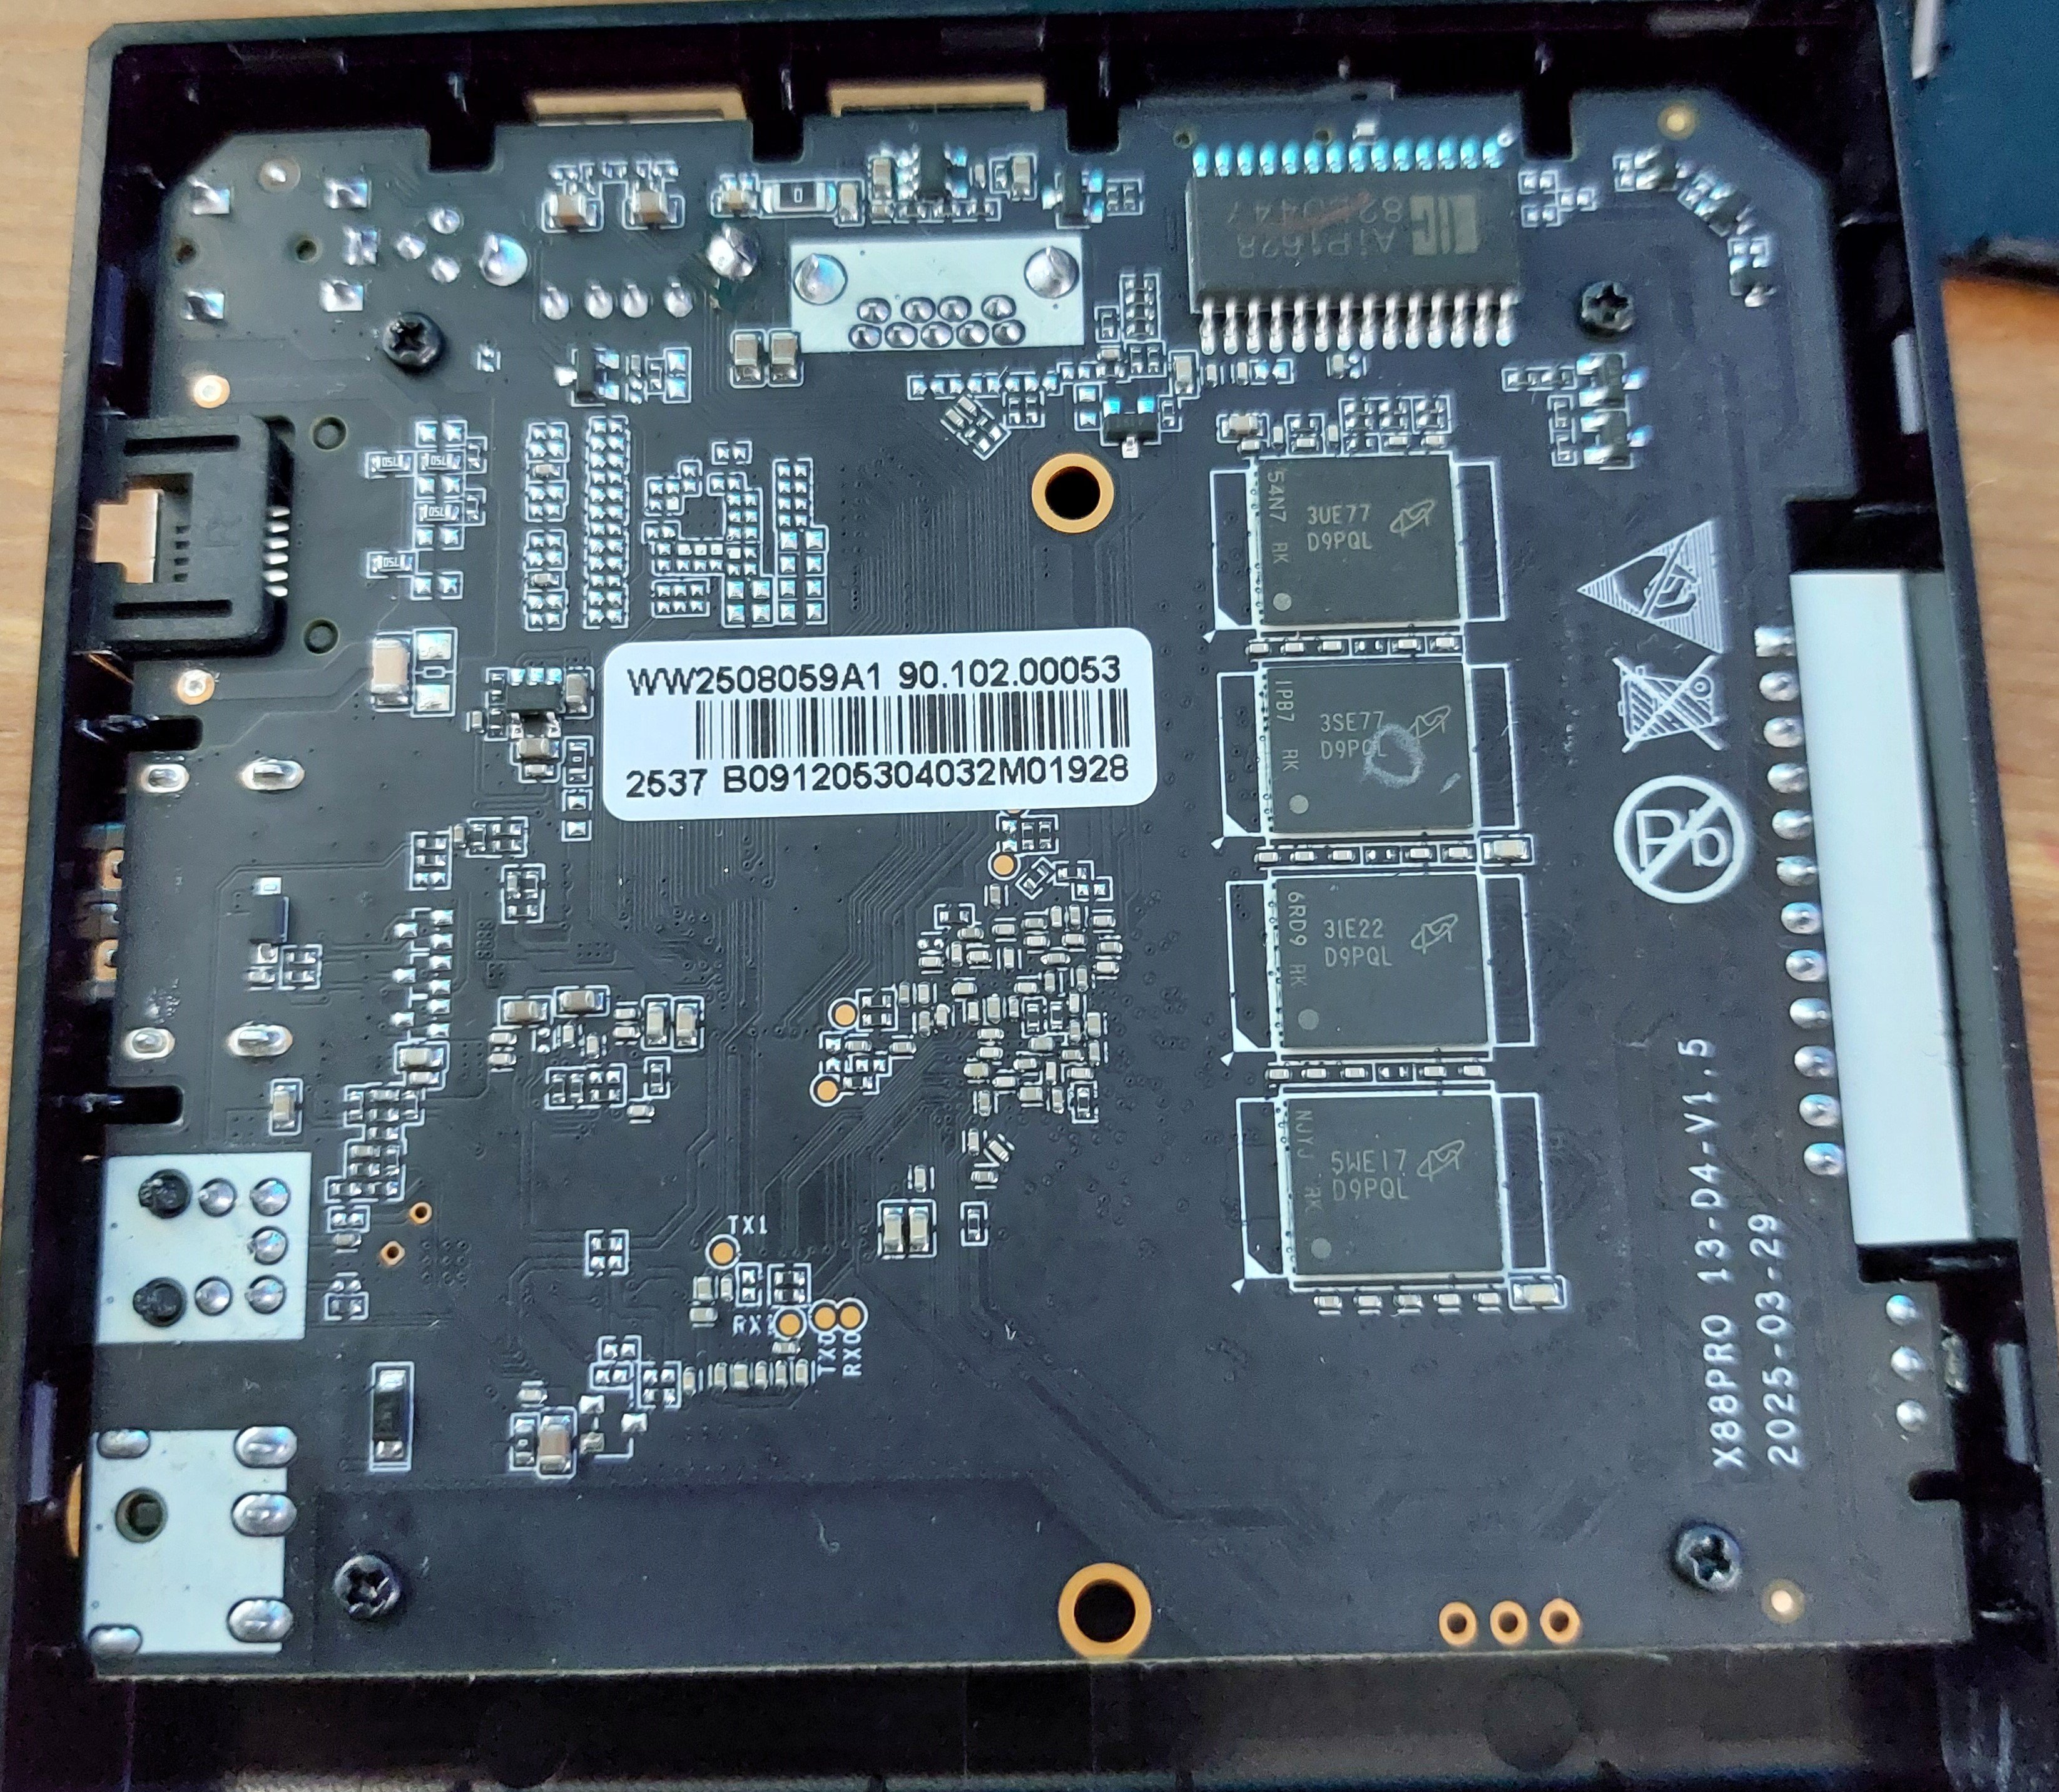
Actually, I was able to find that IC but in chinese version.. https://datasheet4u.com/datasheets/I-CORE/AiP1628/1571692 Looks like its some kind of low level chip that probably transforms low voltage signals into higher voltage, like the ones used on ethernet ports. Probably to power up the LCD leds. -
Rupa X88 Pro 13 - RK3528 board with images
Joao Cordeiro replied to fedes_gl's topic in Rockchip CPU Boxes
I see now. Mine does not have those: I suspect those are some extra functionality that the chip marked as AIP16R (on the top) has but was not implemented. The OP's board maker tought it would be nice to make them into pins in the board at the very least, while my board maker simply left them unconnected. I was not able to find the specs for that AIP16R chip.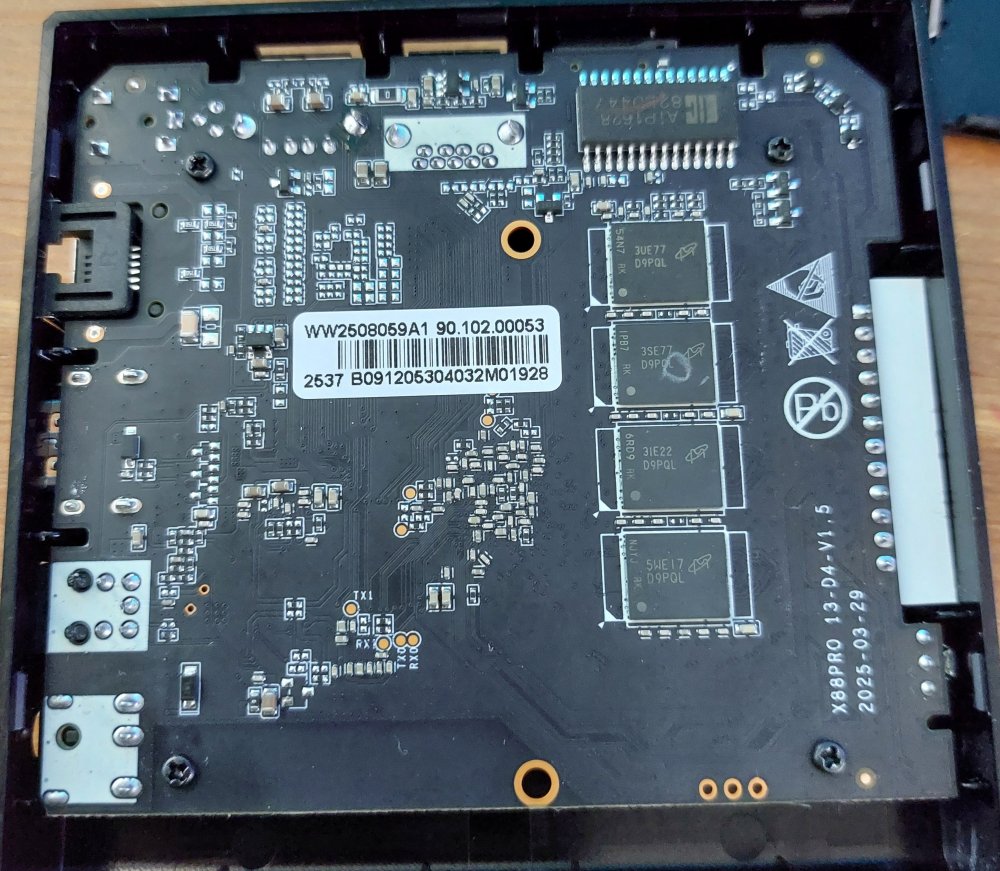
-
Rupa X88 Pro 13 - RK3528 board with images
Joao Cordeiro replied to fedes_gl's topic in Rockchip CPU Boxes
Mine does not have any pinholes near the lcd display. Send a pic, or/and trace their paths into some chip and see what that chip does by its id -
Rupa X88 Pro 13 - RK3528 board with images
Joao Cordeiro replied to fedes_gl's topic in Rockchip CPU Boxes
@fedes_gl To list USB speeds, do You will get an output like: 480M is the important part, this is is usb2.0. for USB3.0 you will see 5G or 10G for 3.1 Also check your ethernet port speed with: (replace end0 with your ethernet device) And if im not mistaken, those are my 2 issues with this image: only usb2.0 and network speed of 100mbps. Making it similar to a 5 years old device.. Let me know if you found the same speeds.