


Myy
-
Posts
365 -
Joined
-
Last visited
Content Type
Forums
Store
Crowdfunding
Applications
Events
Raffles
Community Map
Posts posted by Myy
-
-
I'll open a bug report on the LKML and send the patch, though...
-
There's a few problems with the UART driver on 5.0-rc2 kernels, since proper checks are not done correctly and lead to a Null Pointer dereference.
Here's a patch to avoid this issue :
From 7e43ae8446b420907f00b43308ad0b99b6fe4e51 Mon Sep 17 00:00:00 2001
From: "Miouyouyou (Myy)" <myy@miouyouyou.fr>
Date: Wed, 16 Jan 2019 23:58:52 +0100
Subject: [PATCH] drivers: tty: serial: Bail out if no UART is detected

Before the 5.0, serial8250_register_8250_port consisted of one BIG
if(uart && uart->port.type != PORT_8250_CIR) block, which prevented
NULL dereference if uart, a pointer to an "uart_8250_port" detected
through "serial8250_find_match_or_unused", were to be NULL.

However, a recent patch added a few bits of code just after that,
and that code manipulates the "uart" pointer without checking if
it's NULL or not.

This patch changes the mechanism and bail out early if no UART
structure pointer is provided serial8250_find_match_or_unused.

A goto is used instead of returning directly, since we're inside
a mutex and must release it correctly.

Signed-off-by: Miouyouyou (Myy) <myy@miouyouyou.fr>
---
 drivers/tty/serial/8250/8250_core.c | 8 +++++++-
 1 file changed, 7 insertions(+), 1 deletion(-)

diff --git a/drivers/tty/serial/8250/8250_core.c b/drivers/tty/serial/8250/8250_core.c
index 189ab1212..11120c2d9 100644
--- a/drivers/tty/serial/8250/8250_core.c
+++ b/drivers/tty/serial/8250/8250_core.c
@@ -981,7 +981,12 @@ int serial8250_register_8250_port(struct uart_8250_port *up)
        mutex_lock(&serial_mutex);

        uart = serial8250_find_match_or_unused(&up->port);
-       if (uart && uart->port.type != PORT_8250_CIR) {
+       if (!uart) {
+               printk(KERN_INFO "One UART port failed to register correctly\n");
+               goto no_uart;
+       }
+
+       if (uart->port.type != PORT_8250_CIR) {
                if (uart->port.dev)
                        uart_remove_one_port(&serial8250_reg, &uart->port);

@@ -1081,6 +1086,7 @@ int serial8250_register_8250_port(struct uart_8250_port *up)
                uart->overrun_backoff_time_ms = 0;
        }

+no_uart:
        mutex_unlock(&serial_mutex);

        return ret;
--
2.16.4
-
No. However, they sent some patches to the LKML with an implementation that seems to work with mainline kernels.
So, I'm currently trying to get a kernel 5.0 working in order to test the VPU on it, with these drivers, and see how it goes. -
It seems that @martinayotte was able to run the Nano PC T4 image with a 4.19.x kernel just fine, so you might be able to just start off with the Nano PC T4 DTS/DTB used in this image, and advance from there.
This week, as all the weeks in this year, has been pretty busy for me since I'm trying to advance some personal projects as best as I can. I'll try to fix the DTS file in the following weeks.
-
Got the MMC back but it's still terribly slow for some operations.
Still I got a nice HDMI output using the CEC line instead of the two I2C lines :
https://gist.github.com/Miouyouyou/c8fbd78abbc39dc38bd050a4e9f6eed7
-
I forgot how fun it is to deal with DTS file. Especially the parts where you lose the SDcard detection when you enable USB3.
This... will take some time.
-
5 hours ago, jerryn said:

I remember having similar issues when coding a visualizer with OpenGL, on a Nvidia/Intel laptop.
Turned out that I didn't set up the texture sampler correctly while the documentation clearly stated that not doing so might result in black sampling (aka. (R, G, B, A) = (0, 0, 0, 1) in Khronos terms).
In my case, the mipmaps that were not setup... Mipmaps are triggered mostly when the texture is bigger than the area to draw.
I don't know if you can select output quality on SuperTuxKart, but if you can, try setting as low as possible and see if that still generates issues. Try also expanding the window and see if the black squares expand a little more.
"Maybe" SuperTuxKart does not set up the textures, and still run fine on some platforms that have decent default textures sampler parameters.
Or maybe the drivers are just bugged.
Still, if you can run "apitrace" on it, it might provide some OpenGL trace that you can playback on other machines, or share, to determine if the issue is a driver issue, or some non-conformant OpenGL call procedure.
apitrace works like this :
apitrace trace -a egl -o output-name.trace /path/to/your/opengl/program arguments to the program -
Ok, I uploaded a few Datasheet concerning the power supply bucks and controller used...
However, these files seem to all have "Unauthorized copy prohibited" written at the bottom of the pages, so I'll replace them by HTTP links tomorrow, in order to avoid any legal issues.
-
I've been able to boot a mainline kernel with a barely working DTS file that can, still, boot up to X11 and provide a working serial console.
USB is "just broken" though, since the DTS file doesn't follow the schematics at all.
https://gitlab.com/snippets/1792126
Note that I'm currently using an external MMC file for the moment, since it's the easiest way for me. Replacing broken kernels on the eMMC is a pain, I can't get Gadget mode working with the DesignWare DWC3 connector on U-Boot at the moment (I just tried to enable the option, though, not tinker with the DTB and such...).
So my only way to test and replace kernels quickly is to use a Micro SDCard to boot the system on the OrangePi, and use an USB MicroSD reader on my main PC to replace broken kernels/DTB files.
So, tomorrow will be : Schematics to DTS time... Yay...
-
On 12/15/2018 at 7:48 AM, DataMannen said:
Hi Myy
I just wanna say that I'm following this thread with great interest and a thank you! Much appreciated to finally get something else potentially running on my OPi RK3399 than the images from the OrangePi website.
KEEP UP THE GOOD WORK! :-)Personally, I managed to compile idbloader.img, rk3399_loader_v1.08.106.bin, trust.img, uboot.img, boot.img and then flash the eMMC (together with a rootfs-partition) to and boot up successfully. However, I have used the downloads provided by OrangePi for this and they are not really satisfactory, lacks certain drivers, have eth0 problems, etc, etc. I have been stuck for quite some time but now you have given me back my hope. :-)
Note: To build the images, I have used their provided downloads OrangePi-RK3399_Linux4.4_V1.0_2018_1030.tar.gz (for build-scripts and tools) and OrangePi-rk3399_Debian9_20181016_HDMI IN.tar.gz (for the rootfs partition). Both are available here: https://mega.nz/#F!ggt3QaoJ!ZexfJRVdf7_6C1bs75-fJQ
Can I assist you in any way? I'm not really a "pro" at this, but I am learning as things move along...
Hey ! Glad these information were useful to you !
I should have a bit more time to get into getting a kernel working correctly with the OrangePi this week, so I'm going to try getting a mainline kernel working with... basic things. Like HDMI, USB and decent network.
So, the next step is basically : Rebuilding a DTS file.
Like I said in this topic, the NanoPC T4 DTS file is surprisingly a good start.
The DTS file provided by Orange Pi, however, isn't very good. I mean, no HDMI, flacky Ethernet, flaky DMA (which seems to be related).
Fortunately, they seem to provide the schematics for these boards.
If you'd like to help, I guess that a good start would be to test various RK3399 oriented DTS files and see how they fare (is it better, worse, do you have better USB support, Ethernet, Video, ...).
This would help building a nice OrangePi specific DTS file very quickly.
-
Okay trying this DTS "as-is" with a Rockchip Linux kernel led me to No HDMI, a barely working serial console and other issues. But, at least, it seems that the USB is alright.
I'll try with Orange Pi sources tomorrow and see where it leads me.
-
# Flash an already prepared eMMC image in Maskrom mode (Mute mode) /path/to/your/rkdeveloptool db /path/to/RK3399MiniLoaderAll_V1.05_DDR600MHz.bin # Write the Bootloader /path/to/your/rkdeveloptool ul /path/to/RK3399MiniLoaderAll_V1.05_DDR600MHz.bin # Which is also their firmware /path/to/your/rkdeveloptool wl 0 /path/to/eMMC.img # This will be STUPIDLY slow. You'll have to wait between 10 and 30 minutes. # Unplug and plug the power cable back again, after the command finishes. -
# Install a U-Boot image and Loader image from Maskrom mode (Mute mode) /path/to/your/rkdeveloptool db /path/to/RK3399MiniLoaderAll_V1.05_DDR600MHz.bin # Write the Bootloader # Should display a few things on the serial console # The 666Mhz image doesn't work for me /path/to/your/rkdeveloptool ul /path/to/RK3399MiniLoaderAll_V1.05_DDR600MHz.bin # Which is also their firmware /path/to/your/rkdeveloptool wl 0x4000 /path/to/uboot.img # Write the U-Boot image /path/to/your/rkdeveloptool wl 0x6000 /path/to/trust.img # Write the Trust bits # "Turn it off and on again" by unpluging and plugging the power cable back (Either the USB-C cable or the power plug) # Rebooting through the little button generate "Tinkerboard"-esque issues with the eMMC, which won't be properly power up anymore. -
I extracted the "rk3399-orangepi.dts" from their Linux archive and... it looks like something done by an employee that didn't have much time to understand how the different drivers worked, so he put #ifdef here and there to disable the devices when they're not needed.
While I think it's terribly ugly, at the same time, there isn't many way to disable the initialization of hardware you do not want...
Anyway, here's the DTS file. I'll take a look at the different RK3399 kernel trees, see if one got a "slightly better" DTS file :
https://gist.github.com/Miouyouyou/00f8b006f96b21b0383196f61045df76
-
Alright, turns out that the
/path/to/your/rkdeveloptool rd # Rebootstep in my procedures wasn't rebooting the board anyway.
So, basically, when in Maskrom mode (the mode you are in when the serial console is quiet, or when you keep the "Recovery" button pushed with the Right U-Boot), all writes are "as-is".
If you reboot (unplug and plug the power cable back again) with a Loader, a Firmware and the Trust image, you'll get into a special "rockusb" mode that offset everything by 0x2000 sectors (0x2000 * 512 bytes).
Since I'm not interested in that special rockusb mode, here's the "right" process for installing a U-Boot and Trust.img when you are in "quiet" mode :
/path/to/your/rkdeveloptool db /path/to/RK3399MiniLoaderAll_V1.05_DDR600MHz.bin # Write the Bootloader
/path/to/your/rkdeveloptool ul /path/to/RK3399MiniLoaderAll_V1.05_DDR600MHz.bin # Which is also their firmware
/path/to/your/rkdeveloptool wl 0x4000 /path/to/uboot.img # Write the U-Boot image
/path/to/your/rkdeveloptool wl 0x6000 /path/to/trust.img # Write the Trust bits
# "Turn it off and on again" by unpluging and plugging the power cable back (Either the USB-C cable or the power plug)
# Rebooting through the little button generate "Tinkerboard"-esque issues with the eMMC, which won't be properly power up anymore.
Now, if you already have an eMMC image, you can do this instead :
/path/to/your/rkdeveloptool db /path/to/RK3399MiniLoaderAll_V1.05_DDR600MHz.bin # Write the Bootloader
/path/to/your/rkdeveloptool ul /path/to/RK3399MiniLoaderAll_V1.05_DDR600MHz.bin # Which is also their firmware
/path/to/your/rkdeveloptool wl 0 /path/to/eMMC.img # This will be STUPIDLY slow. You'll have to wait betweens 10 and 30 minutes.
# Unplug and plug the power cable back again, after the command finishes.
I tested successfully these last steps and, therefore, have been able to directly flash my semi-working Armbian installation based on the Firefly RK3399 image.
So, the current step now is "Getting a Rockchip kernel working correctly with this board".
-
It seems that the "wl" instructions write are offseted by 0x2000 . I think I got a glimpse of that information while reading the Firefly RK3399 documentation. However, I can validate that the trust.img is written at 0xC00000 bytes in the eMMC, which translates to 0x6000 with 512 bytes sectors. Since I wrote it as 0x4000, it clearly seems that a +0x2000 offset is added...
Also, my U-Boot image is present at 0x800000 which translates to sector 0x4000, which clearly shows the offset again.
However, the same U-Boot image is also present at 0x400000, which translates to sector 0x2000. Since I messed up with the "trust.img" thingy, my guess is that during the first "mute phase", every write is done at the correct address. THEN, on reboot, every write is offseted by +0x2000.
So I guess that, if I write a new eMMC image, I'll have to do it during the first phase, since on the second phase, everything will be offseted by +0x2000 sectors (0x400000 bytes) and the partition table won't be written at the right place.
I'll try that this Sunday and see how it fares.
-
Okay, turns out that you need to write the "trust.img" BEFORE writing a U-Boot image, else the U-Boot image won't be booted with either one of these errors :
LoadTrustBL error:-1hdr 0x0:0 0 0 0 0 0 0 0 0 0 0 0 0 0 0 0Even if you install the Trust.img afterwards.
I still have to figure out why, but the procedure for recovering from a mute RK3399 with an empty MMC is :
/path/to/your/rkdeveloptool db /path/to/RK3399MiniLoaderAll_V1.05_DDR600MHz.bin # Write the Bootloader
/paht/to/your/rkdeveloptool ul /path/to/RK3399MiniLoaderAll_V1.05_DDR600MHz.bin # Which is also their firmware
/path/to/your/rkdeveloptool rd # Reboot
sleep 5 # If you're just copy-pasting line by line, it should be ok. Else, wait 5 seconds for the system to reboot
/path/to/your/rkdeveloptool wl 0x4000 /path/to/trust.img # Write the Trust bits
/path/to/your/rkdeveloptool rd # Reboot
sleep 5 # If you're just copy-pasting line by line, it should be ok. Else, wait 5 seconds for the system to reboot
/path/to/your/rkdeveloptool wl 0x2000 /path/to/uboot.img # Write the U-Boot image
You can use your own compiled U-Boot image. However, I still don't know how to generate the trust.img so I used the one provided by OrangePi in their RKTool_Linux.tar.gz .
-
21 hours ago, Seasalt said:
Why did you buy the Orange Pi rk3399?
I was offered this board to see what I can do with it. Just like the other boards I got (MiQi, Tinkerboard, ...)
Concerning "plans", I won't have any until I at least get a way to install a Linux image with a Rockchip kernel that "kind of work" correctly, in an "automated fashion" (scripted and useable with rkdeveloptool and Windows tools, so that you can reflash it at any moment if things go wrong).
Then I'll start mimicking their drivers on latest kernels and see if there's any major barrier, though I will have to deal with a few other issues before that.
I still see that the VPU is neither documented anywhere on their schematics, so there's at least that. If they could at least document which channel the VPU uses with the DMA subsystem, it might help a bit.
For the GPU side, given how fast the Panfrost project is progressing, it might be possible to overcome Mali binary drivers issues with these drivers. The Rockchip team was never able to provide Vulkan-ready binary drivers for their Mali-T7xx and Mali-T8xx chips, and the only one ARM provided with Vulkan support was with fbdev support only. There's of course drivers able to use DRM/KMS but you're "limited" to OpenGL ES 2.x / 3.x and you need an old GPL kernel driver that's starting to pile up patches to get it work with latest mainline kernels.
Now, given how the NanoPC T4 4.4 kernel was able to provide : HDMI output, (kind of shaky but working) Ethernet, eMMC and SDCard support, there's chances that "Orange Pi" specific issues might be fewer than expected. What remains, in terms of connections, are : SATA ports, USB, USBC, Audio, Wifi and Bluetooth.
Bluetooth might just be like the Tinkerboard : Wake up the Wifi/Bluetooth chip, flip a few GPIO and then find a way to send the local "binary blob firmware" to the chip.
There's also the MIPI connectors, but I got nothing to connect to these ports. Same for the battery.
Anyway, I'll be a bit busy this week but I might be able to advance a bit this week-end.
-
Best post is last post
So I got an Orange Pi RK3399 this Saturday morning, and my current objectives are :
1. Be able to install a bootable Linux on the eMMC.
By bootable, I mean : You plug it, it boots the Linux system, no questions asked.
2. Be able to generate an image of the Linux installation and be able to flash it using the Rockchip rkdeveloptool3. Compile and install a Rockchip kernel specialized for Orange Pi RK3399 <- Currently focusing on this
4. Integrate the image generation and installation into Armbian
5. Compile and install a mainline kernel (4.19-4.20), and get at least, the following working :
- HDMI and X11 display
- OpenGL rendering
- Networking
- USB.Anyway, I'm currently at phase 2, so don't hold your breath.
There's so little documentation on the Orange Pi website, that I have to adapt documentation about others RK3399 boards and make do.# Random procedures I used at the moment
Now, if you intend to follow any step in these procedures, which I'll advise *against* since you might just have a "easy to install" Armbian image in a few weeks :
1. Learn how to get a serial console that works.
This is *VERY* useful.-
Plug in an RS232<->USB connector on the board, by following the pinout provided in the Orange Pi RK3399 User Guide
I don't use the "Debug" one, since I have no documentation on this one and I hate trying different combinations with serial connectors.
To get an output, you need to be at 1500000 bauds.
I use picocom as my serial terminal. Minicom just doesn't do the trick to me.
sudo picocom -b 1500000 /dev/ttyUSB0# If your system is properly configured, just omit the 'sudo'. picocom -b 1500000 /dev/ttyUSB0- Power on the board and see if you get something on the screen.
- Check the pinout again if you don't and try again.
2. Download the Orange PI RK3399 boot, trust and loader images.
Again, *life savers* :- Get RKTool_Linux.tar.gz from Orange Pi "Mega" folder : https://mega.nz/#F!K1BQFQjL!W9rYedaoGpV4y8vHfrGEfQ!ekYA0AwR
- Extract it.
- Extract the Linux_rockdev_2015-06-17_for_RK3399.zip archive contained in it
- Copy the RK3399MiniLoaderAll_V1.05_DDR600MHz.bin, uboot.img and trust.img contained in it to some place
3. Get rkdeveloptool if you're using a Linux system. And I have no idea how to perform any of the step forementionned from Windows.
You've been warned !
git clone https://github.com/rockchip-linux/rkdeveloptool --depth 1
cd rkdeveloptool
autoreconf -i
./configure
make
cp rkdeveloptool /path/to/your/local/bin
Now, when I got the board, I booted on Android, got into developer mode, got an ADB shell and I started to backup a few things :
- The eMMC image : dd if=/dev/block/mmcblk0 of=/storage/path/to/my/USB/Stick/Backup.img
- Made a copy of the cmdline :
earlycon=uart8250,mmio32,0xff1a0000 swiotlb=1 androidboot.baseband=N/A androidboot.selinux=permissive androidboot.hardware=rk30board androidboot.console=ttyFIQ0 init=/init mtdparts=rk29xxnand:0x00002000@0x00002000(uboot),0x00002000@0x00004000(trust),0x00002000@0x00006000(misc),0x00008000@0x00008000(resource),0x0000C000@0x00010000(kernel),0x00010000@0x0001C000(boot),0x00018000@0x0002C000(recovery),0x00038000@0x00044000(backup),0x00040000@0x0007C000(cache),0x00600000@0x000BC000(system),0x00008000@0x006BC000(metadata),0x00002000@0x006C4000(baseparamer),0x00000400@0x006C6000(frp),-@0x006C6400(userdata) storagemedia=emmc loader.timestamp=2017-08-23_15:15:41 hdmi.vic=-1 androidboot.mode=emmc- Made a copy of the parameters.txt used in their U-Boot :
FIRMWARE_VER: 6.0.1 MACHINE_MODEL: RK3399 MACHINE_ID: 007 MANUFACTURER: RK3399 MAGIC: 0x5041524B ATAG: 0x00200800 MACHINE: 3399 CHECK_MASK: 0x80 PWR_HLD: 0,0,A,0,1 #KERNEL_IMG: 0x00280000 #FDT_NAME: rk-kernel.dtb #RECOVER_KEY: 1,1,0,20,0 #in section; per section 512(0x200) bytes CMDLINE: androidboot.baseband=N/A androidboot.selinux=permissive androidboot.hardware=rk30board androidboot.console=ttyFIQ0 init=/init mtdparts=rk29xxnand:0x00002000@0x00002000(uboot),0x00002000@0x00004000(trust),0x00002000@0x00006000(moasc),0x00008000@0x00008000(resource),0x0000C000@0x00010000(kernel),0x00010000@0x0001C000(boot),0x00018000@0x0002C000(recovery),0x00038000@0x00044000(backup),0x00040000@0x0007C000(cache),0x00600000@0x000BC000(system),0x00008000@0x006BC000(metadata),0x00002000@0x006C4000(baseparamer),0x00000400@0x006C6000(frp),-@0x006C6400(userdata)- All these information proved to be quite useless, beside the 0x00002000@0x00004000(trust) which... weren't that useful anyway.
I then botched the eMMC and... you could do the same thing by just doing dd if=/dev/zero of=/dev/block/mmcblk0 ...
I just used their "update_tool" and fired an "update_tool ef" instead. Same thing.Which led me to a common issue with Rockchip boards :
The dreaded quiet serial console on reboot.
However, the board was pluged into my PC and lsusb still showed this :
Bus 001 Device 012: ID 2207:330c
The important part is : ID 2207:330cIf you get into this situation, you can get a "noisy UBoot" back again by plugging the board to your PC, with an USBC<->USB cable and do :
/path/to/your/rkdeveloptool db /path/to/RK3399MiniLoaderAll_V1.05_DDR600MHz.bin
/paht/to/your/rkdeveloptool ul /path/to/RK3399MiniLoaderAll_V1.05_DDR600MHz.bin
However, before doing that, it might be a good moment to compile yourself a uboot image, since it's the *only moment* where you can flash a U-boot image easily.
To compile U-Boot, you'll need the arm-trusted-firmware.
To compile the arm-trusted-firmware for RK3399, you'll need the arm-none-eabi- toolset.
You can grab it here : https://developer.arm.com/open-source/gnu-toolchain/gnu-rm/downloads
The x64 version link : https://developer.arm.com/-/media/Files/downloads/gnu-rm/7-2018q2/gcc-arm-none-eabi-7-2018-q2-update-linux.tar.bz2?revision=bc2c96c0-14b5-4bb4-9f18-bceb4050fee7- Unpack the toolset somewhere, and then export PATH=$PATH:/path/to/where/you/unpacked/the/toolset/bin/
- Check that arm-none-eabi-gcc can run.
- Then, compile the ARM Trusted Firmware :
git clone https://github.com/ARM-software/arm-trusted-firmware.git --depth 1
cd arm-trusted-firmware
make realclean
make CROSS_COMPILE=aarch64-unknown-linux-gnu- PLAT=rk3399 bl31
cp arm-trusted-firmware/build/rk3399/release/bl31/bl31.elf /tmp
Then, compile U-Boot :
git clone https://github.com/u-boot/u-boot --depth 1
cd u-boot/
export CROSS_COMPILE=aarch64-unknown-linux-gnu- # Set this to your ARM64 GCC toolset prefix. Set nothing if you're compiling on an ARM64 machine.
export PLAT=rk3399
export ARCH=arm64
make firefly-rk3399_defconfig
make -j4 # N virtual CPU. On high-end AMD Ryzen, for example, put -j16
cp /tmp/bl31.elf .
make u-boot.itb
cp u-boot-dtb.bin /tmp
Then get the "Rockchip tools" and make a "Rockchip compatible U-Boot image" :
git clone https://github.com/rockchip-linux/rkbin.git --depth 1
cd rkbin/tools
./loaderimage --pack --uboot /tmp/u-boot-dtb.bin /tmp/uboot.img
Then remember where you backed up RK3399MiniLoaderAll_V1.05_DDR600MHz.bin
And do :/path/to/your/rkdeveloptool db /path/to/RK3399MiniLoaderAll_V1.05_DDR600MHz.bin # Write the Bootloader /paht/to/your/rkdeveloptool ul /path/to/RK3399MiniLoaderAll_V1.05_DDR600MHz.bin # Which is also their firmware /path/to/your/rkdeveloptool wl 0x4000 /path/to/uboot.img # Write the U-Boot image /path/to/your/rkdeveloptool wl 0x6000 /path/to/trust.img # Write the Trust bits # Unplug and plug the power cable again to provoke a hard reboot of the board. # The "reboot" button might not be sufficient to reinitialize the eMMC correctly, leading to U-Boot stalling when loading. # Just unplug and plug the power cable again.Now reboot and you should have a noisy Rockchip U-Boot again, that then boots into your freshly compiled UBoot.
If you want to reflash a UBoot image, you generally HAVE TO reflash the Miniloader image and let it boot so that it accepts writing anything with rkdeveloptool.Now, the freshly compiled UBoot can boot an SDCard and, also, have a 5 seconds timer (instead of 0...).
I used that way and burned an Armbian image for NanoPC T4 on an SDCard and booted it with that UBoot.
However, if you insert the SDCard on boot, then Rockchip's Loader crashes... Seriously...
So, I just waited until everything went on, U-Boot tried to find a bootable image and failed... And THEN I put the SDCard and typed :
boot
On the serial console.Now, when booting the Armbian image, the serial console is setup at 115000 bauds so you'll see random characters on the serial console.
Just drop the speed of the serial console. On picocom, do CTRL-A CTRL-D until you drop at 115200. You can up the speed back with CTRL-A CTRL-U.
Then push a few times Enter when the scribblings stopped appearing on the serial console and you should see :
nanopct4 login:Type "root" and then "1234", and then "1234" again and then type a new password, create a new user and an X11 session should open...
Anyway, the X11 session was useless to me since the NanoPC T4 image is not compatible with Orange Pi boards USB-Wise !
So you'll have no USB. Which means no mouse, no keyboard. And also no Wifi/Bluetooth, just in case you're wondering...Still, the serial console worked, so I was able to partition the eMMC, put a GPT partition table and create a partition that starts after the first 16MB (or MibiBytes) just to be sure.
Then I put the Armbian image into this eMMC partition by doing a stupidly complex procedure, which I do not recommend :- Halt the system
- Mount the SDCard on another Linux system
-
Extract the ext4 partition of the Armbian NanoPC T4 image file by first :
- configure losetup and mount the partition inside the file ( https://askubuntu.com/questions/69363/mount-single-partition-from-image-of-entire-disk-device )
- sudo dd if=/dev/loop0 of=/my/SDCard/mountpoint/ArmbianPartitionOnly.img
- Boot the board back with the SDCard back
-
Log as root and check which /dev/mmcblk is the eMMC, using cfdisk.
The eMMC is 16GB, while my SDCard is 64 GB
In my case /dev/mmcblk1 was the eMMC - Type dd if=/path/to/ArmbianPartitionOnly.img of=/dev/mmcblk1p1
I'm sure there's way safer and easier ways to burn an Armbian image into an eMMC partition.
I then halted the board, removed the SDCard, booted the board again and saw it boots into Armbian automatically, through the eMMC partition.
So, I'm now at phase 2 : Get a snapshot of the partition and be able to flash it again with rkdeveloptool.
I'm putting this here, since it might help other people tinkering with the board, trying to get something out of it besides "getting Android working".
Still, if you just want an Armbian image : WAIT.
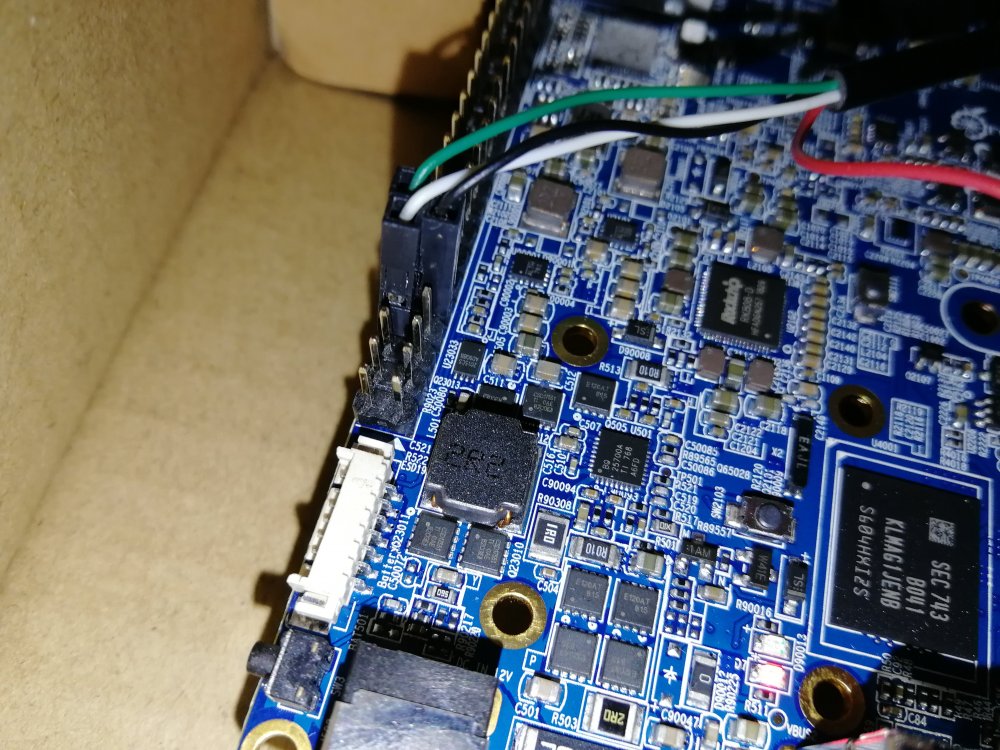
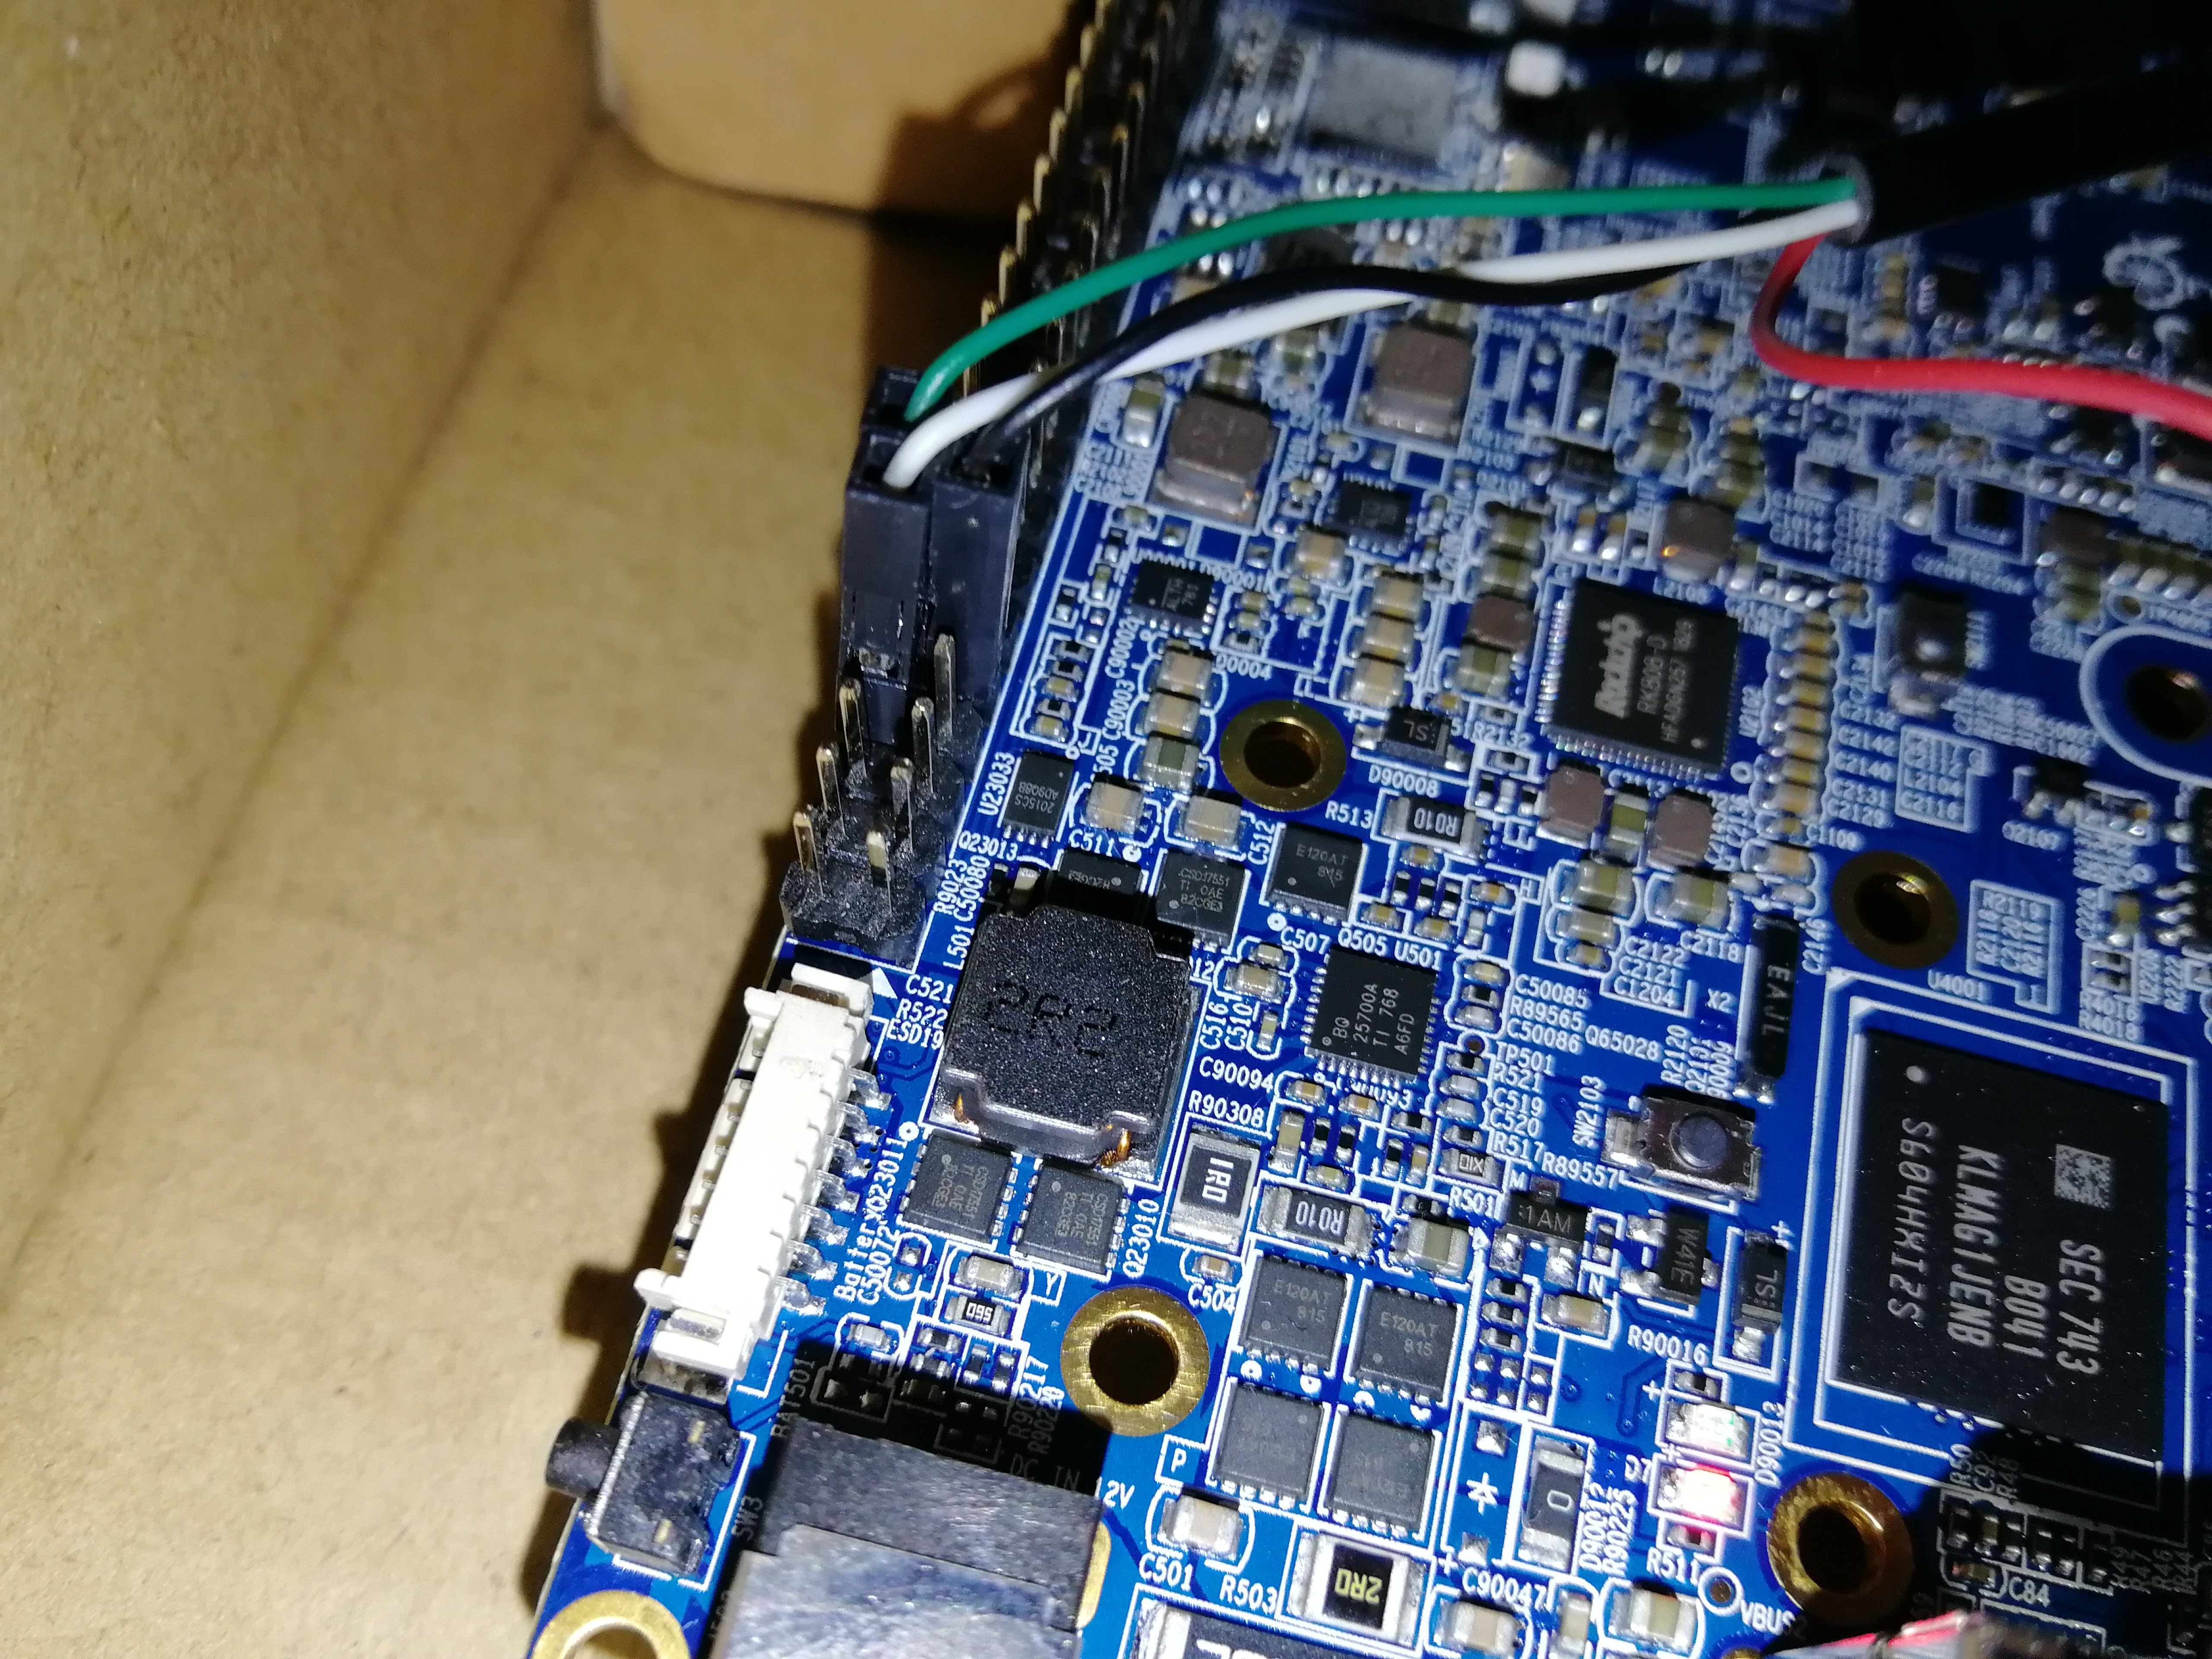
Attachments :
* A picture showing wow to get the Debug USART using the standard GPIO block.
* OrangePI RK3399 Schematics
* What seems to be the main 5V converter chip.
* What seems to be the main 3.3V converter chip
* What seems to be the main charge controller
-
Plug in an RS232<->USB connector on the board, by following the pinout provided in the Orange Pi RK3399 User Guide
-
Alright, I was able to do a full "get into MaskRom mode, restore the bootloader and firmware, restore U-Boot" and reboot on the already written eMMC.
Now, the last steps should be :
- Resize the NanoPC T4 armbian image partition of the eMMC. I'm using this image as a basis, since it works "just enough" on the Orange PI to get network and display.
- DD it.
- Flash the eMMC
- Rewrite the eMMC through this image.
Almost done.
-
Okay, I was able to transfer the image on the eMMC. Now, I'll try to get an image of the eMMC again and find a way to flash it "again".
-
Try the following :
Compile rkdeveloptool. As stated in their README :
sudo apt-get install libudev-dev libusb-1.0-0-dev dh-autoreconf
git clone --depth 1 https://github.com/rockchip-linux/rkdeveloptool
cd rkdeveloptool
autoreconf -i
./configure
make
You might also need to
sudo apt install build-essentialsThen download rk3399-typec-android8-20181112.tgz from FriendlyElec Google drive for RK3399 boards :
https://drive.google.com/drive/folders/1gaLKSlIHvqhJ5cASTFGSjJ9XvtgosZFQ
Extract the MiniLoaderAll.bin somewhere and then do :
/path/to/rkdeveloptool db /path/to/MiniLoaderAll.bin
/path/to/rkdeveloptool uf /path/to/MiniLoaderAll.bin
I tested than on another RK3399 board and that got it working after being in "quiet MaskROM mode".
Now, by working, I just mean that it will print its UBoot messages back on the serial console. However, you'll need to flash an image again with some flash tools, either on Linux or Windows.
-
I burned a NanoPC T4 image on an SD card and was able to boot it, though I had to put the SDCard once the compiled U-Boot was booting, else the initial Rockchip U-Boot would b0rk and die.
The image provides some networking, X11 display but no USB support.
Now, I'm trying to understand :
- How I can update U-Boot again, since keeping the recovery button pressed doesn't work.
- How to copy the SDCard image onto the eMMC.
Then, if the eMMC can boot, the final question will be :
- How to put the whole thing at once (U-Boot + Linux image) with rkdeveloptool, so that new owners can install prebuilt image into the board.
-
This procedure was recovered from tidbits of my bash history, I might be missing a few things . So, to anyone who got an Orange Pi RK3399 : Give it a shot, tell me how it fares.
The VPU driver
in Tinkerboard
Posted
Well, I've been able to get a 5.0-rc2 working now. So I'll try the VPU patches this week and see if I can get decode anything with them.
Other people seems to be eager too, it seems.