Search the Community
Showing results for 'tv'.
-
Good day to you))) I have a TV BOX TX9Pro. Chassis (Main Board): H616/H313mini84 V2.0 kernel 4.9.170 I would like to run one of the armbian builds on it. But I can’t figure out how to do this, here are the logs when starting the console... Is there support for this device? tell me what to do and how... Thanks in advance. U-Boot SPL 2021.04 (May 25 2023 - 13:03:46 +0200) DRAM:This DRAM setup is currently not supported. resetting ... [70]HELLO! BOOT0 is starting! [73]BOOT0 commit : 803d783 [75]set pll start [78]periph0 has been enabled [81]set pll end [83]unknow PMU [84]unknow PMU [86]PMU: AXP1530 [88]dram return write ok [90]board init ok [92]DRAM BOOT DRIVE INFO: V0.645 [96]the chip id is 0x5d00 [98]chip id check OK [103]DRAM_VCC set to 1500 mv [106]DRAM CLK =600 MHZ [108]DRAM Type =3 (3:DDR3,4:DDR4,7:LPDDR3,8:LPDDR4) [116]Actual DRAM SIZE =1024 M [118]DRAM SIZE =1024 MBytes, para1 = 30eb, para2 = 4000000, dram_tpr13 = 6041 [132]DRAM simple test OK. [134]rtc standby flag is 0x0, super standby flag is 0x0 [140]dram size =1024 [143]card no is 2 [145]sdcard 2 line count 8 [147][mmc]: mmc driver ver 2020-09-10 15:32 [157][mmc]: Wrong media type 0x0, but host sdc2, try mmc first [163][mmc]: ***Try MMC card 2*** [202][mmc]: RMCA OK! [204][mmc]: bias 4 [207][mmc]: MMC 5.0 [209][mmc]: HSSDR52/SDR25 8 bit [212][mmc]: 50000000 Hz [214][mmc]: 7456 MB [216][mmc]: ***SD/MMC 2 init OK!!!*** [291]Loading boot-pkg Succeed(index=0). [294]Entry_name = u-boot [304]Entry_name = monitor [307]Entry_name = dtbo [310]Entry_name = dtb [314]tunning data addr:0x4a0003e8 [317]Jump to second Boot. NOTICE: BL3-1: v1.0(debug):a0d3abd NOTICE: BL3-1: Built : 17:32:02, 2020-10-20 NOTICE: BL3-1 commit: 8 ERROR: Error initializing runtime service tspd_fast NOTICE: BL3-1: Preparing for EL3 exit to normal world NOTICE: BL3-1: Next image address = 0x4a000000 NOTICE: BL3-1: Next image spsr = 0x1d3 U-Boot 2018.05 (Feb 15 2023 - 17:22:04 +0800) Allwinner Technology [00.391]CPU: Allwinner Family [00.394]Model: sun50iw9 I2C: ready [00.398]DRAM: 1 GiB [00.401]Relocation Offset is: 35ebf000 [00.442]secure enable bit: 0 [00.444]pmu_axp152_probe pmic_bus_read fail [00.448]PMU: AXP1530 [00.454]CPU=1008 MHz,PLL6=600 Mhz,AHB=200 Mhz, APB1=100Mhz MBus=400Mhz [00.462]drv_disp_init [00.492]__clk_enable: clk is null. [00.497]drv_disp_init finish [00.500]gic: sec monitor mode [00.522]flash init start [00.524]workmode = 0,storage type = 2 [00.528]MMC: 2 [00.529][mmc]: mmc driver ver uboot2018:2021-07-19 14:09:00 [00.535][mmc]: get sdc_type fail and use default host:tm4. [00.546][mmc]: SUNXI SDMMC Controller Version:0x40502 [00.590][mmc]: Best spd md: 4-HS400, freq: 3-100000000, Bus width: 8 [00.596]sunxi flash init ok [00.600]Loading Environment from SUNXI_FLASH... OK [00.609]usb burn from boot delay time 0 weak:otg_phy_config [00.623]usb prepare ok [01.426]overtime [01.430]do_burn_from_boot usb : no usb exist [01.434]boot_gui_init:start FAT: Misaligned buffer address (7be7be58) 32 bytes read in 4 ms (7.8 KiB/s) tcon_de_attach:de=0,tcon=2[01.567]boot_gui_init:finish [01.570]bmp_name=bootlogo.bmp 2764854 bytes read in 40 ms (65.9 MiB/s) [01.633]update dts ** Unrecognized filesystem type ** [01.642]load file(ULI/factory/rootwait init.txt) error. ** Unrecognized filesystem type ** [01.655]load file(ULI/factory/snum.txt) error. [01.659]name in map mac ** Unrecognized filesystem type ** [01.668]load file(ULI/factory/wifi_mac.txt) error. ** Unrecognized filesystem type ** [01.680]load file(ULI/factory/bt_mac.txt) error. ** Unrecognized filesystem type ** [01.692]load file(ULI/factory/selinux.txt) error. ** Unrecognized filesystem type ** [01.704]load file(ULI/factory/specialstr.txt) error. [01.713]update part info [01.738]update bootcmd [01.740]No ethernet found. Hit any key to stop autoboot: 0 [02.050]Starting kernel ... [02.053][mmc]: mmc exit start [02.101][mmc]: mmc 2 exit ok [ 0.000000] Booting Linux on physical CPU 0x0 [ 0.000000] Linux version 4.9.170 (akrd6@R740XD) (gcc version 5.3.1 20160412(Linaro GCC 5.3-2016.05) ) #80 SMP PREEMPT Wed Feb 15 17:22:30 CST 2023 [ 0.000000] Boot CPU: AArch64 Processor [410fd034] [ 0.000000] bootconsole [earlycon0] enabled [ 0.027874] BOOTEVENT: 27.858249: ON [ 0.242175] sunxi_i2c_probe()2209 - [i2c3] warning: failed to get regulator d [ 0.243164] sunxi_i2c_probe()2209 - [i2c5] warning: failed to get regulator d [ 0.244517] axp2101-regulator axp2101-regulator.0: Setting DCDC frequency fo unsupported AXP variant [ 0.244601] axp2101-regulator axp2101-regulator.0: Error setting dcdc frequecy: -22 [ 0.279245] [ac200] get ave_regulator_name failed! [ 0.279751] [ac200] pwm enable [ 0.363211] gpio_pin_4(229) gpio_request fail [ ▒[ 0.369727] uart uart1: get regulator failed [ 0.402346] [NAND][NE] Not found valid nand node on dts [ 0.411005] sunxi-wlan soc@03000000:wlan: get gpio chip_en failed [ 0.417894] sunxi-wlan soc@03000000:wlan: get gpio power_en failed [ 0.550010] hci: request ohci1-controller gpio:232 [ 0.742282] axp2101_pek: axp2101-pek can not register without irq [ 0.752785] sunxi_ir_startup: get ir protocol failed [ 0.761135] VE: get debugfs_mpp_root is NULL, please check mpp [ 0.761135] [ 0.769395] VE: sunxi ve debug register driver failed! [ 0.769395] [ 0.784659] mmc:failed to get gpios [ 0.865627] mmc:failed to get gpios [ 0.901895] FD655: ==fd655_driver_probe==================== [ 0.908284] FD655: : (null) [ 0.909038] sunxi-mmc sdc1: smc 2 p1 err, cmd 52, RTO !! [ 0.912260] sunxi-mmc sdc1: smc 2 p1 err, cmd 52, RTO !! [ 0.926757] FD655: : (null) [ 0.929915] sunxi-mmc sdc1: smc 2 p1 err, cmd 5, RTO !! [ 0.935814] sunxi-mmc sdc1: smc 2 p1 err, cmd 5, RTO !! [ 0.941713] sunxi-mmc sdc1: smc 2 p1 err, cmd 5, RTO !! [ 0.947606] sunxi-mmc sdc1: smc 2 p1 err, cmd 5, RTO !! [ 0.953859] FD655: register_fd655_driver: Successed to add fd655 module [ 0.973520] failed get gpio-spdif gpio from dts,spdif_gpio:-2 [ 0.983217] [audio-codec]dachpf_cfg configurations missing or invalid. [ 0.990865] lineout_vol:26, linein_gain:3, fmin_gain:3, digital_vol:0, adcdr_cfg:0, adchpf_cfg:0, dacdrc_cfg:0, dachpf_cfg:0, ramp_func_used:1, pa_msleep_tme:160, pa_ctl_level:0, gpio-spk:0 [ 1.014903] sndhdmi sndhdmi: ASoC: CPU DAI (null) not registered [ 1.021698] sndhdmi sndhdmi: snd_soc_register_card() failed: -517 [ 1.035293] sunxi-ahub-cpudai 5097000.cpudai3-controller: ahub cpudai id invlid [ 1.068733] ERROR: pinctrl_get for HDMI2.0 DDC fail [ 1.078344] tv_probe()1435 - of_property_read_string tv_power failed! [ 1.174637] cpu cpu1: opp_list_debug_create_link: Failed to create link [ 1.182156] cpu cpu1: _add_opp_dev: Failed to register opp debugfs (-12) [ 1.189771] cpu cpu2: opp_list_debug_create_link: Failed to create link [ 1.197234] cpu cpu2: _add_opp_dev: Failed to register opp debugfs (-12) [ 1.204828] cpu cpu3: opp_list_debug_create_link: Failed to create link [ 1.212279] cpu cpu3: _add_opp_dev: Failed to register opp debugfs (-12) [ 1.684491] selinux: avc: denied { set } for scontext=u:r:vendor_init:s0 context=u:object_r:default_prop:s0 tclass=property_service permissive=1 [ 1.684491] [ 1.702686] selinux: avc: denied { set } for scontext=u:r:vendor_init:s0 context=u:object_r:dalvik_prop:s0 tclass=property_service permissive=1 [ 1.702686] [ 2.576915] FAT-fs (mmcblk0p15): bogus number of reserved sectors console:/ $ [ 8.720978] apexd: Failed to walk /product/apex : Can't open /prduct/apex for reading : No such file or directory ^C 130|console:/ $ [ 22.711942] sunxi-mmc sdc1: smc 2 p1 err, cmd 52, RTO !! [ 22.913822] SSV6XXX_SDIO mmc2:0001:1: vendor = 0x3030 device = 0x3030 [ 22.947618] SSV6XXX_SDIO mmc2:0001:1: dataIOPort 0x10000 regIOPort 0x10020 [ 22.958352] sunxi-mmc sdc1: smc 2 p1 err, cmd 52, RE RCE !! [ 23.030814] SSV6XXX_SDIO mmc2:0001:1: dataIOPort 0x10000 regIOPort 0x10020 [ 23.057388] SSV6XXX HCI TX Task started. [ 23.135876] Enable HCI TX aggregation [ 24.042450] SSV WLAN driver SSV6006C: Set new macaddr [ 24.060821] SSV WLAN driver SSV6006C: VIF 08:1a:1e:fd:85:e4 of type 2 is added. [ 25.361805] SSV WLAN driver SSV6006C: Set new macaddr [ 25.386662] SSV WLAN driver SSV6006C: VIF 08:1a:1e:fd:85:e5 of type 2 is added. [ 27.173711] selinux: avc: denied { set } for property=sys.config.rootservice pid=2978 uid=0 gid=0 scontext=u:r:rootservice:s0 tcontext=u:object_r:system_prop:s0 tclass=property_service permissive=1 [ 27.173711] [ 27.207603] audit: rate limit exceeded [ 30.214797] apexd: Can't open /product/apex for reading : No such file or directory U-Boot SPL 2021.04 (May 25 2023 - 13:03:46 +0200) /system/bin/sh: syntax error: unexpected '(' 1|console:/ $ DRAM:This DRAM setup is currently not supported. /system/bin/sh: DRAM:This: inaccessible or not found 127|console:/ $ [ 34.750480] selinux: avc: denied { set } for property=supolicy.loaded pid=3902 uid=0 gid=0 scontext=u:r:toolbox:s0 tcontext=u:object_r:default_prop:s0 tclass=property_service permissive=1 [ 34.750480] U-Boot SPL 2021.04 (May 25 2023 - 13:03:46 +0200) /system/bin/sh: syntax error: unexpected '(' 1|console:/ $ DRAM:This DRAM setup is currently not supported. /system/bin/sh: DRAM:This: inaccessible or not found 127|console:/ $
-
1, serial port: open the box, on the backside, there are 3 hole, which is serail port, from right to left, they are TX, GND, RX, serial config is 150000n8. first log: we know the memory is 8GB Lp4x. Ddr version is V1.14. freq=324Mhz? which is from rkbin repo. next step try to use ctrl+c to stop auto boot.
-
Hello Community!!! I got this device https://linux-sunxi.org/Sunchip_SDK-758 I’m trying to boot armbian Armbian_23.11.1_Cubietruck_jammy_current_6.1.63_xfce_desktop.img Burned image with balena etcher, phoenixcard( invalid image), win32diskimager, and DD but same result…board won’t boot complaining about missing Ethernet If I insert the sd card and an usb key burned both with same image the board boots correctly. Only caveat is I need that usb because it’s the only one working so I can’t log in with keyboard and ethernet seems not to work properly so i can't SSH into it Is there a way to make it boot only on sdcard? additional info---->actually board is flashed with ubuntuone (kernel 3.4.709) it boots properly from nand i found this .FEX file here https://github.com/ade-ma/A20Notes might it be helpful? .....i'm getting crazy burning dozens of images finding the right one thnx in advance
-
 Good morning, I'm trying to remove the Android layer from my T95N Mini MX+ and install ArmBian. Can you help me please? Thank you for your reply
 -
Hello! So i am newbie on this subject, and i want to try Home Assistant and for that, i need to install ARMBian on an Android Box and i have no idea yet how to do it. First i would like to know which version of ARMBian should i install on a R-TV Box S10? That box has a Amlogic S912 socket 3Gb RAM and 32Gb ROM. Which firmware should i install to achieve my goal and how to do it? Thanks in advance for all the help.
-
Hi, After running armbian-install on S905x device it stopped booting. USB Burning Tool doesn't recognize the device, nothing. After connecting to UART it looks like install script has overwritten the original u-boot. That's the boot log from UART connection without sd card: GXL:BL1:9ac50e:a1974b;FEAT:ADFC318C;POC:3;RCY:0;EMMC:0;READ:0;0.0;CHK:0; TE: 104174 BL2 Built : 11:58:42, May 27 2017. gxl gc3c9a84 - xiaobo.gu@droid05 set vcck to 1120 mv set vddee to 1000 mv Board ID = 1 CPU clk: 1200MHz DQS-corr enabled DDR scramble enabled DDR3 chl: Rank0+1 @ 912MHz - PASS Rank0: 1024MB(auto)-2T-13 Rank1: 1024MB(auto)-2T-13 DataBus test pass! AddrBus test pass! -s Load fip header from eMMC, src: 0x0000c200, des: 0x01400000, size: 0x00004000 New fip structure! Load bl30 from eMMC, src: 0x00010200, des: 0x01100000, size: 0x0000d600 Load bl31 from eMMC, src: 0x00020200, des: 0x05100000, size: 0x00018400 Load bl33 from eMMC, src: 0x0003c200, des: 0x01000000, size: 0x000af000 NOTICE: BL3-1: v1.0(release):3348978 NOTICE: BL3-1: Built : 15:44:01, May 12 2017 [BL31]: GXL CPU setup! mpu_config_enable:ok [Image: gxl_v1.1.3221-2cfba69 2017-05-27 16:03:58 qiufang.dai@droid07] OPS=0x82 8f bb f0 da ba 22 d2 cf 1 b0 31 f4 [0.359461 Inits done] secure task start! high task start! low task start! ERROR: Error initializing runtime service opteed_fast <debug_uart> U-Boot 2022.07-armbian (Nov 25 2023 - 12:50:42 +0000) libretech-cc Model: Libre Computer AML-S905X-CC SoC: Amlogic Meson GXL (S905X) Revision 21:b (82:2) DRAM: 2 GiB Core: 169 devices, 27 uclasses, devicetree: separate MMC: mmc@72000: 0, mmc@74000: 1 Loading Environment from nowhere... OK In: serial Out: serial Err: serial [BL31]: tee size: 0 [BL31]: tee size: 0 Net: eth0: ethernet@c9410000 Hit any key to stop autoboot: 0 switch to partitions #0, OK mmc1(part 0) is current device Scanning mmc 1:1... Found /boot/extlinux/extlinux.conf Retrieving file: /boot/extlinux/extlinux.conf 1: Armbian Retrieving file: /uInitrd ** File not found /uInitrd ** Skipping Armbian for failure retrieving initrd SCRIPT FAILED: continuing... Found U-Boot script /boot/boot.scr 8147 bytes read in 1 ms (7.8 MiB/s) ## Executing script at 08000000 U-boot default fdtfile: amlogic/meson-gxl-s905x-libretech-cc.dtb Current variant: Current fdtfile after armbianEnv: amlogic/meson-gxl-s905x-libretech-cc.dtb Mainline bootargs: root=/dev/mmcblk1p1 rootwait rootfstype=ext4 splash=verbose c onsole=ttyAML0,115200 console=tty1 consoleblank=0 coherent_pool=2M loglevel=1 ub ootpart=d27dbd06-01 libata.force=noncq usb-storage.quirks= cgroup_enable=memo ry swapaccount=1 22783841 bytes read in 500 ms (43.5 MiB/s) 27433472 bytes read in 601 ms (43.5 MiB/s) 40228 bytes read in 4 ms (9.6 MiB/s) Failed to load '/boot/dtb/amlogic/overlay/-fixup.scr' ## Loading init Ramdisk from Legacy Image at 13000000 ... Image Name: uInitrd Image Type: AArch64 Linux RAMDisk Image (gzip compressed) Data Size: 22783777 Bytes = 21.7 MiB Load Address: 00000000 Entry Point: 00000000 Verifying Checksum ... OK ## Flattened Device Tree blob at 04080000 Booting using the fdt blob at 0x4080000 Loading Ramdisk to 7a982000, end 7bf3c721 ... OK Loading Device Tree to 000000007a90f000, end 000000007a981fff ... OK "Synchronous Abort" handler, esr 0x96000004 elr: 00000000010656ec lr : 0000000001055038 (reloc) elr: 000000007dfb46ec lr : 000000007dfa4038 x0 : e14b4287a666c25d x1 : 000000007dfbc290 x2 : 0000000000000010 x3 : 000000007bf54e10 x4 : 0000000000000000 x5 : e14b4287a666c25d x6 : 0000000001000000 x7 : 0000000000000000 x8 : 0000000000000007 x9 : 0000000000000000 x10: 0000000000000178 x11: 000000007bf40eec x12: 00000000000000a4 x13: 000000007bf40ea8 x14: 000000007a90f000 x15: 0000000000000020 x16: 000000007df5946c x17: 0000000000000000 x18: 000000007bf4cdb0 x19: 000000007af41040 x20: 000000007df4fb18 x21: 000000007dfbc290 x22: 0000000000001000 x23: 000000007bf54d60 x24: 000000007dfdacb8 x25: 0000000001000000 x26: 0000000000000000 x27: 0000000001000000 x28: 0000000000001000 x29: 000000007bf40ea0 Code: eb04005f 54000061 52800000 14000006 (386468a3) Resetting CPU ... resetting ... bl31 reboot reason: 0xd bl31 reboot reason: 0x0 system cmd 1. And with sd card GXL:BL1:9ac50e:a1974b;FEAT:ADFC318C;POC:3;RCY:0;EMMC:0;READ:0;0.0;CHK:0; TE: 103545 BL2 Built : 11:58:42, May 27 2017. gxl gc3c9a84 - xiaobo.gu@droid05 set vcck to 1120 mv set vddee to 1000 mv Board ID = 1 CPU clk: 1200MHz DQS-corr enabled DDR scramble enabled DDR3 chl: Rank0+1 @ 912MHz - PASS Rank0: 1024MB(auto)-2T-13 Rank1: 1024MB(auto)-2T-13 DataBus test pass! AddrBus test pass! -s Load fip header from eMMC, src: 0x0000c200, des: 0x01400000, size: 0x00004000 New fip structure! Load bl30 from eMMC, src: 0x00010200, des: 0x01100000, size: 0x0000d600 Load bl31 from eMMC, src: 0x00020200, des: 0x05100000, size: 0x00018400 Load bl33 from eMMC, src: 0x0003c200, des: 0x01000000, size: 0x000af000 NOTICE: BL3-1: v1.0(release):3348978 NOTICE: BL3-1: Built : 15:44:01, May 12 2017 [BL31]: GXL CPU setup! mpu_config_enable:ok [Image: gxl_v1.1.3221-2cfba69 2017-05-27 16:03:58 qiufang.dai@droid07] OPS=0x82 8f bb f0 da ba 22 d2 cf 1 b0 31 f4 [0.358822 Inits done] secure task start! high task start! low task start! ERROR: Error initializing runtime service opteed_fast <debug_uart> U-Boot 2022.07-armbian (Nov 25 2023 - 12:50:42 +0000) libretech-cc Model: Libre Computer AML-S905X-CC SoC: Amlogic Meson GXL (S905X) Revision 21:b (82:2) DRAM: 2 GiB Core: 169 devices, 27 uclasses, devicetree: separate MMC: mmc@72000: 0, mmc@74000: 1 Loading Environment from nowhere... OK In: serial Out: serial Err: serial [BL31]: tee size: 0 [BL31]: tee size: 0 Net: eth0: ethernet@c9410000 Hit any key to stop autoboot: 0 switch to partitions #0, OK mmc0 is current device Scanning mmc 0:1... Found /extlinux/extlinux.conf Retrieving file: /extlinux/extlinux.conf 1: Armbian Retrieving file: /uInitrd Retrieving file: /Image append: root=UUID=a6cf29bd-49ae-4d3b-bf22-800408ae1fba rootflags=data=writeback console=ttyAML0,115200n8 console=tty0 rw no_console_suspend consoleblank=0 fsck.fix=yes fsck.repair=yes net.ifnames=0 splash plymouth.ignore-serial-consoles Retrieving file: /dtb/amlogic/meson-gxl-s905x-p212.dtb Moving Image from 0x8080000 to 0x8200000, end=9cd0000 ## Loading init Ramdisk from Legacy Image at 13000000 ... Image Name: uInitrd Image Type: AArch64 Linux RAMDisk Image (gzip compressed) Data Size: 22783777 Bytes = 21.7 MiB Load Address: 00000000 Entry Point: 00000000 Verifying Checksum ... OK ## Flattened Device Tree blob at 08008000 Booting using the fdt blob at 0x8008000 Loading Ramdisk to 7a982000, end 7bf3c721 ... OK Loading Device Tree to 000000007a975000, end 000000007a98169c ... OK "Synchronous Abort" handler, esr 0x96000004 elr: 00000000010656ec lr : 0000000001055038 (reloc) elr: 000000007dfb46ec lr : 000000007dfa4038 x0 : e14b4287a666c25d x1 : 000000007dfbc290 x2 : 0000000000000010 x3 : 000000007bf54e10 x4 : 0000000000000000 x5 : e14b4287a666c25d x6 : 0000000001000000 x7 : 0000000000000000 x8 : 0000000000000007 x9 : 0000000000000000 x10: 0000000000000188 x11: 000000007bf409ec x12: 00000000000000b4 x13: 000000007bf409a8 x14: 000000007a975000 x15: 0000000000000020 x16: 000000007df7a768 x17: 0000000000000000 x18: 000000007bf4cdb0 x19: 000000007af41040 x20: 000000007df4fb18 x21: 000000007dfbc290 x22: 0000000000001000 x23: 000000007bf54d60 x24: 000000007dfdacb8 x25: 0000000001000000 x26: 0000000000000000 x27: 0000000001000000 x28: 0000000000001000 x29: 000000007bf409a0 Code: eb04005f 54000061 52800000 14000006 (386468a3) Resetting CPU ... resetting ... bl31 reboot reason: 0xd bl31 reboot reason: 0x0 system cmd 1. Is there any way to restore original firmware?
-
Hello, I have recently found two android TV boxes and am interested in getting Armbian running on them versus the very deprecated Android versions they have. Doing a little research, I've found that they're MXQ EasyView TV models and run on ARM processors similar to my Le Potatoes that I've been playing around with for a few months. I've found their webpage, and it's pretty comical. Unfortunately, they don't list the exact ARM processor and/or specs and just looking up MXQ results in newer models only and Easyview barely anything except the mentioned site. https://easyviewtv.com/homepage.html Now, there does look like there was a project at one point, but unfortunately it is seemingly cancelled? The websites hosting it are no longer available. I was wondering if anybody came across these and successfully got linux running on them or know of any ways to get them rooted? They'd be fantastic mini-pcs to accompany my Le Potatoes.
-
 The tv box has a fake specification (8 gb ram) ... But originally it should have less than 2 gigabytes of memory.
 -
 How to put armbian on this tvbox? 8GB+128GB Media Player H.265 Q96 MAX Smart TV Box Android 11 Amlogic S905L Quad Core 2.4G WIFI 4K Set Top Box Home Theater. The latest TV Box in 2022, supports 4K resolution, enjoy super-definition images and breathtaking viewing effect. H.265 decoding technology saves half of the bandwidth than H.264, so it can show vivid and rich image details. 2/4/8GB RAM and 16/64/128GB ROM, large capacity allows you to download more applications and games in your TV box. Amlogic S905L quad core processor is adopted for smooth and flexible operation, no worries about slow running problem. The latest Android 11.1 system, with open-source application store, you can enjoy whatever you like. Supports HDMI 2.0 version, convenient to stream your photos, video to TV screen. 2.4G WIFI Connection offers more stable wireless signal for you to enjoy HD media and playing game experience. Supports mouse and keyboard via USB port; Also support 2.4GHz wireless mouse and keyboard via 2.4G USB dongle. Multiple-using scenes: office work, home entertainment, meeting demonstrate, school education, digital advertising etc. Specifications: CPU: Amlogic S905L2 up to 1.5 GHz, Quad core ARM Cortex-A53 Wifi: 2.4G HDMI Out: HDMI2.0 to support maximum 4Kx2K display USB Port: 2 High speed USB 2.0,support U DISK and USB HDD AV Out: AV(3 in 1) port Lan: RJ45 10/100M Power Supply: DC Jack 5V/2A OS Version: Android 11.1 K0DI: K0di 18.1
 -
Hi everyone, I would like to ask if it is possible to dual boot Linux on an Android TV Box without removing Android? I would like to start an ARM-type Linux distribution on this device specific for this kind of low-power devices; My model is: Bqeel R2 Plus CPU: RK3318 quad core RAM: 4GB 64GB ROM I should use a fast micro SD card to run the operating system on;
-
 I have an OTT TV Box, model ABOX-A1 ( 1G + 8G, S905X ). Inside it looks very similar to NEXBOX A95X discussed at https://www.savagemessiahzine.com/forum/index.php?showtopic=770346 . It has an analog AV port, with a 3PEAK TPF632A audio line driver on the output. So, all the digital audio stuff is inside the S905X SOC, and maybe some GPIO switches mute of that analog output chip. I first booted Devmfc_Debian-Bookworm_6.1.57-meson64_Minimal-23.10.12.img.xz from https://github.com/devmfc/debian-on-amlogic and had sound on the analog output. (The later Devmfc_Debian-Bookworm_6.6.1-meson64_Minimal-23.11.09.img.xz did not work.) I used its aml-multiboot-setup.sh script to set up automatic boot from USB or SD if they're present, without needing to hold the button in the bottom of the AV port. Then I decided I'd rather run Armbian, and I got Armbian_23.11.1_Aml-s9xx-box_bookworm_current_6.1.63_minimal.img.xz running from a USB drive. (I couldn't run Armbian_23.11.1_Aml-s9xx-box_bookworm_current_6.1.63.img.xz and some others, but I'm not 100% sure that I didn't do something wrong that prevented them from running.) This works fine, except there are absolutely no audio devices, either for HDMI or analog audio. I saw that the kernel modules that seem needed were present, but they weren't loaded and loading them didn't help. I guess they only work if the device tree informs Linux about that hardware being present. Using grep gx-sound-card /boot/dtb/amlogic/*s905x* I see only meson-gxl-s905x-khadas-vim.dtb, meson-gxl-s905x-libretech-cc.dtb, and meson-gxl-s905x-libretech-cc-v2.dtb contain that. I had had tried meson-gxl-s905x-p212.dtb and meson-gxl-s905x-nexbox-a95x.dtb so far, and neither have sound. Then I found https://github.com/torvalds/linux/commit/7e01e14e9f75385910d1e42f97a5e98f36244967 "arm64: dts: meson: add audio playback to S905X-P212 dts". After applying that patch, rebuilding the .dtb, and rebooting, I got a sound device. I could play audio files, and that took the appropriate amount of time, as if audio was going somewhere, but there was no analog audio output. Then, changing some things via amixer got it to work. These changes must have persisted, because I shut down, removed power, and booted again, and analog audio worked without having to do anything. I am attaching the altered .dtb file, the .dts file with the patch applied, and amixer output showing the current configuration with working analog audio. If you don't get audio, you can diff your amixer output against that output and see what might need to be changed. If you want to build the .dtb file yourself, note that the dtc program cannot handle the C preprocessor include directives found in these files. So, you first need to run them through the C preprocessor, and then you need to run dtc on the preprocessed output. Use something like cpp -nostdinc -I include -I arch -undef -x assembler-with-cpp arch/arm64/boot/dts/amlogic/meson-gxl-s905x-p212.dts ~/p212.dtsp To obtain the source code, I simply used https://github.com/armbian/build to start a build of a minimal Armbian system, telling it I want to custom configure the kernel. Then when the kernel configuration menu came up, I killed that, knowing all the files I needed were present. s905x-p212_audio_fix.tar.xz
 -
Hello, I have installed the armbian bookworm version with xfce on it, 6.1.30 kernel on my 32gb usb flash drive using balena etcher according to the instruction, I have tweaked the boot.cmd file, and only tweaked the video settings and regenerated using the mkimage command, Using linux to setup. and when I tried booting on the tv, everything worked till bam it kernel panics and starts flashing the red status leds on my android box. The kernel panic error is not syncing asynchronous SError interrupt, I cannot get anymore logs because I dont have any loggers, There is an uart port on my tv's motherboard but i dont have an usb to ttl device. Keep in mind, i cannot use sd cards because my box is so cheap it doesnt even have an sd card slot, but it boots into u-boot with the usb stick, the only thing i done after flashing the usb stick was resizing the root partition to maximum size with gparted. By the way, if i need to retrieve any data, my android tv box is also rooted meaning i can fetch some files from android itself using sftp ssh or terminal emulator I have an S905L2 variant of Amlogic S905X series and used the u-boot-s905x-s912. Also the tv is 1gb and has an power adapter thats 12 volts 1 amp, if that might be related to the error My extlinux configuration file LABEL Armbian LINUX /Image INITRD /uInitrd FDT /dtb/amlogic/meson-gxl-s905x-p212.dtb append root=UUID=81afe1e2-4cdc-499c-a1f4-e4f1c7c42a08 rootflags=data=writeback rw fsck.fix=yes fsck.repair=yes net.ifnames=0 I am a new user, I am sorry If i am an inconvinience. Cannot find other tags, because there is no tv box or amlogic tag Feel free to ask if you need additional information from me.
-
Hello Everyone, I'm an armbian user since 2020 and i'm having issues trying to run armbian on a custom TV box made from a company that sell iptv solutions for business. I've got this from one of the company manager as the device was failing HDMI and didn't want to bother themself with RMA, i've got few but really they trew out like 50 pcs. The device has a Amlogic s905x3 soc with 2gb Ram and 16gb memory. 1 usb 2.0 and 1 usb 3.0 otg, micro sd slot and many other component. wifi and bluetooth board and it's PoE. I know that S905X3 isn't supported very much but i've seen some posts from users succeding, so why don't try to let armbian run? Tested with this img: Armbian_24.2.0_amlogic_s905x3_jammy_5.15.141_server_2023.12.07.img.gz tried different dtb but nothing starts, i do believe the bootloader is locked and i can't find the old aml_autoscript.zip file to flash. it has the recovery button behind the AV and it works to boot on recovery only, and with TWRP i did a full backup of the system. Tried with terminal to "reboot update" but it stuck on boot logo. here some few details, if somebody is interested on giving me an hand i can disclose more details about the device. [ 4.808428] ro.boot.oem.key1=ATV00104319 [ 4.808436] ro.boot.build.expect.baseband=N/A [ 4.808442] ro.boot.selinux=permissive [ 4.808448] ro.boot.dtbo_idx=0 [ 4.808454] ro.boot.firstboot=0 [ 4.808463] ro.hdmi.set_menu_language=true [ 4.808470] ro.wifi.channels= [ 4.808477] ro.allow.mock.location=0 [ 4.808483] ro.build.expect.bootloader=01.01.180822.145544 [ 4.808895] ro.boot.hardware=amlogic [ 4.808905] ro.boot.bootloader=U-Boot [ 4.809083] ro.product.cpu.abi=armeabi-v7a [ 4.809089] ro.product.cpu.abilist=armeabi-v7a,armeabi [ 4.809139] ro.hardware=amlogic [ 4.809168] ro.bootloader=U-Boot [ 4.809730] ro.board.platform=franklin [ 4.810076] pm.dexopt.boot=verify [ 4.810085] pm.dexopt.ab-ota=speed-profile [ 4.810095] pm.dexopt.install=speed-profile [ 4.810101] pm.dexopt.bg-dexopt=speed-profile [ 4.810108] pm.dexopt.first-boot=quicken [ 4.810218] ro.adb.secure=0 [ 4.810231] ro.secure=1 [ 4.810300] sys.usb.config=mtp,adb [ 4.810309] sys.usb.configfs=1 [ 4.810495] sys.usb.ffs.ready=1 [ 4.811106] log.tag.stats_log=I ro.vendor.app.optimization=true [ 4.813516] ro.vendor.vndk.version=26.1.0 [ 4.813527] ro.vendor.product.cpu.abilist=armeabi-v7a,armeabi [ 4.813535] ro.vendor.product.cpu.abilist32=armeabi-v7a,armeabi [ 4.813542] ro.vendor.product.cpu.abilist64= Thanks

-
see http://www.cnx-software.com/2017/04/28/24-sunvell-r69-android-4-4-tv-box-is-powered-by-allwinner-h2-processor/ This device boots from uSD with Ubuntu desktop – legacy kernel 5.30 for OrangePi One and RetrOrangePi-3.0.1.Orangepione.img. It didn't boot after initial setting and reboot command/automatic reboot (I don't know why yet, but it should boot and resize fs). It looks it somehow breaks filesystem on uSD card (and I don't have different uSD card to test it). Ethernet works out of box. Some guy in Facebook group RetrOrangePi confirmed RetrOrangePi for OrangePi One works.
-
The guide was created in response to the outdated or non-functional nature of much of the software provided by armbian-config->Software->Softy, particularly for TV boxes. It is tailored for advanced users who are adept at using commands, prefer manual installation, and favor the convenience of copying and pasting commands rather than searching for them on the armbian forum. While detailed explanations of each command's function won't be provided, I will include source links for each section, enabling you to conduct your own research. In this guide, I am using the latest ubuntu-based Armbian build: Armbian_23.11.1_Aml-s9xx-box_jammy_current_6.1.63_xfce_desktop.img.xz. Table of Contents check dtb burn Armbian to SD card configure boot partition install Armbian on SD card flashing install-aml.sh script Amlogic USB Burning Tool Amlogic Burn Card Maker Tool SHORT PIN method Team Win Recovery Project software install docker install openWRT install pi-hole install portainer install RPi monitor install xfce install midori browser install full armbian firmware install USB LTE dongle backup SD card armbian commands android stock firmware check dtb Install Device Info HW and open the app In the "SYSTEM" tab, you can find the "dtb" information for your box. This information is crucial for configuring the boot partition correctly. Please keep a note of your "dtb" (device tree blob) information for future boot partition configuration. burn Armbian to SD card Mare sure to use good, reliable and fast SD card from SandDisk, class 10, A1 Choose between ubuntu (jammy) and debian (bookworm) and download .xz file compressed image from the official Armbian archive. For advanced linux users who want a clean server (not even includes armbian-config), the "minimal" variant is recommended. Download burning tool balenaEtcher or USBImager and burn the compressed image to your SD card. https://docs.armbian.com/User-Guide_Getting-Started/ configure boot partition Open extlinux/extlinux.conf and uncomment the correct dtb for your box. If you make a mistake here, you will fail to boot. Make sure only one line is uncommented (check your dtb, for s912 SoC its q200 or q201). Go back to armbi_boot partition, copy the correct u-boot file according to your SoC and rename it to u-boot.ext. If you dont know your SoC, boot into Android, install/open Device Info HW app and go to SOC tab. The app may need root access to read device specs. install Armbian on SD card To boot the system for the first time you have to use one from the following - sometimes only one way of doing this works! If your box is installed with libreElec/coreElec, then you can't boot into Armbian, because you have to flash stock Android firmware first. Toothpick method: disconnect the power supply, insert card/drive, push reset button and connect the power while holding the button. Wait until Armbian logo appears and release the button. Terminal method: boot to Android, insert SD card with Armbian, install Terminal Emulator app (either from Google Play or APKMirror), run it and type reboot update. Your box should reboot to Armbian. Update&Backup: somewhere in the Android interface, perhaps the applications folder, you will find a program called Update OR Update&Backup, open it if you have "Update" app pre-installed, insert SD card with Armbian, select "Local" and choose ZIP file (aml_autoscript.zip) from the SD card; select "Update" and your box should reboot to Armbian. Recovery method: boot into Android, insert card/thumb drive and choose Reboot to recovery. Your box should boot into Armbian. ADB method: enable ADB (Google it) and run the following command in a terminal window: adb reboot update Menu button method (works with very few devices): disconnect the power supply, insert card/drive, push menu button on your remote control and connect the power while holding the button. Wait until Armbian boot script appears and release the button. install-aml.sh script NOTE: This will overwrite the Android ROM on the eMMC flash and attempt to install Armbian on the internal eMMC storage. Before beginning, make sure you have a backup of the stock Android ROM in the event the installation fails or you want to revert back to Android in the future. Proceed at your own risk. You can copy the working Armbian environment from SD card to eMMC using the install-aml.sh script. This file does a physical copy of whole system to eMMC. You can install Armbian to eMMC by running the shell script in the /root directory. Run the following commands in a terminal window: sudo su cd /root/ sudo ./install-aml.sh Once the Armbian finishes copying to the eMMC, shutdown Armbian, unplug power from the box, remove the SD card from the box, power the box back on to boot from the eMMC storage, if everything worked as expected, Armbian should boot from the internal eMMC storage and no longer require the SD/microSD card. Amlogic USB Burning Tool If you have a box with an Amlogic processor and need to update its firmware, install a custom ROM, or unbrick the box, the Amlogic USB Burning Tool is the recommended solution. It provides an easy-to-use interface for flashing firmware onto Amlogic-based devices. To use the Amlogic USB Burning Tool, follow these steps: Download the Amlogic USB tool zip file and extract it to the PC. In the folder, you have the InstallDriver.exe. This will install the required drivers for Amlogic TV boxes. Download the firmware file compatible with your box. Launch the Amlogic USB Burning Tool, change language and click “File” > “Import Image” to load the firmware file. Connect your box to your PC using a USB cable, ensuring the box is in recovery mode (toothpick method) or bootloader mode. The tool should detect your box, and you can click the “Start” button to begin the flashing process. Wait for the process to complete, and your box will reboot with the new firmware installed. Amlogic Burn Card Maker Tool With this method you can recover the device from a brick if you have no way to connect it to a PC. In this tutorial, we will guide you on using the burn card maker tool to create a bootable SD card for reinstalling Android Stock Firmware (ROM) on your box. You just need the correct firmware (ROM) for your specific box. Download Burn_Card_Maker v2.0.2 (3.96 MB). Extract the archive and run Burn_Card_Maker.exe file to run the tool. Click on upper left chinese menu and choose second option, check ‘English Version’ and restart the application. Choose disk then ‘Choose your image files’ to open image and select your specific .img firmware for your box. Press ‘Make’ button and wait to finish. Now insert the micro SD card in your box and power on while holding the reset AV button. You will be able to enter into recovery and the firmware will be flashed automatically. When the TV BOX reboots, remove the micro SD Card, this step is very important, wait 4-5 minutes and the update will completed. If your device fails to boot, your last option is to use the SHORT PIN method. SHORT PIN method Follow the steps outlined in the guide Amlogic Burn Card Maker Tool. If pressing the AV reset button doesn't work, it is likely that your device is unresponsive or "dead". In this case, you can try shorting out the PINS. Please note that at this point, you have little to lose in terms of further damage to the device. The SHORT PIN method can be used when other recovery methods and the Amlogic USB Burning Tool are not responsive. Please note that this method should only be attempted by those who fully understand the risks involved in handling electronics and take full responsibility for any potential issues that may arise. Dismantle: to proceed with the SHORT PIN method, you will need to dismantle your device. Remove the rubber placeholders on the back of the device to reveal screws. Unscrew these screws and carefully separate the device. Be cautious when removing the top part of the device, as the WIFI antenna is usually attached to it. Removing it too quickly may cause damage to the WIFI cable. NAND flash: locate the NAND flash chip, which is where the operating system is stored. Look closely at the PINS on the chip, as they are quite small. Identify two pins that are next to each other, and using a screwdriver, short them out by making them touch each other. Recovery menu: ensure that your SD card is inserted with the firmware image using the Burn Card Maker tool. Have your power supply and HDMI cable ready to be inserted. Now, slowly try different combinations of the PINS while applying power to the device. Eventually, you will find a combination that initiates the hardware and communicates with the SD card. This will initiate the boot sequence, and you should see a recovery menu on the screen. From there, the installation of Android will begin. Essentially, shorting out these two PINS is similar to holding the AV reset button. Again: Before applying power, hold down the two PINS and then apply power. Repeat this process until you see results or something on the screen. Sometimes, the screen may flash green or red, indicating that you have found the correct PINS but have the wrong firmware. In this case, return to your PC and find a different firmware image specific to your SoC. If you are unable to find the original stock ROM for your box, it is possible that your box is a clone of another well-known box. In this case, find the firmware for the box that is most closely related to yours. You need to make your box boot once into recovery/update mode to reinstall firmware from SD card. The SHORT PIN method modifies normal boot procedure to make your box look for kernel and dtb on SD card before booting from internal memory. https://inv.vern.cc/watch?v=CUfKNNgxb9E Team Win Recovery Project TWRP, short for Team Win Recovery Project, is a community-driven project that provides a custom recovery solution for Android devices. It supports backups, restoration, and custom ROM installation. https://twrp.me/Devices/ install docker ubuntu Add the GPG key: curl -fsSL https://download.docker.com/linux/ubuntu/gpg | sudo apt-key add - Add repository to APT sources: sudo add-apt-repository "deb [arch=$(dpkg --print-architecture)] https://download.docker.com/linux/ubuntu $(lsb_release -cs) stable" apt-get update Install Docker: apt-get install docker-ce docker-ce-cli containerd.io Test the installation: docker --version Install Docker Compose: sudo curl -L "https://github.com/ubiquiti/docker-compose-aarch64/releases/download/1.22.0/docker-compose-Linux-aarch64" -o /usr/local/bin/docker-compose<br> sudo chmod +x /usr/local/bin/docker-compose Test Docker Compose installation: docker-compose --version debian apt-get remove docker docker-engine docker.io containerd runc apt-get install ca-certificates curl gnupg lsb-release mkdir -p /etc/apt/keyrings curl -fsSL https://download.docker.com/linux/debian/gpg | sudo gpg --dearmor -o /etc/apt/keyrings/docker.gpg echo "deb [arch=$(dpkg --print-architecture) signed-by=/etc/apt/keyrings/docker.gpg] https://download.docker.com/linux/debian $(lsb_release -cs) stable" | sudo tee /etc/apt/sources.list.d/docker.list > /dev/null apt update apt-get install docker-ce docker-ce-cli containerd.io docker-compose-plugin If you would like to use Docker as a non-root user, you should now consider adding your user to the docker group with something like: sudo usermod -aG docker $USER https://docs.armbian.com/User-Guide_Advanced-Features/#how-to-run-docker install openWRT On the host system, the full armbian firmware should be installed so you can use it on AP mode: wget https://imola.armbian.com/apt/pool/main/a/armbian-firmware-full/armbian-firmware-full_21.08.6_all.deb sudo dpkg -i armbian-firmware-full_21.08.6_all.deb Make sure your USB WIFI adapter supports AP mode: iw list Set country regulations, for example, to Spain set: iw reg set ES Make sure you are not runing wpa_supplicant on your host machine or docker container will tell messages like wlan0: Could not connect to kernel driver. sudo systemctl stop wpa_supplicant sudo systemctl disable wpa_supplicant Install dependencies: sudo apt install iw iproute2 gettext dhcpcd5 Initial configuration is performed using a config file, openwrt.conf. You can use the included openwrt.conf.example as a baseline, which explains the values. At the very least you’ll need to change the values of LAN_PARENT and WIFI_IFACE. Commands to download the repo and configure openwrt.conf git clone https://github.com/oofnikj/docker-openwrt.git cd docker-openwrt cp openwrt.conf.example openwrt.conf nano openwrt.conf Build the image: make build Create the openwrt container: make run If you arrive at * Ready, point your browser to LAN_DOMAIN and you should be presented with the login page. The default login is root with the password set as ROOT_PW. Any settings you configured or additional packages you installed will persist until you run: make clean This will delete the container and all associated Docker networks so you can start fresh if you screw something up. Installing will create and enable a service pointing to wherever you cloned this directory and execute run.sh on boot. make install https://forum.openwrt.org/t/running-openwrt-in-a-docker-container/56049 https://badgateway.qc.to/contain-your-router/ https://github.com/oofnikj/docker-openwrt install pi-hole Start by creating a directory where you will store the configuration file for the Pi-Hole docker container: mkdir pihole cd pihole nano docker-compose.yml Enter the following lines: services: pihole: container_name: pihole image: pihole/pihole:latest ports: - "53:53/tcp" - "53:53/udp" - "67:67/udp" - "80:80/tcp" environment: TZ: 'Europe/Berlin' WEBPASSWORD: '1234' networks: internal: ipv4_address: 192.168.16.10 # Assign a static IP within your router's subnet volumes: - './etc-pihole:/etc/pihole' - './etc-dnsmasq.d:/etc/dnsmasq.d' cap_add: - NET_ADMIN restart: unless-stopped networks: openwrt-lan: ipv4_address: 192.168.16.10 # Assign a static IP within your LAN subnet networks: openwrt-lan: If you are using ubuntu to run the pi-hole docker container, you may need to disable the systemd-resolve service: systemctl disable systemd-resolved.service systemctl stop systemd-resolved Then, you can bring your pi-hole up: docker-compose up -d As we managed our own router firmware using OpenWrt, you need to tell your router to send pi-hole IP as DNS server to client. Go to Interfaces -> Lan -> DHCP Server -> Advanced Settings, inside DHCP-Options enter value: 6,192.168.16.10. Apply changes and restart the LAN interface. https://pimylifeup.com/pi-hole-docker/ https://firebog.net/ https://arstech.net/pi-hole-blocking-lists-2023/ https://avoidthehack.com/best-pihole-blocklists install portainer docker volume create portainer_data docker run -d -p 8000:8000 -p 9000:9000 --name=portainer --restart=always -v /var/run/docker.sock:/var/run/docker.sock -v portainer_data:/data --network=openwrt-lan portainer/portainer-ce install xfce sudo apt-get -y install xorg lightdm xfce4 tango-icon-theme gnome-icon-theme dbus-x11 sudo startxfce4 To disable the desktop environment and return to tty1 after installing xfce on Armbian, you can follow these steps: Press Ctrl + Alt + F1 to switch to tty1. Log in with your username and password. Stop the display manager service by running the following command: sudo service lightdm stop This will stop the graphical interface and return you to the command line interface. To prevent the display manager from starting automatically on boot, run the following command: sudo systemctl disable lightdm install midori browser sudo apt install midori install RPi monitor The RPi monitor on port 8888 can also be installed for AMLOGIC boxes with the following command: sudo armbianmonitor -r install full armbian firmware By default, the Armbian builds only include a limited set of firmwares out of the box. To address certain driver issues, you may need to install the complete Armbian firmware. There are two ways to do this: either through armbian-config -> software -> Full, or by manually installing the firmware via a USB device if you don't have internet connectivity on your box. To manually install the firmware, download it from the following link: https://imola.armbian.com/apt/pool/main/a/armbian-firmware-full/. Once downloaded, copy the firmware to your USB device. Then, insert the USB device into the Armbian box and navigate to your home folder. cd ~ Check device identifier of your USB device: lsblk Mount USB device at ./usbstick and install the package: mkdir usbstick sudo mount /dev/sdX1 ./usbstick cd usbstick dpkg --install armbian-firmware-full_*.deb Replace sdX1 with your device identifier. install USB LTE dongle Armbian has a default setting that treats USB LTE Dongles as mass storage devices. However, in order for the dongle to be recognized as an Ethernet device, it needs to be switched from mass storage mode to network mode. To achieve this, we will need to install and configure usb-modeswitch. sudo nano /etc/usb_modeswitch.conf Paste the following: # Huawei E353 (3.se) and others TargetVendor=0x12d1 TargetProductList="14db,14dc" HuaweiNewMode=1 NoDriverLoading=1 Install usb-modeswitch: sudo apt-get update sudo apt-get install usb-modeswitch Switch dongle to network mode: sudo usb_modeswitch -v 12d1 -p 1f01 -c /etc/usb_modeswitch.conf You can now check if mass storage is removed: lsusb https://askubuntu.com/questions/757638/can-not-connect-huawei-e3372-modem-on-ubuntu-15-10-please-help https://installati.one/install-usb-modeswitch-ubuntu-20-04/ armbian commands Configure system, network, timezone, language, hostname, keyboard, etc: armbian-config Check temperature of SoC: armbianmonitor -m Get boot logs for inspection and automatically upload it to an online pasteboard service: armbianmonitor -u backup SD card Identify the SD Card: First, you need to identify the device name of your SD card. You can use the lsblk or fdisk -l command to list all storage devices and identify the SD card. Backup with dd: Use the dd command to create a raw image of the SD card. Here's an example command: sudo dd if=/dev/sdX of=/path/to/backup.img bs=4M status=progress Replace /dev/sdX with the actual device name of your SD card and /path/to/backup.img with the desired backup location and filename. Restoring from Backup: To restore the backup to a new SD card, you can use either balenaEtcher or a similar command in reverse: sudo dd if=/path/to/backup.img of=/dev/sdX bs=4M status=progress android stock firmware x96 Tanix Ugoos Vontar Mecool
-
Hello community, I bought this TV box which happens to have fake specs, it seems it's really only 1GB RAM and 8GB of storage and comes with Android 7 instead of 12, however it has 2 USB ports and SD card reader, so I guess it could be flashed and repurposed for retro gaming or something like that. I think the SoC is Allwinner H3 (sun8iw7p1). It would be very much appreciated if someone could help me with these questions: 1) Where can I download or backup the stock firmware, yes the one with the fake specs? 2) Could it be flashed with some light version of Android TV or Google TV? 3) Can the memory be upgraded to 2 GB by replacing the RAM chips? Best regards
-
Hello, I would be grateful for some assistance on a sound issue. I installed Armbian_20.10_Arm-64_bullseye_current_5.9.0_desktop.img.xz on a YUNDOO Y6 TV Box with S905X. It worked fine, but I believe that there is no support for Armbian 20 anymore. Useful info, the sound was OK and the audio card was identified as GXL-S905X-P212. Then, I tried various versions of Armbian_23.11.1_Aml-s9xx-box_bookworm_current_6.1.63 and Armbian_23.11.1_Aml-s9xx-box_jammy_current_6.1.63. Most of them do work, but none detects the sound card. Now I am playing with Armbian_23.11.1_Aml-s9xx-box_bookworm_current_6.1.63_xfce_desktop.img, which actually has meson-gxl-s905x-p212.dtb in boot/dtb/amlogic. Yet, it cannot see the soundcard. No matter how I try, GXL-S905X-P212 is never shown as a connected device. I would appreciate any suggestion. However, please keep in mind that I am hardly an expert in Linux and have never tried Debian (only some variations of Ubuntu, and even that at beginner’s level).
-
I found a .dts file for my TV set-top box on an amlogic processor, and I want to compile this file for Armbian, please tell me how to do this, my TV box is K1 plus. https://github.com/CoreELEC/device-trees-amlogic/tree/master
-
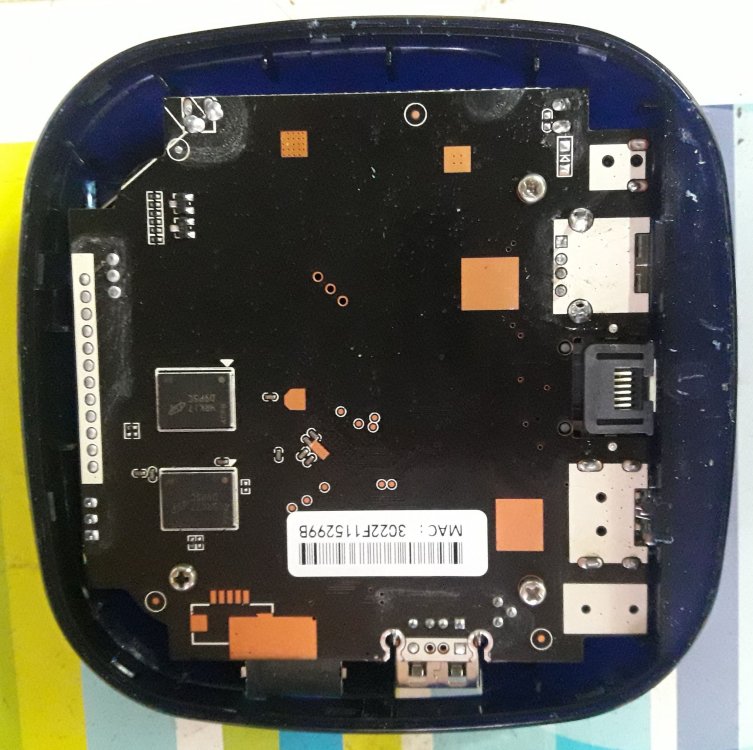
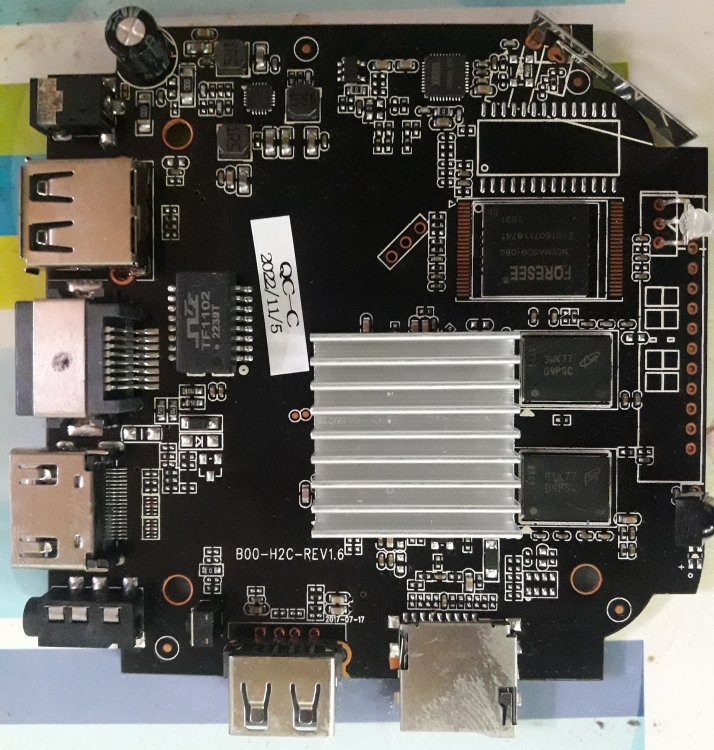
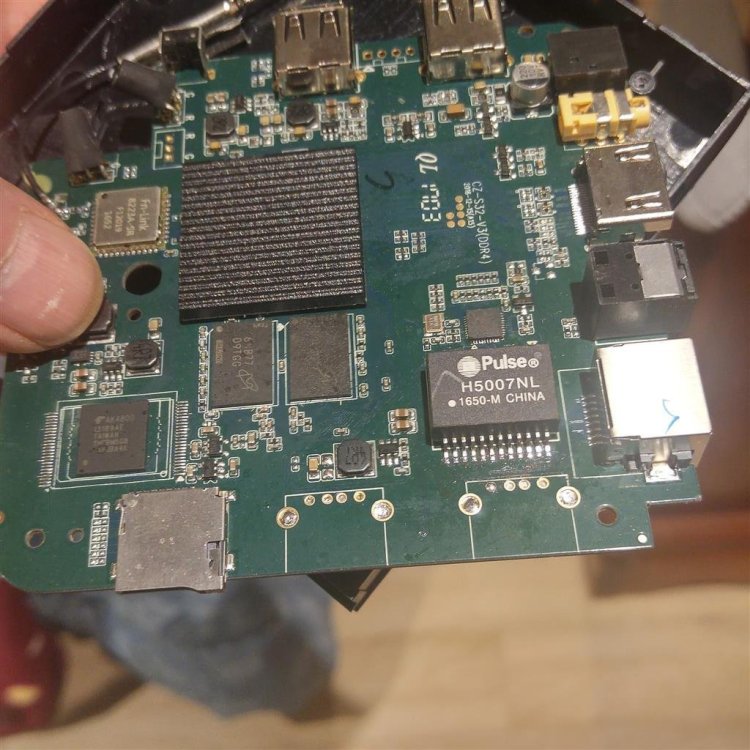
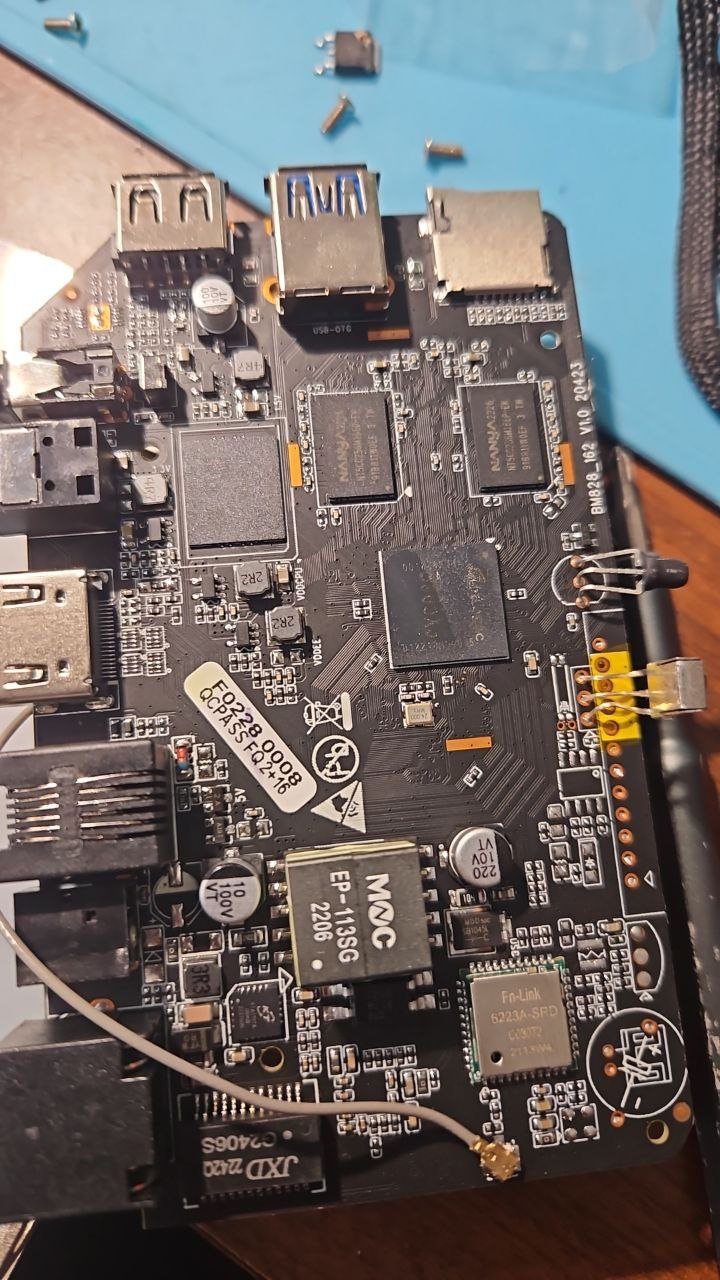
 Hello everyone, I recently acquired a Tigre 2 TV Box with the following hardware specifications: Amlogic S905X processor, 2GB of RAM, and 16GB NAND storage (SkHynix). I attempted to install the Armbian operating system, and the installation process started from a USB drive. Unfortunately, after the installation, the device seems to be bricked as it doesn't boot up (led red). I've read that it might be possible to recover a bricked device by putting it into MaskROM mode through a process involving a short circuit. However, I'm not entirely sure how to do this, and I'm hoping someone here can provide guidance or steps on how to put my Tigre 2 TV Box into MaskROM mode. Any help or advice would be greatly appreciated. Thank you in advance!
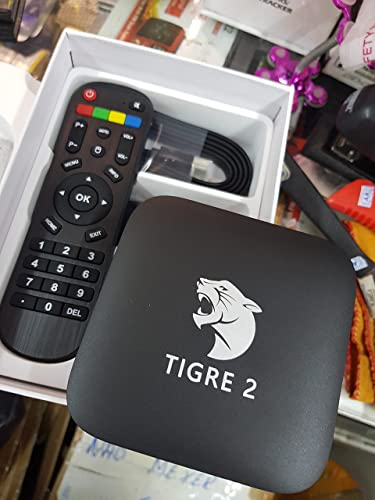
.thumb.jpeg.2f691d44cc27b513c3453ae5abe49e8d.jpeg)
.thumb.jpeg.dbde2f701424b65b02a35c19e21b8ed4.jpeg)
-
Hello everyone, I have a Tigre 2 TV BOX with Amlogic S905X, 1GB DDR3, and 16GB NAND storage. I'm interested in installing Armbian on this device, but there doesn't seem to be native support for the latest Armbian versions for NAND storage. I'm wondering if there is any way to install Armbian on this box, and if so, where I can find an Armbian version with a graphical interface and a Legacy Kernel 3.4.x that is compatible with Amlogic processors. I appreciate any help in this regard. Thank you in advance.
-
 Hw Spec Soc: Amlogic S912-H, (S192 with dolby, DTS) Mem: 2G Ddr3 Emmc: 16G 4K HDMi AV out ethernet ?? Wifi/Bt ?? USB port *1 5V DC-IN IR receiver Reset hole OS: Ali YunOS Steps 1, connect UART from mainboard test points, (I can only find M17's UART port) 2, build u-boot follow q200.rst in u-boot doc, use VIM2 config and use VIM2 fip blobs (hope that works) 3, build Arm64 debian bookworm with default debian kernel to USB driver, and config system. 4, falsh u-boot to USB driver 5, connect to device with UART, hope to stop at u-boot cmdline, and erase emmc. if failed, find other way to erase, maybe Amlogic flash tool. 6, instert USB driver, and reboot device potaintial issues: can't find UART port on mainboard VIM2 mainline Uboot can't boot M16S device does not support boot from USB. No schematics for next step dev.
-
From an article at: https://torrentfreak.com/brazil-regulator-claims-80-of-pirate-tv-boxes-were-blocked-last-week-231030/ "Brazil's telecoms regulator Anatel claims that during an operation last week, it successfully blocked around 80% of pirate 'TV boxes' in the country. Estimates from early 2023 suggest that seven million were active in Brazil." Maybe they could be re-purposed to run Armbian /s What's your take on this?
-
Recently I've installed armbian on my 905 TV box using this article as a guide: https://i12bretro.github.io/tutorials/0269.html After some experiments with dtb files and tuning everything seems to work fine except of one thing: the box can't be turned off, it boots immediately after shutting down. I've found a similar problem described in several articles, for example: https://gist.github.com/george-hawkins/a897a6fe116093a4c1f29ad19df088de It is suggested to enable XHCI HCD quirks in grub. But there is not such file in the system I've installed, the closest thing I found was config-5.9.0-arm-64 file. What is the right way to modify it to add XHCI HCD quirks? Or maybe the suggested method doesn't suite for my system? Sorry if my question is dumb, I'm a total noob with Linux.
-
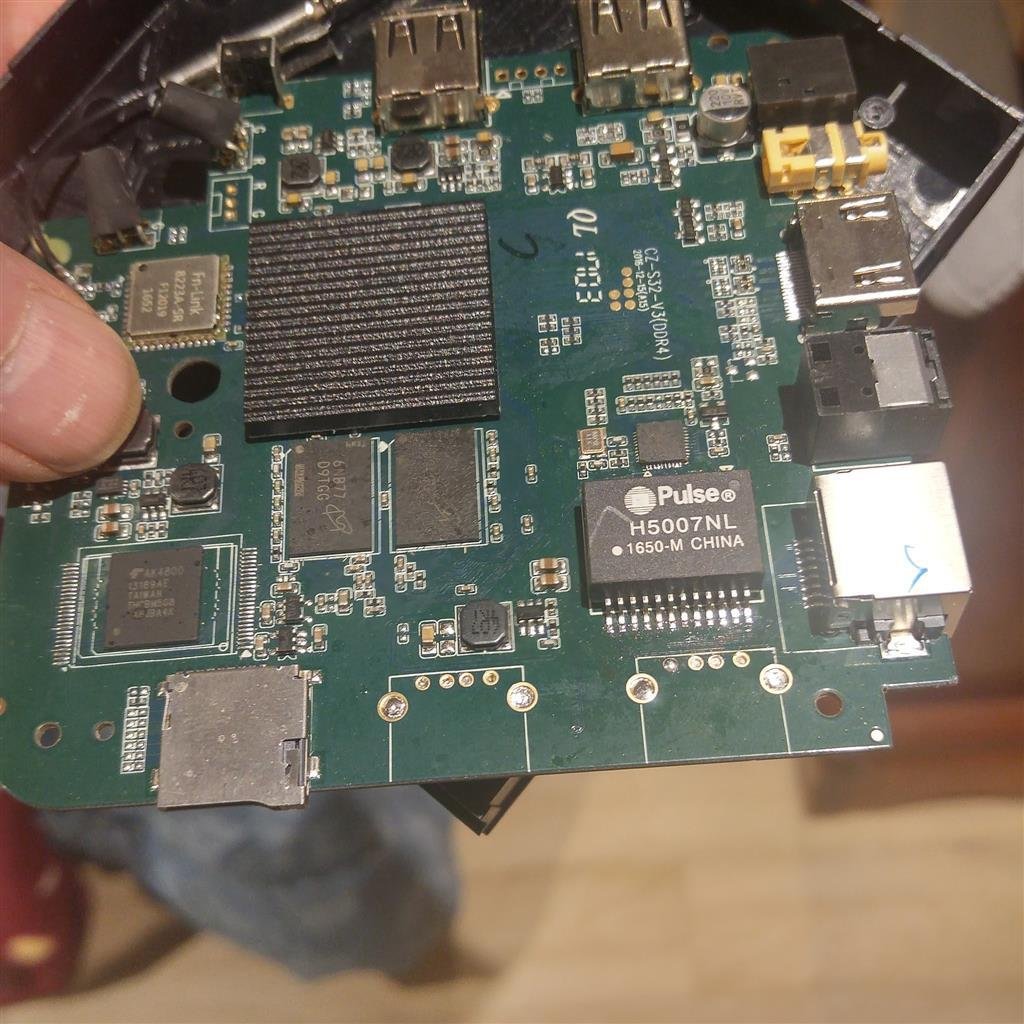
H96 Pro Plus android TV box stuck at 2%, Tried to re install many, but stuck on 2%, any clue from fellows.,.,regards H96 Pro Plus CZ-S32-V3 (DDR4) 2016-12-15(A15)
-
 I tried to write different images from the h6 family, for example: Arabian_23.11.0_allwinner_tanix-tx6_bullseye_5.136_server_2023.10.20.img to my SD and USB drive, however, this does not work. If you install the SD card and turn it on, then the red LED lights up on the device and that's it. The device simply ignores the USB flash drive and loads android. What could be the problem?


.jpeg.89c533b1c7fdec0292b55068166207e7.jpeg)
.jpeg.c8a08981ef5fc92948df253814067c19.jpeg)