Dantes
Members-
Posts
103 -
Joined
-
Last visited
Content Type
Forums
Store
Crowdfunding
Applications
Events
Raffles
Community Map
Everything posted by Dantes
-
I think that Firefox is still using the 3D-accelerated ffmpeg+libavcodec , so the only solution I see now is to remove the 3D acceleration and reinstall ffmpeg+libavcodec. (and it works but the tradeoff is no 3DA/HWA) So there is no easy switching
-
What I did not understand was that after installing the 'hardware acceleration' it replaces ffmpeg and a bunch of libraries. All these dependencies need to be removed and that does not go as smooth as it should, but I finally found out how to do it: sudo apt purge --yes mali-g610-firmware rockchip-multimedia-config sudo apt autoremove --yes sudo apt dist-upgrade --yes sudo add-apt-repository --yes --remove ppa:liujianfeng1994/panfork-mesa sudo add-apt-repository --yes --remove ppa:liujianfeng1994/rockchip-multimedia sudo apt update --yes sudo apt purge ffmpeg libavcodec-extra sudo apt install --fix-broken sudo apt autoremove sudo apt install ffmpeg libavcodec-extra Maybe someone smarter can optimize it, but hey I can play YouTube video's again
-
I ran into this problem again today which I thought to be solved, but it seems to be related to the hardware acceleration. Afaict HWA does not play nice with Firefox/YouTube even if it is disabled. So I decided to boot into an sdcard WITHOUT hardware acceleration and YouTube videos play just fine in Firefox Then booted into an sdcard WITH hardware acceleration and disabled HWA in Firefox but YouTube videos are not working anymore Settings I changed: * settings > general > performance unchecked "Use recommended performance settings" unchecked "Use hardware acceleration when available" * about:config media.hardware-video-decoding.enabled false media.hardware-video-decoding.force-enabled false at this point I do not know if its me or driver related.
-
Thank you for the long answer, I really appreciate it. FYI: When I use the Armbian JammyMinimal CLI the USB 3.0 port is not working: /: Bus 04.Port 1: Dev 1, Class=root_hub, Driver=xhci-hcd/1p, 5000M /: Bus 03.Port 1: Dev 1, Class=root_hub, Driver=xhci-hcd/1p, 480M /: Bus 02.Port 1: Dev 1, Class=root_hub, Driver=ohci-platform/1p, 12M /: Bus 01.Port 1: Dev 1, Class=root_hub, Driver=ehci-platform/1p, 480M When I use the Armbian JammyCLI the USB 3.0 port works just fine: /: Bus 04.Port 1: Dev 1, Class=root_hub, Driver=xhci-hcd/1p, 5000M |__ Port 1: Dev 2, If 0, Class=Mass Storage, Driver=uas, 5000M /: Bus 03.Port 1: Dev 1, Class=root_hub, Driver=xhci-hcd/1p, 480M /: Bus 02.Port 1: Dev 1, Class=root_hub, Driver=ohci-platform/1p, 12M /: Bus 01.Port 1: Dev 1, Class=root_hub, Driver=ehci-platform/1p, 480M First I thought I was maybe missing a package, but I think the USB drivers are in the kernel ? If anyone has a solution, I'm all ears
-
found serial in: /proc/cpuinfo /proc/device-tree/serial-number /sys/firmware/devicetree/base/serial-number https://community.toradex.com/t/cpu-serial-in-proc-cpuinfo-on-imx7/6390 The serial number available in cpuinfo is set by U-Boot from the data available in config block. https://elixir.free-electrons.com/linux/v6.4-rc7/source/arch/arm/kernel/setup.c function that passes serial number to kernel some more info i could find: https://forums.raspberrypi.com/viewtopic.php?t=183474
-
I found out that OpenWRT does not have this (at least the mj82 build), so I asked there if we could be enlightened: https://forum.openwrt.org/t/nanopi-r6s-linux-6-3-arm-soc-updates/153072/28
-
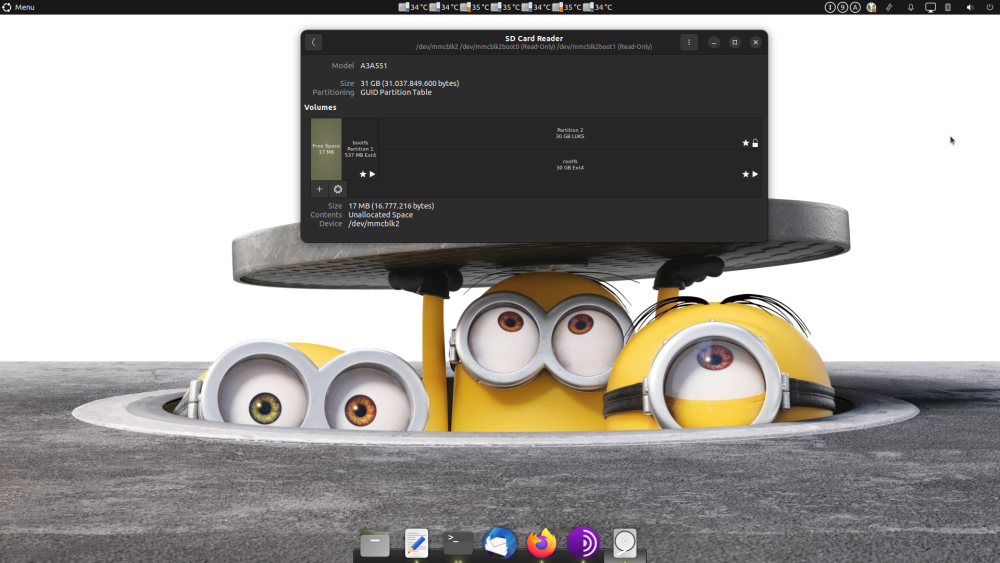
Disclaimer: For people reading this thread: this is what I did, unless you know exactly what you are doing, don't try this. I extracted the bootloader from the Armbian Image and hurled it through binwalk and then packed it to get some indication of its entropy: # xzcat Armbian_23.5.1_Nanopi-r6s_jammy_legacy_5.10.160_minimal.img.xz | head -c $((16*1024*1024)) > bootloader # ls -l bootloader -rw-rw-r-- 1 test test 16777216 Jun 14 bootloader # binwalk bootloader DECIMAL HEXADECIMAL DESCRIPTION -------------------------------------------------------------------------------- 244504 0x3BB18 CRC32 polynomial table, little endian 320368 0x4E370 Flattened device tree, size: 5186 bytes, version: 17 8388608 0x800000 Flattened device tree, size: 2255 bytes, version: 17 9186092 0x8C2B2C CRC32 polynomial table, little endian 9248112 0x8D1D70 Android bootimg, kernel size: 1919249152 bytes, kernel addr: 0x5F6C656E, ramdisk size: 1919181921 bytes, ramdisk addr: 0x5700635F, product name: "" 9799680 0x958800 Flattened device tree, size: 9761 bytes, version: 17 # gzip -k bootloader # ls -l bootloader.gz -rw-rw-r-- 1 test test 737185 Jun 14 bootloader.gz # Then did the same for the OpenwRT Image: # zcat openwrt-rockchip-armv8-friendlyelec_nanopi-r6c-squashfs-sysupgrade.img.gz | head -c$((16*1024*1024)) > openwrt_bootloader # ls -l openwrt_bootloader -rw-rw-r-- 1 test test 16777216 Jun 14 openwrt_bootloader # binwalk openwrt_bootloader DECIMAL HEXADECIMAL DESCRIPTION -------------------------------------------------------------------------------- 199408 0x30AF0 Flattened device tree, size: 4419 bytes, version: 17 8388608 0x800000 Flattened device tree, size: 22528 bytes, version: 17 9421824 0x8FC400 Flattened device tree, size: 47104 bytes, version: 17 # gzip -k openwrt_bootloader # ls -l openwrt_bootloader.gz -rw-rw-r-- 1 test test 572342 Jun 14 openwrt_bootloader.gz # The armbian bootloader seems to have a false positive or some old garbage afaict in this particular image, which is common in a WIP. Then installed the bootloader: # sgdisk --backup=partition-table.original /dev/mmcblk2 # dd if=openwrt_bootloader bs=16M count=1 of=/dev/mmcblk2 1+0 records in 1+0 records out 16777216 bytes (17 MB, 16 MiB) copied, 0,0489076 s, 343 MB/s # sgdisk --load-backup=partition-table.original /dev/mmcblk2 Warning: The kernel is still using the old partition table. The new table will be used at the next reboot or after you run partprobe(8) or kpartx(8) The operation has completed successfully. # reboot Now running u-boot 2023.04
-
I've been following this thread: https://forum.openwrt.org/t/nanopi-r6s-linux-6-3-arm-soc-updates/153072/14 downloaded the latest version. Decided to do some experimenting and found out that they use u-boot 2023.04. And after some experimenting I found out that it works with Armbian when I flash it to the internal storage. U-Boot 2017.09-armbian (Apr 25 2023 - 04:20:41 +0000) U-Boot SPL 2023.04-OpenWrt-r0-e283eb2 (Jun 12 2023 - 00:36:27 +0000) Whats the reason the armbian u-boot is so far behind ? (i know its WIP, just asking)
-

Install MATE desktop to Minimal Image (blues)
Dantes replied to Walter Zambotti's topic in Beginners
I had some trouble with Mate on a NanoPI r6c, so I wrote this script to get a proper Mate desktop. -
Now I'm no expert but I got Mate working maybe there are some shortcuts I did not take, but it works great. So feel free to point out any flaws or improve it, #!/bin/sh -vx packages=' cryptsetup libblockdev-crypto2 engrampa firefox ffmpeg libavcodec-extra gufw lightdm lightdm-settings slick-greeter ubuntu-mate-wallpapers-common mate-desktop-environment-extras mate-applet-brisk-menu mate-applets mate-calc mate-indicator-applet ayatana-indicator-application ayatana-indicator-bluetooth ayatana-indicator-common ayatana-indicator-display ayatana-indicator-keyboard ayatana-indicator-messages ayatana-indicator-notifications ayatana-indicator-power ayatana-indicator-printers ayatana-indicator-session ayatana-indicator-sound mate-media mate-menu mate-power-manager mate-sensors-applet mate-session-manager mate-settings-daemon mate-screensaver mate-tweak mate-utils eom mpv plank pluma network-manager-gnome software-properties-gtk libcanberra-gtk-module libcanberra-gtk3-module ubuntu-advantage-tools gnome-software gnome-system-tools update-manager xorg ' apt update -y apt upgrade -y apt install -y $packages ##### fix 'Software' desktop file so it shows up in the 'Control Center' sed -i \ 's,^Categories=.*,Categories=System;Settings,g' \ /usr/share/applications/org.gnome.Software.desktop ##### no default wallpaper, set a mate wallpaper to the login screen cat << EOF > /etc/lightdm/slick-greeter.conf [Greeter] background=/usr/share/backgrounds/ubuntu-mate-common/Grey-Jazz.jpg EOF #sudo apt remove zsh openssh-server openssh-sftp-server avahi-autoipd evolution-data-server* #echo net.ipv6.conf.all.disable_ipv6=1 #net.ipv6.conf.default.disable_ipv6=1 #net.ipv6.conf.lo.disable_ipv6=1 #' |sudo tee -a /etc/sysctl.conf mate-install
-
This was fun but its still a bit flaky/unstable now and then but overall it seems to work. What is it: KODI multimedia player standalone installation script. Features: Boots directly into KODI with KODI standalone service Enabled Hardware decoding by liujianfeng1994 Encrypted rootfs partition with auto-decrypt on boot Encryption key is randomly generated during installation and inserted into initramfs/crypttab Tested with EXT4 only Installed on Minimal CLI Ubuntu/Jammy installation How to: Download Ubuntu-Jammy-Minimal CLI Copy 'kodi-minimal-cli' to sdcard /root chmod +x /root/kodi-minimal-cli boot from sdcard fill out Armbian questionnaire run ./kodi-minimal-cli install to emmc and choose EXIT after fill out wifi details in network manager if you need it reboot #!/bin/sh -vxe # GPLv3 just in case anyone cares # 0. boot from sdcard (ubuntu/jammy) minimal cli # 1. remove Ubuntu Telemetry/Spyware if any cd /tmp apt \ update \ --yes apt \ purge\ --yes \ ubuntu-report \ popularity-contest \ apport \ whoopsie \ apport-symptoms apt-mark \ hold \ ubuntu-report \ popularity-contest \ apport \ whoopsie \ apport-symptoms cat << 'EOF' >> /etc/hosts 127.0.0.1 popcon.ubuntu.com 127.0.0.1 metrics.ubuntu.com EOF # format /dev/mmcblk2p1 ext4 bootfs format(){ case $2 in ext4) mkfs.ext4 -F -L rootfs $1;; btrfs) mkfs.btrfs -f -L rootfs $1;; f2fs) mkfs.f2fs -f -l rootfs $1;; *) false;; esac } #WORKDIR=/mnt #slower running from storage WORKDIR=$(mktemp -d -p /dev/shm) #faster running from memory TARGET=/dev/mmcblk2 FSTYPE=ext4 grep -q "${TARGET}.*/boot" /proc/mounts && { echo "error: not booted from sdcard" exit 1 } # 2. update and install: apt update --yes && apt upgrade --yes apt install --yes cryptsetup-bin gdisk # 3. run armbian-install and install to emmc, when done choose: exit armbian-install || true # 4. backup data mkdir -p ${WORKDIR}/emmcdata mount ${TARGET}p1 ${WORKDIR}/emmcdata rsync \ --archive \ --info=progress2 \ ${WORKDIR}/emmcdata/ \ ${WORKDIR}/backup sync umount ${TARGET}p1 rmdir ${WORKDIR}/emmcdata # 5. create new partition layout and encrypt disk sgdisk -og ${TARGET} sgdisk -n 1:32768:+512M -t 0:8300 ${TARGET} sgdisk -n 0:0:0 -t 0:8300 ${TARGET} ############################################ #NAME SIZE RO TYPE MOUNTPOINTS #mmcblk2 28,9G 0 disk #├─mmcblk2p1 512M 0 part /boot #└─mmcblk2p2 28,4G 0 part # └─rootfs 28,4G 0 crypt /var/log.hdd # / ############################################ # format 1st/boot partition format ${TARGET}p1 ${FSTYPE} bootfs # create encryption key KEYFILE=/dev/shm/rootfs.keyfile dd if=/dev/urandom bs=$((4096/8)) count=1 of=${KEYFILE} chmod u=r,go-rwx ${KEYFILE} # encrypt 2nd/root partition cryptsetup \ luksFormat \ --batch-mode \ --cipher=aes-xts-plain64 \ --key-size=512 \ --hash=sha512 ${TARGET}p2 \ ${KEYFILE} ROOTFS=/dev/mapper/rootfs cryptsetup \ open \ --key-file=${KEYFILE} \ ${TARGET}p2 \ rootfs # format root partition format ${ROOTFS} ${FSTYPE} rootfs # 6. mount partitions ROOT=${WORKDIR}/restore mkdir -p ${ROOT} mount ${ROOTFS} ${ROOT} mkdir -p ${ROOT}/boot mount ${TARGET}p1 ${ROOT}/boot # 7. restore from backup rsync \ --archive \ --info=progress2 \ ${WORKDIR}/backup/ \ ${ROOT} sync # 8. enable network in chrooted environment cd ${ROOT} touch root/.no_rootfs_resize cp -p /etc/resolv.conf etc/resolv.conf cp -p /etc/hosts etc/hosts cp -p /etc/apt/sources.list etc/apt/sources.list cp -p /etc/apt/sources.list.d/armbian.list etc/apt/sources.list.d/armbian.list # 9. update initramfs-modules, crypttab, fstab sed -i "/^rootdev=/s,=.*,=${ROOTFS}," boot/armbianEnv.txt awk '{print $1}' /proc/modules > etc/initramfs-tools/modules cat << EOF > etc/fstab ${ROOTFS} / ${FSTYPE} defaults,noatime,nodiratime,commit=600,errors=remount-ro 0 1 UUID=$(lsblk ${TARGET}p1 --noheadings -o UUID) /boot ${FSTYPE} defaults,noatime,nodiratime,commit=600,errors=remount-ro 0 2 tmpfs /tmp tmpfs defaults,nosuid 0 0 EOF KEYDIR=${ROOT}/etc/luks mkdir -p ${KEYDIR} chmod u=rx,go-rwx ${KEYDIR} mv ${KEYFILE} ${KEYDIR} cat << EOF > ${ROOT}/etc/crypttab rootfs UUID=$(blkid -s UUID -o value ${TARGET}p2) /etc/luks/rootfs.keyfile luks,discard EOF #10. chrooted environment mount -o rbind /dev dev mount -t proc proc proc mount -t sysfs sys sys CONFIG=/dev/shm/config cat << 'EOF' > ${CONFIG} #!/bin/sh -vxe apt update --yes apt -o Dpkg::Options::="--force-confdef" --yes install cryptsetup-initramfs ### embed keyfile KEYDIR=/etc/luks KEYFILE=${KEYDIR}/rootfs.keyfile echo "KEYFILE_PATTERN=${KEYDIR}/*.keyfile" >> /etc/cryptsetup-initramfs/conf-hook echo "UMASK=0077" >> /etc/initramfs-tools/initramfs.conf update-initramfs -u ### network manager apt install --yes network-manager ufw ### kodi echo kodi >/etc/hostname hostname -F /etc/hostname PPA='https://ppa.launchpadcontent.net/liujianfeng1994/panfork-mesa/ubuntu' GPG='/etc/apt/trusted.gpg.d/liujianfeng1994_ubuntu_panfork-mesa.gpg' LIST='/etc/apt/sources.list.d/liujianfeng1994-ubuntu-panfork-mesa.list' URL='https://keyserver.ubuntu.com/pks/lookup?op=get&search=0x' KEY='0B2F0747E3BD546820A639B68065BE1FC67AABDE' curl -S "${URL}${KEY}" | gpg --batch --yes --dearmor --output "${GPG}" echo "deb ${PPA} $(lsb_release -sc) main" | tee ${LIST} apt update --yes apt install --yes mali-g610-firmware apt install --yes xserver-xorg xinit kodi unzip make useradd kodi --no-create-home --home-dir /var/lib/kodi echo "kodi:kodi" | chpasswd # cec-adapter usermod kodi -a -G dialout mkdir /etc/sysusers.d/ URL=https://codeload.github.com/graysky2/kodi-standalone-service/zip/refs/heads/master wget ${URL} -O /dev/shm/master.zip unzip /dev/shm/master.zip -d/dev/shm cd /dev/shm/kodi-standalone-service-master/ make install systemd-sysusers systemd-tmpfiles --create || true systemctl enable kodi.service # disable the local resolver and use the one provided by DHCP #systemctl disable systemd-resolved # cat << EOF >> /etc/sysctl.conf # # disable ipv6 # net.ipv6.conf.all.disable_ipv6=1 # net.ipv6.conf.default.disable_ipv6=1 # net.ipv6.conf.lo.disable_ipv6=1 # EOF # sed -i '/#ListenAddress 0.0.0.0/s,^#,,' /etc/ssh/sshd_config # network manager to setup wifi nmtui exit EOF chmod +x ${CONFIG} chroot . ${CONFIG} cd ${WORKDIR} #awk -v WD=${WORKDIR} '$0 ~ WD {print $2}' /proc/mounts | sort -r | xargs umount || true kodi-minimal-cli
-
Well I tried the following, but it did "not" work unfortunately apt install device-tree-compiler then converted the nanopi-r6c device tree from dtb to dts dtc -I dtb -O dts -o rk3588s-nanopi-r6c.dtb rk3588s-nanopi-r6c.dts Inserted a serial-number /dts-v1/; / { compatible = "friendlyelec,nanopi-r6c\0rockchip,rk3588"; interrupt-parent = <0x01>; #address-cells = <0x02>; #size-cells = <0x02>; model = "FriendlyElec NanoPi R6C"; serial-number = "0000000000000000" then converted the nanopi-r6c device tree from dts to dtb dtc -I dts -O dtb -o rk3588s-nanopi-r6c.dts rk3588s-nanopi-r6c.dtb renamed the original .bak and copied the new file into /boot/dtb: sudo mv /boot/dtb/rockchip/rk3588s-nanopi-r6c.dtb /boot/dtb/rockchip/rk3588s-nanopi-r6c.dtb.bak sudo cp rk3588s-nanopi-r6c.dtb /boot/dtb/rockchip/rk3588s-nanopi-r6c.dtb /proc/cpuinfo and /sys/firmware/devicetree/base/serial-number still show the original serial. Maybe someone smarter can pick this up
-
I've been playing around with the 3d hardware acceleration on jammy, so I can use KODI without stuttering. And that works fine although the KODI version is a bit outdated. So I installed it doing this, under root: add-apt-repository ppa:liujianfeng1994/panfork-mesa add-apt-repository ppa:liujianfeng1994/rockchip-multimedia apt update apt dist-upgrade apt install mali-g610-firmware rockchip-multimedia-config but how do I revert: apt purge --yes mali-g610-firmware rockchip-multimedia-config apt autoremove --yes apt dist-upgrade --yes add-apt-repository --yes --remove ppa:liujianfeng1994/panfork-mesa add-apt-repository --yes --remove ppa:liujianfeng1994/rockchip-multimedia I tried this, but its not a 100%, because I'm having issues with firefox playing videos after. If anyone knows, I'm all ears
-
A small issue with the current installer is that it does not distinguish between r6s and r6c. It only becomes r6c when you change the dtb in the armbianEnv.txt to r6c. So maybe you can use the r6s option if its available?
-
I had a need to change the macaddress of this device, after looking through the bootloader I spotted 2 offsets: 0x380400 macaddress NIC1 0x380406 macaddress NIC2 I would love an option in the installer, but I did it manually now: # dd if=/dev/mmcblk2 bs=16M count=1 of=bootloader 1+0 records in 1+0 records out 16777216 bytes (17 MB, 16 MiB) copied, 0,0736928 s, 228 MB/s # read_mac bootloader 0x380400 9c:d5:dc:b2:ce:1c # write_mac bootloader 0x380400 $(random_mac) write_mac bootloader 0x380400 $(random_mac) # read_mac bootloader 0x380400 b0:3f:1a:83:9a:da After scripting a couple of functions of course: ### Functions read_mac , write_mac and random_mac are hereby licensed under GPLv3 # read_mac file offset # read_mac bootloader 0x380400 # read_mac /dev/mmcblk2 0x380400 read_mac(){ dd if=$1 bs=1 count=6 skip=$(($2)) 2>/dev/null |\ xxd -l 16 -p | sed 's/../:&/g;s/^://' } # write_mac file offset macaddress # write_mac bootloader 0x380400 aa:bb:cc:dd:ee:ff # write_mac /dev/mmcblk2 0x380400 aa:bb:cc:dd:ee:ff write_mac(){ for hex in $(echo $3|tr ':' ' ');do printf "\x$hex";done |\ dd of=$file bs=1 count=6 seek=$(($offset)) conv=notrunc 2>/dev/null } # print a random macaddress random_mac(){ printf "%012x" \ $(( 0x$(hexdump -n6 -ve '/1 "%02X"' /dev/urandom) & 0xFCFFFFFFFFFF )) |\ sed 's/../:&/g;s/^://' }
-
I have serious issues with the serial number being exposed in /proc/cpuinfo. Especially when browsers have access to this information. Afaik, its u-boot who passed this information on to Linux. Any idea how to mask this from Linux? Your help is appreciated
-
Alright here is a "proof of concept" script I can't modify the installer, I'm not that savvy. But I took your tutorial and scripted it to my needs. Its been tested (on jammy) and it works. nanopi6_fdeBasically it comes down to this 1. Download the script 2. Copy it to the jammy sdcard 3. Boot with the sdcard and fill out Armbian questionnaire 4. chmod +x nanopi6_fde 5 ./nanopi6_fde 6. In the armbian-installer choose boot from emmc filesystem is ext4 (change the script if you want something else) exit after installation 7. At the end it prompts you for a passphrase 8. Reboot #!/bin/sh -vxe WORKDIR=$(mktemp -d -p /dev/shm) #faster running from memory #WORKDIR=/mmt #slower running from storage # 1. boot from sdcard (ubuntu/jammy), then update and install: apt update && apt upgrade apt install cryptsetup-bin gdisk # 2. run armbian-install and install to emmc/ext4, when done choose: exit armbian-install || true # 3. backup data mkdir -p ${WORKDIR}/emmcdata mount /dev/mmcblk2p1 ${WORKDIR}/emmcdata rsync -a --info=progress2 ${WORKDIR}/emmcdata/. ${WORKDIR}/backup sync umount /dev/mmcblk2p1 rmdir ${WORKDIR}/emmcdata # 4. create new partition layout sgdisk -og /dev/mmcblk2 sgdisk -n 1:32768:+512M -t 0:8300 /dev/mmcblk2 sgdisk -n 0:0:0 -t 0:8300 /dev/mmcblk2 # 5. create partitions mkfs.ext4 -F -L bootfs /dev/mmcblk2p1 dd if=/dev/zero bs=$((512/8)) count=1 of=/dev/shm/keyfile cryptsetup luksFormat --batch-mode --cipher=aes-xts-plain64 --key-size=512 \ --hash=sha512 /dev/mmcblk2p2 /dev/shm/keyfile cryptsetup open /dev/mmcblk2p2 rootfs --key-file=/dev/shm/keyfile mkfs.ext4 -L rootfs /dev/mapper/rootfs # 6. mount partitions mkdir -p ${WORKDIR}/restore mount /dev/mapper/rootfs ${WORKDIR}/restore mkdir -p ${WORKDIR}/restore/boot mount /dev/mmcblk2p1 ${WORKDIR}/restore/boot # 7. restore from backup rsync -a --info=progress2 ${WORKDIR}/backup/. ${WORKDIR}/restore sync # 8. disable rootfs resize?? touch ${WORKDIR}/restore/root/.no_rootfs_resize # 9. prepare chroot environment cd ${WORKDIR}/restore mount -o rbind /dev dev mount -t proc proc proc mount -t sysfs sys sys cat /etc/resolv.conf > etc/resolv.conf cat /etc/hosts > etc/hosts cat /etc/apt/sources.list > etc/apt/sources.list cat /etc/apt/sources.list.d/armbian.list > etc/apt/sources.list.d/armbian.list #10. change armbian environment sed -i '/^bootlogo=/s,=.*,=false,;/^rootdev=/s,=.*,=/dev/mapper/rootfs,' boot/armbianEnv.txt #11. add necessary modules to initramfs lsmod | cut -d ' ' -f1 | tail -n+2 > etc/initramfs-tools/modules #12. create etc/crypttab echo "rootfs UUID=$(lsblk /dev/mmcblk2p2 --nodeps --noheadings -o UUID) none initramfs,luks" > etc/crypttab #13. create etc/fstab echo "/dev/mapper/rootfs / ext4 defaults,noatime,nodiratime,commit=600,errors=remount-ro 0 1" > etc/fstab echo "UUID=$(lsblk /dev/mmcblk2p1 --noheadings -o UUID) /boot ext4 defaults,noatime,nodiratime,commit=600,errors=remount-ro 0 2" >> etc/fstab echo "tmpfs /tmp tmpfs defaults,nosuid 0 0" >> etc/fstab #14. chrooted environment cat << EOF > config #!/bin/sh -vx apt update echo 'force-confdef' > /root/.dpkg.cfg apt --yes install cryptsetup-initramfs rm /root/.dpkg.cfg lsinitramfs /boot/initrd.img* | grep 'usr.*cryptsetup' exit EOF chmod +x config chroot . ./config rm config #15. user input needed: new passphrase (temporary keyfile becomes obsolete) cryptsetup luksChangeKey --key-file=/dev/shm/keyfile --cipher=aes-xts-plain64 --hash=sha512 /dev/mmcblk2p2 #16. unmount everything umount | awk '/restore/{print $3}' | sort -r | xargs umount #17. poweroff, eject sdcard, power on [ -d "${WORKDIR}" ] && rmdir "${WORKDIR}" nanopi6_fde
-
Not talking about hardware accelerated support Software rendering works just fine in mpv. I thought firefox maybe needed an extra package, but it seems the online videos I tested are broadcasts. That's the only thing that makes sense . Local rendering work just fine, just not accelerated. Thanks for your time though.
-
Armbian/Jammy is working like a charm, thanks guys. Settings up the encryption was a bit of bitch but its working as you can see. Any chance of adding encryption to the installer?
-
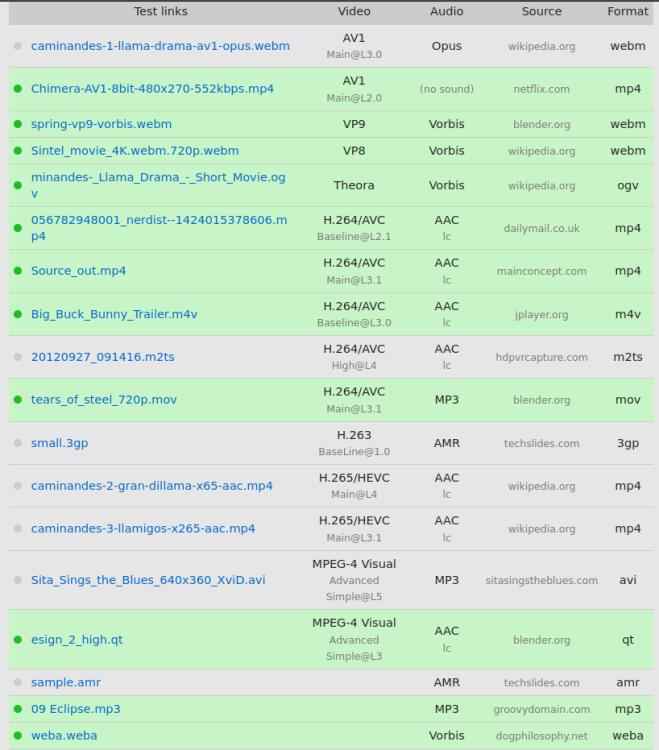
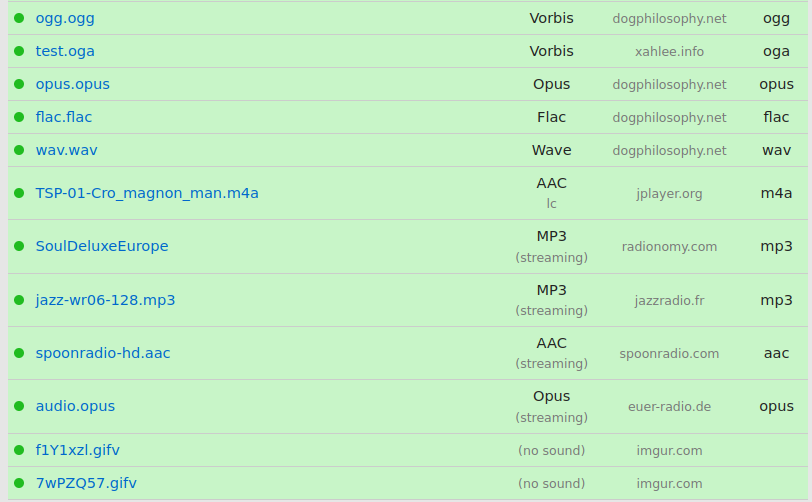
This is a HTML5 audio/video tester for web browsers: https://tools.woolyss.com/html5-audio-video-tester/ As you can see .webm is not enabled because frankly I have no idea which package I need to enable that. I have opus and av1 installed: ii libdav1d5:arm64 0.9.2-1 arm64 fast and small AV1 video stream decoder (shared library) ii libopus0:arm64 1.3.1-0.1build2 arm64 Opus codec runtime library I tried gstreamer1.0-ugly and gstreamer1.0-bad but to no avail. Any idea's which package I am missing?
-
Thank you for responding, but you take it seemingly the wrong way, so assume its me and let me rephrase: I am not asking for anything. Since its a WIP, I assumed (wrongly?) that the project would like some feedback. > SSH & serial login is enabled by default. I don't think allowing blank password > would be a good idea under such circumstance. Yes, its users call, but we have > to prevent at least most stupid actions. One can always override this later in > case he knows what he is doing. We even used to have password complexity check > error, which was perhaps too hard and a while back was downgraded to a warning. > IMO there are enough of safety compromises. I was merely pointing out the 'inconsistency' of * Being able to set a blank password during installation and * Not being able to login upon reboot > Making it work on Ubuntu packages base represented months of work in exchange > for virtually nothing. Rare people is able to understand that and most people > are just used to consume without compensation, complaining and asking for more. > If you / people would understand what they are asking for ... ;) it would > already be a great step forward. No, this is not easy to make. Especially > because everyone expects from developers to pay for everything. Join, do your > part. But not with requests and demands. Project would hire several developers > to make it better for you ... Not what I meant at all mate. I was merely pointing out that not every user knows that (in this case) Bullseye means Debian and Jammy means "Ubuntu". I had to google it. A bit more information on the d/l page would have been most welcome :) > As it is impossible to satisfy everyone in this aspect, we don't even try. > Armbian provides clean base images with minimum set of applications. > Additional applications can be installed classical APT way, via armbian-config > or you start making your own images - build framework > https://github.com/armbian/build is a masterpiece. You can do your own Armbian > based image and adding your own applications in no time. Guilty, I jumped the gun here a bit. I contacted the "Tor Project" that there is a userbase that uses dev. boards as daily drivers (rpi,opi,nanopi) and want to use Tor Browser but can't. So with any luck in the future we hopefully can download it from their website. But here one can D/L a 3rd party port: https://sourceforge.net/projects/tor-browser-ports/files/ That being said, since you mentioned building images, I could build my own, but to what end? I am already using what I want. And personally I believe that no one would want to D/L what I build, just from a security perspective for starters. Could you elaborate, because I do not understand why an end user would want to build his own image.
-
Tried the Bullseye CLI, its feels solid Feedback: SHA is missing: https://redirect.armbian.com/nanopi-r6s/Bullseye_legacy_minimal.sha blank password will not be allowed after installation, so you are stuck on the login screen hardware acceleration does not work for bullseye ( bullseye=debian jammy=ubuntu i had to google it ) no tor-browser? ( i know I'm pushing my luck here ) Other than that, it was a pleasant experience
-
What is the power draw for NanoPC-T6 ? If you can and would do a reading or give an indication. That would be very much appreciated. These guys already did it for the r6s/r6c https://forum.openwrt.org/t/nanopi-r6s-linux-6-3-arm-soc-updates/153072/25
-
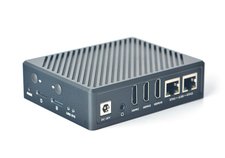
There is another "crazy " device out: NanoPC-T6, almost same specs as r6s and r6c https://www.friendlyelec.com/index.php?route=product/product&product_id=292 https://wiki.friendlyelec.com/wiki/index.php/NanoPC-T6 MEM: 4gb/8gb/16gb EMMC: 32gb/64gb/256gb NICS: 2x 2.5gbps nic VIDEO: 3x hdmi (2x out,1x in) IR: optional


