Search the Community
Showing results for 'tv'.
-
specs: hi3798 ram 1g rom 4g sd/usb boot or emmc boot any help appreciated
-
So, For some Months I was trying to Use Latest Armbian on My Tx6S , First I found Nick Avollic's (Nick A) Armbian build that has my tx6s version supported the axp313 one but it was old (I can work with that though) but I wanted something that would support armbian latest.At first I tried to import directly from his repo but as he used miniarch patches it was difficult but somehow with some of ai assistantance I managed to made latest one but it was not on the latest stable kernal I used it for some time than now I thought why not get lastest kernal so After a lot of trail and error I finally managed to get latest Armbian and latest stable kernal working on my Tx6s.Its Also syncable to official armbian without issues . Github What's Working: Ethernet WiFi USB Ir-Receiver What's Not Working: Nothing,Right Now. Untested: Bluetooth (As my TV Box Doest Have Bluetooth So Its not possible for me to test) Downloads: Minimal Server [I do recommended people to build/compile their own image from sources and not to trust any random build on internet. You can build your own image from my forked githubs add-tanix-tx6s-axp313 branch your own image] In my test in CLI I found almost all the things working correctly.I will test the GUI/Desktop Interface later.
-
I have recently purchased a Linux-based TV box with the following specifications: Realtek chipset with the code RTD1395PU 1 GB of RAM (SEC 149 model) 8 GB Flash memory (SCY brand) Operating system: Linux Support for 1 USB, LAN, HDMI I have tried connecting the UART interface to it and observed the boot process using Putty. What I received was a boot system that I will describe later. The issue I'm facing is that there is very little information on the internet about this CPU model, and the support for it is similarly scarce, as it seems to have been discontinued. I can use ESC/Space to access Uboot in the Realtek> prompt, but the number of supported commands is limited. I can still access USB, and of course, I can't use Ctrl+D to stop this process due to copyright issues. Does anyone have any ideas on how to install Armbian from a USB drive onto its flash memory?
-
 🏆 Become a sponsor, help to add other boards in armbian standart, you don't need to be a programmer to help the community, just need a copy of the ARM BOARD and a x86 computer to compile new versions. If you like what you see here and want to help: Donate Armbian the like button only costs a few dollars. Armbian Needs you help! Product Specification: Chipset: Rockchip RK3576 Octa Core ARM Mali G52 MC3 WIFI: WiFi6 11ax 1x1 80 MHz wifi controller: AP6275P RAM: DDR4 4GB/8GB ROM: eMMC 32GB/64GB/128GB OS: Android 14.0 || Armbian Vendor 6.1 Ethernet: 1000M Standard RJ-45 Bluetooth: BT 5.0 The RK3576 is indeed a lower-cost SoC but features four Cortex-A72 and four Cortex-A53 cores instead Android Base Files: H96-RK3576-ANDROID.dts H96-RK3576-ANDROID.dts H96-RK3576-BOX.dtb H96-RK3576-BOX.dtb RK3576_MiniLoaderAll.bin Vendor Kernel DTS: @RealAn H96-RK3576-VENDOR.dts Mainline status: Verify wifi controller: AP6275P Wifi Driver: https://drive.google.com/file/d/1n6x4tg5Xh24nWllOTJTq1ldVyDkK8W2Q/view?usp=sharing Flashing Tools: https://drive.google.com/file/d/1nLgPCBN0qmbzufWDFmISYc92JUpvwMPc/view?usp=sharing build_armbian.csc: https://drive.google.com/file/d/1VNR5QJlPylPsce9PI9O2TB3wOpshK2Bh/view?usp=sharing @hzdm Stock Firmware: method https://drive.google.com/file/d/1zLGvIxLE6vf8iSTjsyEr-Ly4MZ6ZahBB/view?usp=sharing Flashing Firmware Tutorial Factory Firmware for H96 Max M9 https://disk.yandex.ru/d/pWGEtRel0P9ejg https://drive.google.com/drive/folders/1g63F8fGSLEA9iK2_Mqzd6F0xfaTRnGlm?usp=sharing Factory Firmware for H96 Max M9S https://disk.yandex.ru/d/H17eGTYCjgmCsg https://drive.google.com/drive/folders/1Q360l5XbTVsWIvWkqy2xJ0sLpqHRSApM?usp=sharing TTL debug: RX TX GND pins: Enable SDCARD Reader: @rustamt method from 4pda Force board Maskrom Mode Maskrom Pins:


-
 Thank you for your reply. My H96 Max M9 is running Android 14 with the original stock firmware. I have not installed Armbian or any Linux-based operating system. Therefore, I don't think I can run sudo armbianmonitor -u on the TV box. Is there an equivalent way to collect and share the Android system logs, for example using ADB and adb logcat or dmesg? The problem appears when Android's system file picker/Storage Access Framework is used by applications such as PPSSPP and Dolphin Emulator.
 -
i have an android tv box. model name: tx 10 pro. i want to install ARMbian on it. there is a reset button under the av port. it has 2 gb of ram and 4 gb of rom (though the internet says 8G ram and 128G rom, also the android ui too). i have enabled both usb debugging and oem unlocking from the android developer option menu. the tv box can go to recovery mode using adb command. until going to the recovery mode, the adb connects perfectly but whenever it goes into recovery mode, the adb cant connect to the tv box. it consists option for fastboot inside the recovery mode but whenever i try to apply any command (e.g. fastboot/adb) the tv box doesnt show up among the devices when the device is in recovery mode. As there is no zip file for direct linux installation that i can use with flash from usb option. and the reset button beneath the av port does nothing, ive tried to flash multiple ARMbian Img files using both rufus and etcher but the screen just goes black whenever i press and hold the reset button beneath the av port. there is no option to install twrp as neither adb nor fastboot can connect whenever the device is in recovery mode. what to do?
-
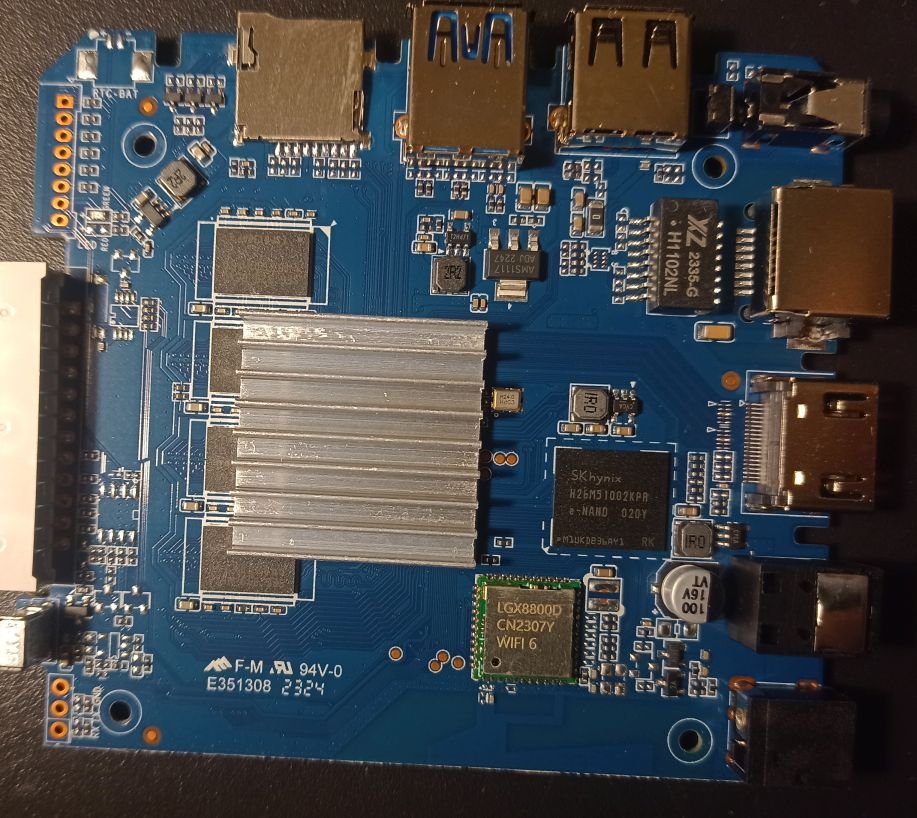
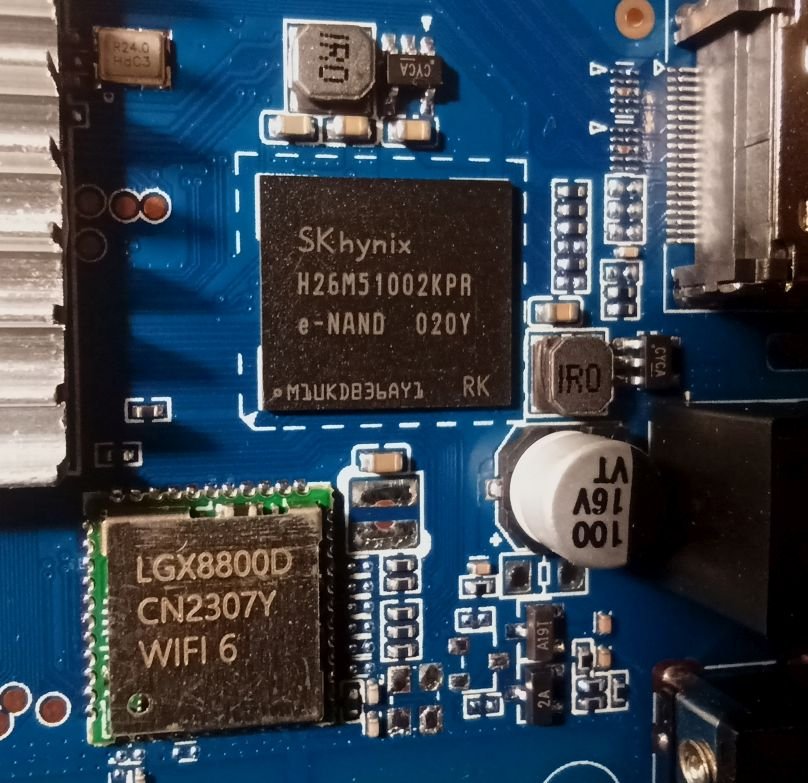
So I bought this chinise Android TV Box and would love to install armbian on it. I am new on this and discovered armbian just after buying it. I didn't know there was no support and not official open source for the Rockchip RK3528, otherwise I would have chosen any other. The box works fine but it has that known malware that send packets to suspicious links (I scanned activity with pi-hole). Description says it has 2GB RAM and 16GB storage (Hynix H26M51002KPR) WiFi chip is LGX8800D I attach images of the board and all of it's componentes, including IR sensor and display. It also has a red LED that turns on when in stand-by mode. I hope this help to develop or patch a working version of armbian for it. I have already read about some patches around that would probably work, but I' new to this and I'm not sure how to start. What I would like to do first is a completly ROM backup, and start doing test with a pendrive or SD card, not writting directly to the eMMC (if possible) until the important things get working. And any help would be appreciated. Edit: I will keep posting in this thread with my progress (or attemps!)


-
Hello Im a begginer and dont know Linux. I have a tv box : enyBox x98q Cpu amlogic s905w2 2g ram 16g rom My need to install MetaTrader5 on linux on this tv box. I downloaded both files on site this link: debian 13 ubuntu 26.04 I need to learn the install way by watching a video clip. I request you for making it
-
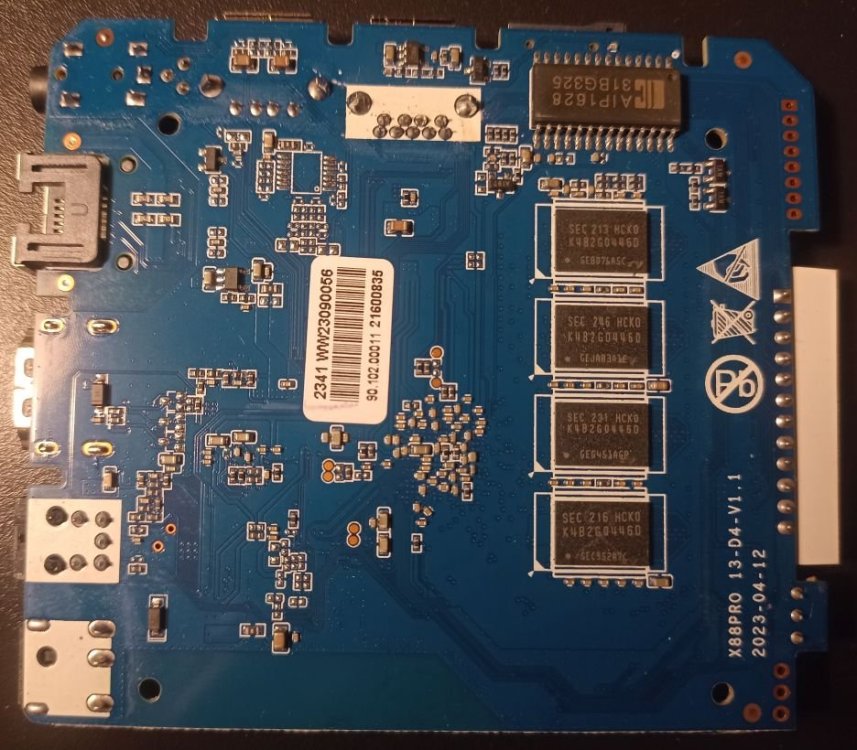
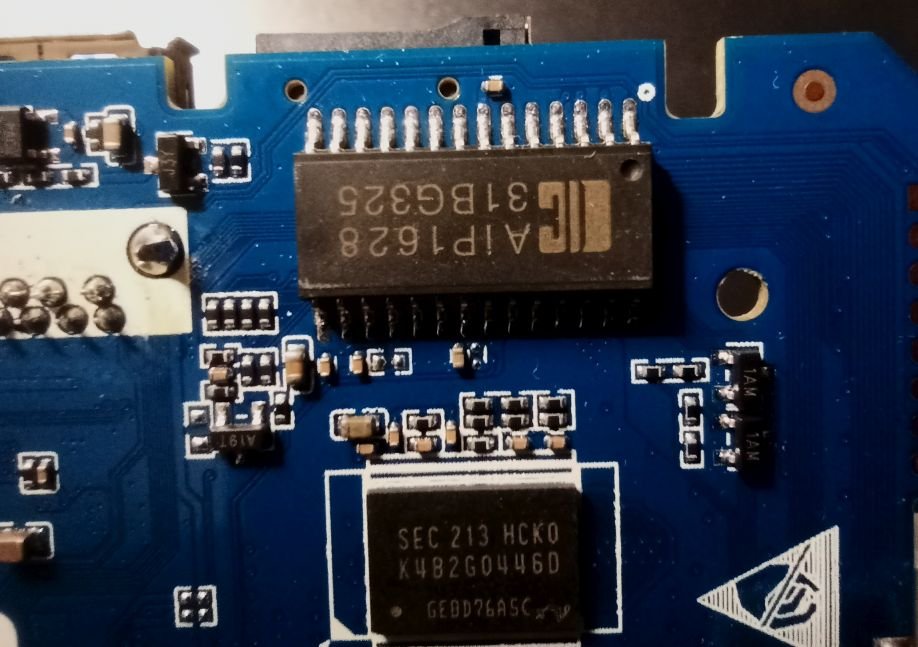
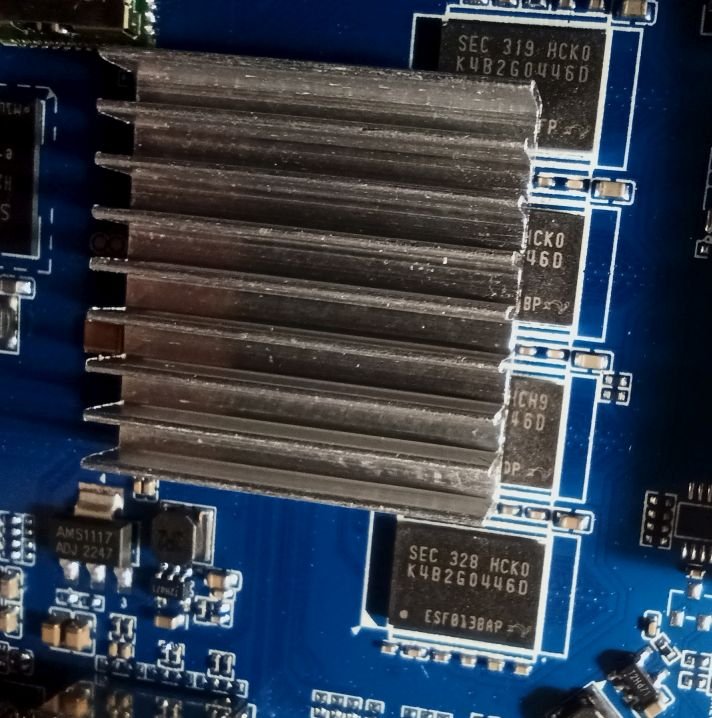
This week's updates center on new hardware enablement, a broad U-Boot v2026.07 modernization, and build system hardening for toolchain and infrastructure changes. Board support expanded across multiple SoC families, including the X88 PRO RK3566 TV box, Avnet MaaXBoard 8ULP (i.MX8ULP), EASY EAI Nano (RV1126), and the AYN Odin3. The Youyeetoo R1 v3 was promoted to standard support with named audio outputs, while the Radxa Dragon Q8B gained an edge kernel (7.1) target. Rockchip work included RK3588 CAN support for kernels 6.18/7.1/7.2, HDMI-RX fixes on the OrangePi 5 Ultra, and Mixtile Blade3 refinements on the 7.2 bleeding edge. A coordinated U-Boot bump to v2026.07 landed across Helios4, Odroid HC4/M1, Turing RK1, Radxa E52C, Qidi X6, Mekotronics R58X-Pro, and the Espressobin/Macchiatobin (paired with TF-A 2.14.0). This surfaced toolchain issues on Trixie, addressed through SWIG 4.3 pylibfdt compatibility, demotion of gcc 14 int-conversion and implicit-declaration errors to warnings, and related pin cleanups. Infrastructure work strengthened build reliability and CI. The rootfs stage gained DNS fallback and apt retry hardening for chroot operations, armbian-firstlogin received power-loss recovery with atomic writes, and armbian-install now reports bootloader write failures explicitly. Docker framework updates enable native riscv64 image generation on trixie and noble runners, while new extensions introduce sysrq serial trigger, kernel-debug tiers, ram-boot via rkusbboot, and generic SATA park-on-shutdown enabled by default on the Odroid HC4. #Armbian #EmbeddedLinux #UBoot #Rockchip #RISCV ChangesAdd support for X88 PRO RK3566 TV box. by @Ovaday in armbian/linux-rockchip#500Add AI-driven README updater (central, cross-repo). by @igorpecovnik in armbian/armbian.github.io#359Add Avnet MaaXBoard 8ULP (i.MX8ULP) support. by @govindsi in armbian/build#9991Add AYN Odin3 firmware. by @kasimling in armbian/firmware#136Add ayn-odin3 board image. by @kasimling in armbian/armbian.github.io#358Add board: EASY EAI Nano RV1126. by @hqnicolas in armbian/build#10154Add minimal SWT6621S firmware support for KICKPI K3B. by @retro98boy in armbian/firmware#134armbian-firstlogin: power-loss recovery and atomic writes. by @mingzhangqun in armbian/build#9954armbian-install: report bootloader write failures instead of "Done.". by @iav in armbian/build#10204artifact-rootfs: surface git-log failure when computing configng hash. by @igorpecovnik in armbian/build#9849board: aml-c400-plus: Fix eMMC boot format and partition layout. by @jomadeto in armbian/build#9911boards/easy-eai-nano: enable usb and brcm wifi. by @hqnicolas in armbian/build#10177brcm: add brcmfmac firmware aliases for easy-eai nano (rv1126). by @igorpecovnik in armbian/firmware#133bsp: generic SATA park-on-shutdown (HDD_PARK_ON_SHUTDOWN), enable on Odroid HC4. by @igorpecovnik in armbian/build#10191bsp: use kernel version argument in ABL postinst scripts (fixes #10108). by @rorystandley in armbian/build#10109can: rockchip: add RK3588 CAN support (for kernel v6.18 / v7.1 / v7.2). by @lch08 in armbian/build#10184ci(board-assets): don't check out fork head under pull_request_target. by @igorpecovnik in armbian/build#10194cix-acpi: bump edge to 7.1.y. by @EvilOlaf in armbian/build#10167Cleanup patches. by @EvilOlaf in armbian/build#10174csc board: NORCO EMB-3531: Do not reset LTE moden. by @retro98boy in armbian/build#10222docker/framework: build riscv64 images on native runners (trixie, noble). by @igorpecovnik in armbian/docker-armbian-build#34docker/framework: generate riscv64 images (trixie, noble, resolute). by @igorpecovnik in armbian/docker-armbian-build#33docker/riscv64: fix cross-compiler availability for generate-dockerfile. by @igorpecovnik in armbian/build#9589docker: allow overriding host_arch for foreign-arch Dockerfile generation. by @igorpecovnik in armbian/build#10211docs: refresh README (AI-assisted). by @igorpecovnik in armbian/ci#29Enable memory compaction and RK630 PHY on Rockchip vendor kernels . by @lukaszsobala in armbian/build#10175Enable pwm gpio. by @frank-f in armbian/build#10238extensions/nvidia: per-distro version detection + runtime auto-disable on no-GPU hosts. by @igorpecovnik in armbian/build#9845extensions/radxa-aic8800: use local dir as download cache. by @rpardini in armbian/build#10156extensions/rkusbboot: easy ramboot mainline u-boot on Rockchip devices. by @rpardini in armbian/build#10158feat(extensions): sysrq-serial-trigger + kernel-debug-tiers (on-device kernel debugging via serial console). by @iav in armbian/build#9776feat(flash): keep the success screen when verification is cancelled. by @SuperKali in armbian/imager#166Fix build for Linux 7.1. by @EvilOlaf in armbian/bcmdhd-dkms#7fix hdmi rx on orangepi5 ultra by adding hpd-gpios. by @pdapandapda in armbian/build#10172fix Radxa U-Boot ITB dependency. by @yisding in armbian/build#10196Fix sata2 target-supply for Orange Pi 3B and Station M2. by @dust-7 in armbian/build#10137fix the hdmirx HPD patch against kernel6.18 & kernel 7.1. by @pdapandapda in armbian/build#10180fix(offline): honor OFFLINE_WORK in git-ref2info and memoize TTL. by @iav in armbian/build#9797gha: disable build cronjobs (moved to armbian/ci). by @igorpecovnik in armbian/os#482git: match safe.directory literally, not as a regex. by @igorpecovnik in armbian/build#10223git: silence spurious SUBSHELL error annotation from safe.directory check. by @igorpecovnik in armbian/build#10225helios4: bump u-boot to v2026.07. by @iav in armbian/build#10183helios4: drop stale u-boot patch dir v2025.10/board_helios4. by @iav in armbian/build#10189input: remotectl: rockchip-pwm: prefer dedicated channel-3 IRQ. by @rpardini in armbian/linux-rockchip#503k3: sk-am62-lp: shrink R5 SPL to fit SRAM + silence k3 cp noise. by @igorpecovnik in armbian/build#10230luckfox-lyra-ultra-w: Add spidev overlay with 2 CS. by @vidplace7 in armbian/linux-rockchip#505mainline: bump bleedingedge to v7.2-rc3. by @EvilOlaf in armbian/build#10181mekotronics-r58x-pro: u-boot: bump to v2026.07. by @rpardini in armbian/build#10232mixtile-blade3: edge: u-boot: fancy it up (lwIP, mbedTLS, efi, btrfs, etc). by @rpardini in armbian/build#10234mvebu64: modernize EspressoBin/MacchiatoBin firmware (u-boot 2026.07 + TF-A 2.14.0 + A3720 fixes). by @igorpecovnik in armbian/build#10213odroidhc4: u-boot: bump to v2026.07, drop upstreamed patch. by @rpardini in armbian/build#10233odroidm1: bump u-boot to v2026.07. by @iav in armbian/build#10201Qidi X6: update to u-boot 2026.07. by @Shadowrom2020 in armbian/build#10228radxa-dragon-q8b: add edge kernel (7.1) target. by @SuperKali in armbian/build#10215radxa-e52c: bump uboot to v2026.07. by @okrc in armbian/build#10135Rk3588 es8388 codec silence log. by @CT1IQI in armbian/build#10198rockchip64-6.18: rework rk3588-0010-fix-clk-divisions to avoid patching include/linux/math.h. by @rpardini in armbian/build#10207rockchip64-7.2: bleedingedge: enable REALTEK_PHY_HWMON. by @rpardini in armbian/build#10206rockchip64-7.2: rk3588-mixtile-blade3, many fixes and additions. by @rpardini in armbian/build#10203rootfs-image: move pre_install_distribution_specific inside install_distribution_specific(). by @rpardini in armbian/build#10157rootfs: DNS fallback for build-time chroot resolv.conf. by @igorpecovnik in armbian/build#10205rootfs: harden chroot apt against transient fetch failures (retries + fail-fast update). by @igorpecovnik in armbian/build#10202rootfs: pin tar for resolute kernel deb install (all families). by @igorpecovnik in armbian/build#10187rootfs: revert resolute tar pin (#10187) — fixed upstream. by @igorpecovnik in armbian/build#10209runner-clean: drop stale amlogic FIP source caches. by @igorpecovnik in armbian/actions#28runner-clean: ensure tree is installed on the host. by @igorpecovnik in armbian/actions#27runner-clean: register qemu binfmt handlers on the host. by @igorpecovnik in armbian/actions#26sc8280xp: fix wrong LINUXCONFIG name for the sc8280xp branch. by @igorpecovnik in armbian/build#10227SpacemiT: Defconfig: Enable CONFIG_PWM_PXA. by @fkpwolf in armbian/build#10182sun55iw3-syterkit: skip TF-A build (SyterKit is self-contained). by @igorpecovnik in armbian/build#10214targets: drop resolute from riscv64 userspace builds (RVA23 vs RV64GC). by @igorpecovnik in armbian/ci#27turing-rk1: bump u-boot v2024.04 → v2026.07 (fix SWIG 4.3 build break on trixie). by @igorpecovnik in armbian/build#10216u-boot: bump 2026.07-rc4/rc5 pins to final v2026.07. by @igorpecovnik in armbian/build#10186u-boot: don't error on implicit declarations (gcc ≥ 14 / trixie). by @igorpecovnik in armbian/build#10221u-boot: fix old pylibfdt build against SWIG ≥ 4.3 (trixie). by @igorpecovnik in armbian/build#10217u-boot: sync btrfs zstd short-extent fix into shadowed board/pool copies. by @iav in armbian/build#10208uboot: demote int-conversion & incompatible-pointer-types to warnings (gcc 14). by @igorpecovnik in armbian/build#10224Up rtw8822b to v30.20.0. by @farwayer in armbian/firmware#135update Helios4 BSP postinst. by @leggewie in armbian/build#9065workflows: add Delete Old Releases (copied from os). by @igorpecovnik in armbian/ci#26workflows: enable build cronjobs (taking over from armbian/os). by @igorpecovnik in armbian/ci#25youyeetoo-r1-v3: bump mainline u-boot to v2026.04. by @SuperKali in armbian/build#10219youyeetoo-r1-v3: promote to standard support and name audio outputs. by @SuperKali in armbian/build#10220View the full article
-
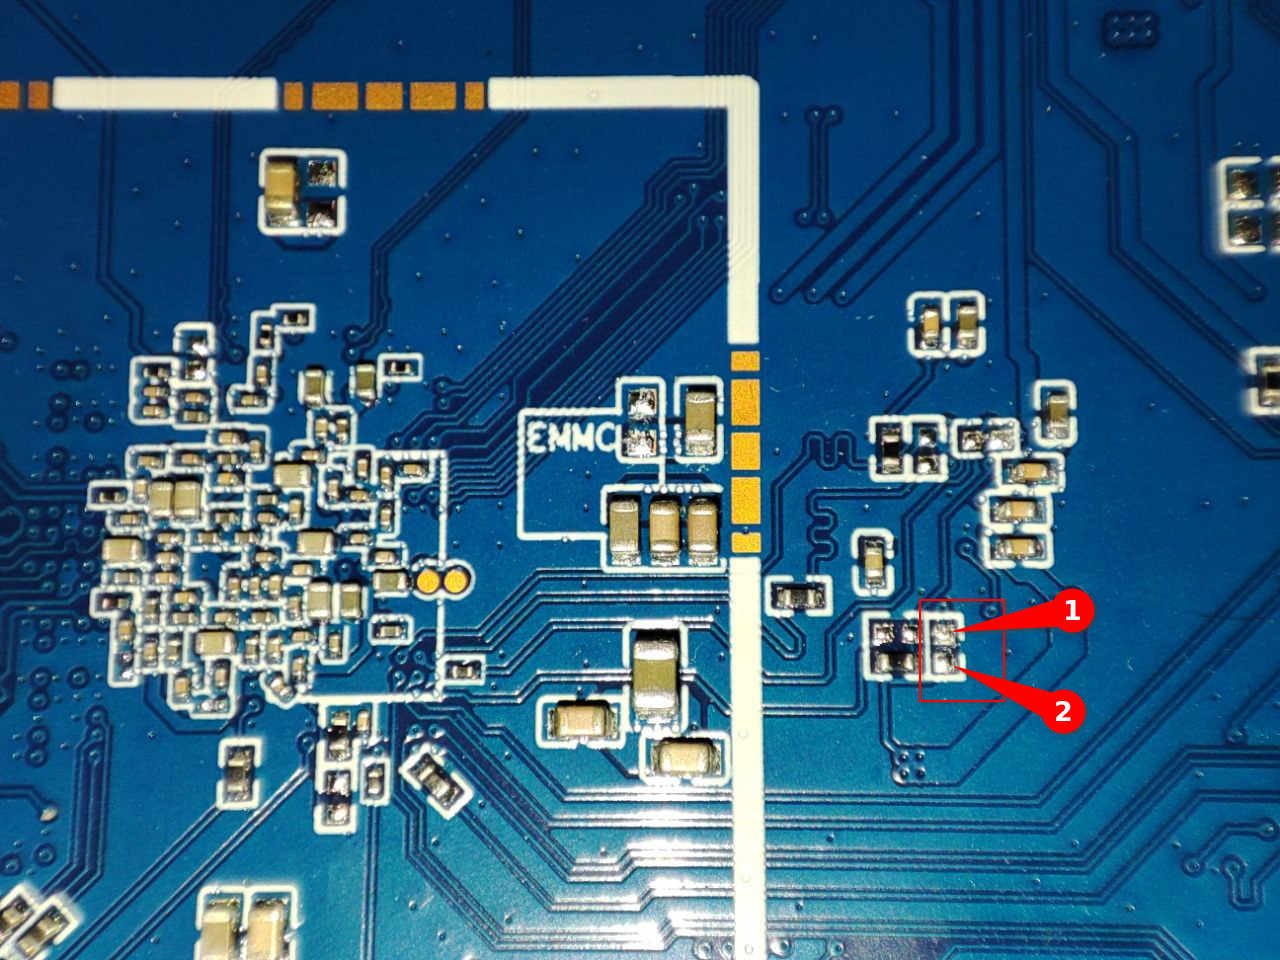
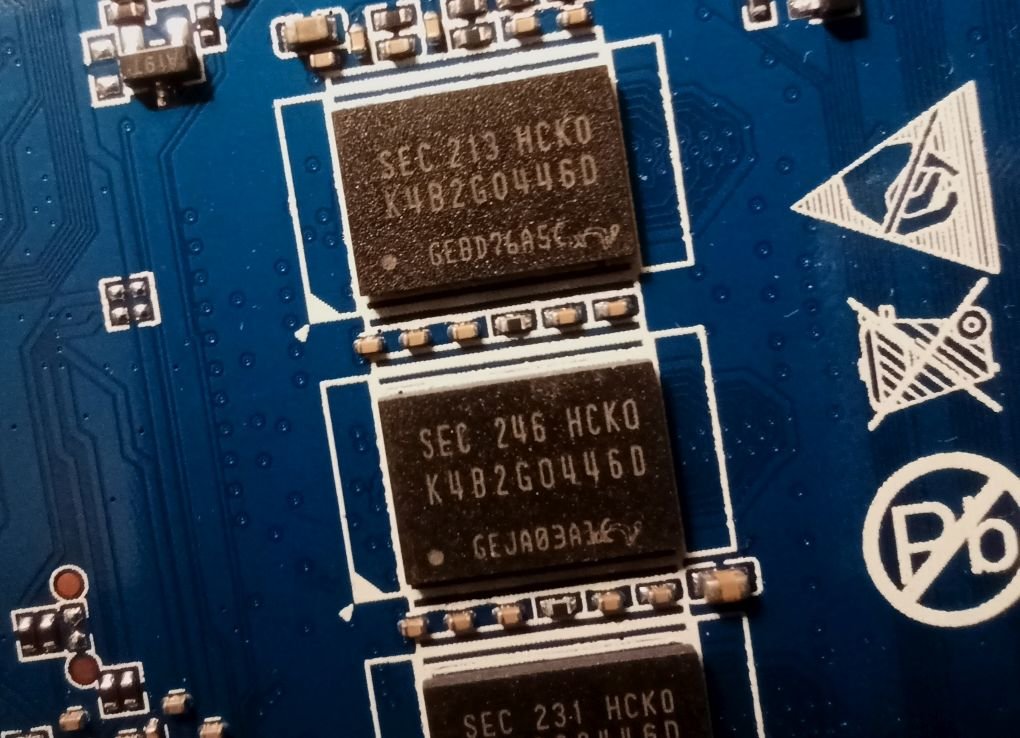
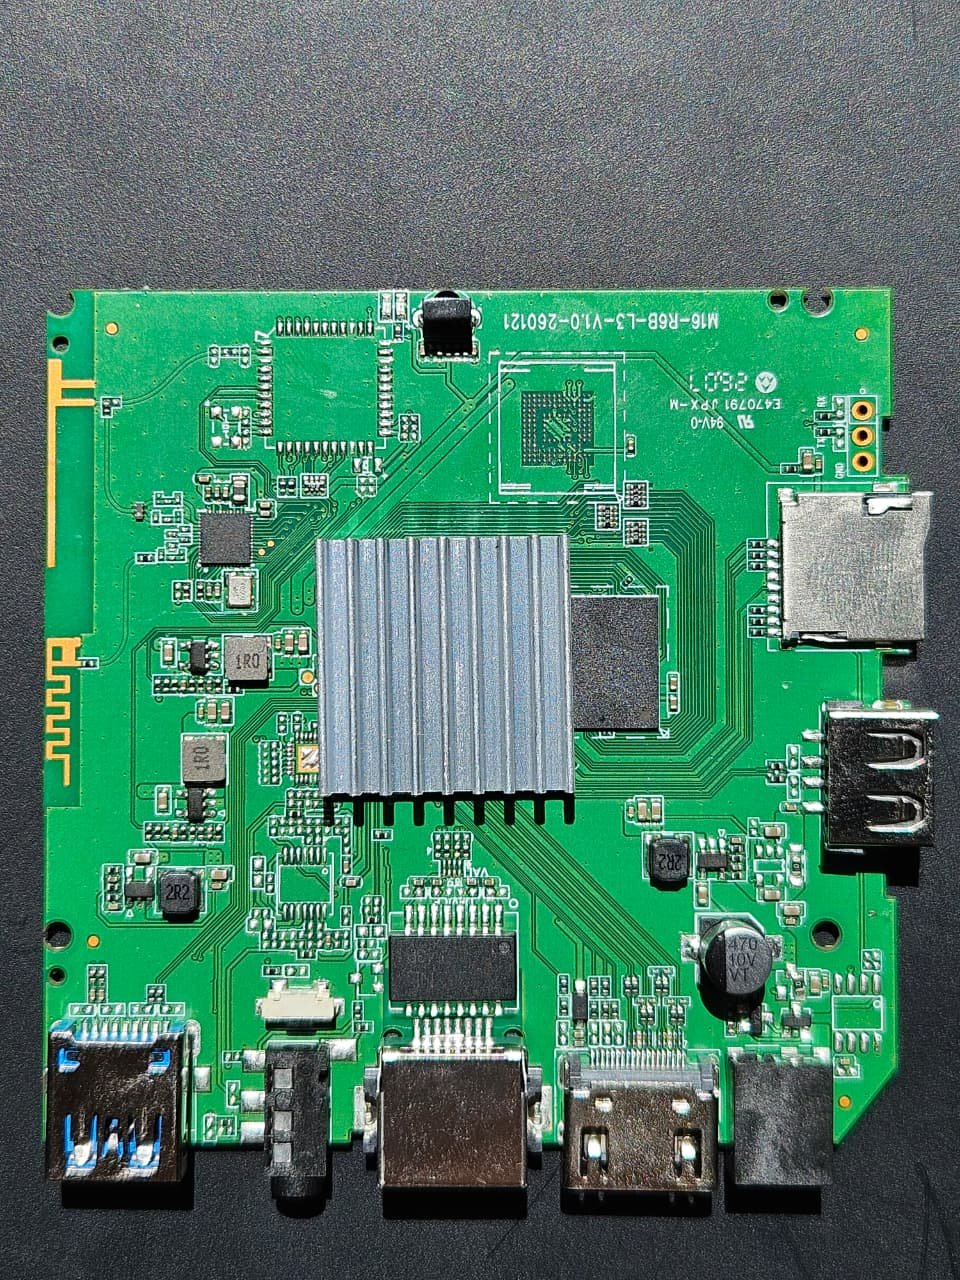
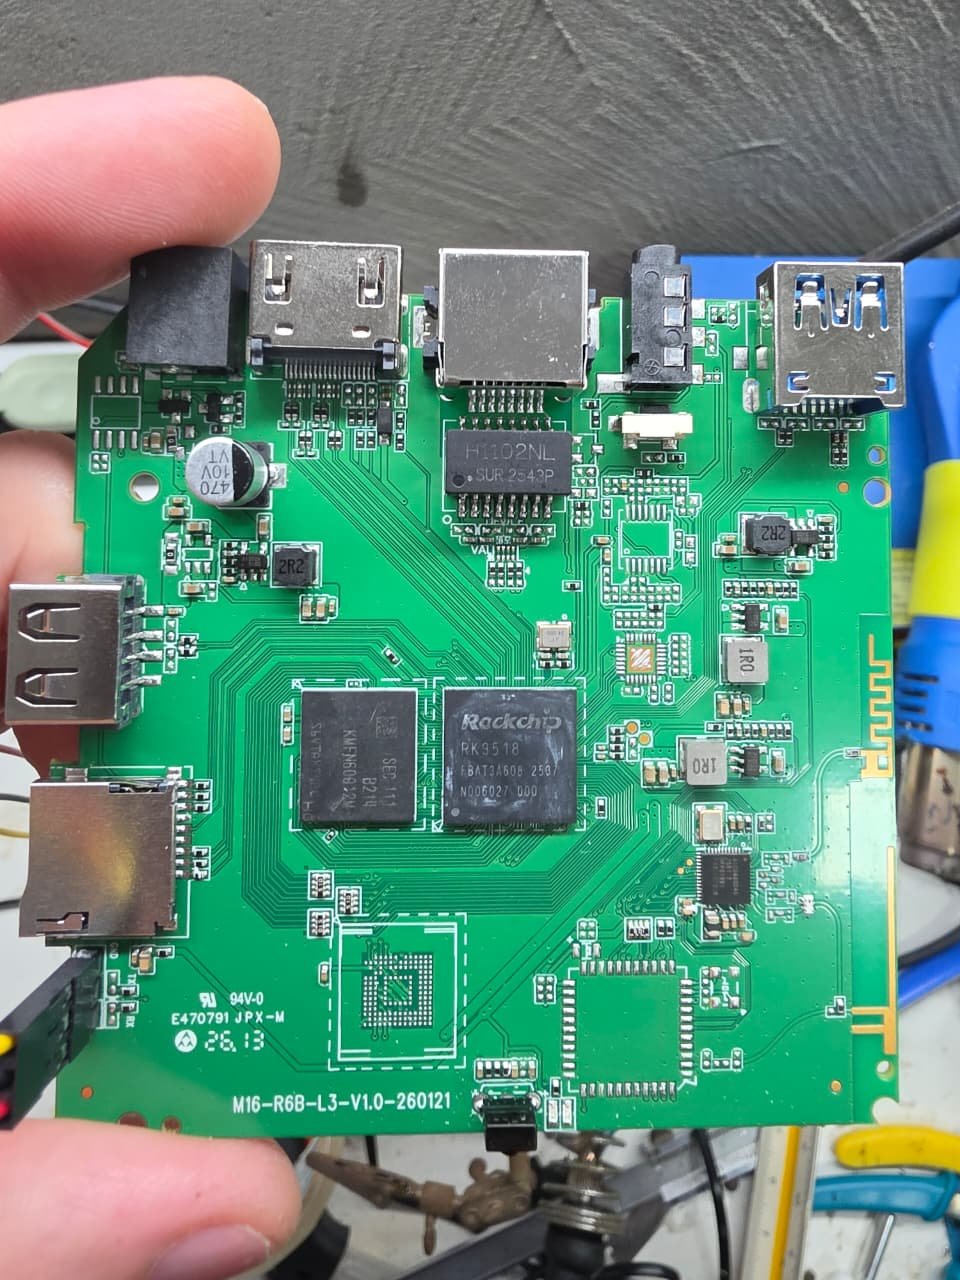
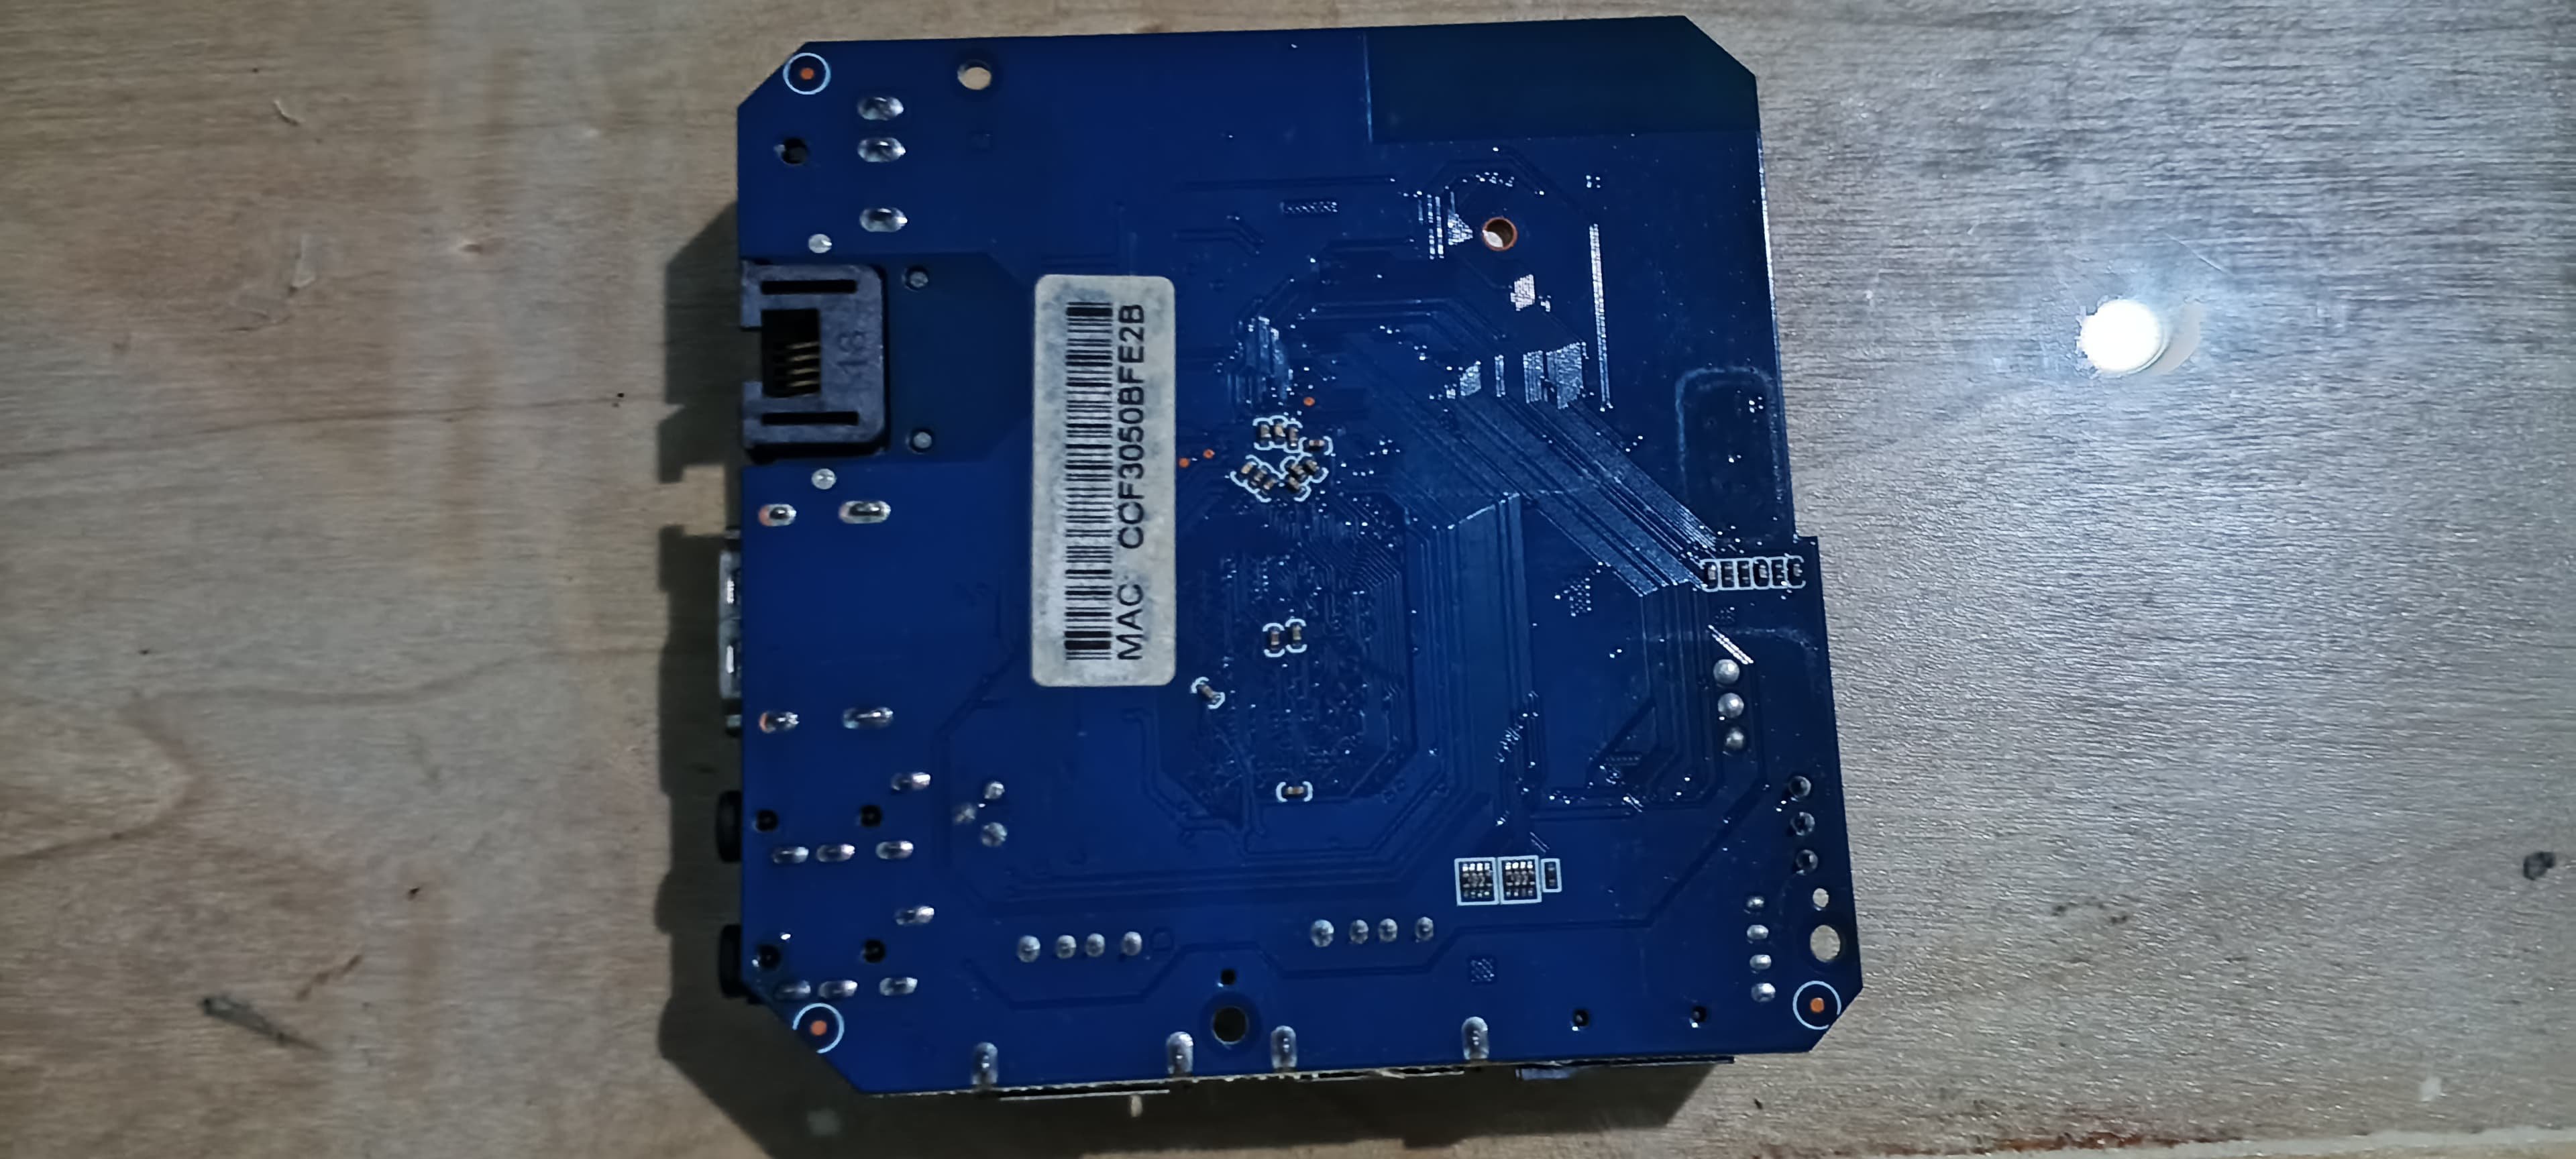
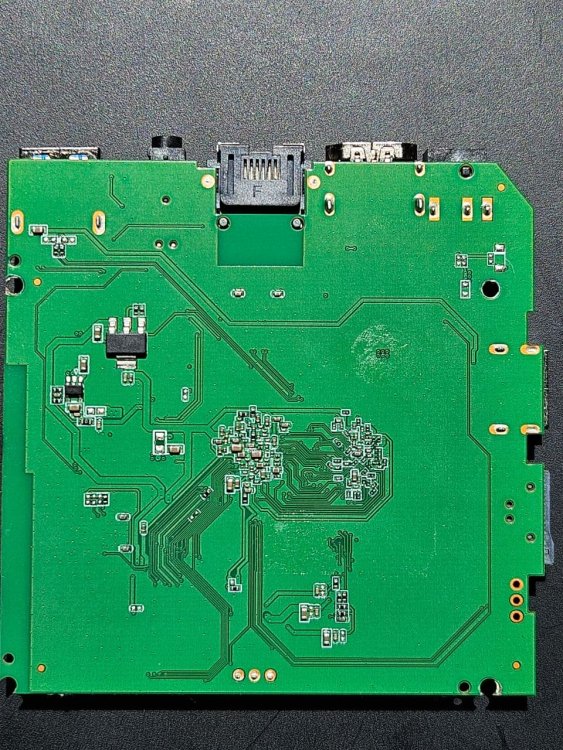
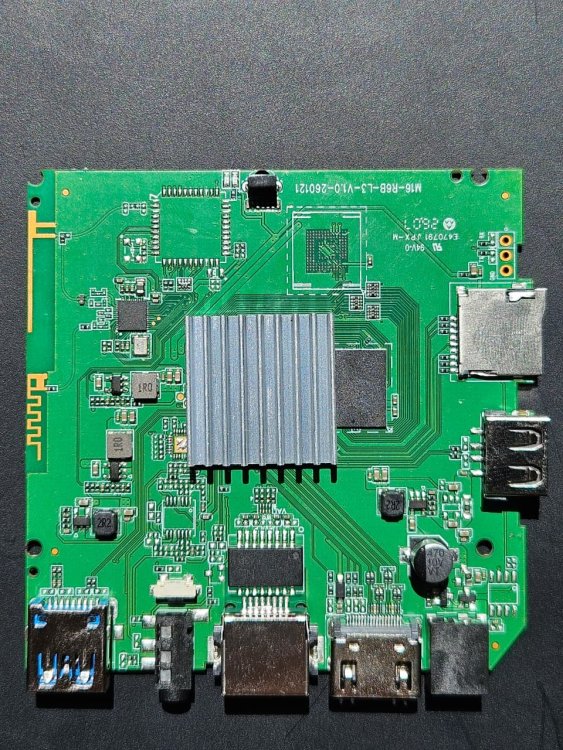
 Hi, I need help identifying the Maskrom/eMMC short points for an RK3528 TV box. Device: - TV box sold as H20 Pro - SoC confirmed as Rockchip RK3528 - Board marking: M16-R6B-L3-V1.0-260121 - RAM detected in Linux: 963 MiB - eMMC detected in Linux: 7.83 GB / 7.30 GiB - eMMC name from Linux: P1J95K - eMMC CID: fe014e50314a39354b12739109744200 What happened: - The box originally booted Android from eMMC. - Armbian booted successfully from SD using a customized joilg/x88pro-based image. - Later I wrote U-Boot/idbloader to eMMC: - idbloader.img at sector 64 - u-boot.itb at sector 16384 - After reboot, the board no longer boots from SD or eMMC. - LED stays red. - No HDMI output. - No Ethernet link/activity. - RKDevTool on Windows shows "No Devices Found". Recovery attempts: - Tried the reset/recovery button behind the AV/P2 jack while connecting power and USB. - Tried both USB ports. - Tried RKDevTool v2.86 with Rockchip drivers installed. - No Loader or Maskrom device appears. - Tried UART pads marked GND/TX/RX using ESP32-C3 as bridge, but output is not readable. Question: Can anyone identify the eMMC Maskrom short point for this board? I need to force RK3528 into Maskrom mode so I can restore the first bootloader area of the eMMC. Attached photos: - Front of board - Back of board - Macro photo of the eMMC/storage chip area - Macro photo of test pads near the storage chip
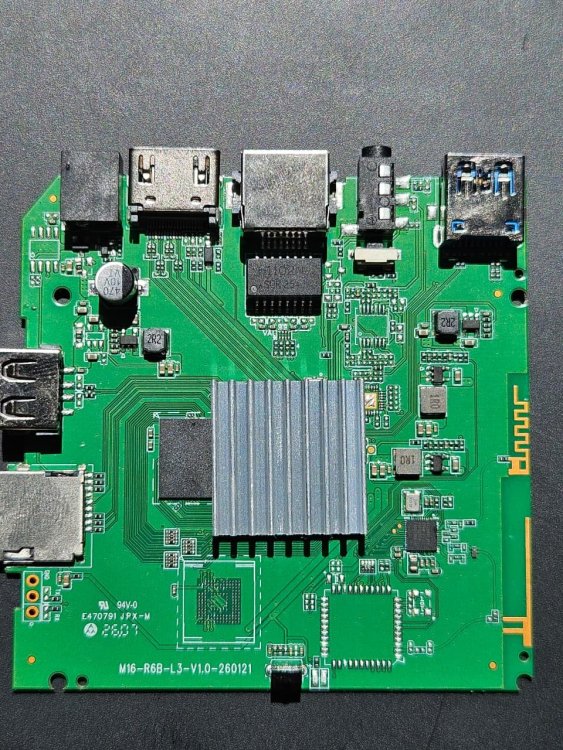

-
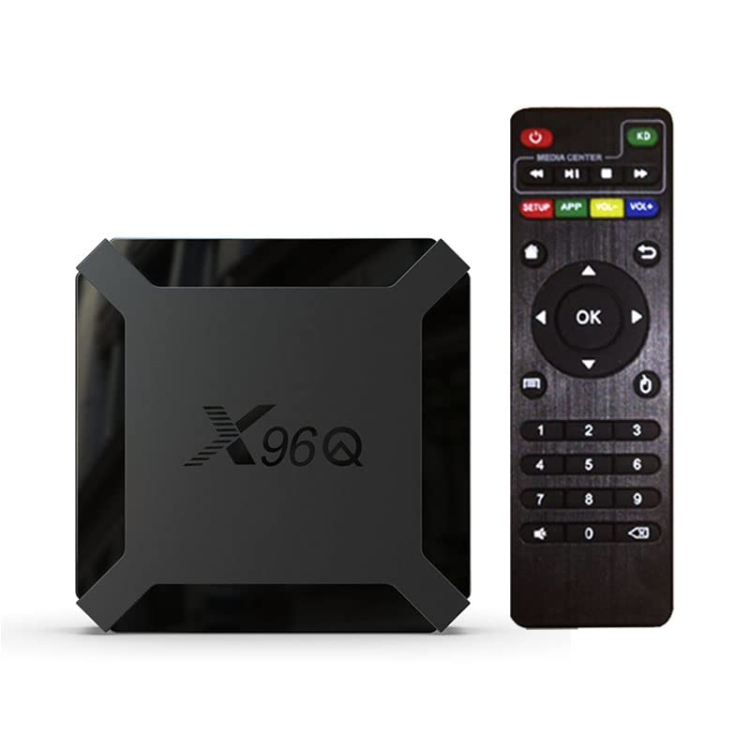
Currently working on a build for this device. It boots and is about 90% functional on 6.6 and 6.7 Kernel https://github.com/sicXnull/armbian-build/tree/X96Q-TVBOX-LPDDR3 Working - Desktop - Ethernet - Wifi Not working - DTS could use some work. Right now it does not detect internal EMMC so installing to EMMC is not an option. - Likely other things i've missed. I've uploaded two images to my git. Full w/Mate Desktop Minimal/Server Feel free to compile this yourself if you don't trust my images, it's encouraged. Changes are on the X96Q-TVBOX-LPDDR3 Branch Full W/Desktop ./compile.sh build BOARD=x96q-tvbox BRANCH=current BUILD_DESKTOP=yes BUILD_MINIMAL=no EXPERT=yes KERNEL_CONFIGURE=no KERNEL_GIT=shallow RELEASE=bookworm Minimal/Server ./compile.sh build BOARD=x96q-tvbox BRANCH=current BUILD_DESKTOP=no BUILD_MINIMAL=yes EXPERT=yes KERNEL_CONFIGURE=no KERNEL_GIT=shallow RELEASE=bookworm
-
Help for install ambian 22 or 23 in box TV with soc rk3528 i have instaled in box with amlogic no problème but with rockchip no support no boot......
-
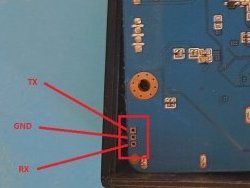
 Hello everyone, I am trying to install Armbian on my Android TV Box, but unfortunately, I flashed an incorrect firmware. Now the device is hard-bricked: the red and blue LEDs are blinking alternately, there is no HDMI output (black screen), and the physical reset button is not working properly. I already have an SD card loaded with the multitool to install Armbian, but I need to force the SoC into Maskrom Mode first so it can bypass the corrupted eMMC and boot from the SD card. Device Specifications: SoC: Rockchip RK3228A Board ID: T39-V1.0 Storage: eMMC (BGA type) I have attached the front and back photos of my PCB board (IMG-20260607-WA0027.jpg and IMG-20260607-WA0031.jpg) for reference. Could anyone help me identify the exact and safe test points (CLK to GND shorting points) for this specific T39-V1.0 board layout? Thank you so much for your help!
-
 Hi everyone! 👋 I managed to get Armbian running on a generic RK3518 TV box — mainline U-Boot, onboard Ethernet, and AIC8800D80 SDIO Wi-Fi all working. I couldn't find a single RK3518 thread here when I started, so I wrote everything up to help the community. Full step-by-step guide, device tree, and the loader binaries I built are in my GitHub repo: 👉https://github.com/juliovendramini/rk3518_armbian Happy to answer questions. Hope it helps someone! 🙂
 -
Hello averyone I'm trying to download the multitool.img.xz can someone please help me find it or share a valide link?
-
 Hello everyone, I am hoping to get some advice on the possibility of running Armbian on a TV box I have. I understand this is a niche device, and I am new to this process, so any guidance would be greatly appreciated. Device Information: Device Type: TV Box Manufacturer: SkyworthDigital Model: SK Hailstrom Ref 1325 Board: HPR3E1325_4k Hardware/Platform: rtd1325 Product: HPR10X Hardware Details (from system info): Core Architecture: 4x ARM Cortex-A55 @ 1700MHz Instruction Set: 64-bit ARMv8-A (32-bit Mode) Supported ABIs: armeabi-v7a, armeabi Scaling Governor: schedutil I have done some preliminary research and learned that official Armbian support for Realtek SoCs is not available. However, I noticed that there is some ongoing community development for the RTD13xx family. My questions are: Has anyone had any success with a similar Realtek RTD1325 device? Would it be possible to adapt an existing build (perhaps one intended for the RTD1319) to work with this hardware? If so, what would be the main challenges (e.g., DTB files, drivers)? Could someone point me toward the best resources or forum threads for building a custom Armbian image for this kind of Realtek platform? I have experience with the command line and following technical guides, but I am not a developer. I am prepared for the possibility that this might not be feasible, but I am eager to learn and experiment. I will, of course, proceed with caution regarding the risks (e.g., bricking the device). Thank you in advance for your time and expertise. Additional Context: I have the device rooted and can access ADB.
 -
 Topic: Armbian GNU/Linux for 'TX9PROMAX' TV box (not to be confused with the Tanix TX9, this one is a fake version of Tanix TX9 Pro) I am a beginner who wants to flash Armbian GNU/Linux to my fake TV box. It claims a high-end device specifications on the manual, box and even on the underside of the box itself (such as 256 gigabytes of storage and 8 gigabytes of RAM). However, that is completely false, proven by opening the box. Upon analysis of the TV box, we see that it has the following device specifications (given below in the form of a table): Note that the device specifications have been checked and I am sure that these are the specifications. The GitHub repository for this project is: GitHub_Repository (ARMX9ProMax_Project)
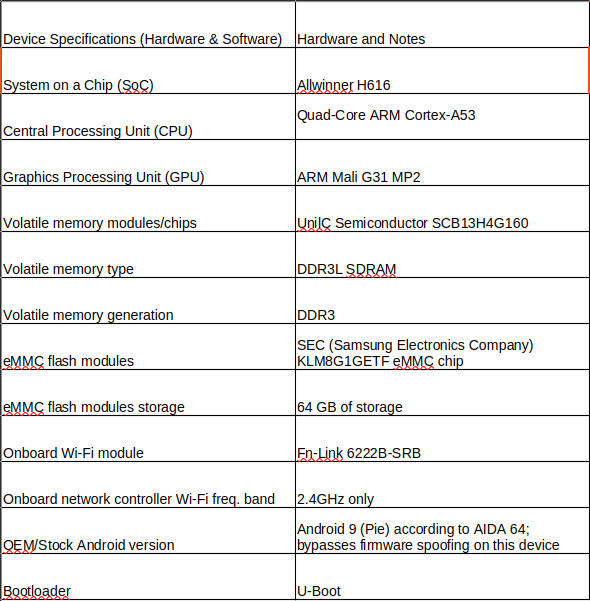
-
DISCLAIMER (PLEASE READ): everything you can find in this thread (binaries, texts, code snippets, etc...) are provided AS-IS and are not part of official Armbian project. For this reason not people from Armbian project nor myself are responsible for misuse or loss of functionality of hardware. Please don't ask about support or assistance in other non-community forums nor in the official Armbian github repository, instead post your questions in this thread, in the TV Boxes forum section (hardware related) or in the Peer-to-peer support section (general linux/software related). Thank you! This thread is to give stable and mature long-term range support to rk3318/rk3328 found in many tv boxes in Armbian project as Community Supported Configuration (CSC). The current work is mainlined into Armbian project, but your mileage may vary; most recent developments live on my personal fork on github -> here <- Important notes: is just a personal opinion, but apparently widely supported, that rk3318 chip is not an official rockchip part. They probably are scrap rk3328 parts which have not passed conformance tests but are sold anyway to tv boxes manufacturers. They don’t reach the same operating frequency of the rk3328, have much higher leakage currents (and thus higher temperatures) and often the boards they are installed on are low quality with low quality components, in fact a very very common issue is the eMMC failure due to bad parts and bad soldering. So said, I personally suggest not to buy any rk3318 tv box, but instead find a properly supported SBC (Single Board Computer) if you need a reliable product. In the unfortunate case you already have such product, this thread may help you have some fun with them. What works: • Works on RK3318 and RK3328 TV boxes with DDR3 memories • Mainline u-boot • Mainline ATF provided as Trusted Execution Environment • All 4 cores are working • Ethernet • Serial UART (configured at stock 1.5Mbps) • Thermals and frequency scaling • OTG USB 2.0 port (also as boot device!) • EHCI/OHCI USB 2.0 ports and XHCI USB 3.0 ports • MMC subsystem (including , SD and sdio devices) • Hardware video acceleration (fully supported via RKMPP on legacy kernel, support via hantro and rkvdec kernel driver on mainline) • Various WIFI over SDIO are supported • Full acceleration on legacy kernel and mainline kernel • U-boot boot order priority: first the sdcard, then the USB OTG port and eventually the internal ; you can install u-boot (and the whole system) in the internal and u-boot will always check for images on external sdcard/USB first. Unbrick: Technically, rockchip devices cannot be bricked. If the internal flash does not contain a bootable system, they will always boot from the sdcard. If, for a reason, the bootable system on the internal flash is corrupted or is unable to boot correctly, you can always force the maskrom mode shorting the clock pin on the PCB. The procedure is explained here for rk322x, but for rk3318/28 is the same. In most of the rk3318/28 boards, shorting the clock pin is difficult or impossible because eMMC are BGA chips with no exposed pins. Pay double attention when burning something on the internal flash memory and always test first the image booting from the sdcard to be sure it works before burning anything in internal flash. This is a list of posts where forum users have been able to spot the eMMC clock pin to trigger the maskrom mode: H96 Max+ (board signature: RK3318_V1.4) by @Gausus X88 PRO 10 (board signature: X88_PRO_B) by @mathgaming HK1 Max (board signature YX_RK3318) by @Constantin Gatej Ninkbox N1 Max RK3318 by @enigmasphinx Hongtop H50 (board signature t98-3318-221-v11) by @GmP Partecipation and debugging: If you want to partecipate or need help debugging issues, do not hesitate to share your experience with the installation procedure of the boxes. In case of issues and missed support, provide as many as possible of these things is very useful to try and bring support for an unsupported board: some photos of both sides of the board. Details of the eMMC, DDR and Wifi chips are very useful! upload the device tree binary (dtb) of your device. We can understand a lot of things of the hardware from that small piece of data; and alternative is a link to the original firmware (you can do a full backup with the Multitool); dmesg and other logs (use armbianmonitor -u that automatically collects and uploads the logs online) attach a serial converter to the device and provide the output of the serial port; Multimedia: Mainline kernel: 3D acceleration is provided by Lima driver and is already enabled. Hardware video decoding: https://forum.armbian.com/topic/19258-testing-hardware-video-decoding-rockchip-allwinner/ Legacy kernel: If you need multimedia features, like OpenGL/OpenGL ES acceleration, hardware accelerated Kodi, ffmpeg and mpv you can take a look to this post Installation (via SD card): Building: You can build your own image follow the common steps to build armbian for other tv boxes devices: when you are in the moment to choose the target board, switch to /TVB/ boards and select "rk3318-box" from the list. Prebuilt images: Nightly stables - built from trunk by Armbian servers and GPG-signed: https://github.com/armbian/community Multitool: Multitool - A small but powerful image for RK3318/RK3328 TV Box maintenance. Download it from here Quick installation instructions on eMMC: Build or download your preferred Armbian image and a copy of the Multitool; Burn the Multitool on an SD card; once done, place the Armbian image in images folder of the SD card NTFS partition; Plug the SD card in the TV box and plug in the power cord. After some seconds the blue led starts blinking and the Multitool appears; OPTIONAL: you can do a backup of the existing firmware with "Backup flash" menu option; Choose "Burn image to flash" from the menu, then select the destination device (usually mmcblk2) and the image to burn; Wait for the process to complete, then choose "Shutdown" from main menu; Unplug the power cord and the SD card, then replug the power cord; Wait for 10 seconds, then the led should start blinking and HDMI will turn on. The first time the boot process will take a couple of minutes or more because the filesystem is going to be resized, so be patient and wait for the login prompt. On first boot you will be asked for entering a password for root user of your choice and the name and password for a regular user Run rk3318-config to configure the board specific options Run armbian-config to configure timezone, locales and other personal options Congratulations, Armbian is now installed! Despite the procedure above is simple and reliable, I always recommend to first test that your device boots Armbian images from SD Card. Due to the really large hardware variety, there is the rare chance that the images proposed here may not boot. If a bad image is burned in , the box may not boot anymore forcing you to follow the unbrick section at the top of this post. Quick installation instructions to boot from SD Card: If you are already running Armbian from eMMC, skip to the next step. Instead if you are running the original firmware you need to first erase the internal flash; to do so download the Multitool, burn it on an SD Card, plug the SD Card and power the TV Box. Use "Backup flash" if you want to do a backup of the existing firmware, then choose "Erase flash" menu option. Build or download your preferred Armbian image; Uncompress and burn the Armbian image on the SD Card; Plug the SD Card in the TV Box and power it on; Wait for 10 seconds, then the led should start blinking and HDMI will turn on. The first time the boot process will take a couple of minutes or more because the filesystem is going to be resized, so be patient and wait for the login prompt; On first boot you will be asked for entering a password for root user of your choice and the name and password for a regular user Run rk3318-config to configure the board specific options Run armbian-config to configure timezone, locales and other personal options, or also to transfer the SD Card installation to internal ; Congratulations, Armbian is running from SD Card! Tutorial - How to install Armbian on your TV Box (by @awawa) : https://www.hyperhdr.eu/2022/01/tv-box-mania-i-part-x88-pro-10.html A note about boot device order: With Armbian also comes mainline U-boot. If you install Armbian, the bootloader will look for valid bootable images in this order: External SD Card External USB Stick in OTG Port Internal The Multitool does not boot / How to burn image directly on eMMC: Some boards have the sdcard attached to an auxiliary (called also sdmmc_ext or external) controller which is not the common one. Forum findings declare that those boards are not able to boot from sdcard with stock firmware and they neither do in maskrom mode: the stock firmware always boots even if you put the multitool on sdcard. In such case, burning images directly on eMMC is the only way to have a working Armbian installation. You can follow these instructions by @fabiobassa to burn images directly on eMMC: https://forum.armbian.com/topic/17597-csc-armbian-for-rk3318rk3328-tv-box-boards/?do=findComment&comment=130453 Notes and special hardware: Script to change DDR memory frequency here Wireless chip AP2734, SP2734, HY2734C and similars: they are clones of AmPAK AP6334 which is combo wifi + bluetooth of broadcom BCM4334/B0 chips. You may need a special nvram file, instructions by @paradigman are here Critics, suggestions and contributions are welcome! Credits: @fabiobassa for his ideas, inspiration, great generosity in giving the boards for development and testing. The project of bringing rk3318 into armbian would not have begun without his support! @hexdump for his precious support in early testing, ideas and suggestions @MX10.AC2Nfor his patience in testing mxq-rk3328-d4 board support All the rockhip64 maintainers at Armbian project who have done and do most of the work to support the platform
-
you fancy a fun distraction rather than a frustrating one: I'm also putting together a retro-gaming image for this SoC (HDMI to the TV + a gamepad = a neat little emulation box, and it's the same chip as some of the new handhelds). Early days, but it's in the works — one more reason to keep the board out of the eBay pile. 🙂
-
These instructions are for Amlogic CPUs for TV Boxes. Note: If you have previously run other distributions on the box such as coreelec the below installation will not work. You will need to restore the original android firmware before attempting the install. coreelec changes the boot environment in ways that are incompatible with these Armbian builds. Download links: Weekly Community Rolling Builds: https://www.armbian.com/amlogic-s9xx-tv-box/ or build your own image using the Armbian build framework Once you download your chosen build, you need to burn the image to an SD card. Generally balenaEtcher is recommended as it does a verification of the burn. Also be sure to use high quality SD cards. Once you have the SD card with your chosen build, then you need to edit the boot configuration file on the SD card. In the BOOT partition of the SD card there will be a file /boot/extlinux/extlinux.conf, that you need to edit. There will also be a extlinux.conf.template file to use as a reference. You will need to add a line into the extlinux.conf file for the Device Tree (dtb) file you will be using for your box. Place this line before the APPEND line as shown in the .template file. Basically you need to have the correct dtb for your box. You may need to attempt to use different dtb files until you find the one that works the best for your box's hardware (there are a bunch of dtb files in /boot/dtb/amlogic/... to try depending on your cpu architecture and hardware). It is unlikely that there will be a matching dtb file for your TV box. The idea is to find the one that works best for your box. This may mean that you try booting with different dtb files until you fine one that works good enough for your needs. By searching the forums you will find information about what dtbs other users have found work best for different boxes. Because you are booting from an SD card, you can easily try different dtb files. The dtd files are named by cpu family. So for example dtb files for the s905x2 cpu are named meson-g12a-*. Below there is a table that shows the identifiers for each familiy (g12a for s905x2 in this case). Next you need to copy the correct uboot for your box. This is needed for how these builds boot on amlogic boxes. There are four different u-boot files located in the /boot directory: u-boot-s905, u-boot-s905x-s912, u-boot-s905x2-s922, u-boot-s905x3 You need to copy (note copy not move) the u-boot file that matches your cpu to a new file named u-boot.ext in the /boot directory So for example with a TX3 mini box that has an s905w cpu you would copy u-boot-s905x-s912 to u-boot.ext: cp u-boot-s905x-s912 u-boot.ext (See table below for more details on which u-boot to use for which cpu) Once you have your SD card prepared you need to enable multiboot on the box. There are different ways documented to do this, but the most common is the "toothpick" method. The "toothpick" method means to hold the reset button while applying power to the box. The reset button is often hidden and located at the back of the audio/video jack connector. By pressing that button with a toothpick or other such pointed device you can enable multiboot. What you need to do is have the box unplugged, have your prepared sd card inserted, then press and hold the button while inserting the power connector. Then after a bit of time you can release the button. (I don't know exactly how long you need to hold the button after power is applied, but if it doesn't work the first time try again holding for longer or shorter times). You should now be booting into armbian/linux. Note that the first boot takes longer as it is enlarging the root filesystem to utilize the entire SD card. After you are satisfied that your box is working correctly for your needs you can optionally copy the installation from the SD card to internal emmc storage (assuming your box has emmc). (Note: Installing to emmc has some risks of bricking your box. Don't do this unless you feel you understand how to reinstall your box's android firmware) You install armbian to emmc by running the shell script in the /root directory: install-aml.sh. Note: It is not possible to install into emmc on boxes with the s905 cpu (s905x, s905w, s905x2, etc however should all be supported). It is recommended that you make a backup of emmc first. Also be prepared if anything goes horribly wrong with your emmc install to reinstall the android firmware using the Amlogic USB Burning Tool to unbrick your device. If you have or can find an original android firmware on the internet and you can generally (but not always) recover a bricked box using the Amlogic tool and the original firmware file. Mapping from CPU to uboot and dtb: u-boot-s905 s905 - gxbb u-boot-s905x2-s912 S905X - gxl S905W - gxl S905D - gxl S905L - gxl S805X - gxl S912 - gxm A311D - gxm u-boot-s905x2-s922 S905X2 - g12a S922 - g12b u-boot-s905x3 S905X3 - sm1 Not supported or not tested S805 - S905W2 - S905X4 - S805X2 - s4 A113D - axg A113X - axg Note: Followup posts in this thread should be limited to comments to improve or better understand these instructions. Other issues should be posted as new questions in the Amlogic CPU Boxes sub-forum.
-
Good day to you))) I have a TV BOX TX9Pro. Chassis (Main Board): H616/H313mini84 V2.0 kernel 4.9.170 I would like to run one of the armbian builds on it. But I can’t figure out how to do this, here are the logs when starting the console... Is there support for this device? tell me what to do and how... Thanks in advance. U-Boot SPL 2021.04 (May 25 2023 - 13:03:46 +0200) DRAM:This DRAM setup is currently not supported. resetting ... [70]HELLO! BOOT0 is starting! [73]BOOT0 commit : 803d783 [75]set pll start [78]periph0 has been enabled [81]set pll end [83]unknow PMU [84]unknow PMU [86]PMU: AXP1530 [88]dram return write ok [90]board init ok [92]DRAM BOOT DRIVE INFO: V0.645 [96]the chip id is 0x5d00 [98]chip id check OK [103]DRAM_VCC set to 1500 mv [106]DRAM CLK =600 MHZ [108]DRAM Type =3 (3:DDR3,4:DDR4,7:LPDDR3,8:LPDDR4) [116]Actual DRAM SIZE =1024 M [118]DRAM SIZE =1024 MBytes, para1 = 30eb, para2 = 4000000, dram_tpr13 = 6041 [132]DRAM simple test OK. [134]rtc standby flag is 0x0, super standby flag is 0x0 [140]dram size =1024 [143]card no is 2 [145]sdcard 2 line count 8 [147][mmc]: mmc driver ver 2020-09-10 15:32 [157][mmc]: Wrong media type 0x0, but host sdc2, try mmc first [163][mmc]: ***Try MMC card 2*** [202][mmc]: RMCA OK! [204][mmc]: bias 4 [207][mmc]: MMC 5.0 [209][mmc]: HSSDR52/SDR25 8 bit [212][mmc]: 50000000 Hz [214][mmc]: 7456 MB [216][mmc]: ***SD/MMC 2 init OK!!!*** [291]Loading boot-pkg Succeed(index=0). [294]Entry_name = u-boot [304]Entry_name = monitor [307]Entry_name = dtbo [310]Entry_name = dtb [314]tunning data addr:0x4a0003e8 [317]Jump to second Boot. NOTICE: BL3-1: v1.0(debug):a0d3abd NOTICE: BL3-1: Built : 17:32:02, 2020-10-20 NOTICE: BL3-1 commit: 8 ERROR: Error initializing runtime service tspd_fast NOTICE: BL3-1: Preparing for EL3 exit to normal world NOTICE: BL3-1: Next image address = 0x4a000000 NOTICE: BL3-1: Next image spsr = 0x1d3 U-Boot 2018.05 (Feb 15 2023 - 17:22:04 +0800) Allwinner Technology [00.391]CPU: Allwinner Family [00.394]Model: sun50iw9 I2C: ready [00.398]DRAM: 1 GiB [00.401]Relocation Offset is: 35ebf000 [00.442]secure enable bit: 0 [00.444]pmu_axp152_probe pmic_bus_read fail [00.448]PMU: AXP1530 [00.454]CPU=1008 MHz,PLL6=600 Mhz,AHB=200 Mhz, APB1=100Mhz MBus=400Mhz [00.462]drv_disp_init [00.492]__clk_enable: clk is null. [00.497]drv_disp_init finish [00.500]gic: sec monitor mode [00.522]flash init start [00.524]workmode = 0,storage type = 2 [00.528]MMC: 2 [00.529][mmc]: mmc driver ver uboot2018:2021-07-19 14:09:00 [00.535][mmc]: get sdc_type fail and use default host:tm4. [00.546][mmc]: SUNXI SDMMC Controller Version:0x40502 [00.590][mmc]: Best spd md: 4-HS400, freq: 3-100000000, Bus width: 8 [00.596]sunxi flash init ok [00.600]Loading Environment from SUNXI_FLASH... OK [00.609]usb burn from boot delay time 0 weak:otg_phy_config [00.623]usb prepare ok [01.426]overtime [01.430]do_burn_from_boot usb : no usb exist [01.434]boot_gui_init:start FAT: Misaligned buffer address (7be7be58) 32 bytes read in 4 ms (7.8 KiB/s) tcon_de_attach:de=0,tcon=2[01.567]boot_gui_init:finish [01.570]bmp_name=bootlogo.bmp 2764854 bytes read in 40 ms (65.9 MiB/s) [01.633]update dts ** Unrecognized filesystem type ** [01.642]load file(ULI/factory/rootwait init.txt) error. ** Unrecognized filesystem type ** [01.655]load file(ULI/factory/snum.txt) error. [01.659]name in map mac ** Unrecognized filesystem type ** [01.668]load file(ULI/factory/wifi_mac.txt) error. ** Unrecognized filesystem type ** [01.680]load file(ULI/factory/bt_mac.txt) error. ** Unrecognized filesystem type ** [01.692]load file(ULI/factory/selinux.txt) error. ** Unrecognized filesystem type ** [01.704]load file(ULI/factory/specialstr.txt) error. [01.713]update part info [01.738]update bootcmd [01.740]No ethernet found. Hit any key to stop autoboot: 0 [02.050]Starting kernel ... [02.053][mmc]: mmc exit start [02.101][mmc]: mmc 2 exit ok [ 0.000000] Booting Linux on physical CPU 0x0 [ 0.000000] Linux version 4.9.170 (akrd6@R740XD) (gcc version 5.3.1 20160412(Linaro GCC 5.3-2016.05) ) #80 SMP PREEMPT Wed Feb 15 17:22:30 CST 2023 [ 0.000000] Boot CPU: AArch64 Processor [410fd034] [ 0.000000] bootconsole [earlycon0] enabled [ 0.027874] BOOTEVENT: 27.858249: ON [ 0.242175] sunxi_i2c_probe()2209 - [i2c3] warning: failed to get regulator d [ 0.243164] sunxi_i2c_probe()2209 - [i2c5] warning: failed to get regulator d [ 0.244517] axp2101-regulator axp2101-regulator.0: Setting DCDC frequency fo unsupported AXP variant [ 0.244601] axp2101-regulator axp2101-regulator.0: Error setting dcdc frequecy: -22 [ 0.279245] [ac200] get ave_regulator_name failed! [ 0.279751] [ac200] pwm enable [ 0.363211] gpio_pin_4(229) gpio_request fail [ ▒[ 0.369727] uart uart1: get regulator failed [ 0.402346] [NAND][NE] Not found valid nand node on dts [ 0.411005] sunxi-wlan soc@03000000:wlan: get gpio chip_en failed [ 0.417894] sunxi-wlan soc@03000000:wlan: get gpio power_en failed [ 0.550010] hci: request ohci1-controller gpio:232 [ 0.742282] axp2101_pek: axp2101-pek can not register without irq [ 0.752785] sunxi_ir_startup: get ir protocol failed [ 0.761135] VE: get debugfs_mpp_root is NULL, please check mpp [ 0.761135] [ 0.769395] VE: sunxi ve debug register driver failed! [ 0.769395] [ 0.784659] mmc:failed to get gpios [ 0.865627] mmc:failed to get gpios [ 0.901895] FD655: ==fd655_driver_probe==================== [ 0.908284] FD655: : (null) [ 0.909038] sunxi-mmc sdc1: smc 2 p1 err, cmd 52, RTO !! [ 0.912260] sunxi-mmc sdc1: smc 2 p1 err, cmd 52, RTO !! [ 0.926757] FD655: : (null) [ 0.929915] sunxi-mmc sdc1: smc 2 p1 err, cmd 5, RTO !! [ 0.935814] sunxi-mmc sdc1: smc 2 p1 err, cmd 5, RTO !! [ 0.941713] sunxi-mmc sdc1: smc 2 p1 err, cmd 5, RTO !! [ 0.947606] sunxi-mmc sdc1: smc 2 p1 err, cmd 5, RTO !! [ 0.953859] FD655: register_fd655_driver: Successed to add fd655 module [ 0.973520] failed get gpio-spdif gpio from dts,spdif_gpio:-2 [ 0.983217] [audio-codec]dachpf_cfg configurations missing or invalid. [ 0.990865] lineout_vol:26, linein_gain:3, fmin_gain:3, digital_vol:0, adcdr_cfg:0, adchpf_cfg:0, dacdrc_cfg:0, dachpf_cfg:0, ramp_func_used:1, pa_msleep_tme:160, pa_ctl_level:0, gpio-spk:0 [ 1.014903] sndhdmi sndhdmi: ASoC: CPU DAI (null) not registered [ 1.021698] sndhdmi sndhdmi: snd_soc_register_card() failed: -517 [ 1.035293] sunxi-ahub-cpudai 5097000.cpudai3-controller: ahub cpudai id invlid [ 1.068733] ERROR: pinctrl_get for HDMI2.0 DDC fail [ 1.078344] tv_probe()1435 - of_property_read_string tv_power failed! [ 1.174637] cpu cpu1: opp_list_debug_create_link: Failed to create link [ 1.182156] cpu cpu1: _add_opp_dev: Failed to register opp debugfs (-12) [ 1.189771] cpu cpu2: opp_list_debug_create_link: Failed to create link [ 1.197234] cpu cpu2: _add_opp_dev: Failed to register opp debugfs (-12) [ 1.204828] cpu cpu3: opp_list_debug_create_link: Failed to create link [ 1.212279] cpu cpu3: _add_opp_dev: Failed to register opp debugfs (-12) [ 1.684491] selinux: avc: denied { set } for scontext=u:r:vendor_init:s0 context=u:object_r:default_prop:s0 tclass=property_service permissive=1 [ 1.684491] [ 1.702686] selinux: avc: denied { set } for scontext=u:r:vendor_init:s0 context=u:object_r:dalvik_prop:s0 tclass=property_service permissive=1 [ 1.702686] [ 2.576915] FAT-fs (mmcblk0p15): bogus number of reserved sectors console:/ $ [ 8.720978] apexd: Failed to walk /product/apex : Can't open /prduct/apex for reading : No such file or directory ^C 130|console:/ $ [ 22.711942] sunxi-mmc sdc1: smc 2 p1 err, cmd 52, RTO !! [ 22.913822] SSV6XXX_SDIO mmc2:0001:1: vendor = 0x3030 device = 0x3030 [ 22.947618] SSV6XXX_SDIO mmc2:0001:1: dataIOPort 0x10000 regIOPort 0x10020 [ 22.958352] sunxi-mmc sdc1: smc 2 p1 err, cmd 52, RE RCE !! [ 23.030814] SSV6XXX_SDIO mmc2:0001:1: dataIOPort 0x10000 regIOPort 0x10020 [ 23.057388] SSV6XXX HCI TX Task started. [ 23.135876] Enable HCI TX aggregation [ 24.042450] SSV WLAN driver SSV6006C: Set new macaddr [ 24.060821] SSV WLAN driver SSV6006C: VIF 08:1a:1e:fd:85:e4 of type 2 is added. [ 25.361805] SSV WLAN driver SSV6006C: Set new macaddr [ 25.386662] SSV WLAN driver SSV6006C: VIF 08:1a:1e:fd:85:e5 of type 2 is added. [ 27.173711] selinux: avc: denied { set } for property=sys.config.rootservice pid=2978 uid=0 gid=0 scontext=u:r:rootservice:s0 tcontext=u:object_r:system_prop:s0 tclass=property_service permissive=1 [ 27.173711] [ 27.207603] audit: rate limit exceeded [ 30.214797] apexd: Can't open /product/apex for reading : No such file or directory U-Boot SPL 2021.04 (May 25 2023 - 13:03:46 +0200) /system/bin/sh: syntax error: unexpected '(' 1|console:/ $ DRAM:This DRAM setup is currently not supported. /system/bin/sh: DRAM:This: inaccessible or not found 127|console:/ $ [ 34.750480] selinux: avc: denied { set } for property=supolicy.loaded pid=3902 uid=0 gid=0 scontext=u:r:toolbox:s0 tcontext=u:object_r:default_prop:s0 tclass=property_service permissive=1 [ 34.750480] U-Boot SPL 2021.04 (May 25 2023 - 13:03:46 +0200) /system/bin/sh: syntax error: unexpected '(' 1|console:/ $ DRAM:This DRAM setup is currently not supported. /system/bin/sh: DRAM:This: inaccessible or not found 127|console:/ $
-
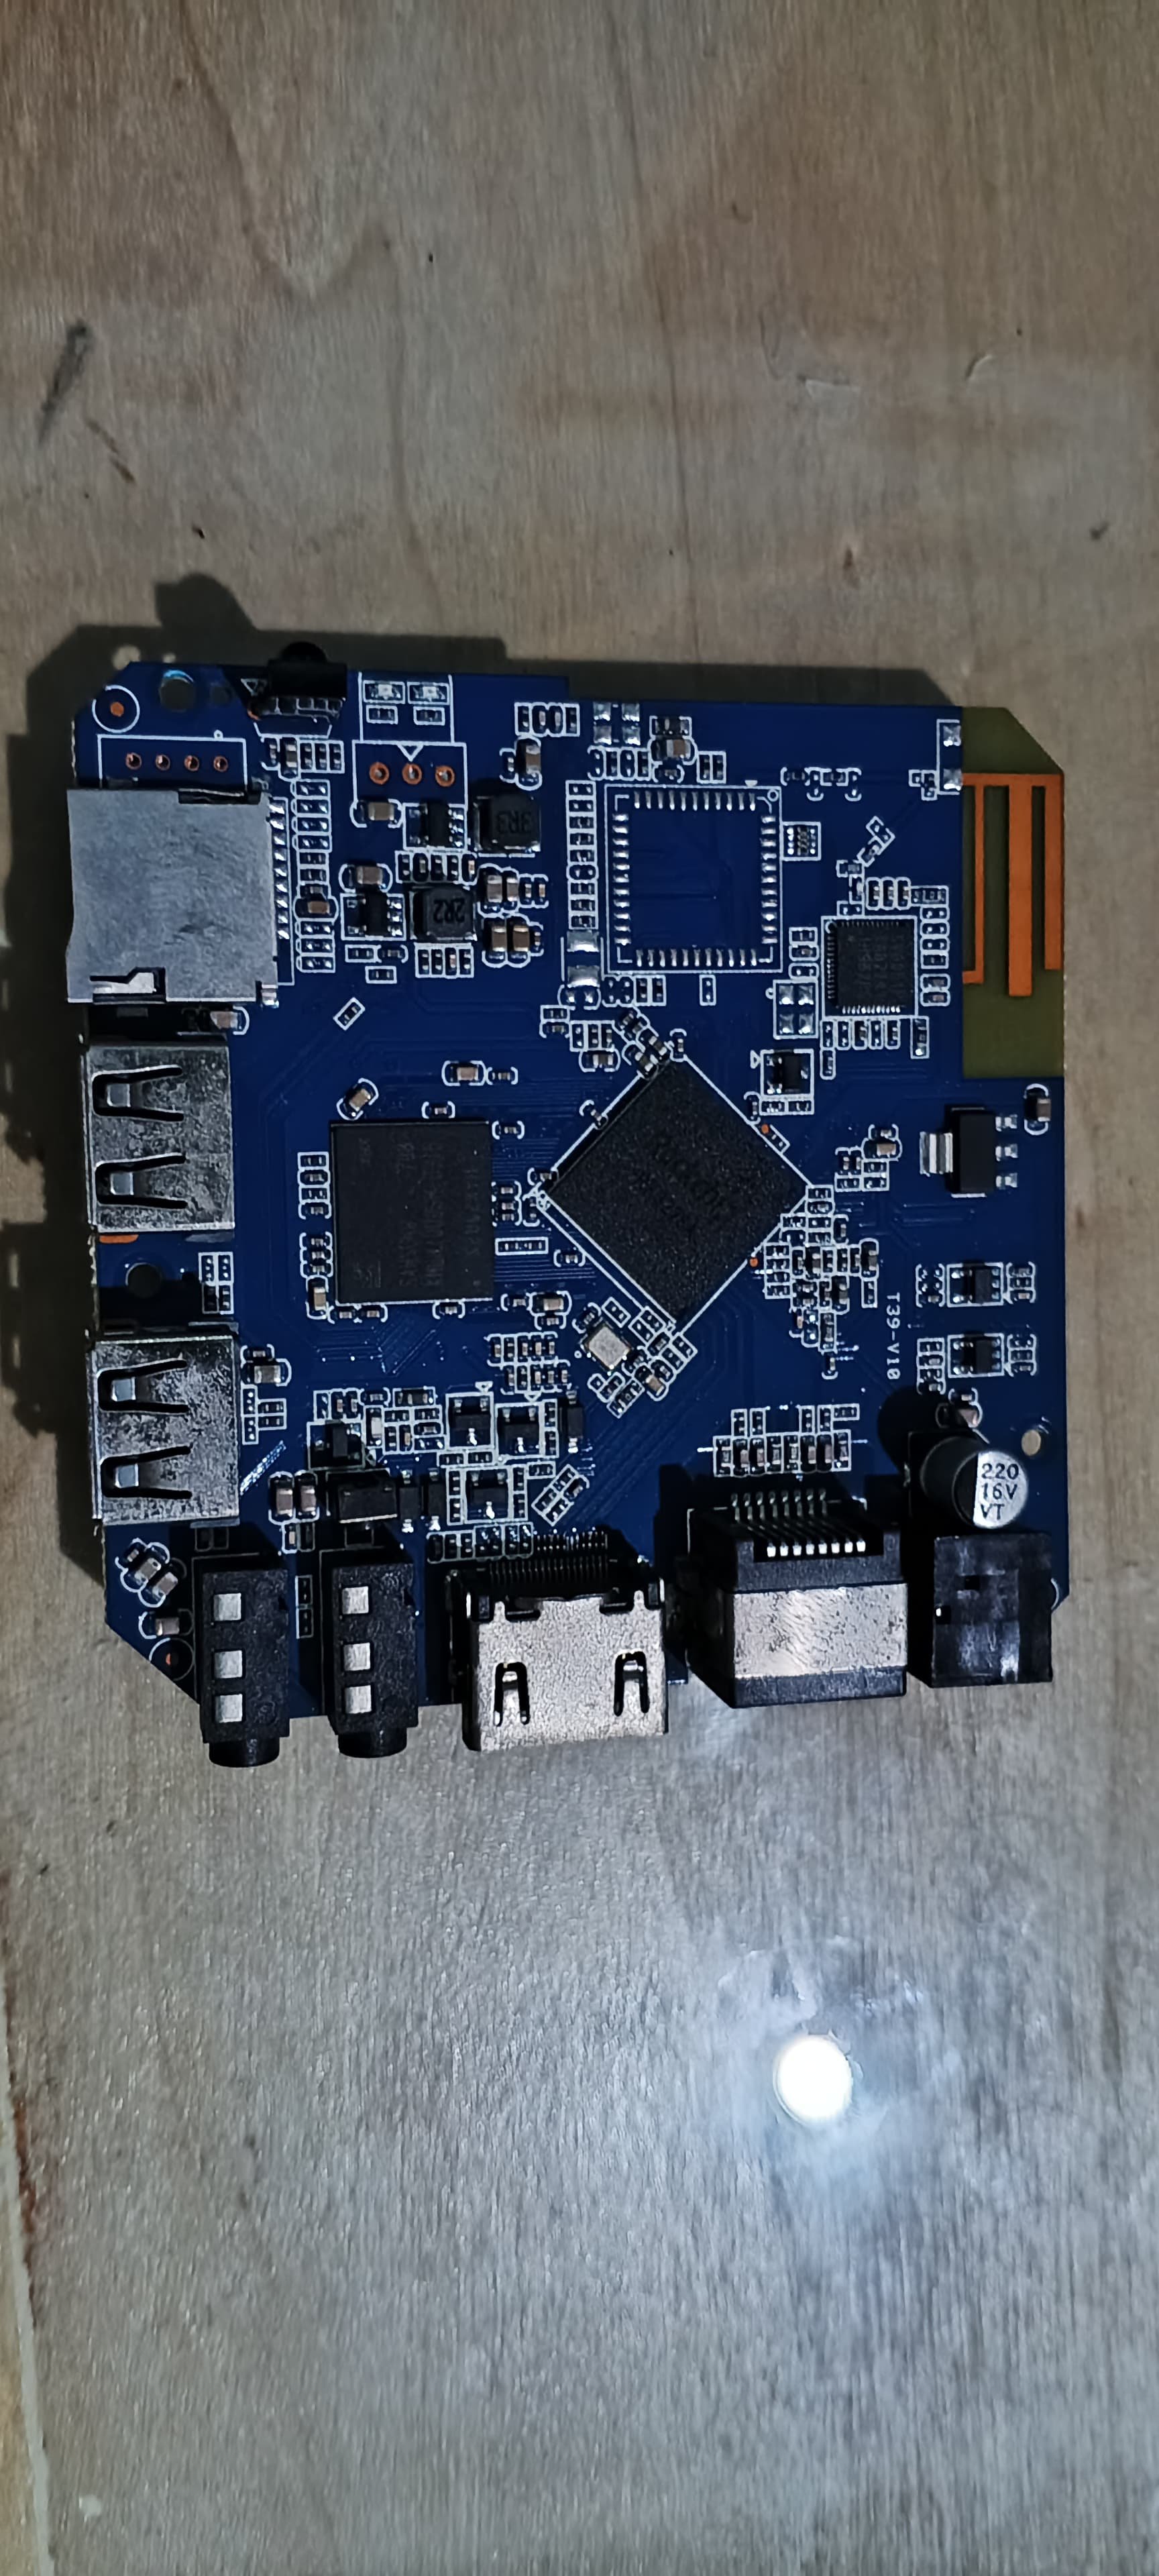
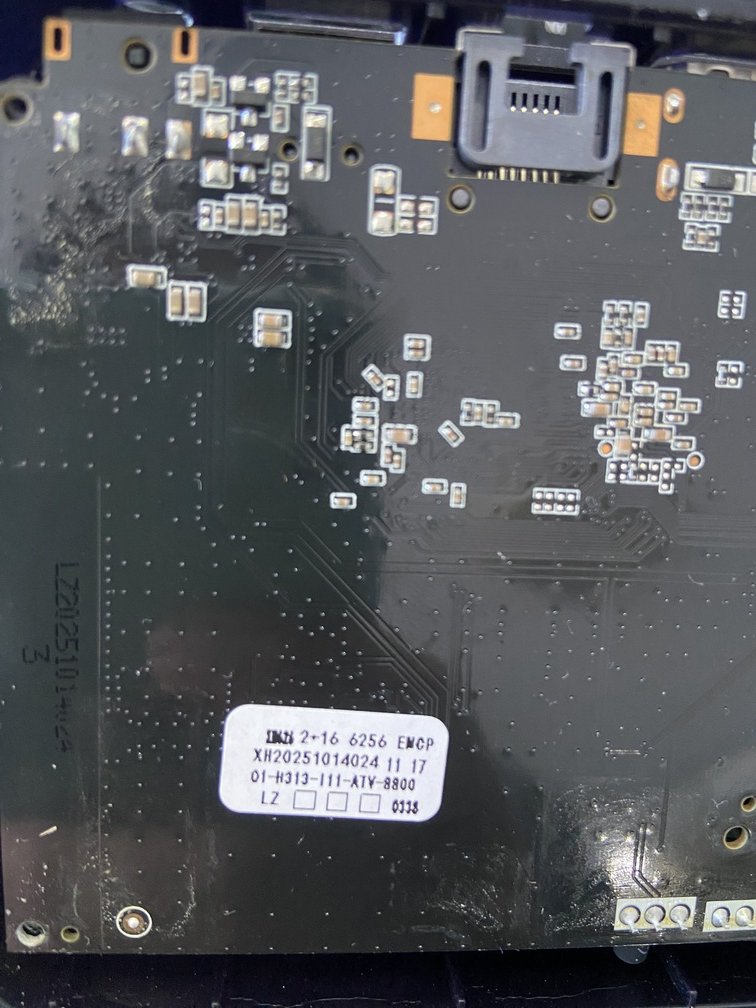
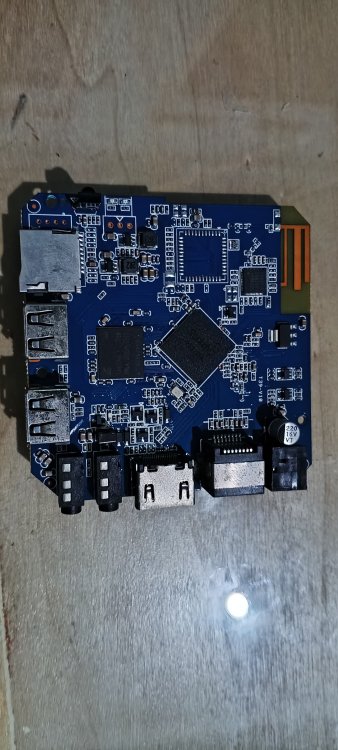
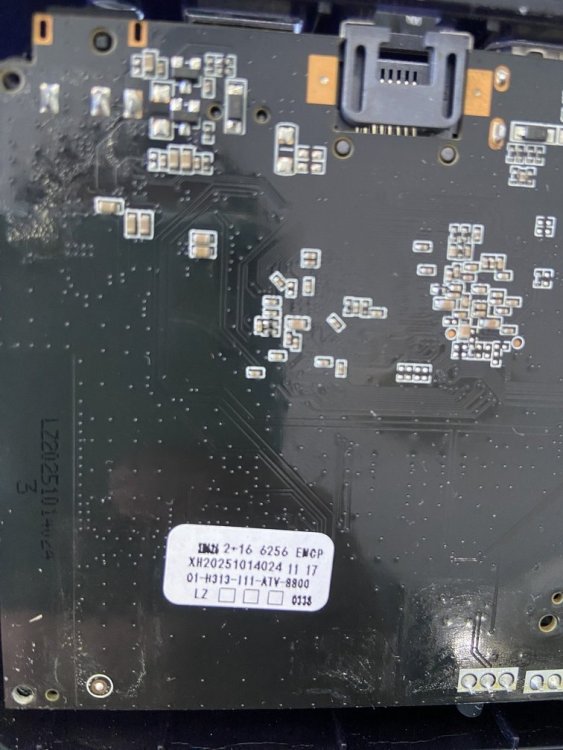
 Hello everyone, I am looking for the original firmware for my Q1 TV Box. Board information: Board: Q1-V4.0 CPU: Allwinner H313 RAM/Storage: 2GB + 16GB eMCP (Foresee) WiFi: SV6256P Sticker on PCB: Q1-H313-111-ATV-8800 XH20251014024 I have already tried searching on Needrom, but the available firmware is for Q1-V3.0 / A32 / A33 boards, and I am not sure it is compatible with my Q1-V4.0 board. Does anyone have the original firmware (.img) or know where I can download it? Thank you very much.
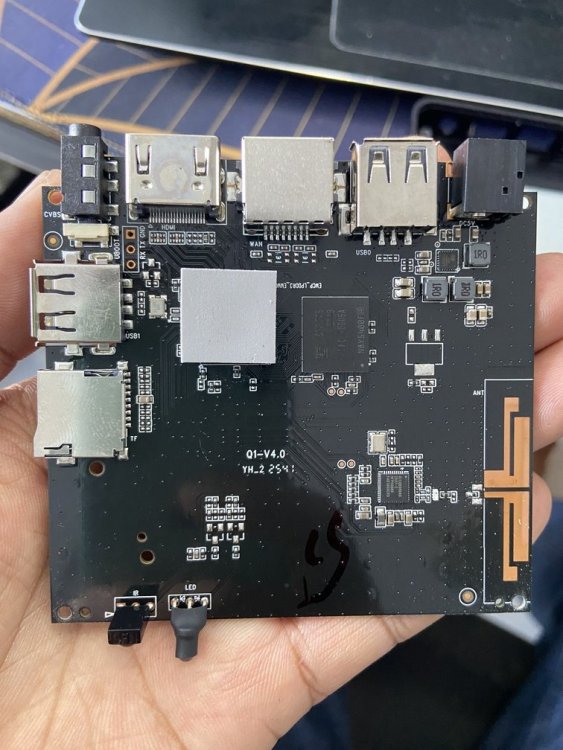
-
Hi — I've been following this thread, the 100 Mbit ethernet cap and the silent mainline boot hang especially. I ended up doing a full mainline bring-up of the 4A on 6.18.38 and got gigabit ethernet working properly (RX/TX), plus the boot hang sorted, so I wanted to share the whole patch series in case it helps here. Full disclosure: I'm not a kernel developer by trade — I got most of this working with a lot of help from AI coding agents, leaning hard on the BSP 5.15 as the source of truth. In my own testing everything seems stable, but I'd genuinely welcome anyone who actually knows this stuff to review the patches and tell me what I got wrong or did in a hacky way. No egos here — I'm sharing it in case it's useful and to get feedback, not claiming it's perfect. 🙂 What works (confirmed on hardware): HDMI KMS display (DE33/DE3.5 + TCON-TV + DW-HDMI 2.0 + Inno PHY) — 720p/1080p, clean VSU8 scaling GPU Mali-G57 (Panfrost) — accelerated (KDE Plasma Wayland) HDMI audio (i2s2 → dw-hdmi) — PCM out to the TV Ethernet GMAC1 (YT8531 PHY, RGMII) — full gigabit RX/TX WiFi AP6256 (BCM43456, brcmfmac, SDIO) — 2.4/5 GHz scan + assoc reboot / poweroff (sunxi_wdt / AXP717) AFBC scanout (v350 AFBD decoder) USB — the 4 rear ports (all USB 2.0; the board doesn't wire the SoC's USB3) — HID + mass storage, hotplug THS thermal sensors (5 zones: cpu_l / cpu_b / gpu / npu / ddr) + 110 °C critical trip CPU cpufreq/DVFS (little cluster up to 1.416 GHz, big cluster up to 1.8 GHz) + thermal throttling GPU devfreq/DVFS (Panfrost, 150–600 MHz) + thermal throttling HDMI HPD / hotplug (native, no force) Known not working / help wanted: eMMC — not tested (I don't have a module). I saw the mmc2: error -110 reports earlier in the thread; happy to dig into it with anyone who has eMMC. Hardware video decode (VPU) — no driver in 6.18 yet (software decode works). Suspend/hibernate — untested. 4GB variant — expected to work out of the box (the bootloader auto-detects the RAM size and fills in /memory at boot; verified over UART on the 2GB board). I only own the 2GB variant, so if you have the 4GB one, a free -h confirmation would be very welcome. NVMe SSD — untested, no drive here. Everything so far has only run from microSD. Freshness note: the cpufreq/thermal/GPU-devfreq block landed this very week and is still under soak testing on my board — everything else has more mileage. I'll report anything that shakes out in this thread. Repo / patches: https://github.com/ut-slayer/orangepi-4a-mainline It's a git format-patch series (~106 patches) on top of 6.18.38 vanilla, plus a defconfig and the board .dts. The README groups the patches by intended destination: generic sunxi fixes (pinctrl, watchdog vs PSCI, AXP717 poweroff, a RESET_GPIO/mmc-pwrseq bug affecting any sunxi board with SDIO WiFi), the HDMI KMS display series (largely ported/adapted from the minimyth2 / Justin Suess H728 work, with original authorship kept in the patch headers), the A523 CPU CCU + thermal + DVFS, board integration (dts + defconfig), and a few U-Boot BSP workarounds that go away with mainline U-Boot. Coming next: a ready-to-flash Debian 13 (Trixie) image with accelerated Panfrost and KDE Plasma on Wayland — I'll share it in this thread once it's had a bit more soak testing. Happy to open a PR against armbian/build (sun55iw3 family) with the board dts + defconfig + patches if there's interest. Feedback and testers welcome! Credits: minimyth2 / Justin Suess for the H728 display groundwork, and the linux-sunxi community. Cheers.
-
DISCLAIMERS (PLEASE READ): Everything you can find in this thread (binaries, texts, code snippets, etc...) are provided AS-IS and are not part of official Armbian project. For this reason not people from Armbian project nor myself are responsible for misuse or loss of functionality of hardware. THIS POST explains very well the troubles with TV Boxes and why they are not suitable for everyone Please don't ask about support or assistance in other non-community forums nor in the official Armbian github repository, instead post your questions in this thread, in the TV Boxes forum section (hardware related) or in the Peer-to-peer support section (general linux/software related). Following the recent thread on LibreElec forum about an unofficial image for rk3229 devices, I would like to make public the work made by me and @fabiobassa about bringing rk322x support to armbian. The project is now in -> mainline Armbian <- development fork -> here <- This first page and the last 3 or 4 pages of the thread are enough to get up to date with recent developments. Many useful experiences are scattered through the thread, but the most important things are collected here in the first page, so please read it carefully! Mainline kernel is fully supported and will receive most support in the future. Legacy kernel 4.4 is deprecated, but is kept around only for special purposes. What works: Should boot and work flawlessy on all boards with RK3228a, RK3228b and RK3229, with either DDR2 and DDR3 memories. Mainline u-boot Proprietary OPTEE provided as Trusted Execution Environment (needed for DRAM frequency scaling) All 4 cores are working Ethernet Serial UART (configured at 115200 bps, not 1.5Mbps!) Thermals, CPU and DRAM frequency scaling OTG USB 2.0 port (also as boot device!) EHCI/OHCI USB 2.0 ports MMC subsystem (including eMMC, SD and sdio devices) Hardware video acceleration NAND is available only on legacy kernel. To fully boot from NAND, use the Multitool and its steP-nand installation (instructions are below) Various WIFI over SDIO are supported (SSV6051P, SSV6256P, ESP8089, Realtek chips, etc...), ssv6256p driver is available only on legacy kernel Full GPU acceleration U-boot boot order priority: first the sdcard, then the USB OTG port and eventually the internal eMMC; you can install u-boot (and the whole system) in the internal eMMC and u-boot will always check for images on external sdcard/USB first. Unbrick: Technically, rockchip devices cannot be bricked. If the internal flash does not contain a bootable system, they will always boot from the sdcard. If, for a reason, the bootable system on the internal flash is corrupted or is unable to boot correctly, you can always force the maskrom mode shorting the eMMC clock pin on the PCB. Here there is the procedure, but you can also google around if you get stuck on a faulty bootloader, the technique is pretty simple and requires a simple screwdriver. There are however some unfortunate cases (expecially newer boards) where shorting the eMMC clock pin is difficult or impossibile, like eMMC or eMCP BGA chips with no exposed pins. In those cases pay double attention when burning something on the internal eMMC/eMCP and always test first the image from the sdcard to be sure it works before burning anything on eMMC/eMCP. Some useful links with pins, pads or procedures for some boards: Generic procedure for boards with non-BGA eMMC MXQPRO_V71 - eMCP H20 - eMCP ZQ01 - eMCP NAND vs eMMC vs eMCP difference: RK3228 and RK3229 tv boxes comes with three different flash memory chips: eMMC, NAND and eMCP. It does not depend upon the market name of the tv box and neither the internal board; manufacturers put whatever they find cheaper when they buy the components. NAND chip is just the non-volatile memory eMMC chip contains both the non-volatile memory plus a controller. eMCP chip contains the non-volatile memory, a controller for the non-volatile memory (like eMMC), but also contains a bank of DDR SDRAM memory on the same physical chip. The difference is very important, because eMMC and eMCP are far easier to support at various levels: the controller deals with the physical characteristics of the non-volatile memory, so the software has no to deal with. NAND chips instead are harder to support, because the software is required to deal with the physical characteristics and non-standard things that depends upon the NAND manufacturer. If you have a NAND chips you're unlucky because mainline kernel currently cannot access it, but also because you need special care and instructions explained later. You can discover if you have a NAND, eMMC or eMCP chip looking on the board are reading the signature on the flash memory chip. The Multitool (see later) also can detect which chip you have onboard: the program will warn you at startup if you have a NAND chip. NAND bootloader upgrade: IMPORTANT: don't do this is you have an eMMC or eMCP; skip this paragraph if you are unsure too! For very expert people who are having issues when (re)booting images, there is the chance to upgrade the bootloader on NAND. The NAND bootloader is nothing else than a regular idbloader (see official rockchip documentation) but contains some bits to correctly access the data on your flash memory. Upgrading requires to erase the existing flash content, in the worst case will require you to follow the Unbrick procedure above or restore an older but more compatible bootloader. If you are not mentally ready to overcome possible further issues, don't do this! The detailed instructions and the binaries are available at this post Multimedia: Mainline kernel: 3D acceleration is provided by Lima driver and is already enabled. Hardware video decoding: https://forum.armbian.com/topic/19258-testing-hardware-video-decoding-rockchip-allwinner/ Deprecated legacy kernel: multimedia features, like OpenGL/OpenGL ES acceleration, hardware accelerated Kodi, ffmpeg and mpv you can take a look to this post An effective tutorial from @Hai Nguyen on how to configure a box as a hi-quality music player using an USB audio card, and controlling it via remote control is available in this post Brief explanation about kernel naming: current kernel is the mainline LTS kernel version, most maintained and tested. This is the suggested version for production devices. If you don't know what to pick, pick this. legacy kernel (version 4.4) is provided by manufacturer; it is deprecated, unmaintained and not suggested. edge kernel is the development mainline kernel version, with experimental features and drivers; usually stable but perhaps suitable for production devices. You can switch from one kernel flavour to another using armbian-config or manually via apt. Installation (via SD card): Building: You can build your own image follow the common steps to build armbian for other tv boxes devices: when you are in the moment to choose the target board, switch to CSC/TVB/EOL boards and select "rk322x-box" from the list. Download prebuilt images from the following links: Archive builds (GPG-signed) - https://imola.armbian.com/dl/rk322x-box/archive/ SUGGESTED - Nightly built from trunk each week by Armbian servers (GPG-signed) - https://github.com/armbian/community Old images provided by me (unsigned and outdated) - https://users.armbian.com/jock/rk322x/armbian/stable Archived/older images: https://armbian.hosthatch.com/archive/rk322x-box/archive/ Multitool: The Multitool is a small but powerful tool to do quick backup/restore of internal flash, but also burn images and general system rescue and maintenance via terminal or SSH. Compressed images will be uncompressed on fly. Multitool - A small but powerful image for RK322x TV Box maintenance (instructions to access via network here) Quick installation instructions on eMMC: Build or download your preferred Armbian image and a copy of the Multitool; Burn the Multitool on an SD card; once done, place the Armbian image in images folder of the SD card NTFS partition; Plug the SD card in the TV box and plug in the power cord. After some seconds the blue led starts blinking and the Multitool appears; OPTIONAL: you can do a backup of the existing firmware with "Backup flash" menu option; Choose "Burn image to flash" from the menu, then select the destination device (usually mmcblk2) and the image to burn; Wait for the process to complete, then choose "Shutdown" from main menu; Unplug the power cord and the SD card, then replug the power cord; Wait for 10 seconds, then the led should start blinking and HDMI will turn on. The first time the boot process will take a couple of minutes or more because the filesystem is going to be resized, so be patient and wait for the login prompt. On first boot you will be asked for entering a password for root user of your choice and the name and password for a regular user Run sudo rk322x-config and select your board characteristics to enable leds, wifi chips, high-speed eMMC, etc... Run sudo armbian-config to configure timezone, locales and other personal options Congratulations, Armbian is now installed and configured! Despite the procedure above is simple and reliable, I always recommend to first test that your device boots Armbian images from SD Card. Due to the really large hardware variety, there is the rare chance that the images proposed here may not boot. If a bad image is burned in eMMC, the box may not boot anymore forcing you to follow the unbrick section at the top of this post. Quick installation instructions on NAND: Build or download your preferred Armbian image and a copy of the Multitool; Burn the Multitool on an SD card; once done, place the Armbian legacy kernel image in images folder of the SD card NTFS partition; Plug the SD card in the TV box and plug in the power cord. After some seconds the blue led starts blinking and the Multitool appears; OPTIONAL: you can do a backup of the existing firmware with "Backup flash" menu option; Choose "Burn Armbian image via steP-nand" from the menu, then select the destination device (usually rknand0) and the image to burn; Wait for the process to complete, then choose "Shutdown" from main menu; Unplug the power cord and the SD card, then replug the power cord; Wait for 10 seconds, then the led should start blinking and HDMI will turn on. The first time the boot process will take a couple of minutes or more because the filesystem is going to be resized, so be patient and wait for the login prompt. On first boot you will be asked for entering a password for root user of your choice and the name and password for a regular user Run sudo rk322x-config and select your board characteristics to enable leds, wifi chips, etc... Run armbian-config to configure timezone, locales and other personal options Congratulations, Armbian is now installed! Alternative: you can install the bootloader in NAND and let it boot from SD Card or USB: Download a copy of the Multitool and burn it on an SD card; Plug the SD card in the TV box and plug in the power cord. After some seconds the blue led starts blinking and the Multitool appears; RECOMMENDED: make a backup of the existing firmware with "Backup flash" menu option; Choose "Install Jump Start for Armbian" menu option: the Jump Start uses the internal NAND to boot from external SD Card or external USB Stick; Follow the general instructions to boot from SD Card below, skip the first erase eMMC step. Quick installation instructions to boot from SD Card: If you are already running Armbian from eMMC, skip to the next step. Instead if you are running the original firmware you need to first erase the internal eMMC; to do so download the Multitool, burn it on an SD Card, plug the SD Card and power the TV Box. Use "Backup flash" if you want to do a backup of the existing firmware, then choose "Erase flash" menu option. Build or download your preferred Armbian image; Uncompress and burn the Armbian image on the SD Card; Plug the SD Card in the TV Box and power it on; Wait for 10 seconds, then the led should start blinking and HDMI will turn on. The first time the boot process will take a couple of minutes or more because the filesystem is going to be resized, so be patient and wait for the login prompt; On first boot you will be asked for entering a password for root user of your choice and the name and password for a regular user Run sudo rk322x-config and select your board characteristics to enable leds, wifi chips, high-speed eMMC or NAND, etc... Run armbian-config to configure timezone, locales and other personal options, or also to transfer the SD Card installation to internal eMMC; Congratulations, Armbian is running from SD Card! A note about boot device order: With Armbian also comes mainline U-boot. If you install Armbian or just the bootloader in the eMMC or the Jump Start on internal NAND, the bootloader will look for valid bootable images in this order: External SD Card External USB Stick in OTG Port Internal eMMC Installation (without SD card, board with eMMC) If you have no sd card slot and your board has an eMMC, you can burn the armbian image directly on the internal eMMC using rkdeveloptool and a male-to-male USB cable: Download your preferred Armbian image from Armbian download page and decompress it. Download the rk322x bootloader: rk322x_loader_v1.10.238_256.bin Download a copy of rkdeveloptool: a compiled binary is available in the official rockchip-linux rkbin github repository. Unplug the power cord from the tv box Plug an end of an USB Male-to-male cable into the OTG port (normally it is the lone USB port on the same side of the Ethernet, HDMI, analog AV connectors) while pressing the reset microbutton with a toothpick. You can find the reset microbutton in a hole in the back of the box, but sometimes it is hidden into the AV analog jack Plug the other end of the USB Male-to-male cable into an USB port of your computer If everything went well, run lsusb: you should see a device with ID 2207:320b Run sudo rkdeveloptool rd 3 (if this fails don't worry and proceed to next step) Run sudo rkdeveloptool db rk322x_loader_v1.10.238_256.bin Run sudo rkdeveloptool wl 0x0 image.img (change image.img this with the real Armbian image filename) Unplug the power cord Done! Installation (without SD card, board with NAND) If you are in the unfortunate case you can't use an SD card for installation and your board has a NAND chip, you still have an option to use the quick Multitool installation steps via USB. Obtain a copy of rkdeveloptool: a compiled binary is available in the official rockchip-linux rkbin github repository. Unplug the power cord from the tv box Plug an end of an USB Male-to-male cable into the OTG port (normally it is the lone USB port on the same side of the Ethernet, HDMI, analog AV connectors) while pressing the reset microbutton with a toothpick. You can find the reset microbutton in a hole in the back of the box, but sometimes it is hidden into the AV analog jack Plug the other end of the USB Male-to-male cable into an USB port of your computer If everyting went well, using lsusb you should see a device with ID 2207:320b Run sudo rkdeveloptool wl 0x4000 u-boot-main.img (download u-boot-main.img.xz , don't forget to decompress it!) Unplug the power cord Now you can follow the instructions on how to install on eMMC/NAND via SD card, just use instead an USB stick to do all the operations and plug it into the USB OTG port. Once you reboot, USB OTG port will be used as a boot device. NOTE: NAND users without SD slot may be unhappy to know that it will be difficult to do extra maintenance with Multitool in case something breaks in the installed Armbian system: installing u-boot-main.img makes the installed system unbootable because it is missing the NAND driver. Alternative backup, restore and erase flash for EXPERTS: These backup, restore and erase flash procedures are for experts only. They are kept here mostly for reference, since the Multitool is perfectly able to do same from a very comfy interface and is the suggested way to do maintenance. Backup: Obtain a copy of rkdeveloptool: a compiled binary is available in the official rockchip-linux rkbin github repository. If you prefer, you can compile it yourself from the sources available at official rockchip repository Unplug the power cord from the tv box Plug an end of an USB Male-to-male cable into the OTG port (normally it is the lone USB port on the same side of the Ethernet, HDMI, analog AV connectors) while pressing the reset microbutton with a toothpick. You can find the reset microbutton in a hole in the back of the box, but sometimes it is hidden into the AV analog jack Plug the other end of the USB Male-to-male cable into an USB port of your computer If everyting went well, using lsusb you should see a device with ID 2207:320b change directory and move into rkbin/tools directory, run ./rkdeveloptool rfi then take note of the FLASH SIZE megabytes (my eMMC is 8Gb, rkdeveloptool reports 7393 megabytes) run ./rkdeveloptool rl 0x0 $((FLASH_SIZE * 2048)) backup.data (change FLASH_SIZE with the value you obtained the step before) once done, the internal eMMC is backed up to backup.data file Restore: first we have to restore the original bootloader, then restore the original firmware. Running rkdeveloptool with these switches will accomplish both the jobs: ./rkdeveloptool db rk322x_loader_v1.10.238_256.bin Downloading bootloader succeeded. ./rkdeveloptool ul rk322x_loader_v1.10.238_256.bin Upgrading loader succeeded. ./rkdeveloptool wl 0x0 backup.data Write LBA from file (100%) Download here: Erase the flash memory: clearing the internal eMMC/NAND memory makes the SoC look for external SD Card as first boot option. If there isn't any suitable SD Card, the SoC enters maskrom mode, which can then be used for full eMMC/NAND access using rkdeveloptool. This is perfectly fine if your box has an eMMC flash memory. NOTE: In case you have a NAND flash memory this option is however discouraged. The original bootloader contains some special parameters to correctly access the data. Clearing the flash memory will probably garbage the NAND data and restoring the bootloader may require some special instructions. Obtain a copy of rkdeveloptool: a compiled binary is available in the official rockchip-linux rkbin github repository. If you prefer, you can compile it yourself from the sources available at official rockchip repository Unplug the power cord from the board Plug an end of an USB Male-to-male cable into the OTG port (normally it is the lone USB port on the same side of the Ethernet, HDMI, analog AV connectors) while pressing the reset microbutton with a toothpick. You can find the reset microbutton in a hole in the back of the box, but sometimes it is hidden into the AV analog jack Plug the other end of the USB Male-to-male cable into an USB port of your computer If everyting went well, using lsusb you should see a device with ID 2207:320b run ./rkdeveloptool ef and wait a few seconds once done, the internal eMMC is erased and the device will boot from the sdcard from now on Partecipation and debugging: If you want to partecipate or need help debugging issues, do not hesitate to share your experience with the installation procedure of the boxes. In case of issues and missed support, provide as many as possible of these things is very useful to try and bring support for an unsupported board: some photos of both sides of the board. Details of the eMMC, DDR and Wifi chips are very useful! upload the device tree binary (dtb) of your device. We can understand a lot of things of the hardware from that small piece of data; and alternative is a link to the original firmware (you can do a full backup with the Multitool); dmesg and other logs (use armbianmonitor -u that automatically collects and uploads the logs online) attach a serial converter to the device and provide the output of the serial port; Critics, suggestions and contributions are welcome! Credits: @fabiobassa for his ideas, inspiration, great generosity in giving the boards for development and testing. The project of bringing rk322x into armbian would not have begun without his support! Justin Swartz, for his work and research to bring mainline linux on rk3229 (repository here) @knaerzche for his great contribution to libreelec support and mainline patches @Alex83 for his patience in testing the NAND bootloader upgrade procedure on his board @Jason Duhamell for his generous donation that allowed researching eMCP boards and esp8089 wifi chip