Search the Community
Showing results for 'tv'.
-
So.... I am the winner of a Inovato Quadra4K from a drawing at my amateur radio club meeting. Yeah! Cool! It runs a software called HamClock automagically.... BUT WAIT! There is MORE! You can exit that app and run other applications... Providing you have a mouse & keyboard (because I am a native WinWeenie) or keyboard if you are a Linux forever personage. It also has a wireless interface that I would like to configure so it doesn't have to have an Ethernet tail tied to a port on our ISP router. I would rather it was mounted to a HDMI TV or monitor. So, I need the keyboard (and because I am a longtime WinWeenie and rodent dependent) mouse to reconfigure it. I would like to have it use a USB Logitech Unifier Nano dongle with wireless keyboard/mouse. By the way, the brilliant man that came up with this computer is trudging the same path I am, fighting cancer. His fight has gotten so tough he has shut down his company. I hope he gets better. Is there already a compiled binary for this with directions,,. or do I have to master the dark arts of programming routines, subroutines, interrupts, memory fetches, writes, threads and all that then compile it into something the machine understands? Please understand I didn't even take typing in high school, so college was a real bear.... When I was in high school Jobs and Wozniak were still dumpster diving behind Xerox-Park Corporation and Radio Shack. Any takers on this one? Thanks in advance, Dave, The-Other-One
-
Hello, sorry for my very bad english. I recently I bought a TV box with an h618 processor And I want to install Linux to make it a server but I only find images for the h616 processor, can I install one of these images on my TV box? It seems that the h616 processor and the h618 procesador are almost the same Thanks :D
-
Hello everyone, I have three Amlogic S905x TV boxes with a dead EMMC, and one with a desoldered EMMC (since I thought without it, they would boot from the microSD card). Is there a way to force them to boot into Armbian? Holding the power button doesn't work, and desoldering the EMMC didn't help either. I was able to boot Armbian using UART. A workaround is to use Ardruino, which sends commands to boot Armbian after a while, but that's a workaround, and I'd like a more elegant solution. 1) Download the *.img.gz image for the amlogic_s905x 2) Write the image to the microSD card using Rufus. 3) Connect the UART. Steps 2-6 in the brick instructions. 4) Insert the microSD card with Armbian into the console. 5) Turn on the console, close the testpoint, and at a certain point, the UART boot log will stop at gxl_p212_v1#. 6) Execute the following commands: mmc dev 1 env default -a -f;save setenv preboot 'if fatload mmc 0 1020000 aml_autoscript; then autoscr 1020000; fi; if fatload usb 0 1020000 aml_autoscript; then autoscr 1020000; fi; if fatload mmc 1 1020000 emmc_autoscript; then autoscr 1020000; fi;' save reboot Is there a simpler way to boot from a microSD card to default settings? Maybe I need to cleverly write a bootloader to it?
-
DISCLAIMERS (PLEASE READ): Everything you can find in this thread (binaries, texts, code snippets, etc...) are provided AS-IS and are not part of official Armbian project. For this reason not people from Armbian project nor myself are responsible for misuse or loss of functionality of hardware. THIS POST explains very well the troubles with TV Boxes and why they are not suitable for everyone Please don't ask about support or assistance in other non-community forums nor in the official Armbian github repository, instead post your questions in this thread, in the TV Boxes forum section (hardware related) or in the Peer-to-peer support section (general linux/software related). Following the recent thread on LibreElec forum about an unofficial image for rk3229 devices, I would like to make public the work made by me and @fabiobassa about bringing rk322x support to armbian. The project is now in -> mainline Armbian <- development fork -> here <- This first page and the last 3 or 4 pages of the thread are enough to get up to date with recent developments. Many useful experiences are scattered through the thread, but the most important things are collected here in the first page, so please read it carefully! Mainline kernel is fully supported and will receive most support in the future. Legacy kernel 4.4 is deprecated, but is kept around only for special purposes. What works: Should boot and work flawlessy on all boards with RK3228a, RK3228b and RK3229, with either DDR2 and DDR3 memories. Mainline u-boot Proprietary OPTEE provided as Trusted Execution Environment (needed for DRAM frequency scaling) All 4 cores are working Ethernet Serial UART (configured at 115200 bps, not 1.5Mbps!) Thermals, CPU and DRAM frequency scaling OTG USB 2.0 port (also as boot device!) EHCI/OHCI USB 2.0 ports MMC subsystem (including eMMC, SD and sdio devices) Hardware video acceleration NAND is available only on legacy kernel. To fully boot from NAND, use the Multitool and its steP-nand installation (instructions are below) Various WIFI over SDIO are supported (SSV6051P, SSV6256P, ESP8089, Realtek chips, etc...), ssv6256p driver is available only on legacy kernel Full GPU acceleration U-boot boot order priority: first the sdcard, then the USB OTG port and eventually the internal eMMC; you can install u-boot (and the whole system) in the internal eMMC and u-boot will always check for images on external sdcard/USB first. Unbrick: Technically, rockchip devices cannot be bricked. If the internal flash does not contain a bootable system, they will always boot from the sdcard. If, for a reason, the bootable system on the internal flash is corrupted or is unable to boot correctly, you can always force the maskrom mode shorting the eMMC clock pin on the PCB. Here there is the procedure, but you can also google around if you get stuck on a faulty bootloader, the technique is pretty simple and requires a simple screwdriver. There are however some unfortunate cases (expecially newer boards) where shorting the eMMC clock pin is difficult or impossibile, like eMMC or eMCP BGA chips with no exposed pins. In those cases pay double attention when burning something on the internal eMMC/eMCP and always test first the image from the sdcard to be sure it works before burning anything on eMMC/eMCP. Some useful links with pins, pads or procedures for some boards: Generic procedure for boards with non-BGA eMMC MXQPRO_V71 - eMCP H20 - eMCP ZQ01 - eMCP NAND vs eMMC vs eMCP difference: RK3228 and RK3229 tv boxes comes with three different flash memory chips: eMMC, NAND and eMCP. It does not depend upon the market name of the tv box and neither the internal board; manufacturers put whatever they find cheaper when they buy the components. NAND chip is just the non-volatile memory eMMC chip contains both the non-volatile memory plus a controller. eMCP chip contains the non-volatile memory, a controller for the non-volatile memory (like eMMC), but also contains a bank of DDR SDRAM memory on the same physical chip. The difference is very important, because eMMC and eMCP are far easier to support at various levels: the controller deals with the physical characteristics of the non-volatile memory, so the software has no to deal with. NAND chips instead are harder to support, because the software is required to deal with the physical characteristics and non-standard things that depends upon the NAND manufacturer. If you have a NAND chips you're unlucky because mainline kernel currently cannot access it, but also because you need special care and instructions explained later. You can discover if you have a NAND, eMMC or eMCP chip looking on the board are reading the signature on the flash memory chip. The Multitool (see later) also can detect which chip you have onboard: the program will warn you at startup if you have a NAND chip. NAND bootloader upgrade: IMPORTANT: don't do this is you have an eMMC or eMCP; skip this paragraph if you are unsure too! For very expert people who are having issues when (re)booting images, there is the chance to upgrade the bootloader on NAND. The NAND bootloader is nothing else than a regular idbloader (see official rockchip documentation) but contains some bits to correctly access the data on your flash memory. Upgrading requires to erase the existing flash content, in the worst case will require you to follow the Unbrick procedure above or restore an older but more compatible bootloader. If you are not mentally ready to overcome possible further issues, don't do this! The detailed instructions and the binaries are available at this post Multimedia: Mainline kernel: 3D acceleration is provided by Lima driver and is already enabled. Hardware video decoding: https://forum.armbian.com/topic/19258-testing-hardware-video-decoding-rockchip-allwinner/ Deprecated legacy kernel: multimedia features, like OpenGL/OpenGL ES acceleration, hardware accelerated Kodi, ffmpeg and mpv you can take a look to this post An effective tutorial from @Hai Nguyen on how to configure a box as a hi-quality music player using an USB audio card, and controlling it via remote control is available in this post Brief explanation about kernel naming: current kernel is the mainline LTS kernel version, most maintained and tested. This is the suggested version for production devices. If you don't know what to pick, pick this. legacy kernel (version 4.4) is provided by manufacturer; it is deprecated, unmaintained and not suggested. edge kernel is the development mainline kernel version, with experimental features and drivers; usually stable but perhaps suitable for production devices. You can switch from one kernel flavour to another using armbian-config or manually via apt. Installation (via SD card): Building: You can build your own image follow the common steps to build armbian for other tv boxes devices: when you are in the moment to choose the target board, switch to CSC/TVB/EOL boards and select "rk322x-box" from the list. Download prebuilt images from the following links: Archive builds (GPG-signed) - https://imola.armbian.com/dl/rk322x-box/archive/ SUGGESTED - Nightly built from trunk each week by Armbian servers (GPG-signed) - https://github.com/armbian/community Old images provided by me (unsigned and outdated) - https://users.armbian.com/jock/rk322x/armbian/stable Archived/older images: https://armbian.hosthatch.com/archive/rk322x-box/archive/ Multitool: The Multitool is a small but powerful tool to do quick backup/restore of internal flash, but also burn images and general system rescue and maintenance via terminal or SSH. Compressed images will be uncompressed on fly. Multitool - A small but powerful image for RK322x TV Box maintenance (instructions to access via network here) Quick installation instructions on eMMC: Build or download your preferred Armbian image and a copy of the Multitool; Burn the Multitool on an SD card; once done, place the Armbian image in images folder of the SD card NTFS partition; Plug the SD card in the TV box and plug in the power cord. After some seconds the blue led starts blinking and the Multitool appears; OPTIONAL: you can do a backup of the existing firmware with "Backup flash" menu option; Choose "Burn image to flash" from the menu, then select the destination device (usually mmcblk2) and the image to burn; Wait for the process to complete, then choose "Shutdown" from main menu; Unplug the power cord and the SD card, then replug the power cord; Wait for 10 seconds, then the led should start blinking and HDMI will turn on. The first time the boot process will take a couple of minutes or more because the filesystem is going to be resized, so be patient and wait for the login prompt. On first boot you will be asked for entering a password for root user of your choice and the name and password for a regular user Run sudo rk322x-config and select your board characteristics to enable leds, wifi chips, high-speed eMMC, etc... Run sudo armbian-config to configure timezone, locales and other personal options Congratulations, Armbian is now installed and configured! Despite the procedure above is simple and reliable, I always recommend to first test that your device boots Armbian images from SD Card. Due to the really large hardware variety, there is the rare chance that the images proposed here may not boot. If a bad image is burned in eMMC, the box may not boot anymore forcing you to follow the unbrick section at the top of this post. Quick installation instructions on NAND: Build or download your preferred Armbian image and a copy of the Multitool; Burn the Multitool on an SD card; once done, place the Armbian legacy kernel image in images folder of the SD card NTFS partition; Plug the SD card in the TV box and plug in the power cord. After some seconds the blue led starts blinking and the Multitool appears; OPTIONAL: you can do a backup of the existing firmware with "Backup flash" menu option; Choose "Burn Armbian image via steP-nand" from the menu, then select the destination device (usually rknand0) and the image to burn; Wait for the process to complete, then choose "Shutdown" from main menu; Unplug the power cord and the SD card, then replug the power cord; Wait for 10 seconds, then the led should start blinking and HDMI will turn on. The first time the boot process will take a couple of minutes or more because the filesystem is going to be resized, so be patient and wait for the login prompt. On first boot you will be asked for entering a password for root user of your choice and the name and password for a regular user Run sudo rk322x-config and select your board characteristics to enable leds, wifi chips, etc... Run armbian-config to configure timezone, locales and other personal options Congratulations, Armbian is now installed! Alternative: you can install the bootloader in NAND and let it boot from SD Card or USB: Download a copy of the Multitool and burn it on an SD card; Plug the SD card in the TV box and plug in the power cord. After some seconds the blue led starts blinking and the Multitool appears; RECOMMENDED: make a backup of the existing firmware with "Backup flash" menu option; Choose "Install Jump Start for Armbian" menu option: the Jump Start uses the internal NAND to boot from external SD Card or external USB Stick; Follow the general instructions to boot from SD Card below, skip the first erase eMMC step. Quick installation instructions to boot from SD Card: If you are already running Armbian from eMMC, skip to the next step. Instead if you are running the original firmware you need to first erase the internal eMMC; to do so download the Multitool, burn it on an SD Card, plug the SD Card and power the TV Box. Use "Backup flash" if you want to do a backup of the existing firmware, then choose "Erase flash" menu option. Build or download your preferred Armbian image; Uncompress and burn the Armbian image on the SD Card; Plug the SD Card in the TV Box and power it on; Wait for 10 seconds, then the led should start blinking and HDMI will turn on. The first time the boot process will take a couple of minutes or more because the filesystem is going to be resized, so be patient and wait for the login prompt; On first boot you will be asked for entering a password for root user of your choice and the name and password for a regular user Run sudo rk322x-config and select your board characteristics to enable leds, wifi chips, high-speed eMMC or NAND, etc... Run armbian-config to configure timezone, locales and other personal options, or also to transfer the SD Card installation to internal eMMC; Congratulations, Armbian is running from SD Card! A note about boot device order: With Armbian also comes mainline U-boot. If you install Armbian or just the bootloader in the eMMC or the Jump Start on internal NAND, the bootloader will look for valid bootable images in this order: External SD Card External USB Stick in OTG Port Internal eMMC Installation (without SD card, board with eMMC) If you have no sd card slot and your board has an eMMC, you can burn the armbian image directly on the internal eMMC using rkdeveloptool and a male-to-male USB cable: Download your preferred Armbian image from Armbian download page and decompress it. Download the rk322x bootloader: rk322x_loader_v1.10.238_256.bin Download a copy of rkdeveloptool: a compiled binary is available in the official rockchip-linux rkbin github repository. Unplug the power cord from the tv box Plug an end of an USB Male-to-male cable into the OTG port (normally it is the lone USB port on the same side of the Ethernet, HDMI, analog AV connectors) while pressing the reset microbutton with a toothpick. You can find the reset microbutton in a hole in the back of the box, but sometimes it is hidden into the AV analog jack Plug the other end of the USB Male-to-male cable into an USB port of your computer If everything went well, run lsusb: you should see a device with ID 2207:320b Run sudo rkdeveloptool rd 3 (if this fails don't worry and proceed to next step) Run sudo rkdeveloptool db rk322x_loader_v1.10.238_256.bin Run sudo rkdeveloptool wl 0x0 image.img (change image.img this with the real Armbian image filename) Unplug the power cord Done! Installation (without SD card, board with NAND) If you are in the unfortunate case you can't use an SD card for installation and your board has a NAND chip, you still have an option to use the quick Multitool installation steps via USB. Obtain a copy of rkdeveloptool: a compiled binary is available in the official rockchip-linux rkbin github repository. Unplug the power cord from the tv box Plug an end of an USB Male-to-male cable into the OTG port (normally it is the lone USB port on the same side of the Ethernet, HDMI, analog AV connectors) while pressing the reset microbutton with a toothpick. You can find the reset microbutton in a hole in the back of the box, but sometimes it is hidden into the AV analog jack Plug the other end of the USB Male-to-male cable into an USB port of your computer If everyting went well, using lsusb you should see a device with ID 2207:320b Run sudo rkdeveloptool wl 0x4000 u-boot-main.img (download u-boot-main.img.xz , don't forget to decompress it!) Unplug the power cord Now you can follow the instructions on how to install on eMMC/NAND via SD card, just use instead an USB stick to do all the operations and plug it into the USB OTG port. Once you reboot, USB OTG port will be used as a boot device. NOTE: NAND users without SD slot may be unhappy to know that it will be difficult to do extra maintenance with Multitool in case something breaks in the installed Armbian system: installing u-boot-main.img makes the installed system unbootable because it is missing the NAND driver. Alternative backup, restore and erase flash for EXPERTS: These backup, restore and erase flash procedures are for experts only. They are kept here mostly for reference, since the Multitool is perfectly able to do same from a very comfy interface and is the suggested way to do maintenance. Backup: Obtain a copy of rkdeveloptool: a compiled binary is available in the official rockchip-linux rkbin github repository. If you prefer, you can compile it yourself from the sources available at official rockchip repository Unplug the power cord from the tv box Plug an end of an USB Male-to-male cable into the OTG port (normally it is the lone USB port on the same side of the Ethernet, HDMI, analog AV connectors) while pressing the reset microbutton with a toothpick. You can find the reset microbutton in a hole in the back of the box, but sometimes it is hidden into the AV analog jack Plug the other end of the USB Male-to-male cable into an USB port of your computer If everyting went well, using lsusb you should see a device with ID 2207:320b change directory and move into rkbin/tools directory, run ./rkdeveloptool rfi then take note of the FLASH SIZE megabytes (my eMMC is 8Gb, rkdeveloptool reports 7393 megabytes) run ./rkdeveloptool rl 0x0 $((FLASH_SIZE * 2048)) backup.data (change FLASH_SIZE with the value you obtained the step before) once done, the internal eMMC is backed up to backup.data file Restore: first we have to restore the original bootloader, then restore the original firmware. Running rkdeveloptool with these switches will accomplish both the jobs: ./rkdeveloptool db rk322x_loader_v1.10.238_256.bin Downloading bootloader succeeded. ./rkdeveloptool ul rk322x_loader_v1.10.238_256.bin Upgrading loader succeeded. ./rkdeveloptool wl 0x0 backup.data Write LBA from file (100%) Download here: Erase the flash memory: clearing the internal eMMC/NAND memory makes the SoC look for external SD Card as first boot option. If there isn't any suitable SD Card, the SoC enters maskrom mode, which can then be used for full eMMC/NAND access using rkdeveloptool. This is perfectly fine if your box has an eMMC flash memory. NOTE: In case you have a NAND flash memory this option is however discouraged. The original bootloader contains some special parameters to correctly access the data. Clearing the flash memory will probably garbage the NAND data and restoring the bootloader may require some special instructions. Obtain a copy of rkdeveloptool: a compiled binary is available in the official rockchip-linux rkbin github repository. If you prefer, you can compile it yourself from the sources available at official rockchip repository Unplug the power cord from the board Plug an end of an USB Male-to-male cable into the OTG port (normally it is the lone USB port on the same side of the Ethernet, HDMI, analog AV connectors) while pressing the reset microbutton with a toothpick. You can find the reset microbutton in a hole in the back of the box, but sometimes it is hidden into the AV analog jack Plug the other end of the USB Male-to-male cable into an USB port of your computer If everyting went well, using lsusb you should see a device with ID 2207:320b run ./rkdeveloptool ef and wait a few seconds once done, the internal eMMC is erased and the device will boot from the sdcard from now on Partecipation and debugging: If you want to partecipate or need help debugging issues, do not hesitate to share your experience with the installation procedure of the boxes. In case of issues and missed support, provide as many as possible of these things is very useful to try and bring support for an unsupported board: some photos of both sides of the board. Details of the eMMC, DDR and Wifi chips are very useful! upload the device tree binary (dtb) of your device. We can understand a lot of things of the hardware from that small piece of data; and alternative is a link to the original firmware (you can do a full backup with the Multitool); dmesg and other logs (use armbianmonitor -u that automatically collects and uploads the logs online) attach a serial converter to the device and provide the output of the serial port; Critics, suggestions and contributions are welcome! Credits: @fabiobassa for his ideas, inspiration, great generosity in giving the boards for development and testing. The project of bringing rk322x into armbian would not have begun without his support! Justin Swartz, for his work and research to bring mainline linux on rk3229 (repository here) @knaerzche for his great contribution to libreelec support and mainline patches @Alex83 for his patience in testing the NAND bootloader upgrade procedure on his board @Jason Duhamell for his generous donation that allowed researching eMCP boards and esp8089 wifi chip
- 3021 replies
-
23
-
🏆 Become a sponsor, help to add other boards in armbian standart, you don't need to be a programmer to help the community, just need a copy of the ARM BOARD and a x86 computer to compile new versions. If you like what you see here and want to help: Donate Armbian the like button only costs a few dollars. Armbian Needs you help! This Armbian adventure was summarized in my Public Github Repository. H96 MAX V56 RK3566 8gb Ram SD-Card unofficial images: Tutorial SD-Card Version v0.5 ARMBIAN BETA unofficial H96 MAX V56 RK3566 8gb EMMC Chainloader to mainline HotnikQ unofficial images: Tutorial EMMC Version V0.7 ARMBIAN BETA unofficial H96 MAX V56 RK3566 8gb EMMC Mainline Boot Hzdm unofficial images: Tutorial EMMC Version v0.8 ARMBIAN unofficial H96 MAX V56 RK3566 8gb EMMC Mainline Boot Hzdm unofficial images: Tutorial EMMC Version v0.9 ARMBIAN BETA unofficial H96 MAX V56 RK3566 8gb EMMC Chainloader to mainline HotnikQ unofficial images: Tutorial EMMC Version v1.0 ARMBIAN unofficial H96 MAX V56 RK3566 8gb EMMC Hzdm Mainline Boot Custom unofficial images: Tutorial Build Your own Armbian EMMC unofficial image H96 MAX V56 RK3566 EMMC Raspiblitz HotnikQ unofficial images: Tutorial Build Raspiblitz on EMMC Armbian Bullseye unofficial H96 MAX V56 RK3566 8gb EMMC Hzdm Mainline Boot unofficial images: Tutorial Build Your own V1.1 Armbian EMMC unofficial image H96 MAX V56 RK3566 8gb Vendor Kernel 5.1.16 Tutorial Build Your own Armbian Rockchip Kernel vendor Kernel 5.1.16 Armbian Joshua Riek Ubuntu Rockchip Images kernel 5.1 H96 MAX V56 RK3566 8gb Vendor Kernel 6.1.43 Tutorial Build Your own Armbian Rockchip Kernel vendor Kernel 6.1.43 Armbian Joshua Riek Ubuntu Rockchip Images Kernel 6.1 Tutorial Flash H96 Max on Linux Desktop Tutorial Build Your own Armbian with Maxios Lan Device Using Linux Power Shell H96 MAX V56 RK3566 8gb EMMC Ning Mainline Kernel: Armbian EMMC official image Armbian Desktop Gnome kernel The Latest official Debian BookWorm Server Kernel Minimal The Latest official Desktop Test Images: Pre-Build Desktop 22.04 Armbian Test Image (PT-BR) Community Official Images: Armbian_community_25.2.0-trunk.410_H96-tvbox-3566_bookworm_current_6.12.11_minimal.img.xz Armbian_community_25.2.0-trunk.410_H96-tvbox-3566_noble_current_6.12.11_gnome_desktop.img.xz Bleding Edge images: Armbian-unofficial_25.11.0-trunk_H96-tvbox-3566_bookworm_edge_6.16.10_gnome_desktop.tar.xz Software description: V0.5 = @armbian The Armbian SD card image "Compiled From Armbian Project" V0.8 = @hzdm Project with Mainline Bootloader "Boot the 64gb Emmc Armbian with Mainline Rockchip" V0.9 = @hzdm Release Mainline Bootloader "Boot the 32gb and 64gb Emmc Armbian with Mainline Rockchip" V1.0 = @hotnikq The Armbian SD card inside the Android Legacy Rockchip Image "Two Original Glued Images: Android boot for Linux" V1.2 = @ning Release Device Tree and Bootloader to longterm 6.6.27 Kernel "Boot with Mainline Rockchip" V1.3 = @Hqnicolas Github PR Enable h96 Rk3566 TV-Box device for Kernel 6.8 V1.4 = @pocosparc Github PR Enable OpenVFD and IR controller V1.5 = @dfahren Github PR Update U-boot 2025.01 for Kernel 6.12+ @fevangelou Linux Flash Tutorial @WINEDS Build Armbian for Maxios Lan Chip Board Video drivers: https://developer.arm.com/downloads/-/mali-drivers/bifrost-kernel https://docs.mesa3d.org/download.html https://docs.mesa3d.org/drivers/panfrost.html Wifi Driver: https://drive.google.com/file/d/1B1LmAylalETcnBEWiPiJHL0MjK5xlIV4/view?usp=sharing For Boards Newer than 2025: Follow @WINEDS method to compile Armbian with the ethernet and wifi drivers Front Panel Display: Tutorial Repo: https://github.com/jefflessard/tm16xx-display UEFI: https://github.com/hqnicolas/h96v56_uefi/releases/tag/v1.2.1 Or Just Live install Wifi Driver: cd /lib/firmware/brcm/ sudo wget https://github.com/CoreELEC/brcmfmac_sdio-firmware-aml/raw/master/firmware/brcm/fw_bcm4335b0_ag.bin sudo ln -s fw_bcm4335b0_ag.bin brcmfmac4335-sdio.h96-TVbox,rk3566.bin sudo reboot now nmcli dev wifi sudo rmmod brcmfmac_wcc brcmfmac brcmutil modprobe brcmfmac Topic description: This topic aims to demonstrate the path taken to the Armibian EMMC solution. In our path we create a lot of ready-to-use ROM files, some users burn an use this images without learning with the Linux compilation process. the name of the topic is efforts but that's no effort at all, you should try compile your own images. Device Capability Test: Using Rockchip SoCs NPU. Drivers: https://github.com/rockchip-linux/rknpu2 User Guide: https://github.com/rockchip-linux/rknpu2/blob/master/doc/Rockchip_RKNPU_User_Guide_RKNN_API_V1.4.0_EN.pdf OpenCV: https://opencv.org/blog/2022/11/29/working-with-neural-processing-units-npus-using-opencv/ A discussion on Reddit: https://www.reddit.com/r/OrangePI/comments/12b3jmj/accessing_the_npu_on_the_orange_pi/ Transformers models: https://github.com/usefulsensors/useful-transformers Usage: https://www.crowdsupply.com/useful-sensors/ai-in-a-box/ Usage: https://youtu.be/pN8mKZ5wpdQ
-

Efforts to develop firmware for H96 MAX V56 RK3566 8G/64G
王类 replied to Hqnicolas's topic in Rockchip CPU Boxes
I bricked my original H96MAX TV box while tinkering with it, so I bought a new one. The new unit works fine with both wireless and wired networks on Android, but after flashing the firmware Armbian_26.2.0-trunk.302_H96-tvbox-3566_forky_current_6.18.6_minimal.img, the wired network stops working and only the wireless network is functional. Please help me fix this issue, thank you! -
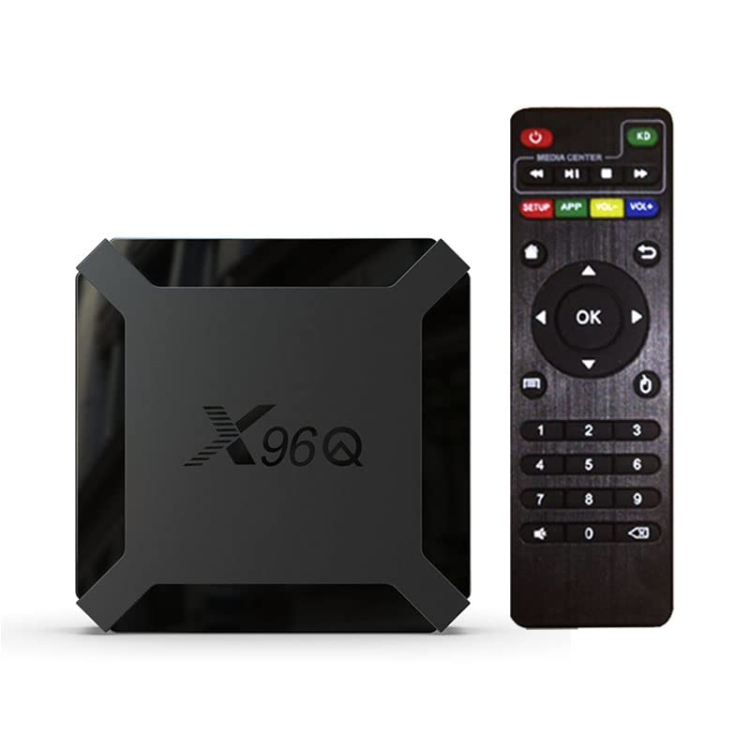
Currently working on a build for this device. It boots and is about 90% functional on 6.6 and 6.7 Kernel https://github.com/sicXnull/armbian-build/tree/X96Q-TVBOX-LPDDR3 Working - Desktop - Ethernet - Wifi Not working - DTS could use some work. Right now it does not detect internal EMMC so installing to EMMC is not an option. - Likely other things i've missed. I've uploaded two images to my git. Full w/Mate Desktop Minimal/Server Feel free to compile this yourself if you don't trust my images, it's encouraged. Changes are on the X96Q-TVBOX-LPDDR3 Branch Full W/Desktop ./compile.sh build BOARD=x96q-tvbox BRANCH=current BUILD_DESKTOP=yes BUILD_MINIMAL=no EXPERT=yes KERNEL_CONFIGURE=no KERNEL_GIT=shallow RELEASE=bookworm Minimal/Server ./compile.sh build BOARD=x96q-tvbox BRANCH=current BUILD_DESKTOP=no BUILD_MINIMAL=yes EXPERT=yes KERNEL_CONFIGURE=no KERNEL_GIT=shallow RELEASE=bookworm
-

Installing Armbian in emmc on MXQ Pro 4k S905W
SteeMan replied to m4teush's topic in Amlogic CPU Boxes
If you mean the built-in script as described in the instructions linked to from the download page (https://www.armbian.com/amlogic-s9xx-tv-box) Then yes that should do everything you need. -
DISCLAIMER (PLEASE READ): everything you can find in this thread (binaries, texts, code snippets, etc...) are provided AS-IS and are not part of official Armbian project. For this reason not people from Armbian project nor myself are responsible for misuse or loss of functionality of hardware. Please don't ask about support or assistance in other non-community forums nor in the official Armbian github repository, instead post your questions in this thread, in the TV Boxes forum section (hardware related) or in the Peer-to-peer support section (general linux/software related). Thank you! This thread is to give stable and mature long-term range support to rk3318/rk3328 found in many tv boxes in Armbian project as Community Supported Configuration (CSC). The current work is mainlined into Armbian project, but your mileage may vary; most recent developments live on my personal fork on github -> here <- Important notes: is just a personal opinion, but apparently widely supported, that rk3318 chip is not an official rockchip part. They probably are scrap rk3328 parts which have not passed conformance tests but are sold anyway to tv boxes manufacturers. They don’t reach the same operating frequency of the rk3328, have much higher leakage currents (and thus higher temperatures) and often the boards they are installed on are low quality with low quality components, in fact a very very common issue is the eMMC failure due to bad parts and bad soldering. So said, I personally suggest not to buy any rk3318 tv box, but instead find a properly supported SBC (Single Board Computer) if you need a reliable product. In the unfortunate case you already have such product, this thread may help you have some fun with them. What works: • Works on RK3318 and RK3328 TV boxes with DDR3 memories • Mainline u-boot • Mainline ATF provided as Trusted Execution Environment • All 4 cores are working • Ethernet • Serial UART (configured at stock 1.5Mbps) • Thermals and frequency scaling • OTG USB 2.0 port (also as boot device!) • EHCI/OHCI USB 2.0 ports and XHCI USB 3.0 ports • MMC subsystem (including , SD and sdio devices) • Hardware video acceleration (fully supported via RKMPP on legacy kernel, support via hantro and rkvdec kernel driver on mainline) • Various WIFI over SDIO are supported • Full acceleration on legacy kernel and mainline kernel • U-boot boot order priority: first the sdcard, then the USB OTG port and eventually the internal ; you can install u-boot (and the whole system) in the internal and u-boot will always check for images on external sdcard/USB first. Unbrick: Technically, rockchip devices cannot be bricked. If the internal flash does not contain a bootable system, they will always boot from the sdcard. If, for a reason, the bootable system on the internal flash is corrupted or is unable to boot correctly, you can always force the maskrom mode shorting the clock pin on the PCB. The procedure is explained here for rk322x, but for rk3318/28 is the same. In most of the rk3318/28 boards, shorting the clock pin is difficult or impossible because eMMC are BGA chips with no exposed pins. Pay double attention when burning something on the internal flash memory and always test first the image booting from the sdcard to be sure it works before burning anything in internal flash. This is a list of posts where forum users have been able to spot the eMMC clock pin to trigger the maskrom mode: H96 Max+ (board signature: RK3318_V1.4) by @Gausus X88 PRO 10 (board signature: X88_PRO_B) by @mathgaming HK1 Max (board signature YX_RK3318) by @Constantin Gatej Ninkbox N1 Max RK3318 by @enigmasphinx Hongtop H50 (board signature t98-3318-221-v11) by @GmP Partecipation and debugging: If you want to partecipate or need help debugging issues, do not hesitate to share your experience with the installation procedure of the boxes. In case of issues and missed support, provide as many as possible of these things is very useful to try and bring support for an unsupported board: some photos of both sides of the board. Details of the eMMC, DDR and Wifi chips are very useful! upload the device tree binary (dtb) of your device. We can understand a lot of things of the hardware from that small piece of data; and alternative is a link to the original firmware (you can do a full backup with the Multitool); dmesg and other logs (use armbianmonitor -u that automatically collects and uploads the logs online) attach a serial converter to the device and provide the output of the serial port; Multimedia: Mainline kernel: 3D acceleration is provided by Lima driver and is already enabled. Hardware video decoding: https://forum.armbian.com/topic/19258-testing-hardware-video-decoding-rockchip-allwinner/ Legacy kernel: If you need multimedia features, like OpenGL/OpenGL ES acceleration, hardware accelerated Kodi, ffmpeg and mpv you can take a look to this post Installation (via SD card): Building: You can build your own image follow the common steps to build armbian for other tv boxes devices: when you are in the moment to choose the target board, switch to /TVB/ boards and select "rk3318-box" from the list. Prebuilt images: Nightly stables - built from trunk by Armbian servers and GPG-signed: https://github.com/armbian/community Multitool: Multitool - A small but powerful image for RK3318/RK3328 TV Box maintenance. Download it from here Quick installation instructions on eMMC: Build or download your preferred Armbian image and a copy of the Multitool; Burn the Multitool on an SD card; once done, place the Armbian image in images folder of the SD card NTFS partition; Plug the SD card in the TV box and plug in the power cord. After some seconds the blue led starts blinking and the Multitool appears; OPTIONAL: you can do a backup of the existing firmware with "Backup flash" menu option; Choose "Burn image to flash" from the menu, then select the destination device (usually mmcblk2) and the image to burn; Wait for the process to complete, then choose "Shutdown" from main menu; Unplug the power cord and the SD card, then replug the power cord; Wait for 10 seconds, then the led should start blinking and HDMI will turn on. The first time the boot process will take a couple of minutes or more because the filesystem is going to be resized, so be patient and wait for the login prompt. On first boot you will be asked for entering a password for root user of your choice and the name and password for a regular user Run rk3318-config to configure the board specific options Run armbian-config to configure timezone, locales and other personal options Congratulations, Armbian is now installed! Despite the procedure above is simple and reliable, I always recommend to first test that your device boots Armbian images from SD Card. Due to the really large hardware variety, there is the rare chance that the images proposed here may not boot. If a bad image is burned in , the box may not boot anymore forcing you to follow the unbrick section at the top of this post. Quick installation instructions to boot from SD Card: If you are already running Armbian from eMMC, skip to the next step. Instead if you are running the original firmware you need to first erase the internal flash; to do so download the Multitool, burn it on an SD Card, plug the SD Card and power the TV Box. Use "Backup flash" if you want to do a backup of the existing firmware, then choose "Erase flash" menu option. Build or download your preferred Armbian image; Uncompress and burn the Armbian image on the SD Card; Plug the SD Card in the TV Box and power it on; Wait for 10 seconds, then the led should start blinking and HDMI will turn on. The first time the boot process will take a couple of minutes or more because the filesystem is going to be resized, so be patient and wait for the login prompt; On first boot you will be asked for entering a password for root user of your choice and the name and password for a regular user Run rk3318-config to configure the board specific options Run armbian-config to configure timezone, locales and other personal options, or also to transfer the SD Card installation to internal ; Congratulations, Armbian is running from SD Card! Tutorial - How to install Armbian on your TV Box (by @awawa) : https://www.hyperhdr.eu/2022/01/tv-box-mania-i-part-x88-pro-10.html A note about boot device order: With Armbian also comes mainline U-boot. If you install Armbian, the bootloader will look for valid bootable images in this order: External SD Card External USB Stick in OTG Port Internal The Multitool does not boot / How to burn image directly on eMMC: Some boards have the sdcard attached to an auxiliary (called also sdmmc_ext or external) controller which is not the common one. Forum findings declare that those boards are not able to boot from sdcard with stock firmware and they neither do in maskrom mode: the stock firmware always boots even if you put the multitool on sdcard. In such case, burning images directly on eMMC is the only way to have a working Armbian installation. You can follow these instructions by @fabiobassa to burn images directly on eMMC: https://forum.armbian.com/topic/17597-csc-armbian-for-rk3318rk3328-tv-box-boards/?do=findComment&comment=130453 Notes and special hardware: Script to change DDR memory frequency here Wireless chip AP2734, SP2734, HY2734C and similars: they are clones of AmPAK AP6334 which is combo wifi + bluetooth of broadcom BCM4334/B0 chips. You may need a special nvram file, instructions by @paradigman are here Critics, suggestions and contributions are welcome! Credits: @fabiobassa for his ideas, inspiration, great generosity in giving the boards for development and testing. The project of bringing rk3318 into armbian would not have begun without his support! @hexdump for his precious support in early testing, ideas and suggestions @MX10.AC2Nfor his patience in testing mxq-rk3328-d4 board support All the rockhip64 maintainers at Armbian project who have done and do most of the work to support the platform
- 1960 replies
-
20
-

Install on amlogic tv box without working emmc
hexdump replied to Игорь Шаповалов's topic in Amlogic CPU Boxes
you might try to write (after gunzip) this u-boot boot-amlogic_gxl_a95x-r2-atf-aarch64.dd.gz from https://github.com/hexdump0815/u-boot-misc/releases/tag/250629-01 which i built some time ago via "dd if=boot-amlogic_gxl_a95x-r2-atf-aarch64.dd of=/dev/your-sd-card bs=512 seek=1 skip=1" to the sd-card to which you wrote the armbian image before and see if it boots (never tested it with armbian) - build instructions for that u-boot are here: https://github.com/hexdump0815/u-boot-misc/blob/wip-v2025-04/readme.gxl ... alternatively you might try to boot this (non armbian) image to see if that u-boot works at all on your device: https://github.com/velvet-os/imagebuilder-testimages/releases/download/autumn-release-2025-testimages/aarch64_mbr_uefi-aarch64-trixie-251016.img.gz (please keep in mind that anything around that image is not related to armbian and thus should not be discussed here as i do not want to hijack this armbian thread) @SteeMan - in case you are interested in getting some of this into armbian, maybe have a look at it and i can try to answer potential questions around it - this was just some experiment to boot amlogic via the u-boot uefi implementation and grub which worked out quite well - as a result an amlogic tv box feels a bit like a pc with a normal grub boot on the screen ... should be possible to make that work for many of the supported amlogic socs - i simply do not have the time to look further into this right now ... -
I am trying to install armbian on my Xiaomi mi tv box 3 I got the image on a flash drive it's a 16 gig USB 3 stick I got the files ready also but I don't know why it freezes when i enter the recovery screen and click on reboot to boatloader so If any on can help me fix this problem or start again that would be really useful thx
-
I’m using the DEVMFC version [https://github.com/devmfc/debian-on-amlogic]. Additionally, I took the `/boot` partition and copied all the files from the Devmfc_Ubuntu-Oracular_6.12.11-meson64_Minimal-25.01.24.img.xz image. Then, I downloaded the same version available from the Armbian community, but with a graphical interface: Armbian_community_25.5.0-trunk.4_Aml-s9xx-box_noble_current_6.12.12_xfce_desktop.img.xz. I first flashed the Armbian image onto a USB drive. Then, in the `/boot` partition, I moved all existing root files into a `/backup` folder. After that, I copied the files from the DEVMFC version into the root of the `/boot` partition on the USB drive. Surprisingly, when I tried to boot this setup on a TV Box similar to the Vontar X4, which has an S905X4 processor, it actually booted! It prompted me to create a root password, a regular user, set the language, and select a time zone. Then, it successfully launched into X for the graphical interface. However, it seems that USB ports were either disabled, or the system froze—the login screen was visible, and the keyboard cursor was blinking, but no input was possible. I believe this is a solid starting point for getting Armbian images with a graphical interface running on S905X4 (Meson SC2), S905W2 (Meson S4), and S905Y4 (Meson S4) processors. Even without hardware-accelerated graphics, it should still be usable for basic applications like Notepad, text editors, spreadsheets, calculators, terminal access, and other simple tasks. Has anyone else made progress running Armbian on the S905X4?
-
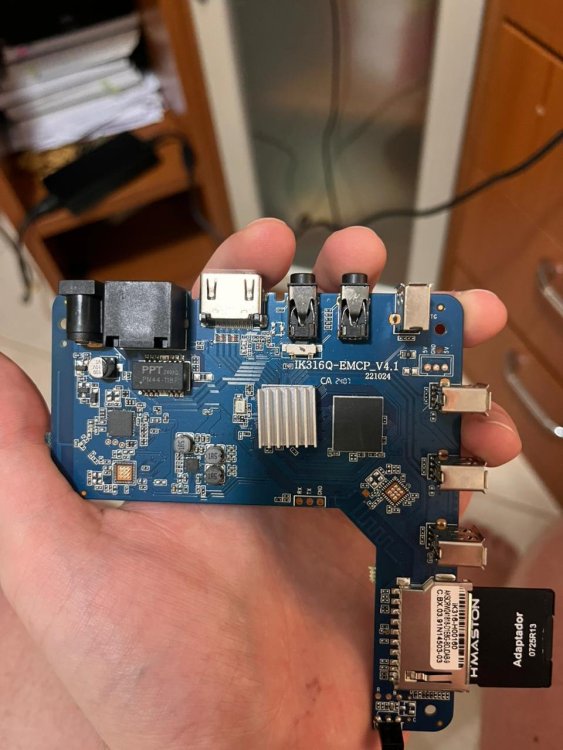
Hello community, I am looking for help to boot Armbian on a generic TV Box sold as "MXQ Pro 4K 5G". I have tried multiple images (including official and community builds from sicXnull), but I only get a black screen or signal loss immediately after the boot attempt. Device Specifications: Model on case: MXQ Pro 4K 5G Board ID: IK316Q-EMCP_V4.1 SoC: Allwinner H313 (identified as sun50iw9p1 in Android) RAM: 1GB (Single chip configuration) Storage: 8GB eMMC Current Status: I am able to boot into the stock Android. To attempt the Armbian boot, I am using the reboot update command from a terminal emulator within Android. The issue: Upon executing the reboot command, the Android system shuts down, the display signal cuts off (or stays black), and the device never initializes Armbian (no HDMI output, no LEDs blinking differently). What I have tried: Builds from sicXnull repository (Kernel 6.x). Ophub community builds (H616/H313 variants). I have updated the extlinux.conf / uEnv.txt to point to the sun50i-h313-x96-q-lpddr3.dtb (and others like x96-mate), but the result is always the same failure to initialize. Has anyone successfully booted this specific board revision (IK316Q_V4.1)? Is there a specific bootloader argument or a different DTB required for this MXQ clone? Photos of the board are attached. Thanks!
-
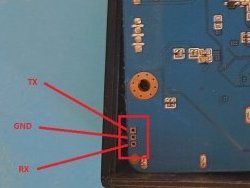
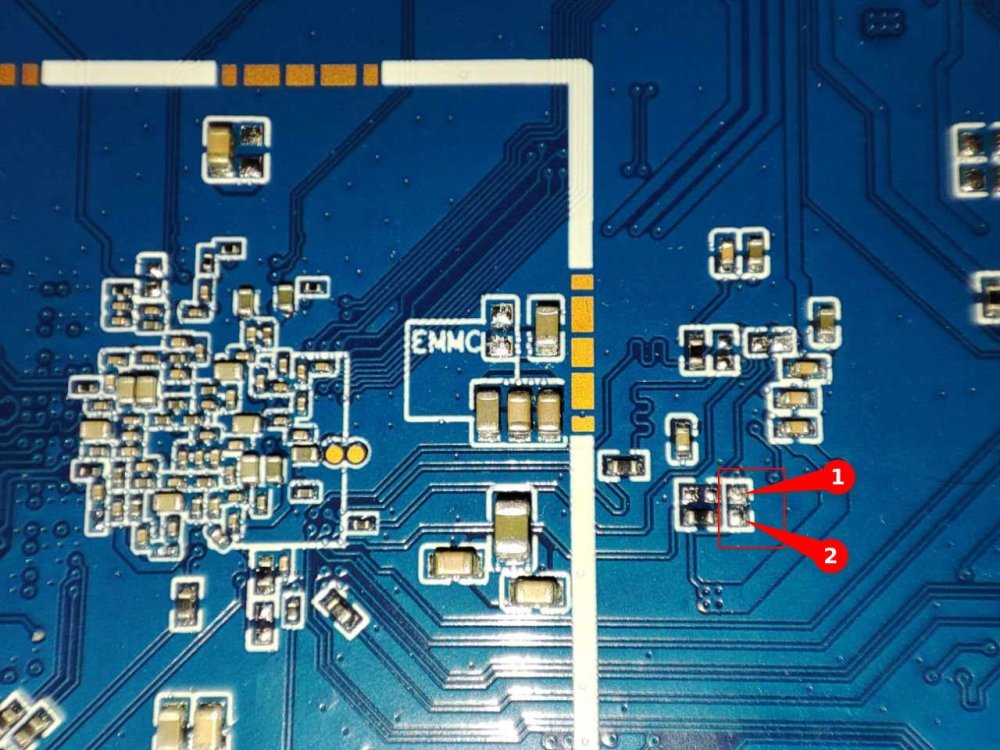
🏆 Become a sponsor, help to add other boards in armbian standart, you don't need to be a programmer to help the community, just need a copy of the ARM BOARD and a x86 computer to compile new versions. If you like what you see here and want to help: Donate Armbian the like button only costs a few dollars. Armbian Needs you help! Product Specification: Chipset: Rockchip RK3576 Octa Core ARM Mali G52 MC3 WIFI: WiFi6 11ax 1x1 80 MHz wifi controller: AP6275P RAM: DDR4 4GB/8GB ROM: eMMC 32GB/64GB/128GB OS: Android 14.0 || Armbian Vendor 6.1 Ethernet: 1000M Standard RJ-45 Bluetooth: BT 5.0 The RK3576 is indeed a lower-cost SoC but features four Cortex-A72 and four Cortex-A53 cores instead Android Base Files: H96-RK3576-ANDROID.dts H96-RK3576-ANDROID.dts H96-RK3576-BOX.dtb H96-RK3576-BOX.dtb RK3576_MiniLoaderAll.bin Vendor Kernel DTS: @RealAn H96-RK3576-VENDOR.dts Mainline status: Verify wifi controller: AP6275P Wifi Driver: https://drive.google.com/file/d/1n6x4tg5Xh24nWllOTJTq1ldVyDkK8W2Q/view?usp=sharing Flashing Tools: https://drive.google.com/file/d/1nLgPCBN0qmbzufWDFmISYc92JUpvwMPc/view?usp=sharing build_armbian.csc: https://drive.google.com/file/d/1VNR5QJlPylPsce9PI9O2TB3wOpshK2Bh/view?usp=sharing @hzdm Stock Firmware: method https://drive.google.com/file/d/1zLGvIxLE6vf8iSTjsyEr-Ly4MZ6ZahBB/view?usp=sharing Flashing Firmware Tutorial Factory Firmware for H96 Max M9 https://disk.yandex.ru/d/pWGEtRel0P9ejg https://drive.google.com/drive/folders/1g63F8fGSLEA9iK2_Mqzd6F0xfaTRnGlm?usp=sharing Factory Firmware for H96 Max M9S https://disk.yandex.ru/d/H17eGTYCjgmCsg https://drive.google.com/drive/folders/1Q360l5XbTVsWIvWkqy2xJ0sLpqHRSApM?usp=sharing TTL debug: RX TX GND pins: Enable SDCARD Reader: @rustamt method from 4pda Force board Maskrom Mode Maskrom Pins:
-
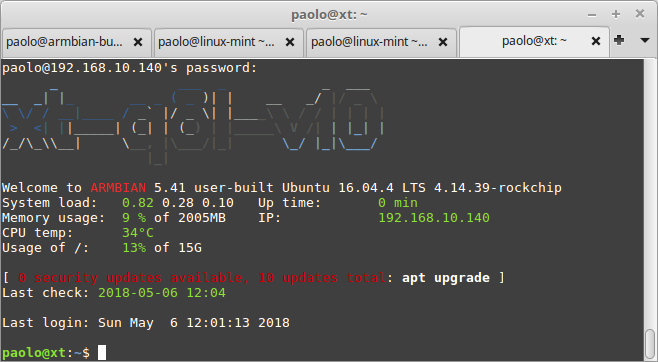
DISCLAIMER (PLEASE READ): everything you can find in this thread (binaries, texts, code snippets, etc...) are provided AS-IS and are not part of official Armbian project. For this reason not people from Armbian project nor myself are responsible for misuse or loss of functionality of hardware. Please don't ask about support or assistance in other non-community forums nor in the official Armbian github repository, instead post your questions in this thread, in the TV Boxes forum section (hardware related) or in the Peer-to-peer support section (general linux/software related). Thank you! This is CSC Armbian for XT-Q8L-V10 boards, also known as Chiptrip Q8, Vsmart Q8, ENY 3288 Q8, etc... All source code has been merged into Armbian mainline project. I still keep my personal public Armbian fork for experimental features: https://github.com/paolosabatino/armbian-build Nightly images: download directory Quick installation instructions on eMMC: Build or download your preferred Armbian image from Download directory and a copy of the Multitool; Burn the Multitool on an SD card; once done, place the Armbian image in images folder of the SD card NTFS partition; Plug the SD card in the TV box and plug in the power cord. After some seconds the blue led starts blinking and the Multitool appears; OPTIONAL: you can do a backup of the existing firmware with "Backup flash" menu option; Choose "Burn image to flash" from the menu, then select the destination device (usually mmcblk2) and the image to burn; Wait for the process to complete, then choose "Shutdown" from main menu; Unplug the sd card, then push the power button for 1 second (the led will turn blue) After 10 seconds HDMI will turn on and you will get logging messages; On first boot you will be asked for entering a password for root user of your choice and the name and password for a regular user Run armbian-config to configure timezone, locales and other personal options Congratulations, Armbian is now installed! Boot from SD Card/USB stick (with Armbian already installed in eMMC, empty eMMC or no eMMC😞 Build or download your preferred Armbian image from Download directory; Burn the image on your SD card/USB stick; Plug the SD card/USB stick in the device; Push the power button for 1 second (the led will turn blue); After 10 seconds HDMI will turn on and you will get logging messages; On first boot you will be asked for entering a password for root user of your choice and the name and password for a regular user Run armbian-config to configure timezone, locales and other personal options Congratulations, Armbian is now installed! Boot from SD Card/USB stick (with original firmware or other firmware): In case your box has the original firmware installed, use the Multitool to erase the internal flash. Don't worry, you will not brick your box: once the eMMC is emptied, the box will automatically boot from SD Card. This is called Maskrom mode and is common to all Rockchip devices. Instructions and download links for the Multitool are at the bottom of this post. After erasing the internal eMMC, just follow the "Boot from SD Card" procedure above and then you are fine. Boot priority: Newer images (those with mainline kernel >= 4.14.50) now support booting from multiple devices. Priority is fixed and boot devices are probed in this order: External SD card External USB storage device (Any USB Stick/Hard drive attached to USB host ports) Internal eMMC This way even if you install armbian to internal eMMC, you can still easily test different images booting from external devices. Experts notes: when armbian is installed into eMMC you get U-boot installed too in eMMC. This is important to know because the box won't boot in Maskrom Mode, but instead will always boot the embedded U-boot, no matter if you put an sdcard/usb stick. In practice the embedded U-boot is totally responsible for the boot priority. If you want to restore the Maskrom Mode, just erase U-boot from eMMC using this command: dd if=/dev/zero of=/dev/mmcblk2 seek=64 count=8128 conv=sync,fsync Current status: Wireless: works. pretty fast and stable, signal is strong on my box; Bluetooth: works. I was able to transfer files and stream audio without problems USB ports: works, with autosuspend too. A quick benchmark show that transfer rate is quite good (topped at 34 MB/s) USB OTG: works in host mode. Transfer rate is very good (> 40 MB/s) MMC: works and is perfectly accessible as storage device. The images above with "eMMC friendly" have been tested and work when installed in eMMC using the standard armbian-config eMMC installer SDCard: works. legacy kernel is limited to high speed, while mainline works fine in UHS mode too. A quick benchmark with a Samsung EVO card shows the promised 48Mb/s read speed. Gigabit Ethernet: works, fast and reliably HDMI: works perfectly Serial: works Audio: both HDMI audio and SPDIF connector works IR remote: works on legacy and mainline kernels Reboot/Suspend process: rebooting the device is a working in progress, at the moment sometimes it works and sometimes it doesn't. Suspend is still not available. Hardware acceleration: everything which works for rk3288 boards applies here too. This guide or maybe the Media Testing Script will help you gain an hardware accelerated X11 and Chromium (using GL4ES I enjoyed Quake 2 from the start till the end, but also Quake and Quake III Arena work flawlessy, here a quick how-to to compile and install GL4ES) Multimedia: On mainline kernel 3D acceleration is provided by Panfrost driver and is already enabled. Hardware video decoding: https://forum.armbian.com/topic/19258-testing-hardware-video-decoding-rockchip-allwinner/ Multitool: The Multitool is a small but powerful tool to easy operate on internal eMMC flash of RK3288 devices. Features: Backup the content of internal eMMC Restore a previously backed-up image to eMMC Erase the eMMC (via fast blkdiscard or zero-fill as fallback) Burn an Armbian (or LibreELEC) image directly on the eMMC Provide a recovery shell for manual maintenance Windows-friendly: everything is placed in a NTFS partition Image compression format autodetection: they are decompressed on-the-fly during burn process Network support for remote maintenance via SSH (instructions to access via network here) Instructions are simple: Download the image from here Burn it on an sdcard Open the NTFS partition with your preferred file manager Place the images you want to burn on the device in images directory (backups will be stored in backups directory) Plug the sd card in the RK3288 device Power the device and wait few seconds, the Multitool menu will appear on screen and can be navigated with the keyboard Last edit: 07/06/2020 - updated installation instructions
-
Hey there forum! I've got this MXQ PRO 5G TV Box (Yes, I know It's been said the brand isn't important, but I figured I might as well say it anyways) thing a few days ago and, as you do, my first instinct was 'Let's linux it', which Is, as It turns out far more trouble than I had initially imagined. And frankly I am a little tired of slamming my head into a brick wall, repeating the same steps again and again so as a sort of last resort, I'm here to ask for your help (thanks in advance). To check which image to download and what steps to follow I've opened the box to take a peek at It's board. As the main CPU, RK3228A, for the storage 128GB of eMMC, and for the memory 8GB of RAM (which exactly type, I can't discover). Following the instructions on the first page of this topic, I downloaded an image, downloaded multitool, got my SD card. At first everything went according to the guide. Multitool flashed, the thing booted It and the partition expanded, then I shut it down and put the extracted .img into the 'images' folder, plug the card back in boot, flash, shut down once more and upon trying to boot, the LED stays off and doesn't turn on. After waiting for a solid 10 minutes I decide I'll just try booting it directly off the card. I flash It, plug it in and some images booted partially and some didn't. Some boot only to a certain point like starting a specific service (usually it got stuck after or during starting armbian-ramlog.service) and some just don't boot at all. I've tried disabling the services by manipulating the files on the card yet they just reappear again. After that I noticed that upon each boot there's a quick 'error' that happens, returning different numbers seemingly depending on the image on the card, either Internal error: Oops: 805 [#1] SMP ARM, or Oops: 80000005 SMP ARM or just Oops 5 which as far as I could find meant something related to illegal instructions (specifically interrupts). I haven't really made any progress past that. Also, If It's of any help, I can provide images of the board (from both sides) and all of It's components. Thanks in advance for all your help, friends!
-
Hi, how are you? Well, I don't know English very well, so this text will be translated using Google Translate since I'm Brazilian. Anyway. I found a way to boot the SD card with Linux on the Allwinner H3 chip, using a Chinese MXQ 4K 5G TV box. I booted Android normally and, using the remote control, pressed the power button and then confirmed. After shutting down, I booted with the remote control and Linux started normally. After that, every time I booted with the SD card, it booted perfectly. Another thing I did before, but I believe it doesn't affect this, was to enable USB0 device mode in developer mode. I hope this information helps with your Linux projects!
-
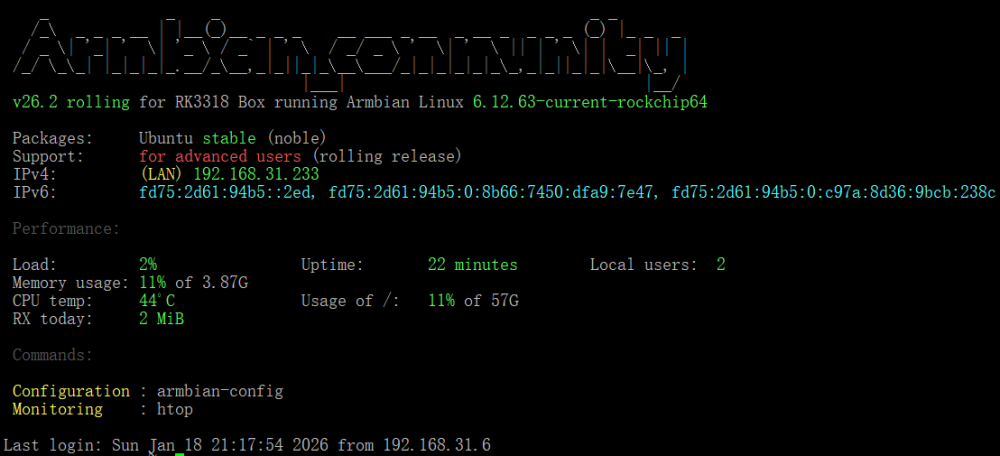
@jockNow, I've finally solved this problem. Successfully flashed the latest version of armbian, https://github.com/armbian/community/releases/download/26.2.0-trunk.151/Armbian_community_26.2.0-trunk.151_Rk3318-box_noble_current_6.12.63_gnome_ desktop.img.xz Next, I will share my problem-solving journey. I found that I couldn't enter maskrom/loader mode anyway, and when I accidentally inserted the USB flash drive into the multitool.img into the TV box and powered it directly on, I found that it actually started the system directly in the USB flash drive. So I guess that it may have changed the boot order after flashing the loader.bin before, and the armbian system I flashed in before it continued to toss before it could be configured, probably because the system files of the root partition were corrupted, causing it to not boot normally. Therefore, I simply tried to flash the firmware of the rk3188-box in the official community directly into the USB flash drive, because after these images are flashed into the USB flash drive, there is only the root partition, that is, the system. And there is no boot partition. I guess the boot partition may have been written somewhere else, and I don't need to worry about it anymore. So, I plugged the USB flash drive into the latest rk3318 firmware into the box and waited for a few minutes after powering on it directly and starting it, it obtained the IP address assigned by my router DHCP, I was so excited, I quickly connected to the rk3318-box through SSH, and made the preliminary configuration. Quickly enter the command armbian-install and select item 2, and immediately write the system on the USB flash drive to emmc. After the writing is completed, turn it off, unplug the USB flash drive, power on, wait for a few minutes, and the startup is successful. It means that I have successfully flashed the phone this time. Thank you very much for your help. @jockand @fabiobassa, You're passionate and highly skilled.
-

CSC Armbian for RK3318/RK3328 TV box boards
OmegaCyclops replied to jock's topic in Rockchip CPU Boxes
Hello everyone, I hope I'm in the right place. So I got an H50 tv box (T98) that I found lying around, and installed via the multitool everything including armbian itself, which works properly. The issue that I have is that I had to do all via ssh and haven't been able to get any HDMI output, tried updating lightdm, switching it to sleek, and at this point idk what else to do. Thank you in advance! -
I've never used any other method. I'd suggest using a search engine to search for other methods to "enable multi boot on amlogic TV box"
-
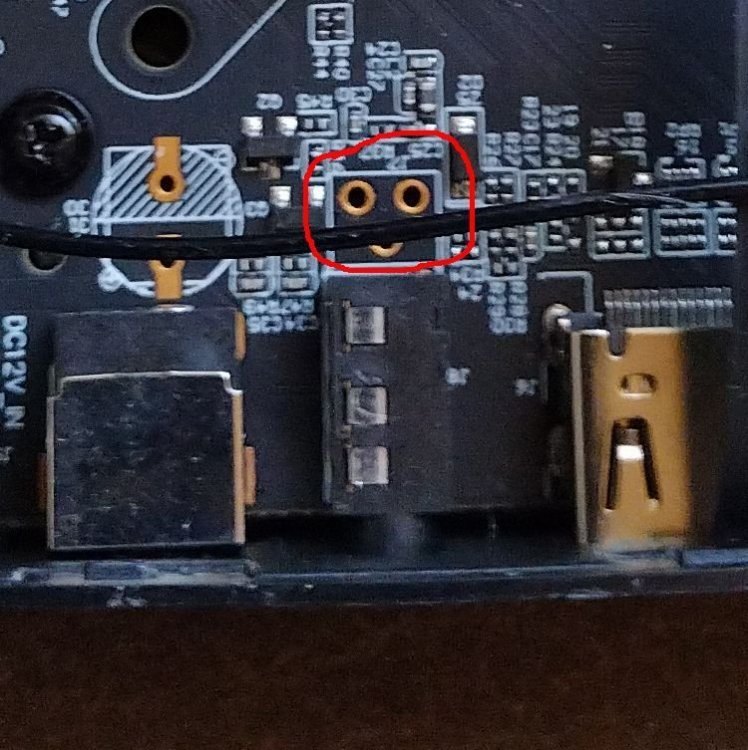
Hi guys, I try to install Armbian on my Amlogix G11pro (S509X2 based) TV Gamebox. It keeps booting only into my Emuelec SD card, if I plug it or with anyhting else it only boots into Android that is on eMMC. I understood that I have to use the toothpic method to press the reset button to get into the recovery mode. I tried this but failed as my toothpic didnt reach anything I could click, it just went through. so I opened the box and found that behind the audio jack there is nothing (see attached pic). there is empty space with three connectors on the board, maybe that is the place where usually the micro switch for the reset button sits, but I am not sure. Before I try to short these (why three connectors?), I would be like to have a bit more info, in order not to brick my board. The FAQ says to use the toothpic method is only one method of several, what are the other ones ? BR retro123
-
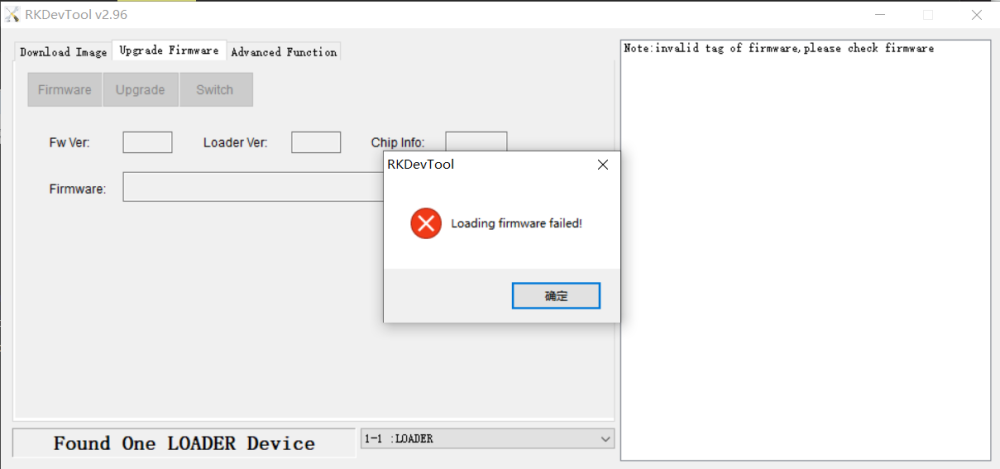
https://forum.armbian.com/topic/26978-csc-armbian-for-rk3318rk3328-tv-box-boards/page/66/#findComment-231768 Thanks your help,jock. I hava a try to use the rkdevtool to install armbian. I just choose the iamge in url https://github.com/armbian/community/releases/download/26.2.0-trunk.151/Armbian_community_26.2.0-trunk.151_Rk3318-box_trixie_current_6.12.63_minimal.img.xz. But,there catch a error message in the tool. I don't known is this image is error or other reason?
-
Excuse me,jock. My TV-Box is the H96Max rk3318 4+64G.The box was installed Ubuntu 24.04,kenel 4.4,desktop vension by the seller。But now, i want to install the armbian system in the box.There are some problem for me that i have no HDMI-wire and no usb-keyboard,just only an usb-A to usb-A data-wire and a notepad computer。i think that i can't use the multitool.img to help me install the armbian. So, can you give me some help to install the armbian by USB-A to USB-A data-wire?I through some search some article to know maybe the RKdevtool can help me,but the tool need the loader.bin to flash the image. I don't know where is the loader.bin for rk3318.can you help me?
-
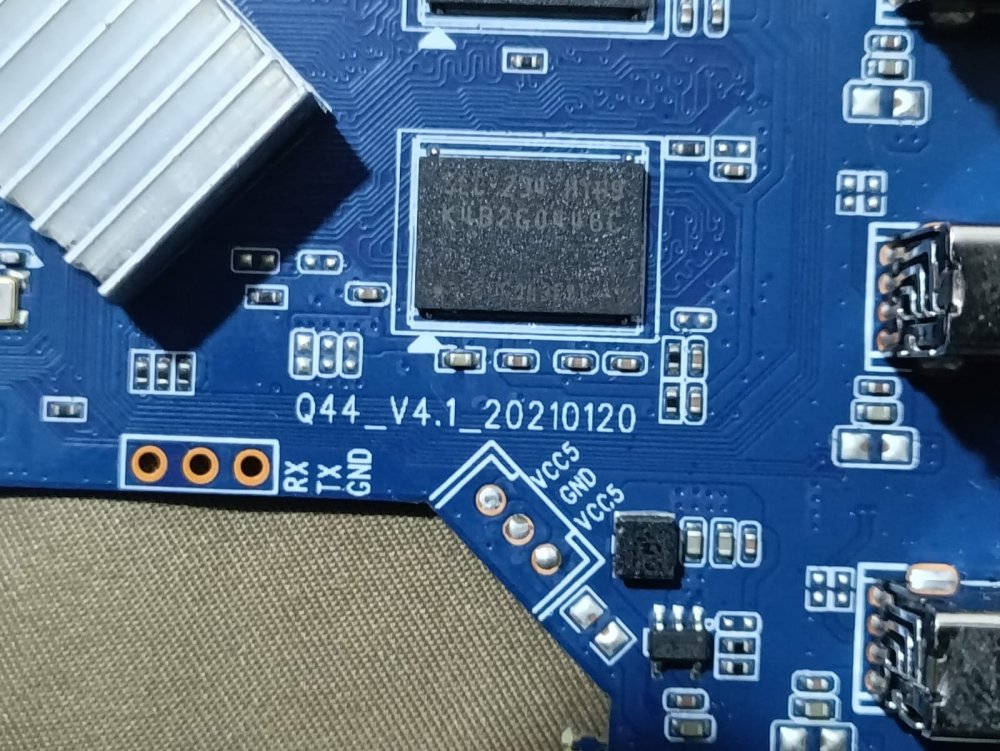
Does anyone know of a compatible image for the MXQ PRO 4K 5G TV Box with Allwinner H3, model Q44_V4.1_20210120? I've searched a lot and only found images compatible up to version V4.0. Since mine is V4.1, I haven't been able to get a successful boot from the SD card. If anyone has any tips, a working image, or experience with this specific model, I’d really appreciate the help!
-
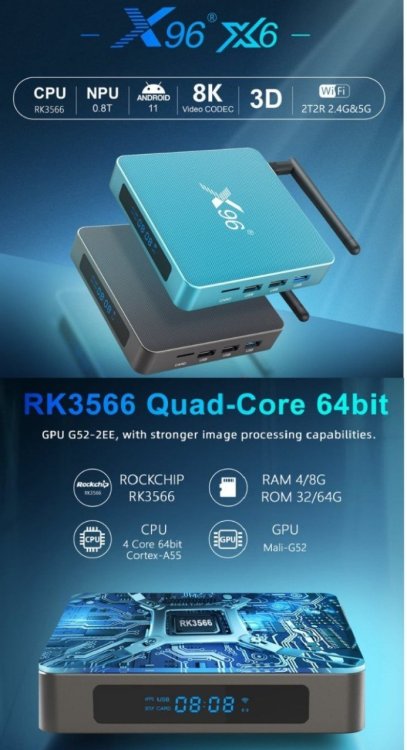
Hi everybody, I just bought an X96 X6 TV box (8G/64G) to run Home Assistant. However it is not popular so there is no Armina for it. Home Assistant requires Debian 11/12 (linux kernel, no desktop version) to operate. Hope everyone can help me. Thank you very much. I only need 1 file *.img file to install Home Assistant, no need: USB, wifi, Bluetooth... because it can be difficult. Thank you very much!


