
All Activity
- Past hour
-

Have Armbian for Tanix TX1 QHZIW_H313_TX1_EMCP_V2.0?
Nick A replied to Lesano's topic in Allwinner CPU Boxes
@Lesano https://linux-sunxi.org/Tanix_TX1 shouldn’t be hard to make a armbian config for this board. You would need to boot over USB cable. https://linux-sunxi.org/FEL/USBBoot -
From what I know it isn't possible to boot without emmc on the amlogic TV boxes
- Today
-
 During first boot if the wifi router is not online, the whole setup skips wifi configuration. It would have good if it keeps scanning for new wifi names everytime it fails to connect to chosen option.
 -
PSA - trunk 130 is not a bootable image. trunk 100 works fine.
-
I couldn't find this documented specifically, but I confirmed this was the case via testing. Google also provided an AI summary which also stated that this was the case. I enabled `iptables-legacy` in the Armbian kernel builder which then resolved the errors I was getting. I also eventually realized through further research that `nftables` were also supported and available as a module out of the box. I wound up changing my Microk8s config to use `nftables`, which also worked out and is where I left my config today. Hopefully this is helpful for someone else in the future. Somewhat relevant articles: https://github.com/canonical/microk8s/issues/2180 https://github.com/canonical/microk8s/issues/4387 https://hub.libre.computer/t/missing-iptables-kernel-configs-for-microk8s-calico/3717
-
Thx, i'll do that
-
i suppose for headless minimal OS, this can become showstopper if it is difficult to access the serial console and there is a need to switch from one wifi with dhcp to other wifi with static ip configuration.
-
i also tried installing network manager separately, however it is not able to override the wifi configurations. It was allowing in image files few months ago. But now it does not allow.
-
Hello, I am facing situation where new armbian images e.g. Armbian_community_26.2.0-trunk.100_Orangepizero2w_trixie_current_6.12.63_minimal is coming without nmui. nmtui support one wifi configuration with dhcp while assigning static ip to other wifi. systemd-networkd does not support separate behaviour for two different wifi configruation. Requesting to provide nmtui which is more flexible. To elaborate the case, the dhcp is must for connecting to mobile hotspot which keeps on changing ip series. And for IoT project, I need static configuration. That's why i need armbian to allow dhcp when i am trying to ssh on mobile hotspot for initial configuration to and later switch to static ip of IoT project router.
-
Hi all, I have this Amlogic S905x2 (ddr3l) android tv box which I'm trying to boot Armbian on. Firstly, I was having issue with the default bootloader always booting into android, no matter if I used the sd card or usb. So then I lifted the emmc chip, in hope that it will then choose to boot from the sd card. However, I failed to notice that BL2 is stored in the emmc, and as you guessed, I need BL2 to boot into linux. Now I've read that you can use USB burning tool to send and start BL2 from RAM. However, I've no idea what to do next and what file am I even supposed to send via the USB Burning tool. I would be very thankful for any assistance.
-
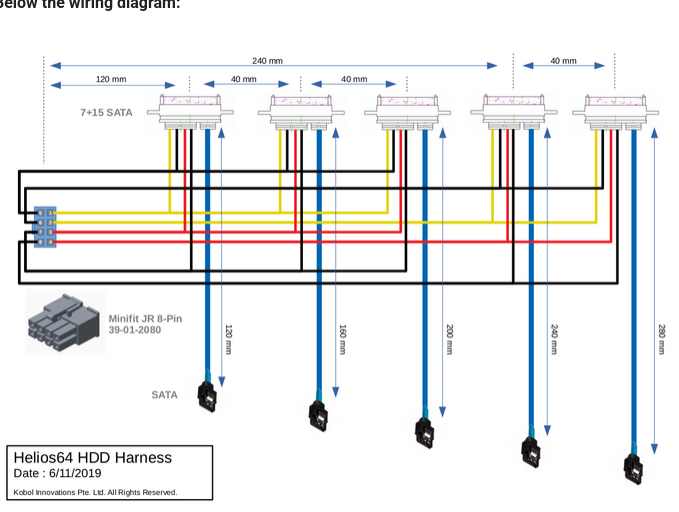
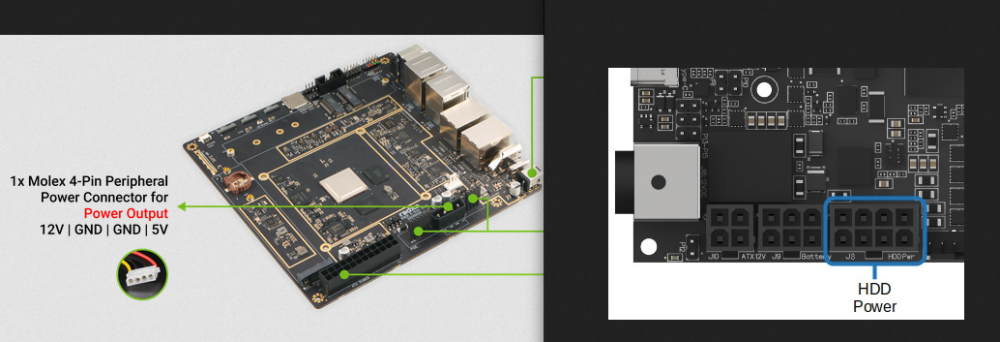
I like it, unfortunately I couldn't find anything about the specs of the 12V/5V molex output. Only the recommended power supply using the 12V barrel (90W/ 12V/8A). You should probably reach to Radxa on their discord/forum to find out if the board can supports the intensity peak of 5 3.5" HDD spinning up a the same time....
-
Hello, After 5 years of loyal service, my Helios64 SBC just died on me last night. Would a Radxa Rock5 ITX+ and a M.2 to Hexa SATA Adapter could be a good drop in replacement to reuse the case? Both are Mini-ITX so it would fit. I know I would lose the front panel lights and power/reset button, and I would need to cut the back panel to fit the I/O shield but these are minor problems. What I am more concerned with, is if it is at all possible to power the 5 HDD from the radxa board (as the Helios 64 board didi). Helios engineers had made it possible to do it with minimum power, mainly by starting up the drives sequentially. Can the molex 4-Pin connector on the Radxa can do it? Provided I could buy/make an adapter to connect it to the J8 harness of the case? That would definitely be a great thing if I could reuse that very fine enclosure. Thanks for your input on that matter.
-
 In the past (2019) there was no chance to use the A64-CPU Jide Remix Mini with armbian, because of a blocked -u-boot But today I found a site (from February 2025 on github) https://github.com/r4nd3l/revived_remix_mini_pc?tab=readme-ov-file which can make the Closed Jide Remix Mini to boot from SDCard with a modified u-boot There at the github page is a modified u-boot and a modified A64 armbian for the Jide Remix Mini. Jide did leave us with a closed/blocked device AT this time the 16GB emmc isnt useable, but using SDCard is a start for upcycling the Jide Remix Mini
-
 If this fails on multiple build host environments, maybe check your network/internet connectivity. Else I don't really know what could be the cause. I use Armbian Aarch64 (RK3588s) with various tweaks ans kernels and it works fine for builds.
 -
This suggests it is 5V only and also no USB-C PD. You should power a ROCK5 with higher voltage, then no issues, at least that is my experience and is also what you can see if you look at schematics. You can also read the end-user docs/wiki. ROCK3A, ROCK5B, NanoPi-R6C all have own step-down DC/DC converter on the board itself. The latter one for example has an 8A component for it. So it can make enough power from 20 or 15 Volt input at a perfect 5V internally for USB devices on its type-A ports, and also easily maintain its 3.3V and lower voltages for CPU etc. OrangePi is cheap, same as RaspberryPi. Those shift the powering (issues) to the end-user, meaning you need a stable enough 5V on the USB power input connector. A slight voltagedrop can lead to problems. But board itself is cheap. RPi5 requires a quite rare 5A capable 5V USB-C PD (RPI5), where the ROCK3A/5B can just be fed from any voltage between 9 and 20 Volt (see docs/wiki). If you use 5V, the on-board DC/DC step-down cannot do its work of course, so essentially bypassed. Why did you buy a ROCK5 then. Same as buying a car with combustion engine with empty fuel tank, instead put a horse in front to pull you forward from A to B. (Or get a bicycle). The (extra) horse is the 27W Pi5 PSU here, costed me 18 Euros, half the price of the ROCK3A. I put a fixed 12V on a USB-C connector, from an old card battery, that by itself is kept at about 12V by a 12V/10A generic powerbrick. Is also UPS then is no 230VAC mains. The Nanpi-R6C with latest U-Boot and latest mainline kernel does also do USB-C PD, so with a generic 45W USB-C PD PSU, is flips automatically to 15V on its USB-C input. With another 60W USB-C PD PSU it was 20V. ROCK5B should be able to do the same, but haven't tried as run 24/7 for months as home/house server.
-

Installation Instructions for TV Boxes with Amlogic CPUs
Maurizio Finesso replied to SteeMan's topic in FAQ
Hi guys and Happy Christmas. I found something that could be useful. I had trouble due to fake sd card that report fake capacity. Capacity declared 64 Gb real capacity 3.7 GB. H2testw (windows) will show you the real capacity. Don't trust if it is a known brand because there are companies with machine to fake SD card. After another problem that I found is not to see the boot partition after imaging SD card. I don't know why but you must be sure that your imaging program (balena etcher o pi imager or rufus) are run in admin mode. after that in any case if it doesn't appear you have to assign a letter drive (sometimes it is not assigned) I used aomei partition manager) -
 Very strange, still fail when build with docker. Maybe I need to try use Ubuntu Noble. https://paste.armbian.com/ojadabewej [🐳|🔨] Processing triggers for man-db (2.12.0-4build2) ... [🐳|🔨] Processing triggers for dbus (1.14.10-4ubuntu4.1) ... [🐳|🔨] Errors were encountered while processing: [🐳|🔨] systemd-timesyncd [🐳|🔨] E: Sub-process /usr/bin/dpkg returned an error code (1) [🐳|💥] Error 1 occurred in main shell [ at /armbian/lib/functions/logging/runners.sh:15 chroot_sdcard_apt_get_install() --> lib/functions/logging/runners.sh:15 install_distribution_agnostic() --> lib/functions/rootfs/distro-agnostic.sh:327 do_with_logging() --> lib/functions/logging/section-logging.sh:81 build_rootfs_and_image() --> lib/functions/main/rootfs-image.sh:31 full_build_packages_rootfs_and_image() --> lib/functions/main/default-build.sh:36 do_with_default_build() --> lib/functions/main/default-build.sh:42 cli_standard_build_run() --> lib/functions/cli/cli-build.sh:25 armbian_cli_run_command() --> lib/functions/cli/utils-cli.sh:136 cli_entrypoint() --> lib/functions/cli/entrypoint.sh:208 main() --> ./compile.sh:50
 -
 Yes, highly recommended in order to avoid troubles. We mainly use Noble and all of our build & test automation runs on Jammy / Noble. However, when using Docker, you should have more freedom.
 -
Thanks for you help. The host system must be Ubuntu Noble 24.04.x?
-
Welcome! Strange. Works here without a problem: https://paste.armbian.com/uqutokajas
-
clone the latest armbian/build repo, run ./compile.sh but fail. I try native or docker build, all fail.
-

DM_CRYPT module unavailable in initramfs after update to 6.1.115
The Tall Man replied to David Zarebski's topic in Beginners
I've used an encrypted root in my configuration. I've found earlier versions of the vendor kernel to not include dm_crypt, so I've always used the edge kernel. That one's been quite reliable with encryption. If you're using serpent encryption, that's one that's more likely missing than the others. Run this to see if serpent's missing (from your (vendor) kernel): cryptsetup benchmark If serpent is missing, it will report N/A instead of a speed for that one. If you really want to use a vendor kernel, you can build it yourself... being sure to include dm_crypt, and if necessary, a serpent encryption module. - Yesterday
-

Help wanted to test a new OpenVFD alternative
blackc replied to Jean-Francois Lessard's topic in Amlogic meson
I was rechecked that openvfd works and get its config openvfd dtbo overlay fragment (decompiled on running system) It works, driver loaded and userspace software shows me current time on LED (some segments shows wrong, i think it result of wrong chars config) tm16xx: I've tried many values for GPIO line config, GPIO_ACTIVE_LOW (1), GPIO_ACTIVE_HIGH | GPIO_OPEN_DRAIN (6), GPIO_ACTIVE_HIGH (0), GPIO_ACTIVE_LOW | GPIO_OPEN_DRAIN (7). It was no result at all, driver still says that cannot init controller. Also i was tried drivers fd6551, fd655 with different GPIO lines config. No success. I was rechecked LED controller chip on board, it is really FD6551. tm16xx dtbo overlay fragment (decompiled on running system) I have no ideas what goes wrong. When i was configure openvfd device tree, pointing gpio chip as &gpio was not works. Only pointing as "0300b000.pinctrl" was successful. Maybe, its important... Maybe, some features/conflicts at controller init needs debugging -
Rock 5-whatever are really picky with power supplies. They are skipping like a school girl if the power supply is not right. I have for example one relative dumb little power supply with 2 outputs and using both outputs with Orange Pis works just fine. When I used one output with the Rock 5b+ I saw many crashes. It just hard reset at various stages. After connecting it to a usb output from a powerstrip it worked just fine. Radxas devices are really really picky is what everybody needs to keep in mind.
-
@humanus I would argue that if you build your own image with your own u-boot that uses the vendor versions of BL31 Elf and DDR Bin plus some rootfs, you can test very quickly different kernel versions to see if latest mainline kernel 6.18 or 6.19-rc is working. U-Boot is quickly to build # extract u-boot cd u-boot-2026.01-rc5 # Get bl31 and ddr. Maybe even try newer versions of BL31 and DDR curl -LO https://raw.githubusercontent.com/rockchip-linux/rkbin/0b3e87afc2abd8dd6eb0052cd1be00de94a96637/bin/rk35/rk3528_ddr_1056MHz_v1.09.bin curl -LO https://raw.githubusercontent.com/rockchip-linux/rkbin/bf63f186b9d6ffeca758278f8cadb5d5e5dc7f86/bin/rk35/rk3528_bl31_v1.17.elf # Create the u-boot config make rock-2-rk3528_defconfig # Enable more config options like this, ONLY if really needed scripts/config --enable CONFIG_USE_PREBOOT scripts/config --set-str CONFIG_PREBOOT 'led green on; sleep 0.1; led green off' scripts/config --set-val CONFIG_LOGLEVEL '7' scripts/config --set-val CONFIG_SPL_LOGLEVEL '7' # If you enabled more than default, update the config make olddefconfig # Build u-boot make EXTRAVERSION=-MyAwesomeUboot-1 BL31=rk3528_bl31_v1.17.elf ROCKCHIP_TPL=rk3528_ddr_1056MHz_v1.09.bin # use u-boot files to flash - idbloader.img - u-boot.itb sudo dd of=/path/to/rock-2f-archlinux.img bs=512 conv=notrunc if=/path/to/idbloader.img seek=64 sudo dd of=/path/to/rock-2f-archlinux.img bs=512 conv=notrunc if=/path/to/u-boot.itb seek=16384 # or the combined file - u-boot-rockchip.bin sudo dd of=/path/to/rock-2f-archlinux.img bs=512 conv=notrunc if=/path/to/u-boot-rockchip.bin seek=64 This is just an idea to get you started and created relative quickly a base image for a boot test. If you have a process to build that quickly, flash it and try to boot. Hook up a serial console and if it boots interrupt the u-boot to get to the u-boot prompt. If you get there, you don't need to think about to much about the boot loader in the image. Because at that prompt you can test various boot options live, instead of editing something on the sdcard or to whatever medium you flashed it. Here are some thoughts and notes on how you can debug and try to boot from the u-boot prompt. # Lets assume device 1 is the SDCARD with the system on it # Check you disks (sdcard / emmc) mmc list mmc dev 1 mmc list mmc part # Maybe that will show you something like this. => mmc list sdhci@2a330000: 0 (eMMC) mmc@2a310000: 1 (SD) mmc@2a320000: 2 (SDIO) # 'dev part' will show you the partitions. # Lets assume you have 3 partitions on and part 3 is your system # Check if you can read files ls mmc 1:3 ls mmc 1:3 /boot/ # Now if you know your Linux kernel image, initrd and DTB name, you can try to boot load the files and boot # You get the PARTUUID from the 'mmc part' above load mmc 1:3 ${kernel_addr_r} /boot/Image load mmc 1:3 ${fdt_addr_r} /boot/dtbs/rockchip/rk3528-rock-2f.dtb load mmc 1:3 ${ramdisk_addr_r} /boot/initramfs-linux.img setenv bootargs 'root=PARTUUID=ab3ede6d-b4b9-4368-80a9-a029b67cca29 console=ttyS0,1500000 rootwait' booti ${kernel_addr_r} ${ramdisk_addr_r}:${filesize} ${fdt_addr_r} Most important is you need to figure out what the serial console really is. If it is not ttyS0, try ttyS1 or ttyS2. The above "bootargs" at very basic. If you don't see much, try adding more. Here are some example you can add. Not all at ones! earlycon=uart8250,mmio32,0xfeb50000 console=tty1 console=ttyS2,1500000 console=both consoleblank=0 loglevel=7 panic=10 rootwait rw init=/sbin/init rootfstype=ext4 The "earlycon" parameter is also board specific. Not sure if it is valid for a Rock 2F or what the correct address would be. Again, this is not a working step by step guide but something that I would try to use for development and debugging. Once you have something working, I would think about integrating it into the Armbian config files.

