denni_isl
-
Posts
125 -
Joined
-
Last visited
Content Type
Forums
Store
Crowdfunding
Applications
Events
Raffles
Community Map
Everything posted by denni_isl
-
Might try that. If there is nothing on the SPI will that force booting up from SD and is it possible to flash the spi through the gpio pins afterward in case if the spi boot is needed?
-
I did not copy bl31.elf src dir consciously to the spi. It must still contain the original from t-firefly.com. It might be some Chinese "protection" because it is bought as a industrial board. What is the purpose of bl31.elf - is it similar to mbr (before the arm embedded revolution)? The boot order of Rockship (rk3399) is problematic - should be CPU-SD-emmc Actually you and balbes150 are by far much more advanced than I am.
-
Using the 4 pin debug (close to usb-C) on the board connected to usb adapter (not the GPIO pins) connected to odroid-n2. Are you talking about more options through the GPIO pins and a USB adapter like this one https://www.aliexpress.com/item/1005001589090572.html?spm=a2g0o.productlist.0.0.7a3238aeXZN4i6&algo_pvid=6ca99289-4fc4-4f1a-b243-e1ced9b7863a&algo_expid=6ca99289-4fc4-4f1a-b243-e1ced9b7863a-17&btsid=0b0a555616106170618963449e6cd7&ws_ab_test=searchweb0_0,searchweb201602_,searchweb201603_ Did fallow fallowing instructions from page 8 on this tread and that must have spoiled the SPI chip somehow, though u-boot seems to be working except the kernel is not functional. When one make mistakes is when he/she learn -
-
Armbian 20.11.6 Bullseye - armbianEnv.txt - verbosity=7
-
Armbian_21.02.0-trunk_Station-p1_bullseye_current_5.9.16_xfce_desktop.img.xz = yellow screen (etcher) Armbian_21.02.0-trunk_Station-p1_buster_current_5.9.16_xfce_desktop.img.xz = yellow screen (etcher) Armbian_21.02.0-trunk_Station-p1_buster_current_5.10.5_xfce_desktop.img.xz = Starting kernel ... (etcher) Armbian_20.11.6_Station-p1_bullseye_current_5.9.14.img = yellow screen (dd)
-
yes
-
and extlinux.conf The boot directory (/BOOT partition)
-
Yes, this is the board. Did try bot suggestions balbes150 and PanzerKnacker Can not see it on the network with sudo nmap -sn 192.168.1.0/24
-
-
-
Taking out ,0xff1a0000 did get the kernel further, now it stops at the yellow screen (still the red indication light). The model is roc-rk3399-pc-plus (en.t-firefly.com).
-
Taking out ,0xff1a0000 did get the kernel further, now it stops at the yellow screen. The model is roc-rk3399-pc-plus (en.t-firefly.com).
-
The HDMI output hangs at Starting the kernel.... And the indication light is constant red. How does one make the output more verbose in extlinux - can not see it here https://wiki.syslinux.org/wiki/index.php?title=Config ?
-
Somehow the kernel hangs on - Starting kernel ...
-
It is still the same u-boot messages. When booting the roc-rk3399-pc-plus board, there is immediately red light and this message; Maybe related to this issue from here https://github.com/OE4T/meta-tegra/issues/502 commented on Nov 24, 2020 @om26er fwiw, I have an overlay that puts a file in /boot/extlinux/extlinux.conf. As @madisongh mentioned cboot's handling of ext4 is pretty primitive so if you go this route in your do_install you'll want something like the below so cboot can read it ok dd if=/dev/zero of=./extlinux.conf bs=1 count=1 seek=4095 status=none ?
-
Thank you balbes150 This is the output from u-boot And this is extlinux.conf The image is - Armbian_20.11_Arm-64_focal_current_5.10.0-rc4.img ps. Have not studied extlinux yet https://wiki.syslinux.org/wiki/index.php?title=EXTLINUX
-
Unable to boot the kernel through extlinux script - here is the output from u-boot There are two things that concern me. This error message at the beginning. And the extlinux.conf. Any idea how to boot SD from u-boot using extlinux (or u-boot command prompt)?
-
How does one use the u-boot command prompt commands to boot up from a sd card (or usb)?
-
 One should of course use just USB serial adapter. Try to use minicom or screen. Here are some info about to set up minicom http://wiki.t-firefly.com/en/ROC-RK3399-PC-PLUS/debug.html#use-serial-debug-on-ubuntu The main thing is the correct bout rate. Usually you just have to connect gnd tx and rx (not 3,3 or 5v)
 -
You are correct about that . It is armbian 20.11 kernel 5.10.0.rc4 - xfce4 - did work like a charm as a desktop. Installed from a server version through tasksel.
-
Latest Balbes50 arm-64 images did work for me https://users.armbian.com/balbes150/arm-64/ .. before I did flash the spi with unfunctional to boot kernel image.
-
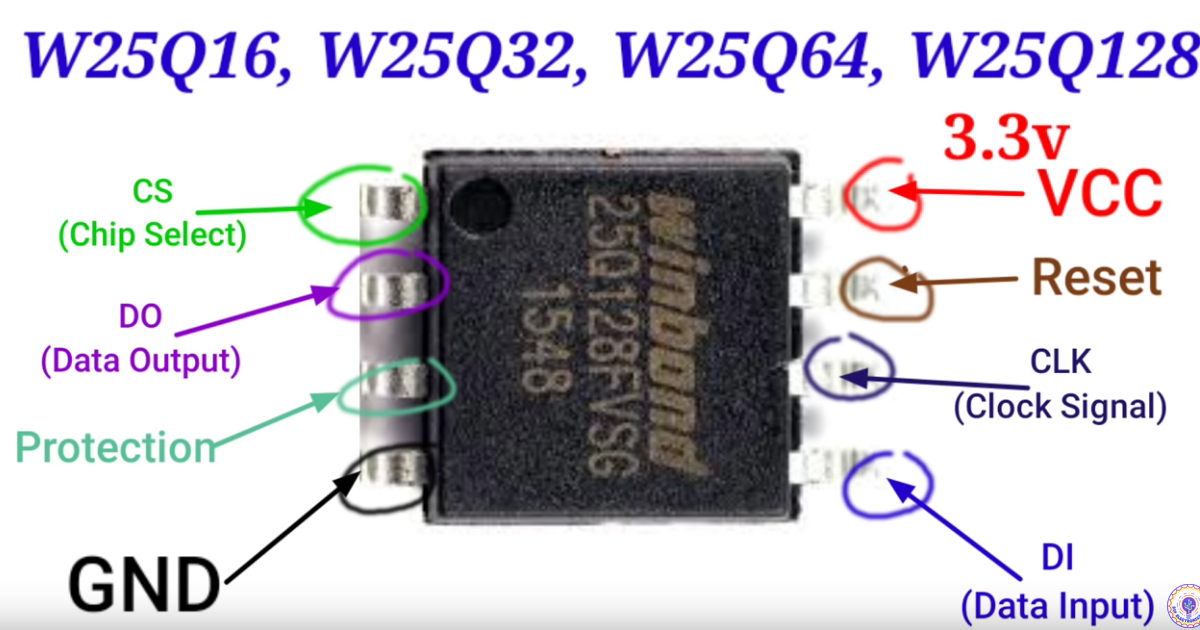
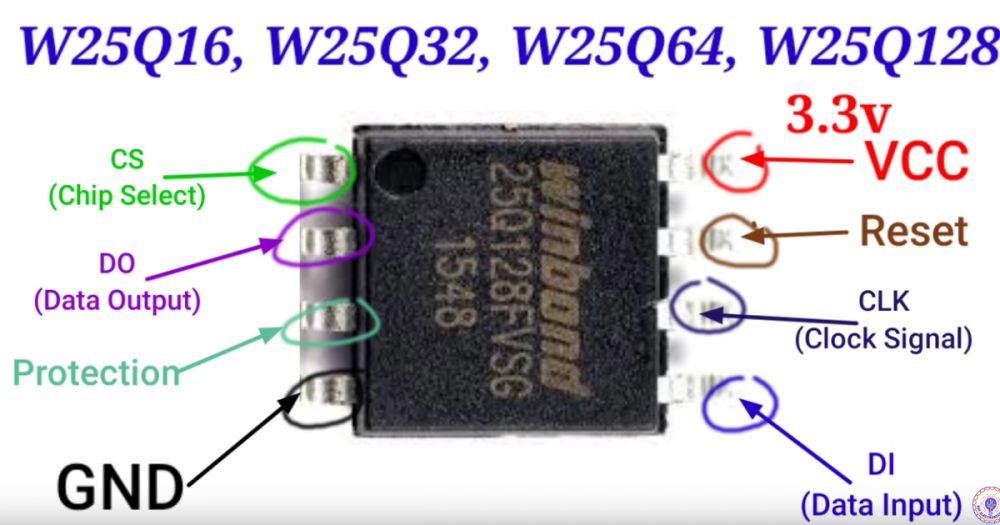
Thank you for the guide. This u-boot message is of concern. This is BOOT directory (partition) of the armbian image extlinux/extlinux.conf What armbian, or another SD image is this particular u-boot version most likely to boot up on roc-rk3399-pc-plus (mezzanine)? The spi ship w250q128fv manual https://www.winbond.com/resource-files/w25q128fv_revhh1_100913_website1.pdf and the spi section for roc-rk3399-pc-plus http://wiki.t-firefly.com/en/ROC-RK3399-PC-PLUS/driver_spi.html https://tomvanveen.eu/flashing-bios-chip-arduino/ https://github.com/flashrom/flashrom The spi chip is W25Q128FV The next step if one wants to save this, around 90$ sbc is probably to flash the spi through adapter or with possibly raspberry or something like that. That is totally another story. But might be interesting to get the know how, to flash a tiny modern spi (2020) chip directly. Perhaps something like this method https://libreboot.org/docs/install/rpi_setup.html Is there someone that want to share his knowledge of the subject?
-
Thank you Panzerknacker for the info - did not know one could edit variables within u-boot. I am not trying to appear more tech wise than I am. Now the only thing it boots into is this u-boot spi boot. Unable to boot into maskrom with USB-C with data only cable. And unable to boot from the sd card (not trying to boot from nvme). How does one use u-boot commands to boot a armbian SD installation? (This is all done for educational purpose - have few of those single board computers to play with).
-
Happy new year folks, This is after fallowing the instructions completely.
-
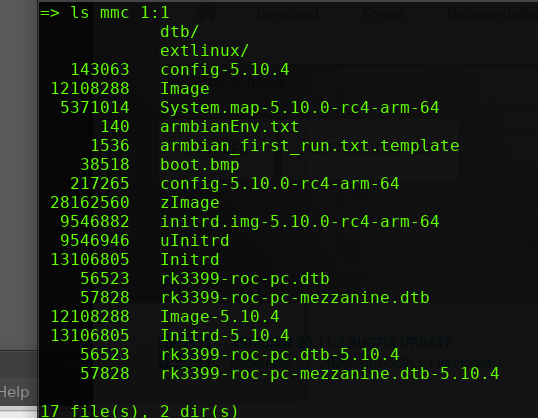
How is this done? This is the current terminal debug info