berin
-
Posts
97 -
Joined
-
Last visited
Content Type
Forums
Store
Crowdfunding
Applications
Events
Raffles
Community Map
Everything posted by berin
-
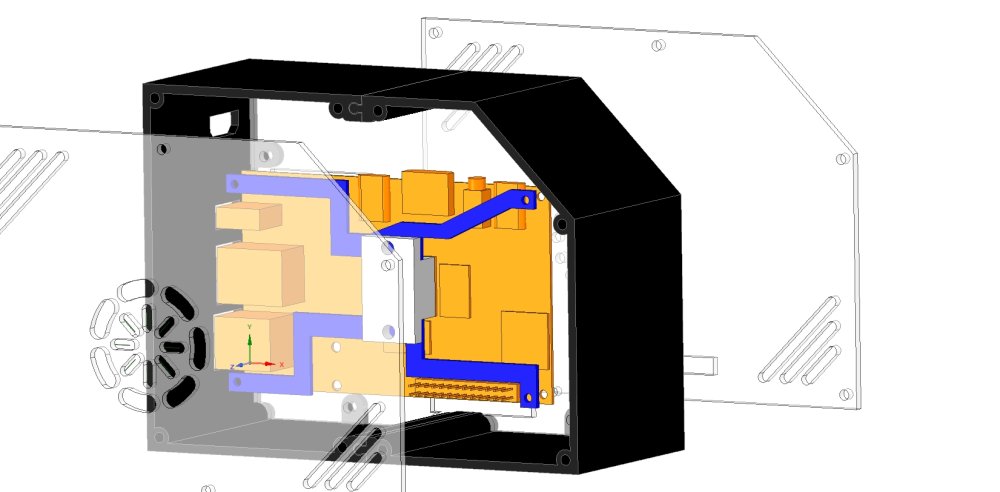
Look for a GIT repo UPDATE of cad .RSDOC .STL .DXF files update on the OPI5 micro desktop around 11pm or so, there ARE new parts now added. I have just started printing the front half after printing some small parts. the front half + updates print on this new 3d printer is about 6 hrs at 60% infill. I may re-print the back half tomorrow to fingers crossed confirm my updates are measurement accurate. As is the mount plane for the OPI5 fits the back half of the print like a glove. Sadly I had errors I didnt know about in the ports locations so.... we will see. Now that I have had some time to work on the cad files its really starting to look good with the new updates. With luck someone else will even post about there thoughts on the project. I doubt it but I am a pipe dreamer.
-
Ok at this point made some big design changes to the case, It looks the same but big adjustments plus I've added a hand full of new features. I may update the GIT repo tonight. FYI I removed the "back section" STL becuase of errors I found. I will update with the corrected stl(s) when I'm happy with the latest progress. Ok so summary of things I have added. HDMI/pocket filler power wire holder for power, HDMI female holder, RTC battery older, front i2c LCD, power button and other modifications.
-
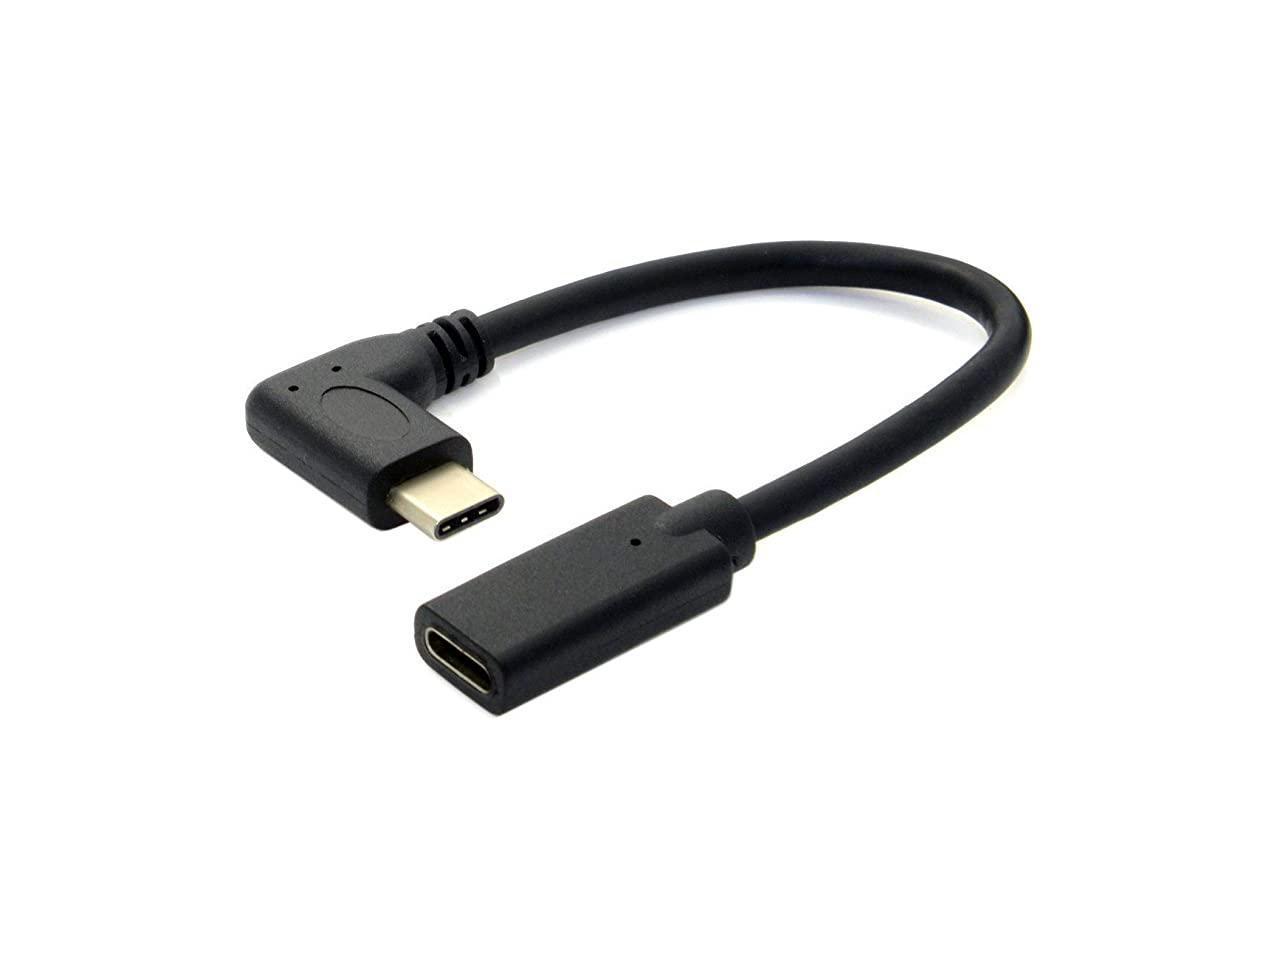
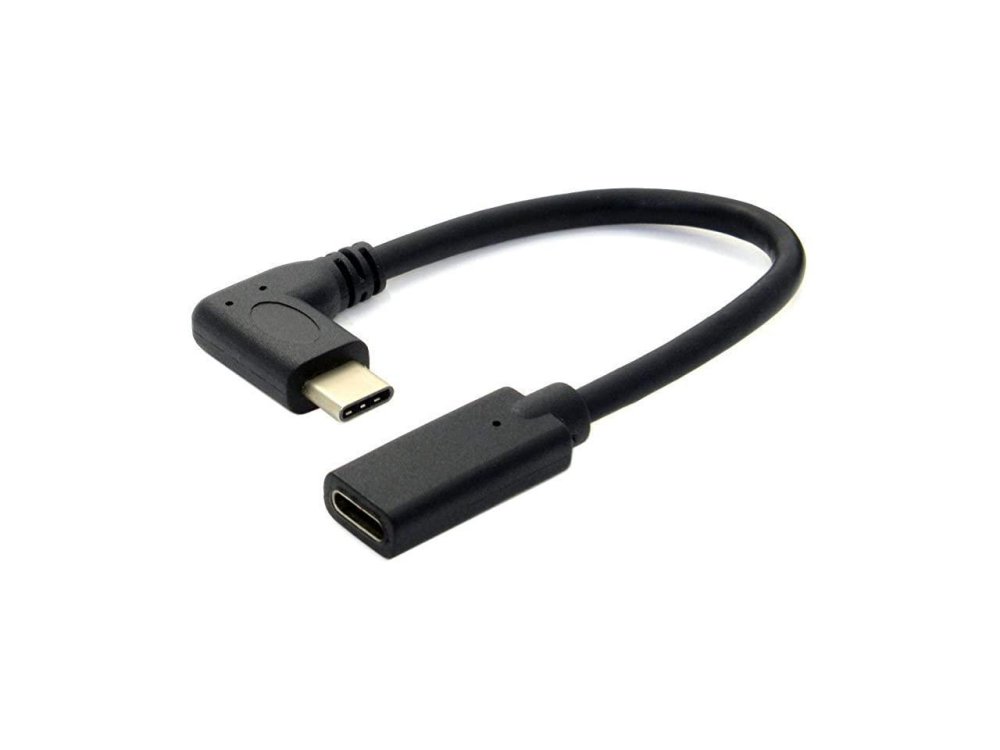
Ok so for the HDMI port I am designing for one of these kind of options https://www.amazon.com/dp/B09F61FZWQ https://www.amazon.com/Angled-Degree-Female-Multicopter-Photography/dp/B08C7DLDR4 . I will make it with a screw on holder/shelf to mount the HDMI. Though I'm trying to find the USBC version to have the option of USB-C hdmi or full size HDMI ports. If I'm not mistaken this USB-C adapter could be swapped in to work. https://www.amazon.com/Type-USB-C-Type-C-Cable-Phone/dp/B095KCR9GG
-
So looking at my aft section print I discovered some issues. I'm working on the CAD drawing a bit today I may or may not be done and update the GIT repo with updated CAD files today. I am also adding a wire retainment setup for the power wire with a filler peace. That will allow the usb power cable to go in the back and be neat.
-
So AMAZON had there first ever screw up with me and packages. My new 3d printer never showed up and I was home at the time, nore did I miss it per the security footage. Finally got it resolved and got my money back, and I just got a fully pre built 3d printer from a local big box office store. TONIGHT I am starting the first shell print. I'm printing the back case section. I'll have photos some time tomorrow. My current settings I'm looking at about 6 hours print time. I only have red PLA on hand so... so be it.
-
I just finished designing a new feature for the OPI5 micro desktop. I'm not going to announce what it is but will be interesting to see if anyone talks about it. The new cad file update has been committed to the git repo, I wonder if I will get any feedback on the design. No photos or other files have been updated.
-
I have committed the updates to the GIT repo.
-
tonight, I'm milling the corrected OPI5 micro tower corrected back plane out of acrylic. I'll post photos when done.
-
I have just ordered one of these https://www.amazon.com/gp/product/B076WXR8N9/ "MakerFocus I2c OLED Display 0.96 Inch IIC Serial LCD LED Module". I will get it next weekend with any luck. When I get it I will add the footprint to the cad drawing, my plan it to mount it in the 45-degree section of the case design. I also JUST ordered a new larger 3d printer. When I get that in the mail and all setup I will finally "print" the main body of the case. If anyone has any idea's suggestions. I'm always all ears, FYI there have been very few comments on any forum regarding this case design. As to the 3d printer, I ordered the "Creality Ender 3 Neo 3D" with some extra bells and whistles. The first upgrade I'll do when I get the 3d printer is a back angle support posts. Also I'm toying with the idea of creating a custom light up milled/3d printed power button. more or less a ring of the acrylic material embeded as part of the 3d print. With a 3d printed button that presses the power button on the OPI5. The other option is to solder some wire leads to the button. I'm not a fan of soldering to non solder test points.
-
Side panels cut finally!!!! Now the fun process of cleaning them up.
-
So I've done a number of test prints etc.. and as much as I love my monoprice mini delta 3d printer. I think I'm going to purcahse a larger 3d printer to make this shell. I just dont want to deal with the supports hell.
-
After more unexpected delays I AM milling the acrylic parts right now Saturday night 2/4/2023. I have also made more changes to the cad drawings the side panel covers. I'll be loading those to the git repo later tonight after the milling job is done.
-
FINALLY I got a free min. Tonights project is milling the side and if I have time re-cutting the mounting plane. I am using Tuffak-ar abrasion resistant polycarbonate sheet 1/8 th material. I am using it not because its expensive but because I have access to it. I'll post photos later tonight when done. Sorry I've been quiet, but I'm stuck with a "project" at work that the manager "above me" totally screwed up and committed us to the job that should not be done. nothing but issues and @#$%#@$% discovery's. I keep having to adapt things to save the progress. finally past most of the BS at this point nock on wood. As of this writing I'm JUST starting to setup my cnc machine.
-
I'm doing a sizing test print, been doing work cad work all day long :(.. I own a "mini delta 3d printer, mine tends to have an issue with print size %. often under or over by 1-2% hence I wont post any cura output files unless someone has the same 3d printer. according to my first test my delta 3d printers print is undersized by 1.471% doing second print with adjustment. And I'm now doing an other test print at 1.6% increase so thats 101.6% trying to get the print size accurate. And I have settled on 101.65% for my MP MINI DELTA 3d printer. Sucks I will have to print the halfs in a vertical setup with an aggressive support setup. When I DO the prints I'll post my 3d print settings.
-

I have no SD writer, can I boot from a simple USB thumbstick?
berin replied to snow's topic in Orange Pi 5
You can use the raspberrypi iso burner software to write to an SD card or thumb drive etc.... there are a number of image burning/writing softwares. for different OS's What OS are you using and or have you solved your problem yet? -
Ok I just spend hours poring over the CAD drawings. I have discovered the source of my measurements error and have now corrected it. All effected cad files have been updated with corrections. I thought I was having lost steps on my cnc machine when I made the steel heatsink brackets. It would not surprised me considering my cnc machine is not made to cut steel. When I cut the first attempt of the back plane for mounting the OPI5 the holes didn't match up at all. Oh sh!t we have a problem. I have had no comments to me with issues which leads me to believe no one has built (fully) the design yet including me.
-
This weekend I WILL be making some progress with the case build. I've had fam visiting and other life activities this week.
-
I finally got a chance to mill out the acrylic opi5 back plane. I discovered I was off by a millimeter or two so I'm updating the cad drawing. If you're building my case design. Please double check all measurements before committing to a build, in case I made an error.
-
So I didnt get to do much of anything for the OPI5 micro case this weekend. I DID update the cad drawings, they now are updated to the standoffs I am using. The desktop case is now in a V1.0 basic design. Anything beyond this point will be versions split between the front half and the rear half of the case. This will allow anyone wanting to build the case to have custom options if I or someone else creates a new feature build. JUST AN FYI, i HAVE BEEN RUNNING my opi5 for a few hours now. and it is stone cold with the rpi heatsink. I have not done any benchmarks yet but even running screensavers is not heating the heasink up at all.
-
This weekend I'm going to try to start the build.
-
I am trying to find a USB extension cable like this. It is a USB-C extension cable with a 90-degree plug. But I'm looking for a version that is the 20gbps Thunderbolt rated about 4 - 6 " long. the 10gbps is not thunderbolt rated. If anyone knows of a source please let me know.
-
Ok I'm trying to find a USBC cable. 4-6" long MALE USBC with a 90 degree plug to plug into the OPI5. A straight, or mount able by nut, screws, or clamp USBC female end. More or less I'm looking for a 4-6" USBC extension cable. Also this cable needs to be rated "Thunderbolt" That means it can do HDMI, 20gbps RATED. and 100watts rated or something like that. If anyone knows the model of the audio jack on the OPI5 I'm trying to find the PCB mounted part.
-
@xAda hehe I have not touched my tinkerboard in some time because of the "boot" issues. I have not reviewed my past posts but as I recall I may have posted about using a CASTLE DCDC that can be programmed for output voltage. But I took the tinkerbrd out of the custom enclosure I built that is housing that PSU. I'll get back to it some time but I'm waiting for my $ #MMTLP #finrafraud ( <<< twitter) problem to resolve. You may find my current project interesting https://github.com/berin-aquaquad/orange-pi-5 .
-
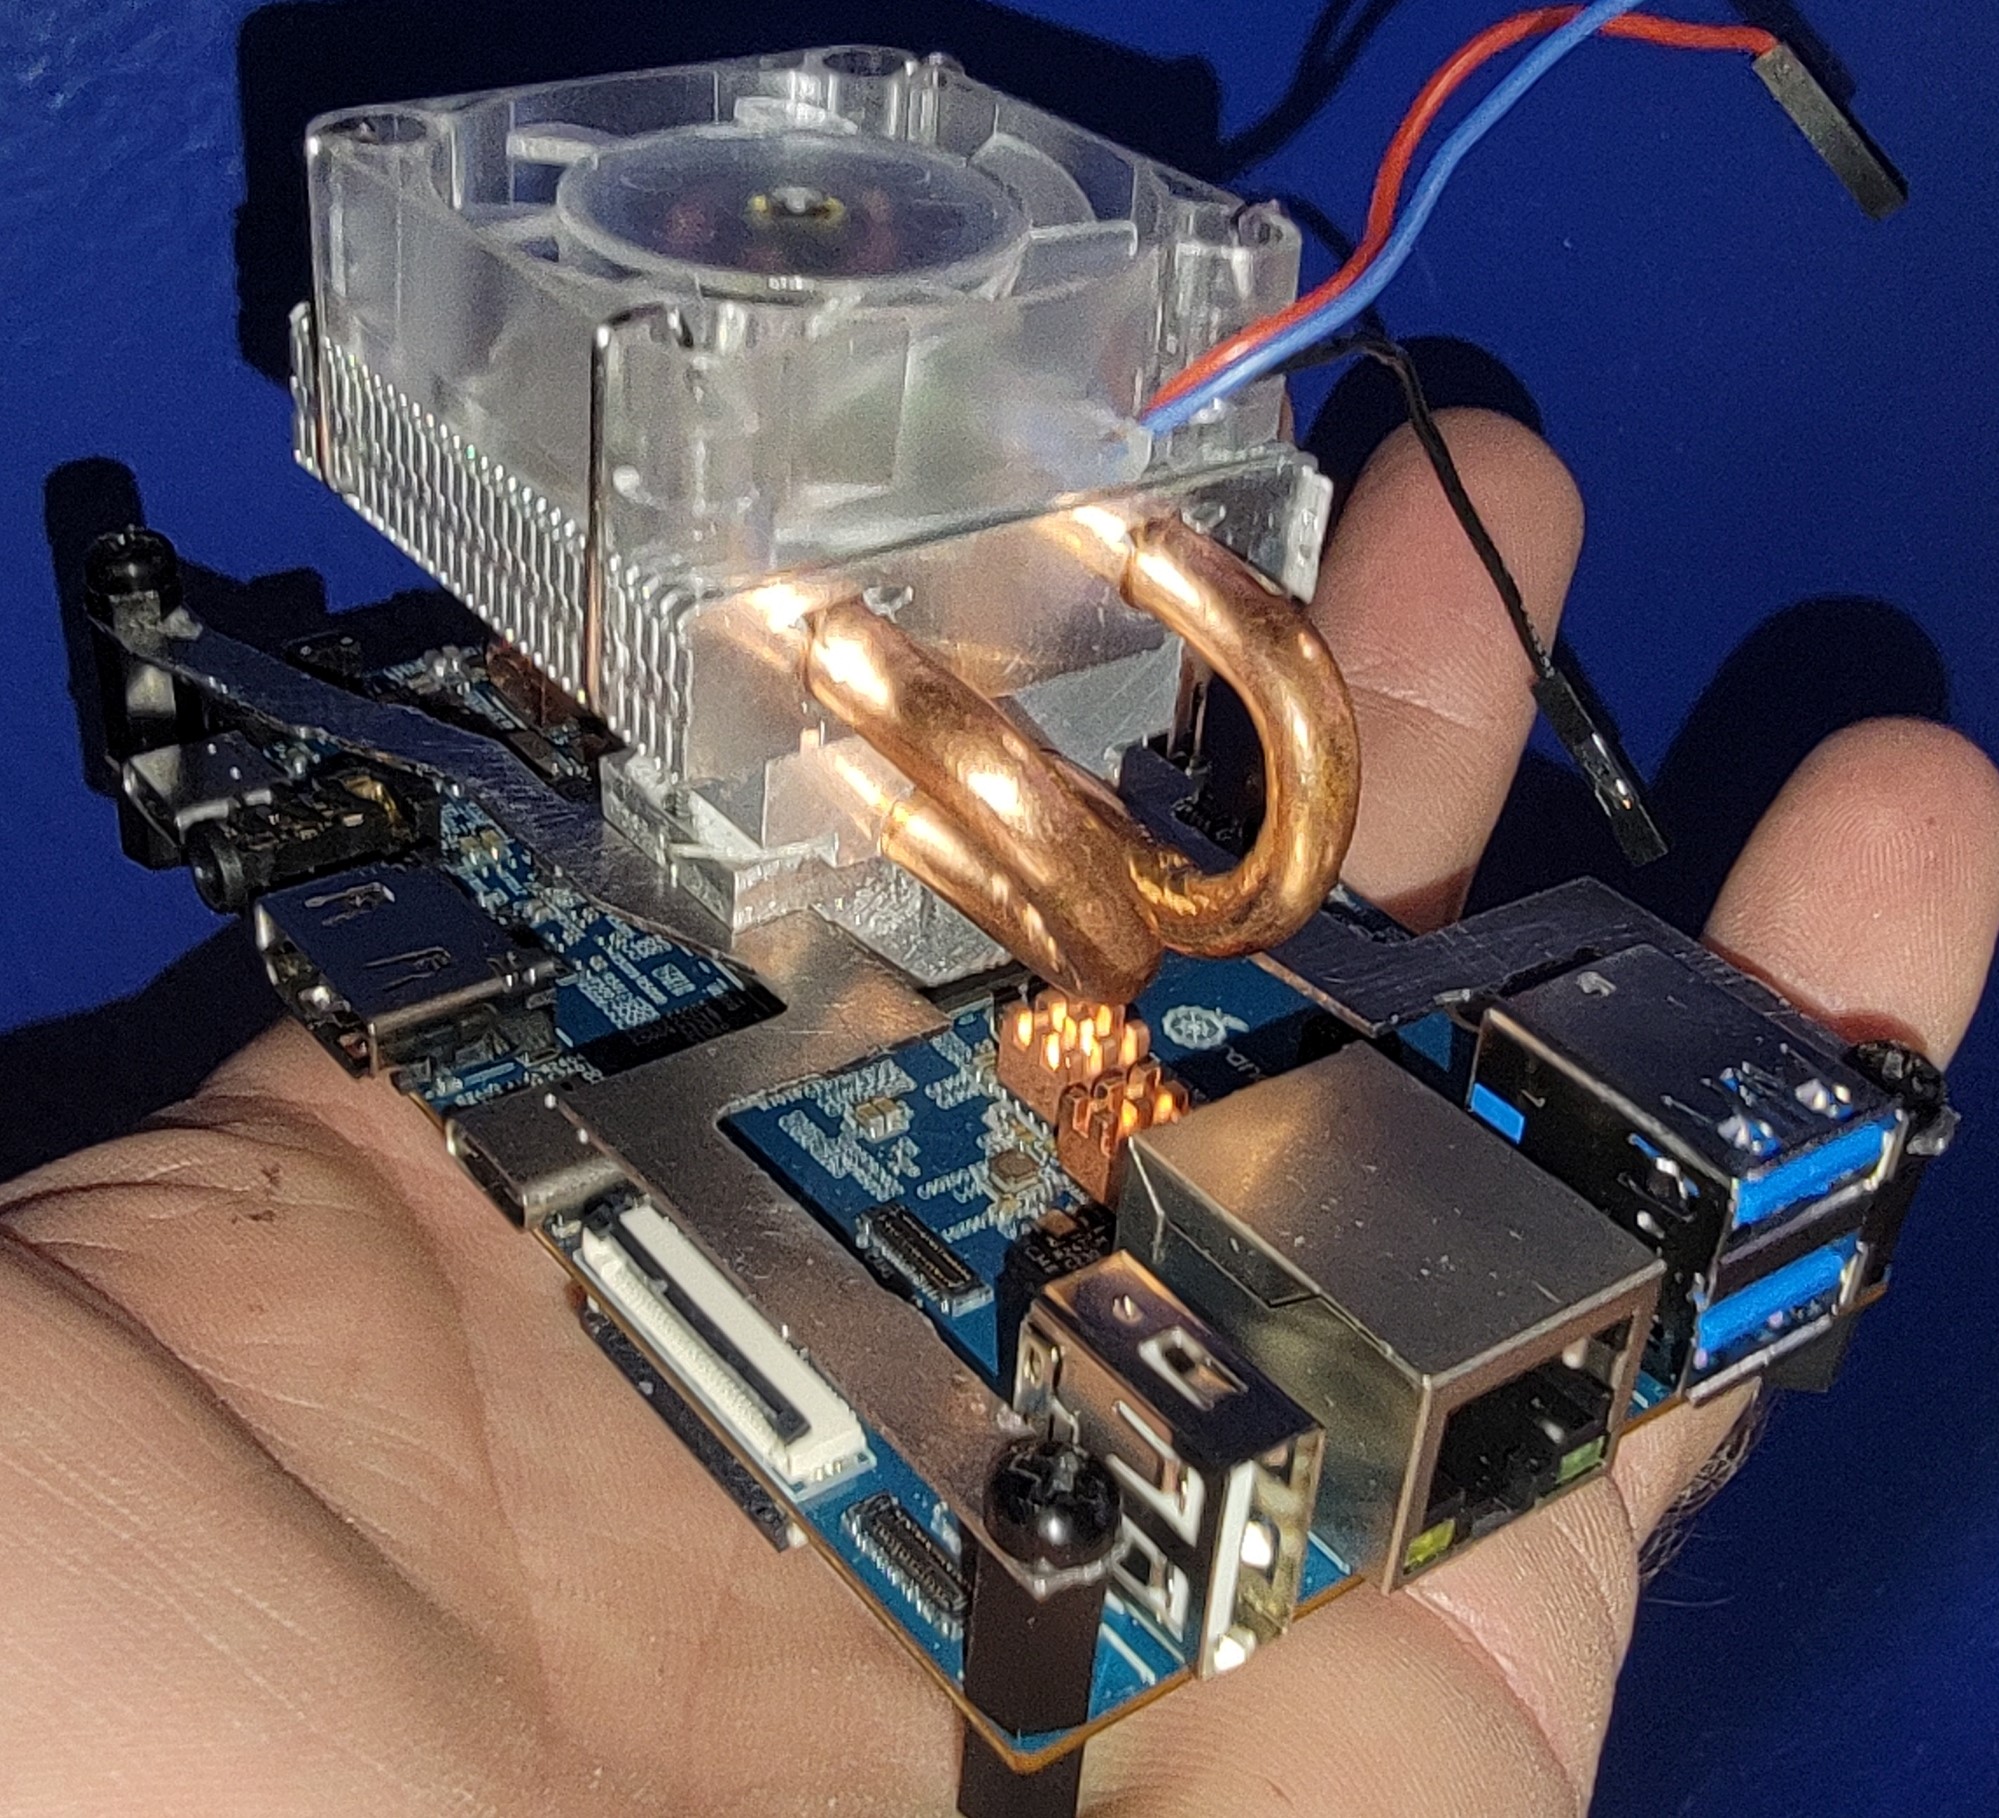
Hello just got home from work. As to working aspect of the OPI5 check the documents from the orange pi web site. http://www.orangepi.org/html/hardWare/computerAndMicrocontrollers/service-and-support/Orange-pi-5.html . The heatsink I'm using is this one https://www.amazon.com/dp/B07ZV1LLWK Its for the RPI4 ice tower low profile. The aluminum spacer block I built, the Cad files are on my github listed in the first post including the cad for building it and the steel mounting brackets pictured above. The mounting standoffs are these https://www.amazon.com/dp/B08DMSNB8X That I am using. I have not had time but I'm going to do a build write up as I get free time. In short the bottom standoffs are the 6mm "barrels" the top are the 10mm with thread. That allows a person to use "screws" on the mounting plane so they can remove the OPI5 board easy from the backside. Let me know if this helps?
-
Just mounted my ICE tower for RPI. first OPI5 ICE TOWER IN THE WORLD next working on building the shell. and the RTC setup.