Search the Community
Showing results for 'pinebook' in topics.
-
I finally successfully got Armbian installed on my Pinebook Pro's eMMC. That should be giving it its best possible performance. I thought you may all be interested in compiling a list of games that work at least reasonably well on it given its restrictions of being ARM64 architecture, 1.8GHz CPU & 4GBs RAM. So to start here is a list of the ones I currently have on mine. I may try more later but for now I'm limited by the stock 64GB eMMC that the PCP came with... 0AD - 3D RTS Cave Story - Pixel Art Metroidvania Dr Robotnik's Ring Racers - Kart Racer Dune Legacy - RTS Endless Sky - Space Sandbox Flare - Fantasy RPG Freeciv - Strategy Freecol - Strategy GZDoom - Doom Engine for Mods & Total Conversions Hedgewars - Worms "Homage" Neverball - Monkeyball "Homage" Neverputt - Miniputt Golf Game Open Fodder - FOSS Engine for "Cannon Fodder" OpenRA - FOSS RTS Engine for "Tiberian Dawn", "Red Alert" & "Dune 2000" Open TTD - Transit Management Sim OpenTyrian - FOSS Engine for Top-Down Shmup "Tyrian" Perfect Dark - PC Port of N64 Game with Keyboard/Mouse Support Pico-8 - Indie Pixel Art Gaming & Development Platform Pingus - Lemmings "Homage" ScummVM - FOSS Engine for Classic Point & Click Games Sonic Robo Blast 2 - 3D Platformer The Ur-Quan Masters - FOSS Port of Space Sandbox "Star Control II" Xonotic - Arena Shooter FPS There are other games I have not yet personally tried like OpenHV, SuperTuxKart, other emulators etc but if anyone can confirm they work reasonably well on the Pinebook Pro then please let the rest of us know. All ScummVM games I've tried from King's Quest I to Grim Fandango work perfectly. However GZDoom will struggle with especially demanding modern Doom mods like Trenchfoot, Auger Zenith, Inquisitor III, Godless Nite etc. but most like Aliens: Eradication, Ashes 2063/Afterglow, Brutal Doom, Castlevania: Simon's Destiny, Irontusk's Diablo 3D, Revenge of the Triad etc run just fine.
-
 Full root filesystem encryption on an Armbian system (new, fully rewritten, replaces my earlier tutorial on this topic) MMGen (https://github.com/mmgen) This tutorial provides detailed, step-by-step instructions for setting up full root filesystem encryption on an Armbian system. The disk can be unlocked remotely via SSH or the serial console, permitting unattended bootup. An automated script that performs the same steps, saving you much time and effort, can be found at https://github.com/mmgen/mmgen-geek-tools Note that unlike my earlier tutorial all steps are performed within a running Armbian system. The tutorial is known to work with the following board/image combinations (plus possibly others—follow the comments in this thread for additional info): Orange Pi PC2 Debian Buster mainline / Ubuntu Focal legacy RockPi 4 Debian Trixie mainline / Ubuntu Focal legacy RockPro 64 Ubuntu Focal mainline Odroid HC4 Debian Buster mainline / Ubuntu Focal mainline Pinebook Pro Debian Bookworm current minimal Rock Pi 4A+ Unknown Pine A64 Unknown Orange Pi 5 Debian Bookworm mainline / Ubuntu Noble mainline minimal Rock 5B Debian Trixie mainline Nano Pi M6 Noble mainline minimal / Noble Gnome desktop vendor Raspberry Pi 5** Debian Trixie minimal (see note) Banana Pi F3 Debian Trixie mainline minimal / Ubuntu Noble vendor minimal * Boards/images in bold blue type are personally tested by the author. Others may have issues or require additional steps provided by users below. ** For instructions on how to adapt this tutorial for the Raspberry Pi, see here (instructions are provided by a third party and are untested by the author). You may have success with other boards/images too. If so, please post the details below (or open an issue in the mmgen-geek-tools Github repository), and I’ll add your board to the list. Requirements: A SoC with a running, upgradeable and Internet-connected Armbian system A blank Micro-SD card and USB card reader, or, alternatively, an eMMC installed on the board The ability to edit text files and do simple administrative tasks on the Linux command line Step 1 - Preliminaries All steps in this tutorial are performed as root user on a running Armbian system (the “host”). The encrypted system (the “target”) will be created on a blank micro-SD card (the “target device”). If the board has an eMMC, it may be used as the target device instead of an SD card. Depending on your platform, you may need to run “armbian-install” and select “Install/Update the bootloader on MTD Flash” (preferable) or “Install/Update the bootloader on eMMC” to enable booting from the eMMC. Architecture of host and target (e.g. 64-bit or 32-bit ARM) must be the same. For best results, the host and target hardware should also be identical or similar. Building on a host with more memory than the target, for example, may lead to disk unlocking failure on the target. If you’re building the target system for the currently running board and with the currently running image, which is the recommended approach, the two preceding points will be a non-issue. Packages will be installed using APT, so the host machine must be Internet-connected and its clock correctly set. Step 2 - Upgrade your system and install the cryptsetup package # apt update && apt upgrade # apt install cryptsetup Step 3 - Get and unpack the latest Armbian image for your board Create your build directory: # mkdir armbenc-build && cd armbenc-build Download the Armbian image of your choice for your board, place it in this directory and unpack: # xz -dv *.img.xz Step 4 - Create mount directories and set up the loop mount Create the mount directories: # mkdir -p mnt boot root Determine your first free loop device: # losetup -f Associate the image file with the loop device name displayed by the previous command. This will be '/dev/loop0' in most cases, but if your output was different, substitute that for '/dev/loop0' in the following steps. # losetup -P /dev/loop0 *.img Examine the disk image using fdisk on the loop device: # fdisk -l /dev/loop0 The output should look something like this: Device Start End Sectors Size Type /dev/loop0p1 32768 61931519 61898752 29.5G Linux filesystem Make a note of the start sector (32768 in this case). You’ll need this value in the steps below. Now mount the loop device: # mount /dev/loop0p1 mnt Step 5 - Copy the boot loader to the target device If applicable, insert a blank micro-SD card and card reader into a USB port. Determine the target device name using 'dmesg' or 'lsblk'. We’ll assume it to be '/dev/sda', since that’s the most likely case. If your device name is different, substitute it for '/dev/sda' in the the following steps. For an eMMC, the device name will be something like '/dev/mmcblk1'. WARNING: if '/dev/sda' refers to some other storage device, running the following commands unchanged will destroy data on that device, so always remember to substitute the correct device name!!! The best way to eliminate this danger is to disconnect all unused storage devices on the board before proceeding further. Determine whether your image has a GPT partition table or a legacy MBR (i.e. DOS) one. This can be done by running fdisk -l on the image file and examining the “Disklabel type” entry. For GPT images, also make note of the value in the “Type” column. On ARM devices, it’s likely to be “Linux root (ARM-64)”, for example. You’ll need this information soon when partitioning the target device: # fdisk -l *.img Copy the image’s boot loader to the target device. With MBR-partitioned images, we use the Start sector value from Step 4 as the argument for 'count', while with GPT ones we skip the first 64 sectors and correspondingly subtract 64 from 'count', reducing the number of copied sectors by 64: ### MBR (DOS) images: # dd if=$(echo *.img) of=/dev/sda bs=512 count=32768 ### GPT images: # dd if=$(echo *.img) of=/dev/sda bs=512 skip=64 seek=64 count=32704 Step 6 - Partition the target device # fdisk /dev/sda At the fdisk prompt, create a new disk label with the 'o' command (for MBR images) or 'g' (for GPT images). Use the 'n' command to create a partition of size +400M beginning at the same Start sector as the disk image (for MBR images, select the “primary” partition type). Type 'p' to view the partition table, which should now look something like this: Device Start End Sectors Size Type /dev/sda1 32768 851967 819200 400M Linux root (ARM-64) Use 'n' again to create another partition beginning one sector after the first partition’s end sector and filling the remainder of the device (for MBR, select “primary” again). Type 'p' once more to view the partition table: Device Start End Sectors Size Type /dev/sda1 32768 851967 819200 400M Linux root (ARM-64) /dev/sda2 851968 120829951 119977984 57.2G Linux root (ARM-64) Ensure that the first partition’s Start sector matches that of the disk image (32768 in this example) and that the second partition’s Start sector is one greater than the End sector of the first (851967 and 851968, respectively, in this example). If you’ve made a mistake, use 'd' to delete a partition and start again. With GPT images, you’ll need to change the partition type of your two partitions to match that of the image. Type 'l' to list the known partition types and find the entry matching the value of the “Type” column you made note of above. Note the entry’s integer code and exit the pager with 'q'. Using the 't' command, change the type of your two partitions using this code. Type 'p' once again to view the partition table, which should now look something like this (depending on your platform): Device Boot Start End Sectors Size Id Type /dev/sda1 32768 442367 409600 200M 83 Linux root (ARM-64) /dev/sda2 442368 30636031 30193664 14.4G 83 Linux root (ARM-64) Once everything looks correct, type 'w' to write the partition table to disk. Step 7 - Copy the system to the target device The following commands will create a filesystem on the target device’s boot partition and copy the boot partition data from the image file to it. Don’t forget to substitute the correct device name if necessary. If you’re building the system on an eMMC, the boot partition device will be something like '/dev/mmcblk1p1' instead of '/dev/sda1'. # mkfs.ext4 /dev/sda1 # or '/dev/mmcblk1p1', for an eMMC target # e2label /dev/sda1 CRYPTO_BOOT # mount /dev/sda1 boot # cp -av mnt/boot/* boot # (cd boot; ln -s . boot) Create the encrypted root partition. When prompted for a passphrase, it’s advisable to choose an easy one like 'abc' for now. The passphrase can be changed later with the 'cryptsetup luksChangeKey' command (type 'man cryptsetup' for details) once your encrypted system is up and running. # cryptsetup luksFormat /dev/sda2 # or '/dev/mmcblk1p2', for an eMMC target Activate the encrypted root partition and create a filesystem on it: # cryptsetup luksOpen /dev/sda2 rootfs # enter your passphrase from above # mkfs.ext4 /dev/mapper/rootfs Mount the encrypted root partition and copy the system to it: # mount /dev/mapper/rootfs root # (cd mnt && rsync -a --info=progress2 --exclude=boot * ../root) # sync # be patient, this could take a while # mkdir root/boot # touch root/root/.no_rootfs_resize Unmount the boot partition and image and free the loop device: # umount mnt boot # losetup -d /dev/loop0 Step 8 - Prepare the target system chroot # BOOT_PART=($(lsblk -l -o NAME,LABEL | grep CRYPTO_BOOT)) # ROOT_PART=${BOOT_PART%1}2 # ROOT_UUID="$(lsblk --nodeps --noheadings --output=UUID /dev/$ROOT_PART)" # BOOT_UUID="$(lsblk --noheadings --output=UUID /dev/$BOOT_PART)" # cd root # mount /dev/$BOOT_PART boot # mount -o rbind /dev dev # mount -t proc proc proc # mount -t sysfs sys sys Copy '/etc/resolv.conf' and '/etc/hosts' so you’ll have a working Internet connection within the chroot: # cat /etc/resolv.conf > etc/resolv.conf # cat /etc/hosts > etc/hosts If you’re using non-default APT repositories, you may need to copy their configuration files as well so that 'apt update' and 'apt install' will use them inside the chroot. Note that you can only do this if the host and target systems have the same distro/version. If that’s not the case, you’ll have to edit the target files by hand. # cat /etc/apt/sources.list > etc/apt/sources.list # cat /etc/apt/sources.list.d/armbian.list > etc/apt/sources.list.d/armbian.list If you’re using an apt proxy, then copy its configuration file too: # cp /etc/apt/apt.conf.d/*proxy etc/apt/apt.conf.d/ Step 9 - Edit or create required configuration files in the target system Perform the editing steps below using a text editor of your choice: If the file 'boot/armbianEnv.txt' exists, edit it so that the 'rootdev', 'console' and 'bootlogo' lines read as follows. If you’ll be unlocking the disk via the serial console, then use 'console=serial' instead of 'console=display'. Note that enabling the serial console will make it impossible to unlock the disk from the keyboard and monitor, though unlocking via SSH will still work: rootdev=/dev/mapper/rootfs console=display bootlogo=false If your image lacks an 'armbianEnv.txt' file, you’ll need to edit the file 'boot/extlinux/extlinux.conf' instead. All changes will be made to the line beginning with “append”. Alter the argument beginning with “root=” so that it reads “root=/dev/mapper/rootfs”. If you’ll be unlocking the disk via the serial console, remove the “console=tty1” argument. If not, remove the argument beginning with “console=ttyS...”. Replace the “splash plymouth...” argument with “splash=verbose”. Make sure to read the note about unlocking via serial console in the previous step. Edit 'etc/initramfs-tools/initramfs.conf'. If your board will have a statically configured IP, add the following line to the end of the file, substituting the correct IP in place of 192.168.0.88: IP=192.168.0.88:::255.255.255.0::end0:off If the board will be configured via DHCP, then edit the DEVICE line as follows: DEVICE=end0 If your default network device has a different name, say eth0, then use that instead of end0. The device name can be discovered by issuing the command ip link and looking for the device labelled link/ether. If host and target systems are both Debian buster, you may wish add some key modules to the initramfs to avoid a blank display at bootup time. The easiest way to do this is to add all currently loaded modules as follows: # lsmod | cut -d ' ' -f1 | tail -n+2 > etc/initramfs-tools/modules Retrieve the SSH public key from the remote unlocking host and copy it to the target: # mkdir -p etc/dropbear/initramfs # rsync yourusername@remote_machine:.ssh/id_*.pub etc/dropbear/initramfs/authorized_keys If you want to unlock the disk from more than one host, then edit the authorized_keys file by hand, adding the required additional keys. Create 'etc/crypttab': # echo "rootfs UUID=$ROOT_UUID none initramfs,luks" > etc/crypttab Create 'etc/fstab': # echo '/dev/mapper/rootfs / ext4 defaults,noatime,nodiratime,commit=600,errors=remount-ro 0 1' > etc/fstab # echo "UUID=$BOOT_UUID /boot ext4 defaults,noatime,nodiratime,commit=600,errors=remount-ro 0 2" >> etc/fstab # echo 'tmpfs /tmp tmpfs defaults,nosuid 0 0' >> etc/fstab Create the dropbear configuration file: # echo 'DROPBEAR_OPTIONS="-p 2222"' > etc/dropbear/initramfs/dropbear.conf # echo 'DROPBEAR=y' >> etc/dropbear/initramfs/dropbear.conf If the target is Ubuntu bionic, then a deprecated environment variable must be set as follows: # echo 'export CRYPTSETUP=y' > etc/initramfs-tools/conf.d/cryptsetup Set up automatic disk unlock prompt. Performing this optional step will cause the disk password prompt to appear automatically when you log in remotely via SSH to unlock the disk. Using your text editor, create the file 'etc/initramfs-tools/hooks/cryptroot-unlock.sh' with the following contents: #!/bin/sh if [ "$1" = 'prereqs' ]; then echo 'dropbear-initramfs'; exit 0; fi . /usr/share/initramfs-tools/hook-functions source='/tmp/cryptroot-unlock-profile' root_home=$(echo $DESTDIR/root-*) root_home=${root_home#$DESTDIR} echo 'if [ "$SSH_CLIENT" ]; then /usr/bin/cryptroot-unlock; fi' > $source copy_file ssh_login_profile $source $root_home/.profile exit 0 Save the file and execute the command: chmod 755 'etc/initramfs-tools/hooks/cryptroot-unlock.sh' Step 10 - Chroot into the target system, install packages and configure Now chroot into the encrypted system. All remaining steps will be performed inside the chroot: # chroot . Install the cryptsetup package and the dropbear SSH server: # apt update # echo 'force-confdef' > /root/.dpkg.cfg # apt --yes install cryptsetup-initramfs dropbear-initramfs # for a buster or focal image # apt --yes install cryptsetup dropbear-initramfs # for a bionic image # rm /root/.dpkg.cfg Make sure everything was included in the initramfs (all three commands should produce output): # lsinitramfs /boot/initrd.img-* | grep 'usr.*cryptsetup' # lsinitramfs /boot/initrd.img-* | grep dropbear # lsinitramfs /boot/initrd.img-* | grep authorized_keys Now regenerate your SSH host keys: # ssh-keygen -A Your work is finished! Exit the chroot and shut down the board: # exit # halt -p Insert your freshly written SD card into the board’s main SD slot (or, if the target is an eMMC, just remove the SD card from that slot) and reboot. Unlock the disk by executing the following command on your remote unlocking machine, substituting the correct IP address if necessary: $ ssh -p 2222 root@192.168.0.88 If you performed step 9.10 above, the disk password prompt should appear automatically after login. If not, you must enter the command 'cryptroot-unlock'. You may also unlock the disk from the target board’s console if you wish. Note, however, that certain disk images (RockPi 4 buster mainline, for example) might give you a blank display at startup, so you’ll have to enter your disk password “blindly”. This bug will hopefully be fixed in the future. If all went well, your root-filesystem encrypted Armbian system is now up and running!
 -
Just posting my experiences getting armbian going on pinebook pro. I had a pinebook pro on a shelf for a while, picked it up and ran "apt-get update" after which booting the system broke. So without anything important on there i figured i would reinstall. Tow Boot I had already installed an older version of Tow Boot, but i updated it to 2023.07-007 This is a simple process. Write out the spi.installer.img to an sd card (i used dd). Insert the sd card in to the slot on the side of the pinebook. Start the system. Follow the prompts. Shut down the system. Remove the sd card. Power on the system and hit "Esc" to see the Tow Boot menus and verify the version has been updated in the "Firmware Console" by typing "version" A major change appears to be that Tow Boot has inherited a minimum viable EFI interface from U-Boot. This allows generic efi arm images to boot, but because the efi configuration is stored in the efi partition rather than spi flash, tools like efibootmgr don't work. Read more here in github (I don't think its worth trying to run without Tow Boot installed on the spi, despite the limited efi) Install Armbian I downloaded the Cinnamon Debian version listed on the Pinebook Pro page - the exact file was Armbian_25.2.1_Uefi-arm64_bookworm_current_6.12.13_cinnamon-backported-mesa_desktop.img.xz I then unxz'd that file and dd the image to the sd card. Insert the sd card in to the pinebook and power on. Armbian boots! Install works as normal, but you will notice that efibootmgr commands are failing in the install script although they are non fatal at this stage. This is due to the Tow Boot efi limitations mentioned above. Unfortunately, Armbian will install the grub efi binary as /EFI/Armbian/grubaa64.efi and failing to add a boot entry, the system will fail to boot. You have two options. The first is to copy /EFI/Armbian/grubaa64.efi to default location /EFI/BOOT/BOOTAA64.EFI - this is also perhaps the safest in the short term. (note that on the installer sd card the file is located at /EFI/BOOT/BOOTAA64.EFI). You may need to manually mount the new EFI partition on the mmc and copy the file - do this before rebooting the system so the system remains bootable. If you don't there is no need to panic, adding a boot entry to Tow Boot's efi is very simple from its menus as i will now describe... The second is to add a boot entry in the Tow Boot menus. Contrary to the github issue linked above, it seems that in Tow Boot the "efidebug" command has been replaced with a more convenient set of commands to manage boot options. Power on your pinebook pro, press "Esc" to see the Tow Boot menu and go in to "Firmware Console". Type "eficonfig" and use the convenient menu to add a new boot entry - not that the tow boot console has tab completion which is very convenient. In "eficonfig" hit enter on "Add Boot Option", set "Description" to "Armbian", hit enter on "File" then "Select File" then "mmc 0:1" and find the Armbian/grubaa64.efi file. Then "Save" (initrd and optional data left empty). Then "Change Boot Order" and move the new Armbian entry to the top with -/+ keys then Save. Exit "eficonfig" and continue with a normal boot by typing "bootefi bootmgr" I suggest do both, and once the system is booting from the new boot entry you can remove the BOOTAA64.EFI file as good hygiene I also observed that the Tow Boot menu does freeze up occasionally and the only solution is to press the power button. Also you do seem to need to press keys slowly. Minor issue at log in I observed that for a brief period the keyboard doesn't work at the log in prompt. The speakers give their normal tick sound and the cursor stops flashing - which presents like the system has frozen. I found that pressing the power button causes the system to gracefully shut down - so the system hasn't locked up. Be patient and a moment or two later, the cursor starts flashing again and the keyboard works. I dont know what is causing this behavior but perhaps someone else is interested to dive in to it. Apt update and beyond With the system booted and logged in, i ran updates and rebooted. Things continued to work properly
-
 Yesterday I did start to install armbian trixie iot on my Pinebook. Second part in debian - after the u-boot) starts, but then the Pinebook shuts off, because of a low battery(?) I did charge the whole day and powered off in the evening. Today the Pinebook stand on my table with a swollen battery. I removed it and happily it doesnt crash anything else than the battery holder. But now it doenst boot up complete like with a low battery. After the u-boot debian trixie does boot , but at the middle of the messages it does shutdown Can it run completly without battery? I have normally a 5V/2Ah power-supply connected and that did work the last years. Now I can only try to use a 5V/60W quick-charge Power-Supply. Anyone has experiences with that? Thanks for info in advance...
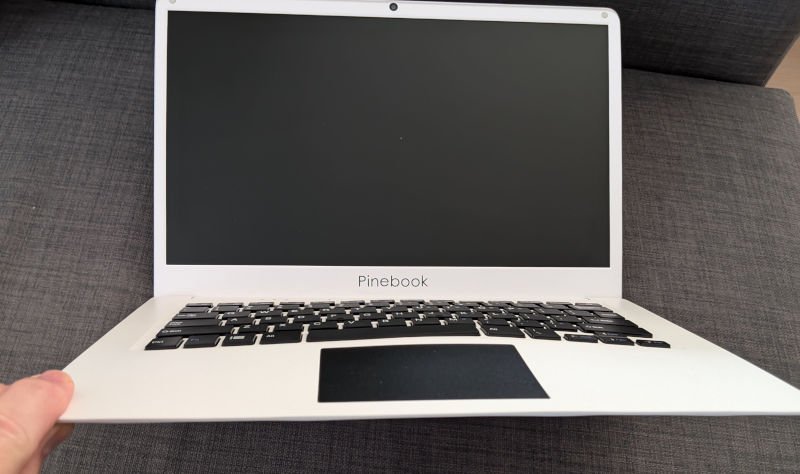
-
What is the current status of Pinebook Pro? I see there were Pinebook-Pro-specific install images for older version of Armbian, but there doesn't appear to be any for more recent versions, and currently, the download page points to (non-machine-specific?) UEFI install images. Is this a transition that was discussed/announced, and can I read the discussion/announcement in archives somewhere? Also, does anyone have any installation/testing reports? Is 25.02 known to work on the Pinebook Pro? I've tried a few different times to create a Armbian SDCard for my Pinebook Pro. I've only had one success, one one of my early attempts. Unfortunately, I did not take very good notes, and I've lost track of which downloaded image file I used to create it. I still have the successfully-created SDCard, and it still works, but I haven't been able to create another. When I inspect the contents of the good SDCard, it appears to be 24.8.1, and it boots via GRUB, but I'm not sure if it was made from a PinebookPro-specific image or a UEFI image. There's plenty more testing I could do on my own -- my supply of SDCards is running low, and I should buy a few more, and in an assortment of sizes (successful SDCard was 32GB, some of the most recent attempts (which failed) were to a 256GB SDcard)
-
Hi every time I start firefox an error message appears stating "Could not read configuration file - contact your system administrator" 🙃, i. e. me. Does anyone know how to fix it ? It is simply an annoyance - firefox works as expected so far. Kind regards Norbert
-
 Hi I can access my nextcloud in the firefox browser, but the client always states "signed out". From time to time there is a request in the browser to confirm access of the client to the nextcloud server. Howeveer, this doesn't seem to work. I guess, I should add an online account (in Preferences). But there is no button to "Add account" shown. Do you have a hint to a missing package ? I am out of ideas how to solve it. Kind regards Norbert
 -
Hi Yesterday I spend the whole day to install Armbian Desktop (XFCE) on my Pinebook Pro. Why Armbian ? The PBP was delivered with Manjaro Arm on it. Everything worked fine until Manjaro stopped support for the Arm platform. For about one year there is no update on stable and the unstable branch couldn't establish a connection to Wifi. I used Manjaro Arm to install tow-boot to the SPI following this website: https://forum.pine64.org/showthread.php?tid=17529 I downloaded the current Bookworm XFCE edition and wrote that to an SD card. Booting from the SD with tow-boot went fine. I installed armbian on the SD card and used armbian-config to install it on the internal eMMC. That didn't work. fsarchiver to the rescue ! I created a GPT partition table on the internal disk, created two partitions with the correct flags and restored both partitions from the SD saved with fsarchiver to the internal disk. Booting went fine from the internal disk after that. Now I am fighting with firefox ("Can't read configuration file - contact your systemadministrator") and the nextcloud client. I can't add a online account anywhere. The application starts up but there is no button execpt (Information about ...) which shows the supported clients a.o. Owncloud (which will work with nextcloud) but there is no way to add an account. I'll open other posts to track that.
-
 Last week installed Armbian for the first time on my Pinebook Pro that was basically bricked from Manjaro. Everything worked great! Audio is a little weak, but will look into that later. Today I pulled down the 25.2.1/6.12.16 update. On booting in Grub, I now get a message "Loading Device Tree Blob...", followed by "Error: not a regular file Press any key to continue". The boot then continues after a bit, and system seems to work fine from a user perspective after that (posting this from the machine). But there are some rockchip-pcie, rk3399-dmc-freq and brcmf errors in the armbianmonitor output (attached url) . I'm an Armbian noob, so dunno if the errors were there on the previous version. The 25.2.1 install re-wrote the grub entries so I don't have the previous kernel to boot into to do any debugging, but it used to boot cleanly before the update. Wondering if there is a known situation here, before I dig into the whole dtb thing. Thanks!
 -
Normally when you have installed a XFCE-Desktop image for the Pinebook A64 you could set the display brigthness with the following pkexec command to a readable higher level - like I did in the past (possible brightness values are 1-10 - on startup this is only set to 2): pkexec /usr/sbin/xfpm-power-backlight-helper --set-brightness 8 read-out command for the current value: pkexec /usr/sbin/xfpm-power-backlight-helper --get-brightness but on standard CLI-install pkexec and xfpm-power-backlight-helper are missing, so to use this command-line (in /etc/rc.local) you have to install these 2 packages: sudo apt install xfce4-power-manager pkexec
-
http://blog.armbian.com/content/images/2026/01/githubhighlights-2.png This week’s Armbian development saw a major cleanup of legacy toolchain code, alongside numerous board-specific improvements and kernel updates. Support was added for the Nuvoton MA35D1 NuMaker IoT board, while the BananaPi CM4/M2S and Khadas VIM3L boards received updated U-Boot bootloaders. Several fixes addressed hardware compatibility, including Bluetooth on Orange Pi Zero2, Type-C issues on Helios64, and build stability for the Raspberry Pi 4B. The release also introduced enhanced audio support for Genio devices and new AV1 patches for Rockchip64. Continuous integration workflows were reorganized, and the Ubuntu Resolute image build was enabled, reflecting ongoing efforts to streamline and modernize the Armbian build system. "get completely rid of dead code toolchain stuff", pt2. by @rpardini in armbian/build#9218"get completely rid of dead code toolchain stuff", pt3. by @rpardini in armbian/build#9252"get completely rid of dead code toolchain stuff", pt4 - fixes. by @rpardini in armbian/build#9256Add post-build Armbian extension for burnable JetHub boards. by @QwaSeeK in armbian/build#8844BananaPi CM4/M2S: Update u-boot to v2026.01. by @pyavitz in armbian/build#9250board: add Nuvoton MA35D1 NuMaker IoT board support. by @TuAFBogey in armbian/build#9205bunch o' fixes: 6.18/current .configs (uefi-all/meson64) + boards KERNEL_TARGET + meson64 6.18 pcie debork again-again. by @rpardini in armbian/build#9247ci: organize GitHub Actions into meaningful categories. by @igorpecovnik in armbian/build#9260Enable Ubuntu Resolute image build. by @iav in armbian/build#9164Fix OP-TEE build on Ubuntu Jammy (older binutils). by @TuAFBogey in armbian/build#9249Fix Panther-X2. by @sicXnull in armbian/build#9243Fix typec on pinebook pro. by @amazingfate in armbian/build#9245genio: add alsa-ucm-conf + ucm2 config for working audio in userspace. by @rpardini in armbian/build#9235genio: collabora: bump to collabora's 6.19-rc5. by @rpardini in armbian/build#9251Helios64: fix Type-C PHY registration. by @iav in armbian/build#9158khadas-vim3l: u-boot: update v2026.01 u-boot fanciness. by @rpardini in armbian/build#9257mainline: bump edge to rc5. by @EvilOlaf in armbian/build#9244Meson64: Delete patches that are not required. by @pyavitz in armbian/build#9239meson64: remove upstreamed patch for 6.18.6 and rewrite the rest. by @EvilOlaf in armbian/build#9266mixtile-core3588e: alias ethernet0 to gmac0 for stable MAC address. by @rpardini in armbian/build#9237orangepizero2: fix bluetooth in edge kernel. by @EvilOlaf in armbian/build#9242radxa-zero2: fancy u-boot v2026.01 // minimal+full fusb302 enablement. by @rpardini in armbian/build#9253rockchip64-6.19: arm64: dts: rockchip: describe pcie ethernets on FriendlyElec NanoPC-T6. by @rpardini in armbian/build#9238Rockchip64: Add verisilion av1 patches. by @amazingfate in armbian/build#9240rockchip64: Helios64: fix Type-C PD negotiation. by @iav in armbian/build#9255rpi4b: fix build and boot issues. by @EvilOlaf in armbian/build#9267sunxi-current: recover lost Makefile entries. by @EvilOlaf in armbian/build#9236sunxi: bump current and edge to latest minor. by @EvilOlaf in armbian/build#9229sunxi: resolve some cross patch dependencies. by @EvilOlaf in armbian/build#9232sunxi: switch current and edge back to auto bumping. by @EvilOlaf in armbian/build#9234u-boot: run binwalk on all the produced u-boot bins (always). by @rpardini in armbian/build#9192Update jethome j200 kernel patchset, uboot to 2025.04. by @adeepn in armbian/build#9231View the full article
-
I'm seeing this exact Cinnamon problem on the Pinebook Pro (Rockchip rk3399). I get the same error message flagging Util.latinise. I see no Start menu button. If I press the hardware start button on my keyboard I see a blank menu box appear with no icons or functionality. Under Armbian/bookworm, which I currently run on the Pinebook Pro, there is no problem; Cinnamon seems to work fine under Armbian/bookworm. The problem appears only with Armbian/trixie.
-
 Hi, I put the image on an SD card, but the machine fails to boot. Looking at the serial console, it just sits in a loop with the CPU constantly resetting after an exception. Serial console log is attached. Regards, Dianne. bootloop.txt
 -
 I bought a Pinebook Pro two weeks ago. It came with Manjaro KDE preinstalled on EMMC. I wanted to try out Armbian, so I downloaded the Bookworm XFCE image from May 27th. In order to get the SD booted, I first flashed Tow-Boot for Pinebook Pro (pine64-pinebookPro-2021.10-005.tar.xz) from github Tow-Boot to the SPI. Then during boot after pressing ESC the menu lets you select the SD card for boot. The first boot to Armbian worked well. I could set up user, timezone and everything. The XFCE desktop looks very clean with a reasonable selection of software. Well done, team! But after I upgrade the system with apt update & upgrade, the next time the machine is booted and SD card is selected, armbian won't boot anymore 😞 The upgrade seem to have broken something. I tried it twice, the second time freezed the kernel-upgrades in the armbian-config tool prior to upgrading it. Didn't help. Manjaro from EMMC still boots ok. Attached is a screenshot of the failed boot process, after I selected SD card to boot on the Tow Boot menu.
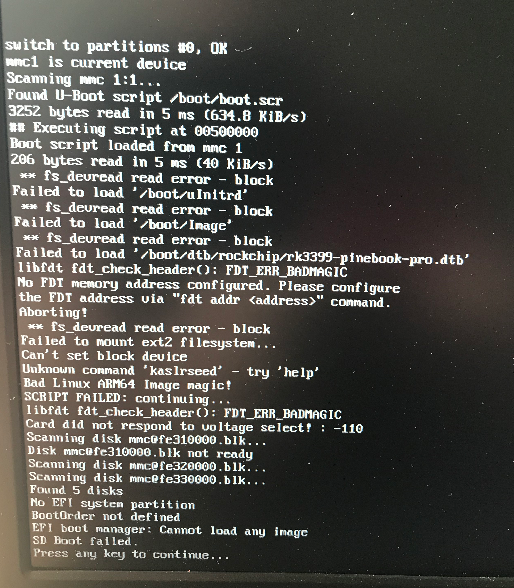
-
 I slowly convinced myself that I wanted a PineBook Pro, some time after the first production run. But then COVID, parts shortages, etc. happened and they were not available again until about mid-2022. But when they were, I decided to snap one up. And since then I have not been able to get it to boot Armbian. It came from the factory with Manjaro, which for me being a Debian guy, might as well be useless. So the PBP sat around collecting dust. Since then I have tried a few times to get it to work. I read many forum posts, tried some things. I won't document all that in detail. In this post, I will continue from where I left off here. However to summarize, that was about comparing DTB/DTS files to Kali, which supposedly works. That may become useful later, but I don't think that's the main problem. I think that the main problem is that this new batch came from the factory with no bootloader flashed to the included SPI flash chip. This is a problem on PineBook Pro because the RK3399 has a kind of weird boot order: SPI, eMMC, SD card. Therefore, if you just put in some SD card you flashed, it still boots from the factory Manjaro from the eMMC. Whatever bootloader they are using also apparently will not recognize an otherwise working Armbian image on an SD card. Now, because of the weird boot situation, there is supposed to be a switch to turn off eMMC. However this did not work for me. Which means one of 2 things: The switch does not work. I read at least one other person saying this. Also on the new revision, it's in a slightly different place than the old revision (may be a clue, maybe not). I simply had a bad Armbian image (which I had burned to sd card) that would not boot for whatever reason.[0] But let's put that aside for a moment. As I still think the main problem is the (empty) SPI. And that will be the easiest/best path forward. I confirmed the 'blank SPI' theory 2 different ways. First, as mentioned in a follow-up to the linked post (4 paragraphs above): As Martijn Braam states here: Of course, I like to beat a horse until it's really dead be thorough in my investigations, so today I wasted a lot of time[1] verifying that this indeed was the case. I did so by dd'ing the /dev/mtd0 block device into a file[2]. When I examined the file, it contained all FF, and also it is about 16 MiB in size. To me this confirms that indeed, the SPI on the new batch comes from the factory empty. So what is next? I keep reading that the only people who had success first had to install something like tow-boot to the SPI. That will be my next step. But before I flashed anything to SPI, I wanted to see what really came from the factory (which I did above). I will continue to document my progress whenever time allows for me to work on this. [0] Once I got the bootloader situation sorted, I later used this same image (on the SD card) to boot and install Armbian, so I do not think this was the case. [1] In the end the solution was simple. But first I wasted a lot of time trying to get rkdeveloptool working in Manjaro on the PBP. Only to realize it's intended to be used from a second machine to read the SPI flash via USB in maskrom mode. Anyway, lesson learned. [2] I tried to attach it but maybe it's too big.
 -
Hi, I read everything I could possibly find on the DP-Alt mode for the RockPro64 and came to the conclusion that no Distro is offering that right now. However, the Pinebook Pro seems to have support via a Kernel Patch. Can the Pinebook Pro Kernel be installed on the RockPro64? Is there a repository for Armbian Kernels? Thanks very much.
-
As a follow up. Armbian doesnt seem to have proper pinebook pro support in its firmware package (i.e `armbian-firmware`) Someone was up until recently keeping track of different firmwares on the pinebook pro (link https://github.com/cobratbq/pinebook-pro) On mine I have just symlinked the raspberry pi4 versions, which has improved wifi and bluetooth. As far as i can tell, an appropriate pull request is needed against this repo? https://github.com/armbian/firmware/tree/master/brcm I was also able to update to trixie without any problems.
-
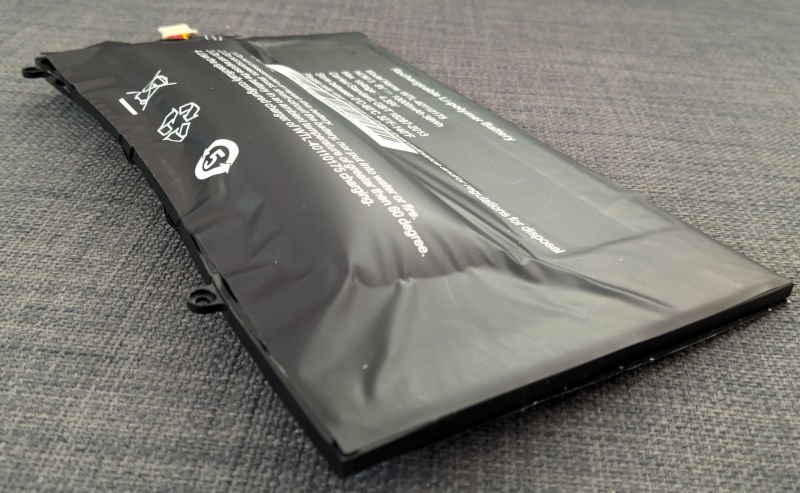
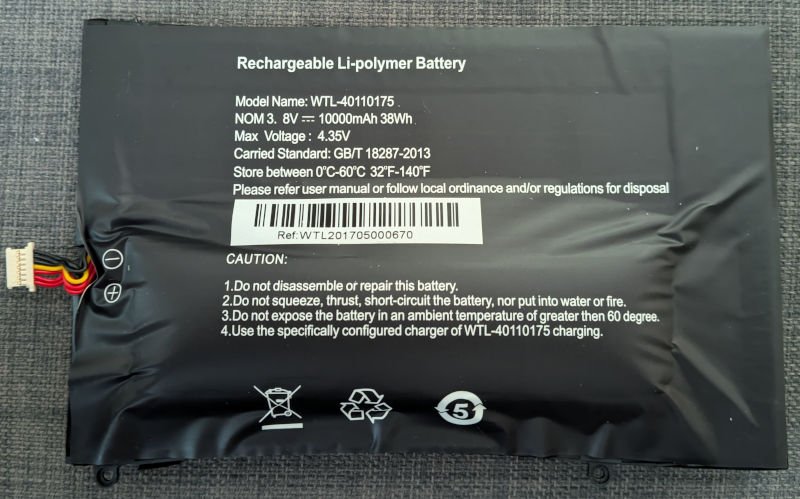
Yes the WTL-40110175 3.8v 10.000mAh battery has 3x red (PB+) and 3x black (PB- GND) and 1x yellow (Overvoltage?) or Temperature) Here in Turkey I do only find a 3.7v 10.000mAh Cell, but without the yellow cable (only red and black): https://www.n11.com/urun/1260110-37v-10000mah-li-polymer-pil-devreli15a-87767963 The battery PDF gives me very less clues Pinebook-WTL40110175-3_8V-10000mAh-14inch.pdf
-
There are schematics available for this device, so one could get a hint from those, but depends if you have electronics background or not. To me it seems that higher level software in Debian/Linux enables power management handling all the way using info it gets from the power management chip/circuitry. You can guess that for this device, same as smartphone, battery operation is considered primary/essential, so decision is 'low-batt' and shutdown. I have a BananaPi M1 that also has LiPo charging, but that is DIY soldereing, so no OS component bothers with not-connected cell, but if a cell is connected/soldered which I did, is charges and runs on that cell if microUSB PSU (they call it 'AC' in the chip signal names) is disconnected, although its SATA port is unpowered then. Runs Armbian Trixie CLI only (eth + serial console). An old business HP 2-core laptop that I got without battery and HDD runs fine on just the original HP power adaptor (has 3rd wire for some genuine HP charger purposes). For USB-C powered devices, there might be many things to deal with, e.g. my ROCK5B after un-boxing goes in a bootloop with a RPI5 PSU, was/is know, so I feed it with own 12V USB-C pig-tail. For the Pinebook, it might be that the 5V is perfectly 5.000V but drops to 4.900V or so in spikes under load, so the typical 5V SBC powering issue well-known from RPi and other cheap SBCs that cannot handle >5V USB PD voltages. The Pinebook might do well if you fake the battery, so look at colored wire/connector. I have used that several times in the past decades. The yellow wire might be for temperature so besides a proper voltage on black and red, you also need to do something with the yellow wire I guess. It also might be that is you skip/disable the parts of software that do power management handling, that it runs fine. So I would boot/run the 'image' of the pinebook in a systemd-nspawn container or libvirt VM (at least the user space) and see what is what. Maybe it is something like purge 'laptop-tools' package or so, or blacklist the kernel module for power management.
-
 Hello, as already mentioned in topic USB C port doesn't work after upgrading to the latest kernel 6.6.2 . The previous problem with not working left usb 3 port persist no more. Everything is fine. As I remember , before update the usb c port has worked with the adapter and the devices like mouse, usb flash etc. Now it doesn't work any more, furthermore it gives no signal of life. There is 0 amps current measured, also dmesg -W gives no output at all after plugging in the device. PS: I was unable to upload the report file, also the service paste.armbian.com doesn't work at the moment.
 -
 Description Other devices could be added if whatever the regulator needed for UHS is enabled. Read perf def improved on the gnome disk benchmarks. Jira reference number [AR-9999] let's enable salva's UHS overlay for RK3399 tested on PBP with 2ghz with 64 gig samsung evo select i like using the yabs.sh fio benchmark for mixed r/w tests curl -sL yabs.sh | bash -s -- -i -g -n also did gnome disk utility read benchmark before kernel 6.6.10 yabs # ## ## ## ## ## ## ## ## ## ## ## ## ## ## ## ## ## # # Yet-Another-Bench-Script # # v2024-01-01 # # https://github.com/masonr/yet-another-bench-script # # ## ## ## ## ## ## ## ## ## ## ## ## ## ## ## ## ## # Sat Jan 6 05:59:38 PM EST 2024 ARM compatibility is considered *experimental* Basic System Information: --------------------------------- Uptime : 0 days, 0 hours, 2 minutes Processor : Cortex-A53 Cortex-A72 CPU cores : 6 @ 1512.0000 2016.0000 MHz AES-NI : ✔ Enabled VM-x/AMD-V : ❌ Disabled RAM : 3.7 GiB Swap : 1.9 GiB Disk : 57.5 GiB Distro : Armbian 23.08.0-trunk sid Armbian 23.08.0-trunk sid Kernel : 6.6.10-edge-rockchip64 VM Type : NONE IPv4/IPv6 : ✔ Online / ❌ Offline fio Disk Speed Tests (Mixed R/W 50/50) (Partition /dev/mmcblk1p1): --------------------------------- Block Size | 4k (IOPS) | 64k (IOPS) ------ | --- ---- | ---- ---- Read | 1.82 MB/s (457) | 8.12 MB/s (126) Write | 1.85 MB/s (463) | 8.51 MB/s (133) Total | 3.68 MB/s (920) | 16.63 MB/s (259) | | Block Size | 512k (IOPS) | 1m (IOPS) ------ | --- ---- | ---- ---- Read | 12.39 MB/s (24) | 12.48 MB/s (12) Write | 13.51 MB/s (26) | 13.74 MB/s (13) Total | 25.90 MB/s (50) | 26.23 MB/s (25) gnome disk utility read benchmark (just defaults) Cool got some tiny gains on everything but 4k block after UHS enabled 6.6.10 yabs # ## ## ## ## ## ## ## ## ## ## ## ## ## ## ## ## ## # # Yet-Another-Bench-Script # # v2024-01-01 # # https://github.com/masonr/yet-another-bench-script # # ## ## ## ## ## ## ## ## ## ## ## ## ## ## ## ## ## # Sat Jan 6 06:05:48 PM EST 2024 ARM compatibility is considered *experimental* Basic System Information: --------------------------------- Uptime : 0 days, 0 hours, 0 minutes Processor : Cortex-A53 Cortex-A72 CPU cores : 6 @ 1512.0000 2016.0000 MHz AES-NI : ✔ Enabled VM-x/AMD-V : ❌ Disabled RAM : 3.7 GiB Swap : 1.9 GiB Disk : 57.5 GiB Distro : Armbian 23.08.0-trunk sid Armbian 23.08.0-trunk sid Kernel : 6.6.10-edge-rockchip64 VM Type : NONE IPv4/IPv6 : ✔ Online / ❌ Offline fio Disk Speed Tests (Mixed R/W 50/50) (Partition /dev/mmcblk1p1): --------------------------------- Block Size | 4k (IOPS) | 64k (IOPS) ------ | --- ---- | ---- ---- Read | 1.85 MB/s (464) | 8.81 MB/s (137) Write | 1.88 MB/s (471) | 9.32 MB/s (145) Total | 3.74 MB/s (935) | 18.14 MB/s (282) | | Block Size | 512k (IOPS) | 1m (IOPS) ------ | --- ---- | ---- ---- Read | 13.06 MB/s (25) | 13.64 MB/s (13) Write | 14.38 MB/s (28) | 15.23 MB/s (14) Total | 27.44 MB/s (53) | 28.87 MB/s (27) gnome disk utility read benchmark (just defaults) View the full article
 -

Failed to boot after trying to manually upgrade kernel
lovenemesis replied to lovenemesis's topic in Raspberry Pi
Many thanks for the reply! Good news is that with your guideline and a bit more information from qwen-code, I managed to chroot to it. It's a bit more complicated to do from a Ryzen Linux machine. A translation layer called "qemu-aarch64-static" is required. It's far more straightforward on a PineBook Pro due to the same architecture. Not so good ones is that reinstalling the old RPi5 specific 6.6 kernel still fails to boot. update-intramfs was automatically run during reinstalling the old kernel and uinitrd in /boot was updated by some scripts(according to last modified time stamp), with symlink as described in armbianEnv.txt. Everything seems to be at the right place and wired in the expected way. Quite confused. Great news is that despite the unsuccesful to restore the kernel, the chroot provide me an enough environment to utilize calcardbackup to extract the personal data from NextCloud database. Better news is that I took this opportunity to start fresh with Armbian 25.8.1 Debian Trixie with Kernel 6.12.44. So far it works beautifully on RPi5. -
Hi all, I have a working Pinebook Pro Focal build with LUKS encryption enabled. The only issue I have is that when booting no progress or password prompt is displayed. As soon as I enter the password and hit enter I see the boot logo or console output depending on what is set in armbianEnv.txt. I will be continuing my research and learning about the boot process in general but wanted to check in here to see if people had any obvious pointers to share or whether maybe this is a known limitation that is going to be hard to resolve. Thanks, Matt
-
Hello all, I got a problem after new update of armbian firmware through your own module (script). The left USB port on pinebook pro has stoped working at all. Before that was occasionaly after 6 -7 boot ups only one time not working (it is used for mouse). Now after x rebooting it doesnt work at all. The right USB port works without problems. On the left, also USB flash drive doesn't work. No idea, what could it be? Before, as already said, it has worked in 90%. Before firmware upgrade.
-
I know for sure that booting from an sd card and then using dd to write the uncompressed image to the emmc device isn't what works. I'm talking about Armbian_22.02.1_Pinebook-pro_focal_current_5.15.25_xfce_desktop.img here. Because that essentially bricked my PBP. I have the little adapter to connect the emmc to a usd slot, and using balena etcher to write to that isn't it either. the uboot in that image prevents booting from sd automatically as well, and i didn't find any uboot documentation that made it clear how to manually boot from sd, though i did hook up a serial console. This is what it said. The LED never turned green, the display flashes once but displays no images or text.