All Activity
- Past hour
-

ssh missfire on bpi-m5 noble
gene1934 replied to gene1934's topic in Software, Applications, Userspace
To clarify that last line htop say's ssh_config is in the cmd listing. put a tail on /var/log/syslog since it has the newest "access time" of any file in e5p's /var/log Further: "ssh gene@coyote" successfully logged into coyote, so assuming that ssh is running set e5p's /etc/apparmor verbose on with nano. from that login "ssh gene@e5p" gets "connection reset by peer", and NO update to syslog. The rejection is not even making it to ANY of the logs. So what's next? Switch back to a 64G u-sd? Is a 128G u-sd too big? I am out of ideas. And a $3000 3d printer is Dead In The Water, no way to restore its klipper /home/gene/printer_data directory after a forced upgrade from jammy to noble. Thanks. - Today
-
I've never used any other method. I'd suggest using a search engine to search for other methods to "enable multi boot on amlogic TV box"
-
Hi @ff255, Can you try with the following changes/additions to armbianEnv.txt: # previous load address 0x01f00000 fdt_addr_r=0x01f00000 # previous load address 0x02000000 # new load address 0x04200000 aligned to 2MiB boundary kernel_addr_r=0x04200000 # previous load address 0x04000000 # new load address 0x05400000 aligned to 2MiB boundary ramdisk_addr_r=0x05400000 Groetjes,
-
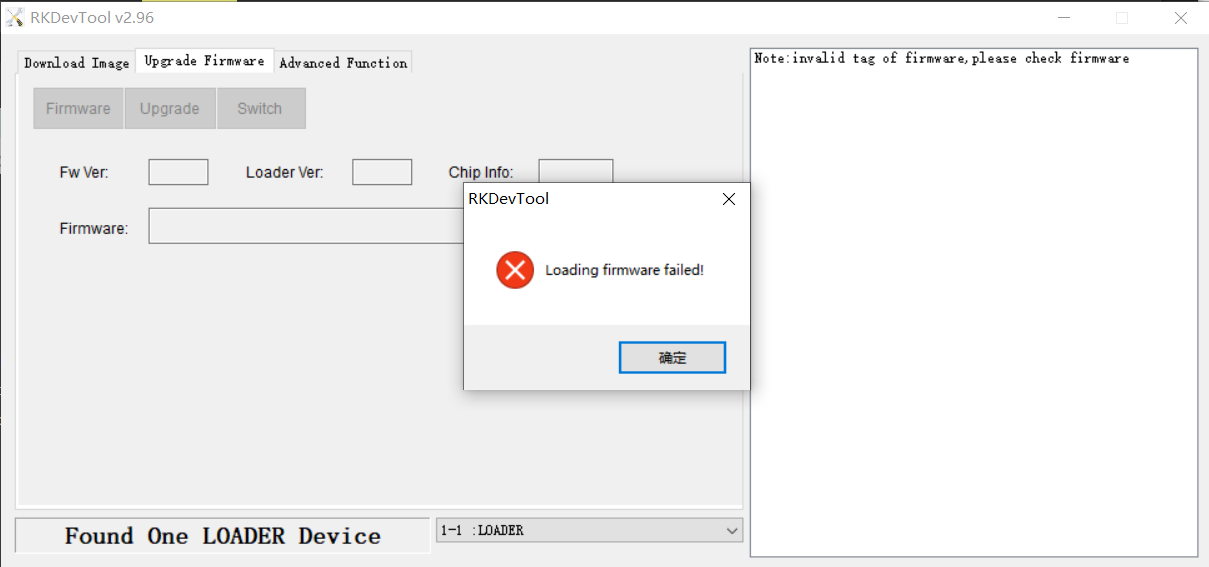
https://forum.armbian.com/topic/26978-csc-armbian-for-rk3318rk3328-tv-box-boards/page/66/#findComment-231768 Thanks your help,jock. I hava a try to use the rkdevtool to install armbian. I just choose the iamge in url https://github.com/armbian/community/releases/download/26.2.0-trunk.151/Armbian_community_26.2.0-trunk.151_Rk3318-box_trixie_current_6.12.63_minimal.img.xz. But,there catch a error message in the tool. I don't known is this image is error or other reason?

- Yesterday
-
-
@0230826 you can follow instructions in this page by @fabiobassa The loader is there too
-

Efforts to develop firmware for H96 MAX V56 RK3566 8G/64G
GBEM replied to Hqnicolas's topic in Rockchip CPU Boxes
Heya, Of interest to anyone encountering the 2025 AIC8800 WiFi and Bluetooth hardware, and who is using Buildroot; this is the package that builds and installs everything into a Home Assistant image. Of academic interest in the present discussion also, offering minor suggestions in dts and service file. 👽 aic8800.zip -
ssh missfire on bpi-m5 noble
gene1934 replied to gene1934's topic in Software, Applications, Userspace
You might not have been looking at the newest dmesg, I had a hard time convincing NetworkManager to stop calling for dhcp and just use the static settings I gave it. Everytime I looked it was re-enabled. Once I had convinced it to skip the dhcp BS, network is fine, apt works, ping -c1 yahoo.com works and FF can browse the whole planet. Everything works except /incoming ssh/. I can goto that printer and log into this machine, but I can't ssh into that machine. I can't "ssh-copy-id gene@e5p" which aliases in the hosts file to 192.168.71.122, it's refusing the incoming connection that worked with 6 other machines. Is there some other tool to trace this? htop says it is ATM. Thank you. -
The issue was bad SD media. Replaced the SD card and the image was written successfully. Side note. Armbian 25.5.1 does not create 2 partitions, it was designed to create only one partition. That was confusing because most instructions for installation were still referring to 2 partitions until I stumbled on a ChatGPT answer.
-
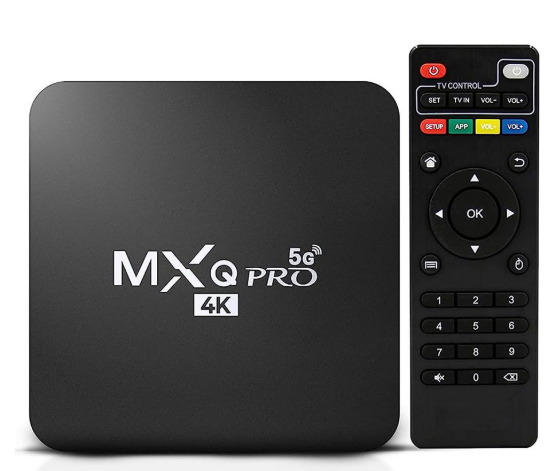
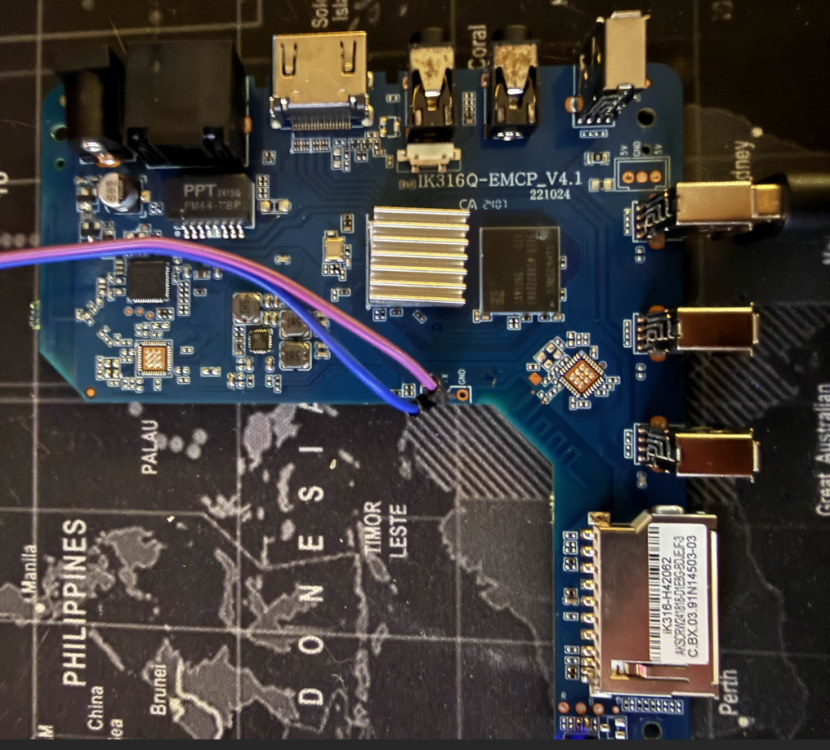
Hello Everyone, I've seen a few threads on these boards but wanted to create a centralized source for information. It's my understanding there are multiple variants of these boards, the one I have and used is IK316Q-EMCP_V4.1 I know there are other versions without UART ports, mine was lucky enough to have them. To build this image (adjust the compile command to your liking) git clone https://github.com/sicXnull/armbian-build cd armbian-build git checkout MXQ-PRO ./compile.sh build BOARD=mxqpro-h313 BRANCH=current BUILD_DESKTOP=yes BUILD_MINIMAL=no DESKTOP_APPGROUPS_SELECTED= DESKTOP_ENVIRONMENT=cinnamon DESKTOP_ENVIRONMENT_CONFIG_NAME=config_base EXPERT=yes KERNEL_BTF=no KERNEL_CONFIGURE=no KERNEL_GIT=shallow RELEASE=bookworm Prebuilt Images Armbian-unofficial_26.02.0-trunk_Mxqpro_bookworm_current_6.12.65_cinnamon_desktop.img Armbian-unofficial_26.02.0-trunk_Mxqpro_bookworm_current_6.12.65_minimal.img Unfortunately this board was already flashed with MiniArch by the time i got it, so i was unable to get the original DTB. Therefore, wifi does not work Is someone able to get the DTB from this board so we can get wifi working?
-

ssh missfire on bpi-m5 noble
eselarm replied to gene1934's topic in Software, Applications, Userspace
Network is down: 2: end0: <BROADCAST,MULTICAST> mtu 1500 qdisc noop state DOWN group default qlen 1000 All instances I could find. I think your own networking methods conflict with what is common nowadays and also might be reason ssh server is not even running or depending on a pseudo random situation. Same as for other topic where you could not reach armbian repo server. -
Bit late to the thread, but just a heads up. Been reading this thread and saw the DTS with the connector numbering. So I went to the manual to check the pinout and the pin number is listed as GPIO S/N. Just thought I would add to the thread.
-
ssh missfire on bpi-m5 noble
gene1934 replied to gene1934's topic in Software, Applications, Userspace
<https://paste.armbian.com/bebayihagi> I did look at it, but nothing yelled at me in a quick scan. Not sure what I s/b looking at. Thank you Werner. -
Have uploaded a new "edge" image for RV2 for testing. This time, wifi works. "current" image is the same. If you want to test, go to https://privat-in.de and grab Downloads. If you want to compile, clone https://github.com/sven-ola/armbian-build/tree/orangepi-rv2 and run Edit: forget to activate Mediatek wifi drivers as well. Also merged current Armbian/main. Uploaded again. LG // Sven-Ola
-
ah yes, you're right. Well homassistant seems to depend on docker, so if the docker issue is resolved, hass will probably work too. Though no clue what the issue with docker is. Since it is an issue with configng, I suggest to report directly here: https://github.com/armbian/configng/issues Don't forgot to be as verbose as possible when reporting. Will raise chances getting it addressed sooner
-
based on the specification orangepiPC2 has the H5 processor and should be 64bit. I
-

ssh missfire on bpi-m5 noble
Werner replied to gene1934's topic in Software, Applications, Userspace
what? armbianmonitor -u -
I had to install (they were missing) sshfs, then fuse and finally ssh on a bpi-m5, using a 128Gb u-sd as boot media. iso was noble from a week ago's download, and updated at 2nd boot after establishing my /etc/hosts file based network. I can ssh from it /to/ the main box w/o any problem. But any attempt to reverse into it /from/ another machine /to/ it is "connection reset by peer". I haven't touched /etc/ssh/*config's from default values. Is there something I need to set/reset in those files to restore incoming logins? And no, I do not enable root logins. Also, systemd is still a puzzle to me if its involved. Thanks for any advice.
-
For docker you don't really need armbian-config to install. Just do code { font-family: Consolas,"courier new"; color: crimson; background-color: rgba(0, 0, 0, 0.2); padding: 2px; font-size: 105%; } apt install docker.io and code { font-family: Consolas,"courier new"; color: crimson; background-color: rgba(0, 0, 0, 0.2); padding: 2px; font-size: 105%; } usermod -aG docker yourusername (if you want as non-root have access to docker). That's it. OPi PC2 is armhf, so 32-bit while it seems that homeassistant requires arm64, so 64bit system. Therefore this won't work.
-
Excuse me,jock. My TV-Box is the H96Max rk3318 4+64G.The box was installed Ubuntu 24.04,kenel 4.4,desktop vension by the seller。But now, i want to install the armbian system in the box.There are some problem for me that i have no HDMI-wire and no usb-keyboard,just only an usb-A to usb-A data-wire and a notepad computer。i think that i can't use the multitool.img to help me install the armbian. So, can you give me some help to install the armbian by USB-A to USB-A data-wire?I through some search some article to know maybe the RKdevtool can help me,but the tool need the loader.bin to flash the image. I don't know where is the loader.bin for rk3318.can you help me?
-
I try to install home assistant on the orangepipc2. Debian 13 (Trixie) is installed op the orangepi and I try to install Docker and homeassistant with the armbian-config utility. Unfortunately, this is not working. First I try to install Docker. ( tested with docker minimal and docker engine). I receive this information : Package docker-ce is not available, but is referred to by another package. This may mean that the package is missing, has been obsoleted, or is only available from another source Package docker-ce-cli is not available, but is referred to by another package. This may mean that the package is missing, has been obsoleted, or is only available from another source E: Package 'docker-ce' has no installation candidate E: Package 'docker-ce-cli' has no installation candidate E: Unable to locate package containerd.io E: Couldn't find any package by glob 'containerd.io' E: Couldn't find any package by regex 'containerd.io' E: Unable to locate package docker-buildx-plugin E: Unable to locate package docker-compose-plugin Failed to enable unit: Unit docker.service does not exist Failed to start docker.service: Unit docker.service not found. When I try to install homeassistant I receive following : Some packages could not be installed. This may mean that you have requested an impossible situation or if you are using the unstable distribution that some required packages have not yet been created or been moved out of Incoming. The following information may help to resolve the situation: The following packages have unmet dependencies: homeassistant-supervised : PreDepends: docker-ce but it is not installable E: Unable to correct problems, you have held broken packages. E: The following information from --solver 3.0 may provide additional context: Unable to satisfy dependencies. Reached two conflicting decisions: 1. homeassistant-supervised:arm64=3.0.0 is selected for install 2. homeassistant-supervised:arm64 PreDepends docker-ce but none of the choices are installable: [no choices] What is wrong ? Please help
-
Hello, @djurny 👋 Thank you for helping! I'm happy to provide as much info as I can Yes, I tried to load the same kernel (6.12.9) and got exactly the same error. cd /boot/ ls -al ... -rw-r--r-- 1 root root 17928050 Jan 15 2025 initrd.img-6.12.9-current-rockchip64 ... -rw-r--r-- 1 root root 36473344 Jan 12 2025 vmlinuz-6.12.9-current-rockchip64 As I can guess this is DT file: cd /boot/dtb-6.12.9-current-rockchip64/rockchip/overlay/ ls -al ... -rw-r--r-- 1 root root 2825 Jan 12 2025 rockchip-fixup.scr ...
-
 How to get this working on your Raspberry Pi (5) Hello all. Thanks again, @MMGen, for offering this fantastic tutorial. As mentioned before, it was the foundation for me to encrypt my Raspi 5, although the tutorial wasn't intended for that. I hat to make the some adjustments to get it working. But first some reasoning. What's the difference? The Armbian image for Raspi comes with two partitions: FAT32 for booting ext4 as a root Out of the box it already resembles the result that we try to achieve. I assume that this is due to the different booting process of a Raspi compared to other sige-board computers. Download the desired image from: https://www.armbian.com/rpi4b/ https://mirrors.dotsrc.org/armbian-dl/rpi4b/archive/ → more images (I only tested my approach with the minimal Trixie image, kernel version 6.12.41 to .58, and would be delighted to know if somebody also got it working with other derrivates.) Changes to the original tutorial: Basically I followed the tutorial (versions Oct 25 to Jan 26) except for the steps below where I had to make some adjustments. If the original tutorial receives major updates (e.g. in its structure) please consider that, as I might not keep this post up to date. Step 6: As the type of the boot partition needs to be FAT32 instead of ext4, in fdisk change the partition type (hit t) to FAT32 (0b or just b in the partition list l). I also adjusted the size of this partition to +1G, just in case, but that shouldn't make a difference. Here's final partition table: Device Boot Start End Sectors Size Id Type /dev/<your-drive>p1 8192 2105343 2097152 1G b W95 FAT32 /dev/<your-drive>p2 2105344 3907029167 3904923824 1.8T 83 Linux I'm using an NVME drive instead of a SD card. I guess that won't make a difference. I always repaced sda with nvme0n1 when I followed the tutorial. I also increased p1's size to a whole GB, just to be sure. Step 7: mkfs -t vfat /dev/<your-drive>p1 # NOT: mkfs.ext4 /dev/<your-drive>p1 # e2label /dev/sda1 CRYPTO_BOOT won't work on FAT32 partitions Step 8: Because there is no label on the FAT32 partition, just link it manually: BOOT_PART=/dev/<your-device>p1 In my image, the resolv.conf was already present and symlinked to /run/systemd/resolve/stub-resolv.conf. I had to rename it to etc/resolv.conf.old and only then did: cat /etc/resolv.conf > etc/resolv.conf Step 9: Now it gets a bit hairy. As already explained, the Armbian Raspi image works a bit differently. It holds the following partitions: P1: is the boot partition. During (or after?) the boot process it will be mounted to P2:/boot/firmware. P2 contains a cmdline.txt (content covered below) which is the config file to make the adjustments from Step 9.1 for the boot partition. P2: is our root partition. P1:/boot does contain an armbianEnv.txt but that is not the config file used during the initial boot process for the unlocking system . Step 9.1: At this point in the tutorial P2 is mounted to root/boot, so you can nano boot/cmdline.txt and change its content to: console=serial0,115200 console=tty1 loglevel=1 root=/dev/mapper/<custom-name-or-rootfs> rootdev=/dev/mapper/<custom-name-or-rootfs> rootfstype=ext4 fsck.repair=yes rootwait logo.nologo cgroup_enable=cpuset cgroup_memory=1 cgroup_enable=memory I was hesitant to make further changes besides the root and rootdev entries or break the line but probably that's also feasible. Step 9.2: Skipped. Step 9.7: As the boot partition is FAT32, etc/fstab has to know about it too. Also notice that commit=600 results in a failure to mount it to /boot/firmware after unlocking and rebooting (took me days before I could plug a display to my Raspi, read the boot log and figure out that line as the source of failure). Therefore I deleted the commit declaration. /dev/mapper/<custom-name-or-rootfs> / ext4 defaults,noatime,nodiratime,commit=600,errors=remount-ro 0 1 UUID=<BOOT_UUID> /boot/firmware vfat defaults,noatime,nodiratime,errors=remount-ro 0 2 tmpfs /tmp tmpfs defaults,nosuid 0 0 Step 10: Add systemd-cryptsetup (when using Trixie or higher) to the install list in the chroot (thanks to @The Tall Man for mentioning; automatic install worked for me btw). apt --yes install systemd cryptsetup cryptsetup-initramfs dropbear-initramfs In principle that should be it and i just followed the rest of the tutorial. But after the initrd.img got generated I always had to make adjustments, after which I had to recreate it. update-initramfs is always suspiciously fast so I just used the approach from this tutorial: KERNEL_VERSION=ls /lib/modules/ echo "CONFIG_RD_ZSTD=y" > /boot/config-$KERNEL_VERSION # to use the right decompression method mkinitramfs -o /boot/initrd.img $KERNEL_VERSION rm /boot/config-$KERNEL_VERSION # remove the config If you want to keep the original initrd.img as a backup you can just copy it before running the above commands but of course it won't be work with our encrypted boot. You can give the .img output file a different name. Don't forget to change the line initramfs initrd.img followkernel in boot/config.txt accordingly. Don't forget ssh-keygen -A. That's it Please let me know how if it worked for your Raspi. Good luck. @MMGen: If you find this sub-tutorial helpful enough, please consider to link it in your original post or feel free to incorporate it. It took me quite some days to figure out all the necessary changes and borow from other sources. Would be nice to spare others and this thread is a top rank in search engines. As you can see I used a name other than rootfs as my device name – the ability to change that could be a nice feature for the next version of your script Cheers!
 -
 http://blog.armbian.com/content/images/2026/01/T6-Plus-01.pngThe NanoPC T6 Plus, powered by the performance-optimized Armbian OS, is your ticket to a truly professional, high-speed edge computing experience. This industrial-grade device is built around the flagship Octa-core Rockchip RK3588 SoC and now features a massive upgrade to LPDDR5 RAM (up to 32GB), giving it the muscle to handle heavy virtualization, 8K media, and AI workloads effortlessly. Its core hardware is ideal for power users and enterprise integration. The dual 2.5GbE Ethernet ports ensure you can maximize the speed of high-bandwidth wired connections, while multiple M.2 slots (M-Key for NVMe and E-Key for Wi-Fi/BT) allow for blazing-fast storage arrays and wireless expansion. More importantly, the switch to LPDDR5 memory significantly boosts bandwidth, unleashing the full potential of the 8-core CPU and NPU. With Armbian, managing this SBC is simple and utilizes the device's full potential. To configure your system or install complex software stacks, just launch the terminal and run: sudo armbian-config. Navigate to Software and select from pre-packaged installers like Docker, Home Assistant or JellyFin. This single step leverages the RK3588’s processing power for seamless containerization and service hosting, combating supply chain bottlenecks with older LPDDR4X boards. Finally, the PCIe 3.0 x4 interface is perfect for attaching high-speed NVMe SSDs, instantly turning the T6 Plus into a high-performance NAS or media server capable of real-time transcoding. This is just one example of usage. It can serve as a compact 8K workstation, an advanced NVR surveillance hub, a powerful emulation gaming box, or a local LLM host utilizing the 6 TOPS NPU and RKLLM. Thanks to its rich interface options—including HDMI 2.1 output and 2.0 HDMI input—the T6 Plus excels in scenarios where multimedia performance and raw compute power are essential. From segmented home labs to industrial control systems. Combined with the efficiency of the new memory architecture and solid software support, it offers an unrivaled balance between performance, expandability, and reliability. Hardware specifications Feature Specification SoC Rockchip RK3588 CPU Octa-core ARM (4× Cortex-A76 @ 2.4GHz + 4× Cortex-A55 @ 1.8GHz) GPU ARM Mali-G610 MP4 Compatible with OpenGL ES 1.1/2.0/3.2, OpenCL 2.2, Vulkan 1.2 NPU 6 TOPS (INT8) Supports INT4, INT8, INT16, FP16 VPU 8K@60fps H.265 / VP9 / AVS2 decoder 8K@30fps H.264 decoder 8K@30fps encoder (H.265 / H.264) Memory 16 GB / 32 GB LPDDR5 (Upgraded from LPDDR4X) Storage 32GB / 64GB / 256GB eMMC 5.1 1 × M.2 M-Key (PCIe 3.0 x4) for NVMe SSD microSD (UHS-I) Ethernet 2 × 2.5 GbE ports (RTL8125BG) Wireless Optional via M.2 E-Key (PCIe 2.1 x1 + USB 2.0) Video Output 2 × HDMI 2.1 (Up to 8K@60fps) 1 × USB-C (DisplayPort 1.4) Video Input 1 × HDMI 2.0 Input (Up to 4K@60fps) USB 1 × USB 3.0 Type-A 1 × USB-C (Data/DP) Misc USB 2.0 headers Expansion 40-pin GPIO header Mini-PCIe connector Power Input DC 12V/2A (5.5 x 2.1mm jack) PCB 8-layer PCB, 110 × 80 mm Operating Temp 0 °C to 70 °C View the full article
 -
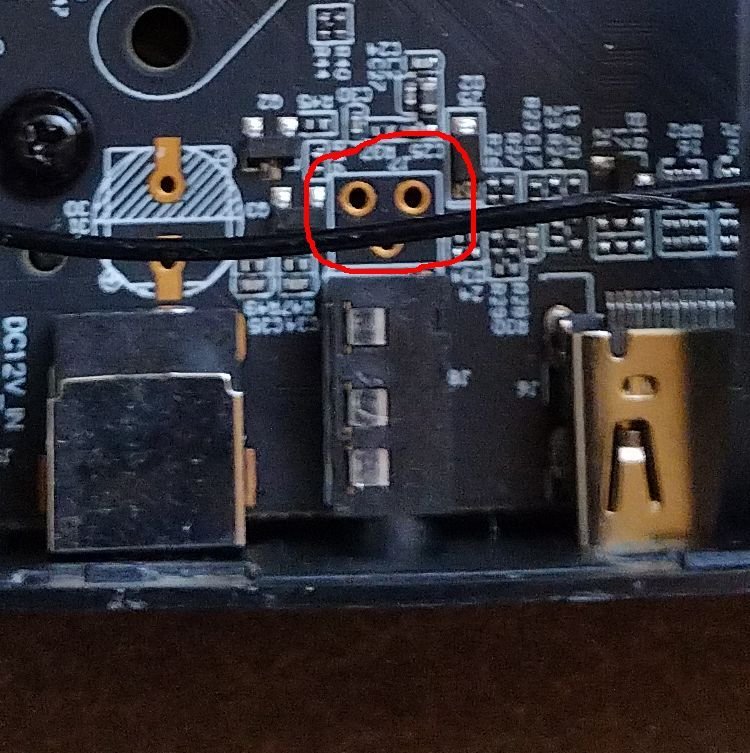
Hi guys, I try to install Armbian on my Amlogix G11pro (S509X2 based) TV Gamebox. It keeps booting only into my Emuelec SD card, if I plug it or with anyhting else it only boots into Android that is on eMMC. I understood that I have to use the toothpic method to press the reset button to get into the recovery mode. I tried this but failed as my toothpic didnt reach anything I could click, it just went through. so I opened the box and found that behind the audio jack there is nothing (see attached pic). there is empty space with three connectors on the board, maybe that is the place where usually the micro switch for the reset button sits, but I am not sure. Before I try to short these (why three connectors?), I would be like to have a bit more info, in order not to brick my board. The FAQ says to use the toothpic method is only one method of several, what are the other ones ? BR retro123