Search the Community
Showing results for 'uart rts'.
-
Orange Pi 5 plus. It seems that in the 'edge' kernels, ssh is disabled by default. Since HDMI doesn't function this is a problem. I used the debugging UART and after setup I got the message "ssh.service is disabled" I enabled the service and all is well. Any reason why ssh would be disabled?
-
DISCLAIMERS (PLEASE READ): Everything you can find in this thread (binaries, texts, code snippets, etc...) are provided AS-IS and are not part of official Armbian project. For this reason not people from Armbian project nor myself are responsible for misuse or loss of functionality of hardware. THIS POST explains very well the troubles with TV Boxes and why they are not suitable for everyone Please don't ask about support or assistance in other non-community forums nor in the official Armbian github repository, instead post your questions in this thread, in the TV Boxes forum section (hardware related) or in the Peer-to-peer support section (general linux/software related). Following the recent thread on LibreElec forum about an unofficial image for rk3229 devices, I would like to make public the work made by me and @fabiobassa about bringing rk322x support to armbian. The project is now in -> mainline Armbian <- development fork -> here <- This first page and the last 3 or 4 pages of the thread are enough to get up to date with recent developments. Many useful experiences are scattered through the thread, but the most important things are collected here in the first page, so please read it carefully! Mainline kernel is fully supported and will receive most support in the future. Legacy kernel 4.4 is deprecated, but is kept around only for special purposes. What works: Should boot and work flawlessy on all boards with RK3228a, RK3228b and RK3229, with either DDR2 and DDR3 memories. Mainline u-boot Proprietary OPTEE provided as Trusted Execution Environment (needed for DRAM frequency scaling) All 4 cores are working Ethernet Serial UART (configured at 115200 bps, not 1.5Mbps!) Thermals, CPU and DRAM frequency scaling OTG USB 2.0 port (also as boot device!) EHCI/OHCI USB 2.0 ports MMC subsystem (including eMMC, SD and sdio devices) Hardware video acceleration NAND is available only on legacy kernel. To fully boot from NAND, use the Multitool and its steP-nand installation (instructions are below) Various WIFI over SDIO are supported (SSV6051P, SSV6256P, ESP8089, Realtek chips, etc...), ssv6256p driver is available only on legacy kernel Full GPU acceleration U-boot boot order priority: first the sdcard, then the USB OTG port and eventually the internal eMMC; you can install u-boot (and the whole system) in the internal eMMC and u-boot will always check for images on external sdcard/USB first. Unbrick: Technically, rockchip devices cannot be bricked. If the internal flash does not contain a bootable system, they will always boot from the sdcard. If, for a reason, the bootable system on the internal flash is corrupted or is unable to boot correctly, you can always force the maskrom mode shorting the eMMC clock pin on the PCB. Here there is the procedure, but you can also google around if you get stuck on a faulty bootloader, the technique is pretty simple and requires a simple screwdriver. There are however some unfortunate cases (expecially newer boards) where shorting the eMMC clock pin is difficult or impossibile, like eMMC or eMCP BGA chips with no exposed pins. In those cases pay double attention when burning something on the internal eMMC/eMCP and always test first the image from the sdcard to be sure it works before burning anything on eMMC/eMCP. Some useful links with pins, pads or procedures for some boards: Generic procedure for boards with non-BGA eMMC MXQPRO_V71 - eMCP H20 - eMCP ZQ01 - eMCP NAND vs eMMC vs eMCP difference: RK3228 and RK3229 tv boxes comes with three different flash memory chips: eMMC, NAND and eMCP. It does not depend upon the market name of the tv box and neither the internal board; manufacturers put whatever they find cheaper when they buy the components. NAND chip is just the non-volatile memory eMMC chip contains both the non-volatile memory plus a controller. eMCP chip contains the non-volatile memory, a controller for the non-volatile memory (like eMMC), but also contains a bank of DDR SDRAM memory on the same physical chip. The difference is very important, because eMMC and eMCP are far easier to support at various levels: the controller deals with the physical characteristics of the non-volatile memory, so the software has no to deal with. NAND chips instead are harder to support, because the software is required to deal with the physical characteristics and non-standard things that depends upon the NAND manufacturer. If you have a NAND chips you're unlucky because mainline kernel currently cannot access it, but also because you need special care and instructions explained later. You can discover if you have a NAND, eMMC or eMCP chip looking on the board are reading the signature on the flash memory chip. The Multitool (see later) also can detect which chip you have onboard: the program will warn you at startup if you have a NAND chip. NAND bootloader upgrade: IMPORTANT: don't do this is you have an eMMC or eMCP; skip this paragraph if you are unsure too! For very expert people who are having issues when (re)booting images, there is the chance to upgrade the bootloader on NAND. The NAND bootloader is nothing else than a regular idbloader (see official rockchip documentation) but contains some bits to correctly access the data on your flash memory. Upgrading requires to erase the existing flash content, in the worst case will require you to follow the Unbrick procedure above or restore an older but more compatible bootloader. If you are not mentally ready to overcome possible further issues, don't do this! The detailed instructions and the binaries are available at this post Multimedia: Mainline kernel: 3D acceleration is provided by Lima driver and is already enabled. Hardware video decoding: https://forum.armbian.com/topic/19258-testing-hardware-video-decoding-rockchip-allwinner/ Deprecated legacy kernel: multimedia features, like OpenGL/OpenGL ES acceleration, hardware accelerated Kodi, ffmpeg and mpv you can take a look to this post An effective tutorial from @Hai Nguyen on how to configure a box as a hi-quality music player using an USB audio card, and controlling it via remote control is available in this post Brief explanation about kernel naming: current kernel is the mainline LTS kernel version, most maintained and tested. This is the suggested version for production devices. If you don't know what to pick, pick this. legacy kernel (version 4.4) is provided by manufacturer; it is deprecated, unmaintained and not suggested. edge kernel is the development mainline kernel version, with experimental features and drivers; usually stable but perhaps suitable for production devices. You can switch from one kernel flavour to another using armbian-config or manually via apt. Installation (via SD card): Building: You can build your own image follow the common steps to build armbian for other tv boxes devices: when you are in the moment to choose the target board, switch to CSC/TVB/EOL boards and select "rk322x-box" from the list. Download prebuilt images from the following links: Archive builds (GPG-signed) - https://imola.armbian.com/dl/rk322x-box/archive/ SUGGESTED - Nightly built from trunk each week by Armbian servers (GPG-signed) - https://github.com/armbian/community Old images provided by me (unsigned and outdated) - https://users.armbian.com/jock/rk322x/armbian/stable Archived/older images: https://armbian.hosthatch.com/archive/rk322x-box/archive/ Multitool: The Multitool is a small but powerful tool to do quick backup/restore of internal flash, but also burn images and general system rescue and maintenance via terminal or SSH. Compressed images will be uncompressed on fly. Multitool - A small but powerful image for RK322x TV Box maintenance (instructions to access via network here) Quick installation instructions on eMMC: Build or download your preferred Armbian image and a copy of the Multitool; Burn the Multitool on an SD card; once done, place the Armbian image in images folder of the SD card NTFS partition; Plug the SD card in the TV box and plug in the power cord. After some seconds the blue led starts blinking and the Multitool appears; OPTIONAL: you can do a backup of the existing firmware with "Backup flash" menu option; Choose "Burn image to flash" from the menu, then select the destination device (usually mmcblk2) and the image to burn; Wait for the process to complete, then choose "Shutdown" from main menu; Unplug the power cord and the SD card, then replug the power cord; Wait for 10 seconds, then the led should start blinking and HDMI will turn on. The first time the boot process will take a couple of minutes or more because the filesystem is going to be resized, so be patient and wait for the login prompt. On first boot you will be asked for entering a password for root user of your choice and the name and password for a regular user Run sudo rk322x-config and select your board characteristics to enable leds, wifi chips, high-speed eMMC, etc... Run sudo armbian-config to configure timezone, locales and other personal options Congratulations, Armbian is now installed and configured! Despite the procedure above is simple and reliable, I always recommend to first test that your device boots Armbian images from SD Card. Due to the really large hardware variety, there is the rare chance that the images proposed here may not boot. If a bad image is burned in eMMC, the box may not boot anymore forcing you to follow the unbrick section at the top of this post. Quick installation instructions on NAND: Build or download your preferred Armbian image and a copy of the Multitool; Burn the Multitool on an SD card; once done, place the Armbian legacy kernel image in images folder of the SD card NTFS partition; Plug the SD card in the TV box and plug in the power cord. After some seconds the blue led starts blinking and the Multitool appears; OPTIONAL: you can do a backup of the existing firmware with "Backup flash" menu option; Choose "Burn Armbian image via steP-nand" from the menu, then select the destination device (usually rknand0) and the image to burn; Wait for the process to complete, then choose "Shutdown" from main menu; Unplug the power cord and the SD card, then replug the power cord; Wait for 10 seconds, then the led should start blinking and HDMI will turn on. The first time the boot process will take a couple of minutes or more because the filesystem is going to be resized, so be patient and wait for the login prompt. On first boot you will be asked for entering a password for root user of your choice and the name and password for a regular user Run sudo rk322x-config and select your board characteristics to enable leds, wifi chips, etc... Run armbian-config to configure timezone, locales and other personal options Congratulations, Armbian is now installed! Alternative: you can install the bootloader in NAND and let it boot from SD Card or USB: Download a copy of the Multitool and burn it on an SD card; Plug the SD card in the TV box and plug in the power cord. After some seconds the blue led starts blinking and the Multitool appears; RECOMMENDED: make a backup of the existing firmware with "Backup flash" menu option; Choose "Install Jump Start for Armbian" menu option: the Jump Start uses the internal NAND to boot from external SD Card or external USB Stick; Follow the general instructions to boot from SD Card below, skip the first erase eMMC step. Quick installation instructions to boot from SD Card: If you are already running Armbian from eMMC, skip to the next step. Instead if you are running the original firmware you need to first erase the internal eMMC; to do so download the Multitool, burn it on an SD Card, plug the SD Card and power the TV Box. Use "Backup flash" if you want to do a backup of the existing firmware, then choose "Erase flash" menu option. Build or download your preferred Armbian image; Uncompress and burn the Armbian image on the SD Card; Plug the SD Card in the TV Box and power it on; Wait for 10 seconds, then the led should start blinking and HDMI will turn on. The first time the boot process will take a couple of minutes or more because the filesystem is going to be resized, so be patient and wait for the login prompt; On first boot you will be asked for entering a password for root user of your choice and the name and password for a regular user Run sudo rk322x-config and select your board characteristics to enable leds, wifi chips, high-speed eMMC or NAND, etc... Run armbian-config to configure timezone, locales and other personal options, or also to transfer the SD Card installation to internal eMMC; Congratulations, Armbian is running from SD Card! A note about boot device order: With Armbian also comes mainline U-boot. If you install Armbian or just the bootloader in the eMMC or the Jump Start on internal NAND, the bootloader will look for valid bootable images in this order: External SD Card External USB Stick in OTG Port Internal eMMC Installation (without SD card, board with eMMC) If you have no sd card slot and your board has an eMMC, you can burn the armbian image directly on the internal eMMC using rkdeveloptool and a male-to-male USB cable: Download your preferred Armbian image from Armbian download page and decompress it. Download the rk322x bootloader: rk322x_loader_v1.10.238_256.bin Download a copy of rkdeveloptool: a compiled binary is available in the official rockchip-linux rkbin github repository. Unplug the power cord from the tv box Plug an end of an USB Male-to-male cable into the OTG port (normally it is the lone USB port on the same side of the Ethernet, HDMI, analog AV connectors) while pressing the reset microbutton with a toothpick. You can find the reset microbutton in a hole in the back of the box, but sometimes it is hidden into the AV analog jack Plug the other end of the USB Male-to-male cable into an USB port of your computer If everything went well, run lsusb: you should see a device with ID 2207:320b Run sudo rkdeveloptool rd 3 (if this fails don't worry and proceed to next step) Run sudo rkdeveloptool db rk322x_loader_v1.10.238_256.bin Run sudo rkdeveloptool wl 0x0 image.img (change image.img this with the real Armbian image filename) Unplug the power cord Done! Installation (without SD card, board with NAND) If you are in the unfortunate case you can't use an SD card for installation and your board has a NAND chip, you still have an option to use the quick Multitool installation steps via USB. Obtain a copy of rkdeveloptool: a compiled binary is available in the official rockchip-linux rkbin github repository. Unplug the power cord from the tv box Plug an end of an USB Male-to-male cable into the OTG port (normally it is the lone USB port on the same side of the Ethernet, HDMI, analog AV connectors) while pressing the reset microbutton with a toothpick. You can find the reset microbutton in a hole in the back of the box, but sometimes it is hidden into the AV analog jack Plug the other end of the USB Male-to-male cable into an USB port of your computer If everyting went well, using lsusb you should see a device with ID 2207:320b Run sudo rkdeveloptool wl 0x4000 u-boot-main.img (download u-boot-main.img.xz , don't forget to decompress it!) Unplug the power cord Now you can follow the instructions on how to install on eMMC/NAND via SD card, just use instead an USB stick to do all the operations and plug it into the USB OTG port. Once you reboot, USB OTG port will be used as a boot device. NOTE: NAND users without SD slot may be unhappy to know that it will be difficult to do extra maintenance with Multitool in case something breaks in the installed Armbian system: installing u-boot-main.img makes the installed system unbootable because it is missing the NAND driver. Alternative backup, restore and erase flash for EXPERTS: These backup, restore and erase flash procedures are for experts only. They are kept here mostly for reference, since the Multitool is perfectly able to do same from a very comfy interface and is the suggested way to do maintenance. Backup: Obtain a copy of rkdeveloptool: a compiled binary is available in the official rockchip-linux rkbin github repository. If you prefer, you can compile it yourself from the sources available at official rockchip repository Unplug the power cord from the tv box Plug an end of an USB Male-to-male cable into the OTG port (normally it is the lone USB port on the same side of the Ethernet, HDMI, analog AV connectors) while pressing the reset microbutton with a toothpick. You can find the reset microbutton in a hole in the back of the box, but sometimes it is hidden into the AV analog jack Plug the other end of the USB Male-to-male cable into an USB port of your computer If everyting went well, using lsusb you should see a device with ID 2207:320b change directory and move into rkbin/tools directory, run ./rkdeveloptool rfi then take note of the FLASH SIZE megabytes (my eMMC is 8Gb, rkdeveloptool reports 7393 megabytes) run ./rkdeveloptool rl 0x0 $((FLASH_SIZE * 2048)) backup.data (change FLASH_SIZE with the value you obtained the step before) once done, the internal eMMC is backed up to backup.data file Restore: first we have to restore the original bootloader, then restore the original firmware. Running rkdeveloptool with these switches will accomplish both the jobs: ./rkdeveloptool db rk322x_loader_v1.10.238_256.bin Downloading bootloader succeeded. ./rkdeveloptool ul rk322x_loader_v1.10.238_256.bin Upgrading loader succeeded. ./rkdeveloptool wl 0x0 backup.data Write LBA from file (100%) Download here: Erase the flash memory: clearing the internal eMMC/NAND memory makes the SoC look for external SD Card as first boot option. If there isn't any suitable SD Card, the SoC enters maskrom mode, which can then be used for full eMMC/NAND access using rkdeveloptool. This is perfectly fine if your box has an eMMC flash memory. NOTE: In case you have a NAND flash memory this option is however discouraged. The original bootloader contains some special parameters to correctly access the data. Clearing the flash memory will probably garbage the NAND data and restoring the bootloader may require some special instructions. Obtain a copy of rkdeveloptool: a compiled binary is available in the official rockchip-linux rkbin github repository. If you prefer, you can compile it yourself from the sources available at official rockchip repository Unplug the power cord from the board Plug an end of an USB Male-to-male cable into the OTG port (normally it is the lone USB port on the same side of the Ethernet, HDMI, analog AV connectors) while pressing the reset microbutton with a toothpick. You can find the reset microbutton in a hole in the back of the box, but sometimes it is hidden into the AV analog jack Plug the other end of the USB Male-to-male cable into an USB port of your computer If everyting went well, using lsusb you should see a device with ID 2207:320b run ./rkdeveloptool ef and wait a few seconds once done, the internal eMMC is erased and the device will boot from the sdcard from now on Partecipation and debugging: If you want to partecipate or need help debugging issues, do not hesitate to share your experience with the installation procedure of the boxes. In case of issues and missed support, provide as many as possible of these things is very useful to try and bring support for an unsupported board: some photos of both sides of the board. Details of the eMMC, DDR and Wifi chips are very useful! upload the device tree binary (dtb) of your device. We can understand a lot of things of the hardware from that small piece of data; and alternative is a link to the original firmware (you can do a full backup with the Multitool); dmesg and other logs (use armbianmonitor -u that automatically collects and uploads the logs online) attach a serial converter to the device and provide the output of the serial port; Critics, suggestions and contributions are welcome! Credits: @fabiobassa for his ideas, inspiration, great generosity in giving the boards for development and testing. The project of bringing rk322x into armbian would not have begun without his support! Justin Swartz, for his work and research to bring mainline linux on rk3229 (repository here) @knaerzche for his great contribution to libreelec support and mainline patches @Alex83 for his patience in testing the NAND bootloader upgrade procedure on his board @Jason Duhamell for his generous donation that allowed researching eMCP boards and esp8089 wifi chip
- 2543 replies
-
20
-
DISCLAIMER (PLEASE READ): everything you can find in this thread (binaries, texts, code snippets, etc...) are provided AS-IS and are not part of official Armbian project. For this reason not people from Armbian project nor myself are responsible for misuse or loss of functionality of hardware. Please don't ask about support or assistance in other non-community forums nor in the official Armbian github repository, instead post your questions in this thread, in the TV Boxes forum section (hardware related) or in the Peer-to-peer support section (general linux/software related). Thank you! This thread is to give stable and mature long-term range support to rk3318/rk3328 found in many tv boxes in Armbian project as Community Supported Configuration (CSC). The current work is mainlined into Armbian project, but your mileage may vary; most recent developments live on my personal fork on github -> here <- Important notes: is just a personal opinion, but apparently widely supported, that rk3318 chip is not an official rockchip part. They probably are scrap rk3328 parts which have not passed conformance tests but are sold anyway to tv boxes manufacturers. They don’t reach the same operating frequency of the rk3328, have much higher leakage currents (and thus higher temperatures) and often the boards they are installed on are low quality with low quality components, in fact a very very common issue is the eMMC failure due to bad parts and bad soldering. So said, I personally suggest not to buy any rk3318 tv box, but instead find a properly supported SBC (Single Board Computer) if you need a reliable product. In the unfortunate case you already have such product, this thread may help you have some fun with them. What works: • Works on RK3318 and RK3328 TV boxes with DDR3 memories • Mainline u-boot • Mainline ATF provided as Trusted Execution Environment • All 4 cores are working • Ethernet • Serial UART (configured at stock 1.5Mbps) • Thermals and frequency scaling • OTG USB 2.0 port (also as boot device!) • EHCI/OHCI USB 2.0 ports and XHCI USB 3.0 ports • MMC subsystem (including , SD and sdio devices) • Hardware video acceleration (fully supported via RKMPP on legacy kernel, support via hantro and rkvdec kernel driver on mainline) • Various WIFI over SDIO are supported • Full acceleration on legacy kernel and mainline kernel • U-boot boot order priority: first the sdcard, then the USB OTG port and eventually the internal ; you can install u-boot (and the whole system) in the internal and u-boot will always check for images on external sdcard/USB first. Unbrick: Technically, rockchip devices cannot be bricked. If the internal flash does not contain a bootable system, they will always boot from the sdcard. If, for a reason, the bootable system on the internal flash is corrupted or is unable to boot correctly, you can always force the maskrom mode shorting the clock pin on the PCB. The procedure is explained here for rk322x, but for rk3318/28 is the same. In most of the rk3318/28 boards, shorting the clock pin is difficult or impossible because eMMC are BGA chips with no exposed pins. Pay double attention when burning something on the internal flash memory and always test first the image booting from the sdcard to be sure it works before burning anything in internal flash. This is a list of posts where forum users have been able to spot the eMMC clock pin to trigger the maskrom mode: H96 Max+ (board signature: RK3318_V1.4) by @Gausus X88 PRO 10 (board signature: X88_PRO_B) by @mathgaming Ninkbox N1 Max RK3318 by @enigmasphinx Partecipation and debugging: If you want to partecipate or need help debugging issues, do not hesitate to share your experience with the installation procedure of the boxes. In case of issues and missed support, provide as many as possible of these things is very useful to try and bring support for an unsupported board: some photos of both sides of the board. Details of the eMMC, DDR and Wifi chips are very useful! upload the device tree binary (dtb) of your device. We can understand a lot of things of the hardware from that small piece of data; and alternative is a link to the original firmware (you can do a full backup with the Multitool); dmesg and other logs (use armbianmonitor -u that automatically collects and uploads the logs online) attach a serial converter to the device and provide the output of the serial port; Multimedia: Mainline kernel: 3D acceleration is provided by Lima driver and is already enabled. Hardware video decoding: https://forum.armbian.com/topic/19258-testing-hardware-video-decoding-rockchip-allwinner/ Legacy kernel: If you need multimedia features, like OpenGL/OpenGL ES acceleration, hardware accelerated Kodi, ffmpeg and mpv you can take a look to this post Installation (via SD card): Building: You can build your own image follow the common steps to build armbian for other tv boxes devices: when you are in the moment to choose the target board, switch to /TVB/ boards and select "rk3318-box" from the list. Prebuilt images: Archived images - built by Armbian servers and GPG-signed: https://imola.armbian.com/dl/rk3318-box/archive/ Nightly stables - built from trunk by Armbian servers and GPG-signed: https://github.com/armbian/community Stables provided by me (unsigned): https://users.armbian.com/jock/rk3318/ Multitool: Multitool - A small but powerful image for RK3318/RK3328 TV Box maintenance. Download it from here Quick installation instructions on eMMC: Build or download your preferred Armbian image and a copy of the Multitool; Burn the Multitool on an SD card; once done, place the Armbian image in images folder of the SD card NTFS partition; Plug the SD card in the TV box and plug in the power cord. After some seconds the blue led starts blinking and the Multitool appears; OPTIONAL: you can do a backup of the existing firmware with "Backup flash" menu option; Choose "Burn image to flash" from the menu, then select the destination device (usually mmcblk2) and the image to burn; Wait for the process to complete, then choose "Shutdown" from main menu; Unplug the power cord and the SD card, then replug the power cord; Wait for 10 seconds, then the led should start blinking and HDMI will turn on. The first time the boot process will take a couple of minutes or more because the filesystem is going to be resized, so be patient and wait for the login prompt. On first boot you will be asked for entering a password for root user of your choice and the name and password for a regular user Run rk3318-config to configure the board specific options Run armbian-config to configure timezone, locales and other personal options Congratulations, Armbian is now installed! Despite the procedure above is simple and reliable, I always recommend to first test that your device boots Armbian images from SD Card. Due to the really large hardware variety, there is the rare chance that the images proposed here may not boot. If a bad image is burned in , the box may not boot anymore forcing you to follow the unbrick section at the top of this post. Quick installation instructions to boot from SD Card: If you are already running Armbian from eMMC, skip to the next step. Instead if you are running the original firmware you need to first erase the internal flash; to do so download the Multitool, burn it on an SD Card, plug the SD Card and power the TV Box. Use "Backup flash" if you want to do a backup of the existing firmware, then choose "Erase flash" menu option. Build or download your preferred Armbian image; Uncompress and burn the Armbian image on the SD Card; Plug the SD Card in the TV Box and power it on; Wait for 10 seconds, then the led should start blinking and HDMI will turn on. The first time the boot process will take a couple of minutes or more because the filesystem is going to be resized, so be patient and wait for the login prompt; On first boot you will be asked for entering a password for root user of your choice and the name and password for a regular user Run rk3318-config to configure the board specific options Run armbian-config to configure timezone, locales and other personal options, or also to transfer the SD Card installation to internal ; Congratulations, Armbian is running from SD Card! Tutorial - How to install Armbian on your TV Box (by @awawa) : https://www.hyperhdr.eu/2022/01/tv-box-mania-i-part-x88-pro-10.html A note about boot device order: With Armbian also comes mainline U-boot. If you install Armbian, the bootloader will look for valid bootable images in this order: External SD Card External USB Stick in OTG Port Internal The Multitool does not boot / How to burn image directly on eMMC: Some boards have the sdcard attached to an auxiliary (called also sdmmc_ext or external) controller which is not the common one. Forum findings declare that those boards are not able to boot from sdcard with stock firmware and they neither do in maskrom mode: the stock firmware always boots even if you put the multitool on sdcard. In such case, burning images directly on eMMC is the only way to have a working Armbian installation. You can follow these instructions by @fabiobassa to burn images directly on eMMC: https://forum.armbian.com/topic/17597-csc-armbian-for-rk3318rk3328-tv-box-boards/?do=findComment&comment=130453 Notes and special hardware: Script to change DDR memory frequency here Wireless chip AP2734, SP2734, HY2734C and similars: they are clones of AmPAK AP6334 which is combo wifi + bluetooth of broadcom BCM4334/B0 chips. You may need a special nvram file, instructions by @paradigman are here Critics, suggestions and contributions are welcome! Credits: @fabiobassa for his ideas, inspiration, great generosity in giving the boards for development and testing. The project of bringing rk3318 into armbian would not have begun without his support! @hexdump for his precious support in early testing, ideas and suggestions @MX10.AC2Nfor his patience in testing mxq-rk3328-d4 board support All the rockhip64 maintainers at Armbian project who have done and do most of the work to support the platform
- 1638 replies
-
18
-
If you can't determine what device you have, there is no way you are going to be able to install Armbian on it. The world of linux on ARM is very different than linux on x86. There are no real standards for a boot environment and on board device management. For this reason you need an individual build for each device. One that has a boot environment that can boot the device and also a device specific dtb (device tree) that tells the linux kernel what hardware the board has. Those components need to be developed for each board at often the expense of many man months as the board manufactures have no interest in supporting the process of having mainline linux work on their devices. If you have the skills and resources to invest a very significant amount of time into such an effort, it can be done (if you have schematics and support from the device manufacturer that helps a lot). But the first step would be to open the device to get as the motherboard and understand what components you are working with. Then get a usb-uart connector hooked up and start monitoring the boot process to figure out how the device is booting (off of what media so you know where you are going to need to install a new boot loader to) Since the board is running android (which is only enough like real linux to get in the way generally), what comes installed isn't going to be very helpful in your process.
-
Hi Long Vu, you should install a UART Serial port so we can find out where it hangs.
-
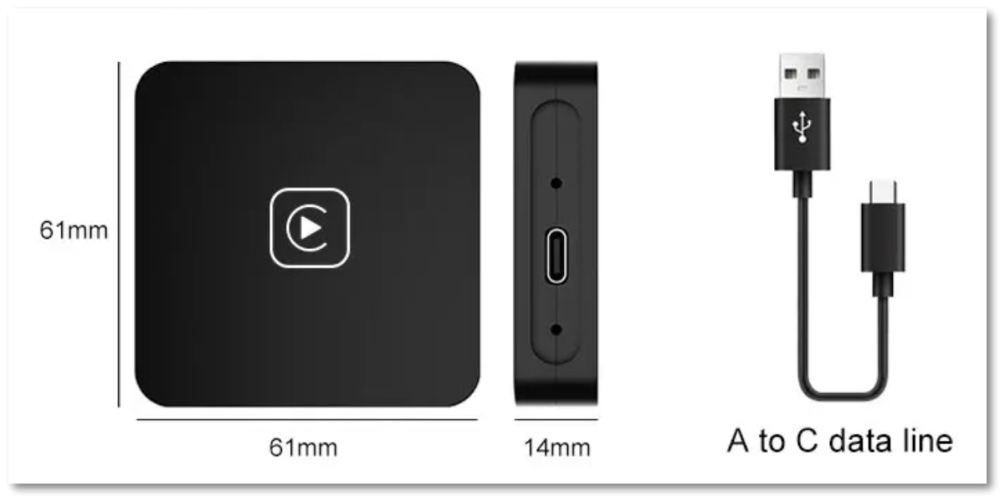
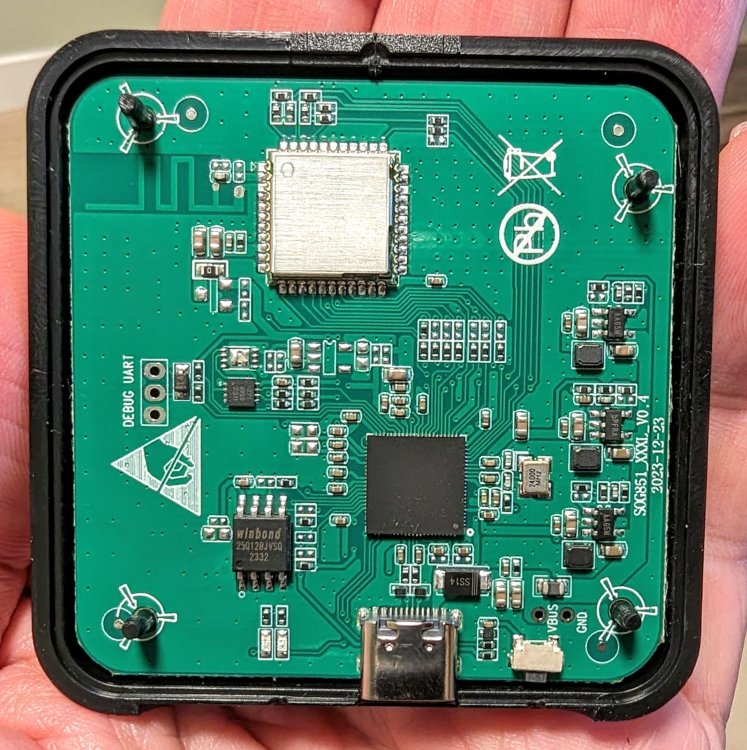
Recently I've bought small box which is kind if "wireless interface" for wired AA: https://www.aliexpress.com/item/1005006001314624.html It works quite nicely with my Ford S-Max but I'm very curious man and got it open (aka teardown). Chips cannot be identified, they lack any marks. But there is DEBUG UART First I connected it into my PC. Removable disk appeared with a few files that keeps my phone's BT address and such information. Nothing really interesting. Then I powered up device when holding the button, it didn't start but went into some "flashing mode" I think - it was identified as USB\VID_1F3A&PID_EFE8 which means sunxi SoC OTG connector in FEL/flashing mode as far as I could google it. So Allwinner inside? At last I soldered pins to UART but I got only "U-Boot(01/24/2024)" and nothing more 😕 It doesn't react to keybord at all. I'm not experienced in "hacking" such ARM things, so maybe someone has any idea how to break booting and get into some console? Any idea what could I do to get into OS?
-
What UART parameters have you set, especially flow control?
-
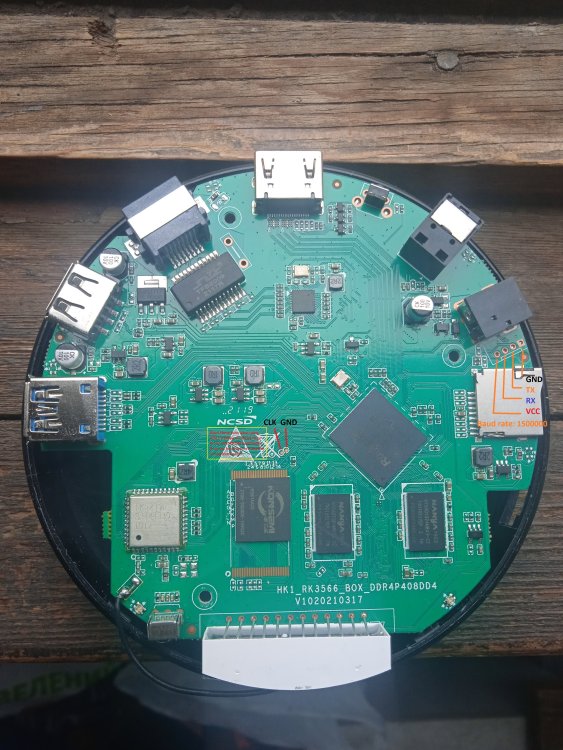
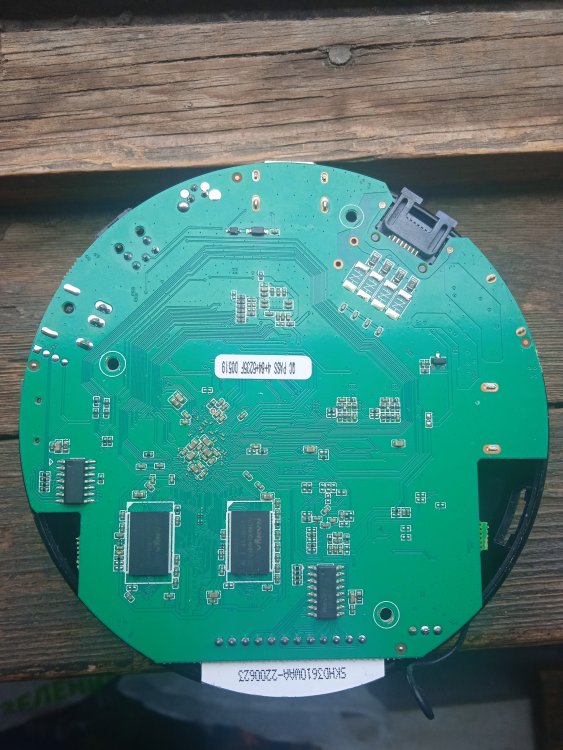
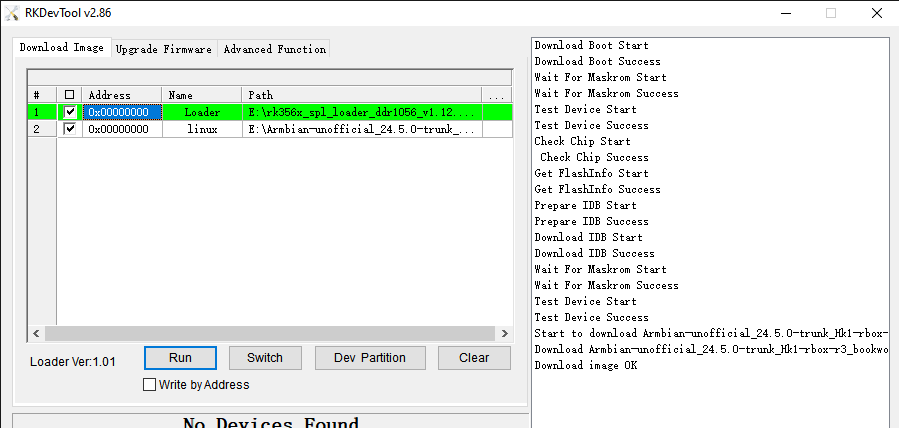
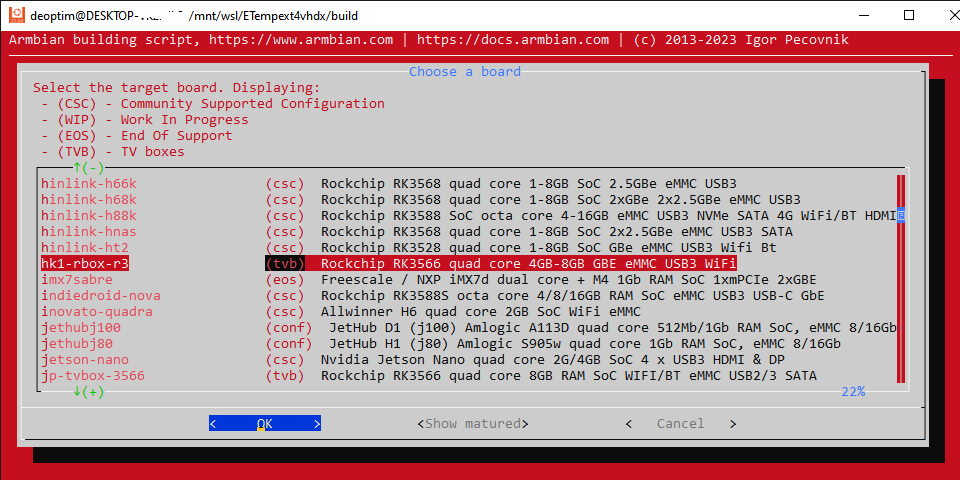
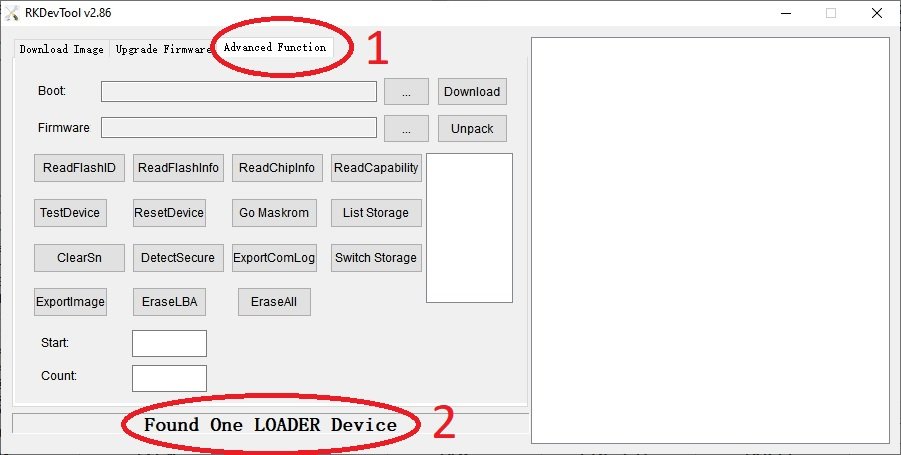
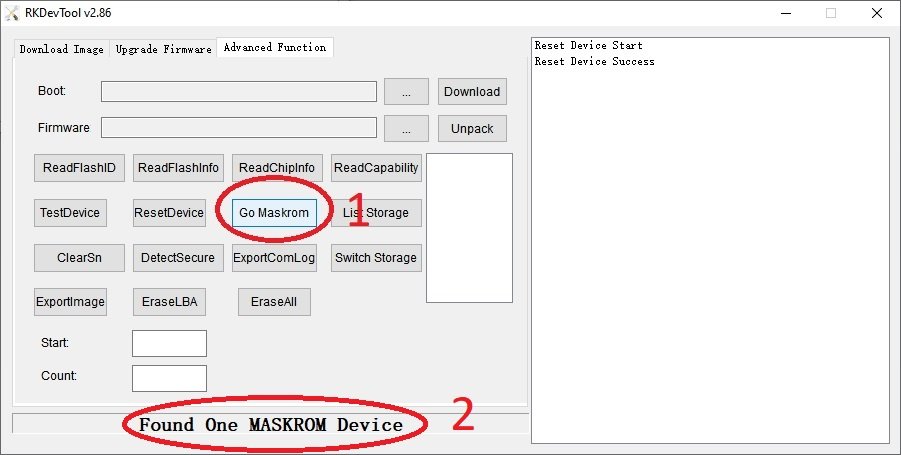
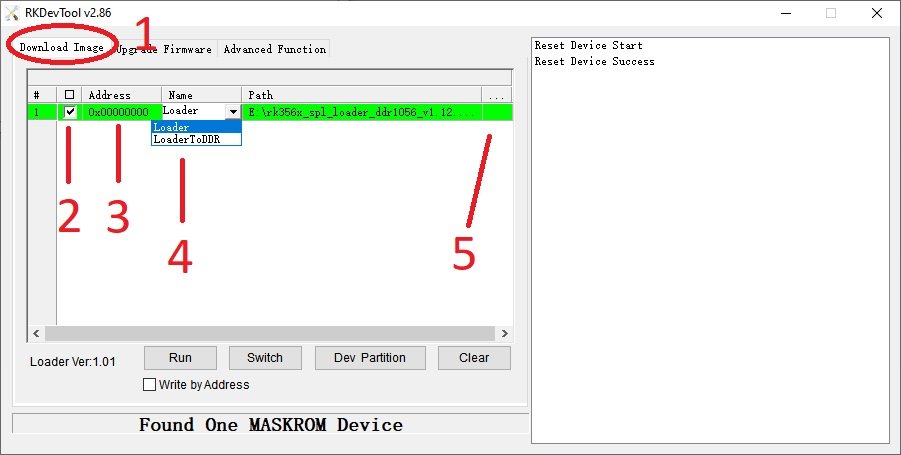
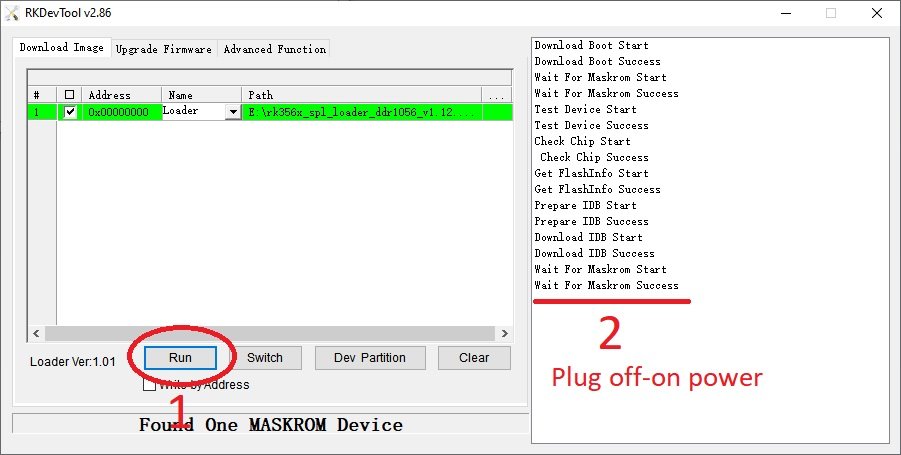
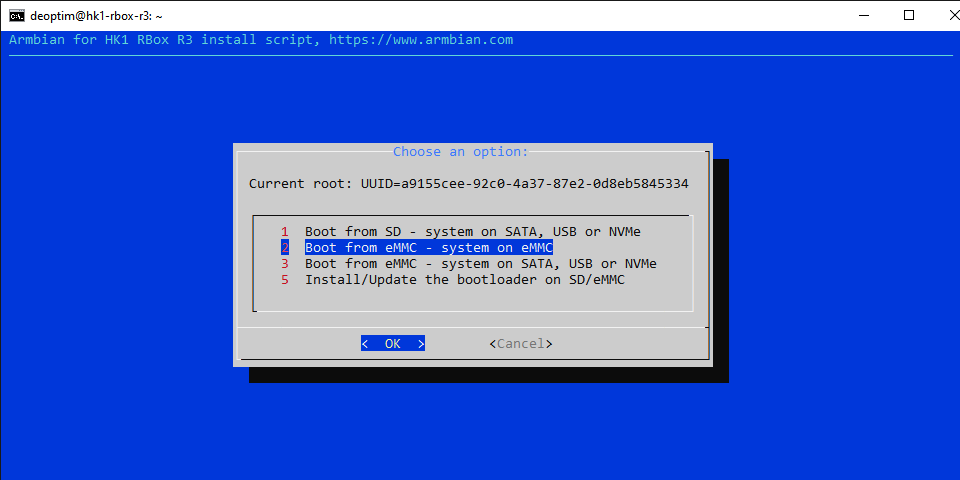
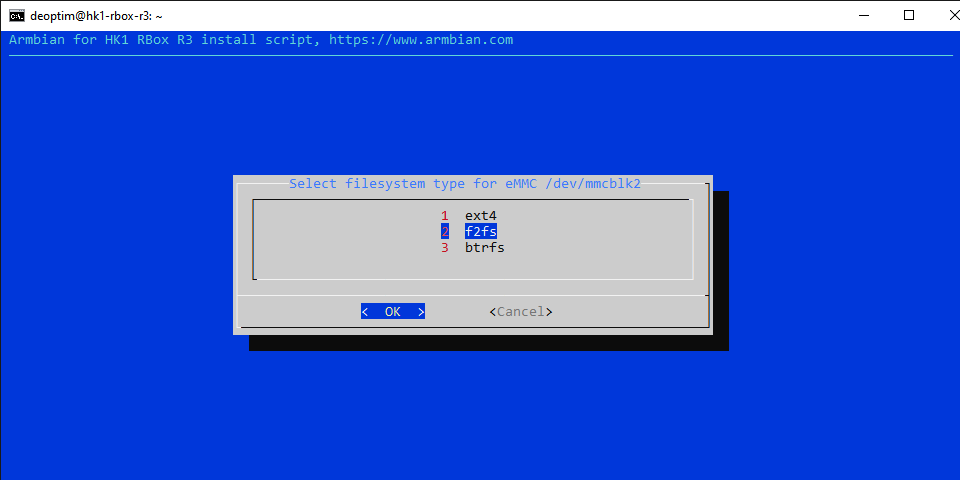
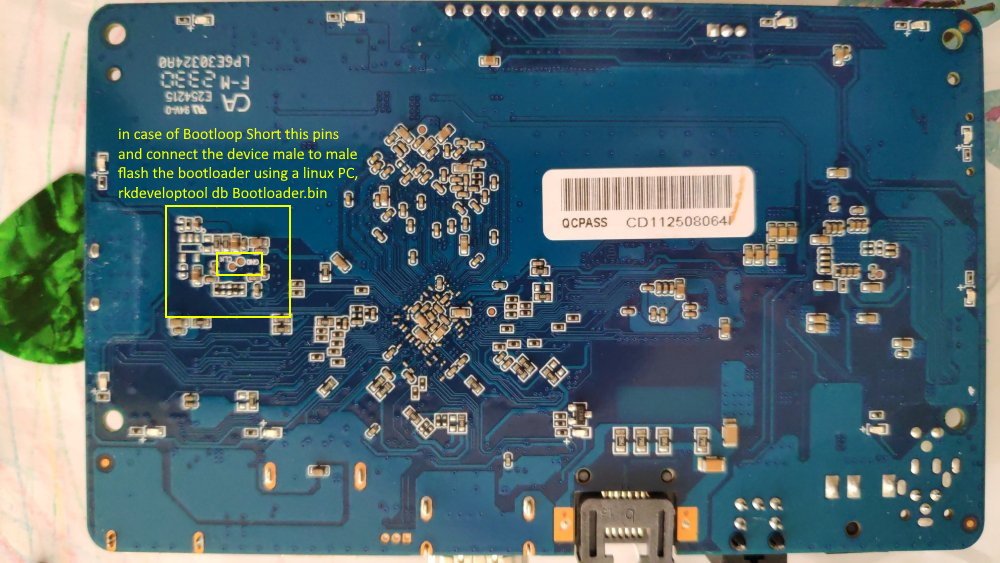
Armbian 24.5.0 Bookworm images (linux-6.1/linux-6.6) for TVBoxes: Vontar KK MAX / HK1 RBOX R2 / HK1 RBOX R3 (the same dts/dtb should work for these TVBoxes) Here is a dts and dtb files, working reworked for mainline: hk1-rbox-r3-profile-kernel-6.1-6.6.zip (original dts and dtb from TVBox rk-kernel-orig.zip) Checked the following: HDMI - works (need to check hot plugging) HDMI sound - works USB 2.0 - works USB 3.0 - works SPDIF - should work (I cannot to check) SD-Card booting and detection - works eMMC install on it (/sbin/nand-sata-install) and detection - works RKDevTool installing and loading images on/from eMMC - works GPU (bugs/frizzes on mainline are not canceled) - works Hardware video acceleration(except for browsers) - works Dualboot if you flash new bootloader (SD-Card boot high priority) - works Here are the compiled Armbian images (Bookworm only) with integrated dtb: https://www.mediafire.com/file/4dwf7ce922x7obq/Armbian-unofficial_24.5.0-trunk_Hk1-rbox-r3_bookworm_current_6.1.87_cinnamon_desktop.img.xz/file https://www.mediafire.com/file/fjwtxb5gjzip341/Armbian-unofficial_24.5.0-trunk_Hk1-rbox-r3_bookworm_current_6.1.87_minimal.img.xz/file https://www.mediafire.com/file/iuz4uijgjh5ry1r/Armbian-unofficial_24.5.0-trunk_Hk1-rbox-r3_bookworm_current_6.6.28_cinnamon_desktop.img.xz/file https://www.mediafire.com/file/kofyqabr5k6qxm8/Armbian-unofficial_24.5.0-trunk_Hk1-rbox-r3_bookworm_current_6.6.28_minimal.img.xz/file The one of this box itself is HK1 RBOX R3, the photo shows the pins for short to go to the Maskrom bootloader and UART pins: A working bootloader(supports dualboot) on this hardware for RKDevTool tool just in case: Loader.zip Please note that RKDevTool flashing utility only needs to flash the .img file with the bootloader, i.e. you need to unpack the .xz archive somewhere first (for ex. you can use 7-zip). -- Recommendations for installation on eMMC ---------------------------------------------------- For those who want to build Armbian themselves, here are the instructions: UPD: Added to images "f2fs-tools" package, added loader to support dualboot without touching the original Android(or other OS) image on eMMC - priority is given to SD-Card. Boot will be from SD-Card if there is on boot partition exist folder and file \boot.scr or extlinux\extlinux.conf - uboot(both: original Android and compiled for Armbian) searches for this path and file if it found this file, it will load from device which contains this file. mmc1(SD-Card) - first, mmc0(eMMC) - second. For correct priority loading it is necessary to replace the main bootloader which is in the archive Loader.zip - if you have an Android it is enough to flash only this bootloader as Loader at 0x0 offset using RKDevTool utility, the rest of the eMMC part should not be touched if the OS and settings we need are there. U-boot on eMMC must be original or Armbian and preinstalled at offset 0x4000. Instructions: (remember, uboot must be on eMMC (even the original Android or Armbian, i.e. if you erase the eMMC - the boot will not work) and this is relevant if you have installed the original MiniLoaderAll.bin, which does not support booting from SD-Card, but only from eMMC. Some TVBoxes may already have a bootloader that supports SD-card booting.). Feel free to test...
-
Hi, I've been using the /dev/ttyAML1 UART port on my Odroid N2+ at the GPIO pins 8 and 10 with buster. With the update to bullseye, the /dev/ttyAML1 device disappeared. Also now in bookworm it is no longer present. Now I happen to need the UART at GPIO 8 and 10 again and did some more persistent research and came across this post over in the DietPI forum. It provided an alternative meson-g12b-odroid-n2-plus.dtb which I installed in my system. Since then my /dev/ttyAML1 device is back and I can use the UART at GPIO 8 and 10 as I wished. However, I am a bit nervous, since I just installed some binary dtb file to my system at a path which is owned by the linux-dtb-current-meson64 package. So it is endangered by a system update. Is there an "official" way to get back my /dev/AML1 UART device which is sustainable? Thank you very much
-
hmm once cable is attached it does report FTDI USB Serial Device converter is attached, however apcupsd does not want to comm. with my APC Back-UPS 650, so either Modular or compiled in does not resolve my issue. [160575.289133] usb 7-1: new full-speed USB device number 3 using xhci-hcd [160575.444894] usb 7-1: New USB device found, idVendor=0403, idProduct=6001, bcdDevice= 6.00 [160575.444943] usb 7-1: New USB device strings: Mfr=1, Product=2, SerialNumber=3 [160575.444966] usb 7-1: Product: FT232R USB UART [160575.444985] usb 7-1: Manufacturer: FTDI [160575.445003] usb 7-1: SerialNumber: AL[hidden] [160575.453241] ftdi_sio 7-1:1.0: FTDI USB Serial Device converter detected [160575.453585] usb 7-1: Detected FT232R [160575.455687] usb 7-1: FTDI USB Serial Device converter now attached to ttyUSB0
-
Thanks!, saved me significant messing around. Generic-ish "T95MAX"(lol) here, 4GB... bridged UART rx FET Source Drain but no luck with that... mounted SD to setup some credentials. Don't really use HDMI, BTOOTH, WIFI(rarely) but I owe you(s) one so if you need something let me know... edit: board is one where BTOOTH seems like it works and WIFI does not due to new brcm chipset etc. etc.
-
Hi. I testing out different images for my DIY NAS project. My plan is to use the Orangepi3b board with armbian bookworm and OMV. I have built images from armbian github, (main,trunk) the edge 6.7.10 kernel is working great. But I do get some Iperf3 retries when sending from Opi3b. From Opi3b 60-70MB/s To Opi3b 110MB/s. With Orangepi own bookworm image I have 110/110 and no retries. The same with Joshua Riek's Ubuntu server image, no retries and 110/110. Orangepi3b armbian with 6.7.10 kernel orangepi@orangepi3b:~$ iperf3 -c 192.168.10.197 -f M Connecting to host 192.168.10.197, port 5201 [ 5] local 192.168.10.155 port 56514 connected to 192.168.10.197 port 5201 [ ID] Interval Transfer Bitrate Retr Cwnd [ 5] 0.00-1.00 sec 74.5 MBytes 74.5 MBytes/sec 217 19.8 KBytes [ 5] 1.00-2.00 sec 75.9 MBytes 75.9 MBytes/sec 218 11.3 KBytes [ 5] 2.00-3.00 sec 79.1 MBytes 79.1 MBytes/sec 200 25.5 KBytes [ 5] 3.00-4.00 sec 73.3 MBytes 73.3 MBytes/sec 225 29.7 KBytes [ 5] 4.00-5.00 sec 79.1 MBytes 79.1 MBytes/sec 210 33.9 KBytes [ 5] 5.00-6.00 sec 77.8 MBytes 77.8 MBytes/sec 211 86.3 KBytes [ 5] 6.00-7.00 sec 77.4 MBytes 77.4 MBytes/sec 202 36.8 KBytes [ 5] 7.00-8.00 sec 76.1 MBytes 76.1 MBytes/sec 207 73.5 KBytes [ 5] 8.00-9.00 sec 75.0 MBytes 75.0 MBytes/sec 222 12.7 KBytes [ 5] 9.00-10.00 sec 73.3 MBytes 73.3 MBytes/sec 239 11.3 KBytes - - - - - - - - - - - - - - - - - - - - - - - - - [ ID] Interval Transfer Bitrate Retr [ 5] 0.00-10.00 sec 761 MBytes 76.1 MBytes/sec 2151 sender [ 5] 0.00-10.04 sec 760 MBytes 75.7 MBytes/sec receiver Orangepi3b Ubuntu with 6.1 kernel ubuntu@ubuntu:~$ iperf3 -R -c 192.168.10.197 -f M Connecting to host 192.168.10.197, port 5201 Reverse mode, remote host 192.168.10.197 is sending [ 5] local 192.168.10.154 port 42888 connected to 192.168.10.197 port 5201 [ ID] Interval Transfer Bitrate [ 5] 0.00-1.00 sec 112 MBytes 112 MBytes/sec [ 5] 1.00-2.00 sec 112 MBytes 112 MBytes/sec [ 5] 2.00-3.00 sec 112 MBytes 112 MBytes/sec [ 5] 3.00-4.00 sec 112 MBytes 112 MBytes/sec [ 5] 4.00-5.00 sec 112 MBytes 112 MBytes/sec [ 5] 5.00-6.00 sec 112 MBytes 112 MBytes/sec [ 5] 6.00-7.00 sec 112 MBytes 112 MBytes/sec [ 5] 7.00-8.00 sec 112 MBytes 112 MBytes/sec [ 5] 8.00-9.00 sec 112 MBytes 112 MBytes/sec [ 5] 9.00-10.00 sec 112 MBytes 112 MBytes/sec - - - - - - - - - - - - - - - - - - - - - - - - - [ ID] Interval Transfer Bitrate Retr [ 5] 0.00-10.04 sec 1.10 GBytes 112 MBytes/sec 1 sender [ 5] 0.00-10.00 sec 1.10 GBytes 112 MBytes/sec receiver So to see if the vendor kernel was different I built with the new 6.1.43-vendor-rk35xx kernel, but It will not boot. build command: ./compile.sh build BOARD=orangepi3b BRANCH=edge BUILD_DESKTOP=no BUILD_MINIMAL=yes KERNEL_CONFIGURE=no RELEASE=bookworm J=4 It seems to be something with power to the NPU. ? "rockchip-pm-domain fdd90000.power-management:power-controller: failed to get ack on domain 'npu', target_idle = 0, target_ack = 0, val=0x6" uart log attachment kernelpanic.log
-

Rupa X88 Pro 13 - RK3528 board with images
fedes_gl replied to fedes_gl's topic in Rockchip CPU Boxes
I tried to dump the full firmware to have a backup but I couldn't do this because its read protection. Apparently I could only extract uboot.img and many other files. There is a workoround by unpacking that file, editing 4 bytes with any HEX editor, repacking and flashing, that allows to fully dump the firmware after tweaking it. I'm not sure of any risk of bricking the device If anything goes wrong. By the momment I cannot unppack the uboot.img file to do the trick. Also I'm looking for some more information about how to use the UART interface with it. I have a UART USB dongle (CP2102 chip) that I believe I can use to connect it. Any information would be appreciated. -
@voapilro, @bjorn, @electricworry I'm attempting to fix (at least a hack) the 1.5GB problem by attempting to build a custom u-boot to attempt to resolve the issue. The thing is the codes are pretty complex. https://docs.u-boot.org/en/latest/ https://source.denx.de/u-boot but that actually I succeeded in building u-boot The trouble is I'm getting this: U-Boot SPL 2024.04-00757-gbeac958153-dirty (Apr 18 2024 - 23:22:28 +0800) DRAM: 0 MiB Trying to boot from MMC1 NOTICE: BL31: v2.10.0(release):v2.10.0-729-gc8be7c08c NOTICE: BL31: Built : 23:11:18, Apr 18 2024 NOTICE: BL31: Detected Allwinner H616 SoC (1823) NOTICE: BL31: Found U-Boot DTB at 0x4a0be348, model: OrangePi Zero3 ERROR: RSB: set run-time address: 0x10003 ion U-Boot 2024.04-00757-gbeac958153-dirty (Apr 18 2024 - 23:22:28 +0800) Allwinner Technology size=30, ptr=590, limit=2000: 26370 CPU: Allwinner H616 (SUN50I) Model: OrangePi Zero3 DRAM: 0 Bytes So I literally need help with the codes, I'm doing pretty tedious debug etc with a 1.5G OPi Z3 board I bought for this purpose. if you run the 'original' images, that has a 'working' u-boot, it reads DRAM 2GB https://www.armbian.com/orange-pi-zero-3/ still 'incorrect' but that accordingly there'd be fixes for it (in u-boot) https://forum.openwrt.org/t/can-someone-make-a-build-for-orange-pi-zero-3/168930/42 https://gist.github.com/iuncuim The trouble as i try to trace where the calls are going is that it is not even going into the dram initialization codes in u-boot meant for H616/H618 to initialize and size up the lpddr4 dram. the codes are complex and I'd hope to get some leads there to attempt a solution. if a 'custom u-boot' can fix that, it'd at least help those who still only have 1.5GB boards to get Armbian running on it. By *replacing* the u-boot (practically the boot loader (and BIOS)) in the image or sd card. The image (and on the SD card) looks like this 0-7 KB (unused/reserved) 8 KB - 1 MB u-boot 1 MB - the rest of your sd card (this is your linux partition and Armbian proper (Debian or Ubuntu) lives here) u-boot does the bulk of the 'black magic' dealing with memory initialization and sizing, and then passing that across to linux during boot up. and linux uses the device tree (DTB, DTS) to configure the various devices uart, usb, sd card, leds, etc etc and subsequently present various of them in /dev. a 'custom u-boot' apparently seem to be a most feasible 'solution' (hack) to at least get past the 1.5GB problem. it is quite easy to simply take the original image, and substitute one u-boot made to say the memory is 1.5GB.
-
@darcyg First let me say that I am no expert on this. I have not tried to compile it lately, but I see that that commit does not longer exist on kwiboo's github. So I don't now if you need to revert to an older version of u-boot. And if you have an EmmC og SPI with u-boot, then it should work to boot from SC card with the new uboot anyway. My log was with debug enabled (and from uart), and I dont have that log anymore. mtty_probe+0x1e8/0x2b0 [sprdbt_tty] So I am not sure the error is the same wireless / bluetooth related error that I got . But I think it is. Make sure that the patch uw5622-fix-adjust-for-rockchip-post-6.1.patch got applied. Take a look in the /output/logs, If you have build the kernel several times it could be using a cached kernel and not included in the log!?, (look in the largest log files). And verify that uw5622-fix-adjust-for-rockchip-post-6.1.patch was included in your compilation: --> (15) INFO: Adding [ Drivers for Unisoc uwe5622 found on some Allwinner and Rockchip boards ] --> (15) INFO: * applying patch/misc/wireless-uwe5622/uwe5622-allwinner.patch --> (15) INFO: * applying patch/misc/wireless-uwe5622/uwe5622-allwinner-bugfix.patch --> (15) INFO: * applying patch/misc/wireless-uwe5622/uwe5622-warnings.patch --> (15) INFO: * applying patch/misc/wireless-uwe5622/uwe5622-park-link-v6.1-post.patch --> (15) INFO: * applying patch/misc/wireless-uwe5622/uwe5622-v6.1.patch --> (15) INFO: * patch/misc/wireless-uwe5622/uwe5622-adjust-for-rockchip-post-6.1.patch --> (15) INFO: * applying patch/misc/wireless-uwe5622/wireless-uwe5622-Fix-compilation-with-6.7-kernel.patch --> (15) INFO: * applying patch/misc/wireless-uwe5622/wireless-uwe5622-reduce-system-load.patch --> (15) INFO: * applying patch/misc/wireless-uwe5622/w-wireless-fix-out-of-tree-build.patch --> (15) INFO: Preparing driver [ driver_rtl8723cs ]
-
Hello all. I can say that now I'm almost happy owner of the Orange Pi Zero 3 board. It took me weeks of googling to get to this awsome thread. Links from official OPi site lead to outdated images where many things didin't work as expected and with broken graphics acceleration. Finally I found armbian and its latest builds for Orange Pi Zero 3 board with working graphics at least. So, first of all, thanks to all people who contributed to this builds, it's an awsome work. I'm total noob in Linux, so I can't do much help here, however, if something needs testing with this board (OPi Zero 3, 2Gb RAM) I'll try to help. Inspite of being able to make my own toy OS for x86 platform I struggle with Linux as it is seems very complex to me so I came here for help or at least right direction. My current goal with Zero 3 board is to get very minimal Linux build which includes: - all CPU cores workig and ability to run single graphics application without desktop environment at all - working 3D acceleration for smooth graphics - working sound (either built in or through i2s interface, preferably) - working GPIO/SPI/UART for communicating with other peripherials built with 8-bit MCUs like ATmel 8-bit chips Currently I'm just learning how to build such kind of Linux images. I've already tried buildroot and "default" build didn't work for me, I guess it is not configured to use HDMI output for terminal by default and I couldn't find how to do that. I also found sunxi site and as I understood armbian is based on that. I tried to follow their instructions to build uboot and kernel however stuck with some steps and errors, and it's also not very clear if they managed to set up HDMI/Mail graphics working with their builds as some instructions labeled as outdated. I also tried Bookworm image and it works pretty well, I even set up xorg there and run glgears app for testing it, but it still pretty big to me and there are several issues with running graphical apps without desktop environment. So, any help on these two topics is very appreciated: - How to get really minimum build and where to find actual informaton about that kind of builds as there are many tutorials but they seems to be outdated/incomplete or do not cover board specifics. - How to get single graphics app running fullscreen without desktop environment (for this experiment I can start with Bookworm build) Thank you.
-
Hello, I'm trying to connect a serial device on my nanopi neo plus2, but the gpio uart seems to be disable, please can you help me step by step? I found some things on forums but I understand nothing .... Thank you in advance
-

Efforts to develop firmware for H96 MAX V56 RK3566 8G/64G
pocosparc replied to Hqnicolas's topic in Rockchip CPU Boxes
@Hqnicolas Nice Job! Sorry I was away for the weekend and I already see that I need to reflash the board. Well I needed to start again with the version 1.2 - I started with Bluetooth and made it work - Although still not sure what is physically written on the chip and how it behaves. I have hcy6335, which in turn should be AP6335 containing the BCM4335 and for Bluetooth BCM4339. Somehow the chip gets represented as hci0: BCM4335A0 (002.001.006) build 0000. I am attaching the hcd file to this post that needs to be copied to the /lib/firmware/brcm. I also changed the dtb for the uart1 as there is no UART1 DMA mode possible otherwise. One just needs to add the dma-names to serial@fe650000 node: serial@fe650000 { compatible = "rockchip,rk3568-uart\0snps,dw-apb-uart"; reg = <0x00 0xfe650000 0x00 0x100>; interrupts = <0x00 0x75 0x04>; clocks = <0x0e 0x11f 0x0e 0x11c>; clock-names = "baudclk\0apb_pclk"; dmas = <0x24 0x02 0x24 0x03>; dma-names = "tx\0rx"; pinctrl-0 = <0x91 0x92 0x93>; pinctrl-names = "default"; reg-io-width = <0x04>; reg-shift = <0x02>; status = "okay"; phandle = <0x10a>; bluetooth { compatible = "brcm,bcm43438-bt"; clocks = <0x94 0x01>; clock-names = "lpo"; device-wakeup-gpios = <0x95 0x11 0x00>; host-wakeup-gpios = <0x95 0x10 0x00>; shutdown-gpios = <0x95 0x0f 0x00>; max-speed = <0x16e360>; pinctrl-names = "default"; pinctrl-0 = <0x96 0x97 0x98>; vbat-supply = <0x23>; vddio-supply = <0x63>; }; }; These are now the dmesg logs that I am getting [ 16.268929] Bluetooth: hci0: BCM: chip id 82 [ 16.269548] Bluetooth: hci0: BCM: features 0x2f [ 16.272162] Bluetooth: hci0: BCM4335A0 [ 16.272173] Bluetooth: hci0: BCM4335A0 (002.001.006) build 0000 [ 16.274413] Bluetooth: hci0: BCM4335A0 'brcm/BCM4335A0.hcd' Patch [ 17.114840] systemd[1]: Finished Armbian memory supported logging. [ 17.152605] systemd[1]: Starting Journal Service... [ 17.299179] systemd[1]: Started Journal Service. [ 17.339995] systemd-journald[632]: Received client request to flush runtime journal. [ 17.369055] Bluetooth: hci0: BCM: features 0x2f [ 17.372008] Bluetooth: hci0: BCM4335B0 JF-LTE MurataXJ AFH_LimitPwr_EDR 2STOPBIT-0343 [ 17.372025] Bluetooth: hci0: BCM4335A0 (002.001.006) build 0353 [ 17.482709] RPC: Registered named UNIX socket transport module. [ 17.482729] RPC: Registered udp transport module. [ 17.482733] RPC: Registered tcp transport module. [ 17.482736] RPC: Registered tcp-with-tls transport module. [ 17.482740] RPC: Registered tcp NFSv4.1 backchannel transport module. [ 18.604874] Bluetooth: BNEP (Ethernet Emulation) ver 1.3 [ 18.604896] Bluetooth: BNEP filters: protocol multicast [ 18.604914] Bluetooth: BNEP socket layer initialized [ 18.647499] Bluetooth: MGMT ver 1.22 ... [ 23.677339] Bluetooth: RFCOMM TTY layer initialized [ 23.677399] Bluetooth: RFCOMM socket layer initialized [ 23.677430] Bluetooth: RFCOMM ver 1.11 h96-tvbox-3566-wifi:~:% hciconfig -a hci0: Type: Primary Bus: UART BD Address: 43:35:B0:07:1F:AC ACL MTU: 1021:8 SCO MTU: 64:1 UP RUNNING RX bytes:4846 acl:0 sco:0 events:556 errors:0 TX bytes:71684 acl:0 sco:0 commands:556 errors:0 Features: 0xbf 0xfe 0xcf 0xff 0xdf 0xff 0x7b 0x87 Packet type: DM1 DM3 DM5 DH1 DH3 DH5 HV1 HV2 HV3 Link policy: RSWITCH SNIFF Link mode: PERIPHERAL ACCEPT Name: 'h96-tvbox-3566-wifi' Class: 0x6c0000 Service Classes: Rendering, Capturing, Audio, Telephony Device Class: Miscellaneous, HCI Version: 4.0 (0x6) Revision: 0x161 LMP Version: 4.0 (0x6) Subversion: 0x4106 Manufacturer: Broadcom Corporation (15) h96-tvbox-3566-wifi:~:% bluetoothctl Agent registered [CHG] Controller 43:35:B0:07:1F:AC Pairable: yes [bluetooth]# show Controller 43:35:B0:07:1F:AC (public) Name: h96-tvbox-3566-wifi Alias: h96-tvbox-3566-wifi Class: 0x006c0000 Powered: yes Discoverable: no DiscoverableTimeout: 0x000000b4 Pairable: yes UUID: A/V Remote Control (0000110e-0000-1000-8000-00805f9b34fb) UUID: Handsfree Audio Gateway (0000111f-0000-1000-8000-00805f9b34fb) UUID: PnP Information (00001200-0000-1000-8000-00805f9b34fb) UUID: Audio Sink (0000110b-0000-1000-8000-00805f9b34fb) UUID: Headset (00001108-0000-1000-8000-00805f9b34fb) UUID: A/V Remote Control Target (0000110c-0000-1000-8000-00805f9b34fb) UUID: Generic Access Profile (00001800-0000-1000-8000-00805f9b34fb) UUID: Audio Source (0000110a-0000-1000-8000-00805f9b34fb) UUID: Generic Attribute Profile (00001801-0000-1000-8000-00805f9b34fb) UUID: Device Information (0000180a-0000-1000-8000-00805f9b34fb) Modalias: usb:v1D6Bp0246d0540 Discovering: no Roles: central Roles: peripheral Advertising Features: ActiveInstances: 0x00 (0) SupportedInstances: 0x05 (5) SupportedIncludes: tx-power SupportedIncludes: appearance SupportedIncludes: local-name [bluetooth]# scan on Discovery started [CHG] Controller 43:35:B0:07:1F:AC Discovering: yes [NEW] Device 4C:BA:D7:02:F5:B7 4C-BA-D7-02-F5-B7 @ning @Hqnicolas UART1 speed is set to max-speed = <1500000>; but according to the datasheet (still no clue if it is the right one) we can go up to 4 MBit/s. Another thing is the schematics that I found somewhere on the internet, but still they are using some AP6xxx wifi/BT chip. Need to dive into this, but hey, now we see the missing components needed for SD-Card slot. Heartbeat is a nice thing, but I will try to enable the backlight blue LEDs, WiFi runniung, and then try to get some HDMI audio out of this thing. BCM4335A0.hcd p562297-AP6335 datasheet_V1.3_02102014.pdf ROC-3566-PC-V10-20210419.pdf -
Additions: GPU node UART 1 & 5 nodes GPU is disabled by default as I am not 100% how functional it currently is. Checklist: Please delete options that are not relevant. [ ] My code follows the style guidelines of this project [ ] I have performed a self-review of my own code [ ] I have commented my code, particularly in hard-to-understand areas [X] My changes generate no new warnings [ ] Any dependent changes have been merged and published in downstream modules View the full article
-
Hi all I have a project need high uart baudrate, > 2Mbit/S, how can I get this work, seems the stty not work correctly
-
The cable is fine. Also tried a different one. I tested it with UART connected to my notebook. The system is available after I have disconnected the network cable. But I can see that some tasks running in docker container after a few seconds cause 100% CPU usage. And the load of the system is growing again and again. I guess that this will kind of „lock“ the device after a few minutes, this tasks are running as root. Thank you for the support and hint with the UART, now I can go on to figure out what the problem is with those tasks…
-

Efforts to develop firmware for H96 MAX V56 RK3566 8G/64G
pocosparc replied to Hqnicolas's topic in Rockchip CPU Boxes
Hi @Hqnicolas I am currently still doing some research as I found out that Bluetooth does not work and it has to do something with the UART1 line. I will first try to fetch the low-hanging fruits. Meanwhile, I replaced the debian with ubuntu image for now and I extracted all of the firmware drivers from my backup dump from the super.img file. I am attaching them to this post and they are coming from the vendor/firmware part. I currently do not know if they need to be statically or dynamically linked with the kernel. If they help in any way, we can include them in the armbian Linux. Link I have a few questions for you as well. Do we have some sort of PCBA schematics and the HW setup with the external hardware: direct pins connections, what goes via muxes, etc.? This would speed things up. I requested this from the buyer, but the chances are really low that he will send anything back. What is the latest dts version? Do we have it in the form of mnemonics and not as bare pointers in byte values (&gpio instead of some 0x8e value)? Now to the Bluetooth problem I found somewhere in this forum that someone fixed the Bluetooth by changing the TX and RX pins in the dts. Link to git commit Looking at what is currently in (I am using some rk3566-firefly-roc-pc.dts - there are multiple of them and changes are phandles for USB 2.0) and what is in the git and the version originally coming from this device show that there is a TX and RX swap in the file (maybe due to different PCB layouts and hoping that there is one bit that allows UART alternate function RX/TX swap - not sure as the datasheet for RK3566 is far from being useful). So the file should be at least changed to: bluetooth { compatible = "brcm,bcm43438-bt"; clocks = <0x8d 0x01>; clock-names = "lpo"; device-wake-gpios = <0x8e 0x10 0x00>; host-wake-gpios = <0x8e 0x11 0x00>; shutdown-gpios = <0x8e 0x0f 0x00>; pinctrl-names = "default"; pinctrl-0 = <0x8f 0x90 0x91>; vbat-supply = <0x24>; vddio-supply = <0x92>; status = "disabled"; }; In the original dump file there is also UART8 messing around, but I am currently not sure what her role is. @Hqnicolas If you have everything setup on you side, can you quickly check this out? Or I will try to fiddle around with armbian-config and device tree entries and let's see where it gets me. -

Efforts to develop firmware for H96 MAX V56 RK3566 8G/64G
Hqnicolas replied to Hqnicolas's topic in Rockchip CPU Boxes
@Werner Are your CP2102 fake? I Have the Chinese Fake CP2102 and it works at 1.5M baud rate This gui's are fake ^^^^^^^^^ and this CP2102 works at 1.5M baud rate but the PL2303HX dont work with anithing is an absolute wast of metal Prolific PL2303 have fake versions to The Serial UART to USB looks like the TV-Box Market -
Yes, that appears to be correct. I couldn't figure out why the UART on the p26 pin header wasn't working. Found your post and tried ttyS1 instead. Working beautifully now. Thanks 🙂.
-

Efforts to develop firmware for H96 MAX V56 RK3566 8G/64G
Hqnicolas replied to Hqnicolas's topic in Rockchip CPU Boxes
Please, Use a debug Tool TTL UART Baud rate: 1500000 Data bit: 8 Stop bit: 1 Parity check: none Flow control: none ☑️ CP2104 TTL Tested the original one! ☑️ CP2102 TTL Tested the chinese fake one!


