Search the Community
Showing results for 'video acceleration within browser'.
-
Rockchip has released bsp kernel 5.10 for rk356x and rk3588. Since multimedia support is not fully supported by mainline kernel, a legacy kernel would be good if you want h264/hevc hardware decode. To make kodi support hardware decoding, you need: 1, ffmpeg supporting rkmpp. I've packaged it in my ppa: https://launchpad.net/~liujianfeng1994/+archive/ubuntu/rockchip-multimedia, which is based on the patch from https://github.com/JeffyCN/FFmpeg/. 2, kodi built with gles render system, which is also in my ppa 3, a gpu driver supporting gles. For rk356x you can use mainline panfrost driver. For rk3588 you can use panfork-mesa from my ppa: https://launchpad.net/~liujianfeng1994/+archive/ubuntu/panfork-mesa I've tested that kodi can support hardware decoding on both 3568 and 3588. Here is the steps for rock5b to install kodi: 1, download the image I build with panfork-mesa and malig610 firmware: https://github.com/amazingfate/armbian-rock5b-images, and install it on your rock5b. 2, add my rockchip multimedia ppa: https://launchpad.net/~liujianfeng1994/+archive/ubuntu/rockchip-multimedia: sudo add-apt-repository ppa:liujianfeng1994/rockchip-multimedia 3, create a udev rule to enable the permission ofrockchip's mpp device: KERNEL=="mpp_service", MODE="0660", GROUP="video" KERNEL=="rga", MODE="0660", GROUP="video" KERNEL=="system-dma32", MODE="0666", GROUP="video" KERNEL=="system-uncached-dma32", MODE="0666", GROUP="video" RUN+="/usr/bin/chmod a+rw /dev/dma_heap" wirte the above rules to /etc/udev/rules.d/11-rockchip-multimedia.rules 4, install kodi: sudo apt install kodi 5, move kodi from xsession to wayland-session: sudo mv /usr/share/xsessions/kodi.desktop /usr/share/wayland-sessions/kodi-wayland.desktop 6, reboot the board: sudo reboot 7, in the lightdm greeter, select kodi and login 8, After starting kodi, in Settings -> Player -> Videos, enable "Allow using DRM PRIME decoder" and "Allow hardware acceleration with DRM PRIME". And set "PRIME Render Method" to "Direct To Plane" 9, Then you can play h264/h265 8 bit/10bit videos up to 4K. ============Updated on 20230206=================== rockchip-multimedia has become a universal ppa for rockchip legacy kernel. Here is the introduction: https://forum.radxa.com/t/introduction-to-rockchip-multimedia-ppa-for-ubuntu-jammy/14537 I provide a new package rockchip-multimedia-config to do all the system configs such as udev rules, chromium v4l2 devices creation. Just install this package and reboot, you are good to go.
-
so, I tried it again with the kernel 6.1.43 and with the instructions from the howto. That resulted in the scrambled picture when opening kodi. (see above post) Then I built mpp, rga, ffmpeg_rockchip and kodi new. After a restart I could not open kodi as it complained about the missing dbdev module. Then I build drm-package and the mesa driver again. Then kodi opened again only to give the following errors when opening a movie: 2024-05-06 09:43:53.882 T:6596 info <general>: Creating InputStream 2024-05-06 09:43:53.916 T:6596 info <general>: Creating Demuxer 2024-05-06 09:43:53.990 T:6596 info <general>: Opening stream: 0 source: 256 2024-05-06 09:43:53.990 T:6596 info <general>: Creating video codec with codec id: 173 2024-05-06 09:43:53.990 T:6596 info <general>: CDVDVideoCodecDRMPRIME::Open - using decoder Rockchip MPP (Media Process Platform) HEVC decoder 2024-05-06 09:43:53.991 T:6596 info <general>: Creating video thread 2024-05-06 09:43:53.991 T:6600 info <general>: running thread: video_thread 2024-05-06 09:43:53.992 T:6596 info <general>: Opening stream: 1 source: 256 2024-05-06 09:43:53.992 T:6596 info <general>: Finding audio codec for: 86060 2024-05-06 09:43:53.992 T:6596 info <general>: CDVDAudioCodecFFmpeg::Open() Successful opened audio decoder truehd 2024-05-06 09:43:53.992 T:6596 info <general>: OpenStream: Allowing max Out-Of-Sync Value of 10 ms 2024-05-06 09:43:53.992 T:6596 info <general>: Creating audio thread 2024-05-06 09:43:53.992 T:6601 info <general>: running thread: CVideoPlayerAudio::Process() 2024-05-06 09:43:53.992 T:6596 info <general>: Opening stream: 9 source: 256 2024-05-06 09:43:54.003 T:6601 info <general>: Creating audio stream (codec id: 86060, channels: 8, sample rate: 48000, no pass-through) 2024-05-06 09:43:54.032 T:1329 error <general>: CEGLImage::SupportsFormat - format not supported: YU10 2024-05-06 09:43:54.033 T:1329 info <general>: GLES: Selecting single pass rendering 2024-05-06 09:43:54.033 T:1329 info <general>: GLES: Selecting YUV 2 RGB shader 2024-05-06 09:43:54.033 T:1329 error <general>: CBaseRenderer::GetShaderFormat - unsupported format 179 2024-05-06 09:43:54.033 T:1329 error <general>: GLES: BaseYUV2RGBGLSLShader - unsupported format none 2024-05-06 09:43:54.034 T:1674 info <general>: Skipped 1 duplicate messages.. So this means, that the original howto's for Rock 5b do not work anymore. And I did not find any working or reproducible collection of steps needed to get kodi reliably working with hw acceleration. This is quite a nightmare. I have this thing for over a year now and i am not able to use it.
-
 Kodi on Orange Pi 5 with GPU Hardware Acceleration and HDMI Audio Huge thanks to user @roykon the Armbian forums for the directions on this in their various forum posts and Armbian forum user @amazingfate for maintaining the PPAs and software builds required for GPU acceleration. I have simply listed below, for the reference of others, the minimum Steps used to get Kodi running with GPU hardware acceleration (for x264/x265 decode) plus HDR auto switching and with HDMI Audio output*. (I am using the Orange Pi 5 with a Samsung 4K TV) *No instructions added yet for enabling HDMI passthrough. ** No instructions added yet for enabling HDMI CEC. Step 1 (SD card image creation) Download the image below, uncompress it and write it to an SD card. https://github.com/armbian/build/releases/download/23.02.0-trunk.0173/Armbian_23.02.0-trunk.0173_Orangepi5_jammy_legacy_5.10.110_xfce_desktop.img.xz#orangepi5 Step 2 (First boot) Boot the SD card image and complete the on-screen prompts for user & password creation. Note down the IP address of the Orange Pi 5, you will need it in step 3. Step 3 (SSH into the Orange Pi 5) SSH to the IP address of your Orange Pi 5 and login using the user account and password you set up in Step 2. Step 4 (Enable PPAs and install other elements required for GPU hardware acceleration) At the command line, enter the following commands (highlighted in Blue): sudo add-apt-repository ppa:liujianfeng1994/panfork-mesa sudo add-apt-repository ppa:liujianfeng1994/rockchip-multimedia sudo apt update sudo apt full-upgrade sudo apt install ubuntu-desktop kodi When prompted on-screen if you wish to use gdm or lightdm, select gdm. Step 5 (Configuration file additions & changes) At the command line, enter the following commands (highlighted in Blue): sudo mv /usr/share/xsessions/kodi.desktop /usr/share/wayland-sessions/kodi-wayland.desktop sudo nano /etc/udev/rules.d/11-rockchip-multimedia.rules KERNEL=="mpp_service", MODE="0660", GROUP="video" KERNEL=="rga", MODE="0660", GROUP="video" KERNEL=="system-dma32", MODE="0666", GROUP="video" KERNEL=="system-uncached-dma32", MODE="0666", GROUP="video" RUN+="/usr/bin/chmod a+rw /dev/dma_heap" sudo nano /etc/gdm3/custom.conf Add the line below and save the file. WaylandEnable=true sudo nano /usr/share/alsa/cards/HDMI-OUT.conf Add all of the content below and save the file. # configuration for HDMI connection which just expose the # audio out device <confdir:pcm/hdmi.conf> HDMI-OUT.pcm.hdmi.0 { @args [ CARD DEVICE CTLINDEX AES0 AES1 AES2 AES3 ] @args.CARD { type string } @args.DEVICE { type integer } @args.CTLINDEX { type integer } @args.AES0 { type integer } @args.AES1 { type integer } @args.AES2 { type integer } @args.AES3 { type integer } type hw card $CARD } sudo nano /usr/share/alsa/cards/aliases.conf Add the line below and save the file. rockchip-hdmi0 cards.HDMI-OUT Step 6 (Reboot and Start Kodi) At the command line, enter the following commands (highlighted in Blue): sudo reboot At the login screen, select “kodi” in the bottom right hand corner menu. Now login using your username and password. Kodi should now load. Step 7 (Adjust Kodi settings) From within Kodi goto Settings -> Player -> Videos goto the bottom left corner of the screen and change it from Standard to Expert. From within Kodi goto Settings -> Player -> Videos, Playback, and change Adjust display refresh rate to “On start/stop” From within Kodi goto Settings -> Player -> Videos, Processing, enable "Allow using DRM PRIME decoder" and "Allow hardware acceleration with DRM PRIME". And set "PRIME Render Method" to "Direct To Plane" From within Kodi goto Settings -> System -> Display, and change the resolution to 1920x1080p From within Kodi goto Settings -> System -> Audio, and change the Audio output device to “Built in Audio Digital Stereo (HDMI),HDMI / DisplayPort (PULSEAUDIO)” Step 8 (Test video playback and check that GPU acceleration & HDMI Audio are working) During video playback, press ‘o’ on the keyboard, and it should show Video decoder: ff-hevc_rkmpp-drm_prime (HW) During video playback, if you have a Samsung TV, press the “Info” button on your Samsung TV remote to show the current playback resolution, frame rate and whether or not HDR is in use. (Depending on the video content being played) Thank you again to Armbian forum users @royk and @amazingfate
 -
DISCLAIMERS (PLEASE READ): Everything you can find in this thread (binaries, texts, code snippets, etc...) are provided AS-IS and are not part of official Armbian project. For this reason not people from Armbian project nor myself are responsible for misuse or loss of functionality of hardware. THIS POST explains very well the troubles with TV Boxes and why they are not suitable for everyone Please don't ask about support or assistance in other non-community forums nor in the official Armbian github repository, instead post your questions in this thread, in the TV Boxes forum section (hardware related) or in the Peer-to-peer support section (general linux/software related). Following the recent thread on LibreElec forum about an unofficial image for rk3229 devices, I would like to make public the work made by me and @fabiobassa about bringing rk322x support to armbian. The project is now in -> mainline Armbian <- development fork -> here <- This first page and the last 3 or 4 pages of the thread are enough to get up to date with recent developments. Many useful experiences are scattered through the thread, but the most important things are collected here in the first page, so please read it carefully! Mainline kernel is fully supported and will receive most support in the future. Legacy kernel 4.4 is deprecated, but is kept around only for special purposes. What works: Should boot and work flawlessy on all boards with RK3228a, RK3228b and RK3229, with either DDR2 and DDR3 memories. Mainline u-boot Proprietary OPTEE provided as Trusted Execution Environment (needed for DRAM frequency scaling) All 4 cores are working Ethernet Serial UART (configured at 115200 bps, not 1.5Mbps!) Thermals, CPU and DRAM frequency scaling OTG USB 2.0 port (also as boot device!) EHCI/OHCI USB 2.0 ports MMC subsystem (including eMMC, SD and sdio devices) Hardware video acceleration NAND is available only on legacy kernel. To fully boot from NAND, use the Multitool and its steP-nand installation (instructions are below) Various WIFI over SDIO are supported (SSV6051P, SSV6256P, ESP8089, Realtek chips, etc...), ssv6256p driver is available only on legacy kernel Full GPU acceleration U-boot boot order priority: first the sdcard, then the USB OTG port and eventually the internal eMMC; you can install u-boot (and the whole system) in the internal eMMC and u-boot will always check for images on external sdcard/USB first. Unbrick: Technically, rockchip devices cannot be bricked. If the internal flash does not contain a bootable system, they will always boot from the sdcard. If, for a reason, the bootable system on the internal flash is corrupted or is unable to boot correctly, you can always force the maskrom mode shorting the eMMC clock pin on the PCB. Here there is the procedure, but you can also google around if you get stuck on a faulty bootloader, the technique is pretty simple and requires a simple screwdriver. There are however some unfortunate cases (expecially newer boards) where shorting the eMMC clock pin is difficult or impossibile, like eMMC or eMCP BGA chips with no exposed pins. In those cases pay double attention when burning something on the internal eMMC/eMCP and always test first the image from the sdcard to be sure it works before burning anything on eMMC/eMCP. Some useful links with pins, pads or procedures for some boards: Generic procedure for boards with non-BGA eMMC MXQPRO_V71 - eMCP H20 - eMCP ZQ01 - eMCP NAND vs eMMC vs eMCP difference: RK3228 and RK3229 tv boxes comes with three different flash memory chips: eMMC, NAND and eMCP. It does not depend upon the market name of the tv box and neither the internal board; manufacturers put whatever they find cheaper when they buy the components. NAND chip is just the non-volatile memory eMMC chip contains both the non-volatile memory plus a controller. eMCP chip contains the non-volatile memory, a controller for the non-volatile memory (like eMMC), but also contains a bank of DDR SDRAM memory on the same physical chip. The difference is very important, because eMMC and eMCP are far easier to support at various levels: the controller deals with the physical characteristics of the non-volatile memory, so the software has no to deal with. NAND chips instead are harder to support, because the software is required to deal with the physical characteristics and non-standard things that depends upon the NAND manufacturer. If you have a NAND chips you're unlucky because mainline kernel currently cannot access it, but also because you need special care and instructions explained later. You can discover if you have a NAND, eMMC or eMCP chip looking on the board are reading the signature on the flash memory chip. The Multitool (see later) also can detect which chip you have onboard: the program will warn you at startup if you have a NAND chip. NAND bootloader upgrade: IMPORTANT: don't do this is you have an eMMC or eMCP; skip this paragraph if you are unsure too! For very expert people who are having issues when (re)booting images, there is the chance to upgrade the bootloader on NAND. The NAND bootloader is nothing else than a regular idbloader (see official rockchip documentation) but contains some bits to correctly access the data on your flash memory. Upgrading requires to erase the existing flash content, in the worst case will require you to follow the Unbrick procedure above or restore an older but more compatible bootloader. If you are not mentally ready to overcome possible further issues, don't do this! The detailed instructions and the binaries are available at this post Multimedia: Mainline kernel: 3D acceleration is provided by Lima driver and is already enabled. Hardware video decoding: https://forum.armbian.com/topic/19258-testing-hardware-video-decoding-rockchip-allwinner/ Deprecated legacy kernel: multimedia features, like OpenGL/OpenGL ES acceleration, hardware accelerated Kodi, ffmpeg and mpv you can take a look to this post An effective tutorial from @Hai Nguyen on how to configure a box as a hi-quality music player using an USB audio card, and controlling it via remote control is available in this post Brief explanation about kernel naming: current kernel is the mainline LTS kernel version, most maintained and tested. This is the suggested version for production devices. If you don't know what to pick, pick this. legacy kernel (version 4.4) is provided by manufacturer; it is deprecated, unmaintained and not suggested. edge kernel is the development mainline kernel version, with experimental features and drivers; usually stable but perhaps suitable for production devices. You can switch from one kernel flavour to another using armbian-config or manually via apt. Installation (via SD card): Building: You can build your own image follow the common steps to build armbian for other tv boxes devices: when you are in the moment to choose the target board, switch to CSC/TVB/EOL boards and select "rk322x-box" from the list. Download prebuilt images from the following links: Archive builds (GPG-signed) - https://imola.armbian.com/dl/rk322x-box/archive/ SUGGESTED - Nightly built from trunk each week by Armbian servers (GPG-signed) - https://github.com/armbian/community Old images provided by me (unsigned and outdated) - https://users.armbian.com/jock/rk322x/armbian/stable Archived/older images: https://armbian.hosthatch.com/archive/rk322x-box/archive/ Multitool: The Multitool is a small but powerful tool to do quick backup/restore of internal flash, but also burn images and general system rescue and maintenance via terminal or SSH. Compressed images will be uncompressed on fly. Multitool - A small but powerful image for RK322x TV Box maintenance (instructions to access via network here) Quick installation instructions on eMMC: Build or download your preferred Armbian image and a copy of the Multitool; Burn the Multitool on an SD card; once done, place the Armbian image in images folder of the SD card NTFS partition; Plug the SD card in the TV box and plug in the power cord. After some seconds the blue led starts blinking and the Multitool appears; OPTIONAL: you can do a backup of the existing firmware with "Backup flash" menu option; Choose "Burn image to flash" from the menu, then select the destination device (usually mmcblk2) and the image to burn; Wait for the process to complete, then choose "Shutdown" from main menu; Unplug the power cord and the SD card, then replug the power cord; Wait for 10 seconds, then the led should start blinking and HDMI will turn on. The first time the boot process will take a couple of minutes or more because the filesystem is going to be resized, so be patient and wait for the login prompt. On first boot you will be asked for entering a password for root user of your choice and the name and password for a regular user Run sudo rk322x-config and select your board characteristics to enable leds, wifi chips, high-speed eMMC, etc... Run sudo armbian-config to configure timezone, locales and other personal options Congratulations, Armbian is now installed and configured! Despite the procedure above is simple and reliable, I always recommend to first test that your device boots Armbian images from SD Card. Due to the really large hardware variety, there is the rare chance that the images proposed here may not boot. If a bad image is burned in eMMC, the box may not boot anymore forcing you to follow the unbrick section at the top of this post. Quick installation instructions on NAND: Build or download your preferred Armbian image and a copy of the Multitool; Burn the Multitool on an SD card; once done, place the Armbian legacy kernel image in images folder of the SD card NTFS partition; Plug the SD card in the TV box and plug in the power cord. After some seconds the blue led starts blinking and the Multitool appears; OPTIONAL: you can do a backup of the existing firmware with "Backup flash" menu option; Choose "Burn Armbian image via steP-nand" from the menu, then select the destination device (usually rknand0) and the image to burn; Wait for the process to complete, then choose "Shutdown" from main menu; Unplug the power cord and the SD card, then replug the power cord; Wait for 10 seconds, then the led should start blinking and HDMI will turn on. The first time the boot process will take a couple of minutes or more because the filesystem is going to be resized, so be patient and wait for the login prompt. On first boot you will be asked for entering a password for root user of your choice and the name and password for a regular user Run sudo rk322x-config and select your board characteristics to enable leds, wifi chips, etc... Run armbian-config to configure timezone, locales and other personal options Congratulations, Armbian is now installed! Alternative: you can install the bootloader in NAND and let it boot from SD Card or USB: Download a copy of the Multitool and burn it on an SD card; Plug the SD card in the TV box and plug in the power cord. After some seconds the blue led starts blinking and the Multitool appears; RECOMMENDED: make a backup of the existing firmware with "Backup flash" menu option; Choose "Install Jump Start for Armbian" menu option: the Jump Start uses the internal NAND to boot from external SD Card or external USB Stick; Follow the general instructions to boot from SD Card below, skip the first erase eMMC step. Quick installation instructions to boot from SD Card: If you are already running Armbian from eMMC, skip to the next step. Instead if you are running the original firmware you need to first erase the internal eMMC; to do so download the Multitool, burn it on an SD Card, plug the SD Card and power the TV Box. Use "Backup flash" if you want to do a backup of the existing firmware, then choose "Erase flash" menu option. Build or download your preferred Armbian image; Uncompress and burn the Armbian image on the SD Card; Plug the SD Card in the TV Box and power it on; Wait for 10 seconds, then the led should start blinking and HDMI will turn on. The first time the boot process will take a couple of minutes or more because the filesystem is going to be resized, so be patient and wait for the login prompt; On first boot you will be asked for entering a password for root user of your choice and the name and password for a regular user Run sudo rk322x-config and select your board characteristics to enable leds, wifi chips, high-speed eMMC or NAND, etc... Run armbian-config to configure timezone, locales and other personal options, or also to transfer the SD Card installation to internal eMMC; Congratulations, Armbian is running from SD Card! A note about boot device order: With Armbian also comes mainline U-boot. If you install Armbian or just the bootloader in the eMMC or the Jump Start on internal NAND, the bootloader will look for valid bootable images in this order: External SD Card External USB Stick in OTG Port Internal eMMC Installation (without SD card, board with eMMC) If you have no sd card slot and your board has an eMMC, you can burn the armbian image directly on the internal eMMC using rkdeveloptool and a male-to-male USB cable: Download your preferred Armbian image from Armbian download page and decompress it. Download the rk322x bootloader: rk322x_loader_v1.10.238_256.bin Download a copy of rkdeveloptool: a compiled binary is available in the official rockchip-linux rkbin github repository. Unplug the power cord from the tv box Plug an end of an USB Male-to-male cable into the OTG port (normally it is the lone USB port on the same side of the Ethernet, HDMI, analog AV connectors) while pressing the reset microbutton with a toothpick. You can find the reset microbutton in a hole in the back of the box, but sometimes it is hidden into the AV analog jack Plug the other end of the USB Male-to-male cable into an USB port of your computer If everything went well, run lsusb: you should see a device with ID 2207:320b Run sudo rkdeveloptool rd 3 (if this fails don't worry and proceed to next step) Run sudo rkdeveloptool db rk322x_loader_v1.10.238_256.bin Run sudo rkdeveloptool wl 0x0 image.img (change image.img this with the real Armbian image filename) Unplug the power cord Done! Installation (without SD card, board with NAND) If you are in the unfortunate case you can't use an SD card for installation and your board has a NAND chip, you still have an option to use the quick Multitool installation steps via USB. Obtain a copy of rkdeveloptool: a compiled binary is available in the official rockchip-linux rkbin github repository. Unplug the power cord from the tv box Plug an end of an USB Male-to-male cable into the OTG port (normally it is the lone USB port on the same side of the Ethernet, HDMI, analog AV connectors) while pressing the reset microbutton with a toothpick. You can find the reset microbutton in a hole in the back of the box, but sometimes it is hidden into the AV analog jack Plug the other end of the USB Male-to-male cable into an USB port of your computer If everyting went well, using lsusb you should see a device with ID 2207:320b Run sudo rkdeveloptool wl 0x4000 u-boot-main.img (download u-boot-main.img.xz , don't forget to decompress it!) Unplug the power cord Now you can follow the instructions on how to install on eMMC/NAND via SD card, just use instead an USB stick to do all the operations and plug it into the USB OTG port. Once you reboot, USB OTG port will be used as a boot device. NOTE: NAND users without SD slot may be unhappy to know that it will be difficult to do extra maintenance with Multitool in case something breaks in the installed Armbian system: installing u-boot-main.img makes the installed system unbootable because it is missing the NAND driver. Alternative backup, restore and erase flash for EXPERTS: These backup, restore and erase flash procedures are for experts only. They are kept here mostly for reference, since the Multitool is perfectly able to do same from a very comfy interface and is the suggested way to do maintenance. Backup: Obtain a copy of rkdeveloptool: a compiled binary is available in the official rockchip-linux rkbin github repository. If you prefer, you can compile it yourself from the sources available at official rockchip repository Unplug the power cord from the tv box Plug an end of an USB Male-to-male cable into the OTG port (normally it is the lone USB port on the same side of the Ethernet, HDMI, analog AV connectors) while pressing the reset microbutton with a toothpick. You can find the reset microbutton in a hole in the back of the box, but sometimes it is hidden into the AV analog jack Plug the other end of the USB Male-to-male cable into an USB port of your computer If everyting went well, using lsusb you should see a device with ID 2207:320b change directory and move into rkbin/tools directory, run ./rkdeveloptool rfi then take note of the FLASH SIZE megabytes (my eMMC is 8Gb, rkdeveloptool reports 7393 megabytes) run ./rkdeveloptool rl 0x0 $((FLASH_SIZE * 2048)) backup.data (change FLASH_SIZE with the value you obtained the step before) once done, the internal eMMC is backed up to backup.data file Restore: first we have to restore the original bootloader, then restore the original firmware. Running rkdeveloptool with these switches will accomplish both the jobs: ./rkdeveloptool db rk322x_loader_v1.10.238_256.bin Downloading bootloader succeeded. ./rkdeveloptool ul rk322x_loader_v1.10.238_256.bin Upgrading loader succeeded. ./rkdeveloptool wl 0x0 backup.data Write LBA from file (100%) Download here: Erase the flash memory: clearing the internal eMMC/NAND memory makes the SoC look for external SD Card as first boot option. If there isn't any suitable SD Card, the SoC enters maskrom mode, which can then be used for full eMMC/NAND access using rkdeveloptool. This is perfectly fine if your box has an eMMC flash memory. NOTE: In case you have a NAND flash memory this option is however discouraged. The original bootloader contains some special parameters to correctly access the data. Clearing the flash memory will probably garbage the NAND data and restoring the bootloader may require some special instructions. Obtain a copy of rkdeveloptool: a compiled binary is available in the official rockchip-linux rkbin github repository. If you prefer, you can compile it yourself from the sources available at official rockchip repository Unplug the power cord from the board Plug an end of an USB Male-to-male cable into the OTG port (normally it is the lone USB port on the same side of the Ethernet, HDMI, analog AV connectors) while pressing the reset microbutton with a toothpick. You can find the reset microbutton in a hole in the back of the box, but sometimes it is hidden into the AV analog jack Plug the other end of the USB Male-to-male cable into an USB port of your computer If everyting went well, using lsusb you should see a device with ID 2207:320b run ./rkdeveloptool ef and wait a few seconds once done, the internal eMMC is erased and the device will boot from the sdcard from now on Partecipation and debugging: If you want to partecipate or need help debugging issues, do not hesitate to share your experience with the installation procedure of the boxes. In case of issues and missed support, provide as many as possible of these things is very useful to try and bring support for an unsupported board: some photos of both sides of the board. Details of the eMMC, DDR and Wifi chips are very useful! upload the device tree binary (dtb) of your device. We can understand a lot of things of the hardware from that small piece of data; and alternative is a link to the original firmware (you can do a full backup with the Multitool); dmesg and other logs (use armbianmonitor -u that automatically collects and uploads the logs online) attach a serial converter to the device and provide the output of the serial port; Critics, suggestions and contributions are welcome! Credits: @fabiobassa for his ideas, inspiration, great generosity in giving the boards for development and testing. The project of bringing rk322x into armbian would not have begun without his support! Justin Swartz, for his work and research to bring mainline linux on rk3229 (repository here) @knaerzche for his great contribution to libreelec support and mainline patches @Alex83 for his patience in testing the NAND bootloader upgrade procedure on his board @Jason Duhamell for his generous donation that allowed researching eMCP boards and esp8089 wifi chip
-
 I gonna use Banana Pi instead of Orange Pi in my phandomate. It's social project to improve our environment through recycling. Lets see video in telegram channel https://t.me/avto_yar . It can work without electronics, but people wanna have statistics, cash back, monitoring and other. I added microcomputer. I improve it. It's so cheap device.
 -
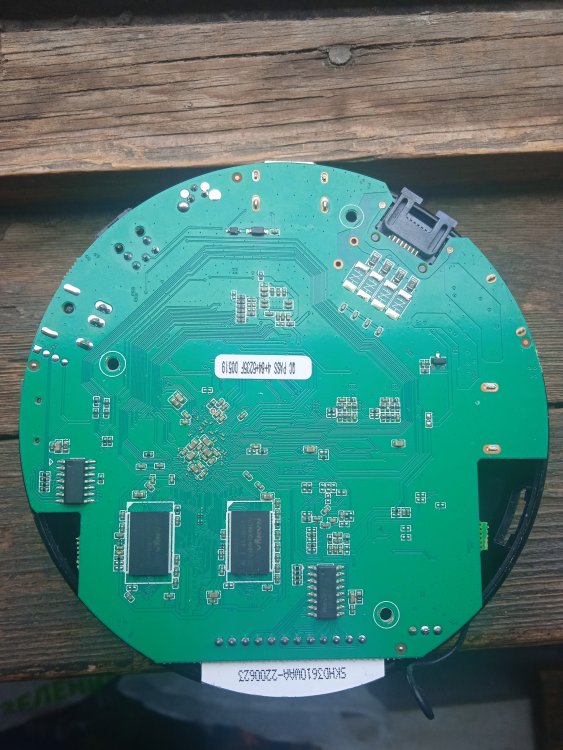
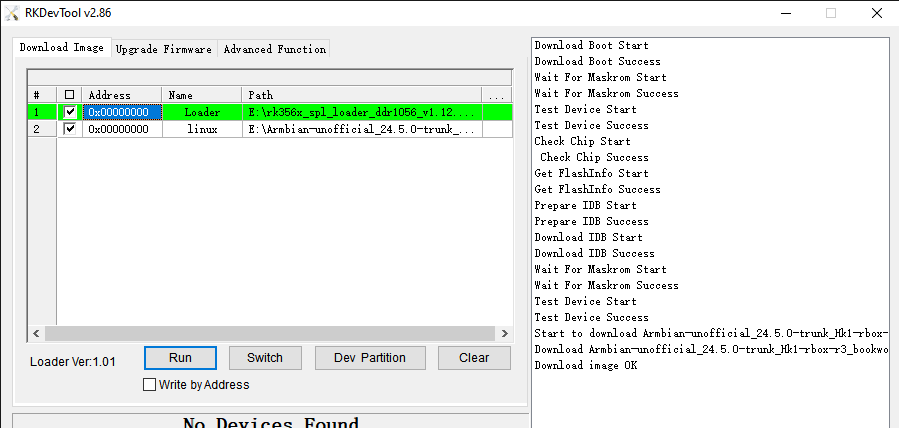
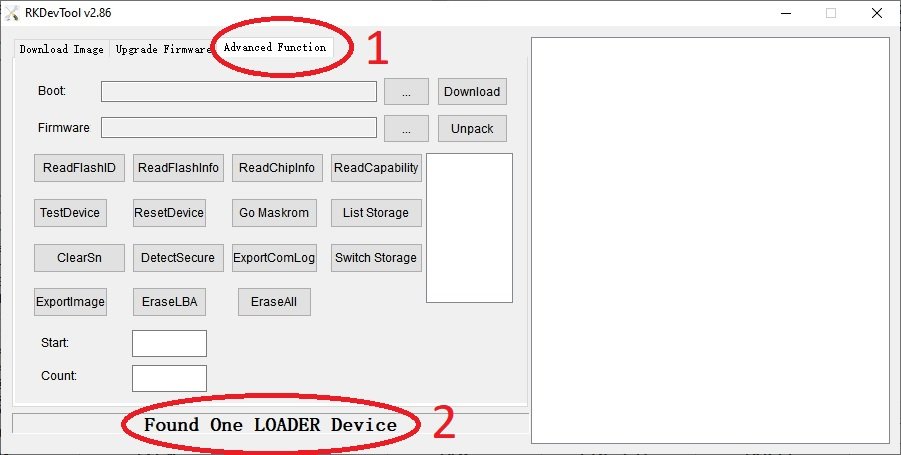
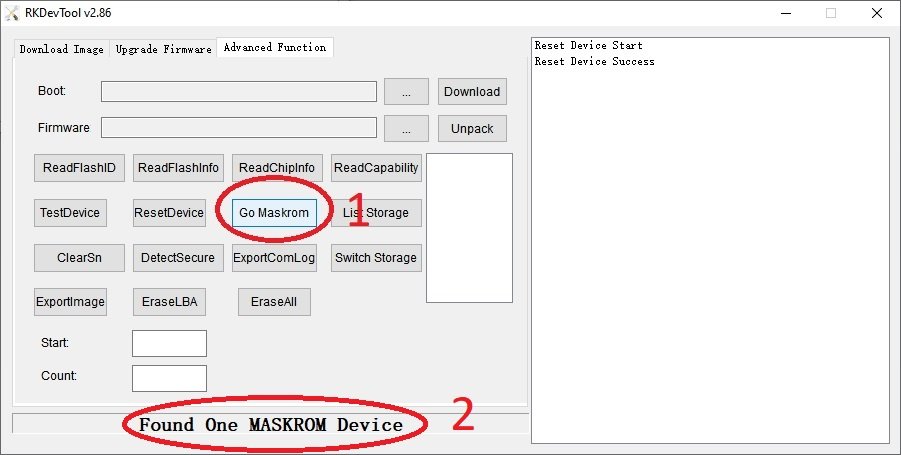
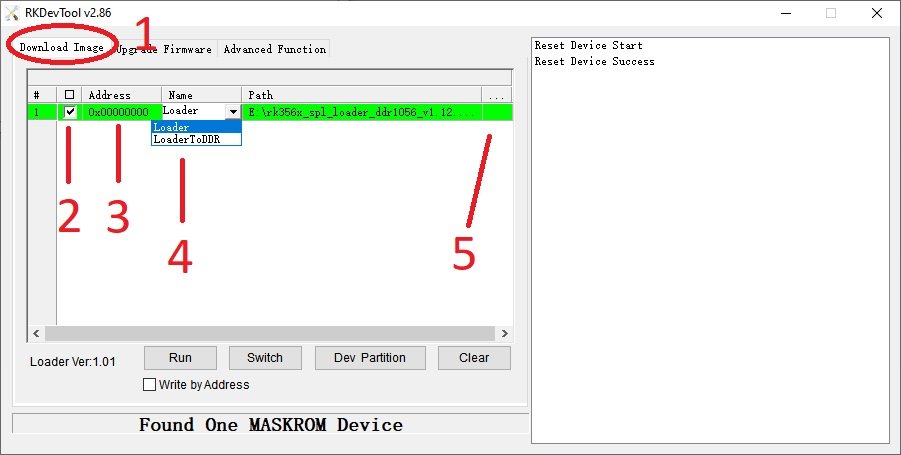
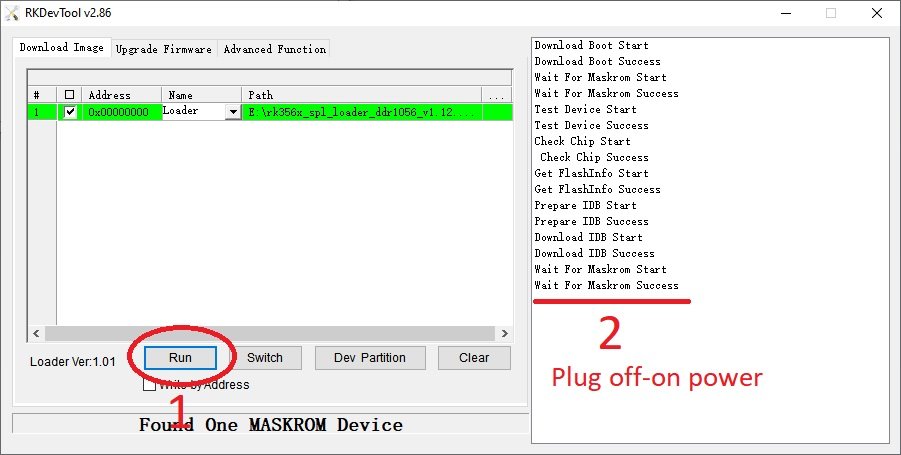
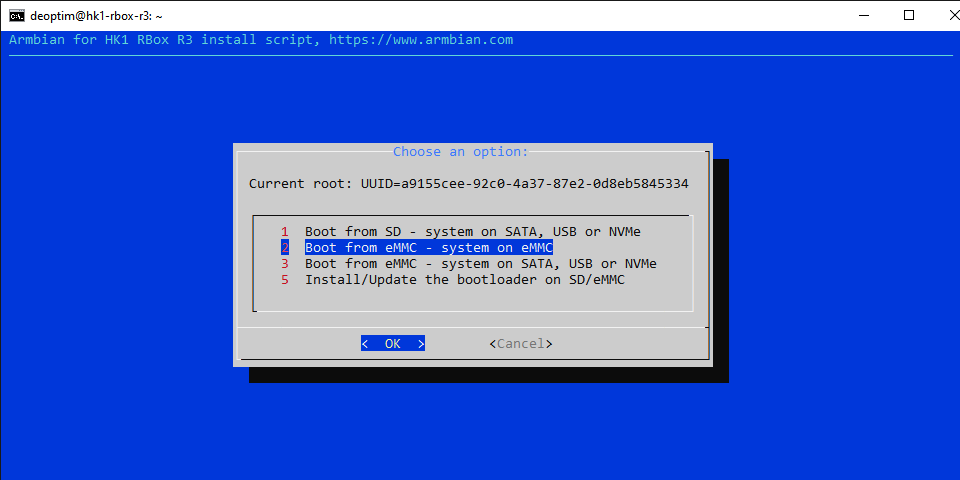
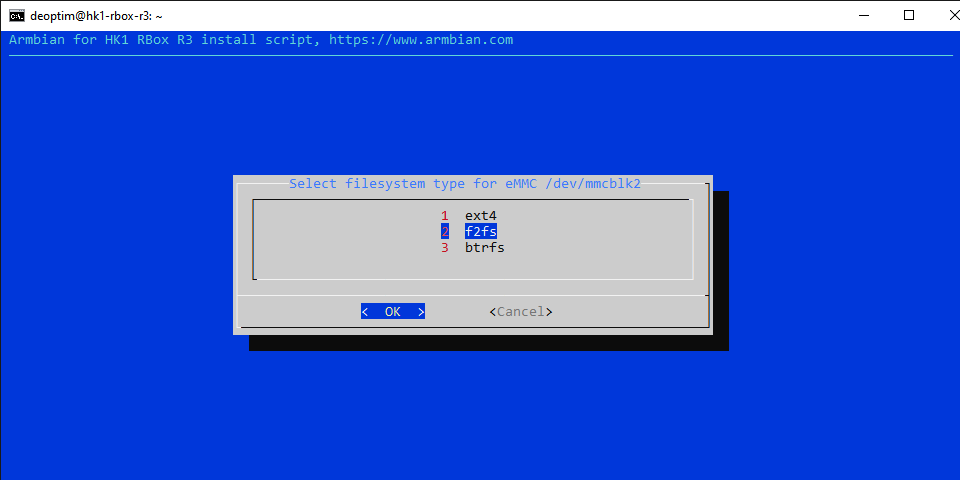
 Armbian 24.5.0 Bookworm images (linux-6.1/linux-6.6) for TVBoxes: Vontar KK MAX / HK1 RBOX R2 / HK1 RBOX R3 (the same dts/dtb should work for these TVBoxes) Here is a dts and dtb files, working reworked for mainline: hk1-rbox-r3-profile-kernel-6.1-6.6.zip (original dts and dtb from TVBox rk-kernel-orig.zip) Checked the following: HDMI - works (need to check hot plugging) HDMI sound - works USB 2.0 - works USB 3.0 - works SPDIF - should work (I cannot to check) SD-Card booting and detection - works eMMC install on it (/sbin/nand-sata-install) and detection - works RKDevTool installing and loading images on/from eMMC - works GPU (bugs/frizzes on mainline are not canceled) - works Hardware video acceleration(except for browsers) - works Dualboot if you flash new bootloader (SD-Card boot high priority) - works Here are the compiled Armbian images (Bookworm only) with integrated dtb: https://www.mediafire.com/file/4dwf7ce922x7obq/Armbian-unofficial_24.5.0-trunk_Hk1-rbox-r3_bookworm_current_6.1.87_cinnamon_desktop.img.xz/file https://www.mediafire.com/file/fjwtxb5gjzip341/Armbian-unofficial_24.5.0-trunk_Hk1-rbox-r3_bookworm_current_6.1.87_minimal.img.xz/file https://www.mediafire.com/file/iuz4uijgjh5ry1r/Armbian-unofficial_24.5.0-trunk_Hk1-rbox-r3_bookworm_current_6.6.28_cinnamon_desktop.img.xz/file https://www.mediafire.com/file/kofyqabr5k6qxm8/Armbian-unofficial_24.5.0-trunk_Hk1-rbox-r3_bookworm_current_6.6.28_minimal.img.xz/file The one of this box itself is HK1 RBOX R3, the photo shows the pins for short to go to the Maskrom bootloader and UART pins: A working bootloader(supports dualboot) on this hardware for RKDevTool tool just in case: Loader.zip Please note that RKDevTool flashing utility only needs to flash the .img file with the bootloader, i.e. you need to unpack the .xz archive somewhere first (for ex. you can use 7-zip). -- Recommendations for installation on eMMC ---------------------------------------------------- For those who want to build Armbian themselves, here are the instructions: UPD: Added to images "f2fs-tools" package, added loader to support dualboot without touching the original Android(or other OS) image on eMMC - priority is given to SD-Card. Boot will be from SD-Card if there is on boot partition exist folder and file \boot.scr or extlinux\extlinux.conf - uboot(both: original Android and compiled for Armbian) searches for this path and file if it found this file, it will load from device which contains this file. mmc1(SD-Card) - first, mmc0(eMMC) - second. For correct priority loading it is necessary to replace the main bootloader which is in the archive Loader.zip - if you have an Android it is enough to flash only this bootloader as Loader at 0x0 offset using RKDevTool utility, the rest of the eMMC part should not be touched if the OS and settings we need are there. U-boot on eMMC must be original or Armbian and preinstalled at offset 0x4000. Instructions: (remember, uboot must be on eMMC (even the original Android or Armbian, i.e. if you erase the eMMC - the boot will not work) and this is relevant if you have installed the original MiniLoaderAll.bin, which does not support booting from SD-Card, but only from eMMC. Some TVBoxes may already have a bootloader that supports SD-card booting.). Feel free to test...
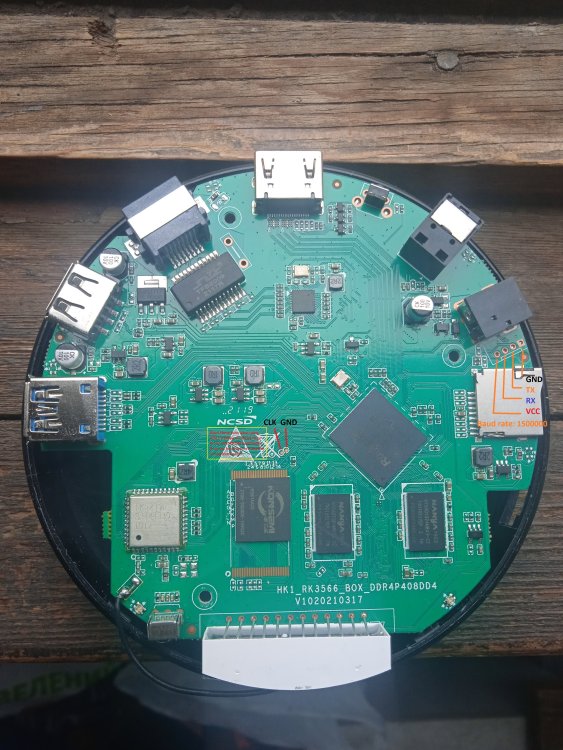
-
DISCLAIMER (PLEASE READ): everything you can find in this thread (binaries, texts, code snippets, etc...) are provided AS-IS and are not part of official Armbian project. For this reason not people from Armbian project nor myself are responsible for misuse or loss of functionality of hardware. Please don't ask about support or assistance in other non-community forums nor in the official Armbian github repository, instead post your questions in this thread, in the TV Boxes forum section (hardware related) or in the Peer-to-peer support section (general linux/software related). Thank you! This thread is to give stable and mature long-term range support to rk3318/rk3328 found in many tv boxes in Armbian project as Community Supported Configuration (CSC). The current work is mainlined into Armbian project, but your mileage may vary; most recent developments live on my personal fork on github -> here <- Important notes: is just a personal opinion, but apparently widely supported, that rk3318 chip is not an official rockchip part. They probably are scrap rk3328 parts which have not passed conformance tests but are sold anyway to tv boxes manufacturers. They don’t reach the same operating frequency of the rk3328, have much higher leakage currents (and thus higher temperatures) and often the boards they are installed on are low quality with low quality components, in fact a very very common issue is the eMMC failure due to bad parts and bad soldering. So said, I personally suggest not to buy any rk3318 tv box, but instead find a properly supported SBC (Single Board Computer) if you need a reliable product. In the unfortunate case you already have such product, this thread may help you have some fun with them. What works: • Works on RK3318 and RK3328 TV boxes with DDR3 memories • Mainline u-boot • Mainline ATF provided as Trusted Execution Environment • All 4 cores are working • Ethernet • Serial UART (configured at stock 1.5Mbps) • Thermals and frequency scaling • OTG USB 2.0 port (also as boot device!) • EHCI/OHCI USB 2.0 ports and XHCI USB 3.0 ports • MMC subsystem (including , SD and sdio devices) • Hardware video acceleration (fully supported via RKMPP on legacy kernel, support via hantro and rkvdec kernel driver on mainline) • Various WIFI over SDIO are supported • Full acceleration on legacy kernel and mainline kernel • U-boot boot order priority: first the sdcard, then the USB OTG port and eventually the internal ; you can install u-boot (and the whole system) in the internal and u-boot will always check for images on external sdcard/USB first. Unbrick: Technically, rockchip devices cannot be bricked. If the internal flash does not contain a bootable system, they will always boot from the sdcard. If, for a reason, the bootable system on the internal flash is corrupted or is unable to boot correctly, you can always force the maskrom mode shorting the clock pin on the PCB. The procedure is explained here for rk322x, but for rk3318/28 is the same. In most of the rk3318/28 boards, shorting the clock pin is difficult or impossible because eMMC are BGA chips with no exposed pins. Pay double attention when burning something on the internal flash memory and always test first the image booting from the sdcard to be sure it works before burning anything in internal flash. This is a list of posts where forum users have been able to spot the eMMC clock pin to trigger the maskrom mode: H96 Max+ (board signature: RK3318_V1.4) by @Gausus X88 PRO 10 (board signature: X88_PRO_B) by @mathgaming Ninkbox N1 Max RK3318 by @enigmasphinx Partecipation and debugging: If you want to partecipate or need help debugging issues, do not hesitate to share your experience with the installation procedure of the boxes. In case of issues and missed support, provide as many as possible of these things is very useful to try and bring support for an unsupported board: some photos of both sides of the board. Details of the eMMC, DDR and Wifi chips are very useful! upload the device tree binary (dtb) of your device. We can understand a lot of things of the hardware from that small piece of data; and alternative is a link to the original firmware (you can do a full backup with the Multitool); dmesg and other logs (use armbianmonitor -u that automatically collects and uploads the logs online) attach a serial converter to the device and provide the output of the serial port; Multimedia: Mainline kernel: 3D acceleration is provided by Lima driver and is already enabled. Hardware video decoding: https://forum.armbian.com/topic/19258-testing-hardware-video-decoding-rockchip-allwinner/ Legacy kernel: If you need multimedia features, like OpenGL/OpenGL ES acceleration, hardware accelerated Kodi, ffmpeg and mpv you can take a look to this post Installation (via SD card): Building: You can build your own image follow the common steps to build armbian for other tv boxes devices: when you are in the moment to choose the target board, switch to /TVB/ boards and select "rk3318-box" from the list. Prebuilt images: Archived images - built by Armbian servers and GPG-signed: https://imola.armbian.com/dl/rk3318-box/archive/ Nightly stables - built from trunk by Armbian servers and GPG-signed: https://github.com/armbian/community Stables provided by me (unsigned): https://users.armbian.com/jock/rk3318/ Multitool: Multitool - A small but powerful image for RK3318/RK3328 TV Box maintenance. Download it from here Quick installation instructions on eMMC: Build or download your preferred Armbian image and a copy of the Multitool; Burn the Multitool on an SD card; once done, place the Armbian image in images folder of the SD card NTFS partition; Plug the SD card in the TV box and plug in the power cord. After some seconds the blue led starts blinking and the Multitool appears; OPTIONAL: you can do a backup of the existing firmware with "Backup flash" menu option; Choose "Burn image to flash" from the menu, then select the destination device (usually mmcblk2) and the image to burn; Wait for the process to complete, then choose "Shutdown" from main menu; Unplug the power cord and the SD card, then replug the power cord; Wait for 10 seconds, then the led should start blinking and HDMI will turn on. The first time the boot process will take a couple of minutes or more because the filesystem is going to be resized, so be patient and wait for the login prompt. On first boot you will be asked for entering a password for root user of your choice and the name and password for a regular user Run rk3318-config to configure the board specific options Run armbian-config to configure timezone, locales and other personal options Congratulations, Armbian is now installed! Despite the procedure above is simple and reliable, I always recommend to first test that your device boots Armbian images from SD Card. Due to the really large hardware variety, there is the rare chance that the images proposed here may not boot. If a bad image is burned in , the box may not boot anymore forcing you to follow the unbrick section at the top of this post. Quick installation instructions to boot from SD Card: If you are already running Armbian from eMMC, skip to the next step. Instead if you are running the original firmware you need to first erase the internal flash; to do so download the Multitool, burn it on an SD Card, plug the SD Card and power the TV Box. Use "Backup flash" if you want to do a backup of the existing firmware, then choose "Erase flash" menu option. Build or download your preferred Armbian image; Uncompress and burn the Armbian image on the SD Card; Plug the SD Card in the TV Box and power it on; Wait for 10 seconds, then the led should start blinking and HDMI will turn on. The first time the boot process will take a couple of minutes or more because the filesystem is going to be resized, so be patient and wait for the login prompt; On first boot you will be asked for entering a password for root user of your choice and the name and password for a regular user Run rk3318-config to configure the board specific options Run armbian-config to configure timezone, locales and other personal options, or also to transfer the SD Card installation to internal ; Congratulations, Armbian is running from SD Card! Tutorial - How to install Armbian on your TV Box (by @awawa) : https://www.hyperhdr.eu/2022/01/tv-box-mania-i-part-x88-pro-10.html A note about boot device order: With Armbian also comes mainline U-boot. If you install Armbian, the bootloader will look for valid bootable images in this order: External SD Card External USB Stick in OTG Port Internal The Multitool does not boot / How to burn image directly on eMMC: Some boards have the sdcard attached to an auxiliary (called also sdmmc_ext or external) controller which is not the common one. Forum findings declare that those boards are not able to boot from sdcard with stock firmware and they neither do in maskrom mode: the stock firmware always boots even if you put the multitool on sdcard. In such case, burning images directly on eMMC is the only way to have a working Armbian installation. You can follow these instructions by @fabiobassa to burn images directly on eMMC: https://forum.armbian.com/topic/17597-csc-armbian-for-rk3318rk3328-tv-box-boards/?do=findComment&comment=130453 Notes and special hardware: Script to change DDR memory frequency here Wireless chip AP2734, SP2734, HY2734C and similars: they are clones of AmPAK AP6334 which is combo wifi + bluetooth of broadcom BCM4334/B0 chips. You may need a special nvram file, instructions by @paradigman are here Critics, suggestions and contributions are welcome! Credits: @fabiobassa for his ideas, inspiration, great generosity in giving the boards for development and testing. The project of bringing rk3318 into armbian would not have begun without his support! @hexdump for his precious support in early testing, ideas and suggestions @MX10.AC2Nfor his patience in testing mxq-rk3328-d4 board support All the rockhip64 maintainers at Armbian project who have done and do most of the work to support the platform
-
 Hi guys, its the first time im gonna post here so bear with me, i am a recent user of orange pi zero 3, one with 4GB RAM and i have been able to run the latest community release on it, things work besides audio thru hdmi, but i have noticed that the video encoding and decoding is not working, albeit 3d acceleration works thru panfrost and Mesa. I have been digging this topic and i wanted to share what i found and maybe validate if im right or perhaps i am not getting this well. 1. Video encoding and decoding in G31-MP2 is something separated from what Mesa and panfrost would do, so even if those work i cant get video acceleration with h.264 etc. 2. It is possible because the android 12 TV version from the manufacturer can do it in a very easy way, but as far as i understood this is because it is using some kind of closed source driver, that the SoC manufacturer provided (that almost all the boards made with the allwinner H616/H618 would run, so it isnt like orange pi dedicated developers to create the android being offered but it is a stock stuff that Allwinner has available for whoever buys their chips) 3. There are efforts to reverse engineer this properly called CEDRUS but there is kind of a lack of information about them since 2019, it is supposedly present in the kernel, but as many others have said and tried for some reason is not working with H616//h618. Anyone knows if it is still being developed? In conclusion the state of things with hardware decoding and encoding of video in ARM is like a wasteland, at least for linux, these chips, ARM chips we get are mostly developed for android TV boxes or TVs or tablets, but they do not develop for linux, that maybe transferring the necessary code to make it work could be trivial, but with thin resources and doing the bare minimum and being closed source the SoC manufacturer has no interest in creating this support and it is left to open source volunteers to find a way. Which means that support for the H616/H618 might come several years into the future perhaps never. Am I interpreting reality right?, i had some hopes to create something like a jellyfin box with accelerated hardware coding and decoding but nothing might be possible, there is maybe some hope, i read somewhere in the LibreELEC forums that someone made it possible to run it with video decoding (if i am not mistaken) with no audio, so perhaps someone found a way?, thanks in advance.
 -
I have install armbian version 10 on this box. Did watch video for some time, no issues except remote who do not only mine box but satelite receiver also, and this do then crash. I have a new remote who can be adjusted on mucho boxes and dvd, tv enc. but did not manage to let it work on this RT box (mxq pro). Oke I did watch video and encode some in H265, but get not such small files als with H264 in handbrake, I do use hardware encoding with videocard, I need stil to install new computer board with a intel I7 but has not yet the time so I can try the intel hardware encoder who seems to be better... The video has much artifacts, special color screens and darknes, clouds. The videobox I have for years now the Elvira Xtreamer has not this artifacts on that same encoded H264 video while armbian has, The RT29** box do have a lot artfacts in dark scenes, sound do loud bang in the amplifier when boot, need to watch out with this, but that is not because of armbian but hardware of these cheap boxes.. Short, the H265 decoder on chip does a bad job, or the version of armbian has issues, and then I think special with the videoplayer, I can also just have 1280 x 720 max in armbian setup, or there is a software active who recode video on the fly for adjust screen dimensions?. I do not now. someone has experience with this?. regards
-

Efforts to develop firmware for H96 MAX V56 RK3566 8G/64G
pessimism replied to Hqnicolas's topic in Rockchip CPU Boxes
A thank you to @Hqnicolas and success report. Did a trunk build with kernel 6.6 and flashed using rkdevtool and your instructions (had a little trouble finding the required H96-MAX-8gb-MiniLoaderAll.bin buried in the threads), and it worked like a charm. I did need to supply an NVRAM file for the wifi adapter, that is missing from your wifi bringup instructions. I found one in the libreelec repo that did not work, I ended up extracting the factory image from the h96max website and grabbing the stock nvram_bcm4335.txt, renaming to brcmfmac4335-sdio.txt and placing in /lib/firmware/brcm. Once that was done, wireless worked. Display works, HDMI audio works, video acceleration sort of works but drops frames under any load and throws audio sync warnings, i chock that up to hantro not being as developed as rkvdec2? Chromium appears to have acceleration too. Great result for a first try trunk build. cd /lib/firmware/brcm/ sudo wget https://github.com/CoreELEC/brcmfmac_sdio-firmware-aml/raw/master/firmware/brcm/fw_bcm4335b0_ag.bin sudo ln -s fw_bcm4335b0_ag.bin brcmfmac4335-sdio.h96-TVbox,rk3566.bin sudo cat > /lib/firmware/brcm/brcmfmac4335-sdio.txt << "EOF" # bcm94335wlcspMS_ES50_RC171p24p23_04052013_AM_mdfy_PAparam.txt -- 4/5/2013 by Murata, based on bcm94335wlcspMS_ES50_RC171p24p20_04022013_AM.txt, changed PA parameters and txidxcap parameters and ccode. # bcm94335wlcspMS_ES50_RC171p24p20_04022013_AM.txt -- 4/2/2013 by Broadcom Corporation # Use with AARDVARK_REL_6_30_171_24_23 -- Murata BCM4335 WLCSP 11AC Module # Sample variables file for Murata Type-XJ ES5.0 (0x00 0x11) -- bcm94335wlcspMS_AM_P400.txt as original sromrev=11 boardrev=0x1500 boardtype=0x064b boardflags=0x10401001 boardflags2=0x0 #updated boardflags3 for forcing to enable external LPO boardflags3=0x0800c08b macaddr=00:90:4c:c5:12:38 #ccode modified by Murata #ccode=0 ccode=XS regrev=0 antswitch=0 pdgain5g=1 pdgain2g=1 tworangetssi2g=0 tworangetssi5g=0 femctrl=4 vendid=0x14e4 devid=0x43ae manfid=0x2d0 #prodid=0x052e nocrc=1 #otpimagesize=502 xtalfreq=37400 extpagain2g=1 extpagain5g=1 rxgains2gelnagaina0=2 rxgains2gtrisoa0=6 rxgains2gtrelnabypa0=1 rxgains5gelnagaina0=3 rxgains5gtrisoa0=5 rxgains5gtrelnabypa0=1 rxchain=1 txchain=1 aa2g=1 aa5g=1 ag0=0 ag1=0 tssipos5g=1 tssipos2g=1 #PA parameters (2G20M/2G40M/5G20M/5G40M/5G80M) #PA parameters modified by Murata #pa2ga0=-208,6208,-764 #pa2ga1=-203,6429,-793 #pa5ga0=-167,5736,-685,-157,5669,-670,-157,5548,-665,-141,5621,-664 #pa5ga1=-101,6543,-735,-99,6452,-731,-147,5743,-695,-75,6468,-723 #pa5ga2=-172,5903,-708,-160,5868,-698,-113,6264,-722,-125,5915,-684 pa2ga0=0xff31,0x1759,0xFD1D pa2ga1=0xff35,0x18BB,0xFCEC pa5ga0=0xff78,0x1715,0xFD49,0xff89,0x1714,0xFD57,0xff86,0x1652,0xFD62,0xffa9,0x1760,0xFD5E pa5ga1=0xff56,0x1596,0xFD5F,0xff88,0x1764,0xFD45,0xff89,0x1632,0xFD65,0xff69,0x160E,0xFD49 pa5ga2=0xff5a,0x1667,0xFD4E,0xff5f,0x15F7,0xFD5E,0xff5a,0x1531,0xFD68,0xff6e,0x1587,0xFD6A # Default Target Power for 2G -- 17dBm(11)/14dBm(54)/13dBm(MCS7,MCS8)/16dBm(6,MCS0) maxp2ga0=74 cckbw202gpo=0 cckbw20ul2gpo=0 dot11agofdmhrbw202gpo=0x6666 ofdmlrbw202gpo=0x0022 mcsbw202gpo=0x88866662 # Default Target Power for 5G -- 14dBm(54)/13dBm(HT20-MCS7,VHT20-MCS8)/12dBm(HT40-MCS7,VHT40-MCS9)/11dBm(VHT80-MCS8/MCS9)/16dBm(6,20HT-MCS0) maxp5ga0=74,74,74,74 # Low mcslr5glpo=0 mcsbw205glpo=0x88866662 mcsbw405glpo=0xAAA88884 mcsbw805glpo=0xCCCAAAA6 # Mid mcslr5gmpo=0 mcsbw205gmpo=0x88866662 mcsbw405gmpo=0xAAA88884 mcsbw805gmpo=0xCCCAAAA6 # High mcslr5ghpo=0 mcsbw205ghpo=0x88866662 mcsbw405ghpo=0xAAA88884 mcsbw805ghpo=0xCCCAAAA6 #20MHz High Rate sb20in40hrpo=0x0 sb20in80and160hr5glpo=0x0 sb20in80and160hr5gmpo=0x0 sb20in80and160hr5ghpo=0x0 #40MHz High Rate sb40and80hr5glpo=0x0 sb40and80hr5gmpo=0x0 sb40and80hr5ghpo=0x0 #20MHz Low Rate sb20in40lrpo=0x0 sb20in80and160lr5glpo=0x0 sb20in80and160lr5gmpo=0x0 sb20in80and160lr5ghpo=0x0 #40MHz Low Rate sb40and80lr5glpo=0x0 sb40and80lr5gmpo=0x0 sb40and80lr5ghpo=0x0 dot11agduphrpo=0x0 dot11agduplrpo=0x0 tssifloor2g=80 tssifloor5g=160,190,240,260 #rpcal:use with 171.17 or later, compensates filter ripple rpcal2g=0x0 rpcal5gb0=0x0 #cckdigfilttype[0-7] 0:default cckdigfilttype=2 phycal_tempdelta=25 #GPIO 0 for SDIO HW OOB interruption muxenab=0x10 #sd_gpout=0 #sd_oobonly=1 rssicorrnorm_c0=-3,-2 rssicorrnorm5g_c0=-1,0,-3,-1,0,-3,-3,-2,-4,-3,-2,-4 #txidxcap2g and txidxcap5g modified by Murata #txidxcap2g=32 #txidxcap5g=44 txidxcap2g=36 txidxcap5g=36 paparambwver=1 EOF sudo rmmod brcmfmac_wcc brcmfmac brcmutil modprobe brcmfmac brcmfmac4335-sdio.txt -
@amazingfate I have one problem with the netflix addon though. It displays a green overlay "fog". Everything else works, I have the Amazon VOD addon working, the Disney+ addon works, I can play H264 as well as 4K HEVC videos with hardware acceleration. Does anyone expierence the same with Netflix? Another thing is, that I have only one working rock 5b image. I have created it myself from armbian with the legacy kernel 5.10.160 as I need custom gpio overlays for using an IR receiver where the driver needs to be activated in the kernel. After that I installed everything based on the howtos for the Rock 5b. I built MPP, RGA, FFMPEG and Kodi and got real nice hardware accelleration. I could, however, never reproduce it to create a current how to. I tried using an edge kernel where the UARTs are supposed to be working and other features should be enabled, but when I start Kodi in a Wayland session I get this: with the following errors in syslog: May 3 12:03:02 rock-5b kernel: [ 185.881239] rockchip-drm display-subsystem: [drm] *ERROR* POST_BUF_EMPTY irq err at vp0 May 3 12:03:02 rock-5b kernel: [ 185.881258] rockchip-drm display-subsystem: [drm] *ERROR* POST_BUF_EMPTY irq err at vp0 May 3 12:03:02 rock-5b kernel: [ 185.881265] rockchip-drm display-subsystem: [drm] *ERROR* POST_BUF_EMPTY irq err at vp0 May 3 12:03:02 rock-5b kernel: [ 185.881271] rockchip-drm display-subsystem: [drm] *ERROR* POST_BUF_EMPTY irq err at vp0 May 3 12:03:02 rock-5b kernel: [ 185.881278] rockchip-drm display-subsystem: [drm] *ERROR* POST_BUF_EMPTY irq err at vp0 May 3 12:03:02 rock-5b kernel: [ 185.881284] rockchip-drm display-subsystem: [drm] *ERROR* POST_BUF_EMPTY irq err at vp0 May 3 12:03:02 rock-5b kernel: [ 185.881299] rockchip-drm display-subsystem: [drm] *ERROR* POST_BUF_EMPTY irq err at vp0 May 3 12:03:02 rock-5b kernel: [ 185.881306] rockchip-drm display-subsystem: [drm] *ERROR* POST_BUF_EMPTY irq err at vp0 May 3 12:03:02 rock-5b kernel: [ 185.881312] rockchip-drm display-subsystem: [drm] *ERROR* POST_BUF_EMPTY irq err at vp0 May 3 12:03:02 rock-5b kernel: [ 185.881319] rockchip-drm display-subsystem: [drm] *ERROR* POST_BUF_EMPTY irq err at vp0 May 3 12:03:07 rock-5b kernel: [ 190.882731] vop2_isr: 198389 callbacks suppressed I don't know what the difference is. I also get that behaviour using the same base image that is working in a new install. Up to now I did not find anything usefull with google or here in the forums. Maybe someone has seen it and can point me somewhere. Thanks Peter


-
These instructions are for Amlogic CPUs for TV Boxes. Note: If you have previously run other distributions on the box such as coreelec the below installation will not work. You will need to restore the original android firmware before attempting the install. coreelec changes the boot environment in ways that are incompatible with these Armbian builds. Download links: Weekly Community Rolling Builds: https://www.armbian.com/amlogic-s9xx-tv-box/ or build your own image using the Armbian build framework Once you download your chosen build, you need to burn the image to an SD card. Generally balenaEtcher is recommended as it does a verification of the burn. Also be sure to use high quality SD cards. Once you have the SD card with your chosen build, then you need to edit the boot configuration file on the SD card. In the BOOT partition of the SD card there will be a file /boot/extlinux/extlinux.conf, that you need to edit. There will also be a extlinux.conf.template file to use as a reference. You will need to add a line into the extlinux.conf file for the Device Tree (dtb) file you will be using for your box. Place this line before the APPEND line as shown in the .template file. Basically you need to have the correct dtb for your box. You may need to attempt to use different dtb files until you find the one that works the best for your box's hardware (there are a bunch of dtb files in /boot/dtb/amlogic/... to try depending on your cpu architecture and hardware). It is unlikely that there will be a matching dtb file for your TV box. The idea is to find the one that works best for your box. This may mean that you try booting with different dtb files until you fine one that works good enough for your needs. By searching the forums you will find information about what dtbs other users have found work best for different boxes. Because you are booting from an SD card, you can easily try different dtb files. The dtd files are named by cpu family. So for example dtb files for the s905x2 cpu are named meson-g12a-*. Below there is a table that shows the identifiers for each familiy (g12a for s905x2 in this case). Next you need to copy the correct uboot for your box. This is needed for how these builds boot on amlogic boxes. There are four different u-boot files located in the /boot directory: u-boot-s905, u-boot-s905x-s912, u-boot-s905x2-s922, u-boot-s905x3 You need to copy (note copy not move) the u-boot file that matches your cpu to a new file named u-boot.ext in the /boot directory So for example with a TX3 mini box that has an s905w cpu you would copy u-boot-s905x-s912 to u-boot.ext: cp u-boot-s905x-s912 u-boot.ext (See table below for more details on which u-boot to use for which cpu) Once you have your SD card prepared you need to enable multiboot on the box. There are different ways documented to do this, but the most common is the "toothpick" method. The "toothpick" method means to hold the reset button while applying power to the box. The reset button is often hidden and located at the back of the audio/video jack connector. By pressing that button with a toothpick or other such pointed device you can enable multiboot. What you need to do is have the box unplugged, have your prepared sd card inserted, then press and hold the button while inserting the power connector. Then after a bit of time you can release the button. (I don't know exactly how long you need to hold the button after power is applied, but if it doesn't work the first time try again holding for longer or shorter times). You should now be booting into armbian/linux. Note that the first boot takes longer as it is enlarging the root filesystem to utilize the entire SD card. After you are satisfied that your box is working correctly for your needs you can optionally copy the installation from the SD card to internal emmc storage (assuming your box has emmc). (Note: Installing to emmc has some risks of bricking your box. Don't do this unless you feel you understand how to reinstall your box's android firmware) You install armbian to emmc by running the shell script in the /root directory: install-aml.sh. Note: It is not possible to install into emmc on boxes with the s905 cpu (s905x, s905w, s905x2, etc however should all be supported). It is recommended that you make a backup of emmc first. Also be prepared if anything goes horribly wrong with your emmc install to reinstall the android firmware using the Amlogic USB Burning Tool to unbrick your device. If you have or can find an original android firmware on the internet and you can generally (but not always) recover a bricked box using the Amlogic tool and the original firmware file. Mapping from CPU to uboot and dtb: u-boot-s905 s905 - gxbb u-boot-s905x2-s912 S905X - gxl S905W - gxl S905D - gxl S905L - gxl S805X - gxl S912 - gxm A311D - gxm u-boot-s905x2-s922 S905X2 - g12a S922 - g12b u-boot-s905x3 S905X3 - sm1 Not supported or not tested S805 - S905W2 - S905X4 - S805X2 - s4 A113D - axg A113X - axg Note: Followup posts in this thread should be limited to comments to improve or better understand these instructions. Other issues should be posted as new questions in the Amlogic CPU Boxes sub-forum.
-
Hello, I find armbian awesome and my problem is because of the manufacurers. I basically want to play accelerated video (because I need 4k). I tried amlogic, but it is not still supported (https://linux-meson.com/hardware.html) the status is partial for the chips I tried. I don't what "partial" means but I can hardware decoding. I also tried allwinner, several chips. In this page https://linux-sunxi.org/Sunxi-Cedrus I see that it is supported but I tried with new kernels, old kernels... Nothing worked. I always reach a point that stops me (like segmentation fault when loading sunxi modules, system freeze when using vdpau, compilation errors due incompatibility between version...) I was thinking of try some rockchip but I think that I will suffer the same pain so this is why I want to ask you guys because I am a bit lost and I am starting to think that everything I try is worthless. Can someone bring me some light? Any tip about what chips are more "friendly" with video acceleration and, if mainline kernel or not, player to use... All the documentation/posts I found are outdated or incomplete and this is the reason I am writing this post, because I am not able to find more information. I know that the manufacturers does not help and everything we have is due the awesome work of the community. It is complicated stuff. Any kind of information will be very helpful. Thanks
-
ey i have a SDMC DV8040 stb ,SoC-Amlogic S805X,CPU-Quad-core 1.2 GHz,GPU-ARM Mali-450,RAM-1GB,Storage-8GB it currently runs custom made android 9 i want to install Armbian linux to it .. i tried almost every youtube video methods to install but none of them worked .. but i was able to serial communicate with it but functions are limited ..please help me
-
 🏆 Become a sponsor, help to add other boards in armbian standart, you don't need to be a programmer to help the community, just need a copy of the ARM BOARD and a x86 computer to compile new versions. If you like what you see here and want to help: Donate Armbian the like button only costs a few dollars. Armbian Needs you help! H96 MAX V56 RK3566 8gb Ram SD-Card unofficial images: Tutorial SD-Card Version v0.5 DEBIAN12 BETA unofficial Tutorial SD-Card Version v0.5 ARMBIAN23 BETA unofficial H96 MAX V56 RK3566 8gb EMMC Chainloader to mainline HotnikQ unofficial images: Tutorial EMMC Version V0.7 ARMBIAN23 BETA unofficial H96 MAX V56 RK3566 8gb EMMC Mainline Boot Hzdm unofficial images: Tutorial EMMC Version v0.8 ARMBIAN unofficial Armbian 23.08.0 Jammy Kernek 6.2 Desktop v0.8 Beta unofficial H96 MAX V56 RK3566 8gb EMMC Mainline Boot Hzdm unofficial images: Tutorial EMMC Version v0.9 ARMBIAN BETA unofficial Debian 12 BookWorm Kernel 6.2 Server v0.9 unofficial Beta Armbian 23.11 Jammy Kernel 6.2 Server v0.9 unofficial Beta Debian 12 BookWorm Kernel 6.2 Desktop v0.9 unofficial Beta Armbian 23.11 Jammy Kernel 6.2 Desktop v0.9 unofficial Beta H96 MAX V56 RK3566 8gb EMMC Chainloader to mainline HotnikQ unofficial images: Tutorial EMMC Version v1.0 ARMBIAN unofficial Armbian 23.11.0 Server Kernel 6.2 Minimal V1.0 unofficial Armbian 23.11.0 Desktop Kernel 6.2 Gnome V1.0 unofficial Debian 12 BookWorm Kernel 6.2 Server Minimal v1.0 unofficial Debian 12 BookWorm Desktop Kernel 6.2 Gnome v1.0 unofficial H96 MAX V56 RK3566 8gb EMMC Hzdm Mainline Boot Custom unofficial images: Tutorial Build Your own Armbian EMMC unofficial image Armbian 23.11.0 Server Minimal Kernel 6.2 Custom unofficial Build Armbian 23.11.0 Desktop Cinnamon Kernel 6.2 Custom unofficial Build Armbian 23.11.0 Desktop XFCE Kernel 6.2 Custom unofficial Build Armbian 23.11.0 Server Standart Kernel 6.2 Custom unofficial Build H96 MAX V56 RK3566 EMMC Raspiblitz HotnikQ unofficial images: Tutorial Build Raspiblitz on EMMC Armbian Bullseye unofficial Armbian 23.11.0 Debian Bullseye Kernel 6.1.54 Custom unofficial Build Armbian_Raspiblitz Debian Bullseye kernel 6.1.54 Backup unofficial H96 MAX V56 RK3566 8gb EMMC Hzdm Mainline Boot unofficial images: Tutorial Build Your own V1.1 Armbian EMMC unofficial image Armbian 24.2.1 Server Minimal V1.1 Custom Kernel 6.2 unofficial Build Armbian 24.2.1 Desktop Gnome V1.1 Custom Kernel 6.2 unofficial Build Debian 12 BookWorm Server Minimal v1.1 Kernel 6.2 Custom unofficial Build Debian 12 BookWorm Desktop Gnome v1.1 Kernel 6.2 Custom unofficial Build H96 MAX V56 RK3566 8gb EMMC Ning Mainline Kernel: Tutorial Build Your own V1.2 & V1.3 Armbian EMMC official image Armbian Desktop Gnome kernel The Latest official Debian BookWorm Server Kernel Minimal The Latest official H96 MAX V56 RK3566 8gb Vendor Kernel 6.1.43 Tutorial Build Your own Armbian Rockchip Kernel vendor Kernel 6.1.43 Armbian Software description: V0.5 = @armbian The Armbian SD card image "Compiled From Armbian Project" V0.8 = @hzdm Project with Mainline Bootloader "Boot the 64gb Emmc Armbian with Mainline Rockchip" V0.9 = @hzdm Release Mainline Bootloader "Boot the 32gb and 64gb Emmc Armbian with Mainline Rockchip" V1.0 = @hotnikq The Armbian SD card inside the Android Legacy Rockchip Image "Two Original Glued Images: Android boot for Linux" V1.2 = @ning Release Device Tree and Bootloader to longterm 6.6.27 Kernel "Boot with Mainline Rockchip" V1.3 = @Hqnicolas Github PR Enable h96 Rk3566 TV-Box device for Kernel 6.8 Video drivers: https://developer.arm.com/downloads/-/mali-drivers/bifrost-kernel https://docs.mesa3d.org/download.html https://docs.mesa3d.org/drivers/panfrost.html Wifi Driver: https://drive.google.com/file/d/1B1LmAylalETcnBEWiPiJHL0MjK5xlIV4/view?usp=sharing Or Just Live install Wifi Driver: cd /lib/firmware/brcm/ sudo wget https://github.com/CoreELEC/brcmfmac_sdio-firmware-aml/raw/master/firmware/brcm/fw_bcm4335b0_ag.bin sudo ln -s fw_bcm4335b0_ag.bin brcmfmac4335-sdio.h96-TVbox,rk3566.bin sudo reboot now nmcli dev wifi sudo rmmod brcmfmac_wcc brcmfmac brcmutil modprobe brcmfmac Topic description: This topic aims to demonstrate the path taken to the Armibian EMMC solution. In our path we create a lot of ready-to-use ROM files, some users burn an use this images without learning with the Linux compilation process. the name of the topic is efforts but that's no effort at all, you should try compile your own images. Device Capability Test: Using Rockchip SoCs NPU. Drivers: https://github.com/rockchip-linux/rknpu2 User Guide: https://github.com/rockchip-linux/rknpu2/blob/master/doc/Rockchip_RKNPU_User_Guide_RKNN_API_V1.4.0_EN.pdf OpenCV: https://opencv.org/blog/2022/11/29/working-with-neural-processing-units-npus-using-opencv/ A discussion on Reddit: https://www.reddit.com/r/OrangePI/comments/12b3jmj/accessing_the_npu_on_the_orange_pi/ Transformers models: https://github.com/usefulsensors/useful-transformers Usage: https://www.crowdsupply.com/useful-sensors/ai-in-a-box/ Usage: https://youtu.be/pN8mKZ5wpdQ
 -
Efforts to develop firmware for H96 MAX V56 RK3566 8G/64G
Hqnicolas replied to Hqnicolas's topic in Rockchip CPU Boxes
thats why I'm making an Kernel legacy rockchip 5.10 righ now. the video codecs make difference Will also try this compilation ############################################ Atenção, aviso de segurança, atención, beware, attention! ############################################ IF YOU FLASH VENDOR KERNEL 6.1 TO RK3566 H96 BOX and the flash goes wrong, to flash a new image you will need to toothpick the board on GND and CLK from EMMC and this pins are sensible like paint (cheap board) ############################################ Atenção, aviso de segurança, atención, beware, attention! ############################################ https://drive.google.com/file/d/1GJktfxVZQpIDEB576hMMtfqa28Tuxg7z/view?usp=drive_link @pocosparc this image is for test Kernel 6.1 dtb's it boot, but it will need a better dtb.... https://drive.google.com/file/d/1cGmIQMIaRy1OUoHydAu1qimYmjNmwPCE/view?usp=sharing @pocosparc this image is for test Kernel 5.1 dtb's it boot, but it will need a better dtb....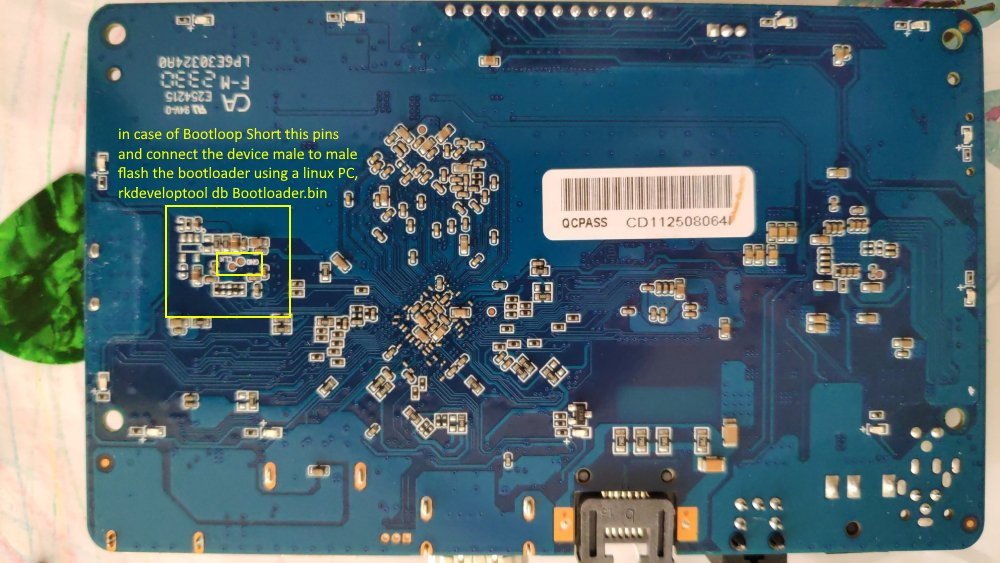
-

Efforts to develop firmware for H96 MAX V56 RK3566 8G/64G
pocosparc replied to Hqnicolas's topic in Rockchip CPU Boxes
I made OpenVFD work. There are some driver changes needed to get it to work. I commited everyting into ArmBoardBringUp git repo with the tutorial on how to get it to work README.txt. There are still some minor tweaks needed as currently the time is upside down (conf file changes) and also the wrong icons are on (also inversed). I will play with these after a few days, but you can try them out BTW Nice work on the video acceleration. IR remote codes are also there in order to be committed and compiled. Maybe KODI is next?
-
Hello! I have a Zero2 board with 1GB of RAM. I compiled a Debian 12 desktop image for Zero2 using Armbian and I want to play online videos through a web browser. Unfortunately, the results have been disappointing as the performance for 1080p videos is very slow. I tried using swap, but it didn't help. I also attempted to play 1080p videos using MPV and VLC. MPV can still play the videos, but it feels sluggish, and VLC gets stuck on the screen until the playback is finished. I would like to know how to configure Zero2 on Linux to achieve video acceleration. I'm new to this, so I would appreciate some guidance. Thank you!
-
Efforts to develop firmware for H96 MAX V56 RK3566 8G/64G
Hqnicolas replied to Hqnicolas's topic in Rockchip CPU Boxes
Based on firefly 5.10 kernel DTB I did the rk3566 h96max kernel 6.10 DTB https://wiki.pine64.org/wiki/Mainline_Hardware_Decoding Since kernel 6.6 dont have Hardware acceleration to RK3566 we only have this option only Hantro, not rkvdec2, so with a maximum resolution of 1080p for now To use Vendor Kernel: Test Image: H96 MAX jammy Vendor 6.1 Kernel Gnome Desktop Test Image: H96 MAX jammy Legacy 5.1 Kernel Gnome Desktop Or compile your own Vendor Kernel 6.1: https://drive.google.com/file/d/1YacPyumHwJ5WYqnKlGUgfT86rNOEzMqx/view?usp=sharing it boot, but it will need a better dtb.... Or compile your own Legacy Kernel 5.1: https://drive.google.com/file/d/1a2zBw5HxXJeWjTe2xCvKuLBTIhNu8CHy/view?usp=sharing it boot, but it will need a better dtb.... ############################################ Atenção, aviso de segurança, atención, beware, attention! ############################################ IF YOU FLASH VENDOR KERNEL 6.1 TO RK3566 H96 BOX and the flash goes wrong, to flash a new image you will need to toothpick the board on GND and CLK from EMMC and this pins are sensible like paint (cheap board) ############################################ Atenção, aviso de segurança, atención, beware, attention! ############################################ if you don't have SD card Reader Onboard To change DTB inside image for reflash: sudo losetup --partscan /dev/loop14 disk_image.img mkdir /tmp/disk_image sudo mount /dev/loop14p1 /tmp/disk_image ####### DROP the new File to /tmp/disk_image/boot/dtb/rockchip ########## sudo fstrim -v /tmp/disk_image sudo umount /tmp/disk_image sudo losetup --detach /dev/loop14 This DTB Show Some Errors ON LOG: [ 94.602483] rockchip-i2s-tdm fe410000.i2s: ASoC: error at snd_soc_dai_hw_params on fe410000.i2s: -22 [ 94.602638] fe410000.i2s-rk817-hifi: ASoC: error at __soc_pcm_hw_params on fe410000.i2s-rk817-hifi: -22
-
Sorry, don't have the Armbianmonitor info handy but wanted to get this started... I'm trying to bring up a Libre Renegade RK3328-CC for use as a media center. Armbian's performance is absolutely wonderful compared to the other builds I've tried on this box. Unfortunately, I want the HDMI output going to a Samsung Frame TV, and resolution negotiation fails badly -- I get obvious rasters with black between them, nowhere near the 4K that this TV model is capable of and not even a smooth conversion (Note that the eyes here suggests that the black line is occurring every third raster or something like that...) What information I have gathered so far: TV: Samsung 43" “The Frame”, model QN43LS03BAFXZA Firmware T-PTMAKVC-1622.4, BT-S 4K native resolution, but should be able to upconvert edid-decode (hex): 00 ff ff ff ff ff ff 00 4c 2d 7f 72 00 0e 00 01 01 20 01 03 80 5f 36 78 0a b3 61 ab 4f 46 a8 27 0b 50 54 bd ef 80 71 4f 81 c0 81 00 81 80 95 00 a9 c0 b3 00 d1 c0 04 74 00 30 f2 70 5a 80 b0 58 8a 00 50 1d 74 00 00 1e 56 5e 00 a0 a0 a0 29 50 30 20 35 00 50 1d 74 00 00 1a 00 00 00 fd 00 18 4b 0f 51 1e 00 0a 20 20 20 20 20 20 00 00 00 fc 00 53 41 4d 53 55 4e 47 0a 20 20 20 20 20 01 9f 02 03 51 f0 52 5f 10 1f 04 13 05 14 20 21 22 5d 5e 62 64 07 16 03 12 2f 0d 57 07 09 07 07 15 07 50 57 07 01 67 54 03 83 0f 00 00 e2 00 4f e3 05 c3 01 6e 03 0c 00 30 00 b8 44 20 00 80 01 02 03 04 e3 06 0d 01 e5 0e 60 61 65 66 e5 01 8b 84 90 01 02 3a 80 18 71 38 2d 40 58 2c 45 00 50 1d 74 00 00 1e 00 00 00 00 00 00 00 00 00 00 00 00 00 00 00 00 00 00 00 00 00 00 00 00 00 00 00 00 ea Block 0, Base EDID: EDID Structure Version & Revision: 1.3 Vendor & Product Identification: Manufacturer: SAM Model: 29311 Serial Number: 16780800 Made in: week 1 of 2022 Basic Display Parameters & Features: Digital display Maximum image size: 95 cm x 54 cm Gamma: 2.20 RGB color display First detailed timing is the preferred timing Color Characteristics: Red : 0.6699, 0.3115 Green: 0.2734, 0.6591 Blue : 0.1533, 0.0449 White: 0.3125, 0.3291 Established Timings I & II: IBM : 720x400 70.081663 Hz 9:5 31.467 kHz 28.320000 MHz DMT 0x04: 640x480 59.940476 Hz 4:3 31.469 kHz 25.175000 MHz Apple : 640x480 66.666667 Hz 4:3 35.000 kHz 30.240000 MHz DMT 0x05: 640x480 72.808802 Hz 4:3 37.861 kHz 31.500000 MHz DMT 0x06: 640x480 75.000000 Hz 4:3 37.500 kHz 31.500000 MHz DMT 0x09: 800x600 60.316541 Hz 4:3 37.879 kHz 40.000000 MHz DMT 0x0a: 800x600 72.187572 Hz 4:3 48.077 kHz 50.000000 MHz DMT 0x0b: 800x600 75.000000 Hz 4:3 46.875 kHz 49.500000 MHz Apple : 832x624 74.551266 Hz 4:3 49.726 kHz 57.284000 MHz DMT 0x10: 1024x768 60.003840 Hz 4:3 48.363 kHz 65.000000 MHz DMT 0x11: 1024x768 70.069359 Hz 4:3 56.476 kHz 75.000000 MHz DMT 0x12: 1024x768 75.028582 Hz 4:3 60.023 kHz 78.750000 MHz DMT 0x24: 1280x1024 75.024675 Hz 5:4 79.976 kHz 135.000000 MHz Apple : 1152x870 75.061550 Hz 192:145 68.681 kHz 100.000000 MHz Standard Timings: DMT 0x15: 1152x864 75.000000 Hz 4:3 67.500 kHz 108.000000 MHz DMT 0x55: 1280x720 60.000000 Hz 16:9 45.000 kHz 74.250000 MHz DMT 0x1c: 1280x800 59.810326 Hz 16:10 49.702 kHz 83.500000 MHz DMT 0x23: 1280x1024 60.019740 Hz 5:4 63.981 kHz 108.000000 MHz DMT 0x2f: 1440x900 59.887445 Hz 16:10 55.935 kHz 106.500000 MHz DMT 0x53: 1600x900 60.000000 Hz 16:9 60.000 kHz 108.000000 MHz (RB) DMT 0x3a: 1680x1050 59.954250 Hz 16:10 65.290 kHz 146.250000 MHz DMT 0x52: 1920x1080 60.000000 Hz 16:9 67.500 kHz 148.500000 MHz Detailed Timing Descriptors: DTD 1: 3840x2160 30.000000 Hz 16:9 67.500 kHz 297.000000 MHz (1872 mm x 1053 mm) Hfront 176 Hsync 88 Hback 296 Hpol P Vfront 8 Vsync 10 Vback 72 Vpol P DTD 2: 2560x1440 59.950550 Hz 16:9 88.787 kHz 241.500000 MHz (1872 mm x 1053 mm) Hfront 48 Hsync 32 Hback 80 Hpol P Vfront 3 Vsync 5 Vback 33 Vpol N Display Range Limits: Monitor ranges (GTF): 24-75 Hz V, 15-81 kHz H, max dotclock 300 MHz Display Product Name: ‘SAMSUNG’ Extension blocks: 1 Checksum: 0x9f Block 1, CTA-861 Extension Block: Revision: 3 Underscans IT Video Formats by default Basic audio support Supports YCbCr 4:4:4 Supports YCbCr 4:2:2 Native detailed modes: 0 Video Data Block: VIC 95: 3840x2160 30.000000 Hz 16:9 67.500 kHz 297.000000 MHz VIC 16: 1920x1080 60.000000 Hz 16:9 67.500 kHz 148.500000 MHz VIC 31: 1920x1080 50.000000 Hz 16:9 56.250 kHz 148.500000 MHz VIC 4: 1280x720 60.000000 Hz 16:9 45.000 kHz 74.250000 MHz VIC 19: 1280x720 50.000000 Hz 16:9 37.500 kHz 74.250000 MHz VIC 5: 1920x1080i 60.000000 Hz 16:9 33.750 kHz 74.250000 MHz VIC 20: 1920x1080i 50.000000 Hz 16:9 28.125 kHz 74.250000 MHz VIC 32: 1920x1080 24.000000 Hz 16:9 27.000 kHz 74.250000 MHz VIC 33: 1920x1080 25.000000 Hz 16:9 28.125 kHz 74.250000 MHz VIC 34: 1920x1080 30.000000 Hz 16:9 33.750 kHz 74.250000 MHz VIC 93: 3840x2160 24.000000 Hz 16:9 54.000 kHz 297.000000 MHz VIC 94: 3840x2160 25.000000 Hz 16:9 56.250 kHz 297.000000 MHz VIC 98: 4096x2160 24.000000 Hz 256:135 54.000 kHz 297.000000 MHz VIC 100: 4096x2160 30.000000 Hz 256:135 67.500 kHz 297.000000 MHz VIC 7: 1440x480i 59.940060 Hz 16:9 15.734 kHz 27.000000 MHz VIC 22: 1440x576i 50.000000 Hz 16:9 15.625 kHz 27.000000 MHz VIC 3: 720x480 59.940060 Hz 16:9 31.469 kHz 27.000000 MHz VIC 18: 720x576 50.000000 Hz 16:9 31.250 kHz 27.000000 MHz Audio Data Block: Linear PCM: Max channels: 6 Supported sample rates (kHz): 192 96 48 44.1 32 Supported sample sizes (bits): 24 20 16 Linear PCM: Max channels: 2 Supported sample rates (kHz): 48 44.1 32 Supported sample sizes (bits): 24 20 16 AC-3: Max channels: 6 Supported sample rates (kHz): 48 44.1 32 Maximum bit rate: 640 kb/s Enhanced AC-3 (DD+): Max channels: 8 Supported sample rates (kHz): 48 44.1 32 Supports Joint Object Coding MAT (MLP): Max channels: 8 Supported sample rates (kHz): 192 96 48 Supports Dolby TrueHD, object audio PCM and channel-based PCM Hash calculation not required for object audio PCM or channel-based PCM Speaker Allocation Data Block: FL/FR - Front Left/Right LFE1 - Low Frequency Effects 1 FC - Front Center BL/BR - Back Left/Right Video Capability Data Block: YCbCr quantization: No Data RGB quantization: Selectable (via AVI Q) PT scan behavior: No Data IT scan behavior: Supports both over- and underscan CE scan behavior: Supports both over- and underscan Colorimetry Data Block: xvYCC601 xvYCC709 BT2020YCC BT2020RGB Reserved MD0 Vendor-Specific Data Block (HDMI), OUI 00-0C-03: Source physical address: 3.0.0.0 Supports_AI DC_36bit DC_30bit DC_Y444 Maximum TMDS clock: 340 MHz Extended HDMI video details: HDMI VICs: HDMI VIC 1: 3840x2160 30.000000 Hz 16:9 67.500 kHz 297.000000 MHz HDMI VIC 2: 3840x2160 25.000000 Hz 16:9 56.250 kHz 297.000000 MHz HDMI VIC 3: 3840x2160 24.000000 Hz 16:9 54.000 kHz 297.000000 MHz HDMI VIC 4: 4096x2160 24.000000 Hz 256:135 54.000 kHz 297.000000 MHz HDR Static Metadata Data Block: Electro optical transfer functions: Traditional gamma - SDR luminance range SMPTE ST2084 Hybrid Log-Gamma Supported static metadata descriptors: Static metadata type 1 YCbCr 4:2:0 Video Data Block: VIC 96: 3840x2160 50.000000 Hz 16:9 112.500 kHz 594.000000 MHz VIC 97: 3840x2160 60.000000 Hz 16:9 135.000 kHz 594.000000 MHz VIC 101: 4096x2160 50.000000 Hz 256:135 112.500 kHz 594.000000 MHz VIC 102: 4096x2160 60.000000 Hz 256:135 135.000 kHz 594.000000 MHz Vendor-Specific Video Data Block (HDR10+), OUI 90-84-8B: Application Version: 1 Detailed Timing Descriptors: DTD 3: 1920x1080 60.000000 Hz 16:9 67.500 kHz 148.500000 MHz (1872 mm x 1053 mm) Hfront 88 Hsync 44 Hback 148 Hpol P Vfront 4 Vsync 5 Vback 36 Vpol P Checksum: 0xea I understand that Armbian is an experimental build and this combination may simply not work.... but if there's anything I can try to do to help the driver and monitor reconcile with each other, or to help you debug this, please let me know. (BTW, I don't mind the security timeout/rechecking on this webform, but having it drag focus back to that checkbox is somewhat disruptive.)
-
@astrosky @tERBO this may help you getting hardware decoded videos, but don't expect your browser work with them. Mixing hardware video decoding into browsers compositors is not an easy task.
-
Efforts to develop firmware for H96 MAX V56 RK3566 8G/64G
Hqnicolas replied to Hqnicolas's topic in Rockchip CPU Boxes
i never seen this on linux..... I think @Kenneth Hidalgo have the answer to legacy linux: This is the Linux Legacy DTB from Kernel 4.19 rk3566-h96-max-linux-legacy.dtsrk3566-h96-max-linux-legacy.dtb To make this 4.19 dtb work with kernel 5.10 You will need to apply this patch: We can just use the legacy kernel device tree from 4.19 vendor kernel. Just some fixes are needed: 1, add these properties to node &gpu to support panfrost driver: 2, change RK_FUNC_1 to 1 because this is not defined in kernel 5.10 3, add &vp0 node to support video output: Example: https://github.com/ginkage/mirrors/commit/fbd247d4c52a11a74c2efbe276ebff7c27fc6da5 -
 Updated: The Armbian vendor kernel version now includes Panthor, and will soon be able to run it as well. Waydroid images: https://github.com/WillzenZou/armbian_fork_build/releases/download/willzen-armbian-24.5.0/2.waydroid-panthorv10-240416-v1.img.tar.gz Note: Waydroid needs to be run in the Wayland desktop environment. (Such as Gnome wayland, KDE wayland session) What's work: OpenGL ES is ok, I have tested some game: Mincecrat, gameSHINE, Monument Valley 2 What's not work: Vulkan. Video hardware decode and encode. How to use Waydroid 1. To install Waydroid, refer to the tutorial : https://docs.waydro.id/faq/using-custom-waydroid-images https://docs.waydro.id/usage/waydroid-command-line-options sudo apt install curl ca-certificates -y curl https://repo.waydro.id | sudo bash sudo apt install waydroid 2. Extract Waydroid system image waydroid-panthorv10-240416-v1.img.tar.gz to /usr/share/waydroid-extra/images and initialize it, there are system.img and vendor.img in it sudo waydroid init -f -i /usr/share/waydroid-extra/images 3. Other more useful parameters that need to be operated after waydroid session start Enable/disable multi-window: waydroid prop set persist.waydroid.multi_windows true waydroid prop set persist.waydroid.multi_windows false Install and start the app (also visible in the app menu after installation): waydroid app install com.app.apk waydroid app launch com.app List of apps: waydroid app list source code(needs morre work): https://github.com/WillzenZou/android_external_mesa3d

-
Efforts to develop firmware for H96 MAX V56 RK3566 8G/64G
Hqnicolas replied to Hqnicolas's topic in Rockchip CPU Boxes
Video acceleration works on Gnome Desktop

-
Efforts to develop firmware for H96 MAX V56 RK3566 8G/64G
Hqnicolas replied to Hqnicolas's topic in Rockchip CPU Boxes
Also Runing android APK's on H96 Max with this waydroid image: https://forum.armbian.com/topic/38184-waydroid-for-rk3588-with-armbian-edge-panthor-kernel-68/#comment-188934 No Vaapi on android video players.... Testing: https://mdn.github.io/dom-examples/webgl-examples/tutorial/sample4/ https://mdn.github.io/dom-examples/webgl-examples/tutorial/sample5/ https://mdn.github.io/dom-examples/webgl-examples/tutorial/sample6/ https://mdn.github.io/dom-examples/webgl-examples/tutorial/sample7/ https://mdn.github.io/dom-examples/webgl-examples/tutorial/sample8/ Testing: https://www.wirple.com/bmark/ Testing: