
bedna
-
Posts
109 -
Joined
-
Last visited
Content Type
Forums
Store
Crowdfunding
Applications
Events
Raffles
Community Map
Everything posted by bedna
-

networking in bpi-m5 with new 26.03.1 release.
bedna replied to gene1934's topic in Software, Applications, Userspace
Either the config on the device is wrong, there is supposed to be a dns ON the device or the dhcp server is handing out wrong dns to the device. Not on every specific device if there is a local dns server available on the network. Then it's normally done on the local dns itself by first checking local configs (like /etc/hosts) and if not available, resolve using online dns servers and then send the response to the device. And the dhcp server is obv configured to point to the local dns server. That way the configs gets propagated via the dhcp lease to all devices on the network. Edit As far as I know, network manager is default on armbian (correct me if I'm wrong) and that should have edited your /etc/resolv.conf. So since it's not, you have made changes outside of default config somehow. Could be that the specific release and device you use does not utilize network manager. But since you have not disclosed that info, hard to know. But it looks like you use systemd-resolved so you should check how that works. Edit2 I was wrong about network manager, see https://docs.armbian.com/User-Guide_Networking/ -
networking in bpi-m5 with new 26.03.1 release.
bedna replied to gene1934's topic in Software, Applications, Userspace
I repeat, what is in your /etc/resolv.conf? -
networking in bpi-m5 with new 26.03.1 release.
bedna replied to gene1934's topic in Software, Applications, Userspace
What's in your /etc/resolv.conf? And what do you mean with "dhcp isn't working"? Is 192.168.71.2 not the correct ip? Where is your dhcp? Your router? -
Getting a SATA hard drive to mount at boot and sharing whole drive by SMB
bedna replied to John Felstead's topic in Beginners
I haven't used samba for a long time so I'm probably not the best to ask, but I checked my old notes about samba, and this was my goto config: [samba] # edit, or whatever name you want to give it path = /path/to/mountlocation/ browsable = yes writable = yes read only = no force user = <your_username> force group = <your_usergroup> create mask = 0644 # edit, you should probably set this to 0640. This is for files, no need for 7 here, unless you want every file to be executable on the samba share? direcotry mask = 0755 # make sure this works on debian, errors on arch (edit, this was in my notes, so I guess 755 instead of 0755.. maybe.. Or rather 0750 or 750 to only give access to your user and group) public = no This was the only thing I changed from default IIRC, so no guest access or anything, just a uname and passwd to connect. Changing the directory permissions on the server filesystem (chmod) does not matter at all when it comes to samba. As you can see in the conf I provided, the mask is defined there, and all files will get that user/mask (if ext4, exfat does not support user/group/all masks, what you see in your filesystem is what you set in fstab for exfat) and is the mask you will se when looking through a samba mount on another computer. And as a rule of thumb, don't use 777 or 666, the solution is very rarely to completely open up everything, that's a "windows thing" (run as administrator or give everybody access to the directory/application), try to get rid of that habit. -
Getting a SATA hard drive to mount at boot and sharing whole drive by SMB
bedna replied to John Felstead's topic in Beginners
Samba has one gazillion options, you can read about all of them here: https://www.samba.org/samba/docs/current/man-html/smb.conf.5.html You can read the wiki with examples here: https://wiki.samba.org/index.php/Setting_up_Samba_as_a_Standalone_Server I would NOT use a samba server without a password. -
iptables module missing from 6.18.10-current-meson64 kernel
bedna replied to Jeedom Cassivet's topic in Beginners
Also: # apt install -y iptables # iptables -v iptables v1.8.11 (nftables): no command specified https://wiki.debian.org/nftables AFAIK using iptables syntax should still work, but nft is what you probably should learn to use instead. https://wiki.nftables.org/wiki-nftables/index.php/Moving_from_iptables_to_nftables -
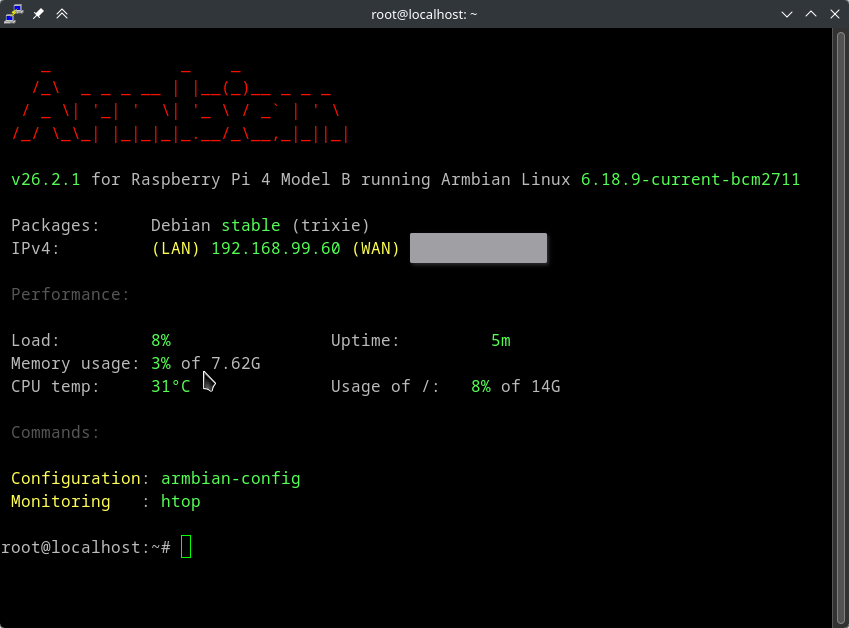
It really is as simple as possible on Armbian. Pretty good documentation too, I posted it before, but here you go again: https://docs.armbian.com/ All you have to do is to login as root from an ssh client following standards. I do not have access to a windows installation where I can confirm if what you say is true, that the ssh client does not let you login with "ssh root@xxx.xxx.xxx.xxx", so maybe you are correct, but it sounds very unlikely to me. But what I can guarantee is using an ssh client from another unix system will definitely let you connect. So use a mac or a linux computer to access. Or install wsl on windows and do it from there. https://learn.microsoft.com/en-us/windows/wsl/install Edit: I actually forgot, but I had putty installed on my system. I used it to check colors in a script I maintain and it exists in the extras repo on arch. Downloaded latest minimal image for rpi (so not same hardware as you) and... No settings changed in putty, just a standard root@192.168.99.60 that I added into the "Host Name (or IP address)" field and clicked "open". Name : putty Version : 0.83-1 So I don't know what to tell you...
-
"ssh -oKexAlgorithms=+diffie-hellman-group1-sha1 -oHostKeyAlgorithms=+ssh-dss -oCiphers=+aes128-cbc -oMACs=+hmac-sha1 -vv root@xyz" Let's try again, but this will be my last time typing this: The normal way to use ssh, is to type: "ssh user@xxx.xxx.xxx.xxx" where x is the ip number. So for Armbian first login, it's "ssh root@xxx.xxx.xxx.xxx", NOTHING ELSE. Just glancing at the few first lines in that log: OpenSSH_for_Windows_9.5p2, LibreSSL 3.8.2 debug2: resolve_canonicalize: hostname xyz is address debug1: Connecting to xyz [xyz] port 22. debug1: Connection established. debug1: identity file C:\\Users\\sebas/.ssh/id_rsa type -1 debug1: identity file C:\\Users\\sebas/.ssh/id_rsa-cert type -1 debug1: identity file C:\\Users\\sebas/.ssh/id_ecdsa type -1 debug1: identity file C:\\Users\\sebas/.ssh/id_ecdsa-cert type -1 debug1: identity file C:\\Users\\sebas/.ssh/id_ecdsa_sk type -1 debug1: identity file C:\\Users\\sebas/.ssh/id_ecdsa_sk-cert type -1 debug1: identity file C:\\Users\\sebas/.ssh/id_ed25519 type -1 debug1: identity file C:\\Users\\sebas/.ssh/id_ed25519-cert type -1 debug1: identity file C:\\Users\\sebas/.ssh/id_ed25519_sk type -1 debug1: identity file C:\\Users\\sebas/.ssh/id_ed25519_sk-cert type -1 debug1: identity file C:\\Users\\sebas/.ssh/id_xmss type -1 debug1: identity file C:\\Users\\sebas/.ssh/id_xmss-cert type -1 debug1: identity file C:\\Users\\sebas/.ssh/id_dsa type -1 debug1: identity file C:\\Users\\sebas/.ssh/id_dsa-cert type -1 debug1: Local version string SSH-2.0-OpenSSH_for_Windows_9.5 debug1: Remote protocol version 2.0, remote software version OpenSSH_6.6.0 debug1: compat_banner: match: OpenSSH_6.6.0 pat OpenSSH_6.5*,OpenSSH_6.6* compat 0x14000002 debug2: fd 3 setting O_NONBLOCK debug1: Authenticating to xyz:22 as 'root' debug1: load_hostkeys: fopen C:\\Users\\sebas/.ssh/known_hosts2: No such file or directory debug1: load_hostkeys: fopen __PROGRAMDATA__\\ssh/ssh_known_hosts: No such file or directory debug1: load_hostkeys: fopen __PROGRAMDATA__\\ssh/ssh_known_hosts2: No such file or directory As I suspected, it looks like it is somehow trying to use keys and whatnot. Since you refuse to listen, yeah, this might be frustrating and "bad for morale". If you instead listen and do what is suggested, your morale would likely not suffer at all.
-
Stop providing false information, I disproved your theory earlier, please stop. On Armbian, the way to do it via ssh IS TO LOGIN AS ROOT on first run, SSH has logging in as root ENABLED BY DEFAULT on Armbian. This works, and is the way I have ALWAYS done it on Armbian, for years. Here is a link to documentation: https://docs.armbian.com/User-Guide_Getting-Started/#first-login I quote: "The first boot will log you in automatically if you have connected a display via HDMI or if you are connected to the serial console. For SSH, you need to login as root and use the password 1234." If OP refuses to listen to recommendation and keep using putty, OP will have to take this up with the devs of putty, there is nobody here that can/will help with that.
-
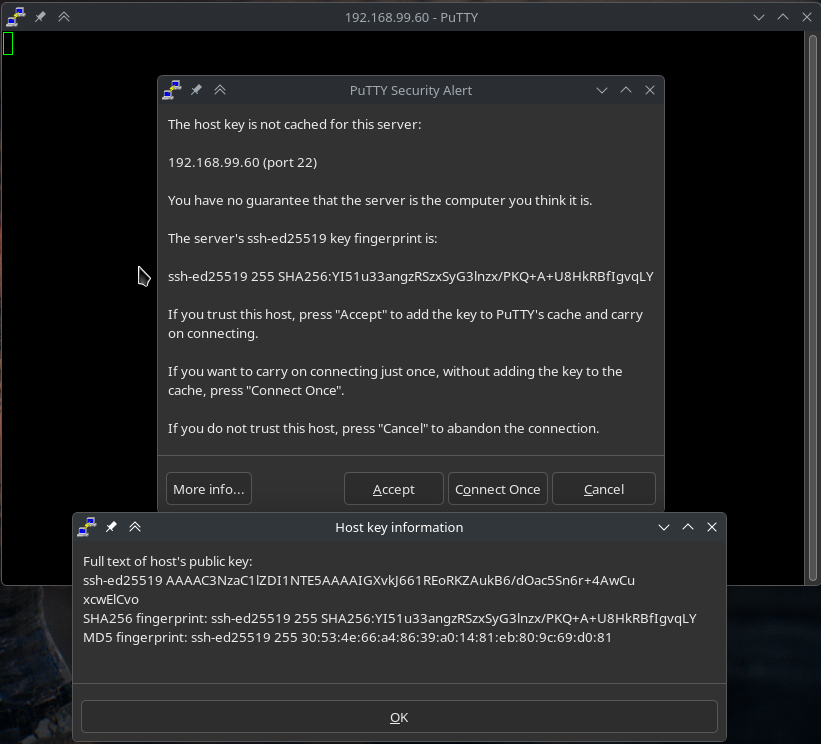
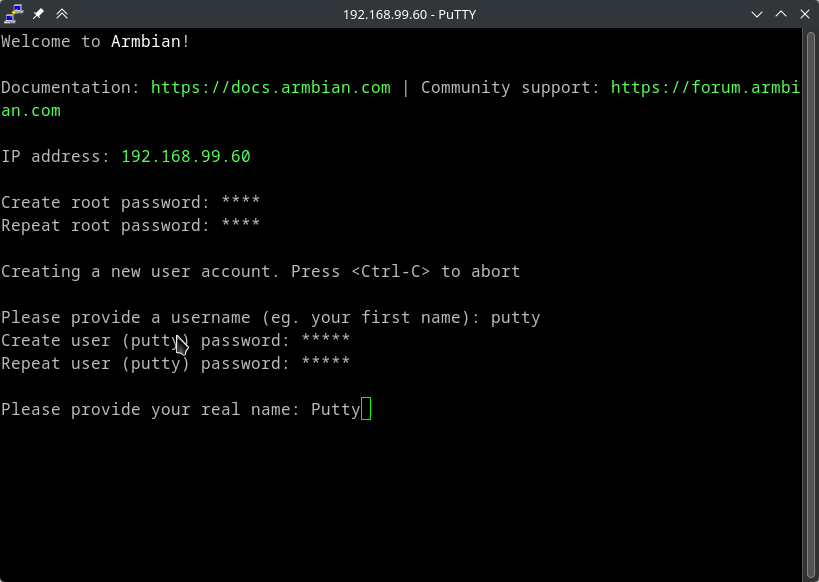
Might be because at first login, you enter 1234, it then asks for you to change that, create a user and whatnot. Not so sure putty will have any idea of what to do with those prompts. When you wrote: "once more: tried ssh through a raspi in the network. the raspi cannot connect to the armbian:" What do you mean by that? You logged in to a rpi OS with putty, and you then tried to connect to this device via the rpi? Was this before or AFTER you already tried logging in to it using putty? In your log: ### [firstrun] Recreated SSH keys (entropy: 256 256) I don't know what this means, but sounds like keys are enrolled and maybe assumed to be used in future. You will have to look into putty (and ask the devs of putty) to learn what is happening, unless you are willing to use a "normal" ssh client that will tell you what is going on by providing STDOUT & STDERR to your monitor. With a NORMAL ssh client, type "ssh root@xxx.xxx.xxx.xxx" (the ip to the device) and it will ask for passw, it will then require you to CHANGE passwd etc. Seems very likely putty has no idea how to deal with that and are doing some strange things at first login, witch then probably leads to it borking your system.
-
Unless they have changed something very recently, you can login as root via ssh on first-run. I double checked /etc/ssh/sshd_config on an armbian install image I had downloaded, and: # Authentication: #LoginGraceTime 2m PermitRootLogin yes #StrictModes yes #MaxAuthTries 6 #MaxSessions 10 PubkeyAuthentication yes <snip> # To disable tunneled clear text passwords, change to no here! #PasswordAuthentication yes #PermitEmptyPasswords no And inside /etc/shadow (default 1234 passwd): root:$y$j9T$SAPCtO/l2ZIj6A2frqTza/$.Z8dP41gzqRHoIS8PvXFn9fghf9rgkGqAWgXVRW4dg6:20234:0:99999:7::: Edit. That can be verified: export PASS=1234 SALT='$y$j9T$SAPCtO/l2ZIj6A2frqTza/$' && perl -le 'print crypt($ENV{PASS}, $ENV{SALT})' # the output verifies the shadow file is correctly setup for passwd 1234 $y$j9T$SAPCtO/l2ZIj6A2frqTza/$.Z8dP41gzqRHoIS8PvXFn9fghf9rgkGqAWgXVRW4dg6 End edit. So that should not be an issue here. (and there are keys inside /etc/ssh that I assume can be used at first login, I have never tried) Sounds more like a faulty sd-card that gets mounted read-only, that can cause stuff like this happening. (as mentioned earlier by Igor) Try with a different sd-card (and use armbian-imager instead of balena) and see if the same happens on another card.
-
Yeah, don't do that.. At least read "<application> --help" before doing sensitive stuff like that if you are unfamiliar. If that happened to you, and that is the reason you typed that.. For future reference: If you have a root account, you can change to root user with "su root" and enter passwd. You are then root and can add your user back to the groups needed. Or you can use the debian "child safe" way, "adduser <user> <group>" (only works on already existing users and groups) instead of usermod to begin with. But best is you learn usermod, since that will let you utilize that knowledge on pretty much any unix system.
-
Tried this? https://gist.github.com/c0m4r/b3fea6342bcf5a1b25b608fc36100d68#pwm-fan-control Ie: download the script and systemd service, edit the script to your liking (or try default) and activate the service. As default It configures to user_space and checks temps every 10s. https://raw.githubusercontent.com/c0m4r/radxa_rock5c_lite/refs/heads/main/usr/local/bin/rock5c_fan_pwm ########################################################## # Radxa Rock 5C fan PWM control script # Author: https:///github.com/c0m4r # License: Public Domain ########################################################## # PWM control path PWM_PATH="/sys/devices/platform/pwm-fan/hwmon" # Configuration INTERVAL=10 # Temperature check interval (seconds) FAN_OFF=1 # 1 = turn off fan below MIN_TEMP after cooldown, 0 = keep at min RPM COOLDOWN=300 # time to wait before turning off the fan when FAN_OFF=1 # Critical temp protection POWEROFF_ON_CRIT=1 # 1 = shutdown when the temperature reaches a critical value, 0 = disable CRITICAL_TEMP=70 # Critical temperature (shutdown) # PWM Values (proper) SAFE_PWM_MIN=105 # Safe minimum PWM to keep fan spinning PWM_LOW=125 # 45–50°C (~50% speed) PWM_MID=165 # 50–55°C (~65% speed) PWM_HIGH=200 # 55–60°C (~80% speed) PWM_MAX=255 # >60°C (100% speed) # PWM Values (temporary - use these instead of proper if the fan spins at max all the time) #SAFE_PWM_MIN=50 # Safe minimum PWM to keep fan spinning #PWM_LOW=60 # 45–50°C (~50% speed) #PWM_MID=70 # 50–55°C (~65% speed) #PWM_HIGH=80 # 55–60°C (~80% speed) #PWM_MAX=255 # >60°C (100% speed) # Constants (requires also changes in code) MIN_TEMP=47 # Minimum temperature (PWM_MIN) MAX_TEMP=60 # Maximum temperature (PWM_MAX) # Set thermal policy thermal_zones=$(ls -1 /sys/class/thermal | grep thermal_zone) if [[ "$thermal_zones" ]]; then for i in /sys/class/thermal/thermal_zone*/policy ; do echo "user_space" > "$i" done else echo "No sensors found, check kernel support, setting fan to high for now!" echo $PWM_HIGH > ${PWM_PATH}/hwmon*/pwm1 exit 1 fi # Set PWM_MIN based on FAN_OFF mode if [ "$FAN_OFF" -eq 1 ]; then PWM_MIN=0 # Allow fan to turn off after cooldown else PWM_MIN=$SAFE_PWM_MIN # Keep fan at minimal safe RPM all the time fi # Validate PWM path if [ ! -d "$PWM_PATH" ]; then echo "Error: PWM control file not found: $PWM_PATH" exit 1 fi # Initialize variables current_pwm=$(cat ${PWM_PATH}/hwmon*/pwm1) # Start at current PWM last_high_temp_time=0 # Track last high temp for cooldown echo "Initializing fan at PWM $current_pwm" echo "$current_pwm" > ${PWM_PATH}/hwmon*/pwm1 # Main loop while true; do for i in /sys/class/thermal/thermal_zone*/policy ; do echo "user_space" > "$i" done <snip>
-
What happens if your start armbian-resize-filesystem.service manually? IE "sudo systemctl start armbian-resize-filesystem.service" and then check the log for the service?
-
I would use systemd. Depending on what application you are talking about, a simple or oneshot service should do the trick. Read the first two examples in the manual: https://www.freedesktop.org/software/systemd/man/latest/systemd.service.html#Examples Assuming you mean an application started by the system and not your user, select the version that fits your situation, create/edit the file /etc/systemd/system/name_your_service.service with the contents needed, for example: [Unit] Description=Service to start "application" [Service] Type=simple ExecStart=/path/to/application [Install] WantedBy=multi-user.target Then enable the service and reboot. sudo systemctl enable name_your_service.service sudo reboot now You can use "systemctl status name_your_service.service" to see status, or "journalctl -u name_your_service.service" to see logs. You should obv change the name of the service from name_your_service to something fitting. If you want the application to run even earlier at boot, you can change multi-user.target to basic.target instead, but be mindful that if you do that and the application requires for example network to be available, you then also need to add "After=network-online.target". Instead, it's usually better to use "Before" and "After" variables and stay on multi-user.target. Please see manual in link above and https://www.freedesktop.org/software/systemd/man/latest/systemd.unit.html for more advanced usage.
-
LMAO! So... What exactly is your question? Did you try "the mouse & keyboard" and they did not work? I would say you will get basic functionality on almost any usb mouse or keyboard on linux. wifi on the other hand can be a hit or miss. A quick search on "USB Logitech Unifier Nano dongle" gave me this: https://forums.linuxmint.com/viewtopic.php?t=373365 so it seems you might want to use solaar to configure the stuff. As for the Inovato Quadra4K, it looks like it is an allwinner H6 processor so I suspect it should work using armbian....
-
Best do what? Disable a systemd service? sudo systemctl disable --now systemd-resolved.service https://www.freedesktop.org/software/systemd/man/latest/systemd-resolved.service.html
-
I have experienced something similar in the past and it made me very puzzled until I figured out what was wrong in that situation. Make sure the clock on both systems are synchronized to an NTP server. IIRC SSH just threw a fit exactly like this without logging why, and it turned out to be a security feature where the ssh server suspected the communication to be intercepted by man-in-the-middle due to clocks not being synchronized. And if logging in physically to the system, apt refused to work as-well until clock was synced. Could be worth to check next time... As for dhcp and systemd. Check if systemd-resolved.service is messing something up for you, maybe try to disable it?
-
Boring? To learn and have discussions? Strange sentiment. About bcachefs, for your sake, let's hope Linus Torvalds goes back on his comment that he and Kent will split ways in kernel 6.17 then so you won't have to rely on dkms for your unstable filesystem. bcachefs is in beta and should not be used as primary filesystem. Linux kernel mailing list: https://lore.kernel.org/all/CAHk-=wi+k8E4kWR8c-nREP0+EA4D+=rz5j0Hdk3N6cWgfE03-Q@mail.gmail.com/ No, it's impossible to have the same UUID on two btrfs systems at the same time, you can't even format a btrfs system and give it the same UUID, the kernel won't let you. See btrfs documentation: https://btrfs.readthedocs.io/en/latest/Send-receive.html So you are lying for some reason. Maybe the same reason you "don't read links". xD Has nothing to do with "trust", it has to do with how COW and send|receive works witch you don't seem to understand/ignore. And ofc an rsync (suddenly you talk about rsync instead of btrfs send -p) will work, it just checks if the files are changed and update them if necessary, witch is exactly what I have been saying is the better way for backups the whole time. IMHO it's even better to just create the subvolume(s) and rsync from the first run altogether if you want a backup, send|receive is not necessary and is just slow. And in the case of a complete backup incl boot like shrink-backup does by dd:ing the "boot sector" (witch includes potential boot partition), all that has to be done is make sure configs point to the new UUID (in case of rpi derivative systems nothing has to be done, because they use PARTUUID witch can be the same in contrast to UUID). If you "don't want to click links" to learn, I won't pressure you. You already seem triggered for some reason. But for others that might read this I hope my knowledge about backup strategies came through. Again, snapshots are perfect for rollbacks, but NOT for backups. Have a good Saturday.
-
That does not change anything about the FIRST send you do, it will take just as long as a dd does while rsync does it in 10% of that time. -p does the same thing as an rsync does to files that has already been rsync:d, the difference is rsync only looks at the data in the files while a send|receive also syncs the entire structure of the filesystem, that's the whole point with the COW snapshot method. So if parent is corrupted without you knowing it (witch is very often the case), so will the child. And as a rule of thumb in backups, you should have multiple backups, the 3-2-1 model is a good guidance. The downside with snapshots is they inherit the flaws of the parent, that is why it is common knowledge (or should be) that snapshots should NOT be treated as backups but ONLY as restore points. No, a scrub will not notice anything until it's too late. A scrub is just a check of the integrity of the filesystem, so if a scrub notices something is wrong the filesystem is already corrupted. So unless you also do a scrub EVERY time on the filesystem you are about to send from before sending, the receive system will also become corrupted. A complete scrub of 2TB takes a while, probably a few hours even if on an nvme. We are all different, I have all my userspace data on home, seems odd to me to rely on a network to be able to access my userspace. Would be really annoying if something were to happen to networking during for example an update or if the network interface stopped working on my desktop for some reason, maybe broken hardware in between like a switch or something. I also do a bit of AI stuff, and some models can be pretty darn big (for example some flux models are around 12GiB) so I want to be able to access them at the speed of an nvme. Other files like movies and such I keep on a network drive, I just have an NFS share on a rpi with a 4TiB spinning drive connected to it, that works just fine for me. That drive is ofc also backed up to another device with 260 incremental versions using urbackup. I'm not trying to convince you to use anything specific, I am simply trying to explain why relying soly on snapshots is not a great idea. I also think that having a restore via an img file is way easier than having only file backups in case of disaster, therefore I maintain shrink-backup. If for example my pihole dies, let's say the sd-card becomes completely unusable, I want as little downtime as possible. Writing an img file to another sd-card only takes a few minutes and the system is restored. Or even worse, if I were to utilize your system relying on a nas. If that nas dies and all my backups are on that nas, what do I do then? So as some friendly advice, I think you should reconsider your backup strategy if you want to be safe in case of complete disaster, you should always plan for worst case scenario. Here is a pretty good read on why snapshots are not considered a good strategy for backups: https://community.veeam.com/blogs-and-podcasts-57/data-backup-basics-i-why-snapshots-are-not-backups-understanding-the-differences-6074 I also rely on snapshots as restore points, but I would never rely on them alone. As an example, by using shrink-backup on my sbc:s I create an img file, I compress that img file and that file then becomes backed up with urbackup to another device (I actually exclude the img file itself in the backup), so when I update that img with shrink-backup, I rename the last compressed file with an "-old" suffix and create a new compressed file. That way I always have 2 backups accessible directly on my desktop computer. Those files are then again backed up by urbackup and are kept at least 3 months (260 backups is the actual threshold so it depends on how many backups is done per day, but minimum 3 months if my computer were to run 24/7). I also store one of those urbackup backups per month for 3 years at a location outside my house, sent encrypted via the internet to another physical location at a friends house (this could also be a cloud storage). In case of for example a fire, no matter how many backups I have at the house, they will all burn and I loose everything. A disaster only has to occur once, and by then it's too late. 3-2-1 backup strategy.
-
Thanks for the feedback, If that was the intention. If you try the version on the testing branch, that won't be an issue because 'btrfs du' (it is just slow and unnecessary) is no longer used. xD There are actually more changes coming to btrfs in the next release. Even looking into conversion from ext4 to btrfs. Oddly enough, I can backup my arch system with boot mounted at /boot/efi using the script on main branch, wonder why yours doesn't, so clearly distro DOES matter. But it soon won't matter for the problem you had, because it will be changed anyway. Besides, shrink-backup is not really intended to be used on a desktop computer, it's for sbc:s that usually are way less convoluted than a desktop setup. For ext4 and f2fs shrink-backup only covers root and boot partitions (if boot partition exists), btrfs is an exception where the script looks up existing subvolumes and creates them. As of now, the script also assumes all subvolumes starting with @ is a top volume, witch does not actually have to be the case, but changes are coming. Interesting to see you use /boot/efi (discouraged by linux kernel standards), and not /boot as boot partition, wonder why? I do the same, because I use timeshift that is built upon snapper. Timeshift also creates entries directly on my grub menu letting me boot into the ro snapshots and restore from there if needed. For others reading this: This is because if you roll back a snapshot where you have changed things in boot process and files inside /boot, you kinda want files inside /boot to be rolled back too or your system won't boot, hence letting /boot be part of the root subvolume and mount boot partition on /boot/efi instead. My point was, that the problem you mentioned, the database might become corrupted is not solved by using snapshots and btrfs, a database has to be closed and locked to be 100% sure it won't become corrupted in ANY copy process. (beside the fact that the database in the case of pihole is only a log and has nothing to do with the integrity of the application itself) I completely disagree with that. If I revert a snapshot because I messed something up on my system or something went wrong in an update for example, witch happens once in a while, I do NOT want my home to be over-written by an old snapshot. I also want to be able to read old log-files to figure out WHAT went wrong, so /home & /var/log in separate snapshots is absolutely a good thing for me. On a sbc I might agree that separate snapshots is a bit overkill though, but not in any way a bad idea. But if you actually use snapshots as a restore points on an sbc I argue /var/log is a good thing to have on separate snapshot. A snapshot takes no time at all, 1s I would guess, but what about the send|receive? Because a snapshot is completely worthless if the filesystem you took the snapshot from becomes corrupt, COW (copy on write) means you use the exact same data. That is why it's (or should be) general knowledge that a snapshot is NOT A BACKUP, but it becomes a file-backup if you send|receive it to a completely different filesystem. So the interesting part here is the send|receive because op asked about backups, and that takes about as long as a dd would take, while rsync probably does the file transfer in about 10% of that time. Also, again, shrink-backup takes everything, including boot process parts and makes an img file at small size (for two reasons, saving space and ability to use the img file on smaller storage device, moving from a 64GiB to a 32GiB sd-card for example) that can be written directly instead of also having to do a bunch of pretty complicated restore processes. And quite a few armbian images utilizes u-boot without a boot partition with header data written to the disk before root partition, shrink-backup covers that as-well. Generally, I treat snapshots as they are intended, as snapshots that can be used as RESTORE POINTS, and I use a backup application to make regular BACKUPS. On my desktop computer I use clonezilla that I have added a menu for in grub to easily boot into (you can make custom menus and boot directly into img/iso files in grub), and on all my sbc:s I obviously use shrink-backup. (for those who don't know, I am the maintainer of shrink-backup) I also have 260 "individual" incremental file backups of my home (and some other locations like /etc and my "file disk"), one every 6h using urbackup running on a rpi4 with a 6TB disk connected to it. It utilizes btrfs so the "individual" means they are just snapshots and only changed files actually take up more space. Lastly, if you don't actually utilize the functionality of running a system with multiple subvolumes, you don't even need to have a subvolume for /, you can just write files directly to the btrfs filesystem.
-
I have a pihole on one of my devices that I backup using shrink-backup. When pihole released 6.0 there was a bug that rendered my system unstable so I found it easier to revert back to 5.x until they fixed the bug. The restore worked without any issues whatsoever. The pihole database is only a db file and the records between the backup and to date is obv lost, but as for integrity of the system it's only a query log so it has no impact on pihole itself. As a matter of fact, you can run pihole without any db history at all. And IIRC the database history is 90 days by default, not one year. A btrfs send|recieve is only a file backup, it will never handle boot process or anything like that. You will also need to do it on every subvolume individually since send|recieve only takes one subvol, not even nested volumes. You will also have to make the source subvolume read only before issuing the send, but I guess that is what you mean by saying "make atomic snapshots". It's also very slow compared to rsync. Besides, using btrfs send|recieve does not solve the issue that copying a database that is in use might corrupt it, shutting down the application using the database before making a backup is. As a matter of fact, it might just make things even more complicated since you have to make the database (subvolume) read only during the send so the application might freak out from not being able to write to the database (unless you snapshot it first like you mention, but then you still have the same problem that an open database might break after being backed up). btrbk solves this (I think) by creating a snapshot (snapshots become read only by default) from the subvolume first and then send that, but you can't btrfs send|recieve a read/write subvolume, but again, does not solve the issue that the database is open. https://btrfs.readthedocs.io/en/latest/btrfs-send.html Fun fact: shrink-backup can backup btrfs devices. https://github.com/UnconnectedBedna/shrink-backup?tab=readme-ov-file#btrfs
-
shrink-backup - a tool for backing up sbc:s
bedna replied to bedna's topic in Software, Applications, Userspace
Well that depends, have you tried adding more space to exclude the possibility that the img actually can fit all the data? If you are using snaps without excluding the containerized mounts on one of them and not the other, it seems like a very logical conclusion that the img actually runs out of space and the "not enough space" is accurate in this situation. Edit: I have never used snaps so I don't know, but I think snaps create containerized mounts every time you boot, and you probably don't want that data on your backup anyway since it will never be used. Others can surely put more light into this than my wild guess about this. Edit 2: This made me a bit curious about how snaps actually work, if they were to randomize the mountpoints and such, but after a tiny bit of searching I found this: https://www.howtogeek.com/660193/how-to-work-with-snap-packages-on-linux/#installing-snap-packages So just editing exclude.txt and adding /snap/* and then add -t option when running shrink-backup should solve this issue. As a matter of fact, I should probably add that as default in the exclude.txt file on the repo and in the script if not using the exclude file, because I don't think you ever want that data on the image... Feedback about this would be highly appreciated before I implement that change, does snap create the directory for each SquashFS within /snap if it does not exist or will it break if it is excluded like I suggest above? Edit 3: According to this each SquashFS is mounted directly to /snap so excluding /snap/* (keeping the actual /snap directory but excluding all content) should work right? Edit 4 (after we figured this out) Shrink-backup now excludes /snap/* by default (including the directory but excluding all contents), so using snaps in combination with shrink-backup is no longer an issue. -
shrink-backup - a tool for backing up sbc:s
bedna replied to bedna's topic in Software, Applications, Userspace
Please use github for issues: https://github.com/UnconnectedBedna/shrink-backup/issues Don't forget to run shrink-backup with -l option and provide the log with the report. Also please try testing branch first, see below. I want to point out there are a ton of reasons for a broken pipe error with rsync that are presented as "no space left", memory on the machine running for example even thought it sounds strange, short network disconnections is another, so most likely these errors are not related to shrink-backup. There have been some changes made to the rsync operation on the testing branch though, primarily an extended --timeout in case it is network related, so please try that out first before creating an issue on github. cd <directory where you git cloned shrink-backup> # switch to testing branch git checkout testing # run shrink-backup sudo ./shrink-backup <whatever options you use> # if you want to switch back to main git checkout main If you used other method than git to acquire the application you can find the testing branch here: https://github.com/UnconnectedBedna/shrink-backup/tree/testing Edit: A solution in a situation like that would be to edit exclude.txt and add paths to what should be excluded and then run shrink-backup with -t option Please see: https://github.com/UnconnectedBedna/shrink-backup/tree/main?tab=readme-ov-file#-t-excludetxt -
It works. On armbian: In /boot/armbianEnv.txt extraargs=ipv6.disable=1 Worked on my orangePi-PC2 at least. On rpiOS: In /boot/firmware/cmdline.txt, add ipv6.disable=1 to your console line, for example: console=serial0,115200 console=tty1 root=PARTUUID=583925ff-02 rootfstype=ext4 fsck.repair=yes ipv6.disable=1 rootwait You can check if it works: $ ls /proc/sys/net/ipv6 ls: cannot access '/proc/sys/net/ipv6': No such file or directory