Search the Community
Showing results for 'disable network manager'.
-
I found my NanoPi Neo Air's could not list or connect to some wifi networks. Some investigating found this was because channel 12/13 are disabled by default. Nothing in runtime had any effect on the output of iw reg get as it should have. Patching in some firmware fixes worked for me. wget http://ftp.be.debian.org/pub/software/network/wireless-regdb/wireless-regdb-2025.02.20.tar.xz tar xf wireless-regdb-2025.02.20.tar.xz sudo cp wireless-regdb-2025.02.20/regulatory.db /lib/firmware/ sudo cp wireless-regdb-2025.02.20/regulatory.db.p7s /lib/firmware/ sudo iw reg set AU #Australia I can now connect to wifi channel 13. Now for my question: I read in this old thread that armbian-firmware-full is required for wifi. would that mean that the full firmware package is desirable for the Nanopi Neo Air? When running apt-get install armbian-firmware-full it states it will consume an additional 1gb of disk space. Hardly desirable for a little device. VERSION v25.5.1 for NanoPi Air running Armbian Linux 6.12.30-current-sunxi
-
That's a very good idea, especially if my online accounts that have my photos would ever become problematic for any reason. I have armbian on a tv box with SMB (samba) and with a USB 3.0 hard drive. The tv box is connected by gigabit ethernet to my home network. So I am going to try these apps - PhotoSync, FolderSync, CX File Explorer - on my android phone to backup my personal photos and videos and determine which is easiest and fastest. Which app on your phone/tablet have you chosen to use to backup your photos/videos?
-

Building Armbian Distribution with Kernel 6.10 for Orange Pi 5 Pro
C127 replied to Sergey Dulimov's topic in Rockchip
Hello everyone. @salas I have just implemented the out-of-box (OOB) network driver functionality in a new commit to the repository. This should serve as a temporary patch for now (or potentially a permanent one, depending on if/when the driver gets mainlined into the Linux kernel). @whywontitwork Thank you very much for the feedback and for testing the image. I need a bit more information to help track down the issue. My suspicion is that the system is successfully loading u-boot but failing to load the kernel. However, without debug logs, it's difficult to know the real cause. To help diagnose this, could you please tell me how you flashed the image? I flash my builds to a microSD card using the Balena Etcher software. Are you using the same method or a different one? I appreciate your support in getting the Orange Pi 5 Pro maintained! One of my main motivations for starting this project was to get Panthor support for the Mali GPU too. I can confirm that on my end, with the image I've built, the latest version of the drivers works correctly. Getting Vulkan and OpenGL running on an RK3588 board! -
 This partnership ensures customers can build embedded products with long-term maintenance viability that will meet the challenges of tomorrow, such as compliance with the CRA, all built on proven Toradex platforms and upstream-first software. View the full article
 -
I have a pair of Orange Pi 3's acting as redundant PiHoles on my home network. After a bit of tinkering and configuring, I have them set up the way I want, and would like to keep them that way. Of course, a good backup plan is essential to this. Looking online, I found Image-Utils for Raspberry Pi, but that is limited in support for only the Raspbian OS. Is there a good system out there to make a cloneable image of an SD card in an Orange Pi, either from the Pi itself to a remote source (NFS mount, etc.), or from a remote source pulling from the Pi? I'd like to schedule this as a CRON job, so that in the event of a hardware failure, I can just restore the image to a new SD card and deploy it with minimal loss. Thank you!
-

Building Armbian Distribution with Kernel 6.10 for Orange Pi 5 Pro
Werner replied to Sergey Dulimov's topic in Rockchip
I added a suggestion at the PR how to implement the driver while building to allow network oob. -
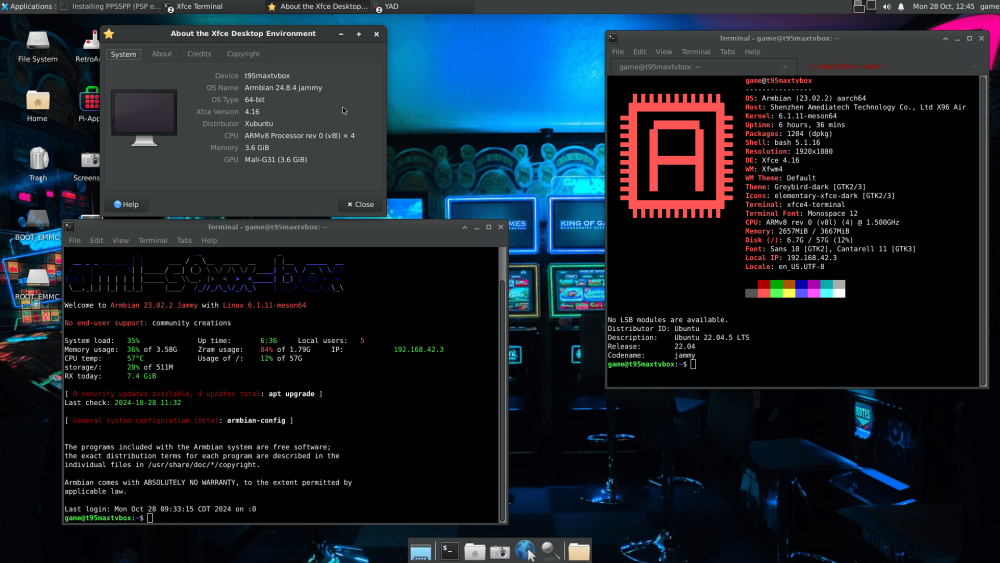
Hello all. I am following the template to write this post and I will add more details as well. My first ever message (here) was in the "Amlogic CPU Boxes" section. TV Box Name: T95 Max+ (Plus) CPU: S905x3 Armbian build file name: Armbian_23.02.2_Aml-s9xx-box_jammy_current_6.1.11.img.xz DTB file used: /dtb-6.1.11-meson64/amlogic/meson-sm1-x96-air.dtb Kernel Version: 6.1.11 Distribution Installed: jammy (Ubuntu) Working Ethernet: Yes Max Ethernet Speed that works: 100 Mbps Does wifi work: No Does bluetooth work: No Does HDMI audio work: No Additional Comments (provide any additional information you feel is important): Read below ... I ran these commands to disable some features that could break the system or cause the system to not boot. This is from my experience of installing the system twice. sudo apt-mark hold linux-image-current-meson64 armbian-bsp-cli-aml-s9xx-box armbian-firmware sudo apt-mark hold linux-dtb-current-meson64 linux-u-boot-aml-s9xx-box-current sudo systemctl disable --now systemd-networkd-wait-online.service sudo systemctl disable --now unattended-upgrades I wanted to get sound out of the box. So, I purchased a generic USB audio dongle from Aliexpress for $3 USD. (see attached photo). The USB audio device is described in Linux as a Texas Instruments PCM2902 Audio Codec (USB PnP Sound Device device 0 USB Audio), and when you run “lsusb” you will see the id numbers 08bb:2902. I updated the databases for repositories by running “sudo apt update -y” and installed necessary packages to support the USB audio device and to use the XFCE4 graphical desktop. Here are the commands I ran for XFCE4 and for some additional nice bits: sudo apt update -y; sudo apt install -y xfdesktop4 xfce4 xfce4-power-manager xfce4-goodies xinit xdm xorg xserver-xorg; sudo apt install -y arandr greybird-gtk-theme numix-gtk-theme numix-icon-theme epiphany-browser; sudo apt install -y elementary-xfce-icon-theme xscreensaver xscreensaver-data xcvt firefox mesa-utils; sudo apt install -y gvfs gvfs-fuse gvfs-common xubuntu-icon-theme at-spi2-core smplayer; sudo apt install -y alsa-base alsa-oss alsa-tools alsa-utils alsamixergui pulseaudio pavucontrol pavumeter; Edit the file /etc/modules with the “nano” command and write “snd-usb-audio” at the end of the file. Also, edit the file /etc/modprobe.d/alsa-base.conf and change a few things, but make a backup copy first: sudo cp /etc/modprobe.d/alsa-base.conf ~/alsa-base.conf.backup Put a # symbol in front of every “options snd-usb-audio index=-2” that you see in /etc/modprobe.d/alsa-base.conf . I found two of them. Add these two lines of text to the bottom of /etc/modprobe.d/alsa-base.conf . alias snd-card-0 snd-usb-audio options snd-usb-audio index=0 Make sure that you are in the 'audio' group. Run the “usermod” command against a regular user (not root) that you want to use often. And reboot. sudo usermod -a G audio {username here} sudo reboot After reboot, the graphical X Display Manager (xdm) should greet you with a simple gray prompt and you can login to XFCE4. You should see a red LED light blinking on the USB audio dongle. You may want to change the display resolution to 1280x720 or 1920x1080 (whichever is available to you) by clicking on the panel (start menu), Applications, Settings, and Display. The Arandr tool in Settings can also help you adjust the display resolution. Open the volume control program by clicking on the panel Applications, Multimedia, PulseAudio Volume Control. Click the Configuration tab at the far right of the volume control and change the profile to Analog Stereo. * Important – now connect a headset, earphone, or amplifier to the 3.5mm (⅛’’) black 🎧 receptacle on the USB audio dongle and play some sounds, music or youtube.
-

We are ready to offer a Bountysource donation to Armbian
tanod replied to maximumsettings's topic in Orange Pi 5
Hey @amazingfate, Thank you very much for the reply! I managed to build it but still a lot of errors in the log... #moonlight-qt/app/moonlight 00:00:00 - SDL Info (0): Compiled with SDL 2.30.0 00:00:00 - SDL Info (0): Running with SDL 2.30.0 00:00:00 - Qt Info: No translation available for "bg_BG" 00:00:00 - SDL Info (0): Detected Wayland 00:00:00 - Qt Warning: qrc:/gui/main.qml:13:1: QML ApplicationWindow: ToolTip must be attached to an Item 00:00:00 - Qt Info: Found "gamecontrollerdb.txt" at "/home/noone/.cache/Moonlight Game Streaming Project/Moonlight/gamecontrollerdb.txt" 00:00:00 - SDL Info (0): Loaded 335 new gamepad mappings Couldn't open plugin directory: No such file or directory No plugins found, falling back on no decorations 00:00:00 - SDL Warn (0): Failed to create test window with platform flags: Installed Vulkan doesn't implement the VK_KHR_surface extension 00:00:00 - SDL Info (0): V-sync disabled libva info: VA-API version 1.20.0 libva info: Trying to open /usr/lib/aarch64-linux-gnu/dri/rockchip_drv_video.so libva info: va_openDriver() returns -1 00:00:00 - SDL Info (0): Skipping VAAPI fallback driver names on libva 2.20+ 00:00:00 - SDL Error (0): Failed to initialize VAAPI: -1 libva info: VA-API version 1.20.0 libva info: Trying to open /usr/lib/aarch64-linux-gnu/dri/rockchip_drv_video.so libva info: va_openDriver() returns -1 00:00:00 - SDL Info (0): Skipping VAAPI fallback driver names on libva 2.20+ 00:00:00 - SDL Error (0): Failed to initialize VAAPI: -1 00:00:00 - SDL Error (0): SDL_Vulkan_GetInstanceExtensions() #1 failed: The specified window isn't a Vulkan window 00:00:00 - SDL Error (0): SDL_Vulkan_GetInstanceExtensions() #1 failed: The specified window isn't a Vulkan window 00:00:00 - SDL Info (0): Opened DRM render node: /dev/dri/renderD128 00:00:00 - SDL Info (0): GPU driver: rockchip 00:00:00 - SDL Info (0): Direct rendering via DRM is disabled 00:00:00 - SDL Error (0): SDL_Vulkan_GetInstanceExtensions() #1 failed: The specified window isn't a Vulkan window 00:00:00 - SDL Info (0): DRM backend supports exporting EGLImage 00:00:00 - SDL Info (0): EGLRenderer: EGL doesn't support HDR rendering 00:00:00 - SDL Info (0): Opened DRM render node: /dev/dri/renderD128 00:00:00 - SDL Info (0): GPU driver: rockchip 00:00:00 - SDL Info (0): Direct rendering via DRM is disabled 00:00:00 - SDL Error (0): SDL_Vulkan_GetInstanceExtensions() #1 failed: The specified window isn't a Vulkan window 00:00:00 - SDL Info (0): Trying DrmRenderer for codec hevc_rkmpp due to preferred pixel format: 0xb3 00:00:00 - SDL Info (0): Opened DRM render node: /dev/dri/renderD128 00:00:00 - SDL Info (0): GPU driver: rockchip 00:00:00 - SDL Info (0): Direct rendering via DRM is disabled 00:00:00 - SDL Error (0): SDL_Vulkan_GetInstanceExtensions() #1 failed: The specified window isn't a Vulkan window 00:00:00 - SDL Info (0): DRM backend supports exporting EGLImage 00:00:00 - SDL Info (0): EGLRenderer: EGL doesn't support HDR rendering 00:00:00 - SDL Info (0): Opened DRM render node: /dev/dri/renderD128 00:00:00 - SDL Info (0): GPU driver: rockchip 00:00:00 - SDL Info (0): Direct rendering via DRM is disabled 00:00:00 - SDL Info (0): Trying SdlRenderer for codec hevc_rkmpp due to compatible pixel format: 0xe4 00:00:00 - SDL Warn (0): No renderer can handle output from decoder: hevc_rkmpp 00:00:00 - SDL Info (0): Trying SdlRenderer for codec hevc_cuvid due to preferred pixel format: 0x9f 00:00:00 - SDL Info (0): Trying DrmRenderer for codec hevc_cuvid due to compatible pixel format: 0x9f 00:00:00 - SDL Info (0): Opened DRM render node: /dev/dri/renderD128 00:00:00 - SDL Info (0): GPU driver: rockchip 00:00:00 - SDL Info (0): Direct rendering via DRM is disabled 00:00:00 - SDL Error (0): SDL_Vulkan_GetInstanceExtensions() #1 failed: The specified window isn't a Vulkan window 00:00:00 - SDL Info (0): DRM backend supports exporting EGLImage 00:00:00 - SDL Info (0): EGLRenderer: EGL doesn't support HDR rendering 00:00:00 - SDL Info (0): Opened DRM render node: /dev/dri/renderD128 00:00:00 - SDL Info (0): GPU driver: rockchip 00:00:00 - SDL Info (0): Direct rendering via DRM is disabled 00:00:00 - SDL Info (0): Trying PlVkRenderer for codec hevc_cuvid due to compatible pixel format: 0x9f 00:00:00 - SDL Error (0): SDL_Vulkan_GetInstanceExtensions() #1 failed: The specified window isn't a Vulkan window 00:00:00 - SDL Error (0): SDL_Vulkan_GetInstanceExtensions() #1 failed: The specified window isn't a Vulkan window 00:00:00 - SDL Warn (0): No renderer can handle output from decoder: hevc_cuvid 00:00:00 - SDL Info (0): Opened DRM render node: /dev/dri/renderD128 00:00:00 - SDL Info (0): GPU driver: rockchip 00:00:00 - SDL Info (0): Direct rendering via DRM is disabled 00:00:00 - SDL Error (0): SDL_Vulkan_GetInstanceExtensions() #1 failed: The specified window isn't a Vulkan window 00:00:00 - SDL Info (0): DRM backend supports exporting EGLImage 00:00:00 - SDL Info (0): EGLRenderer: EGL doesn't support HDR rendering 00:00:00 - SDL Info (0): Opened DRM render node: /dev/dri/renderD128 00:00:00 - SDL Info (0): GPU driver: rockchip 00:00:00 - SDL Info (0): Direct rendering via DRM is disabled 00:00:00 - SDL Error (0): SDL_Vulkan_GetInstanceExtensions() #1 failed: The specified window isn't a Vulkan window 00:00:00 - SDL Info (0): Trying DrmRenderer for codec hevc_rkmpp due to preferred pixel format: 0xb3 00:00:00 - SDL Info (0): Opened DRM render node: /dev/dri/renderD128 00:00:00 - SDL Info (0): GPU driver: rockchip 00:00:00 - SDL Info (0): Direct rendering via DRM is disabled 00:00:00 - SDL Error (0): SDL_Vulkan_GetInstanceExtensions() #1 failed: The specified window isn't a Vulkan window 00:00:00 - SDL Info (0): DRM backend supports exporting EGLImage 00:00:00 - SDL Info (0): EGLRenderer: EGL doesn't support HDR rendering 00:00:00 - SDL Info (0): Opened DRM render node: /dev/dri/renderD128 00:00:00 - SDL Info (0): GPU driver: rockchip 00:00:00 - SDL Info (0): Direct rendering via DRM is disabled 00:00:00 - SDL Info (0): Trying SdlRenderer for codec hevc_rkmpp due to compatible pixel format: 0xe4 00:00:00 - SDL Warn (0): No renderer can handle output from decoder: hevc_rkmpp 00:00:00 - SDL Error (0): SDL_Vulkan_GetInstanceExtensions() #1 failed: The specified window isn't a Vulkan window 00:00:00 - SDL Error (0): SDL_Vulkan_GetInstanceExtensions() #1 failed: The specified window isn't a Vulkan window 00:00:00 - SDL Info (0): Trying SdlRenderer for codec hevc_cuvid due to preferred pixel format: 0x9f 00:00:00 - SDL Info (0): Trying DrmRenderer for codec hevc_cuvid due to compatible pixel format: 0x9f 00:00:00 - SDL Info (0): Opened DRM render node: /dev/dri/renderD128 00:00:00 - SDL Info (0): GPU driver: rockchip 00:00:00 - SDL Info (0): Direct rendering via DRM is disabled 00:00:00 - SDL Error (0): SDL_Vulkan_GetInstanceExtensions() #1 failed: The specified window isn't a Vulkan window 00:00:00 - SDL Info (0): DRM backend supports exporting EGLImage 00:00:00 - SDL Info (0): EGLRenderer: EGL doesn't support HDR rendering 00:00:00 - SDL Info (0): Opened DRM render node: /dev/dri/renderD128 00:00:00 - SDL Info (0): GPU driver: rockchip 00:00:00 - SDL Info (0): Direct rendering via DRM is disabled 00:00:00 - SDL Info (0): Trying PlVkRenderer for codec hevc_cuvid due to compatible pixel format: 0x9f 00:00:00 - SDL Error (0): SDL_Vulkan_GetInstanceExtensions() #1 failed: The specified window isn't a Vulkan window 00:00:00 - SDL Error (0): SDL_Vulkan_GetInstanceExtensions() #1 failed: The specified window isn't a Vulkan window 00:00:00 - SDL Warn (0): No renderer can handle output from decoder: hevc_cuvid libva info: VA-API version 1.20.0 libva info: Trying to open /usr/lib/aarch64-linux-gnu/dri/rockchip_drv_video.so libva info: va_openDriver() returns -1 00:00:00 - SDL Info (0): Skipping VAAPI fallback driver names on libva 2.20+ 00:00:00 - SDL Error (0): Failed to initialize VAAPI: -1 libva info: VA-API version 1.20.0 libva info: Trying to open /usr/lib/aarch64-linux-gnu/dri/rockchip_drv_video.so libva info: va_openDriver() returns -1 00:00:00 - SDL Info (0): Skipping VAAPI fallback driver names on libva 2.20+ 00:00:00 - SDL Error (0): Failed to initialize VAAPI: -1 00:00:00 - SDL Warn (0): VDPAU is not supported on Wayland 00:00:00 - SDL Warn (0): VDPAU is not supported on Wayland 00:00:00 - SDL Error (0): Unable to find working decoder for format: 200 00:00:00 - SDL Error (0): Unable to load FFmpeg decoder 00:00:00 - SDL Info (0): V-sync disabled libva info: VA-API version 1.20.0 libva info: Trying to open /usr/lib/aarch64-linux-gnu/dri/rockchip_drv_video.so libva info: va_openDriver() returns -1 00:00:00 - SDL Info (0): Skipping VAAPI fallback driver names on libva 2.20+ 00:00:00 - SDL Error (0): Failed to initialize VAAPI: -1 libva info: VA-API version 1.20.0 libva info: Trying to open /usr/lib/aarch64-linux-gnu/dri/rockchip_drv_video.so libva info: va_openDriver() returns -1 00:00:00 - SDL Info (0): Skipping VAAPI fallback driver names on libva 2.20+ 00:00:00 - SDL Error (0): Failed to initialize VAAPI: -1 00:00:00 - SDL Error (0): SDL_Vulkan_GetInstanceExtensions() #1 failed: The specified window isn't a Vulkan window 00:00:00 - SDL Error (0): SDL_Vulkan_GetInstanceExtensions() #1 failed: The specified window isn't a Vulkan window 00:00:00 - SDL Info (0): Trying SdlRenderer for codec av1_cuvid due to preferred pixel format: 0x9f 00:00:00 - SDL Info (0): Trying DrmRenderer for codec av1_cuvid due to compatible pixel format: 0x9f 00:00:00 - SDL Info (0): Opened DRM render node: /dev/dri/renderD128 00:00:00 - SDL Info (0): GPU driver: rockchip 00:00:00 - SDL Info (0): Direct rendering via DRM is disabled 00:00:00 - SDL Error (0): SDL_Vulkan_GetInstanceExtensions() #1 failed: The specified window isn't a Vulkan window 00:00:00 - SDL Info (0): DRM backend supports exporting EGLImage 00:00:00 - SDL Info (0): EGLRenderer: EGL doesn't support HDR rendering 00:00:00 - SDL Info (0): Opened DRM render node: /dev/dri/renderD128 00:00:00 - SDL Info (0): GPU driver: rockchip 00:00:00 - SDL Info (0): Direct rendering via DRM is disabled 00:00:00 - SDL Info (0): Trying PlVkRenderer for codec av1_cuvid due to compatible pixel format: 0x9f 00:00:00 - SDL Error (0): SDL_Vulkan_GetInstanceExtensions() #1 failed: The specified window isn't a Vulkan window 00:00:00 - SDL Error (0): SDL_Vulkan_GetInstanceExtensions() #1 failed: The specified window isn't a Vulkan window 00:00:00 - SDL Warn (0): No renderer can handle output from decoder: av1_cuvid 00:00:00 - SDL Info (0): Opened DRM render node: /dev/dri/renderD128 00:00:00 - SDL Info (0): GPU driver: rockchip 00:00:00 - SDL Info (0): Direct rendering via DRM is disabled 00:00:00 - SDL Error (0): SDL_Vulkan_GetInstanceExtensions() #1 failed: The specified window isn't a Vulkan window 00:00:00 - SDL Info (0): DRM backend supports exporting EGLImage 00:00:00 - SDL Info (0): EGLRenderer: EGL doesn't support HDR rendering 00:00:00 - SDL Info (0): Opened DRM render node: /dev/dri/renderD128 00:00:00 - SDL Info (0): GPU driver: rockchip 00:00:00 - SDL Info (0): Direct rendering via DRM is disabled 00:00:00 - SDL Error (0): SDL_Vulkan_GetInstanceExtensions() #1 failed: The specified window isn't a Vulkan window 00:00:00 - SDL Info (0): Trying DrmRenderer for codec av1_rkmpp due to preferred pixel format: 0xb3 00:00:00 - SDL Info (0): Opened DRM render node: /dev/dri/renderD128 00:00:00 - SDL Info (0): GPU driver: rockchip 00:00:00 - SDL Info (0): Direct rendering via DRM is disabled 00:00:00 - SDL Error (0): SDL_Vulkan_GetInstanceExtensions() #1 failed: The specified window isn't a Vulkan window 00:00:00 - SDL Info (0): DRM backend supports exporting EGLImage 00:00:00 - SDL Info (0): EGLRenderer: EGL doesn't support HDR rendering 00:00:00 - SDL Info (0): Opened DRM render node: /dev/dri/renderD128 00:00:00 - SDL Info (0): GPU driver: rockchip 00:00:00 - SDL Info (0): Direct rendering via DRM is disabled 00:00:00 - SDL Info (0): Trying SdlRenderer for codec av1_rkmpp due to compatible pixel format: 0xe4 00:00:00 - SDL Warn (0): No renderer can handle output from decoder: av1_rkmpp 00:00:00 - SDL Info (0): Trying SdlRenderer for codec av1_cuvid due to preferred pixel format: 0x9f 00:00:00 - SDL Info (0): Trying DrmRenderer for codec av1_cuvid due to compatible pixel format: 0x9f 00:00:00 - SDL Info (0): Opened DRM render node: /dev/dri/renderD128 00:00:00 - SDL Info (0): GPU driver: rockchip 00:00:00 - SDL Info (0): Direct rendering via DRM is disabled 00:00:00 - SDL Error (0): SDL_Vulkan_GetInstanceExtensions() #1 failed: The specified window isn't a Vulkan window 00:00:00 - SDL Info (0): DRM backend supports exporting EGLImage 00:00:00 - SDL Info (0): EGLRenderer: EGL doesn't support HDR rendering 00:00:00 - SDL Info (0): Opened DRM render node: /dev/dri/renderD128 00:00:00 - SDL Info (0): GPU driver: rockchip 00:00:00 - SDL Info (0): Direct rendering via DRM is disabled 00:00:00 - SDL Info (0): Trying PlVkRenderer for codec av1_cuvid due to compatible pixel format: 0x9f 00:00:00 - SDL Error (0): SDL_Vulkan_GetInstanceExtensions() #1 failed: The specified window isn't a Vulkan window 00:00:00 - SDL Error (0): SDL_Vulkan_GetInstanceExtensions() #1 failed: The specified window isn't a Vulkan window 00:00:00 - SDL Warn (0): No renderer can handle output from decoder: av1_cuvid 00:00:00 - SDL Info (0): Opened DRM render node: /dev/dri/renderD128 00:00:00 - SDL Info (0): GPU driver: rockchip 00:00:00 - SDL Info (0): Direct rendering via DRM is disabled 00:00:00 - SDL Error (0): SDL_Vulkan_GetInstanceExtensions() #1 failed: The specified window isn't a Vulkan window 00:00:00 - SDL Info (0): DRM backend supports exporting EGLImage 00:00:00 - SDL Info (0): EGLRenderer: EGL doesn't support HDR rendering 00:00:00 - SDL Info (0): Opened DRM render node: /dev/dri/renderD128 00:00:00 - SDL Info (0): GPU driver: rockchip 00:00:00 - SDL Info (0): Direct rendering via DRM is disabled 00:00:00 - SDL Error (0): SDL_Vulkan_GetInstanceExtensions() #1 failed: The specified window isn't a Vulkan window 00:00:00 - SDL Info (0): Trying DrmRenderer for codec av1_rkmpp due to preferred pixel format: 0xb3 00:00:00 - SDL Info (0): Opened DRM render node: /dev/dri/renderD128 00:00:00 - SDL Info (0): GPU driver: rockchip 00:00:00 - SDL Info (0): Direct rendering via DRM is disabled 00:00:00 - SDL Error (0): SDL_Vulkan_GetInstanceExtensions() #1 failed: The specified window isn't a Vulkan window 00:00:00 - SDL Info (0): DRM backend supports exporting EGLImage 00:00:00 - SDL Info (0): EGLRenderer: EGL doesn't support HDR rendering 00:00:00 - SDL Info (0): Opened DRM render node: /dev/dri/renderD128 00:00:00 - SDL Info (0): GPU driver: rockchip 00:00:00 - SDL Info (0): Direct rendering via DRM is disabled 00:00:00 - SDL Info (0): Trying SdlRenderer for codec av1_rkmpp due to compatible pixel format: 0xe4 00:00:00 - SDL Warn (0): No renderer can handle output from decoder: av1_rkmpp libva info: VA-API version 1.20.0 libva info: Trying to open /usr/lib/aarch64-linux-gnu/dri/rockchip_drv_video.so libva info: va_openDriver() returns -1 00:00:00 - SDL Info (0): Skipping VAAPI fallback driver names on libva 2.20+ 00:00:00 - SDL Error (0): Failed to initialize VAAPI: -1 libva info: VA-API version 1.20.0 libva info: Trying to open /usr/lib/aarch64-linux-gnu/dri/rockchip_drv_video.so libva info: va_openDriver() returns -1 00:00:00 - SDL Info (0): Skipping VAAPI fallback driver names on libva 2.20+ 00:00:00 - SDL Error (0): Failed to initialize VAAPI: -1 00:00:00 - SDL Warn (0): VDPAU is not supported on Wayland 00:00:00 - SDL Warn (0): VDPAU is not supported on Wayland 00:00:00 - SDL Error (0): Unable to find working decoder for format: 2000 00:00:00 - SDL Error (0): Unable to load FFmpeg decoder 00:00:00 - SDL Info (0): V-sync disabled 00:00:00 - SDL Error (0): SDL_Vulkan_GetInstanceExtensions() #1 failed: The specified window isn't a Vulkan window 00:00:00 - SDL Error (0): SDL_Vulkan_GetInstanceExtensions() #1 failed: The specified window isn't a Vulkan window 00:00:00 - SDL Error (0): Unable to find working decoder for format: 200 00:00:00 - SDL Error (0): Unable to load FFmpeg decoder 00:00:00 - SDL Info (0): V-sync disabled 00:00:00 - SDL Error (0): SDL_Vulkan_GetInstanceExtensions() #1 failed: The specified window isn't a Vulkan window 00:00:00 - SDL Error (0): SDL_Vulkan_GetInstanceExtensions() #1 failed: The specified window isn't a Vulkan window 00:00:00 - SDL Error (0): SDL_Vulkan_GetInstanceExtensions() #1 failed: The specified window isn't a Vulkan window 00:00:00 - SDL Error (0): SDL_Vulkan_GetInstanceExtensions() #1 failed: The specified window isn't a Vulkan window 00:00:00 - SDL Error (0): SDL_Vulkan_GetInstanceExtensions() #1 failed: The specified window isn't a Vulkan window 00:00:00 - SDL Error (0): SDL_Vulkan_GetInstanceExtensions() #1 failed: The specified window isn't a Vulkan window 00:00:00 - SDL Error (0): Unable to find working decoder for format: 2000 00:00:00 - SDL Error (0): Unable to load FFmpeg decoder 00:00:00 - SDL Info (0): V-sync disabled libva info: VA-API version 1.20.0 libva info: Trying to open /usr/lib/aarch64-linux-gnu/dri/rockchip_drv_video.so libva info: va_openDriver() returns -1 00:00:00 - SDL Info (0): Skipping VAAPI fallback driver names on libva 2.20+ 00:00:00 - SDL Error (0): Failed to initialize VAAPI: -1 libva info: VA-API version 1.20.0 libva info: Trying to open /usr/lib/aarch64-linux-gnu/dri/rockchip_drv_video.so libva info: va_openDriver() returns -1 00:00:00 - SDL Info (0): Skipping VAAPI fallback driver names on libva 2.20+ 00:00:00 - SDL Error (0): Failed to initialize VAAPI: -1 00:00:00 - SDL Warn (0): VDPAU is not supported on Wayland 00:00:00 - SDL Warn (0): VDPAU is not supported on Wayland 00:00:00 - SDL Error (0): SDL_Vulkan_GetInstanceExtensions() #1 failed: The specified window isn't a Vulkan window 00:00:00 - SDL Error (0): SDL_Vulkan_GetInstanceExtensions() #1 failed: The specified window isn't a Vulkan window 00:00:00 - SDL Info (0): Opened DRM render node: /dev/dri/renderD128 00:00:00 - SDL Info (0): GPU driver: rockchip 00:00:00 - SDL Info (0): Direct rendering via DRM is disabled 00:00:00 - SDL Info (0): DRM backend supports exporting EGLImage 00:00:00 - SDL Info (0): Color buffer is: R8G8B8A0 00:00:00 - SDL Info (0): EGL passed preflight checks. Using EGL for GL context creation. 00:00:00 - SDL Info (0): Using DRM renderer 00:00:00 - FFmpeg: [hevc_mp4toannexb @ 0xffff80cc7f80] The input looks like it is Annex B already 00:00:00 - FFmpeg: [hevc_rkmpp @ 0xffff80cc84f0] Picked up an existing RKMPP hardware device 00:00:00 - FFmpeg: [hevc_rkmpp @ 0xffff80cc84f0] Wrote 335 bytes to decoder 00:00:00 - FFmpeg: [hevc_rkmpp @ 0xffff80cc84f0] Wrote 335 bytes to decoder 00:00:00 - FFmpeg: [hevc_rkmpp @ 0xffff80cc84f0] Noticed an info change 00:00:00 - FFmpeg: [hevc_rkmpp @ 0xffff80cc84f0] Decoder options: deint=true afbc=0 fast_parse=true buf_mode=0 00:00:00 - FFmpeg: [hevc_rkmpp @ 0xffff80cc84f0] Configured with size: 1280x720 | pix_fmt: drm_prime | sw_pix_fmt: nv12 00:00:00 - FFmpeg: [hevc_rkmpp @ 0xffff80cc84f0] Wrote 335 bytes to decoder 00:00:00 - FFmpeg: [hevc_rkmpp @ 0xffff80cc84f0] Received a frame 00:00:00 - SDL Info (0): FFmpeg-based video decoder chosen 00:00:00 - Qt Info: Found "gamecontrollerdb.txt" at "/home/noone/.cache/Moonlight Game Streaming Project/Moonlight/gamecontrollerdb.txt" 00:00:00 - SDL Info (0): Loaded 335 new gamepad mappings 00:00:00 - Qt Debug: Current Moonlight version: "6.1.0" 00:00:01 - Qt Info: Gamepad mappings are up to date 00:00:01 - Qt Info: Latest supported GFE server: "99.99.99.99" Is it going to be able to render 4K over 1G network, with this setup? Regards, Tano -
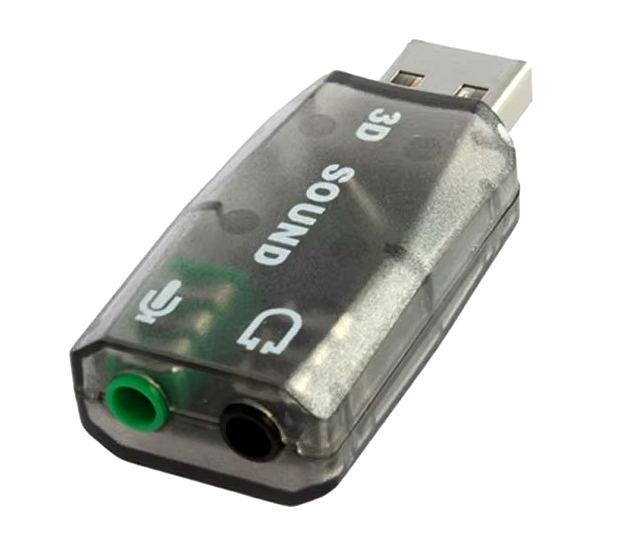
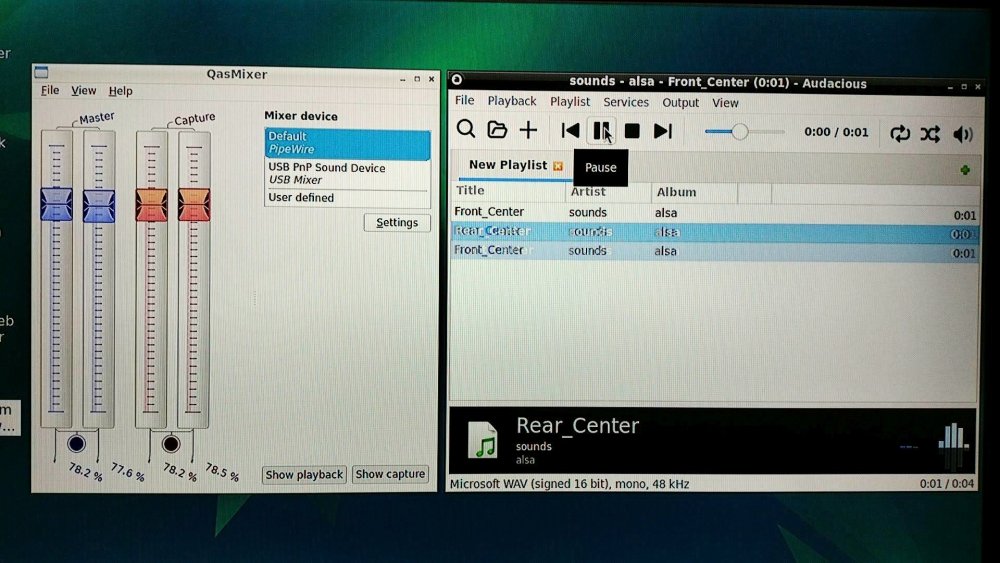
 The previous post was mostly for slightly older releases of Armbian which includes Ubuntu 23 or Debian 10 and lower releases installed on a Tv Box. This short guide is for Ubuntu 24.04 and later releases installed on a Tv Box. This guide should also work for latest versions of Debian (but I didn't test it). Get a generic USB "sound card" audio adapter dongle from AliExpress, eBay, Amazon (etc). See the photo posted above (LINK). These gadgets are often between $2 and $5 USD but they all are usually similar, so I just got the lowest priced one at about $2.50 USD. Insert the USB "sound card" audio adapter dongle into your tv box. Create a new regular user in Linux, and login with the new user (not root). sudo adduser {user-name} Be sure your user is in the group 'audio' and 'sudo', and be sure you have logged in as the user (not root). sudo usermod -a -G audio,sudo {username} Now let's install and setup audio sound using Pipewire and WirePlumber (but not Pulse). First, install alsa base, and mixer software. sudo apt install -y alsa-base alsa-tools alsa-utils alsamixergui qasmixer Make a backup copy of these two text files /etc/modules and /etc/modprobe.d/alsa-base.conf and save the backup copies in your home directory. cp -v /etc/modules $HOME/modules.backup cp -v /etc/modprobe.d/alsa-base.conf $HOME/alsa-base.conf.backup Edit the text file /etc/modules and write “snd-usb-audio” without quotes at the end of the file, and then save and close the file. sudo nano /etc/modules Edit the text file /etc/modprobe.d/alsa-base.conf and change and add some text sudo nano /etc/modprobe.d/alsa-base.conf Put a hash # symbol in front of every “options snd-usb-audio index=-2” that you see in the file /etc/modprobe.d/alsa-base.conf - I found two instances. Add these two lines of text to the bottom of the file /etc/modprobe.d/alsa-base.conf, and then save and close the file. alias snd-card-0 snd-usb-audio options snd-usb-audio index=0 Install pipewire and wireplumber and support files. sudo apt install -y pipewire pipewire-pulse wireplumber pipewire-audio-client-libraries gstreamer1.0-pipewire Optional to install a graphical media player smplayer, vlc, totem, (etc). and optional install a graphical audio player rhythmbox, audacious, (etc). sudo apt install -y smplayer sudo apt install -y audacious In case that the pulse audio system is still installed, we will disable it for the local user. systemctl --user --now disable pulseaudio.service pulseaudio.socket Enable pipewire for the local user systemctl --user --now enable pipewire pipewire-pulse To be sure everything will work, let's reboot sudo reboot Login as the regular user, and run some informative commands to prove that the USB dongle and the pipewire audio system are working. Use alsa player to list audio devices. aplay -l Use alsa player to list PCM audio outputs (use capital "L"). aplay -L Use wireplumber control to show status of audio outputs/inputs via pipewire. wpctl status Use wireplumber control to show a volume level of default output wpctl get-volume @DEFAULT_AUDIO_SINK@ Change the volume using alsa mixer, after running it, press up/down arrow keys, and press "q", "e", "z", "c" and "s" keys. alsamixer Change the volume +/- by ten percent using wireplumber control. wpctl set-volume @DEFAULT_AUDIO_SINK@ 10%+ wpctl set-volume @DEFAULT_AUDIO_SINK@ 10%- * Important * connect a headphone, or amplifier to the 3.5mm output jack 🎧 of the USB adapter dongle and play some audio files. aplay /usr/share/sounds/alsa/Front_Center.wav aplay /usr/share/sounds/alsa/Noise.wav You can also login to the graphical desktop such as lxde or xfce4 and open a video/media player or an audio player software and play some audio files. I used Audacious for this example. Again, audio files are available in the directory /usr/share/sounds/alsa/ From here, you can use the wpctl command (LINK) or another control program for wireplumber. Maybe some of the Pulse audio tools would still work. Audacious works fine when playing locally stored audio files. The same should be true for using SMPlayer or VLC to play video files. Note that depending on the speed of your tv box, Youtube in Chrome / Chromium is sometimes laggy, has delays and resets. Other than that, it's all good. Enjoy ♪ ♫ ☺
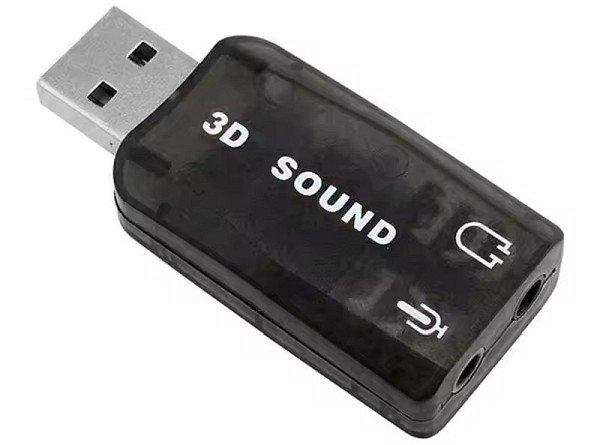

-
 shrink-backup is a bash script for backing up your SBC:s into an img file Version 1.2 Info updated: 20 Oct, 2024. shrink-backup I made this script because I wanted a universal method of backing up my SBC:s into img files as fast as possible (with rsync), no matter what os is in use. Supports backing up root & boot (if existing) partitions. Data from other partitions will be written to root if not excluded (exception for btrfs, all existing subvolumes in /etc/fstab will be created). Please see Info section. Autoexpansion tested on Raspberry Pi os (bookworm and older), Armbian, Manjaro-arm, DietPi and ArchLinuxARM for rpi with ext4 or f2fs root partition. (Now also experimental btrfs functionality, please read further down) Full support for usage inside webmin (including "custom command" button). Latest release: shrink-backup.v1.2 Testing branch if you want to have the absolute latest version. There might be bugs. Very fast restore thanks to minimal size of img file. Can back up any device as long as root is ext4 or f2fs (experimental btrfs) Default device that will be backed up is determined by scanning what disk-device root resides on. This means that if boot is a partition, that partition must be on the same device and before the root partition. Backing up/restoring, to/from: usb-stick /dev/sdX with Raspberry pi os has been tested and works. Ie, writing an sd-card img to a usb-stick and vice versa works. Ultra-fast incremental backups to existing img files. See wiki for information about installation methods, usage and examples. Ideas and feedback is always appreciated, whether it's positive or negative. Please just keep it civil. If you find a bug or think something is missing in the script, please file a Bug report or Feature request Don't forget to ensure the script is executable. To restore a backup, simply "burn" the img file to a device using your favorite method. When booting up a restored image with autoresize active, wait until the the reboot sequence has occured. The login prompt may very well become visible before the autoresize function has rebooted. Usage: shrink-backup -h Script for creating an .img file and subsequently keeing it updated (-U), autoexpansion is enabled by default Directory where .img file is created is automatically excluded in backup ######################################################################## Usage: sudo shrink-backup [-Uatyelhz] [--fix] [--loop] [--f2fs] imagefile.img [extra space (MiB)] -U Update existing img file (rsync to existing img) Optional [extra space] extends img size of root partition -a Autoresize root partition (extra space is ignored) When used in combination with -U: Expand if partition is >=256MiB smaller than resize2fs recommended minimum Shrink if partition is >=512MiB bigger than resize2fs recommended minimum -t Use exclude.txt in same folder as script to set excluded directories One directory per line: "/dir" or "/dir/*" to only exclude contents -y Disable prompts in script (please use this option with care!) -e DO NOT expand filesystem when image is booted -l Write debug messages to logfile shrink-backup.log located in same directory as script -z Make script zoom at light-speed, only question prompts might slow it down Can be combined with -y for UNSAFE ultra mega superduper speed --fix Try to fix the img file if -a fails with a "broken pipe" error --loop [img] Loop img file and exit, works in combination with -l & -z If optional [extra space] is defined, the img file will be extended with the amount before looping NOTE that only the file gets truncated, no partitions Useful if you for example want to manually manage the partitions --f2fs Convert root filesystem on img from ext4 to f2fs Only works on new img file, not in combination with -U Will make backups of fstab & cmdline.txt to: fstab.shrink-backup.bak & cmdline.txt.shrink-backup.bak Then change ext4 to f2fs in both files and add discard to options on root partition in fstab --version Print version and exit -h --help Show this help snippet ######################################################################## Examples: sudo shrink-backup -a /path/to/backup.img (create img, resize2fs calcualtes size) sudo shrink-backup -e -y /path/to/backup.img 1024 (create img, ignore prompts, do not autoexpand, add 1024MiB extra space) sudo shrink-backup -Utl /path/to/backup.img (update img backup, use exclude.txt and write log to shrink-backup.log) sudo shrink-backup -U /path/to/backup.img 1024 (update img backup, expand img size/root partition with 1024MiB) sudo shrink-backup -Ua /path/to/backup.img (update img backup, resize2fs calculates and resizes img file if needed) sudo shrink-backup -Ua --fix /path/to/backup.img 1024 (update img backup, automatically resizes img file if needed, fix img free space) sudo shrink-backup -l --loop /path/to/backup.img 1024 (write to log file, expand IMG FILE (not partition) by 1024MiB and loop) -t (exclude.txt) The folder where the img file is created will ALWAYS be excluded in the backup. If -t option is selected, exclude.txt MUST exist (but can be empty) within the directory where the script is located or the script will exit with an error. Use one directory per line in exclude.txt. /directory/* = create directory but exclude content. /directory = exclude the directory completely. If -t is NOT selected the following folders will be excluded: /lost+found /proc/* /sys/* /dev/* /tmp/* /run/* /mnt/* /media/* /var/swap Please see info section further down. -l (Log file) Use -l to write debug info into shrink-backup.log file in the same directory as the script. -z (Zoom speed) The -z "zoom" option simply removes the one second sleep at each prompt to give the user time to read. By using the option, you save 15-25s when running the script. When used in combination with -y warnings will also be bypassed! PLEASE use with care! --fix (Broken pipe) Add --fix to your options if a backup fails during rsync with a "broken pipe" error. You can also manually add [extra space] instead of using -a to solve this. Example: sudo shrink-backup -Ua --fix /path/to/backup.img The reason it happens is because rsync normally deletes files during the backup, not creating a file-list > removing files from img before starting to copy. So if you have removed and added new data on the system you backup from, there is a risk rsync tries to copy the new data before deleting data from the img, hence completely filling the img. Using --fix makes rsync create a file-list and delete data before starting to transfer new data. This also means the backup takes a little longer. Having a "broken pipe" error during backup has in my experience never broken an img backup after either using --fix (can be used in combination with -a) or adding [extra space] while updating the backup with -U. --loop (Loop img file) Use --loop to loop an img file to your /dev. Example: sudo shrink-backup --loop /path/to/backup.img If used in combination with [extra space] the amount in MiB will be added to the IMG FILE NOT any partition. With this you can run for example run: sudo gparted /dev/loop0 (if you have a graphical interface) to manually manage the img partitions in a graphical interface with gparted. If you added [extra space] this will then show up as unpartitioned space at the end of the device where you can create partition(s) and manually copy data to by mounting the new loop partition that will become visible in lsblk. If you do this, don't forget to create or update the img with -e (disable autoexpansion) first. Autoexpansion will not work since the space will be occupied by your manually managed partition. Example: sudo shrink-backup --loop /path/to/backup.img 1024 This functionality works on any linux system, just use the script on any img file anywhere available to the computer. To remove the loop: sudo losetup -d /dev/loop0, change loop0 to the correct dev it got looped to. To remind yourself: lsblk /dev/loop* (if you forgot the location after using --mount) --f2fs (Convert ext4 into f2fs on img file) ONLY use this for CONVERTING filesystem into img file, if you already have f2fs on your root, do not use this option. The script will detect what filesystem is used on root and act accordingly. Only supported with new backups, not when using -U. Autoexpansion at boot is not supported for f2fs (there is no way of resizing a mounted f2fs filesystem, unlike with ext4) so resizing root partition have to be made manually after writing img to sd-card. Resize operations (when updating backup with -U) is not available for f2fs as of now. The script will make backups of fstab & cmdline.txt into fstab.shrink-backup.bak & cmdline.txt.shrink-backup.bak on the img. It will then change from ext4 to f2fs in fstab & cmdline.txt and add discard to the options on the root partition in fstab. Please read information about f2fs further down. Info Rsync WILL cross filesystem boundries, so make sure you exclude external drives unless you want them included in the backup. (separate /home for example) The script will ONLY create boot (if exits) and root partitions on the img file. The script will ONLY look at your root partition when calculating sizes. Not excluding other partitions will copy the data to the img root partition, not create more partitions so make sure to manually add [extra space] if you do this. Experimental btrfs is an exception to this, all subvolumes will be created. Applications used in the script: fdisk sfdisk dd parted e2fsck truncate mkfs.ext4 rsync gdisk (sgdisk is needed if the partition table is GPT, the script will inform you) ######################################################################## Image creation To create a backup img using recomended size, use the -a option and the path to the img file. Example: sudo shrink-backup -a /path/to/backup.img Theoretically the script should work on any device as long as root filesystem is ext4, f2fs or experimental btrfs. Since the script uses lsblk to crosscheck with /etc/fstab to figure out where the root resides it does not matter what device it is on. Even if you forget to disable autoexpansion on a non supported system, the backup will not fail. Order of operations - image creation Reads the block sizes of the partitions Uses dd to create the boot part of the system + a few megabytes to include the filesystem on root (this can be a partition) Removes and recreates the root partition, size depends on options used when starting the script Creates a new ext4 filesystem with the same UUID and LABEL as the system you are backing up from Uses rsync to sync both partitions (if more than one) Uses lsblk & /etc/fstab to figure out the correct disk device to back up. Reads the block sizes of the system's root (and boot if it exists) partition. Uses dd to create the boot part of the system + a few megabytes to include the filesystem on root. (this can be a partition) Uses df & resize2fs to calculate sizes by analyzing the system's root partition. (For btrfs: btrfs filesystem du + 192MiB is used instead of resize2fs) Uses truncate to resize img file. Loops the img file. Removes and recreates the root partition on the loop of the img file. Creates the root filesystem on loop of the img file with the same UUID and LABEL as the system you are backing up from. Creates a temp directory and mounts img file root partition from loop. Checks if boot partition exists, if true, checks fstab and creates directory on root and mounts accordingly from loop. Uses rsync to sync filesystems. Tries to create autoresize scripts if not disabled with -e. Unmounts and removes temp directory and file (file created for rsync log output). Added space is added on top of df reported “used space”, not the size of the partition. Added space is in MiB, so if you want to add 1GB, add 1024. The script can be instructed to set the img size by requesting recommended minimum size from e2fsck by using the -a option. This is not the absolute smallest size you can achieve bit is the “safest” way to create a “smallest possible” img file. If you do not increase the size of the filesystem you are backing up too much, you can most likely keep it updated with the update function (-U) of the script. By using -a in combination with -U the script will resize the img file if needed (not supported on f2fs). Using combination -Ua on an img that has become overfilled works, if not add --fix and retry. Please see --fix and image update sections for more information. Smallest possible image To get the absolute smallest img file possible, do NOT set -a option and set “extra space” to 0 Example: sudo shrink-backup /path/to/backup.img 0 This will instruct the script to get the used space from df and adding 128MB “wiggle room”. If you are like me, doing a lot of testing, rewriting the sd-card multiple times. The extra time it takes each time will add up pretty fast. Example: -rw-r--r-- 1 root root 3.7G Jul 22 21:27 test.img # file created with -a -rw-r--r-- 1 root root 3.3G Jul 22 22:37 test0.img # file created with 0 Disclaimer: Because of how filesystems work, df is never a true representation of what will actually fit on a created img file. Each file, no matter the size, will take up one block of the filesystem, so if you have a LOT of very small files (running docker f.ex) the “0 added space method” might fail during rsync. Increase the 0 a little bit and retry. This also means you have VERY little free space on the img file after creation. If the filesystem you back up from increases in size, an update (-U) of the img file might fail. By using -a in combination with -U the script will resize the img file if needed (not supported on f2fs). Using combination -Ua on an img that has become overfilled works, if not add --fix and retry. Please see --fix and Image update sections for more information. ######################################################################## Image update To update an existing img file simply use the -U option and the path to the img file. Example: sudo shrink-backup -U /path/to/backup.img Order or operations - image update Loops the img file. Probes the loop of the img file for information about partitions. If -a is selected, calculates sizes by comparing root sizes on system and img file by using fdisk & resize2fs. Expands filesystem on img file if needed or if manually added [extra space] is used. Creates temp directory and mounts root partition from loop. Checks if boot partition exists, if true, checks fstab and creates directory on root and mounts accordingly from loop. Uses rsync to sync filesystems. Shrinks filesystem on img file if -a was used and conditions were met in point 3. Tries to create autoresize scripts if not disabled with -e. Unmounts and removes temp directory and file (file created for rsync log output). Resizing img file when updating If -a is used in combination with -U, the script will compare the root partition on the img file to the size resize2fs recommends as minimum (or du calculations depending on filesystem). The img file root partition needs to be >=256MB smaller than resize2fs recommended minimum to be expanded. The img file root partition needs to be >=512MB bigger than resize2fs recommended minimum to be shrunk. This is to protect from unessesary resizing operations most likely not needed. If manually added [extra space] is used in combination with -U, the img file's root partition will be expanded by that amount. No checks are being performed to make sure the data you want to back up will actually fit. Only expansion is possible with this method. ######################################################################## f2fs The script will detect f2fs on root automatically and act accordingly. Do NOT USE --f2fs unless you are converting from a ext4 filesystem (on your system) into f2fs on the img file. Autoexpansion at boot is not possible with f2fs. User will have to manually expand img to cover entire storage media (f.ex sd-card) when restoring. Resizing of img root partition while updating img (-U) is not possible with f2fs as of now. User will have to create a new backup if img runs out of space. This is something I am planning to implement further down the line. btrfs ALL testing has been done on Manjaro-arm THIS IS NOT A CLONE, IT IS A BACKUP OF REQUIRED FILES FOR A BOOTABLE BTRFS SYSTEM! All options in the script should work just as on ext4. The script will detect btrfs and act accordingly. The script will treat snapshots as nested volumes, so make sure to exclude snapshots if you have any, or directories and nested volumes will be created on the img file. This can be done in exclude.txt, wildcards should work. When starting the script, the initial report window will tell you what volumes will be created. Make sure these are correct before pressing Y. As of now, top level subvolumes are checked for in /etc/fstab and mounted accordingly, mount options should be preseved (if you for example changed compression). Autoresize function works on Manjaro-arm. ---------------------------------------------------------------------------------------------------------------------------------------------------------- Thank you for using my software ❤️ A backup is not really a backup until you have restored from it.
 -
shrink-backup - a tool for backing up sbc:s
bedna replied to bedna's topic in Software, Applications, Userspace
Please use github for issues: https://github.com/UnconnectedBedna/shrink-backup/issues Don't forget to run shrink-backup with -l option and provide the log with the report. Also please try testing branch first, see below. I want to point out there are a ton of reasons for a broken pipe error with rsync that are presented as "no space left", memory on the machine running for example even thought it sounds strange, short network disconnections is another, so most likely these errors are not related to shrink-backup. There have been some changes made to the rsync operation on the testing branch though, primarily an extended --timeout in case it is network related, so please try that out first before creating an issue on github. cd <directory where you git cloned shrink-backup> # switch to testing branch git checkout testing # run shrink-backup sudo ./shrink-backup <whatever options you use> # if you want to switch back to main git checkout main If you used other method than git to acquire the application you can find the testing branch here: https://github.com/UnconnectedBedna/shrink-backup/tree/testing Edit: A solution in a situation like that would be to edit exclude.txt and add paths to what should be excluded and then run shrink-backup with -t option Please see: https://github.com/UnconnectedBedna/shrink-backup/tree/main?tab=readme-ov-file#-t-excludetxt -
Hello everyone, Upgrading from distro isn't supported officially but I tried it anyways and thought I should share my findings. In short, it worked for me. Others have reported issues so maybe we can figure out what causes these issues. My N2+ is fairly vanilla, so I didn't heavily modify it. Running 5.10.x kernel since that is recommended for de N2+ Step 1. Fully upgrade your system on Focal sudo apt-get update sudo apt-get upgrade sudo apt-get dist-upgrade Step 2. Shutdown you N2+ and make an image backup of your emmc using dd or Win32DiskImager in case something goes wrong Step 3. Boot up your N2+ again, disable all 3rd-party applications and PPA and change the release your sources list. sudo sed -i s/deb/#deb/ /etc/apt/sources.list.d/*.list sudo sed -i s/focal/jammy/ /etc/apt/sources.list Step 4. Update sources sudo apt-get update Step 5. This is were the tricky part starts, upgrading packages. Apt will ask to automatically restart services, allow this. Apt will also ask to replace configuration files, personally I kept all my configurations after manually checking them. sudo apt-get upgrade sudo apt-get dist-upgrade Step 6. Reboot the device And if everything works fine Step 7. Re-enable 3rd party applications and PPA and change the release sudo sed -i s/#deb/deb/ /etc/apt/sources.list.d/*.list sudo sed -i s/focal/jammy/ /etc/apt/sources.list.d/*.list sudo apt-get update sudo apt-get dist-upgrade Step 8. Do a last reboot and done, you should be on Jammy. Remember manually upgrading like this is not officially supported by armbian!
-
My goal is to be able to boot mainline kernel actually. I can "boot" orangepi5-pro using the orangepi5 dts in mainline 6.15.4 , but I get no ethernet so that is a no go for me. I dont need wifi, bluetooth or display output, but I need ethernet, emmc and nvme at least. Fdt Ramdisk skip relocation No misc partition ## Flattened Device Tree blob at 0x08300000 Booting using the fdt blob at 0x08300000 Using Device Tree in place at 0000000008300000, end 0000000008316c97 can't found rockchip,drm-logo, use rockchip,fb-logo WARNING: could not set reg FDT_ERR_BADOFFSET. failed to reserve fb-loader-logo memory WARNING: could not set reg FDT_ERR_BADOFFSET. ## reserved-memory: shmem@10f000: addr=10f000 size=100 Adding bank: 0x00200000 - 0xf0000000 (size: 0xefe00000) Adding bank: 0x100000000 - 0x3fc000000 (size: 0x2fc000000) Adding bank: 0x3fc500000 - 0x3fff00000 (size: 0x03a00000) Adding bank: 0x4f0000000 - 0x500000000 (size: 0x10000000) Total: 5511.816/5905.569 ms Starting kernel ... [ 0.000000] Booting Linux on physical CPU 0x0000000000 [0x412fd050] [ 0.000000] Linux version 6.15.4 (root@pi5pro3.lan) (gcc (Ubuntu 13.3.0-6ubuntu2~24.04) 13.3.0, GNU ld (GNU Binutils for Ubuntu) 2.42) #1 SMP Sat Jun 28 00:27:52 UTC 2025 [ 0.000000] KASLR disabled due to lack of seed [ 0.000000] Machine model: Xunlong Orange Pi 5 [ 0.000000] efi: UEFI not found. [ 0.000000] OF: reserved mem: 0x000000000010f000..0x000000000010f0ff (0 KiB) nomap non-reusable shmem@10f000 [ 0.000000] Zone ranges: [ 0.000000] DMA [mem 0x0000000000200000-0x00000000ffffffff] [ 0.000000] DMA32 empty [ 0.000000] Normal [mem 0x0000000100000000-0x00000004ffffffff] [ 0.000000] Movable zone start for each node [ 0.000000] Early memory node ranges [ 0.000000] node 0: [mem 0x0000000000200000-0x00000000efffffff] [ 0.000000] node 0: [mem 0x0000000100000000-0x00000003fbffffff] [ 0.000000] node 0: [mem 0x00000003fc500000-0x00000003ffefffff] [ 0.000000] node 0: [mem 0x00000004f0000000-0x00000004ffffffff] [ 0.000000] Initmem setup node 0 [mem 0x0000000000200000-0x00000004ffffffff] [ 0.000000] On node 0, zone DMA: 512 pages in unavailable ranges [ 0.000000] On node 0, zone Normal: 1280 pages in unavailable ranges [ 0.000000] On node 0, zone Normal: 256 pages in unavailable ranges [ 0.000000] cma: Reserved 16 MiB at 0x00000000ef000000 [ 0.000000] psci: probing for conduit method from DT. [ 0.000000] psci: PSCIv1.1 detected in firmware. [ 0.000000] psci: Using standard PSCI v0.2 function IDs [ 0.000000] psci: MIGRATE_INFO_TYPE not supported. [ 0.000000] psci: SMC Calling Convention v1.2 [ 0.000000] percpu: Embedded 33 pages/cpu s97960 r8192 d29016 u135168 [ 0.000000] Detected VIPT I-cache on CPU0 [ 0.000000] CPU features: detected: GIC system register CPU interface [ 0.000000] CPU features: detected: Virtualization Host Extensions [ 0.000000] CPU features: detected: Qualcomm erratum 1009, or ARM erratum 1286807, 2441009 [ 0.000000] CPU features: detected: ARM errata 1165522, 1319367, or 1530923 [ 0.000000] alternatives: applying boot alternatives [ 0.000000] Kernel command line: root=UUID=0e3353db-b89e-4834-bd3a-f7400169b277 rootwait rw console=ttyS2,1500000 console=tty1 cgroup_enable=cpuset cgroup_memory=1 cgroup_enable=memory androidboot.fwver=ddr-v1.16-9fffbe1e78,bl31-v1.45,uboot-08/31/2024 [ 0.000000] Unknown kernel command line parameters "cgroup_enable=memory cgroup_memory=1", will be passed to user space. [ 0.000000] printk: log buffer data + meta data: 262144 + 917504 = 1179648 bytes [ 0.000000] Dentry cache hash table entries: 2097152 (order: 12, 16777216 bytes, linear) [ 0.000000] Inode-cache hash table entries: 1048576 (order: 11, 8388608 bytes, linear) [ 0.000000] software IO TLB: area num 8. [ 0.000000] software IO TLB: mapped [mem 0x00000000eb000000-0x00000000ef000000] (64MB) [ 0.000000] Built 1 zonelists, mobility grouping on. Total pages: 4192256 [ 0.000000] mem auto-init: stack:off, heap alloc:off, heap free:off [ 0.000000] SLUB: HWalign=64, Order=0-3, MinObjects=0, CPUs=8, Nodes=1 [ 0.000000] ftrace: allocating 68193 entries in 268 pages [ 0.000000] ftrace: allocated 268 pages with 3 groups [ 0.000000] rcu: Hierarchical RCU implementation. [ 0.000000] rcu: RCU event tracing is enabled. [ 0.000000] Rude variant of Tasks RCU enabled. [ 0.000000] Tracing variant of Tasks RCU enabled. [ 0.000000] rcu: RCU calculated value of scheduler-enlistment delay is 30 jiffies. [ 0.000000] RCU Tasks Rude: Setting shift to 3 and lim to 1 rcu_task_cb_adjust=1 rcu_task_cpu_ids=8. [ 0.000000] RCU Tasks Trace: Setting shift to 3 and lim to 1 rcu_task_cb_adjust=1 rcu_task_cpu_ids=8. [ 0.000000] NR_IRQS: 64, nr_irqs: 64, preallocated irqs: 0 [ 0.000000] GIC: enabling workaround for GICv3: non-coherent attribute [ 0.000000] GICv3: GIC: Using split EOI/Deactivate mode [ 0.000000] GICv3: 480 SPIs implemented [ 0.000000] GICv3: 0 Extended SPIs implemented [ 0.000000] GICv3: MBI range [424:479] [ 0.000000] GICv3: Using MBI frame 0x00000000fe610000 [ 0.000000] Root IRQ handler: gic_handle_irq [ 0.000000] GICv3: GICv3 features: 16 PPIs [ 0.000000] GICv3: GICD_CTRL.DS=0, SCR_EL3.FIQ=1 [ 0.000000] GICv3: CPU0: found redistributor 0 region 0:0x00000000fe680000 [ 0.000000] ITS [mem 0xfe640000-0xfe65ffff] [ 0.000000] GIC: enabling workaround for ITS: Rockchip erratum RK3588001 [ 0.000000] GIC: enabling workaround for ITS: non-coherent attribute [ 0.000000] ITS@0x00000000fe640000: allocated 8192 Devices @100150000 (indirect, esz 8, psz 64K, shr 0) [ 0.000000] ITS@0x00000000fe640000: allocated 32768 Interrupt Collections @100160000 (flat, esz 2, psz 64K, shr 0) [ 0.000000] ITS: using cache flushing for cmd queue [ 0.000000] ITS [mem 0xfe660000-0xfe67ffff] [ 0.000000] GIC: enabling workaround for ITS: Rockchip erratum RK3588001 [ 0.000000] GIC: enabling workaround for ITS: non-coherent attribute [ 0.000000] ITS@0x00000000fe660000: allocated 8192 Devices @100180000 (indirect, esz 8, psz 64K, shr 0) [ 0.000000] ITS@0x00000000fe660000: allocated 32768 Interrupt Collections @100190000 (flat, esz 2, psz 64K, shr 0) [ 0.000000] ITS: using cache flushing for cmd queue [ 0.000000] GICv3: using LPI property table @0x00000001001a0000 [ 0.000000] GIC: using cache flushing for LPI property table [ 0.000000] GICv3: CPU0: using allocated LPI pending table @0x00000001001b0000 [ 0.000000] GICv3: GIC: PPI partition interrupt-partition-0[0] { /cpus/cpu@0[0] /cpus/cpu@100[1] /cpus/cpu@200[2] /cpus/cpu@300[3] } [ 0.000000] GICv3: GIC: PPI partition interrupt-partition-1[1] { /cpus/cpu@400[4] /cpus/cpu@500[5] /cpus/cpu@600[6] /cpus/cpu@700[7] } [ 0.000000] rcu: srcu_init: Setting srcu_struct sizes based on contention. [ 0.000000] arch_timer: cp15 timer(s) running at 24.00MHz (phys). [ 0.000000] clocksource: arch_sys_counter: mask: 0xffffffffffffff max_cycles: 0x588fe9dc0, max_idle_ns: 440795202592 ns [ 0.000001] sched_clock: 56 bits at 24MHz, resolution 41ns, wraps every 4398046511097ns [ 0.000930] Console: colour dummy device 80x25 [ 0.000944] printk: legacy console [tty1] enabled [ 0.001803] Calibrating delay loop (skipped), value calculated using timer frequency.. 48.00 BogoMIPS (lpj=80000) [ 0.001832] pid_max: default: 32768 minimum: 301 [ 0.001964] LSM: initializing lsm=capability,apparmor [ 0.002090] AppArmor: AppArmor initialized [ 0.002252] Mount-cache hash table entries: 32768 (order: 6, 262144 bytes, linear) [ 0.002310] Mountpoint-cache hash table entries: 32768 (order: 6, 262144 bytes, linear) [ 0.005371] rcu: Hierarchical SRCU implementation. [ 0.005392] rcu: Max phase no-delay instances is 1000. [ 0.005725] Timer migration: 1 hierarchy levels; 8 children per group; 1 crossnode level [ 0.006942] EFI services will not be available. [ 0.007404] smp: Bringing up secondary CPUs ... [ 0.008106] Detected VIPT I-cache on CPU1 [ 0.008184] GICv3: CPU1: found redistributor 100 region 0:0x00000000fe6a0000 [ 0.008198] GICv3: CPU1: using allocated LPI pending table @0x00000001001c0000 [ 0.008243] CPU1: Booted secondary processor 0x0000000100 [0x412fd050] [ 0.009092] Detected VIPT I-cache on CPU2 [ 0.009165] GICv3: CPU2: found redistributor 200 region 0:0x00000000fe6c0000 [ 0.009178] GICv3: CPU2: using allocated LPI pending table @0x00000001001d0000 [ 0.009220] CPU2: Booted secondary processor 0x0000000200 [0x412fd050] [ 0.010168] Detected VIPT I-cache on CPU3 [ 0.010236] GICv3: CPU3: found redistributor 300 region 0:0x00000000fe6e0000 [ 0.010249] GICv3: CPU3: using allocated LPI pending table @0x00000001001e0000 [ 0.010287] CPU3: Booted secondary processor 0x0000000300 [0x412fd050] [ 0.011061] CPU features: detected: Spectre-v4 [ 0.011067] CPU features: detected: Spectre-BHB [ 0.011072] CPU features: detected: SSBS not fully self-synchronizing [ 0.011075] Detected PIPT I-cache on CPU4 [ 0.011112] GICv3: CPU4: found redistributor 400 region 0:0x00000000fe700000 [ 0.011120] GICv3: CPU4: using allocated LPI pending table @0x00000001001f0000 [ 0.011143] CPU4: Booted secondary processor 0x0000000400 [0x414fd0b0] [ 0.011875] Detected PIPT I-cache on CPU5 [ 0.011918] GICv3: CPU5: found redistributor 500 region 0:0x00000000fe720000 [ 0.011926] GICv3: CPU5: using allocated LPI pending table @0x0000000100200000 [ 0.011951] CPU5: Booted secondary processor 0x0000000500 [0x414fd0b0] [ 0.012678] Detected PIPT I-cache on CPU6 [ 0.012720] GICv3: CPU6: found redistributor 600 region 0:0x00000000fe740000 [ 0.012729] GICv3: CPU6: using allocated LPI pending table @0x0000000100210000 [ 0.012753] CPU6: Booted secondary processor 0x0000000600 [0x414fd0b0] [ 0.013518] Detected PIPT I-cache on CPU7 [ 0.013561] GICv3: CPU7: found redistributor 700 region 0:0x00000000fe760000 [ 0.013570] GICv3: CPU7: using allocated LPI pending table @0x0000000100220000 [ 0.013594] CPU7: Booted secondary processor 0x0000000700 [0x414fd0b0] [ 0.013683] smp: Brought up 1 node, 8 CPUs [ 0.013993] SMP: Total of 8 processors activated. [ 0.014007] CPU: All CPU(s) started at EL2 [ 0.014020] CPU features: detected: 32-bit EL0 Support [ 0.014034] CPU features: detected: Data cache clean to the PoU not required for I/D coherence [ 0.014053] CPU features: detected: Common not Private translations [ 0.014068] CPU features: detected: CRC32 instructions [ 0.014086] CPU features: detected: RCpc load-acquire (LDAPR) [ 0.014100] CPU features: detected: LSE atomic instructions [ 0.014114] CPU features: detected: Privileged Access Never [ 0.014128] CPU features: detected: PMUv3 [ 0.014141] CPU features: detected: RAS Extension Support [ 0.014158] CPU features: detected: Speculative Store Bypassing Safe (SSBS) [ 0.014227] alternatives: applying system-wide alternatives [ 0.016345] CPU features: detected: Hardware dirty bit management on CPU4-7 [ 0.016628] Memory: 16221528K/16769024K available (17152K kernel code, 3516K rwdata, 12656K rodata, 8320K init, 752K bss, 522596K reserved, 16384K cma-reserved) [ 0.020718] devtmpfs: initialized [ 0.027560] clocksource: jiffies: mask: 0xffffffff max_cycles: 0xffffffff, max_idle_ns: 6370867519511994 ns [ 0.027577] posixtimers hash table entries: 4096 (order: 5, 131072 bytes, linear) [ 0.027639] futex hash table entries: 2048 (order: 5, 131072 bytes, linear) [ 0.027758] 22112 pages in range for non-PLT usage [ 0.027761] 513632 pages in range for PLT usage [ 0.027849] pinctrl core: initialized pinctrl subsystem [ 0.028160] DMI not present or invalid. [ 0.030469] NET: Registered PF_NETLINK/PF_ROUTE protocol family [ 0.031132] DMA: preallocated 2048 KiB GFP_KERNEL pool for atomic allocations [ 0.031323] DMA: preallocated 2048 KiB GFP_KERNEL|GFP_DMA pool for atomic allocations [ 0.031490] DMA: preallocated 2048 KiB GFP_KERNEL|GFP_DMA32 pool for atomic allocations [ 0.031519] audit: initializing netlink subsys (disabled) [ 0.031650] audit: type=2000 audit(0.029:1): state=initialized audit_enabled=0 res=1 [ 0.031995] thermal_sys: Registered thermal governor 'fair_share' [ 0.031999] thermal_sys: Registered thermal governor 'step_wise' [ 0.032007] thermal_sys: Registered thermal governor 'user_space' [ 0.032013] thermal_sys: Registered thermal governor 'power_allocator' [ 0.032052] cpuidle: using governor menu [ 0.032179] hw-breakpoint: found 6 breakpoint and 4 watchpoint registers. [ 0.032326] ASID allocator initialised with 65536 entries [ 0.053320] rockchip_rk3588_pll_wait_lock: timeout waiting for pll to lock [ 0.053330] rockchip_rk3588_pll_set_params: pll update unsuccessful, trying to restore old params [ 0.058440] /vop@fdd90000: Fixed dependency cycle(s) with /hdmi@fde80000 [ 0.058480] /hdmi@fde80000: Fixed dependency cycle(s) with /vop@fdd90000 [ 0.061445] /pcie@fe190000: Fixed dependency cycle(s) with /pcie@fe190000/legacy-interrupt-controller [ 0.063859] /i2c@fec80000/usb-typec@22/connector: Fixed dependency cycle(s) with /usb@fc000000 [ 0.064402] /i2c@fec80000/usb-typec@22/connector: Fixed dependency cycle(s) with /phy@fed80000 [ 0.064441] /usb@fc000000: Fixed dependency cycle(s) with /phy@fed80000 [ 0.064475] /phy@fed80000: Fixed dependency cycle(s) with /i2c@fec80000/usb-typec@22/connector [ 0.066929] gpio gpiochip0: Static allocation of GPIO base is deprecated, use dynamic allocation. [ 0.067299] rockchip-gpio fd8a0000.gpio: probed /pinctrl/gpio@fd8a0000 [ 0.067470] gpio gpiochip1: Static allocation of GPIO base is deprecated, use dynamic allocation. [ 0.067632] rockchip-gpio fec20000.gpio: probed /pinctrl/gpio@fec20000 [ 0.067791] gpio gpiochip2: Static allocation of GPIO base is deprecated, use dynamic allocation. [ 0.067946] rockchip-gpio fec30000.gpio: probed /pinctrl/gpio@fec30000 [ 0.068150] gpio gpiochip3: Static allocation of GPIO base is deprecated, use dynamic allocation. [ 0.068299] rockchip-gpio fec40000.gpio: probed /pinctrl/gpio@fec40000 [ 0.068496] gpio gpiochip4: Static allocation of GPIO base is deprecated, use dynamic allocation. [ 0.068646] rockchip-gpio fec50000.gpio: probed /pinctrl/gpio@fec50000 [ 0.069359] /hdmi@fde80000: Fixed dependency cycle(s) with /hdmi0-con [ 0.069395] /hdmi0-con: Fixed dependency cycle(s) with /hdmi@fde80000 [ 0.070486] HugeTLB: allocation took 0ms with hugepage_allocation_threads=2 [ 0.070496] HugeTLB: allocation took 0ms with hugepage_allocation_threads=2 [ 0.070505] HugeTLB: registered 1.00 GiB page size, pre-allocated 0 pages [ 0.070511] HugeTLB: 0 KiB vmemmap can be freed for a 1.00 GiB page [ 0.070519] HugeTLB: registered 32.0 MiB page size, pre-allocated 0 pages [ 0.070524] HugeTLB: 0 KiB vmemmap can be freed for a 32.0 MiB page [ 0.070531] HugeTLB: registered 2.00 MiB page size, pre-allocated 0 pages [ 0.070537] HugeTLB: 0 KiB vmemmap can be freed for a 2.00 MiB page [ 0.070543] HugeTLB: registered 64.0 KiB page size, pre-allocated 0 pages [ 0.070550] HugeTLB: 0 KiB vmemmap can be freed for a 64.0 KiB page [ 0.126828] raid6: neonx8 gen() 6347 MB/s [ 0.183584] raid6: neonx4 gen() 6241 MB/s [ 0.240334] raid6: neonx2 gen() 5196 MB/s [ 0.297084] raid6: neonx1 gen() 4203 MB/s [ 0.353835] raid6: int64x8 gen() 1433 MB/s [ 0.410580] raid6: int64x4 gen() 1867 MB/s [ 0.467326] raid6: int64x2 gen() 2460 MB/s [ 0.524076] raid6: int64x1 gen() 2021 MB/s [ 0.524081] raid6: using algorithm neonx8 gen() 6347 MB/s [ 0.580822] raid6: .... xor() 4730 MB/s, rmw enabled [ 0.580827] raid6: using neon recovery algorithm [ 0.581271] iommu: Default domain type: Translated [ 0.581279] iommu: DMA domain TLB invalidation policy: strict mode [ 0.587176] SCSI subsystem initialized [ 0.587275] usbcore: registered new interface driver usbfs [ 0.587295] usbcore: registered new interface driver hub [ 0.587313] usbcore: registered new device driver usb [ 0.587371] mc: Linux media interface: v0.10 [ 0.587392] videodev: Linux video capture interface: v2.00 [ 0.587425] pps_core: LinuxPPS API ver. 1 registered [ 0.587431] pps_core: Software ver. 5.3.6 - Copyright 2005-2007 Rodolfo Giometti <giometti@linux.it> [ 0.587443] PTP clock support registered [ 0.587495] scmi_core: SCMI protocol bus registered [ 0.587710] Advanced Linux Sound Architecture Driver Initialized. [ 0.588125] Bluetooth: Core ver 2.22 [ 0.588149] NET: Registered PF_BLUETOOTH protocol family [ 0.588155] Bluetooth: HCI device and connection manager initialized [ 0.588163] Bluetooth: HCI socket layer initialized [ 0.588170] Bluetooth: L2CAP socket layer initialized [ 0.588180] Bluetooth: SCO socket layer initialized [ 0.588226] NetLabel: Initializing [ 0.588231] NetLabel: domain hash size = 128 [ 0.588236] NetLabel: protocols = UNLABELED CIPSOv4 CALIPSO [ 0.588270] NetLabel: unlabeled traffic allowed by default [ 0.589731] clocksource: Switched to clocksource arch_sys_counter [ 0.670963] VFS: Disk quotas dquot_6.6.0 [ 0.670982] VFS: Dquot-cache hash table entries: 512 (order 0, 4096 bytes) [ 0.671235] AppArmor: AppArmor Filesystem Enabled [ 0.677902] NET: Registered PF_INET protocol family [ 0.678087] IP idents hash table entries: 262144 (order: 9, 2097152 bytes, linear) [ 0.685075] tcp_listen_portaddr_hash hash table entries: 8192 (order: 6, 262144 bytes, linear) [ 0.685184] Table-perturb hash table entries: 65536 (order: 6, 262144 bytes, linear) [ 0.685218] TCP established hash table entries: 131072 (order: 8, 1048576 bytes, linear) [ 0.685889] TCP bind hash table entries: 65536 (order: 10, 4194304 bytes, linear) [ 0.688980] TCP: Hash tables configured (established 131072 bind 65536) [ 0.689163] MPTCP token hash table entries: 16384 (order: 7, 786432 bytes, linear) [ 0.689373] UDP hash table entries: 8192 (order: 8, 1310720 bytes, linear) [ 0.689895] UDP-Lite hash table entries: 8192 (order: 8, 1310720 bytes, linear) [ 0.690454] NET: Registered PF_UNIX/PF_LOCAL protocol family [ 0.690773] RPC: Registered named UNIX socket transport module. [ 0.690782] RPC: Registered udp transport module. [ 0.690787] RPC: Registered tcp transport module. [ 0.690792] RPC: Registered tcp-with-tls transport module. [ 0.690798] RPC: Registered tcp NFSv4.1 backchannel transport module. [ 0.691298] PCI: CLS 0 bytes, default 64 [ 0.691383] Trying to unpack rootfs image as initramfs... [ 0.698503] kvm [1]: nv: 566 coarse grained trap handlers [ 0.698745] kvm [1]: IPA Size Limit: 40 bits [ 0.698763] kvm [1]: GICv3: no GICV resource entry [ 0.698769] kvm [1]: disabling GICv2 emulation [ 0.698774] kvm [1]: GIC system register CPU interface enabled [ 0.698791] kvm [1]: vgic interrupt IRQ18 [ 0.698811] kvm [1]: VHE mode initialized successfully [ 0.700158] Initialise system trusted keyrings [ 0.700329] workingset: timestamp_bits=46 max_order=22 bucket_order=0 [ 0.700695] NFS: Registering the id_resolver key type [ 0.700712] Key type id_resolver registered [ 0.700718] Key type id_legacy registered [ 0.700731] nfs4filelayout_init: NFSv4 File Layout Driver Registering... [ 0.700738] nfs4flexfilelayout_init: NFSv4 Flexfile Layout Driver Registering... [ 0.723786] NET: Registered PF_ALG protocol family [ 0.723800] xor: measuring software checksum speed [ 0.724322] 8regs : 6351 MB/sec [ 0.724723] 32regs : 8326 MB/sec [ 0.725048] arm64_neon : 10254 MB/sec [ 0.725053] xor: using function: arm64_neon (10254 MB/sec) [ 0.725062] Key type asymmetric registered [ 0.725068] Asymmetric key parser 'x509' registered [ 0.725102] Block layer SCSI generic (bsg) driver version 0.4 loaded (major 243) [ 0.725243] io scheduler mq-deadline registered [ 0.725251] io scheduler kyber registered [ 0.733227] ledtrig-cpu: registered to indicate activity on CPUs [ 0.735078] dma-pl330 fea10000.dma-controller: Loaded driver for PL330 DMAC-241330 [ 0.735090] dma-pl330 fea10000.dma-controller: DBUFF-128x8bytes Num_Chans-8 Num_Peri-32 Num_Events-16 [ 0.735962] dma-pl330 fea30000.dma-controller: Loaded driver for PL330 DMAC-241330 [ 0.735973] dma-pl330 fea30000.dma-controller: DBUFF-128x8bytes Num_Chans-8 Num_Peri-32 Num_Events-16 [ 0.736901] dma-pl330 fed10000.dma-controller: Loaded driver for PL330 DMAC-241330 [ 0.736913] dma-pl330 fed10000.dma-controller: DBUFF-128x8bytes Num_Chans-8 Num_Peri-32 Num_Events-16 [ 0.737680] Serial: 8250/16550 driver, 10 ports, IRQ sharing disabled [ 0.739948] printk: legacy console [ttyS2] disabled [ 0.740114] feb50000.serial: ttyS2 at MMIO 0xfeb50000 (irq = 40, base_baud = 1500000) is a 16550A [ 0.740214] printk: legacy console [ttyS2] enabled [ 0.895545] arm-smmu-v3 fc900000.iommu: ias 48-bit, oas 48-bit (features 0x001c1e8f) [ 0.896687] arm-smmu-v3 fc900000.iommu: allocated 65536 entries for cmdq [ 0.897806] arm-smmu-v3 fc900000.iommu: allocated 32768 entries for evtq [ 0.898891] arm-smmu-v3 fc900000.iommu: msi_domain absent - falling back to wired irqs [ 0.900808] platform fdb50000.video-codec: Adding to iommu group 0 [ 0.902062] platform fdba0000.video-codec: Adding to iommu group 1 [ 0.903254] platform fdba4000.video-codec: Adding to iommu group 2 [ 0.904482] platform fdba8000.video-codec: Adding to iommu group 3 [ 0.905704] platform fdbac000.video-codec: Adding to iommu group 4 [ 0.906853] platform fdd90000.vop: Adding to iommu group 5 [ 0.911863] rockchip-drm display-subsystem: bound fdd90000.vop (ops vop2_component_ops) [ 0.912924] [drm] Initialized rockchip 1.0.0 for display-subsystem on minor 0 [ 0.913571] rockchip-drm display-subsystem: [drm] Cannot find any crtc or sizes [ 0.917039] brd: module loaded [ 0.920292] loop: module loaded [ 0.920776] rbd: loaded (major 254) [ 0.921119] lkdtm: No crash points registered, enable through debugfs [ 0.923637] /spi@feb20000/pmic@0: Fixed dependency cycle(s) with /spi@feb20000/pmic@0/regulators/dcdc-reg6 [ 0.924494] /spi@feb20000/pmic@0: Fixed dependency cycle(s) with /spi@feb20000/pmic@0/regulators/dcdc-reg7 [ 0.925373] /spi@feb20000/pmic@0: Fixed dependency cycle(s) with /spi@feb20000/pmic@0/dvs3-null-pins [ 0.926178] /spi@feb20000/pmic@0: Fixed dependency cycle(s) with /spi@feb20000/pmic@0/dvs2-null-pins [ 0.926998] /spi@feb20000/pmic@0: Fixed dependency cycle(s) with /spi@feb20000/pmic@0/dvs1-null-pins [ 0.928358] spi-nor spi5.0: supply vcc not found, using dummy regulator [ 0.929058] spi-nor spi5.0: unrecognized JEDEC id bytes: ff ff ff ff ff ff [ 0.931239] rk_gmac-dwmac fe1c0000.ethernet: IRQ eth_lpi not found [ 0.931787] rk_gmac-dwmac fe1c0000.ethernet: IRQ sfty not found [ 0.932399] rk_gmac-dwmac fe1c0000.ethernet: supply phy not found, using dummy regulator [ 0.933169] rk_gmac-dwmac fe1c0000.ethernet: clock input or output? (output). [ 0.933796] rk_gmac-dwmac fe1c0000.ethernet: TX delay(0x42). [ 0.934294] rk_gmac-dwmac fe1c0000.ethernet: Can not read property: rx_delay. [ 0.934919] rk_gmac-dwmac fe1c0000.ethernet: set rx_delay to 0x10 [ 0.935460] rk_gmac-dwmac fe1c0000.ethernet: integrated PHY? (no). [ 0.941016] rk_gmac-dwmac fe1c0000.ethernet: init for RGMII_RXID [ 0.941701] rk_gmac-dwmac fe1c0000.ethernet: User ID: 0x30, Synopsys ID: 0x51 [ 0.942330] rk_gmac-dwmac fe1c0000.ethernet: DWMAC4/5 [ 0.942783] rk_gmac-dwmac fe1c0000.ethernet: DMA HW capability register supported [ 0.943446] rk_gmac-dwmac fe1c0000.ethernet: RX Checksum Offload Engine supported [ 0.944102] rk_gmac-dwmac fe1c0000.ethernet: TX Checksum insertion supported [ 0.944719] rk_gmac-dwmac fe1c0000.ethernet: Wake-Up On Lan supported [ 0.945307] rk_gmac-dwmac fe1c0000.ethernet: TSO supported [ 0.945790] rk_gmac-dwmac fe1c0000.ethernet: Enable RX Mitigation via HW Watchdog Timer [ 0.946495] rk_gmac-dwmac fe1c0000.ethernet: Enabled L3L4 Flow TC (entries=2) [ 0.947121] rk_gmac-dwmac fe1c0000.ethernet: Enabled RFS Flow TC (entries=10) [ 0.947746] rk_gmac-dwmac fe1c0000.ethernet: TSO feature enabled [ 0.948272] rk_gmac-dwmac fe1c0000.ethernet: SPH feature enabled [ 0.948799] rk_gmac-dwmac fe1c0000.ethernet: Using 32/32 bits DMA host/device width [ 0.949950] mdio_bus stmmac-0: MDIO device at address 1 is missing. [ 0.951975] usbcore: registered new interface driver asix [ 0.952471] usbcore: registered new interface driver cdc_ether [ 0.953000] usbcore: registered new interface driver rndis_host [ 0.953544] usbcore: registered new interface driver cdc_ncm [ 0.954308] VFIO - User Level meta-driver version: 0.3 [ 0.971555] xhci-hcd xhci-hcd.0.auto: xHCI Host Controller [ 0.972049] xhci-hcd xhci-hcd.0.auto: new USB bus registered, assigned bus number 1 [ 0.972784] xhci-hcd xhci-hcd.0.auto: hcc params 0x0220fe64 hci version 0x110 quirks 0x0000808002000010 [ 0.973078] ehci-platform fc800000.usb: EHCI Host Controller [ 0.973085] ohci-platform fc840000.usb: Generic Platform OHCI controller [ 0.973096] ohci-platform fc840000.usb: new USB bus registered, assigned bus number 2 [ 0.973149] ohci-platform fc840000.usb: irq 57, io mem 0xfc840000 [ 0.973692] xhci-hcd xhci-hcd.0.auto: irq 54, io mem 0xfcd00000 [ 0.973769] ehci-platform fc880000.usb: EHCI Host Controller [ 0.973786] ohci-platform fc8c0000.usb: Generic Platform OHCI controller [ 0.973792] ehci-platform fc880000.usb: new USB bus registered, assigned bus number 3 [ 0.973807] ohci-platform fc8c0000.usb: new USB bus registered, assigned bus number 4 [ 0.973910] ehci-platform fc880000.usb: irq 56, io mem 0xfc880000 [ 0.973930] ohci-platform fc8c0000.usb: irq 58, io mem 0xfc8c0000 [ 0.974111] ehci-platform fc800000.usb: new USB bus registered, assigned bus number 5 [ 0.974254] xhci-hcd xhci-hcd.0.auto: xHCI Host Controller [ 0.974761] ehci-platform fc800000.usb: irq 55, io mem 0xfc800000 [ 0.975393] xhci-hcd xhci-hcd.0.auto: new USB bus registered, assigned bus number 6 [ 0.982313] xhci-hcd xhci-hcd.0.auto: Host supports USB 3.0 SuperSpeed [ 0.982968] usb usb1: New USB device found, idVendor=1d6b, idProduct=0002, bcdDevice= 6.15 [ 0.983100] ehci-platform fc880000.usb: USB 2.0 started, EHCI 1.00 [ 0.983701] usb usb1: New USB device strings: Mfr=3, Product=2, SerialNumber=1 [ 0.984875] usb usb1: Product: xHCI Host Controller [ 0.985305] usb usb1: Manufacturer: Linux 6.15.4 xhci-hcd [ 0.985779] usb usb1: SerialNumber: xhci-hcd.0.auto [ 0.986535] hub 1-0:1.0: USB hub found [ 0.986883] hub 1-0:1.0: 1 port detected [ 0.987403] usb usb6: We don't know the algorithms for LPM for this host, disabling LPM. [ 0.988166] usb usb6: New USB device found, idVendor=1d6b, idProduct=0003, bcdDevice= 6.15 [ 0.988892] usb usb6: New USB device strings: Mfr=3, Product=2, SerialNumber=1 [ 0.989526] usb usb6: Product: xHCI Host Controller [ 0.989961] usb usb6: Manufacturer: Linux 6.15.4 xhci-hcd [ 0.990436] usb usb6: SerialNumber: xhci-hcd.0.auto [ 0.991111] hub 6-0:1.0: USB hub found [ 0.991456] hub 6-0:1.0: 1 port detected [ 0.991989] usbcore: registered new interface driver cdc_acm [ 0.992135] usb usb3: New USB device found, idVendor=1d6b, idProduct=0002, bcdDevice= 6.15 [ 0.992487] cdc_acm: USB Abstract Control Model driver for USB modems and ISDN adapters [ 0.992645] usbcore: registered new interface driver uas [ 0.993067] ehci-platform fc800000.usb: USB 2.0 started, EHCI 1.00 [ 0.993244] usb usb3: New USB device strings: Mfr=3, Product=2, SerialNumber=1 [ 0.993967] usbcore: registered new interface driver usb-storage [ 0.994414] usb usb3: Product: EHCI Host Controller [ 0.995247] mousedev: PS/2 mouse device common for all mice [ 0.995595] usb usb3: Manufacturer: Linux 6.15.4 ehci_hcd [ 0.996210] i2c_dev: i2c /dev entries driver [ 0.996568] usb usb3: SerialNumber: fc880000.usb [ 0.998852] hub 3-0:1.0: USB hub found [ 0.999232] fan53555-regulator 0-0042: FAN53555 Option[10] Rev[1] Detected! [ 0.999240] hub 3-0:1.0: 1 port detected [ 0.999401] fan53555-regulator 2-0042: FAN53555 Option[10] Rev[1] Detected! [ 0.999681] fan53555-regulator 0-0043: FAN53555 Option[10] Rev[1] Detected! [ 1.000409] usb usb5: New USB device found, idVendor=1d6b, idProduct=0002, bcdDevice= 6.15 [ 1.001466] usb usb5: New USB device strings: Mfr=3, Product=2, SerialNumber=1 [ 1.001470] usb usb5: Product: EHCI Host Controller [ 1.002206] usb usb5: Manufacturer: Linux 6.15.4 ehci_hcd [ 1.003276] usb usb5: SerialNumber: fc800000.usb [ 1.003312] rtc-hym8563 6-0051: no valid clock/calendar values available [ 1.003487] hub 5-0:1.0: USB hub found [ 1.003503] hub 5-0:1.0: 1 port detected [ 1.005606] rtc-hym8563 6-0051: registered as rtc0 [ 1.007027] rtc-hym8563 6-0051: no valid clock/calendar values available [ 1.007614] rtc-hym8563 6-0051: hctosys: unable to read the hardware clock [ 1.008116] rockchip-rga fdb80000.rga: HW Version: 0x03.02 [ 1.008820] rockchip-rga fdb80000.rga: Registered rockchip-rga as /dev/video0 [ 1.009690] usbcore: registered new interface driver uvcvideo [ 1.010877] rockchip-thermal fec00000.tsadc: Missing rockchip,grf property [ 1.013508] sdhci: Secure Digital Host Controller Interface driver [ 1.014053] sdhci: Copyright(c) Pierre Ossman [ 1.014436] Synopsys Designware Multimedia Card Interface Driver [ 1.015167] sdhci-pltfm: SDHCI platform and OF driver helper [ 1.016377] arm-scmi arm-scmi.2.auto: Using scmi_smc_transport [ 1.016907] arm-scmi arm-scmi.2.auto: SCMI max-rx-timeout: 30ms / max-msg-size: 104bytes / max-msg: 20 [ 1.017789] scmi_protocol scmi_dev.1: Enabled polling mode TX channel - prot_id:16 [ 1.018587] arm-scmi arm-scmi.2.auto: SCMI Notifications - Core Enabled. [ 1.019203] arm-scmi arm-scmi.2.auto: SCMI Protocol v2.0 'rockchip:' Firmware version 0x0 [ 1.025854] SMCCC: SOC_ID: ARCH_SOC_ID not implemented, skipping .... [ 1.026591] hid: raw HID events driver (C) Jiri Kosina [ 1.027329] usbcore: registered new interface driver usbhid [ 1.027823] usbhid: USB HID core driver [ 1.030576] usb usb2: New USB device found, idVendor=1d6b, idProduct=0001, bcdDevice= 6.15 [ 1.031307] usb usb2: New USB device strings: Mfr=3, Product=2, SerialNumber=1 [ 1.031942] usb usb2: Product: Generic Platform OHCI controller [ 1.032462] usb usb2: Manufacturer: Linux 6.15.4 ohci_hcd [ 1.032937] usb usb2: SerialNumber: fc840000.usb [ 1.033758] hub 2-0:1.0: USB hub found [ 1.033813] hw perfevents: enabled with armv8_cortex_a55 PMU driver, 7 (0,8000003f) counters available [ 1.034109] hub 2-0:1.0: 1 port detected [ 1.035680] usb usb4: New USB device found, idVendor=1d6b, idProduct=0001, bcdDevice= 6.15 [ 1.035716] hw perfevents: enabled with armv8_cortex_a76 PMU driver, 7 (0,8000003f) counters available [ 1.036450] usb usb4: New USB device strings: Mfr=3, Product=2, SerialNumber=1 [ 1.037900] usb usb4: Product: Generic Platform OHCI controller [ 1.038434] usb usb4: Manufacturer: Linux 6.15.4 ohci_hcd [ 1.038723] usbcore: registered new interface driver snd-usb-audio [ 1.038920] usb usb4: SerialNumber: fc8c0000.usb [ 1.040516] hub 4-0:1.0: USB hub found [ 1.040904] hub 4-0:1.0: 1 port detected [ 1.042057] Initializing XFRM netlink socket [ 1.042476] NET: Registered PF_PACKET protocol family [ 1.043067] Key type dns_resolver registered [ 1.043452] Key type ceph registered [ 1.044028] libceph: loaded (mon/osd proto 15/24) [ 1.049961] registered taskstats version 1 [ 1.050450] Loading compiled-in X.509 certificates [ 1.054967] Key type .fscrypt registered [ 1.055316] Key type fscrypt-provisioning registered [ 1.056402] Btrfs loaded, zoned=no, fsverity=no [ 1.056854] AppArmor: AppArmor sha256 policy hashing enabled [ 1.076343] random: crng init done [ 1.083807] cfg80211: Loading compiled-in X.509 certificates for regulatory database [ 1.246494] usb 5-1: new high-speed USB device number 2 using ehci-platform [ 1.384450] usb 5-1: New USB device found, idVendor=1a40, idProduct=0101, bcdDevice= 1.11 [ 1.385196] usb 5-1: New USB device strings: Mfr=0, Product=1, SerialNumber=0 [ 1.385835] usb 5-1: Product: USB 2.0 Hub [ 1.387049] hub 5-1:1.0: USB hub found [ 1.387645] hub 5-1:1.0: 4 ports detected [ 3.055599] Freeing initrd memory: 92432K [ 3.070564] Loaded X.509 cert 'sforshee: 00b28ddf47aef9cea7' [ 3.071501] Loaded X.509 cert 'wens: 61c038651aabdcf94bd0ac7ff06c7248db18c600' [ 3.072197] clk: Disabling unused clocks [ 3.075155] PM: genpd: Disabling unused power domains [ 3.075634] ALSA device list: [ 3.075900] No soundcards found. [ 3.080084] Freeing unused kernel memory: 8320K [ 3.080529] Run /init as init process [ 3.416753] rk_gmac-dwmac fe1c0000.ethernet end0: renamed from eth0 [ 4.616898] async_tx: api initialized (async) [ 4.714374] NET: Registered PF_INET6 protocol family [ 4.715947] Segment Routing with IPv6 [ 4.716324] In-situ OAM (IOAM) with IPv6 [ 4.723206] device-mapper: ioctl: 4.49.0-ioctl (2025-01-17) initialised: dm-devel@lists.linux.dev [ 4.726511] Key type encrypted registered [ 4.733545] 8021q: 802.1Q VLAN Support v1.8 [ 4.740925] rk_gmac-dwmac fe1c0000.ethernet end0: Register MEM_TYPE_PAGE_POOL RxQ-0 [ 4.743535] rk_gmac-dwmac fe1c0000.ethernet end0: Register MEM_TYPE_PAGE_POOL RxQ-1 [ 4.746426] rk_gmac-dwmac fe1c0000.ethernet end0: __stmmac_open: Cannot attach to PHY (error: -19) [ 33.759835] vcc3v3_pcie20: disabling [ 34.774410] rk_gmac-dwmac fe1c0000.ethernet end0: Register MEM_TYPE_PAGE_POOL RxQ-0 [ 34.775895] rk_gmac-dwmac fe1c0000.ethernet end0: Register MEM_TYPE_PAGE_POOL RxQ-1 [ 34.777527] rk_gmac-dwmac fe1c0000.ethernet end0: __stmmac_open: Cannot attach to PHY (error: -19)
-
 Thank you, than i try with Gnome, without the Ubuntu bloat that should be okay still if i just using desktop for doing some admin stuff. For serving it will only be in console mode without any kind of running desktop manager i just though that it could be little better if desktop can run in the background for faster access but its not big deal if not.
 -
DISCLAIMERS (PLEASE READ): Everything you can find in this thread (binaries, texts, code snippets, etc...) are provided AS-IS and are not part of official Armbian project. For this reason not people from Armbian project nor myself are responsible for misuse or loss of functionality of hardware. THIS POST explains very well the troubles with TV Boxes and why they are not suitable for everyone Please don't ask about support or assistance in other non-community forums nor in the official Armbian github repository, instead post your questions in this thread, in the TV Boxes forum section (hardware related) or in the Peer-to-peer support section (general linux/software related). Following the recent thread on LibreElec forum about an unofficial image for rk3229 devices, I would like to make public the work made by me and @fabiobassa about bringing rk322x support to armbian. The project is now in -> mainline Armbian <- development fork -> here <- This first page and the last 3 or 4 pages of the thread are enough to get up to date with recent developments. Many useful experiences are scattered through the thread, but the most important things are collected here in the first page, so please read it carefully! Mainline kernel is fully supported and will receive most support in the future. Legacy kernel 4.4 is deprecated, but is kept around only for special purposes. What works: Should boot and work flawlessy on all boards with RK3228a, RK3228b and RK3229, with either DDR2 and DDR3 memories. Mainline u-boot Proprietary OPTEE provided as Trusted Execution Environment (needed for DRAM frequency scaling) All 4 cores are working Ethernet Serial UART (configured at 115200 bps, not 1.5Mbps!) Thermals, CPU and DRAM frequency scaling OTG USB 2.0 port (also as boot device!) EHCI/OHCI USB 2.0 ports MMC subsystem (including eMMC, SD and sdio devices) Hardware video acceleration NAND is available only on legacy kernel. To fully boot from NAND, use the Multitool and its steP-nand installation (instructions are below) Various WIFI over SDIO are supported (SSV6051P, SSV6256P, ESP8089, Realtek chips, etc...), ssv6256p driver is available only on legacy kernel Full GPU acceleration U-boot boot order priority: first the sdcard, then the USB OTG port and eventually the internal eMMC; you can install u-boot (and the whole system) in the internal eMMC and u-boot will always check for images on external sdcard/USB first. Unbrick: Technically, rockchip devices cannot be bricked. If the internal flash does not contain a bootable system, they will always boot from the sdcard. If, for a reason, the bootable system on the internal flash is corrupted or is unable to boot correctly, you can always force the maskrom mode shorting the eMMC clock pin on the PCB. Here there is the procedure, but you can also google around if you get stuck on a faulty bootloader, the technique is pretty simple and requires a simple screwdriver. There are however some unfortunate cases (expecially newer boards) where shorting the eMMC clock pin is difficult or impossibile, like eMMC or eMCP BGA chips with no exposed pins. In those cases pay double attention when burning something on the internal eMMC/eMCP and always test first the image from the sdcard to be sure it works before burning anything on eMMC/eMCP. Some useful links with pins, pads or procedures for some boards: Generic procedure for boards with non-BGA eMMC MXQPRO_V71 - eMCP H20 - eMCP ZQ01 - eMCP NAND vs eMMC vs eMCP difference: RK3228 and RK3229 tv boxes comes with three different flash memory chips: eMMC, NAND and eMCP. It does not depend upon the market name of the tv box and neither the internal board; manufacturers put whatever they find cheaper when they buy the components. NAND chip is just the non-volatile memory eMMC chip contains both the non-volatile memory plus a controller. eMCP chip contains the non-volatile memory, a controller for the non-volatile memory (like eMMC), but also contains a bank of DDR SDRAM memory on the same physical chip. The difference is very important, because eMMC and eMCP are far easier to support at various levels: the controller deals with the physical characteristics of the non-volatile memory, so the software has no to deal with. NAND chips instead are harder to support, because the software is required to deal with the physical characteristics and non-standard things that depends upon the NAND manufacturer. If you have a NAND chips you're unlucky because mainline kernel currently cannot access it, but also because you need special care and instructions explained later. You can discover if you have a NAND, eMMC or eMCP chip looking on the board are reading the signature on the flash memory chip. The Multitool (see later) also can detect which chip you have onboard: the program will warn you at startup if you have a NAND chip. NAND bootloader upgrade: IMPORTANT: don't do this is you have an eMMC or eMCP; skip this paragraph if you are unsure too! For very expert people who are having issues when (re)booting images, there is the chance to upgrade the bootloader on NAND. The NAND bootloader is nothing else than a regular idbloader (see official rockchip documentation) but contains some bits to correctly access the data on your flash memory. Upgrading requires to erase the existing flash content, in the worst case will require you to follow the Unbrick procedure above or restore an older but more compatible bootloader. If you are not mentally ready to overcome possible further issues, don't do this! The detailed instructions and the binaries are available at this post Multimedia: Mainline kernel: 3D acceleration is provided by Lima driver and is already enabled. Hardware video decoding: https://forum.armbian.com/topic/19258-testing-hardware-video-decoding-rockchip-allwinner/ Deprecated legacy kernel: multimedia features, like OpenGL/OpenGL ES acceleration, hardware accelerated Kodi, ffmpeg and mpv you can take a look to this post An effective tutorial from @Hai Nguyen on how to configure a box as a hi-quality music player using an USB audio card, and controlling it via remote control is available in this post Brief explanation about kernel naming: current kernel is the mainline LTS kernel version, most maintained and tested. This is the suggested version for production devices. If you don't know what to pick, pick this. legacy kernel (version 4.4) is provided by manufacturer; it is deprecated, unmaintained and not suggested. edge kernel is the development mainline kernel version, with experimental features and drivers; usually stable but perhaps suitable for production devices. You can switch from one kernel flavour to another using armbian-config or manually via apt. Installation (via SD card): Building: You can build your own image follow the common steps to build armbian for other tv boxes devices: when you are in the moment to choose the target board, switch to CSC/TVB/EOL boards and select "rk322x-box" from the list. Download prebuilt images from the following links: Archive builds (GPG-signed) - https://imola.armbian.com/dl/rk322x-box/archive/ SUGGESTED - Nightly built from trunk each week by Armbian servers (GPG-signed) - https://github.com/armbian/community Old images provided by me (unsigned and outdated) - https://users.armbian.com/jock/rk322x/armbian/stable Archived/older images: https://armbian.hosthatch.com/archive/rk322x-box/archive/ Multitool: The Multitool is a small but powerful tool to do quick backup/restore of internal flash, but also burn images and general system rescue and maintenance via terminal or SSH. Compressed images will be uncompressed on fly. Multitool - A small but powerful image for RK322x TV Box maintenance (instructions to access via network here) Quick installation instructions on eMMC: Build or download your preferred Armbian image and a copy of the Multitool; Burn the Multitool on an SD card; once done, place the Armbian image in images folder of the SD card NTFS partition; Plug the SD card in the TV box and plug in the power cord. After some seconds the blue led starts blinking and the Multitool appears; OPTIONAL: you can do a backup of the existing firmware with "Backup flash" menu option; Choose "Burn image to flash" from the menu, then select the destination device (usually mmcblk2) and the image to burn; Wait for the process to complete, then choose "Shutdown" from main menu; Unplug the power cord and the SD card, then replug the power cord; Wait for 10 seconds, then the led should start blinking and HDMI will turn on. The first time the boot process will take a couple of minutes or more because the filesystem is going to be resized, so be patient and wait for the login prompt. On first boot you will be asked for entering a password for root user of your choice and the name and password for a regular user Run sudo rk322x-config and select your board characteristics to enable leds, wifi chips, high-speed eMMC, etc... Run sudo armbian-config to configure timezone, locales and other personal options Congratulations, Armbian is now installed and configured! Despite the procedure above is simple and reliable, I always recommend to first test that your device boots Armbian images from SD Card. Due to the really large hardware variety, there is the rare chance that the images proposed here may not boot. If a bad image is burned in eMMC, the box may not boot anymore forcing you to follow the unbrick section at the top of this post. Quick installation instructions on NAND: Build or download your preferred Armbian image and a copy of the Multitool; Burn the Multitool on an SD card; once done, place the Armbian legacy kernel image in images folder of the SD card NTFS partition; Plug the SD card in the TV box and plug in the power cord. After some seconds the blue led starts blinking and the Multitool appears; OPTIONAL: you can do a backup of the existing firmware with "Backup flash" menu option; Choose "Burn Armbian image via steP-nand" from the menu, then select the destination device (usually rknand0) and the image to burn; Wait for the process to complete, then choose "Shutdown" from main menu; Unplug the power cord and the SD card, then replug the power cord; Wait for 10 seconds, then the led should start blinking and HDMI will turn on. The first time the boot process will take a couple of minutes or more because the filesystem is going to be resized, so be patient and wait for the login prompt. On first boot you will be asked for entering a password for root user of your choice and the name and password for a regular user Run sudo rk322x-config and select your board characteristics to enable leds, wifi chips, etc... Run armbian-config to configure timezone, locales and other personal options Congratulations, Armbian is now installed! Alternative: you can install the bootloader in NAND and let it boot from SD Card or USB: Download a copy of the Multitool and burn it on an SD card; Plug the SD card in the TV box and plug in the power cord. After some seconds the blue led starts blinking and the Multitool appears; RECOMMENDED: make a backup of the existing firmware with "Backup flash" menu option; Choose "Install Jump Start for Armbian" menu option: the Jump Start uses the internal NAND to boot from external SD Card or external USB Stick; Follow the general instructions to boot from SD Card below, skip the first erase eMMC step. Quick installation instructions to boot from SD Card: If you are already running Armbian from eMMC, skip to the next step. Instead if you are running the original firmware you need to first erase the internal eMMC; to do so download the Multitool, burn it on an SD Card, plug the SD Card and power the TV Box. Use "Backup flash" if you want to do a backup of the existing firmware, then choose "Erase flash" menu option. Build or download your preferred Armbian image; Uncompress and burn the Armbian image on the SD Card; Plug the SD Card in the TV Box and power it on; Wait for 10 seconds, then the led should start blinking and HDMI will turn on. The first time the boot process will take a couple of minutes or more because the filesystem is going to be resized, so be patient and wait for the login prompt; On first boot you will be asked for entering a password for root user of your choice and the name and password for a regular user Run sudo rk322x-config and select your board characteristics to enable leds, wifi chips, high-speed eMMC or NAND, etc... Run armbian-config to configure timezone, locales and other personal options, or also to transfer the SD Card installation to internal eMMC; Congratulations, Armbian is running from SD Card! A note about boot device order: With Armbian also comes mainline U-boot. If you install Armbian or just the bootloader in the eMMC or the Jump Start on internal NAND, the bootloader will look for valid bootable images in this order: External SD Card External USB Stick in OTG Port Internal eMMC Installation (without SD card, board with eMMC) If you have no sd card slot and your board has an eMMC, you can burn the armbian image directly on the internal eMMC using rkdeveloptool and a male-to-male USB cable: Download your preferred Armbian image from Armbian download page and decompress it. Download the rk322x bootloader: rk322x_loader_v1.10.238_256.bin Download a copy of rkdeveloptool: a compiled binary is available in the official rockchip-linux rkbin github repository. Unplug the power cord from the tv box Plug an end of an USB Male-to-male cable into the OTG port (normally it is the lone USB port on the same side of the Ethernet, HDMI, analog AV connectors) while pressing the reset microbutton with a toothpick. You can find the reset microbutton in a hole in the back of the box, but sometimes it is hidden into the AV analog jack Plug the other end of the USB Male-to-male cable into an USB port of your computer If everything went well, run lsusb: you should see a device with ID 2207:320b Run sudo rkdeveloptool rd 3 (if this fails don't worry and proceed to next step) Run sudo rkdeveloptool db rk322x_loader_v1.10.238_256.bin Run sudo rkdeveloptool wl 0x0 image.img (change image.img this with the real Armbian image filename) Unplug the power cord Done! Installation (without SD card, board with NAND) If you are in the unfortunate case you can't use an SD card for installation and your board has a NAND chip, you still have an option to use the quick Multitool installation steps via USB. Obtain a copy of rkdeveloptool: a compiled binary is available in the official rockchip-linux rkbin github repository. Unplug the power cord from the tv box Plug an end of an USB Male-to-male cable into the OTG port (normally it is the lone USB port on the same side of the Ethernet, HDMI, analog AV connectors) while pressing the reset microbutton with a toothpick. You can find the reset microbutton in a hole in the back of the box, but sometimes it is hidden into the AV analog jack Plug the other end of the USB Male-to-male cable into an USB port of your computer If everyting went well, using lsusb you should see a device with ID 2207:320b Run sudo rkdeveloptool wl 0x4000 u-boot-main.img (download u-boot-main.img.xz , don't forget to decompress it!) Unplug the power cord Now you can follow the instructions on how to install on eMMC/NAND via SD card, just use instead an USB stick to do all the operations and plug it into the USB OTG port. Once you reboot, USB OTG port will be used as a boot device. NOTE: NAND users without SD slot may be unhappy to know that it will be difficult to do extra maintenance with Multitool in case something breaks in the installed Armbian system: installing u-boot-main.img makes the installed system unbootable because it is missing the NAND driver. Alternative backup, restore and erase flash for EXPERTS: These backup, restore and erase flash procedures are for experts only. They are kept here mostly for reference, since the Multitool is perfectly able to do same from a very comfy interface and is the suggested way to do maintenance. Backup: Obtain a copy of rkdeveloptool: a compiled binary is available in the official rockchip-linux rkbin github repository. If you prefer, you can compile it yourself from the sources available at official rockchip repository Unplug the power cord from the tv box Plug an end of an USB Male-to-male cable into the OTG port (normally it is the lone USB port on the same side of the Ethernet, HDMI, analog AV connectors) while pressing the reset microbutton with a toothpick. You can find the reset microbutton in a hole in the back of the box, but sometimes it is hidden into the AV analog jack Plug the other end of the USB Male-to-male cable into an USB port of your computer If everyting went well, using lsusb you should see a device with ID 2207:320b change directory and move into rkbin/tools directory, run ./rkdeveloptool rfi then take note of the FLASH SIZE megabytes (my eMMC is 8Gb, rkdeveloptool reports 7393 megabytes) run ./rkdeveloptool rl 0x0 $((FLASH_SIZE * 2048)) backup.data (change FLASH_SIZE with the value you obtained the step before) once done, the internal eMMC is backed up to backup.data file Restore: first we have to restore the original bootloader, then restore the original firmware. Running rkdeveloptool with these switches will accomplish both the jobs: ./rkdeveloptool db rk322x_loader_v1.10.238_256.bin Downloading bootloader succeeded. ./rkdeveloptool ul rk322x_loader_v1.10.238_256.bin Upgrading loader succeeded. ./rkdeveloptool wl 0x0 backup.data Write LBA from file (100%) Download here: Erase the flash memory: clearing the internal eMMC/NAND memory makes the SoC look for external SD Card as first boot option. If there isn't any suitable SD Card, the SoC enters maskrom mode, which can then be used for full eMMC/NAND access using rkdeveloptool. This is perfectly fine if your box has an eMMC flash memory. NOTE: In case you have a NAND flash memory this option is however discouraged. The original bootloader contains some special parameters to correctly access the data. Clearing the flash memory will probably garbage the NAND data and restoring the bootloader may require some special instructions. Obtain a copy of rkdeveloptool: a compiled binary is available in the official rockchip-linux rkbin github repository. If you prefer, you can compile it yourself from the sources available at official rockchip repository Unplug the power cord from the board Plug an end of an USB Male-to-male cable into the OTG port (normally it is the lone USB port on the same side of the Ethernet, HDMI, analog AV connectors) while pressing the reset microbutton with a toothpick. You can find the reset microbutton in a hole in the back of the box, but sometimes it is hidden into the AV analog jack Plug the other end of the USB Male-to-male cable into an USB port of your computer If everyting went well, using lsusb you should see a device with ID 2207:320b run ./rkdeveloptool ef and wait a few seconds once done, the internal eMMC is erased and the device will boot from the sdcard from now on Partecipation and debugging: If you want to partecipate or need help debugging issues, do not hesitate to share your experience with the installation procedure of the boxes. In case of issues and missed support, provide as many as possible of these things is very useful to try and bring support for an unsupported board: some photos of both sides of the board. Details of the eMMC, DDR and Wifi chips are very useful! upload the device tree binary (dtb) of your device. We can understand a lot of things of the hardware from that small piece of data; and alternative is a link to the original firmware (you can do a full backup with the Multitool); dmesg and other logs (use armbianmonitor -u that automatically collects and uploads the logs online) attach a serial converter to the device and provide the output of the serial port; Critics, suggestions and contributions are welcome! Credits: @fabiobassa for his ideas, inspiration, great generosity in giving the boards for development and testing. The project of bringing rk322x into armbian would not have begun without his support! Justin Swartz, for his work and research to bring mainline linux on rk3229 (repository here) @knaerzche for his great contribution to libreelec support and mainline patches @Alex83 for his patience in testing the NAND bootloader upgrade procedure on his board @Jason Duhamell for his generous donation that allowed researching eMCP boards and esp8089 wifi chip
-
I'm, using one of those CH340 based usb-uart dongles https://www.aliexpress.com/w/wholesale-usb-uart-ch340.html but that normally most usb-uart dongles would work https://www.aliexpress.com/w/wholesale-usb-uart.html just make sure to check that it has / uses 3.3V io levels. Not 5V io levels as that may damage the processor (cpu / soc) for the pins connection review the user manual http://www.orangepi.org/html/hardWare/computerAndMicrocontrollers/service-and-support/Orange-Pi-Zero-3.html it is the 3 pins labelled Debug TTL UART on their board photo http://www.orangepi.org/img/zero3/0627-zero3 (6).png --- off-topic: for these small boards, I've basically stopped running them with an LCD monitor and keyboard as I find it a hassle as I'm using a desktop PC and trying to share the monitor. I mostly use them 'headless' using the usb-uart port. And in fact, after you setup the network appropriately e.g. set a static IP address or install avahi, the usb-uart console is no longer needed for static (fixed) IP address it is covered in the networking guide https://docs.armbian.com/User-Guide_Networking/ for avahi (MDNS) > apt install avahi-daemon avahi-utils edit /etc/avahi/avahi-daemon.conf [publish] publish-workstation=yes you can find the board on the ethernet over MDNS e.g. https://github.com/hrzlgnm/mdns-browser and you can ssh into the board over the network, e.g. using putty https://www.putty.org/
-
as I've not been running X11, I can't really help with this, but among the things, check the logs during X startup (normally /var/log/*), that could lead to the cause. note also that more recently, the display systems are running wayland rather than X11. that could cause xfce etc to fail if it is expecting an X11 based setup it is also recommended to bootup in the uart console (debug) port using a usb-uart dongle. - the benefits are numerous, the boot messages are mostly presented - it provides you with a console to login and check things while the system is running e.g. to login and check dmesg and other logs - essential especially when re-wiring network configuration
-
I have seen many Wifi Benchmarks for speed only and not for reliability. I stopped doing wifi benchmarks for speed since i get very different values for the same board a few hours later,. For real life projects reliability and availability is what matters when you depends solely in wifi network. I would strongly suggest @tkaiser to include "reliability" in his tests, maybe a new thread. As for example you can try iperf with -t 1000, -t 2000, -t 3000 and -t 10000 (if it allows?). Try this with your board and see what happens...
-
Hi everyone, I’m working on a custom Armbian build for an RK3588-based board (cm3588-nas) and trying to completely disable the Rockchip crypto driver (rk_crypto2), since it's negatively impacting LUKS (AES-XTS) performance. Despite several attempts, the module continues to register algorithms in /proc/crypto after boot: driver : rk2-sm3 module : rk_crypto2 driver : rk2-sha512 module : rk_crypto2 driver : xts-aes-rk2 module : rk_crypto2 ... ------------------------------------------------------------ What I’ve Tried ------------------------------------------------------------ 1. Kernel Config Override - Added CONFIG_CRYPTO_DEV_ROCKCHIP=n and CONFIG_CRYPTO_DEV_ROCKCHIP2=n to: userpatches/linux-rockchip-rk3588-edge.config - Verified .config has it set to n after build. - Used CLEAN_LEVEL="make,debs,oldcache" in the build command. 2. Blacklisting & Deletion in customize-image.sh echo "blacklist rk_crypto" > /etc/modprobe.d/blacklist-rk_crypto.conf rm -f /lib/modules/*/kernel/drivers/crypto/rockchip/rk_crypto.ko* 3. Post-Boot Verification - lsmod | grep rk_crypto → empty - modinfo rk_crypto → module not found - /proc/crypto still shows rk2-* drivers tied to rk_crypto2 4. Manual Source Removal - Commented out this line in drivers/crypto/rockchip/Makefile: # obj-$(CONFIG_CRYPTO_DEV_ROCKCHIP) += rk_crypto.o - Also removed or disabled its Kconfig entry. ------------------------------------------------------------ System Details ------------------------------------------------------------ Board : cm3588-nas (RK3588) Kernel : rockchip-rk3588 edge (Linux 6.8.x) Builder : Official Armbian compile.sh ------------------------------------------------------------ Goal ------------------------------------------------------------ I want to fully disable the Rockchip crypto engine (rk_crypto2): - It should not load, not build, and not register anything in /proc/crypto. - LUKS should fall back to software crypto (cryptd, aesni, or default fallback). ------------------------------------------------------------ Any help is appreciated. I’d love to hear from anyone who’s successfully disabled rk_crypto2 entirely or has ideas for where the registration is coming from even when the module appears removed. Thanks!
-
 A while back I tried the more recent kernels (non-legacy) and noticed these issues. Back then I didn't have the possibility to investigate further and I just ended up forcing the kernel back to old legacy kernel. This time around I have the time to actually troubleshoot more, so here we go. When I last updated everything, the kernel got updated from 6.1.104-legacy-sunxi64 to 6.6.75-legacy-sunxi64, the immediate thing I noticed was that the WLAN did get detected. There is a thread about missing wifi with a linked PR, but either that fix hasn't landed in the 6.6.x kernel or something else is wrong. The other issue is that the 6.6.x kernel seems to be very unstable. Having zram turned on will cause the system to crash within minutes from startup. Disabling zram makes the system more stable, but eventually there is a crash. The reason why I was looking at zram was due to the swapper mention in this message I got on the serial console. Note that the output is slightly corrupted due to my extra shoddy serial console that I cobbled together for emergency access. [ 651.303088] Unable to handle kernel NULL pointer dereference at virtual address 0000000000000ec9 [ 651.311994] Mem abort info: [ 651.314808] ESR = 0x0000000096000006 [ 651.318589] EC = 0x25: DABT (current EL),HR bits [ 651.323937] SET = 0, FnV = 0 [ 651.327007] EA = 0, S1PTW = 0 [ 651.330202] FSC = 0x06: level 2 translation fault [ 651.335153] Data abort info: [ MLi� ISV = 0, ISS = 0x00000006, ISS2 = 0x00000000 [ 651.343601] CM = 0, WnR = 0, Tb= 0 [ 651.348705] GCS = 0Kzٕɱ= 0, DirtyBit = 0, Xs = 0 [ 651.354076] user pgtable: 4k pages, 48-bit VAs, pgdp=0000000043760000 [ 651.360576] [0000000000000ec9] pgd=0800000043c45003, p4d=080000004,SbՑ0800000043af6003, pmd=0000000000000000 [ 651.371253] Inter[X * Oops: 0000000096000006 [#1] SMP [ 651.376843] Modules linked in: lz4hc lz4 zram zsmalloc binfmt_misc nls_iso8859_1 rtl8xxxu mac80211 snd_soc_hdmi_codec cfg80211 rfkill libarc4 polyval_ce polyval_generic cdc_acm sunxi_cir r_ephy sunxi_ac200 [ 651.417619] CPU: 1 PID: 0 Comm: swapper/1 Tainted: G C $rrjbsunxi64 #1 [ 651.426311] Hardware name: BigTreeTech CB1 (DT) [ 651.430848] pstate: 60000005 (nZCv daif -PAN -UAO -TCO -DIT -SSBS BTYPE=--) [ 651.437822] pc : n K}}}0x18/0xa4 [ 651.442473] lr : do_idle+0x38/0x270 [ 651.445975] sp : f�0 [ 651.449291] x29: ffff800081cbbe10 x28: 0000000000000000 x27: 0000000000000000 [ 651.456445] x26: 0000000000000000 x25: 000000000004: 0000000000000000 [ 651.463595] x23: 0000000000000000 x22: 0000000000000000 x21: 000j [ 651.470746] x20: 0000000000000001 x19: 00000000000000L8: 0000000000000000 [ 651.477901] x17: 0000000000000000 x16: 0000000000000000 x15: 00000000035ffbb0 [ 651.485055] x14: 000000000000028b x13: ffff8000810dde30 x12: ffff800081a29af8 [ 651.492206] x11: 0000000000000001 x10: 00000000000009a0 x9 : ffff800081cbbd50C[ 651.499359] x8 : ffff0000020a6c00 x7 : ffff00003fd81340 x6 : ffff000003504280 [ 651.506510] x5 : 00000000410fd030 x4 : 0000000000000ec1 x3 : 0000000000000j [ 651.513638] x2 : ffff8000817f42c0 x1 : ffff8000817f42c0 x] Code: 913b0084 d000bae2 910b0042 aa0203e1 (f8607883) [ 651.546301] ---[ end trace 0000000000000000 ]--- [ 651.551024] Kernel panic - not syncing: Attempted to kill the idle task! [ 651.557741] SMP: stopping secondary CPUs [ 651.561666] Kernel Offset: disabled [ 651.565150] CPU features: 0x0,00000008,00020000,0000420b [ 651.570457] Memory Limit: none [ 651.MӪ---[ end Kernel panic - not syncing: Attempted to kill the idle task! ]--- I'll keep the system in this state for a while and figure out a better serial console so that I can collect more clean data. The board is in a printer and is in a bit awkward location for more conventional troubleshooting.
 -
The distributions for this SBC don't boot due to errors to thermal device. I saw some messages in the forum where has be told that disabling thermal check the distribution works. Can you blacklist or disable thermal sensors check?
-
Hey everyone, for the past couple of days I've been looking into the Mesa-VPU script made by AmazingFate that's used to patch Mesa/VPU onto a custom build of Armbian. https://github.com/armbian/build/blob/main/extensions/mesa-vpu.sh I already have an install of Armbian (Debian XFCE 6.12.28-current-rockchip64 ) on my Rock5b and was looking into applying as much as I can without re-building an image or starting from scratch. From my understanding, You'd need the vendor rk3588 kernel if you want the best possible compatibility with things like the VPU for multimedia acceleration (Someone please correct me if this is not the case lol) What follows is what I was able to piece together after troubleshooting, reading the Mesa changelog & trying to apply as many packages as I can from AmazingFate's kernel extension script. I've also included some tweaks for XFCE to hopefully provide a smooth graphical experience. Although my Rock5b is used as a headless server and doesnt have anything plugged into the HDMI port, I can say that the following changes have made a huge difference in graphical performance of VNC. Please keep in mind that i'm not a developer for Armbian. I just wanted to share this as a guide i've put together to hopefully help someone else who's tried the same (Please let me know your thoughts or if there was anything i've missed. Like I said, this is what has worked for me) (Obviously the correct fix is to rebuild Armbian with Mesa-VPU. What follows was done as an experiment) #################### GUIDE BELOW. THIS IS NOT A SHELL SCRIPT! PLEASE READ AND DO NOT COPY/PASTE ENTIRETY INTO TERMINAL!############################# #### -- 01 Setup AmazingFate Panfork-Mesa repo for mali-g610-firmware 01 -- #### ## 1A: import gpg key and use it to sign repo ## wget -qO - https://download.opensuse.org/repositories/home:/amazingfate:/panfork-mesa/Debian_12/Release.key | sudo gpg --dearmor -o /etc/apt/trusted.gpg.d/panfork-mesa.gpg ## 1B: Add Repo to apt sources & update ## echo "deb https://download.opensuse.org/repositories/home:/amazingfate:/panfork-mesa/Debian_12/ /" | sudo tee /etc/apt/sources.list.d/panfork-mesa.list sudo apt update ## 1C: Install firmware ## sudo apt install mali-g610-firmware libmali-g610-x11 ## 1D: **RECOMMENDED** : Remove panfork-mesa repo ## sudo rm -rf /etc/apt/sources.list.d/panfork-mesa.list sudo rm -rf /etc/apt/trusted.gpg.d/panfork-mesa.gpg #### -- 02 Enable Debian Experimental Repo for recent Mesa Packages 02 -- #### sudo nano /etc/apt/sources.list ## 2A: Add the following to the bottom of the document... ## deb http://deb.debian.org/debian unstable main contrib non-free deb http://deb.debian.org/debian experimental main ## 2B: Update and install Mesa Packages ## sudo apt update sudo apt install -t experimental mesa-vulkan-drivers mesa-utils libgl1-mesa-dri libglx-mesa0 mesa-vdpau-drivers mesa-va-drivers mesa-opencl-icd mesa-libgallium ## 2C: **RECOMMENDED** : Re-open apt sources and remove Experimental/Unstable repos... ## sudo nano /etc/apt/sources.list #Remove the following and update apt...# deb http://deb.debian.org/debian unstable main contrib non-free deb http://deb.debian.org/debian experimental main sudo apt update #### -- 03 Add rockchip-multimedia Ubuntu Repo to Apt 03 -- #### echo "deb [arch=arm64] https://ppa.launchpadcontent.net/liujianfeng1994/rockchip-multimedia/ubuntu jammy main" | sudo tee /etc/apt/sources.list.d/rockchip-multimedia.list ## 3A: Download Key and add convert to gpg ## curl -o rockchip-multimedia.asc "https://keyserver.ubuntu.com/pks/lookup?op=get&search=0x8065BE1FC67AABDE" gpg --dearmor rockchip-multimedia.asc sudo mv rockchip-multimedia.asc.gpg /etc/apt/keyrings/rockchip-multimedia.gpg ## 3B: Add PPA Repo and update ## echo "deb [arch=arm64 signed-by=/etc/apt/keyrings/rockchip-multimedia.gpg] https://ppa.launchpadcontent.net/liujianfeng1994/rockchip-multimedia/ubuntu jammy main" | sudo tee /etc/apt/sources.list.d/rockchip-multimedia.list sudo apt update ## 3C: Install packages ## sudo apt install libv4l-rkmpp chromium gstreamer1.0-rockchip1 rockchip-multimedia-config ## 3D: **OPTIONAL** : Disable rockchip-multimedia PPA repo ## sudo mv /etc/apt/sources.list.d/rockchip-multimedia.list /etc/apt/sources.list.d/rockchip-multimedia.list.disabled sudo apt update #### -- 04 Optimize XFCE/Xorg and Reboot 04 -- #### ## 4A: Open default xorg config ## sudo nano /etc/X11/xorg.conf.d/01-armbian-defaults.conf #Add the following... # Section "Device" Identifier "Mali-G610" Driver "modesetting" Option "DRI" "3" # Required for Mali GPUs Option "GALLIUM_DRIVER" "panfrost" Option "PageFlip" "on" # Reduces tearing Option "TearFree" "true" # Xfce-specific anti-tearing EndSection ## 4B: Add XFCE Specific tweaks ## sudo nano /etc/X11/xorg.conf.d/20-xfce-tweaks.conf #Add the following... # Section "Extensions" Option "COMPOSITE" "Enable" EndSection Section "ServerFlags" Option "AutoAddGPU" "off" # Prevents duplicate GPU detection EndSection ## 4C: Reboot ## sudo reboot now
-
@robertoj there are some 'old' stuff that may not be fully relevant but still useful this gist likely helps: https://gist.github.com/ag88/de02933ba65500376d1ff48e504b1bf3 an 'old' post: Note that currently in the minimal image netplan is set to systemd-networkd https://docs.armbian.com/User-Guide_Networking/#minimal-images I'm less familiar with systemd-networkd, though it is possible to setup the network fully with it. What i did currently, is to update netplan config as above to use NetworkManager After that I use NetworkManger to setup a bridge adding the ethernet interface. https://gist.github.com/ag88/de02933ba65500376d1ff48e504b1bf3 . However, I actually make NetworkManager *unmanage* the Wifi interface, because i'm using hostapd. I'm using hostapd mainly because in journalctl logs, there is an entry for every host/client that connects. I'm not sure about how to do the same with Network Manager. hostapd also supports elaborate RADIUS authentication if one wants to go the distance. Then I install and configure hostapd as described in the gist, and during startup, hostapd actually patch the wifi interface into the bridge that is setup with NetworkManager.. The configuration for wifi AP is completely done in hostapd.conf as described in the gist. I'm using a bridge as DHCP is managed from my gateway router, hence I did not run a separate DHCP server instance in Orange Pi Zero 3 itself. An alternative setup is to setup NAT (network address translation) on the Orange Pi Zero 3 and to run a DHCP server on the Orange Pi Zero 3 itself. I think NAT approach is 'more common' I'm using hostapd, but I think without hostapd, it is also possible to setup an AP using NetworkManager alone. i.e. to let Network Manager manage the Wifi interface, and configure it as an AP. The benefit here is that Network manager woulld likely manage the DHCP and NAT as well all from Network Manager configurations. As I'm doing everything from the command line, I used NetworkManager cli (nmcli) for all the network manager configuration tasks. Note that while messing with networking, it is necessary to work in the serial debug console using a usb-uart dongle. i.e. bootup and login as root using a usb-uart dongle to the 3 'debug' pins for the serial console.
-
True. Also on most computers we have eth0 Not just eth Devices naming is a cosmetic thing from the outside / user perspection, while it has consistency issue from the inside and currently breaks initial (default netplan) configuration. Our job is not to tell user how to configure his network, but that network devices gets up at first boot. Now they do. Job done.
-
I am not sure if this line in the yaml file makes sense: all-wan-interfaces: # include interfaces that are renamed to 'wanX' by udev, e.g. nanopi-r1 There is usually only 1 WAN interface on routers. The print on my R6C is "WAN" and "LAN1". WAN is clearly the Rockchip GMAC. Actually I use it as 'LAN', as the only RJ45 cable. Only temporary I also use the PCI-E / 2.5GbE port while bridging with the GMAC, so I have a real 2.5GbE port as peer for my ROCK5B (just for speedtests). For the R5C, the Rockchip GMAC is not used. A rename from WAN to WAN1 I would refuse, but I do not use netplan.io, so not affected. I have the R6C now flashed with EDK2-UEFI and running Tumbleweed. 70-persistent-net.rules is empty, but Armbian 6.15.2-edge-rockchip64 kernel. I am not sure why the naming is still OK (wan and lan1, so my .nmconnection files keep working). With other kernel it gets end0 and enP3p49s0, I might use those eventually, ignoring what is printed on the case, depends how often I am going to unplug/plug network cables. For the R5C, the ports in the schematics are named "LAN1" and "LAN2", not sure how they map to what is printed on the case. They are each 1 lane of the PCIE3x2, that might be a problem for some kernel and/or bootloader.