
Search the Community
Showing results for 'tv'.
-
Hello, I'am recently install Armbian_community 24.5.0-trunk.563 Bookworm with Linux 6.6.30-current-rockchip64 on RKM v3 tv-stick and it works good, excepting wireless: root@rk3318-box:~# dmesg | grep brcmfmac [ 10.596796] brcmfmac: F1 signature read @0x18000000=0x1532a9a6 [ 10.609573] brcmfmac: brcmf_fw_alloc_request: using brcm/brcmfmac43430b0-sdio for chip BCM43430/2 [ 10.610733] usbcore: registered new interface driver brcmfmac [ 10.611292] brcmfmac mmc1:0001:1: Direct firmware load for brcm/brcmfmac43430b0-sdio.rockchip,rk3318-box.bin failed with error -2 [ 10.611486] brcmfmac mmc1:0001:1: Direct firmware load for brcm/brcmfmac43430b0-sdio.bin failed with error -2 [ 11.619242] brcmfmac: brcmf_sdio_htclk: HT Avail timeout (1000000): clkctl 0x50 RKM v3 is tv-stick with rk3328 cpu 2g ram 16g emmc (https://www.rikomagic.com/en/showgoods/90.html) Inside the stick has rk805-1 power chip and klmag1jetd emmc chip. Not sure about memory because it under the same heat sink with cpu. Stock image, extracted from eMMC with help of multitool looks like this: /dev/loop0p1 16384 24575 8192 4M /dev/loop0p2 24576 32767 8192 4M /dev/loop0p3 32768 40959 8192 4M /dev/loop0p4 40960 43007 2048 1M /dev/loop0p5 43008 75775 32768 16M /dev/loop0p6 75776 141311 65536 32M /dev/loop0p7 141312 149503 8192 4M /dev/loop0p8 149504 157695 8192 4M /dev/loop0p9 157696 190463 32768 16M /dev/loop0p10 190464 192511 2048 1M /dev/loop0p11 192512 258047 65536 32M /dev/loop0p12 258048 389119 131072 64M /dev/loop0p13 389120 421887 32768 16M /dev/loop0p14 421888 946175 524288 256M /dev/loop0p15 946176 9334783 8388608 4G /dev/loop0p16 9334784 9367551 32768 16M /dev/loop0p17 9367552 13561855 4194304 2G /dev/loop0p18 13561856 13692927 131072 64M /dev/loop0p19 13692928 13693951 1024 512K /dev/loop0p20 13693952 13698047 4096 2M /dev/loop0p21 13698048 30535646 16837599 8G some partitions have dtbs: rkm_android7_dtbs/ ├── p1 │ ├── 00_kernel │ ├── 01_dtbdump_rockchip,rk3328-evb.dtb │ ├── 02_dtbdump_rockchip,rk3328-evb.dtb │ ├── 03_dtbdump_rockchip,rk3328-evb.dtb │ ├── 04_dtbdump_rockchip,rk3328-evb.dtb │ └── offset ├── p11 │ ├── 00_kernel │ ├── 01_dtbdump_rockchip,rk3328-evb-avb.dtb │ └── offset ├── p12 │ ├── 00_kernel │ ├── 01_dtbdump_rockchip,rk3328-evb-avb.dtb │ ├── 02_dtbdump_Rockchip_RK3128h_liantong_board.dtb │ └── offset └── p8 ├── 00_kernel ├── 01_dtbdump_Rockchip_RK3128h_liantong_board.dtb └── offset p1 01..04 files contain the same and look like for bootloader (very brief) p11 and p12 partition contain bigger one - 01_dtbdump_rockchip,rk3328-evb-avb.dtb (same content in both p11 and p12 partitions as i see). it contains such nodes: wireless-bluetooth { compatible = "bluetooth-platdata"; clocks = <0x9a 0x01>; clock-names = "ext_clock"; uart_rts_gpios = <0x76 0x0a 0x01>; pinctrl-names = "default\0rts_gpio"; pinctrl-0 = <0x9b>; pinctrl-1 = <0x9c>; BT,power_gpio = <0x76 0x15 0x00>; BT,wake_host_irq = <0x76 0x1a 0x00>; status = "okay"; }; wireless-wlan { compatible = "wlan-platdata"; rockchip,grf = <0x1c>; wifi_chip_type = "ap6354"; sdio_vref = <0x708>; WIFI,host_wake_irq = <0x76 0x13 0x00>; status = "okay"; }; inside the stick there is a chip with metal cap marked AP6212 but in the last_kmsg from stock firmware there is such a line: <6>[ 2.304427] [WLAN_RFKILL]: wlan_platdata_parse_dt: wifi_chip_type = ap6354 partition 17 have firmwares: ls rkm_v3_p17/etc/firmware/ 4343A0.hcd fw_bcm4334b1_ag_apsta.bin fw_RK903_p2p.bin rtl8723b_fw awnb108.hcd fw_bcm4334b1_ag.bin monet.bin rtl8723bs_config bcm20710a1_24M.hcd fw_bcm4334b1_ag_p2p.bin nh660.hcd rtl8723bs_fw bcm20710a1_26M.hcd fw_bcm4339a0_ag_apsta.bin nvram_4330_oob.txt rtl8723bs_VQ0_config bcm20710a1.hcd fw_bcm4339a0_ag.bin nvram_4330.txt rtl8723bs_VQ0_fw BCM20710A1.hcd fw_bcm4339a0_ag_p2p.bin nvram_AP6181.txt rtl8723bu_config bcm2076b1.hcd fw_bcm43436b0_apsta.bin nvram_AP6210_24M.txt rtl8723d_config bcm40183b2.hcd fw_bcm43436b0.bin nvram_AP6210.txt rtl8723d_fw bcm43241b4.hcd fw_bcm43436b0_p2p.bin nvram_ap6212a.txt rtl8723ds_config bcm4329.hcd fw_bcm43438a0_apsta.bin nvram_ap6212.txt rtl8723ds_fw BCM4330B1.hcd fw_bcm43438a0.bin nvram_ap6233f.txt rtl8761a_config bcm43341b0.hcd fw_bcm43438a0_p2p.bin nvram_AP6234.txt rtl8761a_fw bcm4339a0.hcd fw_bcm43438a1_apsta.bin nvram_ap6236.txt rtl8761at8192er_fw bcm43438a0.hcd fw_bcm43438a1.bin nvram_ap6255.txt rtl8761at_config bcm43438a1.hcd fw_bcm43438a1_p2p.bin nvram_ap62x2.txt rtl8761at_fw BCM4343A0.hcd fw_bcm43455c0_ag_apsta.bin nvram_AP6330.txt rtl8761au8192ee_fw BCM4343A1.hcd fw_bcm43455c0_ag.bin nvram_AP6335.txt rtl8761au8812ae_fw BCM4343B0.hcd fw_bcm43455c0_ag_p2p.bin nvram_ap6354.txt rtl8761au_fw BCM4345C0.hcd fw_bcm4354a1_ag_apsta.bin nvram_ap6356s.txt rtl8761aw8192eu_config bcm4354a1.hcd fw_bcm4354a1_ag.bin nvram_ap6356.txt rtl8761aw8192eu_fw BCM4354A2.hcd fw_bcm4354a1_ag_p2p.bin nvram_ap6398s.txt rtl8821a_config BCM4356A2.hcd fw_bcm4356a2_ag_apsta.bin nvram_AP6441.txt rtl8821a_fw BCM4359C0.hcd fw_bcm4356a2_ag.bin nvram_ap6452.txt rtl8821as_config fw_awnb108_ap.bin fw_bcm4356a2_ag_p2p.bin nvram_AP6476.txt rtl8821as_fw fw_awnb108.bin fw_bcm4359c0_ag_apsta.bin nvram_AP6493.txt rtl8821c_config fw_bcm40181a2_apsta.bin fw_bcm4359c0_ag.bin nvram_awnb108.txt rtl8821c_fw fw_bcm40181a2.bin fw_bcm4359c0_ag_p2p.bin nvram_B23.txt rtl8821cs_config fw_bcm40183b2_ag_apsta.bin fw_info.txt nvram_GB86302I.txt rtl8821cs_fw fw_bcm40183b2_ag.bin fw_RK901a0_apsta.bin nvram_RK901.txt rtl8822b_config fw_bcm40183b2_ag_p2p.bin fw_RK901a0.bin nvram_RK903_26M.cal rtl8822b_fw fw_bcm40183b2_apsta.bin fw_RK901a2_apsta.bin nvram_RK903.cal rtl8822bs_config fw_bcm40183b2.bin fw_RK901a2.bin nvram_RK903.txt rtl8822bs_fw fw_bcm40183b2_p2p.bin fw_RK901a2_p2p.bin nvram_WL211.txt ssv6051-sw.bin fw_bcm43241b4_ag_apsta.bin fw_RK901.bin otp.bin.z77 ssv6051-wifi.cfg fw_bcm43241b4_ag.bin fw_RK903_ag_apsta.bin rk903_26M.hcd TV_Firmware.mk fw_bcm43241b4_ag_p2p.bin fw_RK903_ag.bin rk903.hcd wifi_efuse_8189e.map fw_bcm4330_apsta.bin fw_RK903_ag_p2p.bin RT2870APCard.dat wifi_efuse_8723bs-vq0.map fw_bcm4330.bin fw_RK903b2_apsta.bin RT2870AP.dat wifi_efuse_8723cs.map fw_bcm43341b0_ag_apsta.bin fw_RK903b2.bin RT2870STACard.dat wifi_efuse_8723ds.map fw_bcm43341b0_ag.bin fw_RK903b2_p2p.bin RT2870STA.dat fw_bcm43341b0_ag_p2p.bin fw_RK903.bin rtl8723b_config I have not yet understood how the kernel determines device to contact at which address and what firmware to load into it and i'm asking for advice on what I should learn to make it work. 01_dtbdump_rockchip,rk3328-evb-avb.dts
-
Hi, I'm using the image Armbian_23.02.2_Aml-s9xx-box_bullseye_current_6.1.11.img on my Box TV Tigre 2 with Amlogic S905x processor and the dtb meson-gxl-s905x-p212.dtb and all the things I need are working, except the HDMI Audio output. Using the command "aplay -l" it shows no soundcards found but using the command lsmod | grep snd it shows different sound modules so I think it's a driver problem Also using armbian-config and going to system->hardware it shows an empty list. Any ideas on how to make it work?
-
Hi team, This is not exactly Armbian related, however I hope to find some help here, also it can be useful for someone else in custom board development (my case). For testing I have Olimex RK3328-SOM-EVB and RK3318 TV box boards. They both behave the same way. As summary I'm trying to boot Linux using the Bootrom and USB OTG only, in other words without any external boot NVM attached. To archive this I build U-Boot SPL (u-boot-spl.bin), which support SDP protocol via USB OTG. For SDP file transfer I'm using imx_usb tool. The binaries used in the process are: rk3328_uboot_v1.19.250.bin - consists of u-boot-tpl.bin and u-boot-spl.bin created with boot_merger tool. u-boot.itb - FIT image (ATF, u-boot.bin and dtb), mainline U-Boot v2023.10 kernel.itb - FIT image (Image.gz and dtb), mainline kernel v6.1 I also prepared a proper sdcard image, from above binaries and wrote it to an SD card. My test setup consists of two booting paths, note the binaries in both are the same: With boot path 1, u-boot-tpl, u-boot-spl loaded via USB OTG: RK3328 in Mask ROM mode, SD card removed rkdeveloptool db rk3328_uboot_v1.19.250.bin insert SD card imx_usb - u-boot.itb boot kernel from U-boot prompt: setenv bootargs root=/dev/mmcblk1p2 console=ttyS2,1500000 earlycon ro rootwait; mmc dev 1; load mmc 1 0x800800 kernel.itb; bootm 0x800800 With boot path 2, u-boot-tpl, u-boot-spl loaded from SD card: insert SD card, power on (or reset) the board imx_usb - u-boot.itb boot kernel from U-boot prompt: setenv bootargs root=/dev/mmcblk1p2 console=ttyS2,1500000 earlycon ro rootwait; mmc dev 1; load mmc 1 0x800800 kernel.itb; bootm 0x800800 The overall description of two boot paths is as follow: boot path 1: rk3328_uboot_v1.19.250.bin (bootrom via OTG)-+ +- -> uboot.itb (imx_usb) -> kernel.itb (from SD card) boot path 2: rk3328_uboot_v1.19.250.bin (bootrom via SD) -+ The issues I have: When the SoC is booted through boot path 1 the kernel hangs soon after starting ... [ 0.016620] smp: Bringing up secondary CPUs ... If boot path 2 is used - The kernel boots and everything works as expected. The Bootrom in RK3318/28 first tries eMMC, SPI NOR, SPI NAND and SD card, if those boot devices failed then USB OTG is used for booting. Since the only difference between two boot paths is the way the TPL/SPL is loaded from the Bootrom - USB OTG or SD card, the only logical explanation I can think of is that there is some "leftover" in SoC state after OTG boot, which causes the kernel to hang. Does anyone have any idea how I can narrow down and eventually find the cause for this issue?
-
 I have an OTT TV Box, model ABOX-A1 ( 1G + 8G, S905X ). Inside it looks very similar to NEXBOX A95X discussed at https://www.savagemessiahzine.com/forum/index.php?showtopic=770346 . It has an analog AV port, with a 3PEAK TPF632A audio line driver on the output. So, all the digital audio stuff is inside the S905X SOC, and maybe some GPIO switches mute of that analog output chip. I first booted Devmfc_Debian-Bookworm_6.1.57-meson64_Minimal-23.10.12.img.xz from https://github.com/devmfc/debian-on-amlogic and had sound on the analog output. (The later Devmfc_Debian-Bookworm_6.6.1-meson64_Minimal-23.11.09.img.xz did not work.) I used its aml-multiboot-setup.sh script to set up automatic boot from USB or SD if they're present, without needing to hold the button in the bottom of the AV port. Then I decided I'd rather run Armbian, and I got Armbian_23.11.1_Aml-s9xx-box_bookworm_current_6.1.63_minimal.img.xz running from a USB drive. (I couldn't run Armbian_23.11.1_Aml-s9xx-box_bookworm_current_6.1.63.img.xz and some others, but I'm not 100% sure that I didn't do something wrong that prevented them from running.) This works fine, except there are absolutely no audio devices, either for HDMI or analog audio. I saw that the kernel modules that seem needed were present, but they weren't loaded and loading them didn't help. I guess they only work if the device tree informs Linux about that hardware being present. Using grep gx-sound-card /boot/dtb/amlogic/*s905x* I see only meson-gxl-s905x-khadas-vim.dtb, meson-gxl-s905x-libretech-cc.dtb, and meson-gxl-s905x-libretech-cc-v2.dtb contain that. I had had tried meson-gxl-s905x-p212.dtb and meson-gxl-s905x-nexbox-a95x.dtb so far, and neither have sound. Then I found https://github.com/torvalds/linux/commit/7e01e14e9f75385910d1e42f97a5e98f36244967 "arm64: dts: meson: add audio playback to S905X-P212 dts". After applying that patch, rebuilding the .dtb, and rebooting, I got a sound device. I could play audio files, and that took the appropriate amount of time, as if audio was going somewhere, but there was no analog audio output. Then, changing some things via amixer got it to work. These changes must have persisted, because I shut down, removed power, and booted again, and analog audio worked without having to do anything. I am attaching the altered .dtb file, the .dts file with the patch applied, and amixer output showing the current configuration with working analog audio. If you don't get audio, you can diff your amixer output against that output and see what might need to be changed. If you want to build the .dtb file yourself, note that the dtc program cannot handle the C preprocessor include directives found in these files. So, you first need to run them through the C preprocessor, and then you need to run dtc on the preprocessed output. Use something like cpp -nostdinc -I include -I arch -undef -x assembler-with-cpp arch/arm64/boot/dts/amlogic/meson-gxl-s905x-p212.dts ~/p212.dtsp To obtain the source code, I simply used https://github.com/armbian/build to start a build of a minimal Armbian system, telling it I want to custom configure the kernel. Then when the kernel configuration menu came up, I killed that, knowing all the files I needed were present. s905x-p212_audio_fix.tar.xz
 -
Hello, I have installed the armbian bookworm version with xfce on it, 6.1.30 kernel on my 32gb usb flash drive using balena etcher according to the instruction, I have tweaked the boot.cmd file, and only tweaked the video settings and regenerated using the mkimage command, Using linux to setup. and when I tried booting on the tv, everything worked till bam it kernel panics and starts flashing the red status leds on my android box. The kernel panic error is not syncing asynchronous SError interrupt, I cannot get anymore logs because I dont have any loggers, There is an uart port on my tv's motherboard but i dont have an usb to ttl device. Keep in mind, i cannot use sd cards because my box is so cheap it doesnt even have an sd card slot, but it boots into u-boot with the usb stick, the only thing i done after flashing the usb stick was resizing the root partition to maximum size with gparted. By the way, if i need to retrieve any data, my android tv box is also rooted meaning i can fetch some files from android itself using sftp ssh or terminal emulator I have an S905L2 variant of Amlogic S905X series and used the u-boot-s905x-s912. Also the tv is 1gb and has an power adapter thats 12 volts 1 amp, if that might be related to the error My extlinux configuration file LABEL Armbian LINUX /Image INITRD /uInitrd FDT /dtb/amlogic/meson-gxl-s905x-p212.dtb append root=UUID=81afe1e2-4cdc-499c-a1f4-e4f1c7c42a08 rootflags=data=writeback rw fsck.fix=yes fsck.repair=yes net.ifnames=0 I am a new user, I am sorry If i am an inconvinience. Cannot find other tags, because there is no tv box or amlogic tag Feel free to ask if you need additional information from me.
-
Hello Everyone, I'm an armbian user since 2020 and i'm having issues trying to run armbian on a custom TV box made from a company that sell iptv solutions for business. I've got this from one of the company manager as the device was failing HDMI and didn't want to bother themself with RMA, i've got few but really they trew out like 50 pcs. The device has a Amlogic s905x3 soc with 2gb Ram and 16gb memory. 1 usb 2.0 and 1 usb 3.0 otg, micro sd slot and many other component. wifi and bluetooth board and it's PoE. I know that S905X3 isn't supported very much but i've seen some posts from users succeding, so why don't try to let armbian run? Tested with this img: Armbian_24.2.0_amlogic_s905x3_jammy_5.15.141_server_2023.12.07.img.gz tried different dtb but nothing starts, i do believe the bootloader is locked and i can't find the old aml_autoscript.zip file to flash. it has the recovery button behind the AV and it works to boot on recovery only, and with TWRP i did a full backup of the system. Tried with terminal to "reboot update" but it stuck on boot logo. here some few details, if somebody is interested on giving me an hand i can disclose more details about the device. [ 4.808428] ro.boot.oem.key1=ATV00104319 [ 4.808436] ro.boot.build.expect.baseband=N/A [ 4.808442] ro.boot.selinux=permissive [ 4.808448] ro.boot.dtbo_idx=0 [ 4.808454] ro.boot.firstboot=0 [ 4.808463] ro.hdmi.set_menu_language=true [ 4.808470] ro.wifi.channels= [ 4.808477] ro.allow.mock.location=0 [ 4.808483] ro.build.expect.bootloader=01.01.180822.145544 [ 4.808895] ro.boot.hardware=amlogic [ 4.808905] ro.boot.bootloader=U-Boot [ 4.809083] ro.product.cpu.abi=armeabi-v7a [ 4.809089] ro.product.cpu.abilist=armeabi-v7a,armeabi [ 4.809139] ro.hardware=amlogic [ 4.809168] ro.bootloader=U-Boot [ 4.809730] ro.board.platform=franklin [ 4.810076] pm.dexopt.boot=verify [ 4.810085] pm.dexopt.ab-ota=speed-profile [ 4.810095] pm.dexopt.install=speed-profile [ 4.810101] pm.dexopt.bg-dexopt=speed-profile [ 4.810108] pm.dexopt.first-boot=quicken [ 4.810218] ro.adb.secure=0 [ 4.810231] ro.secure=1 [ 4.810300] sys.usb.config=mtp,adb [ 4.810309] sys.usb.configfs=1 [ 4.810495] sys.usb.ffs.ready=1 [ 4.811106] log.tag.stats_log=I ro.vendor.app.optimization=true [ 4.813516] ro.vendor.vndk.version=26.1.0 [ 4.813527] ro.vendor.product.cpu.abilist=armeabi-v7a,armeabi [ 4.813535] ro.vendor.product.cpu.abilist32=armeabi-v7a,armeabi [ 4.813542] ro.vendor.product.cpu.abilist64= Thanks

-
@Nick A I'm using you latest build from pixeldrift on a Transpeed M98-8K TV box with a H618 and it works like a charm without any modifications! 👏🥳 Now I'm curious how these builds will go on, as the directory description talks about "experimental", "testing only", "are not intended for end users".... ? I will use the TV box as a small home server and do you know if this device (or the Transpeed 8k618-T) will become some more or less "official" cummunity build? Many thanks in advance!
-
@Devmfc Did you manage to run an Armbian system for the S905W2 processor with a graphical interface? I have a TV Box S905W2 with SV6256P and I would like to convert it to Armbian.
-
Hi to all, i've been reading this post but also others, tried multiple .dtb and multiple images (from balbes150 yandex) but all with the same result. Tried both with USB stick and SD card. From USB starts without pressing the reset button (behind AV), but for SC card needs to be pressed. My TV Box is a MXIII 4k, model M82, k200 board with 1Gb of RAM and 8Gb of ROM and, i believe, with a amlogic s802. I wanted to install ubuntu desktop in eMMC if possible.
-
see http://www.cnx-software.com/2017/04/28/24-sunvell-r69-android-4-4-tv-box-is-powered-by-allwinner-h2-processor/ This device boots from uSD with Ubuntu desktop – legacy kernel 5.30 for OrangePi One and RetrOrangePi-3.0.1.Orangepione.img. It didn't boot after initial setting and reboot command/automatic reboot (I don't know why yet, but it should boot and resize fs). It looks it somehow breaks filesystem on uSD card (and I don't have different uSD card to test it). Ethernet works out of box. Some guy in Facebook group RetrOrangePi confirmed RetrOrangePi for OrangePi One works.
-
The guide was created in response to the outdated or non-functional nature of much of the software provided by armbian-config->Software->Softy, particularly for TV boxes. It is tailored for advanced users who are adept at using commands, prefer manual installation, and favor the convenience of copying and pasting commands rather than searching for them on the armbian forum. While detailed explanations of each command's function won't be provided, I will include source links for each section, enabling you to conduct your own research. In this guide, I am using the latest ubuntu-based Armbian build: Armbian_23.11.1_Aml-s9xx-box_jammy_current_6.1.63_xfce_desktop.img.xz. Table of Contents check dtb burn Armbian to SD card configure boot partition install Armbian on SD card flashing install-aml.sh script Amlogic USB Burning Tool Amlogic Burn Card Maker Tool SHORT PIN method Team Win Recovery Project software install docker install openWRT install pi-hole install portainer install RPi monitor install xfce install midori browser install full armbian firmware install USB LTE dongle backup SD card armbian commands android stock firmware check dtb Install Device Info HW and open the app In the "SYSTEM" tab, you can find the "dtb" information for your box. This information is crucial for configuring the boot partition correctly. Please keep a note of your "dtb" (device tree blob) information for future boot partition configuration. burn Armbian to SD card Mare sure to use good, reliable and fast SD card from SandDisk, class 10, A1 Choose between ubuntu (jammy) and debian (bookworm) and download .xz file compressed image from the official Armbian archive. For advanced linux users who want a clean server (not even includes armbian-config), the "minimal" variant is recommended. Download burning tool balenaEtcher or USBImager and burn the compressed image to your SD card. https://docs.armbian.com/User-Guide_Getting-Started/ configure boot partition Open extlinux/extlinux.conf and uncomment the correct dtb for your box. If you make a mistake here, you will fail to boot. Make sure only one line is uncommented (check your dtb, for s912 SoC its q200 or q201). Go back to armbi_boot partition, copy the correct u-boot file according to your SoC and rename it to u-boot.ext. If you dont know your SoC, boot into Android, install/open Device Info HW app and go to SOC tab. The app may need root access to read device specs. install Armbian on SD card To boot the system for the first time you have to use one from the following - sometimes only one way of doing this works! If your box is installed with libreElec/coreElec, then you can't boot into Armbian, because you have to flash stock Android firmware first. Toothpick method: disconnect the power supply, insert card/drive, push reset button and connect the power while holding the button. Wait until Armbian logo appears and release the button. Terminal method: boot to Android, insert SD card with Armbian, install Terminal Emulator app (either from Google Play or APKMirror), run it and type reboot update. Your box should reboot to Armbian. Update&Backup: somewhere in the Android interface, perhaps the applications folder, you will find a program called Update OR Update&Backup, open it if you have "Update" app pre-installed, insert SD card with Armbian, select "Local" and choose ZIP file (aml_autoscript.zip) from the SD card; select "Update" and your box should reboot to Armbian. Recovery method: boot into Android, insert card/thumb drive and choose Reboot to recovery. Your box should boot into Armbian. ADB method: enable ADB (Google it) and run the following command in a terminal window: adb reboot update Menu button method (works with very few devices): disconnect the power supply, insert card/drive, push menu button on your remote control and connect the power while holding the button. Wait until Armbian boot script appears and release the button. install-aml.sh script NOTE: This will overwrite the Android ROM on the eMMC flash and attempt to install Armbian on the internal eMMC storage. Before beginning, make sure you have a backup of the stock Android ROM in the event the installation fails or you want to revert back to Android in the future. Proceed at your own risk. You can copy the working Armbian environment from SD card to eMMC using the install-aml.sh script. This file does a physical copy of whole system to eMMC. You can install Armbian to eMMC by running the shell script in the /root directory. Run the following commands in a terminal window: sudo su cd /root/ sudo ./install-aml.sh Once the Armbian finishes copying to the eMMC, shutdown Armbian, unplug power from the box, remove the SD card from the box, power the box back on to boot from the eMMC storage, if everything worked as expected, Armbian should boot from the internal eMMC storage and no longer require the SD/microSD card. Amlogic USB Burning Tool If you have a box with an Amlogic processor and need to update its firmware, install a custom ROM, or unbrick the box, the Amlogic USB Burning Tool is the recommended solution. It provides an easy-to-use interface for flashing firmware onto Amlogic-based devices. To use the Amlogic USB Burning Tool, follow these steps: Download the Amlogic USB tool zip file and extract it to the PC. In the folder, you have the InstallDriver.exe. This will install the required drivers for Amlogic TV boxes. Download the firmware file compatible with your box. Launch the Amlogic USB Burning Tool, change language and click “File” > “Import Image” to load the firmware file. Connect your box to your PC using a USB cable, ensuring the box is in recovery mode (toothpick method) or bootloader mode. The tool should detect your box, and you can click the “Start” button to begin the flashing process. Wait for the process to complete, and your box will reboot with the new firmware installed. Amlogic Burn Card Maker Tool With this method you can recover the device from a brick if you have no way to connect it to a PC. In this tutorial, we will guide you on using the burn card maker tool to create a bootable SD card for reinstalling Android Stock Firmware (ROM) on your box. You just need the correct firmware (ROM) for your specific box. Download Burn_Card_Maker v2.0.2 (3.96 MB). Extract the archive and run Burn_Card_Maker.exe file to run the tool. Click on upper left chinese menu and choose second option, check ‘English Version’ and restart the application. Choose disk then ‘Choose your image files’ to open image and select your specific .img firmware for your box. Press ‘Make’ button and wait to finish. Now insert the micro SD card in your box and power on while holding the reset AV button. You will be able to enter into recovery and the firmware will be flashed automatically. When the TV BOX reboots, remove the micro SD Card, this step is very important, wait 4-5 minutes and the update will completed. If your device fails to boot, your last option is to use the SHORT PIN method. SHORT PIN method Follow the steps outlined in the guide Amlogic Burn Card Maker Tool. If pressing the AV reset button doesn't work, it is likely that your device is unresponsive or "dead". In this case, you can try shorting out the PINS. Please note that at this point, you have little to lose in terms of further damage to the device. The SHORT PIN method can be used when other recovery methods and the Amlogic USB Burning Tool are not responsive. Please note that this method should only be attempted by those who fully understand the risks involved in handling electronics and take full responsibility for any potential issues that may arise. Dismantle: to proceed with the SHORT PIN method, you will need to dismantle your device. Remove the rubber placeholders on the back of the device to reveal screws. Unscrew these screws and carefully separate the device. Be cautious when removing the top part of the device, as the WIFI antenna is usually attached to it. Removing it too quickly may cause damage to the WIFI cable. NAND flash: locate the NAND flash chip, which is where the operating system is stored. Look closely at the PINS on the chip, as they are quite small. Identify two pins that are next to each other, and using a screwdriver, short them out by making them touch each other. Recovery menu: ensure that your SD card is inserted with the firmware image using the Burn Card Maker tool. Have your power supply and HDMI cable ready to be inserted. Now, slowly try different combinations of the PINS while applying power to the device. Eventually, you will find a combination that initiates the hardware and communicates with the SD card. This will initiate the boot sequence, and you should see a recovery menu on the screen. From there, the installation of Android will begin. Essentially, shorting out these two PINS is similar to holding the AV reset button. Again: Before applying power, hold down the two PINS and then apply power. Repeat this process until you see results or something on the screen. Sometimes, the screen may flash green or red, indicating that you have found the correct PINS but have the wrong firmware. In this case, return to your PC and find a different firmware image specific to your SoC. If you are unable to find the original stock ROM for your box, it is possible that your box is a clone of another well-known box. In this case, find the firmware for the box that is most closely related to yours. You need to make your box boot once into recovery/update mode to reinstall firmware from SD card. The SHORT PIN method modifies normal boot procedure to make your box look for kernel and dtb on SD card before booting from internal memory. https://inv.vern.cc/watch?v=CUfKNNgxb9E Team Win Recovery Project TWRP, short for Team Win Recovery Project, is a community-driven project that provides a custom recovery solution for Android devices. It supports backups, restoration, and custom ROM installation. https://twrp.me/Devices/ install docker ubuntu Add the GPG key: curl -fsSL https://download.docker.com/linux/ubuntu/gpg | sudo apt-key add - Add repository to APT sources: sudo add-apt-repository "deb [arch=$(dpkg --print-architecture)] https://download.docker.com/linux/ubuntu $(lsb_release -cs) stable" apt-get update Install Docker: apt-get install docker-ce docker-ce-cli containerd.io Test the installation: docker --version Install Docker Compose: sudo curl -L "https://github.com/ubiquiti/docker-compose-aarch64/releases/download/1.22.0/docker-compose-Linux-aarch64" -o /usr/local/bin/docker-compose<br> sudo chmod +x /usr/local/bin/docker-compose Test Docker Compose installation: docker-compose --version debian apt-get remove docker docker-engine docker.io containerd runc apt-get install ca-certificates curl gnupg lsb-release mkdir -p /etc/apt/keyrings curl -fsSL https://download.docker.com/linux/debian/gpg | sudo gpg --dearmor -o /etc/apt/keyrings/docker.gpg echo "deb [arch=$(dpkg --print-architecture) signed-by=/etc/apt/keyrings/docker.gpg] https://download.docker.com/linux/debian $(lsb_release -cs) stable" | sudo tee /etc/apt/sources.list.d/docker.list > /dev/null apt update apt-get install docker-ce docker-ce-cli containerd.io docker-compose-plugin If you would like to use Docker as a non-root user, you should now consider adding your user to the docker group with something like: sudo usermod -aG docker $USER https://docs.armbian.com/User-Guide_Advanced-Features/#how-to-run-docker install openWRT On the host system, the full armbian firmware should be installed so you can use it on AP mode: wget https://imola.armbian.com/apt/pool/main/a/armbian-firmware-full/armbian-firmware-full_21.08.6_all.deb sudo dpkg -i armbian-firmware-full_21.08.6_all.deb Make sure your USB WIFI adapter supports AP mode: iw list Set country regulations, for example, to Spain set: iw reg set ES Make sure you are not runing wpa_supplicant on your host machine or docker container will tell messages like wlan0: Could not connect to kernel driver. sudo systemctl stop wpa_supplicant sudo systemctl disable wpa_supplicant Install dependencies: sudo apt install iw iproute2 gettext dhcpcd5 Initial configuration is performed using a config file, openwrt.conf. You can use the included openwrt.conf.example as a baseline, which explains the values. At the very least you’ll need to change the values of LAN_PARENT and WIFI_IFACE. Commands to download the repo and configure openwrt.conf git clone https://github.com/oofnikj/docker-openwrt.git cd docker-openwrt cp openwrt.conf.example openwrt.conf nano openwrt.conf Build the image: make build Create the openwrt container: make run If you arrive at * Ready, point your browser to LAN_DOMAIN and you should be presented with the login page. The default login is root with the password set as ROOT_PW. Any settings you configured or additional packages you installed will persist until you run: make clean This will delete the container and all associated Docker networks so you can start fresh if you screw something up. Installing will create and enable a service pointing to wherever you cloned this directory and execute run.sh on boot. make install https://forum.openwrt.org/t/running-openwrt-in-a-docker-container/56049 https://badgateway.qc.to/contain-your-router/ https://github.com/oofnikj/docker-openwrt install pi-hole Start by creating a directory where you will store the configuration file for the Pi-Hole docker container: mkdir pihole cd pihole nano docker-compose.yml Enter the following lines: services: pihole: container_name: pihole image: pihole/pihole:latest ports: - "53:53/tcp" - "53:53/udp" - "67:67/udp" - "80:80/tcp" environment: TZ: 'Europe/Berlin' WEBPASSWORD: '1234' networks: internal: ipv4_address: 192.168.16.10 # Assign a static IP within your router's subnet volumes: - './etc-pihole:/etc/pihole' - './etc-dnsmasq.d:/etc/dnsmasq.d' cap_add: - NET_ADMIN restart: unless-stopped networks: openwrt-lan: ipv4_address: 192.168.16.10 # Assign a static IP within your LAN subnet networks: openwrt-lan: If you are using ubuntu to run the pi-hole docker container, you may need to disable the systemd-resolve service: systemctl disable systemd-resolved.service systemctl stop systemd-resolved Then, you can bring your pi-hole up: docker-compose up -d As we managed our own router firmware using OpenWrt, you need to tell your router to send pi-hole IP as DNS server to client. Go to Interfaces -> Lan -> DHCP Server -> Advanced Settings, inside DHCP-Options enter value: 6,192.168.16.10. Apply changes and restart the LAN interface. https://pimylifeup.com/pi-hole-docker/ https://firebog.net/ https://arstech.net/pi-hole-blocking-lists-2023/ https://avoidthehack.com/best-pihole-blocklists install portainer docker volume create portainer_data docker run -d -p 8000:8000 -p 9000:9000 --name=portainer --restart=always -v /var/run/docker.sock:/var/run/docker.sock -v portainer_data:/data --network=openwrt-lan portainer/portainer-ce install xfce sudo apt-get -y install xorg lightdm xfce4 tango-icon-theme gnome-icon-theme dbus-x11 sudo startxfce4 To disable the desktop environment and return to tty1 after installing xfce on Armbian, you can follow these steps: Press Ctrl + Alt + F1 to switch to tty1. Log in with your username and password. Stop the display manager service by running the following command: sudo service lightdm stop This will stop the graphical interface and return you to the command line interface. To prevent the display manager from starting automatically on boot, run the following command: sudo systemctl disable lightdm install midori browser sudo apt install midori install RPi monitor The RPi monitor on port 8888 can also be installed for AMLOGIC boxes with the following command: sudo armbianmonitor -r install full armbian firmware By default, the Armbian builds only include a limited set of firmwares out of the box. To address certain driver issues, you may need to install the complete Armbian firmware. There are two ways to do this: either through armbian-config -> software -> Full, or by manually installing the firmware via a USB device if you don't have internet connectivity on your box. To manually install the firmware, download it from the following link: https://imola.armbian.com/apt/pool/main/a/armbian-firmware-full/. Once downloaded, copy the firmware to your USB device. Then, insert the USB device into the Armbian box and navigate to your home folder. cd ~ Check device identifier of your USB device: lsblk Mount USB device at ./usbstick and install the package: mkdir usbstick sudo mount /dev/sdX1 ./usbstick cd usbstick dpkg --install armbian-firmware-full_*.deb Replace sdX1 with your device identifier. install USB LTE dongle Armbian has a default setting that treats USB LTE Dongles as mass storage devices. However, in order for the dongle to be recognized as an Ethernet device, it needs to be switched from mass storage mode to network mode. To achieve this, we will need to install and configure usb-modeswitch. sudo nano /etc/usb_modeswitch.conf Paste the following: # Huawei E353 (3.se) and others TargetVendor=0x12d1 TargetProductList="14db,14dc" HuaweiNewMode=1 NoDriverLoading=1 Install usb-modeswitch: sudo apt-get update sudo apt-get install usb-modeswitch Switch dongle to network mode: sudo usb_modeswitch -v 12d1 -p 1f01 -c /etc/usb_modeswitch.conf You can now check if mass storage is removed: lsusb https://askubuntu.com/questions/757638/can-not-connect-huawei-e3372-modem-on-ubuntu-15-10-please-help https://installati.one/install-usb-modeswitch-ubuntu-20-04/ armbian commands Configure system, network, timezone, language, hostname, keyboard, etc: armbian-config Check temperature of SoC: armbianmonitor -m Get boot logs for inspection and automatically upload it to an online pasteboard service: armbianmonitor -u backup SD card Identify the SD Card: First, you need to identify the device name of your SD card. You can use the lsblk or fdisk -l command to list all storage devices and identify the SD card. Backup with dd: Use the dd command to create a raw image of the SD card. Here's an example command: sudo dd if=/dev/sdX of=/path/to/backup.img bs=4M status=progress Replace /dev/sdX with the actual device name of your SD card and /path/to/backup.img with the desired backup location and filename. Restoring from Backup: To restore the backup to a new SD card, you can use either balenaEtcher or a similar command in reverse: sudo dd if=/path/to/backup.img of=/dev/sdX bs=4M status=progress android stock firmware x96 Tanix Ugoos Vontar Mecool
-
 Hi, thanks for the efforts with this. Just tried this on my MXQ Pro V72 (3228A) with latest Armbian w/ XFCE. Unfortunately, any playback on mpv within xfce did not have good performance. In terms of hardware decode, only h264 8-bit could run w/ hw decode. Meanwhile 10-bit H264 and HEVC did not run with HW decode at all. All files were tested at 1080p. Playback performance was only good when run in virtual terminal, but on XFCE, even 8bit H264 stuttered, not to mention the pink/red color issue (which was fixed with the additional mesa flags). I thought it was a throttling issue, since xfce sensors report 80C, so I added a fan blowing from under the tv box and the temps are now within 55-70C. However that did not fix the issue. Is there anything else I could check or try? Thanks.
 -
 After messing around with Android TV boxes, and trying to get them to run OMV, VPN, AltServer and Syncthing with unpredictable stability and poor performance has made me give up on having a perfect setup. This would completely change that and allow me to focus on testing and developing FOSS tools for Armbian
 -
Hi, I think these messages are not related to analog audio, at least on my custom board with t507 processor, analog audio works with this error. You can simply disable them as it was in the linux kernel 6.1 The sound works for me if I turn it on in the mixer It’s strange, but I have another problem - the sound does not work through HDMI and there is also a problem with reading EDID through the DDC interface. I would be grateful if you could tell me whether automatic detection of monitor or TV resolution via HDMI works for you.
-

Armbian for TX3 Amlogic S905X3 with SP6330-X Bluetooth module
SteeMan replied to Nandini Ajay's topic in Amlogic CPU Boxes
https://forum.armbian.com/topic/16976-status-of-armbian-on-tv-boxes-please-read-first/ -
Hello community, I bought this TV box which happens to have fake specs, it seems it's really only 1GB RAM and 8GB of storage and comes with Android 7 instead of 12, however it has 2 USB ports and SD card reader, so I guess it could be flashed and repurposed for retro gaming or something like that. I think the SoC is Allwinner H3 (sun8iw7p1). It would be very much appreciated if someone could help me with these questions: 1) Where can I download or backup the stock firmware, yes the one with the fake specs? 2) Could it be flashed with some light version of Android TV or Google TV? 3) Can the memory be upgraded to 2 GB by replacing the RAM chips? Best regards
-
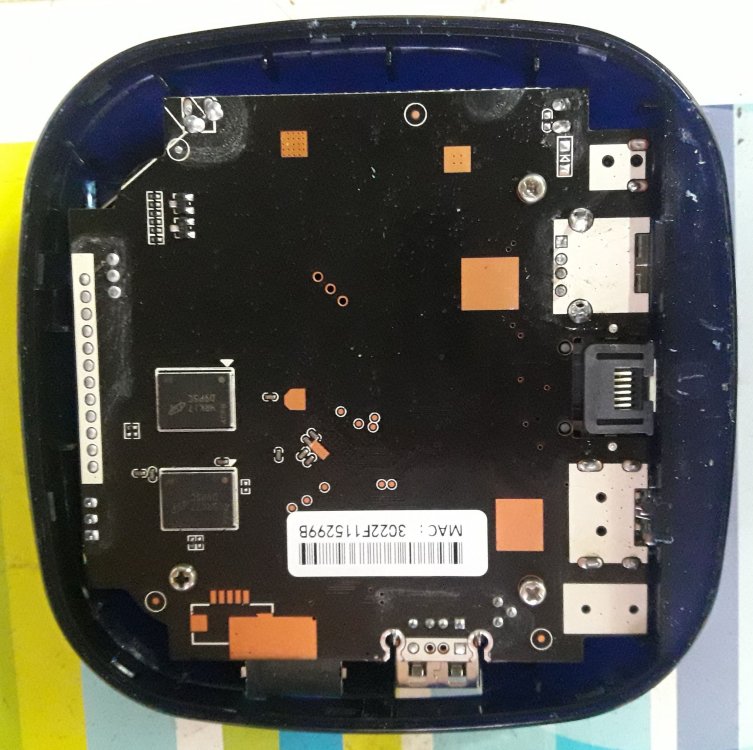
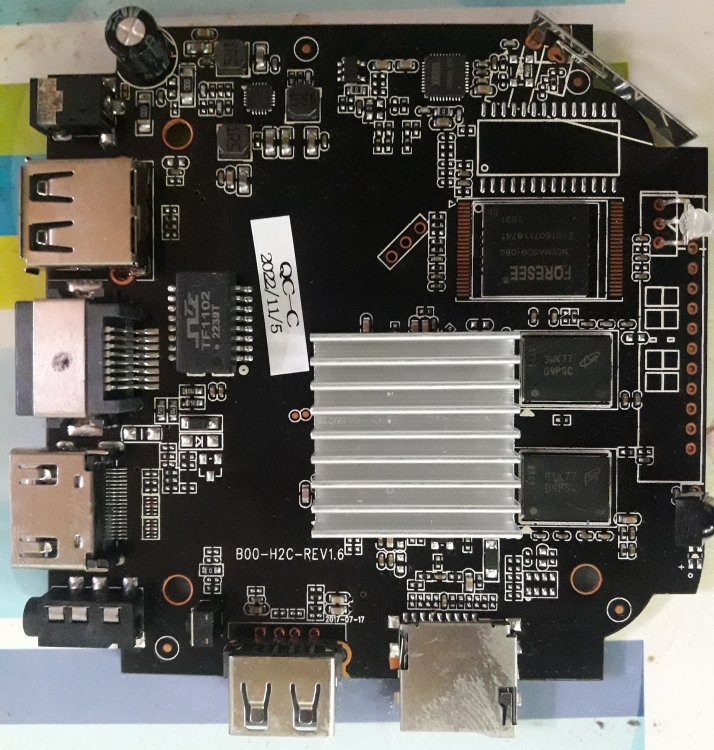
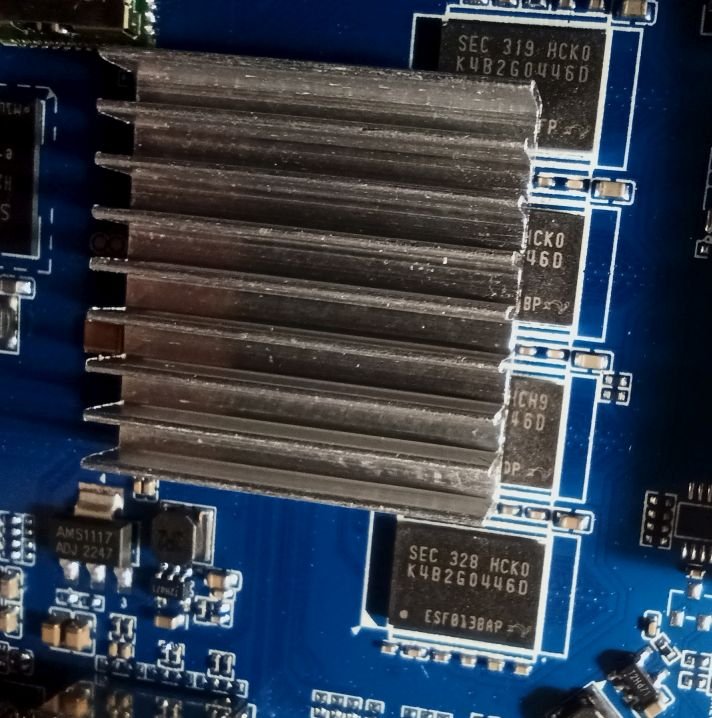
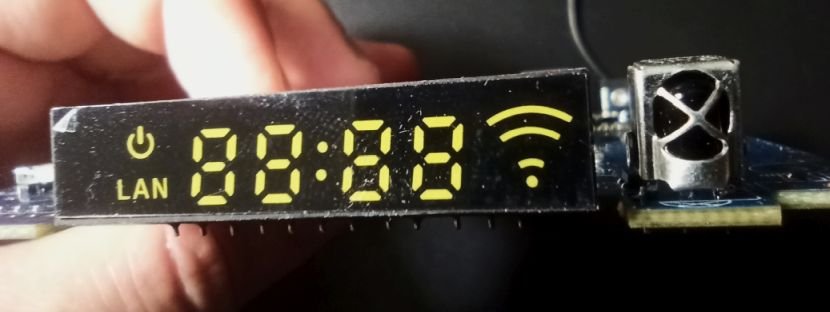
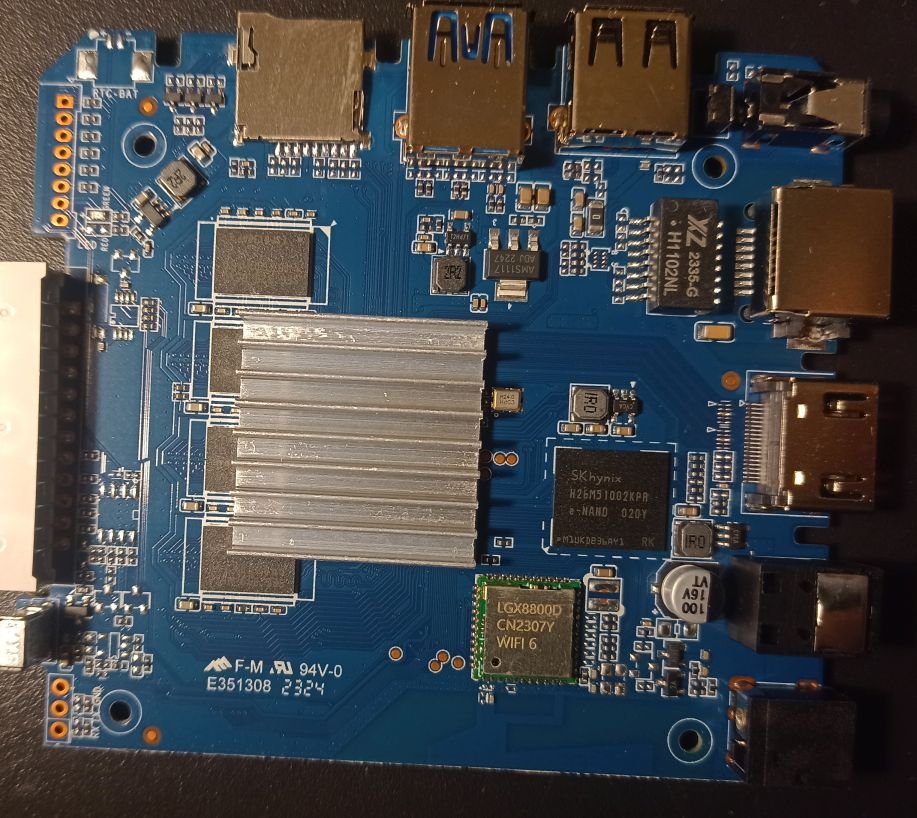
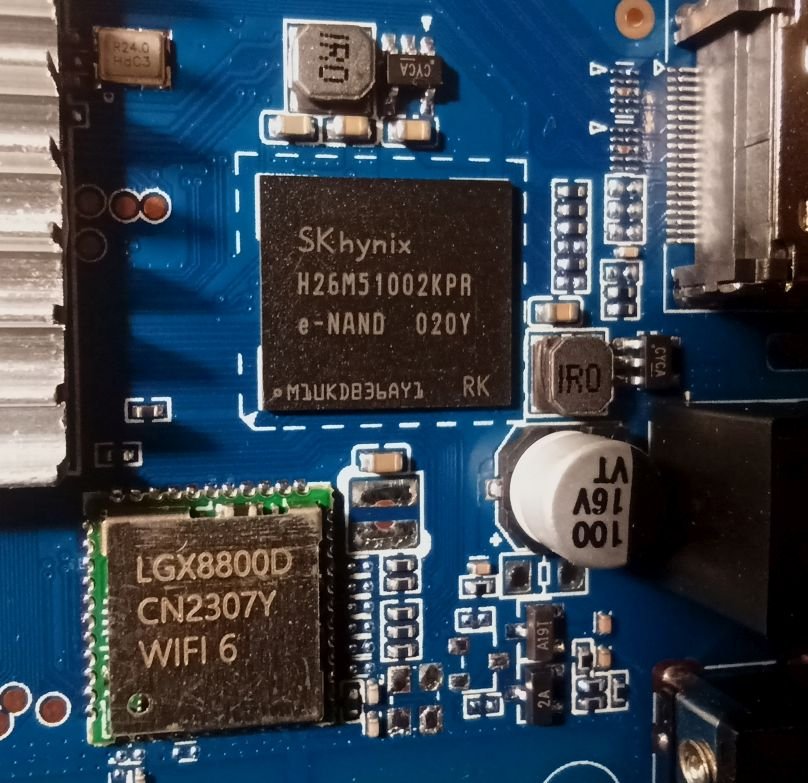
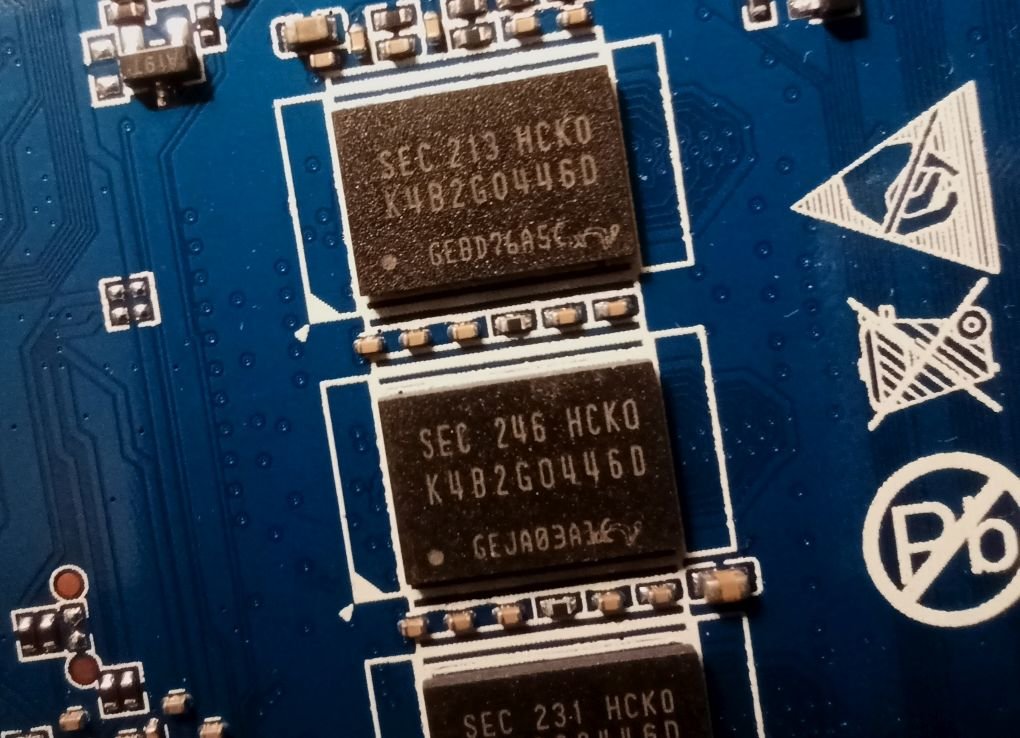
So I bought this chinise Android TV Box and would love to install armbian on it. I am new on this and discovered armbian just after buying it. I didn't know there was no support and not official open source for the Rockchip RK3528, otherwise I would have chosen any other. The box works fine but it has that known malware that send packets to suspicious links (I scanned activity with pi-hole). Description says it has 2GB RAM and 16GB storage (Hynix H26M51002KPR) WiFi chip is LGX8800D I attach images of the board and all of it's componentes, including IR sensor and display. It also has a red LED that turns on when in stand-by mode. I hope this help to develop or patch a working version of armbian for it. I have already read about some patches around that would probably work, but I' new to this and I'm not sure how to start. What I would like to do first is a completly ROM backup, and start doing test with a pendrive or SD card, not writting directly to the eMMC (if possible) until the important things get working. And any help would be appreciated. Edit: I will keep posting in this thread with my progress (or attemps!)


-
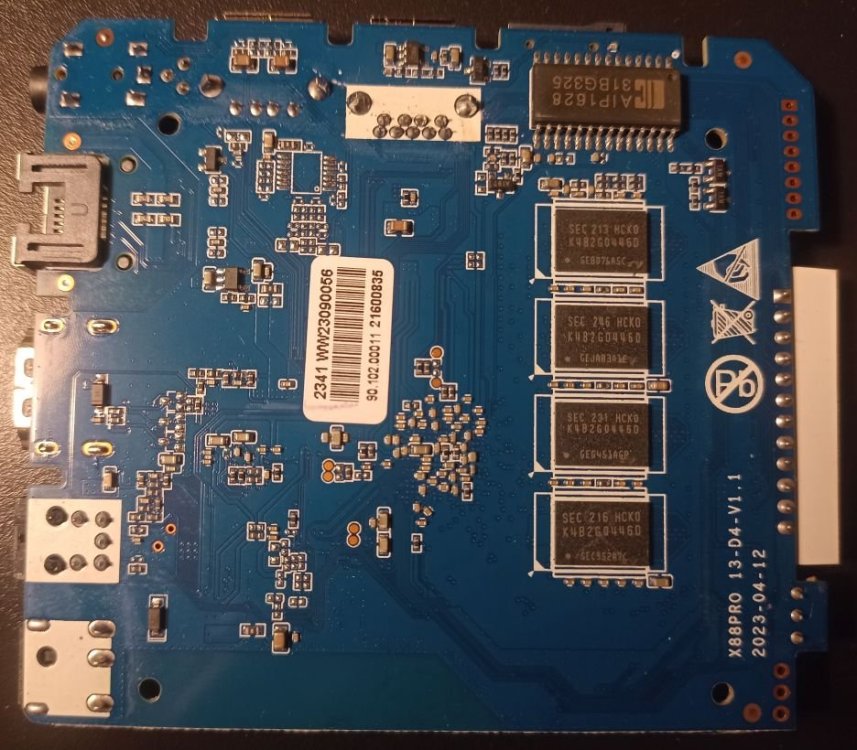
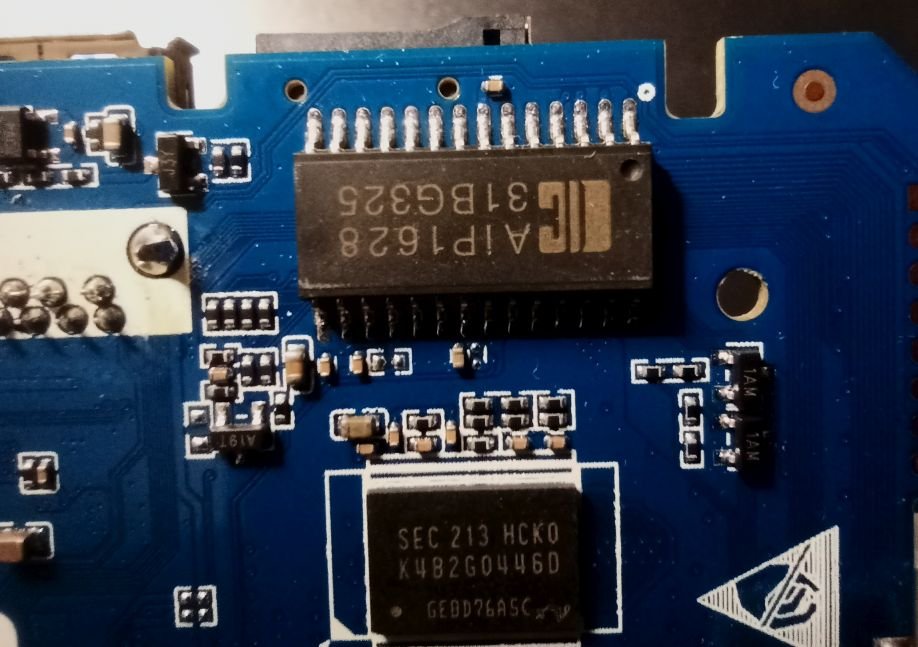
I have this Rupa X88 13 TV BOX with also uses RK3528, I dumped many parts of firmware using a tool called rkdumper and managed to extract .dtb files using a tool called dtb-extract Maybe this can help you. I don't know how to use those files yet, but reading your post I think I have a hint now
-
https://forum.armbian.com/topic/16976-status-of-armbian-on-tv-boxes-please-read-first https://forum.armbian.com/topic/33676-installation-instructions-for-tv-boxes-with-amlogic-cpus
-
Hello, I would be grateful for some assistance on a sound issue. I installed Armbian_20.10_Arm-64_bullseye_current_5.9.0_desktop.img.xz on a YUNDOO Y6 TV Box with S905X. It worked fine, but I believe that there is no support for Armbian 20 anymore. Useful info, the sound was OK and the audio card was identified as GXL-S905X-P212. Then, I tried various versions of Armbian_23.11.1_Aml-s9xx-box_bookworm_current_6.1.63 and Armbian_23.11.1_Aml-s9xx-box_jammy_current_6.1.63. Most of them do work, but none detects the sound card. Now I am playing with Armbian_23.11.1_Aml-s9xx-box_bookworm_current_6.1.63_xfce_desktop.img, which actually has meson-gxl-s905x-p212.dtb in boot/dtb/amlogic. Yet, it cannot see the soundcard. No matter how I try, GXL-S905X-P212 is never shown as a connected device. I would appreciate any suggestion. However, please keep in mind that I am hardly an expert in Linux and have never tried Debian (only some variations of Ubuntu, and even that at beginner’s level).
-
I found a .dts file for my TV set-top box on an amlogic processor, and I want to compile this file for Armbian, please tell me how to do this, my TV box is K1 plus. https://github.com/CoreELEC/device-trees-amlogic/tree/master
-
Hi I know this is an old thread. A few years ago i bought two NanoPi K2's I used these as kodi boxes for a while, but eventually stopped using them when i got an nvidia shield and other android tv boxes Recently i have wanted to put these back to use, specifically to run Armbian and do a source install of Retropie (which works suprisingly well) with only two caveats 1: The Video resolution seems to be locked to lower resolutions (1024x768 and i think 800x600) 2: The onboard HDMI Audio does not seem to work these issues are both apparent with the latest "automated" builds available on the Armbian website I was just wondering which build was the last "non automated" build where HDMI Audio and Video resolutions (say, 1920x1080) are supported Alternatively, are there any patches that can be applied to make the HDMI Audio work or to hard code a custom resolution? I seem to be finding conflicting info online, and this board does not appear to be very popular which is a bit sad, because it actually seems like a well featured board. If only the manufacturer supported it better.
-
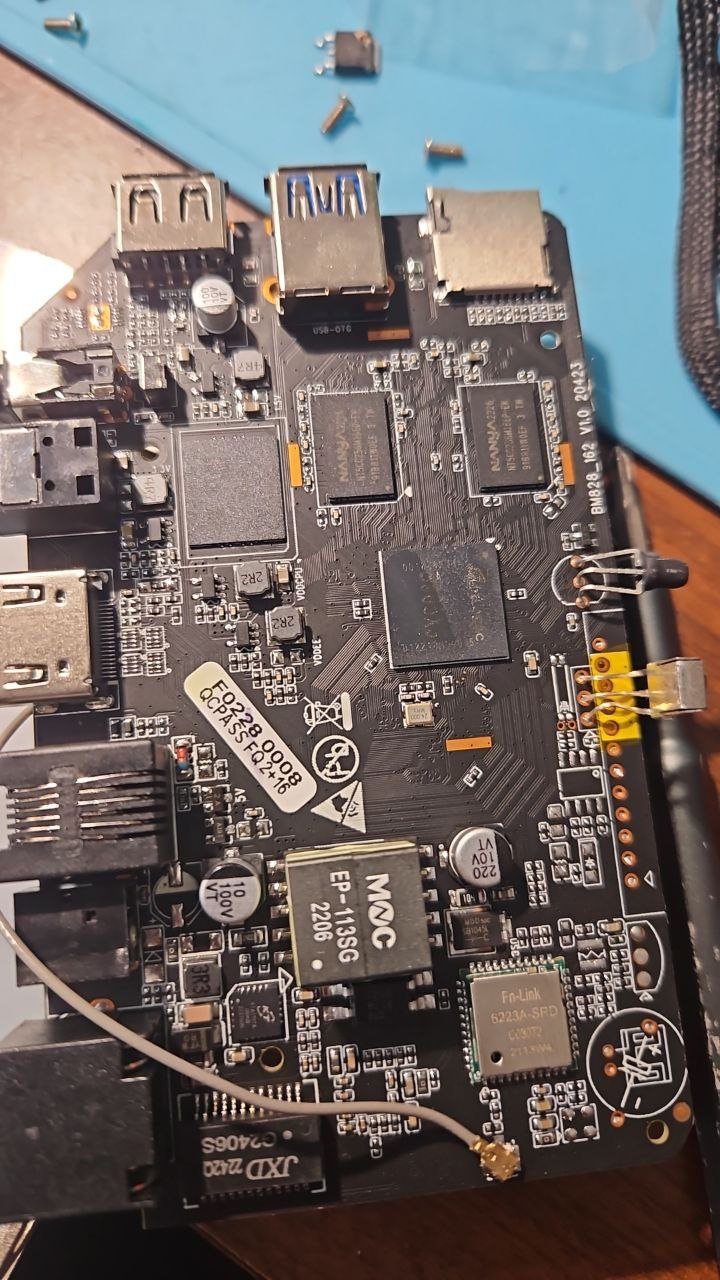
 Hello everyone, I recently acquired a Tigre 2 TV Box with the following hardware specifications: Amlogic S905X processor, 2GB of RAM, and 16GB NAND storage (SkHynix). I attempted to install the Armbian operating system, and the installation process started from a USB drive. Unfortunately, after the installation, the device seems to be bricked as it doesn't boot up (led red). I've read that it might be possible to recover a bricked device by putting it into MaskROM mode through a process involving a short circuit. However, I'm not entirely sure how to do this, and I'm hoping someone here can provide guidance or steps on how to put my Tigre 2 TV Box into MaskROM mode. Any help or advice would be greatly appreciated. Thank you in advance!
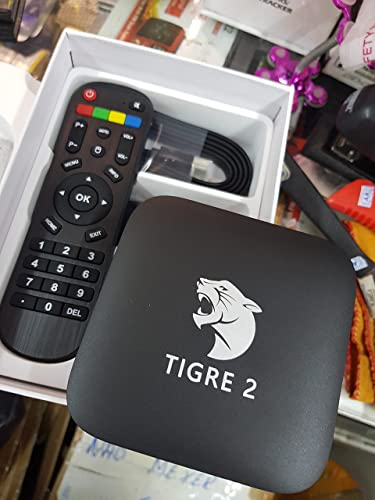
.thumb.jpeg.2f691d44cc27b513c3453ae5abe49e8d.jpeg)
.thumb.jpeg.dbde2f701424b65b02a35c19e21b8ed4.jpeg)
-
Hello everyone, I have a Tigre 2 TV BOX with Amlogic S905X, 1GB DDR3, and 16GB NAND storage. I'm interested in installing Armbian on this device, but there doesn't seem to be native support for the latest Armbian versions for NAND storage. I'm wondering if there is any way to install Armbian on this box, and if so, where I can find an Armbian version with a graphical interface and a Legacy Kernel 3.4.x that is compatible with Amlogic processors. I appreciate any help in this regard. Thank you in advance.
-
I currently use a very old (Amlogic s905) TV box as home server with Armbian so this bananapi would be a massive improvement replacing it.


.jpeg.89c533b1c7fdec0292b55068166207e7.jpeg)
.jpeg.c8a08981ef5fc92948df253814067c19.jpeg)