Search the Community
Showing results for 'ERASE CMD38'.
-
DISCLAIMERS (PLEASE READ): Everything you can find in this thread (binaries, texts, code snippets, etc...) are provided AS-IS and are not part of official Armbian project. For this reason not people from Armbian project nor myself are responsible for misuse or loss of functionality of hardware. THIS POST explains very well the troubles with TV Boxes and why they are not suitable for everyone Please don't ask about support or assistance in other non-community forums nor in the official Armbian github repository, instead post your questions in this thread, in the TV Boxes forum section (hardware related) or in the Peer-to-peer support section (general linux/software related). Following the recent thread on LibreElec forum about an unofficial image for rk3229 devices, I would like to make public the work made by me and @fabiobassa about bringing rk322x support to armbian. The project is now in -> mainline Armbian <- development fork -> here <- This first page and the last 3 or 4 pages of the thread are enough to get up to date with recent developments. Many useful experiences are scattered through the thread, but the most important things are collected here in the first page, so please read it carefully! Mainline kernel is fully supported and will receive most support in the future. Legacy kernel 4.4 is deprecated, but is kept around only for special purposes. What works: Should boot and work flawlessy on all boards with RK3228a, RK3228b and RK3229, with either DDR2 and DDR3 memories. Mainline u-boot Proprietary OPTEE provided as Trusted Execution Environment (needed for DRAM frequency scaling) All 4 cores are working Ethernet Serial UART (configured at 115200 bps, not 1.5Mbps!) Thermals, CPU and DRAM frequency scaling OTG USB 2.0 port (also as boot device!) EHCI/OHCI USB 2.0 ports MMC subsystem (including eMMC, SD and sdio devices) Hardware video acceleration NAND is available only on legacy kernel. To fully boot from NAND, use the Multitool and its steP-nand installation (instructions are below) Various WIFI over SDIO are supported (SSV6051P, SSV6256P, ESP8089, Realtek chips, etc...), ssv6256p driver is available only on legacy kernel Full GPU acceleration U-boot boot order priority: first the sdcard, then the USB OTG port and eventually the internal eMMC; you can install u-boot (and the whole system) in the internal eMMC and u-boot will always check for images on external sdcard/USB first. Unbrick: Technically, rockchip devices cannot be bricked. If the internal flash does not contain a bootable system, they will always boot from the sdcard. If, for a reason, the bootable system on the internal flash is corrupted or is unable to boot correctly, you can always force the maskrom mode shorting the eMMC clock pin on the PCB. Here there is the procedure, but you can also google around if you get stuck on a faulty bootloader, the technique is pretty simple and requires a simple screwdriver. There are however some unfortunate cases (expecially newer boards) where shorting the eMMC clock pin is difficult or impossibile, like eMMC or eMCP BGA chips with no exposed pins. In those cases pay double attention when burning something on the internal eMMC/eMCP and always test first the image from the sdcard to be sure it works before burning anything on eMMC/eMCP. Some useful links with pins, pads or procedures for some boards: Generic procedure for boards with non-BGA eMMC MXQPRO_V71 - eMCP H20 - eMCP ZQ01 - eMCP NAND vs eMMC vs eMCP difference: RK3228 and RK3229 tv boxes comes with three different flash memory chips: eMMC, NAND and eMCP. It does not depend upon the market name of the tv box and neither the internal board; manufacturers put whatever they find cheaper when they buy the components. NAND chip is just the non-volatile memory eMMC chip contains both the non-volatile memory plus a controller. eMCP chip contains the non-volatile memory, a controller for the non-volatile memory (like eMMC), but also contains a bank of DDR SDRAM memory on the same physical chip. The difference is very important, because eMMC and eMCP are far easier to support at various levels: the controller deals with the physical characteristics of the non-volatile memory, so the software has no to deal with. NAND chips instead are harder to support, because the software is required to deal with the physical characteristics and non-standard things that depends upon the NAND manufacturer. If you have a NAND chips you're unlucky because mainline kernel currently cannot access it, but also because you need special care and instructions explained later. You can discover if you have a NAND, eMMC or eMCP chip looking on the board are reading the signature on the flash memory chip. The Multitool (see later) also can detect which chip you have onboard: the program will warn you at startup if you have a NAND chip. NAND bootloader upgrade: IMPORTANT: don't do this is you have an eMMC or eMCP; skip this paragraph if you are unsure too! For very expert people who are having issues when (re)booting images, there is the chance to upgrade the bootloader on NAND. The NAND bootloader is nothing else than a regular idbloader (see official rockchip documentation) but contains some bits to correctly access the data on your flash memory. Upgrading requires to erase the existing flash content, in the worst case will require you to follow the Unbrick procedure above or restore an older but more compatible bootloader. If you are not mentally ready to overcome possible further issues, don't do this! The detailed instructions and the binaries are available at this post Multimedia: Mainline kernel: 3D acceleration is provided by Lima driver and is already enabled. Hardware video decoding: https://forum.armbian.com/topic/19258-testing-hardware-video-decoding-rockchip-allwinner/ Deprecated legacy kernel: multimedia features, like OpenGL/OpenGL ES acceleration, hardware accelerated Kodi, ffmpeg and mpv you can take a look to this post An effective tutorial from @Hai Nguyen on how to configure a box as a hi-quality music player using an USB audio card, and controlling it via remote control is available in this post Brief explanation about kernel naming: current kernel is the mainline LTS kernel version, most maintained and tested. This is the suggested version for production devices. If you don't know what to pick, pick this. legacy kernel (version 4.4) is provided by manufacturer; it is deprecated, unmaintained and not suggested. edge kernel is the development mainline kernel version, with experimental features and drivers; usually stable but perhaps suitable for production devices. You can switch from one kernel flavour to another using armbian-config or manually via apt. Installation (via SD card): Building: You can build your own image follow the common steps to build armbian for other tv boxes devices: when you are in the moment to choose the target board, switch to CSC/TVB/EOL boards and select "rk322x-box" from the list. Download prebuilt images from the following links: Archive builds (GPG-signed) - https://imola.armbian.com/dl/rk322x-box/archive/ SUGGESTED - Nightly built from trunk each week by Armbian servers (GPG-signed) - https://github.com/armbian/community Old images provided by me (unsigned and outdated) - https://users.armbian.com/jock/rk322x/armbian/stable Archived/older images: https://armbian.hosthatch.com/archive/rk322x-box/archive/ Multitool: The Multitool is a small but powerful tool to do quick backup/restore of internal flash, but also burn images and general system rescue and maintenance via terminal or SSH. Compressed images will be uncompressed on fly. Multitool - A small but powerful image for RK322x TV Box maintenance (instructions to access via network here) Quick installation instructions on eMMC: Build or download your preferred Armbian image and a copy of the Multitool; Burn the Multitool on an SD card; once done, place the Armbian image in images folder of the SD card NTFS partition; Plug the SD card in the TV box and plug in the power cord. After some seconds the blue led starts blinking and the Multitool appears; OPTIONAL: you can do a backup of the existing firmware with "Backup flash" menu option; Choose "Burn image to flash" from the menu, then select the destination device (usually mmcblk2) and the image to burn; Wait for the process to complete, then choose "Shutdown" from main menu; Unplug the power cord and the SD card, then replug the power cord; Wait for 10 seconds, then the led should start blinking and HDMI will turn on. The first time the boot process will take a couple of minutes or more because the filesystem is going to be resized, so be patient and wait for the login prompt. On first boot you will be asked for entering a password for root user of your choice and the name and password for a regular user Run sudo rk322x-config and select your board characteristics to enable leds, wifi chips, high-speed eMMC, etc... Run sudo armbian-config to configure timezone, locales and other personal options Congratulations, Armbian is now installed and configured! Despite the procedure above is simple and reliable, I always recommend to first test that your device boots Armbian images from SD Card. Due to the really large hardware variety, there is the rare chance that the images proposed here may not boot. If a bad image is burned in eMMC, the box may not boot anymore forcing you to follow the unbrick section at the top of this post. Quick installation instructions on NAND: Build or download your preferred Armbian image and a copy of the Multitool; Burn the Multitool on an SD card; once done, place the Armbian legacy kernel image in images folder of the SD card NTFS partition; Plug the SD card in the TV box and plug in the power cord. After some seconds the blue led starts blinking and the Multitool appears; OPTIONAL: you can do a backup of the existing firmware with "Backup flash" menu option; Choose "Burn Armbian image via steP-nand" from the menu, then select the destination device (usually rknand0) and the image to burn; Wait for the process to complete, then choose "Shutdown" from main menu; Unplug the power cord and the SD card, then replug the power cord; Wait for 10 seconds, then the led should start blinking and HDMI will turn on. The first time the boot process will take a couple of minutes or more because the filesystem is going to be resized, so be patient and wait for the login prompt. On first boot you will be asked for entering a password for root user of your choice and the name and password for a regular user Run sudo rk322x-config and select your board characteristics to enable leds, wifi chips, etc... Run armbian-config to configure timezone, locales and other personal options Congratulations, Armbian is now installed! Alternative: you can install the bootloader in NAND and let it boot from SD Card or USB: Download a copy of the Multitool and burn it on an SD card; Plug the SD card in the TV box and plug in the power cord. After some seconds the blue led starts blinking and the Multitool appears; RECOMMENDED: make a backup of the existing firmware with "Backup flash" menu option; Choose "Install Jump Start for Armbian" menu option: the Jump Start uses the internal NAND to boot from external SD Card or external USB Stick; Follow the general instructions to boot from SD Card below, skip the first erase eMMC step. Quick installation instructions to boot from SD Card: If you are already running Armbian from eMMC, skip to the next step. Instead if you are running the original firmware you need to first erase the internal eMMC; to do so download the Multitool, burn it on an SD Card, plug the SD Card and power the TV Box. Use "Backup flash" if you want to do a backup of the existing firmware, then choose "Erase flash" menu option. Build or download your preferred Armbian image; Uncompress and burn the Armbian image on the SD Card; Plug the SD Card in the TV Box and power it on; Wait for 10 seconds, then the led should start blinking and HDMI will turn on. The first time the boot process will take a couple of minutes or more because the filesystem is going to be resized, so be patient and wait for the login prompt; On first boot you will be asked for entering a password for root user of your choice and the name and password for a regular user Run sudo rk322x-config and select your board characteristics to enable leds, wifi chips, high-speed eMMC or NAND, etc... Run armbian-config to configure timezone, locales and other personal options, or also to transfer the SD Card installation to internal eMMC; Congratulations, Armbian is running from SD Card! A note about boot device order: With Armbian also comes mainline U-boot. If you install Armbian or just the bootloader in the eMMC or the Jump Start on internal NAND, the bootloader will look for valid bootable images in this order: External SD Card External USB Stick in OTG Port Internal eMMC Installation (without SD card, board with eMMC) If you have no sd card slot and your board has an eMMC, you can burn the armbian image directly on the internal eMMC using rkdeveloptool and a male-to-male USB cable: Download your preferred Armbian image from Armbian download page and decompress it. Download the rk322x bootloader: rk322x_loader_v1.10.238_256.bin Download a copy of rkdeveloptool: a compiled binary is available in the official rockchip-linux rkbin github repository. Unplug the power cord from the tv box Plug an end of an USB Male-to-male cable into the OTG port (normally it is the lone USB port on the same side of the Ethernet, HDMI, analog AV connectors) while pressing the reset microbutton with a toothpick. You can find the reset microbutton in a hole in the back of the box, but sometimes it is hidden into the AV analog jack Plug the other end of the USB Male-to-male cable into an USB port of your computer If everything went well, run lsusb: you should see a device with ID 2207:320b Run sudo rkdeveloptool rd 3 (if this fails don't worry and proceed to next step) Run sudo rkdeveloptool db rk322x_loader_v1.10.238_256.bin Run sudo rkdeveloptool wl 0x0 image.img (change image.img this with the real Armbian image filename) Unplug the power cord Done! Installation (without SD card, board with NAND) If you are in the unfortunate case you can't use an SD card for installation and your board has a NAND chip, you still have an option to use the quick Multitool installation steps via USB. Obtain a copy of rkdeveloptool: a compiled binary is available in the official rockchip-linux rkbin github repository. Unplug the power cord from the tv box Plug an end of an USB Male-to-male cable into the OTG port (normally it is the lone USB port on the same side of the Ethernet, HDMI, analog AV connectors) while pressing the reset microbutton with a toothpick. You can find the reset microbutton in a hole in the back of the box, but sometimes it is hidden into the AV analog jack Plug the other end of the USB Male-to-male cable into an USB port of your computer If everyting went well, using lsusb you should see a device with ID 2207:320b Run sudo rkdeveloptool wl 0x4000 u-boot-main.img (download u-boot-main.img.xz , don't forget to decompress it!) Unplug the power cord Now you can follow the instructions on how to install on eMMC/NAND via SD card, just use instead an USB stick to do all the operations and plug it into the USB OTG port. Once you reboot, USB OTG port will be used as a boot device. NOTE: NAND users without SD slot may be unhappy to know that it will be difficult to do extra maintenance with Multitool in case something breaks in the installed Armbian system: installing u-boot-main.img makes the installed system unbootable because it is missing the NAND driver. Alternative backup, restore and erase flash for EXPERTS: These backup, restore and erase flash procedures are for experts only. They are kept here mostly for reference, since the Multitool is perfectly able to do same from a very comfy interface and is the suggested way to do maintenance. Backup: Obtain a copy of rkdeveloptool: a compiled binary is available in the official rockchip-linux rkbin github repository. If you prefer, you can compile it yourself from the sources available at official rockchip repository Unplug the power cord from the tv box Plug an end of an USB Male-to-male cable into the OTG port (normally it is the lone USB port on the same side of the Ethernet, HDMI, analog AV connectors) while pressing the reset microbutton with a toothpick. You can find the reset microbutton in a hole in the back of the box, but sometimes it is hidden into the AV analog jack Plug the other end of the USB Male-to-male cable into an USB port of your computer If everyting went well, using lsusb you should see a device with ID 2207:320b change directory and move into rkbin/tools directory, run ./rkdeveloptool rfi then take note of the FLASH SIZE megabytes (my eMMC is 8Gb, rkdeveloptool reports 7393 megabytes) run ./rkdeveloptool rl 0x0 $((FLASH_SIZE * 2048)) backup.data (change FLASH_SIZE with the value you obtained the step before) once done, the internal eMMC is backed up to backup.data file Restore: first we have to restore the original bootloader, then restore the original firmware. Running rkdeveloptool with these switches will accomplish both the jobs: ./rkdeveloptool db rk322x_loader_v1.10.238_256.bin Downloading bootloader succeeded. ./rkdeveloptool ul rk322x_loader_v1.10.238_256.bin Upgrading loader succeeded. ./rkdeveloptool wl 0x0 backup.data Write LBA from file (100%) Download here: Erase the flash memory: clearing the internal eMMC/NAND memory makes the SoC look for external SD Card as first boot option. If there isn't any suitable SD Card, the SoC enters maskrom mode, which can then be used for full eMMC/NAND access using rkdeveloptool. This is perfectly fine if your box has an eMMC flash memory. NOTE: In case you have a NAND flash memory this option is however discouraged. The original bootloader contains some special parameters to correctly access the data. Clearing the flash memory will probably garbage the NAND data and restoring the bootloader may require some special instructions. Obtain a copy of rkdeveloptool: a compiled binary is available in the official rockchip-linux rkbin github repository. If you prefer, you can compile it yourself from the sources available at official rockchip repository Unplug the power cord from the board Plug an end of an USB Male-to-male cable into the OTG port (normally it is the lone USB port on the same side of the Ethernet, HDMI, analog AV connectors) while pressing the reset microbutton with a toothpick. You can find the reset microbutton in a hole in the back of the box, but sometimes it is hidden into the AV analog jack Plug the other end of the USB Male-to-male cable into an USB port of your computer If everyting went well, using lsusb you should see a device with ID 2207:320b run ./rkdeveloptool ef and wait a few seconds once done, the internal eMMC is erased and the device will boot from the sdcard from now on Partecipation and debugging: If you want to partecipate or need help debugging issues, do not hesitate to share your experience with the installation procedure of the boxes. In case of issues and missed support, provide as many as possible of these things is very useful to try and bring support for an unsupported board: some photos of both sides of the board. Details of the eMMC, DDR and Wifi chips are very useful! upload the device tree binary (dtb) of your device. We can understand a lot of things of the hardware from that small piece of data; and alternative is a link to the original firmware (you can do a full backup with the Multitool); dmesg and other logs (use armbianmonitor -u that automatically collects and uploads the logs online) attach a serial converter to the device and provide the output of the serial port; Critics, suggestions and contributions are welcome! Credits: @fabiobassa for his ideas, inspiration, great generosity in giving the boards for development and testing. The project of bringing rk322x into armbian would not have begun without his support! Justin Swartz, for his work and research to bring mainline linux on rk3229 (repository here) @knaerzche for his great contribution to libreelec support and mainline patches @Alex83 for his patience in testing the NAND bootloader upgrade procedure on his board @Jason Duhamell for his generous donation that allowed researching eMCP boards and esp8089 wifi chip
-
DISCLAIMER (PLEASE READ): everything you can find in this thread (binaries, texts, code snippets, etc...) are provided AS-IS and are not part of official Armbian project. For this reason not people from Armbian project nor myself are responsible for misuse or loss of functionality of hardware. Please don't ask about support or assistance in other non-community forums nor in the official Armbian github repository, instead post your questions in this thread, in the TV Boxes forum section (hardware related) or in the Peer-to-peer support section (general linux/software related). Thank you! This thread is to give stable and mature long-term range support to rk3318/rk3328 found in many tv boxes in Armbian project as Community Supported Configuration (CSC). The current work is mainlined into Armbian project, but your mileage may vary; most recent developments live on my personal fork on github -> here <- Important notes: is just a personal opinion, but apparently widely supported, that rk3318 chip is not an official rockchip part. They probably are scrap rk3328 parts which have not passed conformance tests but are sold anyway to tv boxes manufacturers. They don’t reach the same operating frequency of the rk3328, have much higher leakage currents (and thus higher temperatures) and often the boards they are installed on are low quality with low quality components, in fact a very very common issue is the eMMC failure due to bad parts and bad soldering. So said, I personally suggest not to buy any rk3318 tv box, but instead find a properly supported SBC (Single Board Computer) if you need a reliable product. In the unfortunate case you already have such product, this thread may help you have some fun with them. What works: • Works on RK3318 and RK3328 TV boxes with DDR3 memories • Mainline u-boot • Mainline ATF provided as Trusted Execution Environment • All 4 cores are working • Ethernet • Serial UART (configured at stock 1.5Mbps) • Thermals and frequency scaling • OTG USB 2.0 port (also as boot device!) • EHCI/OHCI USB 2.0 ports and XHCI USB 3.0 ports • MMC subsystem (including , SD and sdio devices) • Hardware video acceleration (fully supported via RKMPP on legacy kernel, support via hantro and rkvdec kernel driver on mainline) • Various WIFI over SDIO are supported • Full acceleration on legacy kernel and mainline kernel • U-boot boot order priority: first the sdcard, then the USB OTG port and eventually the internal ; you can install u-boot (and the whole system) in the internal and u-boot will always check for images on external sdcard/USB first. Unbrick: Technically, rockchip devices cannot be bricked. If the internal flash does not contain a bootable system, they will always boot from the sdcard. If, for a reason, the bootable system on the internal flash is corrupted or is unable to boot correctly, you can always force the maskrom mode shorting the clock pin on the PCB. The procedure is explained here for rk322x, but for rk3318/28 is the same. In most of the rk3318/28 boards, shorting the clock pin is difficult or impossible because eMMC are BGA chips with no exposed pins. Pay double attention when burning something on the internal flash memory and always test first the image booting from the sdcard to be sure it works before burning anything in internal flash. This is a list of posts where forum users have been able to spot the eMMC clock pin to trigger the maskrom mode: H96 Max+ (board signature: RK3318_V1.4) by @Gausus X88 PRO 10 (board signature: X88_PRO_B) by @mathgaming Ninkbox N1 Max RK3318 by @enigmasphinx Partecipation and debugging: If you want to partecipate or need help debugging issues, do not hesitate to share your experience with the installation procedure of the boxes. In case of issues and missed support, provide as many as possible of these things is very useful to try and bring support for an unsupported board: some photos of both sides of the board. Details of the eMMC, DDR and Wifi chips are very useful! upload the device tree binary (dtb) of your device. We can understand a lot of things of the hardware from that small piece of data; and alternative is a link to the original firmware (you can do a full backup with the Multitool); dmesg and other logs (use armbianmonitor -u that automatically collects and uploads the logs online) attach a serial converter to the device and provide the output of the serial port; Multimedia: Mainline kernel: 3D acceleration is provided by Lima driver and is already enabled. Hardware video decoding: https://forum.armbian.com/topic/19258-testing-hardware-video-decoding-rockchip-allwinner/ Legacy kernel: If you need multimedia features, like OpenGL/OpenGL ES acceleration, hardware accelerated Kodi, ffmpeg and mpv you can take a look to this post Installation (via SD card): Building: You can build your own image follow the common steps to build armbian for other tv boxes devices: when you are in the moment to choose the target board, switch to /TVB/ boards and select "rk3318-box" from the list. Prebuilt images: Archived images - built by Armbian servers and GPG-signed: https://imola.armbian.com/dl/rk3318-box/archive/ Nightly stables - built from trunk by Armbian servers and GPG-signed: https://github.com/armbian/community Stables provided by me (unsigned): https://users.armbian.com/jock/rk3318/ Multitool: Multitool - A small but powerful image for RK3318/RK3328 TV Box maintenance. Download it from here Quick installation instructions on eMMC: Build or download your preferred Armbian image and a copy of the Multitool; Burn the Multitool on an SD card; once done, place the Armbian image in images folder of the SD card NTFS partition; Plug the SD card in the TV box and plug in the power cord. After some seconds the blue led starts blinking and the Multitool appears; OPTIONAL: you can do a backup of the existing firmware with "Backup flash" menu option; Choose "Burn image to flash" from the menu, then select the destination device (usually mmcblk2) and the image to burn; Wait for the process to complete, then choose "Shutdown" from main menu; Unplug the power cord and the SD card, then replug the power cord; Wait for 10 seconds, then the led should start blinking and HDMI will turn on. The first time the boot process will take a couple of minutes or more because the filesystem is going to be resized, so be patient and wait for the login prompt. On first boot you will be asked for entering a password for root user of your choice and the name and password for a regular user Run rk3318-config to configure the board specific options Run armbian-config to configure timezone, locales and other personal options Congratulations, Armbian is now installed! Despite the procedure above is simple and reliable, I always recommend to first test that your device boots Armbian images from SD Card. Due to the really large hardware variety, there is the rare chance that the images proposed here may not boot. If a bad image is burned in , the box may not boot anymore forcing you to follow the unbrick section at the top of this post. Quick installation instructions to boot from SD Card: If you are already running Armbian from eMMC, skip to the next step. Instead if you are running the original firmware you need to first erase the internal flash; to do so download the Multitool, burn it on an SD Card, plug the SD Card and power the TV Box. Use "Backup flash" if you want to do a backup of the existing firmware, then choose "Erase flash" menu option. Build or download your preferred Armbian image; Uncompress and burn the Armbian image on the SD Card; Plug the SD Card in the TV Box and power it on; Wait for 10 seconds, then the led should start blinking and HDMI will turn on. The first time the boot process will take a couple of minutes or more because the filesystem is going to be resized, so be patient and wait for the login prompt; On first boot you will be asked for entering a password for root user of your choice and the name and password for a regular user Run rk3318-config to configure the board specific options Run armbian-config to configure timezone, locales and other personal options, or also to transfer the SD Card installation to internal ; Congratulations, Armbian is running from SD Card! Tutorial - How to install Armbian on your TV Box (by @awawa) : https://www.hyperhdr.eu/2022/01/tv-box-mania-i-part-x88-pro-10.html A note about boot device order: With Armbian also comes mainline U-boot. If you install Armbian, the bootloader will look for valid bootable images in this order: External SD Card External USB Stick in OTG Port Internal The Multitool does not boot / How to burn image directly on eMMC: Some boards have the sdcard attached to an auxiliary (called also sdmmc_ext or external) controller which is not the common one. Forum findings declare that those boards are not able to boot from sdcard with stock firmware and they neither do in maskrom mode: the stock firmware always boots even if you put the multitool on sdcard. In such case, burning images directly on eMMC is the only way to have a working Armbian installation. You can follow these instructions by @fabiobassa to burn images directly on eMMC: https://forum.armbian.com/topic/17597-csc-armbian-for-rk3318rk3328-tv-box-boards/?do=findComment&comment=130453 Notes and special hardware: Script to change DDR memory frequency here Wireless chip AP2734, SP2734, HY2734C and similars: they are clones of AmPAK AP6334 which is combo wifi + bluetooth of broadcom BCM4334/B0 chips. You may need a special nvram file, instructions by @paradigman are here Critics, suggestions and contributions are welcome! Credits: @fabiobassa for his ideas, inspiration, great generosity in giving the boards for development and testing. The project of bringing rk3318 into armbian would not have begun without his support! @hexdump for his precious support in early testing, ideas and suggestions @MX10.AC2Nfor his patience in testing mxq-rk3328-d4 board support All the rockhip64 maintainers at Armbian project who have done and do most of the work to support the platform
-
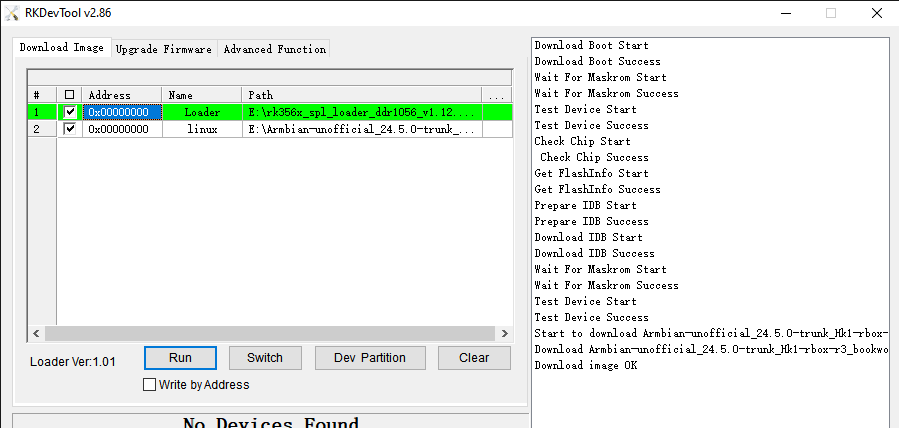
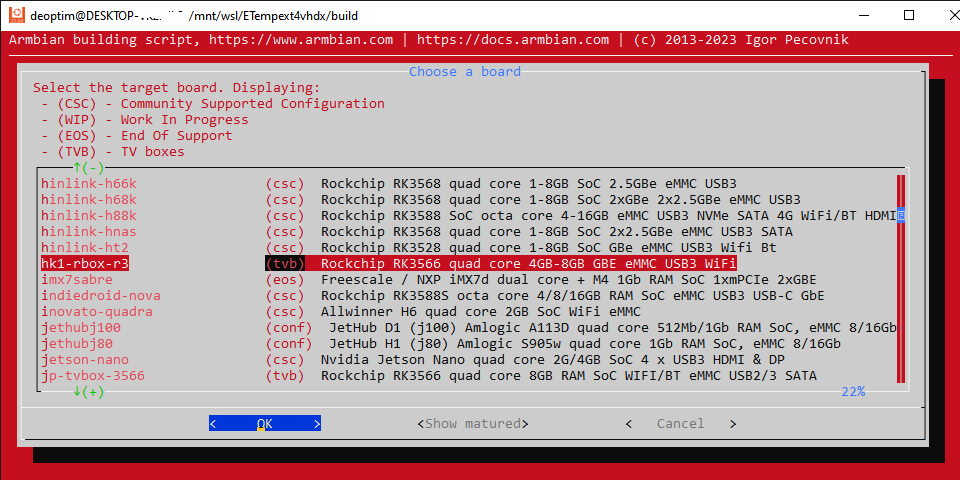
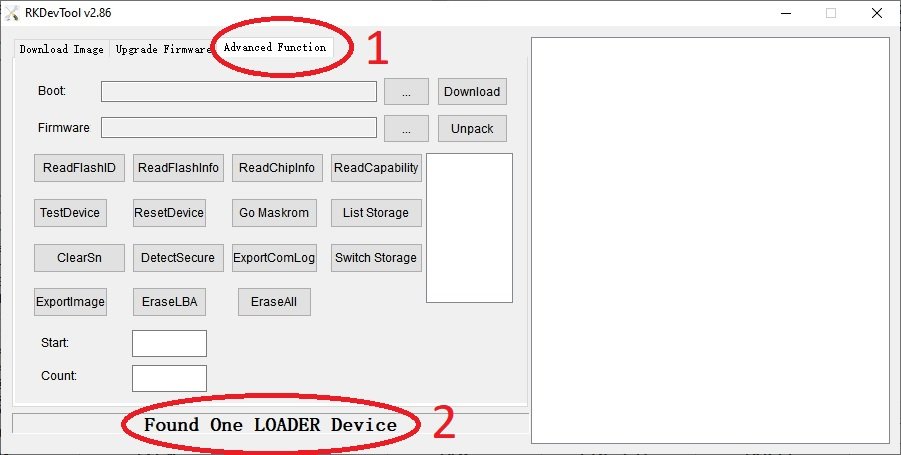
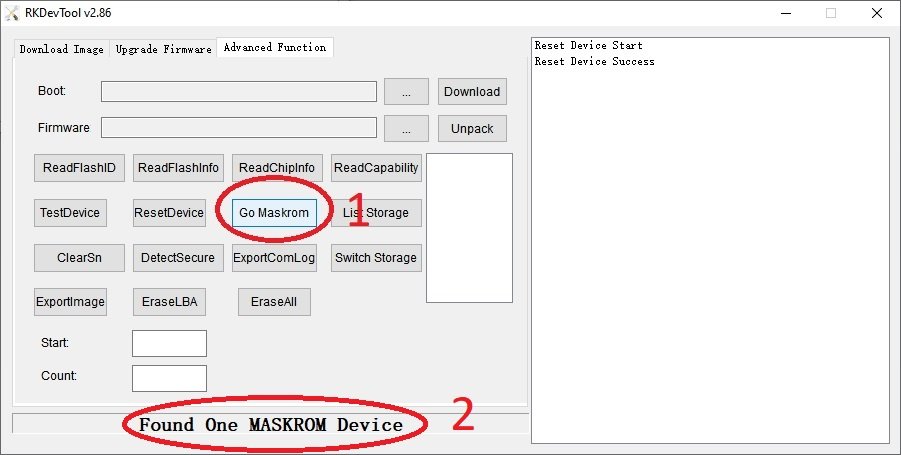
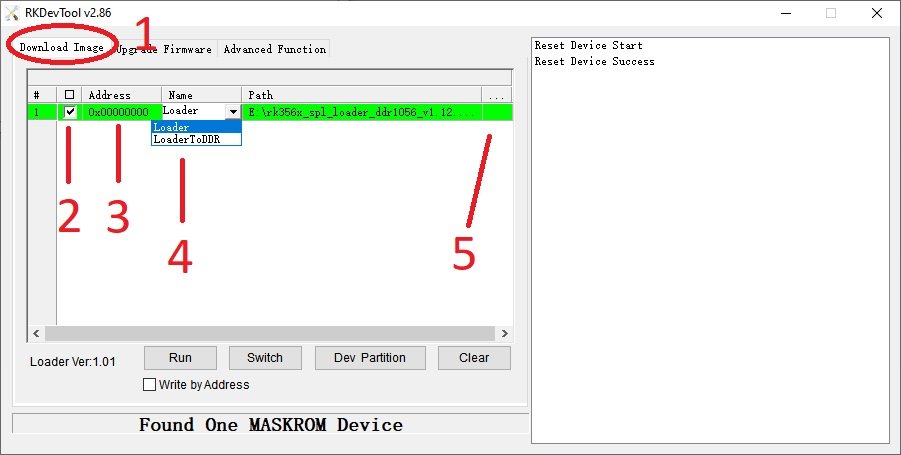
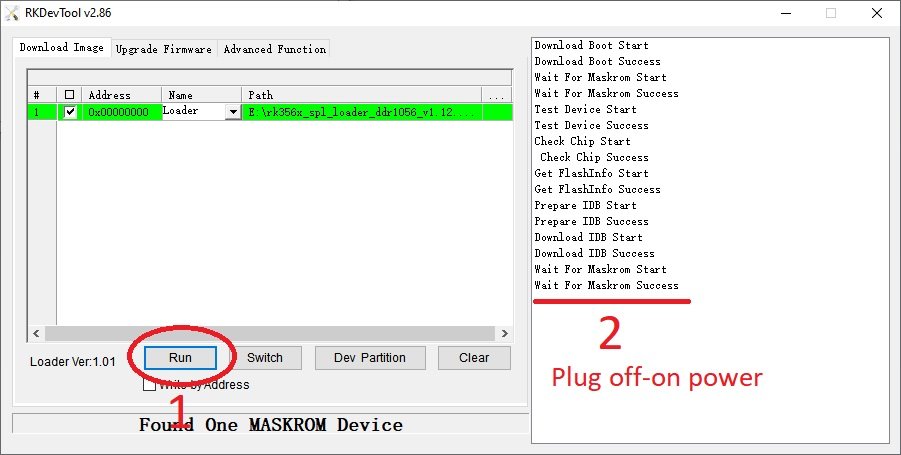
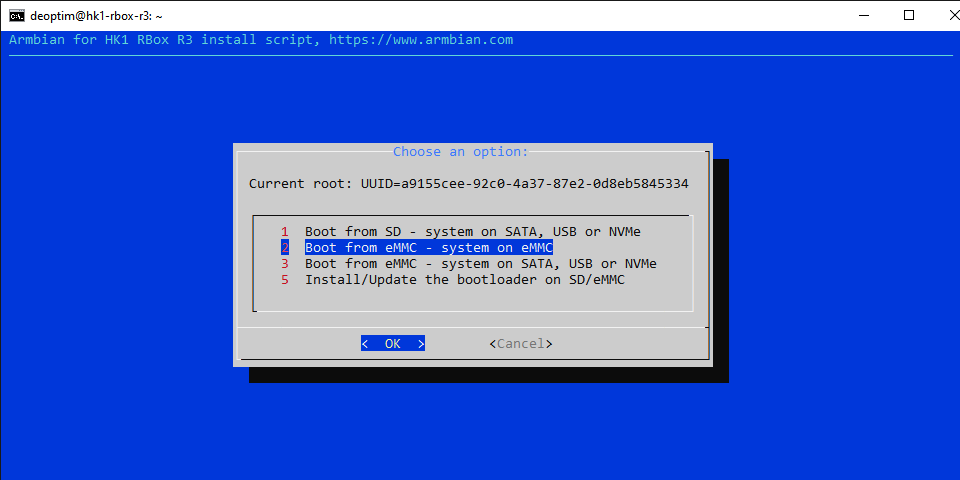
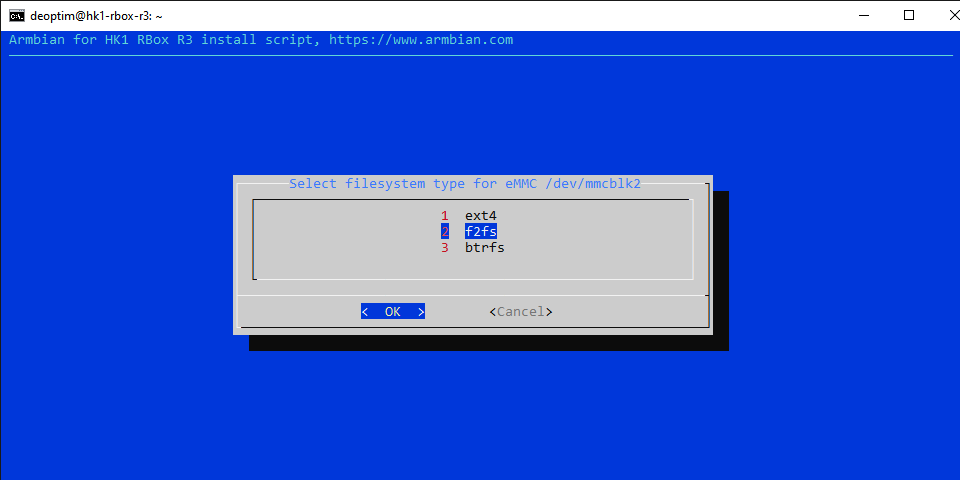
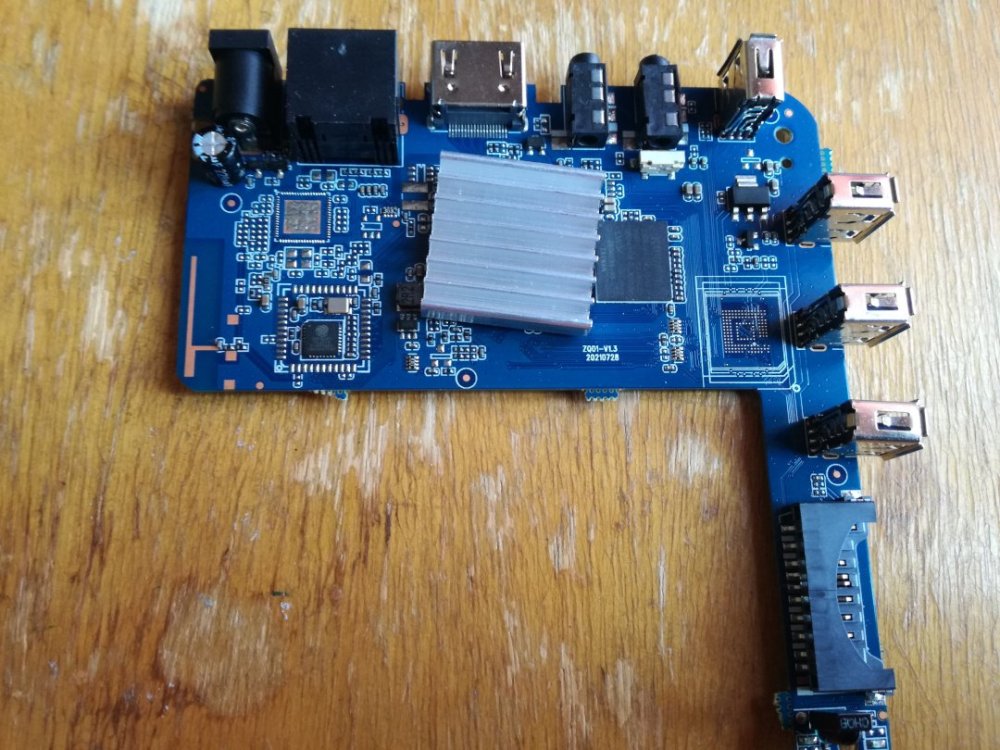
 Armbian 24.5.0 Bookworm images (linux-6.1/linux-6.6) for TVBoxes: Vontar KK MAX / HK1 RBOX R2 / HK1 RBOX R3 (the same dts/dtb should work for these TVBoxes) Here is a dts and dtb files, working reworked for mainline: hk1-rbox-r3-profile-kernel-6.1-6.6.zip (original dts and dtb from TVBox rk-kernel-orig.zip) Checked the following: HDMI - works (need to check hot plugging) HDMI sound - works USB 2.0 - works USB 3.0 - works SPDIF - should work (I cannot to check) SD-Card booting and detection - works eMMC install on it (/sbin/nand-sata-install) and detection - works RKDevTool installing and loading images on/from eMMC - works GPU (bugs/frizzes on mainline are not canceled) - works Hardware video acceleration(except for browsers) - works Dualboot if you flash new bootloader (SD-Card boot high priority) - works Here are the compiled Armbian images (Bookworm only) with integrated dtb: https://www.mediafire.com/file/4dwf7ce922x7obq/Armbian-unofficial_24.5.0-trunk_Hk1-rbox-r3_bookworm_current_6.1.87_cinnamon_desktop.img.xz/file https://www.mediafire.com/file/fjwtxb5gjzip341/Armbian-unofficial_24.5.0-trunk_Hk1-rbox-r3_bookworm_current_6.1.87_minimal.img.xz/file https://www.mediafire.com/file/iuz4uijgjh5ry1r/Armbian-unofficial_24.5.0-trunk_Hk1-rbox-r3_bookworm_current_6.6.28_cinnamon_desktop.img.xz/file https://www.mediafire.com/file/kofyqabr5k6qxm8/Armbian-unofficial_24.5.0-trunk_Hk1-rbox-r3_bookworm_current_6.6.28_minimal.img.xz/file The one of this box itself is HK1 RBOX R3, the photo shows the pins for short to go to the Maskrom bootloader and UART pins: A working bootloader(supports dualboot) on this hardware for RKDevTool tool just in case: Loader.zip Please note that RKDevTool flashing utility only needs to flash the .img file with the bootloader, i.e. you need to unpack the .xz archive somewhere first (for ex. you can use 7-zip). -- Recommendations for installation on eMMC ---------------------------------------------------- For those who want to build Armbian themselves, here are the instructions: UPD: Added to images "f2fs-tools" package, added loader to support dualboot without touching the original Android(or other OS) image on eMMC - priority is given to SD-Card. Boot will be from SD-Card if there is on boot partition exist folder and file \boot.scr or extlinux\extlinux.conf - uboot(both: original Android and compiled for Armbian) searches for this path and file if it found this file, it will load from device which contains this file. mmc1(SD-Card) - first, mmc0(eMMC) - second. For correct priority loading it is necessary to replace the main bootloader which is in the archive Loader.zip - if you have an Android it is enough to flash only this bootloader as Loader at 0x0 offset using RKDevTool utility, the rest of the eMMC part should not be touched if the OS and settings we need are there. U-boot on eMMC must be original or Armbian and preinstalled at offset 0x4000. Instructions: (remember, uboot must be on eMMC (even the original Android or Armbian, i.e. if you erase the eMMC - the boot will not work) and this is relevant if you have installed the original MiniLoaderAll.bin, which does not support booting from SD-Card, but only from eMMC. Some TVBoxes may already have a bootloader that supports SD-card booting.). Feel free to test...
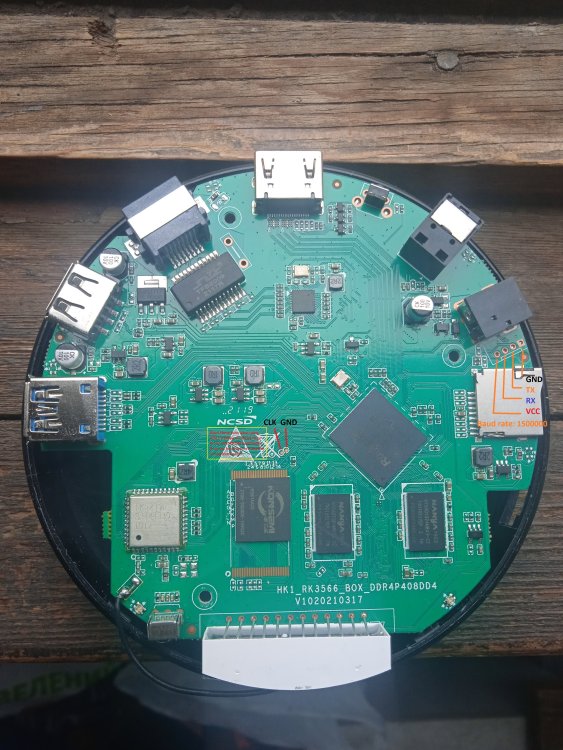
-
 What I did is: df -h to see the space used for "/var/log" Then I went to "/var/log" and ran: sudo du -ha | grep 'G'; sudo du -ha | grep '[0-9][0-9][0-9]M' (Im lazy and the 'G' will return folders or logs with the letter 'G' as well) This will show you which files are bigger than 999MB and which files are bigger than 99MB. After seeing that "/var/log/dpkg.log" was not the problem, for me it was "daemon.log" , I decided to erase all of the February entries on that log, since there were a lot of entries from when I was setting something up. (Junk) sudo sed -i '/^Feb/d' daemon.log And finally (I want to say Im a novice linux user, so I dont know if this is recommended) I deleted the zipped (.gz) old logs that Im sure that I don't need.
 -
very nice, it boots up and doesnt crash! Thank you very much! Do I still have to prevent bootloader updates? Anything else you want me to test? And yes, i flashed without testing. I was uncautious but lesson learned, I now use my SD until I am sure I want to keep the image. edit: It is still running after 10h, I installed iobroker and test-replaced my Pi, works fine. Noticed there is still no HDMI and Armbian shows 959MB Ram instead of 2GB. I used ledconf7 - the LED now flickers when accessing the SD which is nice. edit2: i made an image of my SD with Win32DiskImager and flashed it with rkdeveloptool in WSL2 Debian. It didnt boot but now I can use multitool without crashing. I found out I have a 1GB RAM & 8GB flash device instead of 2/16 as written on the sticker. The same sticker also says Android 12 but it came with 7. Somewhere else on the packaging it says 64bit CPU, I didnt look any further... edit3: used pishrink with -s on my image (in wsl too), flashed it via multitool to the emmc. works! I know I could have used a fresh image but I had a few things set up already and was curious if this will work. /usr/lib/armbian/armbian-resize-filesystem start to expand the filesystem again. final edit (so far): rkdeveloptool also works, I just tried to flash a too big image and it didnt throw an error. Here's how to connect USB devices to WSL VM. Also I used raxda's rkdeveloptool, the original one gave me an error during make. The windows versions of rkdevtool really are cursed. There was exactly one combination of driver and tool that let me erase the flash (see earlier post), I never got it to write to it.
-
Hello, I just received my new Odroid HC4 and wanted to install Armbian on it. I downloaded and decided to use the following image: Armbian_24.2.1_Odroidxu4_jammy_current_6.1.77.img I used two ways to flash the SD card - Balnea echter and also - sudo dd if=Armbian_24.2.1_Odroidxu4_jammy_current_6.1.77.img of=/dev/mmcblk0 As recommended to bypass the bootloader petitboot I followed the recommended procedure: ********************************************************************** Bootloader Bypass Method This is now the preferred method. It is easier, and be performed without a display via SSH Install an SD Card with a fresh Armbian image Flip device upside down With a tool, press and hold down the black button. Continue holding button and plug in power to device Login to console or SSH and perform follow normal setup procedures Verify system can access SPI FLASH device and Erase Reboot odroidhc4:~:# ls -ltr /dev/mtd* crw------- 1 root root 90, 0 Nov 6 21:38 /dev/mtd0 brw-rw---- 1 root disk 31, 0 Nov 6 21:38 /dev/mtdblock0 crw------- 1 root root 90, 1 Nov 6 21:38 /dev/mtd0ro odroidhc4:~:# flash_erase /dev/mtd0 0 0 Erasing 4 Kibyte @ fff000 -- 100 % complete odroidhc4:~:# ********************************************************************** I could find the IP which was 192.168.1.80 But I see no open port using nmap even not the port 22, so I can not get into the system to use ssh for removing "petitboot" Unfortunately I have neither a display nor a keyboard so I can not really see what happens. I could not find any information on how long the black button must be hold so I tried few second up to more or less a minute with always the same result. I'm not sure that the system boots from the SD cad when I press the button. Any help or information what to do ?
-
Good idea but I tried it now and it didn't help. I erased the flash with "flash_erase /dev/mtd0 0 0" and wrote the bootloader to MTD again using armbian-config but it still doesn't boot without the SD card inserted. I even tried to erase the flash a second time and write rkspi_loader.img from Armbian 24.2 but it made no difference.
-

Can't boot MULTITOOL on OTT MXQ 4K (not Pro) RK3229 box
jock replied to ochentay4's topic in Rockchip CPU Boxes
@mocarela Yes, it is possible to boot from sdcard, but you need first to: erase the eMMC, so the SoC will attempt to boot from sdcard, or install armbian on the eMMC, whose bootloader gives priority to sdcard, then USB, then eMMC Also Rockchip SoCs always attempt to boot from eMMC, if they find a valid bootloader. -
Hi all, I am trying to recover after a failed NVMe install. I have a working install on an SDCard, but I think my board no longer boots to SDCard, since I flashed the bootloader via armbian-install. I am not sure if my NVMe install is good or not, and I can't currently reflash it. So I think my best bet is to wipe the SPI, which I hope means the board will go back to booting from SDCard. That's question 1 - is that actually a valid solution? If I wipe the SPI will I be able to again boot to SDCard? I am able to get the board into Maskrom mode, and I can see it using the Windows tool. However, I believe that I need a "loader image" that I "download" into the tool before I can wipe the bootloader. The Rock5 SPI wipe guide posted elsewhere in this forum refers to rk3588_spl_loader_v1.08.111.bin, which I don't have, and I'm not sure that's the right loader for the OPi5. That's question 2 - is there a loader for the OPi5 and/or can the Rock5 loader be used here? The OPi5 Manual is very sparse about Maskrom info, it says how to get into that mode, but only gives instructions for flashing the board to Android. The Android download is not working right now (Google Drive quota) so I am not able to get that package, in case it happens to have a suitable loader image. Thanks for any replies in advance.
-
Hello- Just got my EspressoBin v7, trying to boot to SD using Armbian 23.02 Bullseye. Followed instructions at https://www.armbian.com/espressobin/. Board is 2GB, so I used flash-image-DDR4-2g_2cs_6-1200_750.bin. U-Boot showed CPU runs at 1200, and I confirmed "C120" on the chip. Interrupt boot process bubt flash-image-DDR4-2g_2cs_6-1200_750.bin spi usb env default -a saveenv Flashed Armbian_23.02.2_Espressobin_bullseye_current_5.15.93_minimal.img to a new SanDisk SD card with belenaEtcher and dd. Board doesn't boot, I get "Wrong image format for "source" command" then it tries to boot other devices. I've tried a second new SD card and both minimal and not minimal filesystems with the same result. Any suggestions or advice is greatly appreciated. My U-Boot output: TIM-1.0 mv_ddr-devel-g251bc63 DDR4 16b 2GB 2CS WTMI-devel-18.12.1-1d97715 WTMI: system early-init SVC REV: 5, CPU VDD voltage: 1.225V Setting clocks: CPU 1200 MHz, DDR 750 MHz CZ.NIC's Armada 3720 Secure Firmware 0b68a33-dirty (May 16 2022 17:51:06) Running on ESPRESSObin NOTICE: Booting Trusted Firmware NOTICE: BL1: v2.6(release):a921da5e NOTICE: BL1: Built : 17:55:48, May 16 2022 NOTICE: BL1: Booting BL2 NOTICE: BL2: v2.6(release):a921da5e NOTICE: BL2: Built : 17:55:48, May 16 2022 NOTICE: BL1: Booting BL31 NOTICE: BL31: v2.6(release):a921da5e NOTICE: BL31: Built : 17:55:48, May 16 2022 U-Boot 2022.04-armbian (May 16 2022 - 17:50:52 +0000) DRAM: 2 GiB Core: 38 devices, 20 uclasses, devicetree: fit WDT: Not starting watchdog@8300 Comphy chip #0: Comphy-0: USB3_HOST0 5 Gbps Comphy-1: PEX0 5 Gbps Comphy-2: SATA0 6 Gbps SATA link 0 timeout. AHCI 0001.0300 32 slots 1 ports 6 Gbps 0x1 impl SATA mode flags: ncq led only pmp fbss pio slum part sxs PCIe: Link down MMC: sdhci@d0000: 0, sdhci@d8000: 1 Loading Environment from SPIFlash... SF: Detected mx25u3235f with page size 256 Bytes, erase size 4 KiB, total 4 MiB OK Model: Globalscale Marvell ESPRESSOBin Board Net: eth0: ethernet@30000 Hit any key to stop autoboot: 0 MMC Device 1 not found no mmc device at slot 1 switch to partitions #0, OK mmc0 is current device Scanning mmc 0:1... Found U-Boot script /boot/boot.scr load - load binary file from a filesystem Usage: load <interface> [<dev[:part]> [<addr> [<filename> [bytes [pos]]]]] - Load binary file 'filename' from partition 'part' on device type 'interface' instance 'dev' to address 'addr' in memory. 'bytes' gives the size to load in bytes. If 'bytes' is 0 or omitted, the file is read until the end. 'pos' gives the file byte position to start reading from. If 'pos' is 0 or omitted, the file is read from the start. ## Executing script at 06000000 Wrong image format for "source" command SCRIPT FAILED: continuing... libfdt fdt_check_header(): FDT_ERR_BADMAGIC Scanning disk sdhci@d0000.blk... Found 2 disks No EFI system partition ERROR: invalid device tree starting USB... Bus usb@58000: Register 2000104 NbrPorts 2 Starting the controller USB XHCI 1.00 Bus usb@5e000: USB EHCI 1.00 scanning bus usb@58000 for devices... 1 USB Device(s) found scanning bus usb@5e000 for devices... 1 USB Device(s) found scanning usb for storage devices... 0 Storage Device(s) found Device 0: unknown device scanning bus for devices... Device 0: unknown device (NULL udevice *): mvneta_setup_txqs: can't create txq=0 BOOTP broadcast 1 timeout: packet not sent BOOTP broadcast 2 timeout: packet not sent BOOTP broadcast 3 timeout: packet not sent My printenv: => printenv boot_a_script=load ${devtype} ${devnum}:${distro_bootpart} ${scriptaddr} ${prefix}${script}; source ${scriptaddr} boot_efi_binary=load ${devtype} ${devnum}:${distro_bootpart} ${kernel_addr_r} efi/boot/bootaa64.efi; if fdt addr ${fdt_addr_r}; then bootefi ${kei boot_efi_bootmgr=if fdt addr ${fdt_addr_r}; then bootefi bootmgr ${fdt_addr_r};else bootefi bootmgr;fi boot_extlinux=sysboot ${devtype} ${devnum}:${distro_bootpart} any ${scriptaddr} ${prefix}${boot_syslinux_conf} boot_net_usb_start=usb start boot_pci_enum=pci enum boot_prefixes=/ /boot/ boot_script_dhcp=boot.scr.uimg boot_scripts=boot.scr.uimg boot.scr boot_syslinux_conf=extlinux/extlinux.conf boot_targets=mmc1 mmc0 usb0 scsi0 pxe dhcp bootcmd=run distro_bootcmd bootcmd_dhcp=devtype=dhcp; run boot_net_usb_start; run boot_pci_enum; if dhcp ${scriptaddr} ${boot_script_dhcp}; then source ${scriptaddr}; fi;se; bootcmd_mmc0=devnum=0; run mmc_boot bootcmd_mmc1=devnum=1; run mmc_boot bootcmd_pxe=run boot_net_usb_start; run boot_pci_enum; dhcp; if pxe get; then pxe boot; fi bootcmd_scsi0=devnum=0; run scsi_boot bootcmd_usb0=devnum=0; run usb_boot bootfstype=ext4 criptaddr=0x6d00000 distro_bootcmd=scsi_need_init=; setenv nvme_need_init; for target in ${boot_targets}; do run bootcmd_${target}; done efi_dtb_prefixes=/ /dtb/ /dtb/current/ eth1addr=00:51:82:11:22:01 eth2addr=00:51:82:11:22:02 eth3addr=00:51:82:11:22:03 ethact=ethernet@30000 ethaddr=00:51:82:11:22:00 fdt_addr=0x6f00000 fdt_addr_r=0x6f00000 fdtcontroladdr=7fadcf40 fdtfile=marvell/armada-3720-espressobin-v7.dtb kernel_addr=0x7000000 kernel_addr_r=0x7000000 load_efi_dtb=load ${devtype} ${devnum}:${distro_bootpart} ${fdt_addr_r} ${prefix}${efi_fdtfile} mmc_boot=if mmc dev ${devnum}; then devtype=mmc; run scan_dev_for_boot_part; fi nvme_boot=run boot_pci_enum; run nvme_init; if nvme dev ${devnum}; then devtype=nvme; run scan_dev_for_boot_part; fi nvme_init=if ${nvme_need_init}; then setenv nvme_need_init false; nvme scan; fi pxefile_addr_r=0x6e00000 ramdisk_addr_r=0xa000000 sata_boot=if sata dev ${devnum}; then devtype=sata; run scan_dev_for_boot_part; fi scan_dev_for_boot=echo Scanning ${devtype} ${devnum}:${distro_bootpart}...; for prefix in ${boot_prefixes}; do run scan_dev_for_extlinux; run sca; scan_dev_for_boot_part=part list ${devtype} ${devnum} -bootable devplist; env exists devplist || setenv devplist 1; for distro_bootpart in ${devpt scan_dev_for_efi=setenv efi_fdtfile ${fdtfile}; for prefix in ${efi_dtb_prefixes}; do if test -e ${devtype} ${devnum}:${distro_bootpart} ${prefixe scan_dev_for_extlinux=if test -e ${devtype} ${devnum}:${distro_bootpart} ${prefix}${boot_syslinux_conf}; then echo Found ${prefix}${boot_syslinuxi scan_dev_for_scripts=for script in ${boot_scripts}; do if test -e ${devtype} ${devnum}:${distro_bootpart} ${prefix}${script}; then echo Found U-Be scsi_boot=run boot_pci_enum; run scsi_init; if scsi dev ${devnum}; then devtype=scsi; run scan_dev_for_boot_part; fi scsi_init=if ${scsi_need_init}; then scsi_need_init=false; scsi scan; fi stderr=serial@12000 stdin=serial@12000 stdout=serial@12000 usb_boot=usb start; if usb dev ${devnum}; then devtype=usb; run scan_dev_for_boot_part; fi ver=U-Boot 2022.04-armbian (May 16 2022 - 17:50:52 +0000) Environment size: 4408/65532 bytes
-
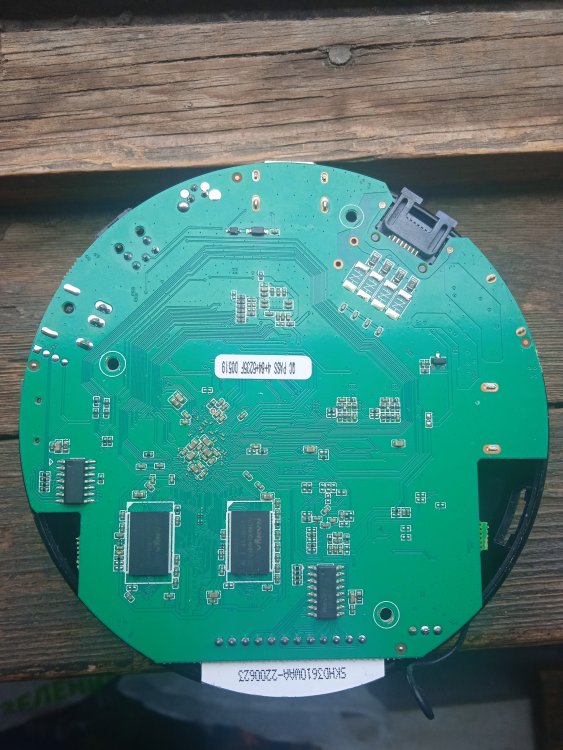
@svdmk Thanks for posting the photos and the firmware! I took a look to the device tree and found something that could be somehow intersting. I'm not absolutely sure it may be related to your issue, but there the device tree contains this gpio switch which is not usual: gpio_poweroff { compatible = "gpio-poweroff"; gpios = <0xb3 0x11 0x01>; status = "okay"; }; it maps to gpio3 bank and pin 17 (PC1, in the rockchip documentation). That string says that the pin is active low, it means that when it is 0, the poweroff is active; when it is 1 the poweroff is inactive. I may assume that gpio pin is used by the operating system to power off the system. On other board that pin is not mapped in the device tree, so I may also assume it is not used anywhere. In your case may (or may not) be related to the weird behaviour you're experiencing. With this command (to be run as root), you can see how the pins is configured. In my case, the pin is set to output at 0 level, but since it is not wired on my board it just does not do anything. Could you please execute the same command on your board? # grep 'gpio3-17' /sys/kernel/debug/pinctrl/pinctrl-rockchip-pinctrl/pinconf-pins pin 113 (gpio3-17): input bias pull down (1 ohms), output drive strength (8 mA), pin output (0 level) You can also control that pin: # cd /sys/class/gpio # echo 113 > export # cd gpio113 # cat direction in # cat value 0 # echo out > direction # cat direction out # echo 1 > value # cat value 1 # echo 0 > value # cat value 0 with echo 113 > export you will make the pin available for userspace, then a directory gpio113 will spawn and you can echo to direction and value to change the pin as input or output and switch levels. If the pin is actually wired to something, it may be that when you switch direction of level the board may suddenly turn off. Now you can also do another test: erase the emmc and verify you still have the shutdown issue. If that is the case, it may be interesting to see what is the pin state in that condition and if switching its condition causes the weird behaviour to stop or does not change anything.
-
That's right. I use multitool only to erase internal flash and then use rkdeveloptool to flash loader and image as it is described in first page. The device boots from sdcard in both cases, blank or flashed emmc but if there is a proper partition on internal flash Armbian works right, otherwise turns off(I heve tried to erase emmc and create partition with fdisk tool in Armbian, and OS works properly ). Armbian boots from internal flash too. I think booting issue and turning off after minute are two different cases. Turning off probably is some kind of interaction between RAM and EMMC into EMCP chip itself(kingston 08emcp08-el3cv100). This is dumped android firmware: https://drive.google.com/file/d/1ZLl-KCvGS47SAO8tY1YDvCHDv6YWIWRP/view?usp=sharing

-
Tv box mxq pro 4k 5g, pcb zq01-v1.3 rk3228a and kingston 08emcp08-el3cv100, wifi esp8265. Multitool boots properly but after a minute the box turns off(Libreelec has same behavior). This minute is enough to erase emms but not enough to flash img on board and bricks the device. Rkdeveloptool works great in maskrom mode and I managed to burn loader and image. I tried Armbian_21.02.1_Rk322x-box_buster_legacy_4.4.194.img , Armbian_23.08.0-trunk_Rk322x-box_buster_edge_6.5.5_minimal, Armbian_23.11.1_Rk322x-box_jammy_current_6.1.63_minimal and self compiled Armbian-unofficial_24.2.0-trunk_Rk322x-box_bookworm_edge_6.7.5_minimal on emmc and sd card with no success. Every time booting process stops and every time on different point despite of so many reboots, and after a minute the box turns off. I noticed with fresh written on emmc Armbian_21.02.1 , Multitool works properly (libreelec too). So I decided to try Armbian-unofficial_24.2.0-trunk on sd card and after more than 20 reboots I managed to set root password and Armbian works fine on sd card. Multutool , Armbian and Libreelec works from sd card on this strange decice only if there is partitision with filesystem on emms, othervice it turns off after a minute. I tried to install Armbian from sd card to emmc with armbian-config with no luck, box does not boot from emmc and from sd card again turns off after 1 minute. Any suggestions how to install Armbian on internal flash? Why Armbian needs so many reboots to reach finish point?
-
The tool connects i'm using version 2.1.8 Erase flash (normal erase) Erase bootloader The image i'm using was sent to my by the suport of the device and has worked on another identical device.
-
@audio kees don't blame on age , 61 here ...lololol anyway the system is booting from sd ..and it will work from internal emmc , too !! just grab the gz one from the server and do all again, first erase the emmc and then burn in internal storage did you remember, or can you test by inserting again the multitool SD , how the internal storage was identified ? usuallycould be mmc2 or something like that
-

Helios64 - Armbian 23.08 Bookworm issues (solved)
TDCroPower replied to ebin-dev's topic in Rockchip
@FlolmI am currently also reinstalling a Helios64 and following the instructions of @ebin-dev from here. As soon as i'm done i'll share a more detailed tutorial for dummies edit: thx to @ebin-dev for your instructions, I was able to run it successfully on my Helios64 and have written down the individual steps in more detail so that others can also do it without major problems. 1. image Armbian_23.5.4_Helios64_bookworm_current_6.1.36 flashing: Download and flash the image on your microSD with balenaEtcher or something similar... https://fi.mirror.armbian.de/archive/helios64/archive/Armbian_23.5.4_Helios64_bookworm_current_6.1.36.img.xz 2. set CPU limits: Run armbian-config -> System -> CPU And set: Min CPU speed = 408000 MHz Max CPU speed = 1200000 MHz CPU governor = on demand 3. disable Armbian Updates: you can either rename the source file or deactivate the line in the file with # at the beginning... root@helios64:~# cd /etc/apt/sources.list.d root@helios64:/etc/apt/sources.list.d# ls -l total 4 -rw-rw-r-- 1 root root 117 Jun 30 2023 armbian.list root@helios64:/etc/apt/sources.list.d# mv armbian.list armbian.list.disabled root@helios64:/etc/apt/sources.list.d# ls -l total 4 -rw-rw-r-- 1 root root 117 Jun 30 2023 armbian.list.disabled root@helios64:/etc/apt/sources.list.d# cat armbian.list.disabled # deb [signed-by=/usr/share/keyrings/armbian.gpg] http://apt.armbian.com bookworm main bookworm-utils bookworm-desktop 4. Download and copy rtl_nic firmware files: Download this 9 files... rtl8125b-2.fw rtl8153a-2.fw rtl8153a-3.fw rtl8153a-4.fw rtl8153b-2.fw rtl8153c-1.fw rtl8156a-2.fw rtl8156b-2.fw rtl8168h-2.fw ... from here... https://git.kernel.org/pub/scm/linux/kernel/git/firmware/linux-firmware.git/tree/rtl_nic ... and copy & replace the files to the directory /lib/firmware/rtl_nic on your helios64. 5. Upgrade kernel to 6.6.8: Download the 6.6.8 deb files from here... https://www.dropbox.com/scl/fi/9s2saibn9oezqmhfwyu3i/debs-6.6.8.zip?rlkey=hkkrxjelitsto0f0zw6wft6pq&dl=1 ... and copy the 3 files to your helios64. Execute these 4 commands one after the other... apt install libelf-dev dpkg -i linux-dtb-edge-rockchip64_24.2.0-trunk.225_arm64__6.6.8-S4c96-Dbc51-Pb65c-C891dHfe66-HK01ba-Vc222-B1743-R448a.deb dpkg -i linux-image-edge-rockchip64_24.2.0-trunk.225_arm64__6.6.8-S4c96-Dbc51-Pb65c-C891dHfe66-HK01ba-Vc222-B1743-R448a.deb dpkg -i linux-headers-edge-rockchip64_24.2.0-trunk.225_arm64__6.6.8-S4c96-Dbc51-Pb65c-C891dHfe66-HK01ba-Vc222-B1743-R448a.deb 6. update bootloader on eMMC: Download the deb file from here... https://imola.armbian.com/apt/pool/main/l/linux-u-boot-helios64-edge/linux-u-boot-edge-helios64_22.02.1_arm64.deb ... and copy the file to your helios64. Execute these 6 commands one after the other... dpkg -x linux-u-boot-edge-helios64_22.02.1_arm64.deb linux-u-boot-edge-helios64_22.02.1_arm64/ cd linux-u-boot-edge-helios64_22.02.1_arm64/usr/lib/linux-u-boot-edge-helios64_22.02.1_arm64/ dd if=idbloader.bin of=/dev/mmcblk1 seek=64 conv=notrunc dd if=uboot.img of=/dev/mmcblk1 seek=16384 conv=notrunc dd if=trust.bin of=/dev/mmcblk1 seek=24576 conv=notrunc reboot now 7. Set nic offload options: Select the LAN port you are using... For end0 - 1 GB Port: ethtool -K end0 tso on gso on gro on For eth1 - 2,5 GB Port: ethtool -K eth1 tso on gso on gro on ... and change the value in the ethtool command after the "-K". Execute the command ... root@helios64:~# ethtool -K end0 tso on gso on gro on Actual changes: tx-tcp-segmentation: off [requested on] tx-tcp-ecn-segmentation: off [requested on] tx-tcp-mangleid-segmentation: off [requested on] tx-tcp6-segmentation: off [requested on] 8. Fix hs400 support and L2 cache information: Download the dtb file from here... https://www.dropbox.com/scl/fi/nif2k0027whxky25djqll/rk3399-kobol-helios64.dtb-6.6.8-L2-hs400.zip?rlkey=zq7zw91oem4ugmgmaqfyuxqsa&dl=1 ... extract the rk3399-kobol-helios64.dtb-6.6.8-L2-hs400.zip ... rename rk3399-kobol-helios64.dtb-6.6.8-L2-hs400 to rk3399-kobol-helios64.dtb ... copy & replace the rk3399-kobol-helios64.dtb into /boot/dtb/rockchip 9. execute sbc-bench script: Execute these 3 commands one after the other... wget https://raw.githubusercontent.com/ThomasKaiser/sbc-bench/master/sbc-bench.sh chmod +x sbc-bench.sh ./sbc-bench.sh -r sbc-bench output.. 10. boot from eMMC: Run armbian-config -> System -> Install -> 2 Boot from eMMC -> erase eMMC: Yes -> 1 ext4 -> poweroff -> remove microSD -> boot hopefully from eMMC 11. update Debian packages: apt update && apt upgrade -
What do you mean with "everything is ok"? Did you run multitool, erase the emmc and try armbian from sdcard? did you install armbian on emmc? Also specs are totally fake, your device is 1G + 8G, not sure is a rk322x also.
-
if the red and blue light are flashing, perhaps the new kernel has some issues with HDMI. The board is running fine, but recently some kernel adjustments broke HDMI output in some cases. You may login via ssh to fix the issue (install and older 6.1 kernel) or erase the eMMC and reinstall armbian, or boot a new armbian installation from USB (now you can, because the bootloader coming with armbian allows USB boot)
-
Ground must be connected on both the edge (the USB serial and the board), otherwise you can't get proper communication. That is essential and you can easily electrically break things when you don't connect the shared ground. Ground first, always! For the other problem about emmc erase: if you did erase from multitool and you can run multitool but not armbian from sdcard there could be two main reasons: your armbian image is a bit old and has the 667Mhz ddrbin; recent images have a slower but more compatible ddrbin your emmc is faulty and accepts but really does not execute erase/write commands (ie: you erase it, but the contents still remains)
-
@suser I tried to erase the emmc but murphy's law bit me; if you want to read it the whole thing is written at the end of the post; but tldr i cooked the emmc and needed to cut its lines to allow the box to boot again; but i am still only able to boot the multitool and not armbian; essentially what i am asking is: does armbian need a bootloader on the emmc for it to boot or is it supposed to just start if the emmc is empty or not detected?
-

CSC Armbian for RK3318/RK3328 TV box boards
DieMitchell replied to jock's topic in Rockchip CPU Boxes
hey, i tried following this and the tutorial mentioned in this to flash it to my x88 pro 10 but i just cant get it to boot i tried building an image and i tried using prebuilt images but it just doesnt want to boot basically what i did: erase emmc flash img to emmc (no signal) restore emmc from backup rinse and repeat for like 5 different images -
i tried building an image and i tried using prebuilt images but it just doesnt want to boot basically what i did: erase emmc flash img to emmc (no signal) restore emmc from backup rinse and repeat for like 5 different images
-
Read those manuals: Thanks Jock and paolosabatino! You have to erase eMMC with multitool to be able to boot Armbian images from SD, then when you have preferable image, you can burn it to eMMC again with multitool. So before all you should make a backup of eMMC again with multitool. Even better try to find original android image for your box before erase eMMC. Extract DTB is also recommended. Good luck! PS, never opened this T9, as usually I open them only if I need to find test point with the oscilloscope, which mean: "things gone wrong"
-
Hello everyone. Please help me with the following problem. I have a Rock Pi 4b 1.4 (with SPI flash). I did the boot from the NVMe SSD using the image rkspi_loader-v20.11.2-trunk-v2.img according to the instructions. I installed Armbian 23.11 Jammy XFCE on NVMe SSD KingSpec NX 1TB. I’m using a power supply Baseus 65W GaN Pro (with PD). The system loads and works well. However, the system cannot reboot. When i click on reboot, the system starts to reboot and after the reset goes into a cyclic reboot. I need to turn off the power to reboot. What could be the problem and how to solve it? UART (Serial console) log: " " $&0 f@`B@@NF0f@`B@@NF 0f@`B@@NF@@@LN`b`N" " 0 "$`@@NN`0@b`@``@LFbpb`@H U-Boot TPL 2020.07-armbian (Dec 04 2020 - 22:10:39) Channel 0: LPDDR4, 50MHz BW=32 Col=10 Bk=8 CS0 Row=16/15 CS=1 Die BW=16 Size=2048MB Channel 1: LPDDR4, 50MHz BW=32 Col=10 Bk=8 CS0 Row=16/15 CS=1 Die BW=16 Size=2048MB 256B stride 256B stride lpddr4_set_rate: change freq to 400000000 mhz 0, 1 lpddr4_set_rate: change freq to 800000000 mhz 1, 0 Trying to boot from BOOTROM Returning to boot ROM... U-Boot SPL 2020.07-armbian (Dec 04 2020 - 22:10:39 +0100) Trying to boot from SPI NOTICE: BL31: v1.3(debug):42583b6 NOTICE: BL31: Built : 07:55:13, Oct 15 2019 NOTICE: BL31: Rockchip release version: v1.1 INFO: GICv3 with legacy support detected. ARM GICV3 driver initialized in EL3 INFO: Using opteed sec cpu_context! INFO: boot cpu mask: 0 INFO: If lpddr4 need support multi frequency, INFO: please update loader! INFO: Current ctl index[0] freq=400MHz INFO: Current ctl index[1] freq=800MHz INFO: plat_rockchip_pmu_init(1190): pd status 3e INFO: BL31: Initializing runtime services WARNING: No OPTEE provided by BL2 boot loader, Booting device without OPTEE initialization. SMC`s destined for OPTEE will return SMC_UNK ERROR: Error initializing runtime service opteed_fast INFO: BL31: Preparing for EL3 exit to normal world INFO: Entry point address = 0x200000 INFO: SPSR = 0x3c9 U-Boot 2020.07-armbian (Dec 04 2020 - 22:10:39 +0100) SoC: Rockchip rk3399 Reset cause: RST Model: Radxa ROCK Pi 4B DRAM: 3.9 GiB PMIC: RK808 MMC: mmc@fe310000: 2, mmc@fe320000: 1, sdhci@fe330000: 0 Loading Environment from SPI Flash... SF: Detected XT25F32B with page size 256 Bytes, erase size 4 KiB, total 4 MiB *** Warning - bad CRC, using default environment In: serial Out: vidconsole Err: vidconsole Model: Radxa ROCK Pi 4B Net: eth0: ethernet@fe300000 Hit any key to stop autoboot: 0 Card did not respond to voltage select! Card did not respond to voltage select! "Synchronous Abort" handler, esr 0x96000210 elr: 000000000022d918 lr : 000000000022d8b4 (reloc) elr: 00000000f3f5a918 lr : 00000000f3f5a8b4 x0 : 00000000f8000000 x1 : 0000000000000001 x2 : 0000000000000000 x3 : 0000000000100000 x4 : 00000000f1f36b30 x5 : 0000000000100000 x6 : 0000000000000001 x7 : 00000000f3fcd888 x8 : 0000000000000000 x9 : 0000000000000008 x10: 00000000ffffffe8 x11: 0000000000000010 x12: 000000000000149c x13: 00000000f1f149fc x14: 00000000f1f15b20 x15: 0000000000000020 x16: 00000000f3f5a878 x17: 0000000000060001 x18: 00000000f1f26dc0 x19: 00000000f1f14970 x20: 0000000000000001 x21: 0000000000000000 x22: 0000000000010000 x23: 00000000f3fd37f8 x24: 0000000000010000 x25: 00000000f3fba3f2 x26: 0000000000000000 x27: 0000000000000000 x28: 00000000f1f36a40 x29: 00000000f1f148d0 Code: 540000c1 350000a5 93407c05 f9400080 (b86068a0) Resetting CPU ... resetting ... U-Boot TPL 2020.07-armbian (Dec 04 2020 - 22:10:39) Channel 0: LPDDR4, 50MHz BW=32 Col=10 Bk=8 CS0 Row=16/15 CS=1 Die BW=16 Size=2048MB Channel 1: LPDDR4, 50MHz BW=32 Col=10 Bk=8 CS0 Row=16/15 CS=1 Die BW=16 Size=2048MB 256B stride 256B stride lpddr4_set_rate: change freq to 400000000 mhz 0, 1 lpddr4_set_rate: change freq to 800000000 mhz 1, 0 Trying to boot from BOOTROM Returning to boot ROM... U-Boot SPL 2020.07-armbian (Dec 04 2020 - 22:10:39 +0100) Trying to boot from SPI NOTICE: BL31: v1.3(debug):42583b6 NOTICE: BL31: Built : 07:55:13, Oct 15 2019 NOTICE: BL31: Rockchip release version: v1.1 INFO: GICv3 with legacy support detected. ARM GICV3 driver initialized in EL3 INFO: Using opteed sec cpu_context! INFO: boot cpu mask: 0 INFO: If lpddr4 need support multi frequency, INFO: please update loader! INFO: Current ctl index[0] freq=400MHz INFO: Current ctl index[1] freq=800MHz INFO: plat_rockchip_pmu_init(1190): pd status 3e INFO: BL31: Initializing runtime services WARNING: No OPTEE provided by BL2 boot loader, Booting device without OPTEE initialization. SMC`s destined for OPTEE will return SMC_UNK ERROR: Error initializing runtime service opteed_fast INFO: BL31: Preparing for EL3 exit to normal world INFO: Entry point address = 0x200000 INFO: SPSR = 0x3c9 U-Boot 2020.07-armbian (Dec 04 2020 - 22:10:39 +0100) SoC: Rockchip rk3399 Reset cause: RST Model: Radxa ROCK Pi 4B DRAM: 3.9 GiB PMIC: RK808 MMC: mmc@fe310000: 2, mmc@fe320000: 1, sdhci@fe330000: 0 Loading Environment from SPI Flash... SF: Detected XT25F32B with page size 256 Bytes, erase size 4 KiB, total 4 MiB *** Warning - bad CRC, using default environment In: serial Out: vidconsole Err: vidconsole Model: Radxa ROCK Pi 4B Net: eth0: ethernet@fe300000 Hit any key to stop autoboot: 0 Card did not respond to voltage select! Card did not respond to voltage select! "Synchronous Abort" handler, esr 0x96000210 elr: 000000000022d918 lr : 000000000022d8b4 (reloc) elr: 00000000f3f5a918 lr : 00000000f3f5a8b4 x0 : 00000000f8000000 x1 : 0000000000000001 x2 : 0000000000000000 x3 : 0000000000100000 x4 : 00000000f1f36b30 x5 : 0000000000100000 x6 : 0000000000000001 x7 : 00000000f3fcd888 x8 : 0000000000000000 x9 : 0000000000000008 x10: 00000000ffffffe8 x11: 0000000000000010 x12: 000000000000149c x13: 00000000f1f149fc x14: 00000000f1f15b20 x15: 0000000000000020 x16: 00000000f3f5a878 x17: 0000000000060001 x18: 00000000f1f26dc0 x19: 00000000f1f14970 x20: 0000000000000001 x21: 0000000000000000 x22: 0000000000010000 x23: 00000000f3fd37f8 x24: 0000000000010000 x25: 00000000f3fba3f2 x26: 0000000000000000 x27: 0000000000000000 x28: 00000000f1f36a40 x29: 00000000f1f148d0 Code: 540000c1 350000a5 93407c05 f9400080 (b86068a0) Resetting CPU ... resetting ... U-Boot TPL 2020.07-armbian (Dec 04 2020 - 22:10:39) Channel 0: LPDDR4, 50MHz BW=32 Col=10 Bk=8 CS0 Row=16/15 CS=1 Die BW=16 Size=2048MB Channel 1: LPDDR4, 50MHz BW=32 Col=10 Bk=8 CS0 Row=16/15 CS=1 Die BW=16 Size=2048MB 256B stride 256B stride lpddr4_set_rate: change freq to 400000000 mhz 0, 1 lpddr4_set_rate: change freq to 800000000 mhz 1, 0 Trying to boot from BOOTROM Returning to boot ROM... U-Boot SPL 2020.07-armbian (Dec 04 2020 - 22:10:39 +0100) Trying to boot from SPI NOTICE: BL31: v1.3(debug):42583b6 NOTICE: BL31: Built : 07:55:13, Oct 15 2019 NOTICE: BL31: Rockchip release version: v1.1 INFO: GICv3 with legacy support detected. ARM GICV3 driver initialized in EL3 INFO: Using opteed sec cpu_context! INFO: boot cpu mask: 0 INFO: If lpddr4 need support multi frequency, INFO: please update loader! INFO: Current ctl index[0] freq=400MHz INFO: Current ctl index[1] freq=800MHz INFO: plat_rockchip_pmu_init(1190): pd status 3e INFO: BL31: Initializing runtime services WARNING: No OPTEE provided by BL2 boot loader, Booting device without OPTEE initialization. SMC`s destined for OPTEE will return SMC_UNK ERROR: Error initializing runtime service opteed_fast INFO: BL31: Preparing for EL3 exit to normal world INFO: Entry point address = 0x200000 INFO: SPSR = 0x3c9 U-Boot 2020.07-armbian (Dec 04 2020 - 22:10:39 +0100) SoC: Rockchip rk3399 Reset cause: RST Model: Radxa ROCK Pi 4B DRAM: 3.9 GiB PMIC: RK808 MMC: mmc@fe310000: 2, mmc@fe320000: 1, sdhci@fe330000: 0 Loading Environment from SPI Flash... SF: Detected XT25F32B with page size 256 Bytes, erase size 4 KiB, total 4 MiB *** Warning - bad CRC, using default environment In: serial Out: vidconsole Err: vidconsole Model: Radxa ROCK Pi 4B Net: eth0: ethernet@fe300000 Hit any key to stop autoboot: 0 Card did not respond to voltage select! Card did not respond to voltage select! "Synchronous Abort" handler, esr 0x96000210 elr: 000000000022d918 lr : 000000000022d8b4 (reloc) elr: 00000000f3f5a918 lr : 00000000f3f5a8b4 x0 : 00000000f8000000 x1 : 0000000000000001 x2 : 0000000000000000 x3 : 0000000000100000 x4 : 00000000f1f36b30 x5 : 0000000000100000 x6 : 0000000000000001 x7 : 00000000f3fcd888 x8 : 0000000000000000 x9 : 0000000000000008 x10: 00000000ffffffe8 x11: 0000000000000010 x12: 000000000000149c x13: 00000000f1f149fc x14: 00000000f1f15b20 x15: 0000000000000020 x16: 00000000f3f5a878 x17: 0000000000060001 x18: 00000000f1f26dc0 x19: 00000000f1f14970 x20: 0000000000000001 x21: 0000000000000000 x22: 0000000000010000 x23: 00000000f3fd37f8 x24: 0000000000010000 x25: 00000000f3fba3f2 x26: 0000000000000000 x27: 0000000000000000 x28: 00000000f1f36a40 x29: 00000000f1f148d0 Code: 540000c1 350000a5 93407c05 f9400080 (b86068a0) Resetting CPU ... resetting ...
-
@jock Hi, yes - that is what i meant. Thank you for the hint. I was able to install Arbian (buster edge 6.5.5 minimal) with some older version of multitool (because of the limited space, that newer have, for image file). And there again that timer, after installing armbian i've got that 60 sec period - the device is not bricked, i was able to reach the point to set a root password (after few reboots) - and it boots normaly to that point. In my thinking there are a timer by default, which is disabled somehow from original image, and after an event - erase emmc or instal another OS or brick the device - there are no suppression on that timer. Very strange.