Active threads
Showing topics posted in for the last 365 days.
- Past hour
-

Building Armbian Distribution with Kernel 6.10 for Orange Pi 5 Pro
salas replied to Sergey Dulimov's topic in Rockchip
I will only be able to test it after july 10th when i return back home but I will get back here as soon as I test it. -

T95 Max + (Plus) S905x3, 4GB RAM / 32B ROM
Pita Bread replied to Pita Bread's topic in TV Boxes running Armbian
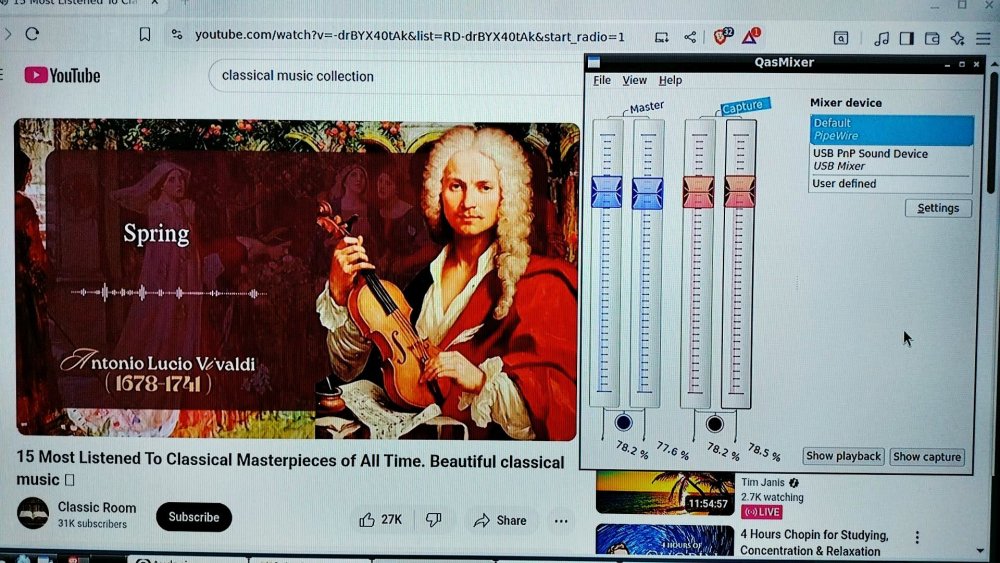
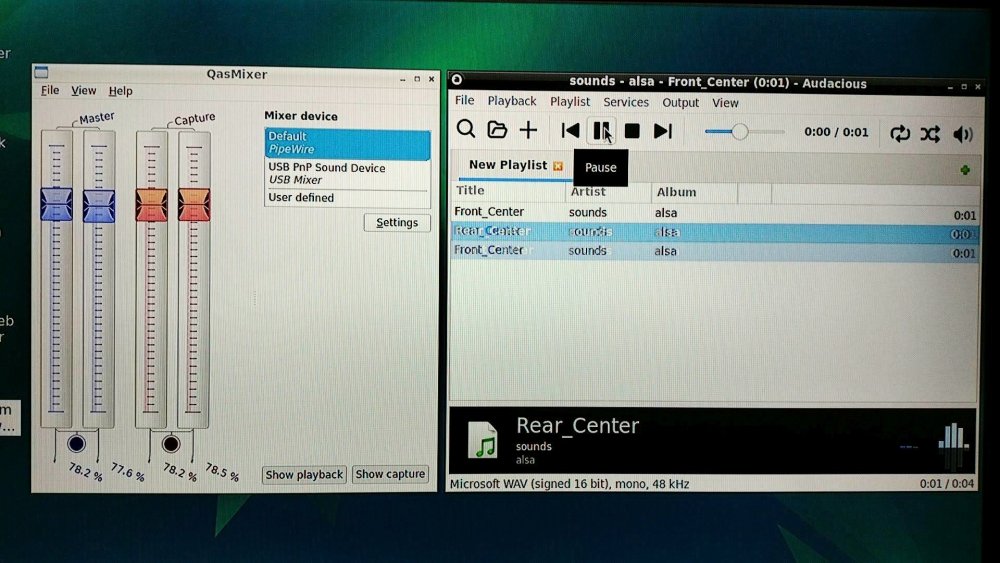
I updated my guide to include the newer "pipewire" audio system software. LINK HERE. I am curious to know if you got sound working on your tv box, and how you did it. Also, what tv box are you using these days? - Today
-
The previous post was mostly for slightly older releases of Armbian which includes Ubuntu 23 or Debian 10 and lower releases installed on a Tv Box. This short guide is for Ubuntu 24.04 and later releases installed on a Tv Box. This guide should also work for latest versions of Debian (but I didn't test it). Get a generic USB "sound card" audio adapter dongle from AliExpress, eBay, Amazon (etc). See the photo posted above (LINK). These gadgets are often between $2 and $5 USD but they all are usually similar, so I just got the lowest priced one at about $2.50 USD. Insert the USB "sound card" audio adapter dongle into your tv box. Create a new regular user in Linux, and login with the new user (not root). sudo adduser {user-name} Be sure your user is in the group 'audio', and be sure you have logged in as the user (not root). sudo usermod -a -G audio {username} Now let's install and setup audio sound using Pipewire and WirePlumber (but not Pulse). First, install alsa base, and mixer software. sudo apt install -y alsa-base alsa-tools alsa-utils alsamixergui qasmixer Make a backup copy of these two text files /etc/modules and /etc/modprobe.d/alsa-base.conf and save the backup copies in your home directory. cp -v /etc/modules $HOME/modules.backup cp -v /etc/modprobe.d/alsa-base.conf $HOME/alsa-base.conf.backup Edit the text file /etc/modules and write “snd-usb-audio” without quotes at the end of the file, and then save and close the file. sudo nano /etc/modules Edit the text file /etc/modprobe.d/alsa-base.conf and change and add some text sudo nano /etc/modprobe.d/alsa-base.conf Put a hash # symbol in front of every “options snd-usb-audio index=-2” that you see in the file /etc/modprobe.d/alsa-base.conf - I found two instances. Add these two lines of text to the bottom of the file /etc/modprobe.d/alsa-base.conf, and then save and close the file. alias snd-card-0 snd-usb-audio options snd-usb-audio index=0 Install pipewire and wireplumber and support files sudo apt install -y pipewire pipewire-pulse wireplumber pipewire-audio-client-libraries gstreamer1.0-pipewire Optional to install a graphical media player smplayer, vlc, totem, (etc). and optional install a graphical audio player rhythmbox, audacious, (etc). sudo apt install -y smplayer sudo apt install -y audacious In case that the pulse audio system is still installed, we will disable it for the local user. systemctl --user --now disable pulseaudio.service pulseaudio.socket Enable pipewire for the local user systemctl --user --now enable pipewire pipewire-pulse To be sure everything will work, let's reboot sudo reboot Login as the regular user, and run some informative commands to prove that the USB dongle and the pipewire audio system are working. Use alsa player to list audio devices. aplay -l Use alsa player to list PCM audio outputs (use capital "L"). aplay -L Use wireplumber control to show status of audio outputs/inputs via pipewire. wpctl status Use wireplumber control to show a volume level of default output wpctl get-volume @DEFAULT_AUDIO_SINK@ Change the volume using alsa mixer, after running it, press up/down arrow keys, and press "q", "e", "z", "c" and "s" keys. alsamixer Change the volume +/- by ten percent using wireplumber control. wpctl set-volume @DEFAULT_AUDIO_SINK@ 10%+ wpctl set-volume @DEFAULT_AUDIO_SINK@ 10%- * Important * connect a headphone, or amplifier to the 3.5mm output jack 🎧 of the USB adapter dongle and play some audio files. aplay /usr/share/sounds/alsa/Front_Center.wav aplay /usr/share/sounds/alsa/Noise.wav You can also login to the graphical desktop such as lxde or xfce4 and open a video/media player or an audio player software and play some audio files. I used Audacious for this example. Again, audio files are available in the directory /usr/share/sounds/alsa/ From here, you can use the wpctl command (LINK) or another control program for wireplumber. Maybe some of the Pulse audio tools would still work. Audacious works fine when playing locally stored audio files. The same should be true for using SMPlayer or VLC to play video files. Note that depending on the speed of your tv box, Youtube in Chrome / Chromium is sometimes laggy, has delays and resets. Other than that, it's all good. Enjoy ♪ ♫ ☺

-
Yes, I know about it and I did it right after the update was finished. Maybe it was an isolated case. I did armbin-install again and test 30 reboot again and each one correctly indicated 1Gb RAM 🙂
-

shrink-backup - a tool for backing up sbc:s
bedna replied to bedna's topic in Software, Applications, Userspace
Well that depends, have you tried adding more space to exclude the possibility that the img actually can fit all the data? If you are using snaps without excluding the containerized mounts on one of them and not the other, it seems like a very logical conclusion that the img actually runs out of space and the "not enough space" is accurate in this situation. Edit: I have never used snaps so I don't know, but I think snaps create containerized mounts every time you boot, and you probably don't want that data on your backup anyway since it will never be used. Others can surely put more light into this than my wild guess about this. Edit 2: This made me a bit curious about how snaps actually work, if they were to randomize the mountpoints and such, but after a tiny bit of searching I found this: https://www.howtogeek.com/660193/how-to-work-with-snap-packages-on-linux/#installing-snap-packages So just editing exclude.txt and adding /snap/* and then add -t option when running shrink-backup should solve this issue. As a matter of fact, I should probably add that as default in the exclude.txt file on the repo and in the script if not using the exclude file, because I don't think you ever want that data on the image... Feedback about this would be highly appreciated before I implement that change, does snap create the directory for each SquashFS within /snap if it does not exist or will it break if it is excluded like I suggest above? Edit 3: According to this each SquashFS is mounted directly to /snap so excluding /snap/* (keeping the actual /snap directory but excluding all content) should work right? Feedback please, I know there are some of you who know how this work, @eselarm maybe? -

Manually upgrading Armbian Focal -> Jammy on ODroid N2+
bthoven replied to dev-null's topic in Odroid N2/N2+
Thanks a lot. It worked with my Beelink Ultimate GT1 from focal to jammy. -

How to install armbian in h618?
Алексей Торопов replied to alienxz77b's topic in Allwinner CPU Boxes
Thanks a lot, now the wifi is working. I have this strange clone in my hands, it is marked as Vontar H618, but the Vontar image on it cannot be written to eMMC. In the case of the Transpeed image, everything is working correctly. -
Personalized support: https://calendly.com/armbian/consultation
-

Unisoc UWE5621DS on RK3566 device? calling Orange Pi experts
Igor replied to dieselnutjob's topic in Off-topic
It works with Armbian too. Just two years ago it was not in good condition -
Package `base-files` 25.* not built for trixie
Igor replied to Zoom's topic in Software, Applications, Userspace
Solved. -
I wonder if for the device tree (DTB) we can combine the Orange Pi 5 Max DTB with the HDMI Input from Orange Pi 5 Plus will make the HDMI input work.
-
@Marvin-03 I will post patch in few days

-

How install Armbian to tvbox Ugoos SK1 ( chip S928X-K )
Hqnicolas replied to Nguyễn Tất Hùng's topic in Amlogic CPU Boxes
S928X-K present in expensive devices like: VS10 Z9X ZIDOO Z9X 8K Zidoo Z3000 PRO-8K ZIDOO Z30 PRO-8K I think you could ask for the factory to support armbian http://forum.zidoo.tv/index.php http://forum.zidoo.tv/index.php?threads/beta-version-v6-4-06-for-z9x-z10-pro-z1000-pro-uhd3000-neo-s-neo-x-release.93680/page-18 -
Cubieboard 1 - No display output when booting Debian 12 image
Igor replied to Shakai2's topic in Allwinner sunxi
Check this thread -

Armbian 25.5.1 Noble Gnome can not open remote dosktop
Werner replied to 唐志's topic in Software, Applications, Userspace
https://forum.armbian.com/terms -
@ScoreABSM https://github.com/armbian/build/pull/8339
-

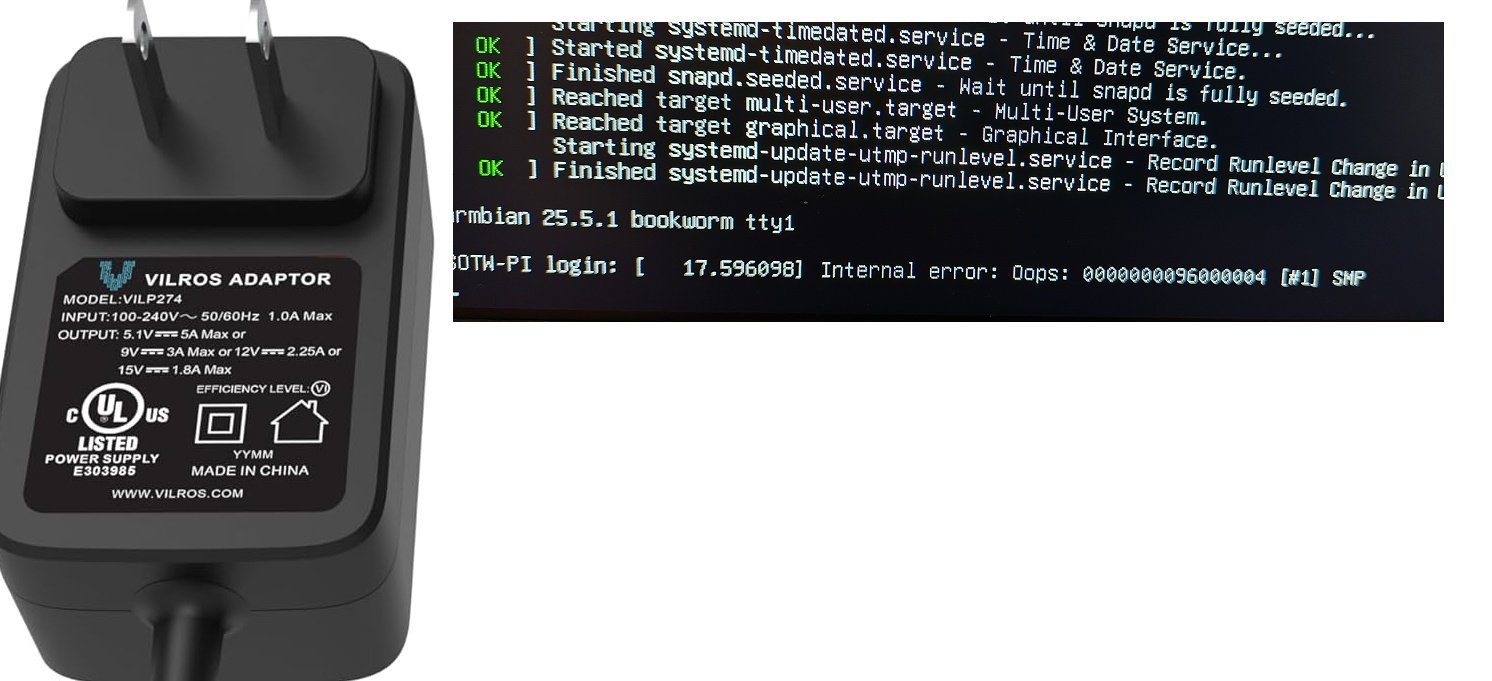
oops when I restart - works fine if I shut down and cold boot.
jondowd replied to jondowd's topic in Orange Pi 5
Thank you. After trying 4 different chargers, the problem persists. It looks like the official chargers from Orangepi do not have the plug layout for North America, I've ordered ones that others have found successful for SBCs including the Orange Pi 5 I have, but none have solved my problem. The good news is the machine will run properly when started from a powered-down state and seems very reliable. The bad news is I will sometime need to 'restart' the board, and if I'm away from it - there's no remedy. Hopefully you can recommend other things that will fix it, as it seems no power supply will solve the Oops error when returning from a 'restart' Here's a picture the power supply I tried today and the error I'm wanting to avoid. Thanks a lot Jon D>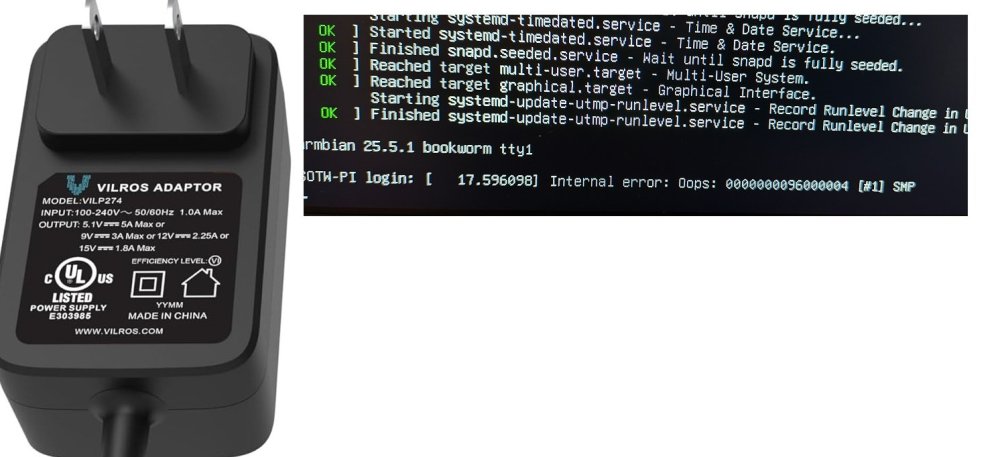
- Yesterday
-

[SOLVED] 100% /var/log usage & rsyslogd high CPU load
ioncube replied to ioncube's topic in Radxa Zero 3W/3E
Solution found at -

FriendlyElec CM3588Plus NAS - nvme's overheating (75C)
serverlesslove replied to serverlesslove's topic in Rockchip
I've also checked for good couple minutes with iotop while system was idle, only the rootfs was accessed which is on the internal eMMC. Next I will investigate more thoroughly using iotop and atop. P.S. I've applied @Sirmalinton recommendations and installed Arctic M2 Pro coolers on all 3 drives. -
Some prerequisites. Distro: Debian 12 bookworm, xfce; Board: Orange Pi 4 LTS; Screen: Samsung SyncMaster 923NW, 1440x900_60, VGA. Using hdmi to vga adapter with vga cable. Tried one piece hdmi to vga cable. Tried other all in one adapter that goes in to the screen and goes to hdmi cable. The problem. While running armbian distro screen resolution is set to be 1080p by default. Using xrandr I can not set it to suggested 900p. Every time I set any other resolution - screen turns black until I set it back to 1080p. It is not a hardware issue, because right now I am running headless Debian bullseye from orange pi and the resolution is set 900p by default, it works. I have tried adding new modes, tried other resolutions and most of them have led me to the black screen. Brothers, I am confused. Any help is welcome.
-
Tanix TX3 mini unable to boot from Memory card
Pita Bread replied to tasknodes's topic in Amlogic CPU Boxes
@tasknodes as SteeMan requested, you should provide details and steps of how you installed Armbian. also provide details of what caused a boot failure and details of what error messages or logs that you saw on your tv/monitor. -
 Personally, I would suggest to not even run a Desktop Environment, certainly not on a true IoT device. What GUI software do you plan to run? Are you aware that X can forward a GUI over ssh for you? Let's say you wanted to run blender and display the output at home or in your office on your shiny 27-inch, curved 4K display. OK. First, install the software on the IoT device "sudo apt install blender". Secondly, make sure X Forwarding is enabled on the IoT device "sudo grep X11Forwarding /etc/ssh/sshd_config" and make sure it is set to yes. Then, you should be having no problem to get blender to run on your IoT device but the GUI window will show on your large display with "ssh -X $IP-of-your-IoT-device", run this of course from your beefy machine. This works just the same for any other software you want to run remotely.
 -
How to get the clock value of rk3288-cru?
laibsch replied to 李松錡's topic in Advanced users - Development
Have you tried to ask this in our discord server? -
I'm sorry, but I don't see where the problem is. Please be more specific.
-
Sound works but only with certain versions
laibsch replied to Reluctant Linux User's topic in Radxa Rock 5 ITX
it would be good to have those logs for a non-working setup.