Active threads
Showing topics posted in for the last 365 days.
- Past hour
-
sounds good. good luck and keep us posted!
-
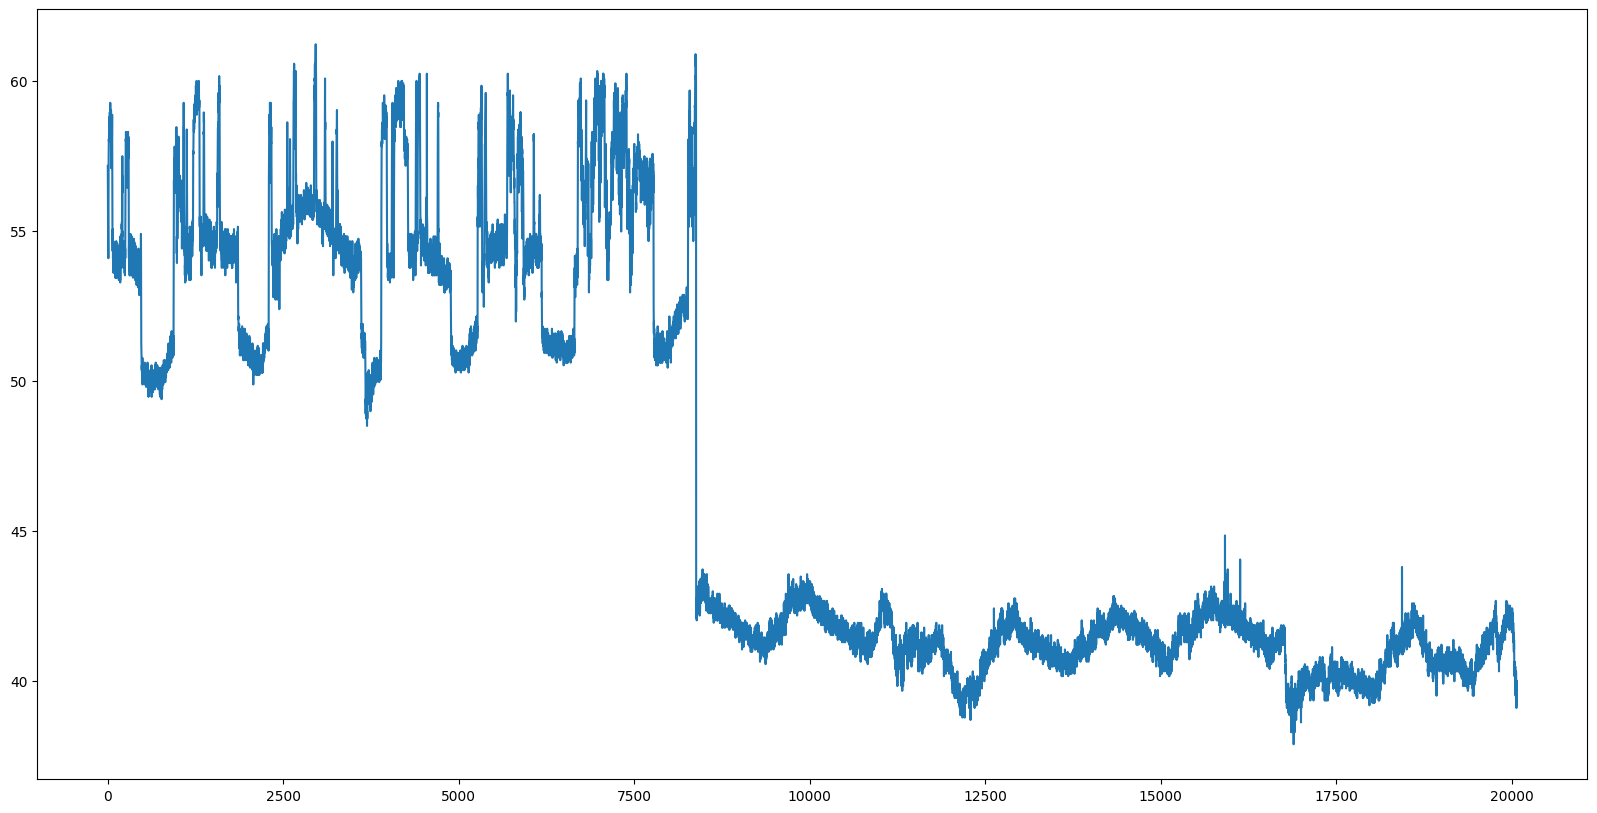
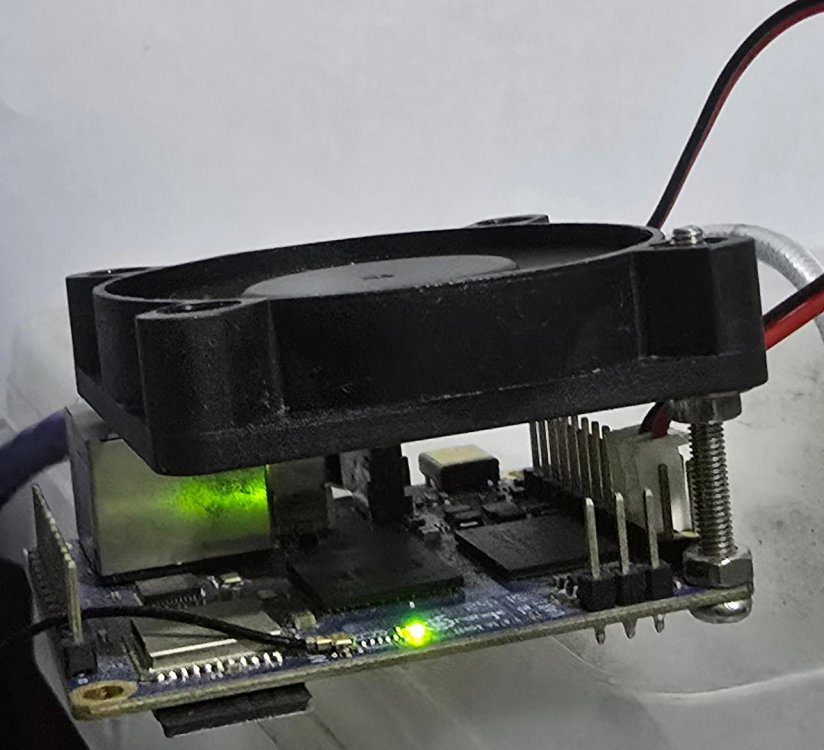
this is somewhat 'off-topic' but still relevant to 'orange pi zero 3' If Orange Pi Zero 3 is operated in warm climates (e.g. room temperature 30 deg C etc) , it can at times run up to like 60 deg C. this is in open still air adding a fan blowing at it reduce that by some 20 deg C to 40 deg C ! And this is my ghetto fan setup, no fancy case, no heatsink nothing, just a single long machine screw that lifts it up checking temperatures is easy > armbianmonitor -m Stop monitoring using [ctrl]-[c] Time CPU load %cpu %sys %usr %nice %io %irq Tcpu C.St. 18:03:39 480 MHz 0.00 0% 0% 0% 0% 0% 0% 40.8 °C 0/7^C strictly speaking, 60 deg C is 'nothing to scream about' , I've a Rpi 4 hitting up 80 deg C and it throttles. similarly use a fan blowing at it + a heat sink over the cpu, drastically reduce running temperatures. for 'occasional' use, I don't think it is necessary to have a fan blowing at the Orange Pi Zero 3. I think it is feasible to run at lower temperatures if I disable and unclock the GPU and HDMI, but for now I'm not sure how to go about doing that. Initially, I'm thinking maybe the wifi is causing it, but now I don't think so, it is moderately likely the gpu is heating it up a bit. And still air don't seem to dissipate heat very well.

- Today
-
Thanks for the feedback, If that was the intention. If you try the version on the testing branch, that won't be an issue because 'btrfs du' (it is just slow and unnecessary) is no longer used. xD There are actually more changes coming to btrfs in the next release. Even looking into conversion from ext4 to btrfs. Oddly enough, I can backup my arch system with boot mounted at /boot/efi using the script on main branch, wonder why yours doesn't, so clearly distro DOES matter. But it soon won't matter for the problem you had, because it will be changed anyway. Besides, shrink-backup is not really intended to be used on a desktop computer, it's for sbc:s that usually are way less convoluted than a desktop setup. For ext4 and f2fs shrink-backup only covers root and boot partitions (if boot partition exists), btrfs is an exception where the script looks up existing subvolumes and creates them. As of now, the script also assumes all subvolumes starting with @ is a top volume, witch does not actually have to be the case, but changes are coming. Interesting to see you use /boot/efi (discouraged by linux kernel standards), and not /boot as boot partition, wonder why? I do the same, because I use timeshift that is built upon snapper. Timeshift also creates entries directly on my grub menu letting me boot into the ro snapshots and restore from there if needed. For others reading this: This is because if you roll back a snapshot where you have changed things in boot process and files inside /boot, you kinda want files inside /boot to be rolled back too or your system won't boot, hence letting /boot be part of the root subvolume and mount boot partition on /boot/efi instead. My point was, that the problem you mentioned, the database might become corrupted is not solved by using snapshots and btrfs, a database has to be closed and locked to be 100% sure it won't become corrupted in ANY copy process. (beside the fact that the database in the case of pihole is only a log and has nothing to do with the integrity of the application itself) I completely disagree with that. If I revert a snapshot because I messed something up on my system or something went wrong in an update for example, witch happens once in a while, I do NOT want my home to be over-written by an old snapshot. I also want to be able to read old log-files to figure out WHAT went wrong, so /home & /var/log in separate snapshots is absolutely a good thing for me. On a sbc I might agree that separate snapshots is a bit overkill though, but not in any way a bad idea. But if you actually use snapshots as a restore points on an sbc I argue /var/log is a good thing to have on separate snapshot. A snapshot takes no time at all, 1s I would guess, but what about the send|receive? Because a snapshot is completely worthless if the filesystem you took the snapshot from becomes corrupt, COW (copy on write) means you use the exact same data. That is why it's (or should be) general knowledge that a snapshot is NOT A BACKUP, but it becomes a file-backup if you send|receive it to a completely different filesystem. So the interesting part here is the send|receive because op asked about backups, and that takes about as long as a dd would take, while rsync probably does the file transfer in about 10% of that time. Also, again, shrink-backup takes everything, including boot process parts and makes an img file at small size (for two reasons, saving space and ability to use the img file on smaller storage device, moving from a 64GiB to a 32GiB sd-card for example) that can be written directly instead of also having to do a bunch of pretty complicated restore processes. And quite a few armbian images utilizes u-boot without a boot partition with header data written to the disk before root partition, shrink-backup covers that as-well. Generally, I treat snapshots as they are intended, as snapshots that can be used as RESTORE POINTS, and I use a backup application to make regular BACKUPS. On my desktop computer I use clonezilla that I have added a menu for in grub to easily boot into (you can make custom menus and boot directly into img/iso files in grub), and on all my sbc:s I obviously use shrink-backup. (for those who don't know, I am the maintainer of shrink-backup) I also have 260 "individual" incremental file backups of my home (and some other locations like /etc and my "file disk"), one every 6h using urbackup running on a rpi4 with a 6TB disk connected to it. It utilizes btrfs so the "individual" means they are just snapshots and only changed files actually take up more space. Lastly, if you don't actually utilize the functionality of running a system with multiple subvolumes, you don't even need to have a subvolume for /, you can just write files directly to the btrfs filesystem.
-

Desktop not showing Armbian 25.5.1 Noble Gnome, Orange Pi 5
Efe Çetin replied to compent's topic in Orange Pi 5
The image from https://dl.armbian.com/orangepi5/Noble_vendor_gnome works well for me. It might be good to see some GDM logs as i am not sure where the problem arises from. -

NanoPi neo AIR no avalible COM port when connect to PC after update
Dandaman46 replied to Aknot's topic in Beginners
Hello @Aknot, better late than never? This is likely because USB OTG support is on out of the box now. You used to have to add an overlay to get it to work. You will need to modify the the overylays to change this. -
I found my NanoPi Neo Air's could not list or connect to some wifi networks. Some investigating found this was because channel 12/13 are disabled by default. Nothing in runtime had any effect on the output of iw reg get as it should have. Patching in some firmware fixes worked for me. wget http://ftp.be.debian.org/pub/software/network/wireless-regdb/wireless-regdb-2025.02.20.tar.xz tar xf wireless-regdb-2025.02.20.tar.xz sudo cp wireless-regdb-2025.02.20/regulatory.db /lib/firmware/ sudo cp wireless-regdb-2025.02.20/regulatory.db.p7s /lib/firmware/ sudo iw reg set AU #Australia I can now connect to wifi channel 13. Now for my question: I read in this old thread that armbian-firmware-full is required for wifi. would that mean that the full firmware package is desirable for the Nanopi Neo Air? When running apt-get install armbian-firmware-full it states it will consume an additional 1gb of disk space. Hardly desirable for a little device. VERSION v25.5.1 for NanoPi Air running Armbian Linux 6.12.30-current-sunxi
-
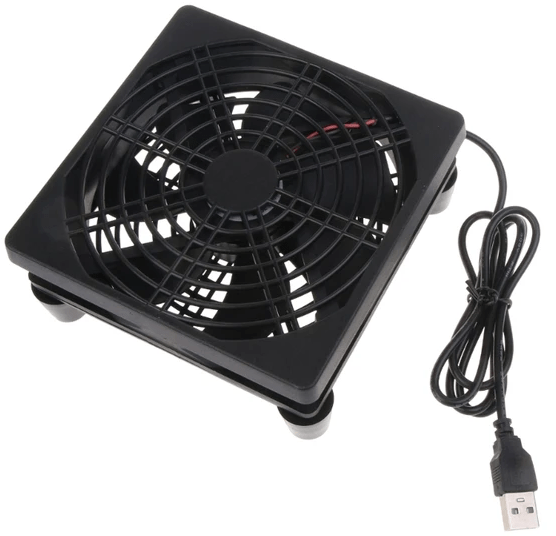
I disassembled my tv box - there are 4 screws under the 4 rubbery feet. Removed the motherboard and I drilled some holes of 1/4 inch (7 mm) diameter through the bottom plastic piece. Then I placed a USB fan underneath the tv box and wow the temperature really goes down and stays down around 45 C to 60 C depending on work load. The fans are 80mm and 120mm in size. I chose 120mm to be sure.
- Yesterday
-

T95Z Plus (Second one) running great
Pita Bread replied to Tomas Catone's topic in TV Boxes running Armbian
you can install "ethtool" and run ethtool eth0 on the command line. look for the line that shows " Speed: " how did you install ZFS in Armbian? -

Building Armbian Distribution with Kernel 6.10 for Orange Pi 5 Pro
C127 replied to Sergey Dulimov's topic in Rockchip
Hello everyone. @salas I have just implemented the out-of-box (OOB) network driver functionality in a new commit to the repository. This should serve as a temporary patch for now (or potentially a permanent one, depending on if/when the driver gets mainlined into the Linux kernel). @whywontitwork Thank you very much for the feedback and for testing the image. I need a bit more information to help track down the issue. My suspicion is that the system is successfully loading u-boot but failing to load the kernel. However, without debug logs, it's difficult to know the real cause. To help diagnose this, could you please tell me how you flashed the image? I flash my builds to a microSD card using the Balena Etcher software. Are you using the same method or a different one? I appreciate your support in getting the Orange Pi 5 Pro maintained! One of my main motivations for starting this project was to get Panthor support for the Mali GPU too. I can confirm that on my end, with the image I've built, the latest version of the drivers works correctly. Getting Vulkan and OpenGL running on an RK3588 board! -

Armbian for an old Allwinner A10 tablet
thewiseguyshivam replied to thewiseguyshivam's topic in Allwinner sunxi
The display does not work at all, just the backlight turns on and nothing shows up on the screen. I think looking at what you suggested I should try to take the good parts of these dts files and see what I can get working. After that I will try to compile uboot with that mixed dts file. I will take some time out to make this mixed dts file. I did try running pi-hole on this and it worked for some time, but it needs further testing. Will try the above and report back. Thanks, Shivam -
 Things you should try: Capture the dmesg since before the sound file is playing Try again with the sound file in the main EXT4 partition
 -
I have long struggled with a problem with my Rock S0: If using the USB OTG port in device mode, the connection would suddenly drop randomly, minutes or sometimes hours after initialization. I spent months on and off looking for solutions, and I finally found one, so here it is if you ever find yourself having the same problem. Basically, it is caused by the SoC being very sensitive to voltage drops before the USB controller interprets it as the connection being lost. It's far more sensitive than it needs to be, given that my device is bus-powered and so the OS never actually needs to worry about a connection loss. If the connection is lost it is because I have unplugged the cable and so the device would be shut off regardless. Anyway, the solution lies deep within the RK3308's control registers, where I found the following: Three bits named "B_validsession reference tuning". There's no other explanation on what these bits does in the manual, but it sounded vaguely promising since I had been able to establish that "b-session valid" is actually the name of the status/interrupt that the vbus voltage affects in OTG device mode. Other registers related to the b-session valid status didn't work, however, including filter times, interrupt masks, force high bits, etc. But luckily this one register finally did the trick. The default value of these three bits are 000. Without any documentation I basically just had to guess what to do, so I tried setting them to 111 instead. And that seemed to work. It significantly lowered the voltage on the vbus pin required to trigger a disconnect signal. My connection was finally stable. Here's how you can do it yourself. First install memtool via apt, then run: memtool mw 0xFF008018 0x1C001C00
-
Well its equivalent so other than vendor not beeing in a database does not count as custom in my books, but that is beside the point. Armbian correctly recognizes the size and I can write to it and that is important. Now flashing an existing image is simple. My preferred way is dd as described by Piter75: dd if=uboot.img of=/dev/mtdblock0 bs=4K for u-boot images and dd if=idbloader.img of=/dev/mtdblock0 seek=64 bs=512 conv=sync dd if=u-boot.itb of=/dev/mtdblock0 seek=16384 bs=512 conv=sync if used with image tree blob. Nice thing is that if new u-boot hangs or does not boot I can just short pin 23-25 to boot from SD card and try again. Since I have an 8Mb flash I would really like to bake in m.2 to SATA drivers - for ASM1166 in my case. Any pointers are welcome. DeMo
-
 As part of the activities Embedded Recipes in Nice, France, Collabora hosted a PipeWire workshop/hackfest, an opportunity for attendees to meet face-to-face with PipeWire developers and participate in direct discussions about the future of PipeWire. View the full article
 -
I am always happy to see people keeping old hardware running. But I think it would be best to make the necessary changes in Armbian itself. I am happy to help out where I can be useful.
-
The ones I linked. You mentioned that you have no experience to compile stuff. One option is to target another SBC or a virtual machine so that you can focus on learning the build framework (explicit instructions are already given in some of the links) instead of having to deal with a multitude of issues (setting up your compilation host, getting compilation to succeed, finding the artifact to flash, only to then run into the next issue that armbian currently does not support your board). With a virtual system, you can be sure that you should get a working image. You can then focus on the compilation and familiarize yourself with that before jumping into real hardware enablement.
-

Efforts to develop firmware for X96 X6 RK3566 (8G/64G)
Dũng Trần replied to loi xin's topic in Rockchip CPU Boxes
Do you have specific instructions for installing the X96 X6? @Chris4arm Thank you very much. -
Driving the ili9488 LCD (4.0 inch cheap chinese clone)
robertoj replied to robertoj's topic in Allwinner sunxi
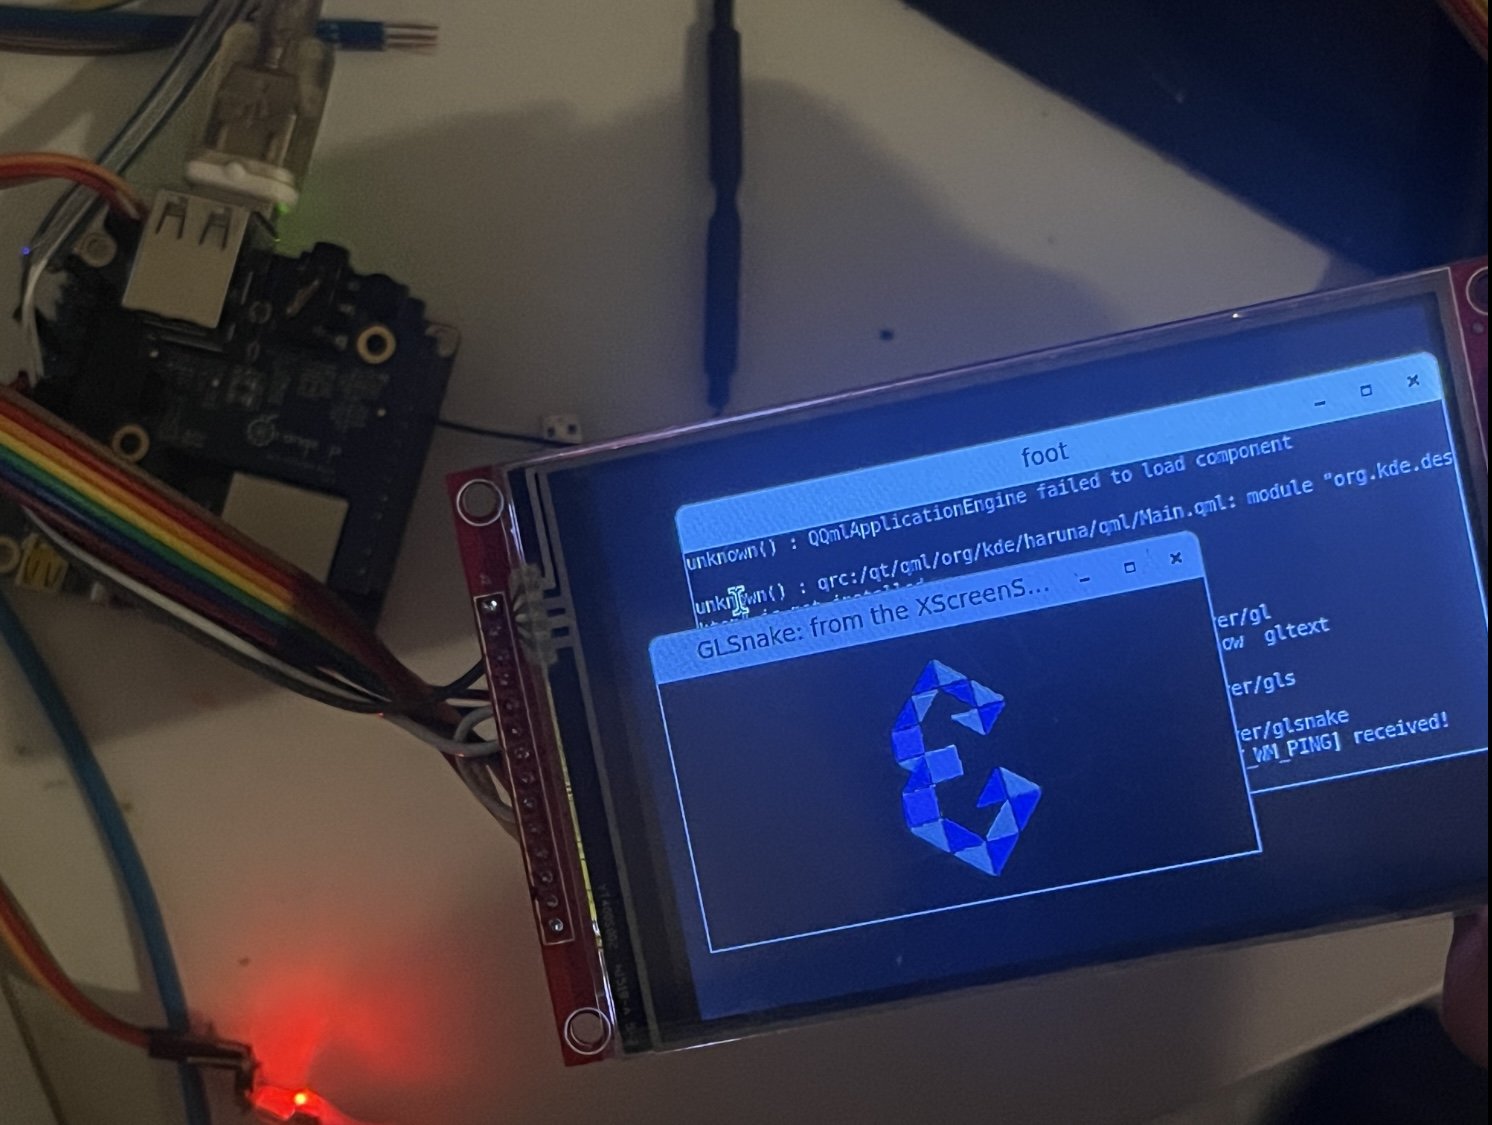
Ok I was able to get the LCD working with a self built image, by copying the linux config from the armbian.com image to the build/userpatches/linux-sunxi64-edge.config Currently rebuilding without the successful linux config, and then I will look at the difference Update: I didn't find any differences and the new image without the userpatches config accepts the LCD DTS and bin file. Ok, I dont understand what was happening before. Now I am getting the same X11 error as before: MESA-LOADER: failed to open panel-mipi-dbi: /usr/lib/dri/panel-mipi-dbi_dri.so: cannot open shared object file: No such file or directory (search paths /usr/lib/aarch64-linux-gnu/dri:\$${ORIGIN}/dri:/usr/lib/dri, suffix _dri) I see that this panel-mipi-dbi_dri.so is part of libgl1-mesa-dri debian package, in DEBIAN SID, but not Bookworm https://packages.debian.org/sid/arm64/libgl1-mesa-dri/filelist https://packages.debian.org/bookworm/arm64/libgl1-mesa-dri/filelist Next, when I rebuilt the armbian OS with xfce desktop, I get the same panel-mipi-dbi-spi error: can't find the bin file. I checked the config again... and it was the same Update: It was easier to build Sid minimal, and install labwc (wayland), just remember to install seatd: https://eirenicon.org/labwc-a-tutorial/ I isolated why the panel-mipi-dbi-spi can't load when I apply it in an Armbian OS with XFCE. xcfe requires plymouth, and plymouth does something to the uInitRd And when I reboot immediately after installing plymouth, the SPI LCD does not start, and dmesg shows that panel-mipi-dbi-spi could not find the firmware file.
-
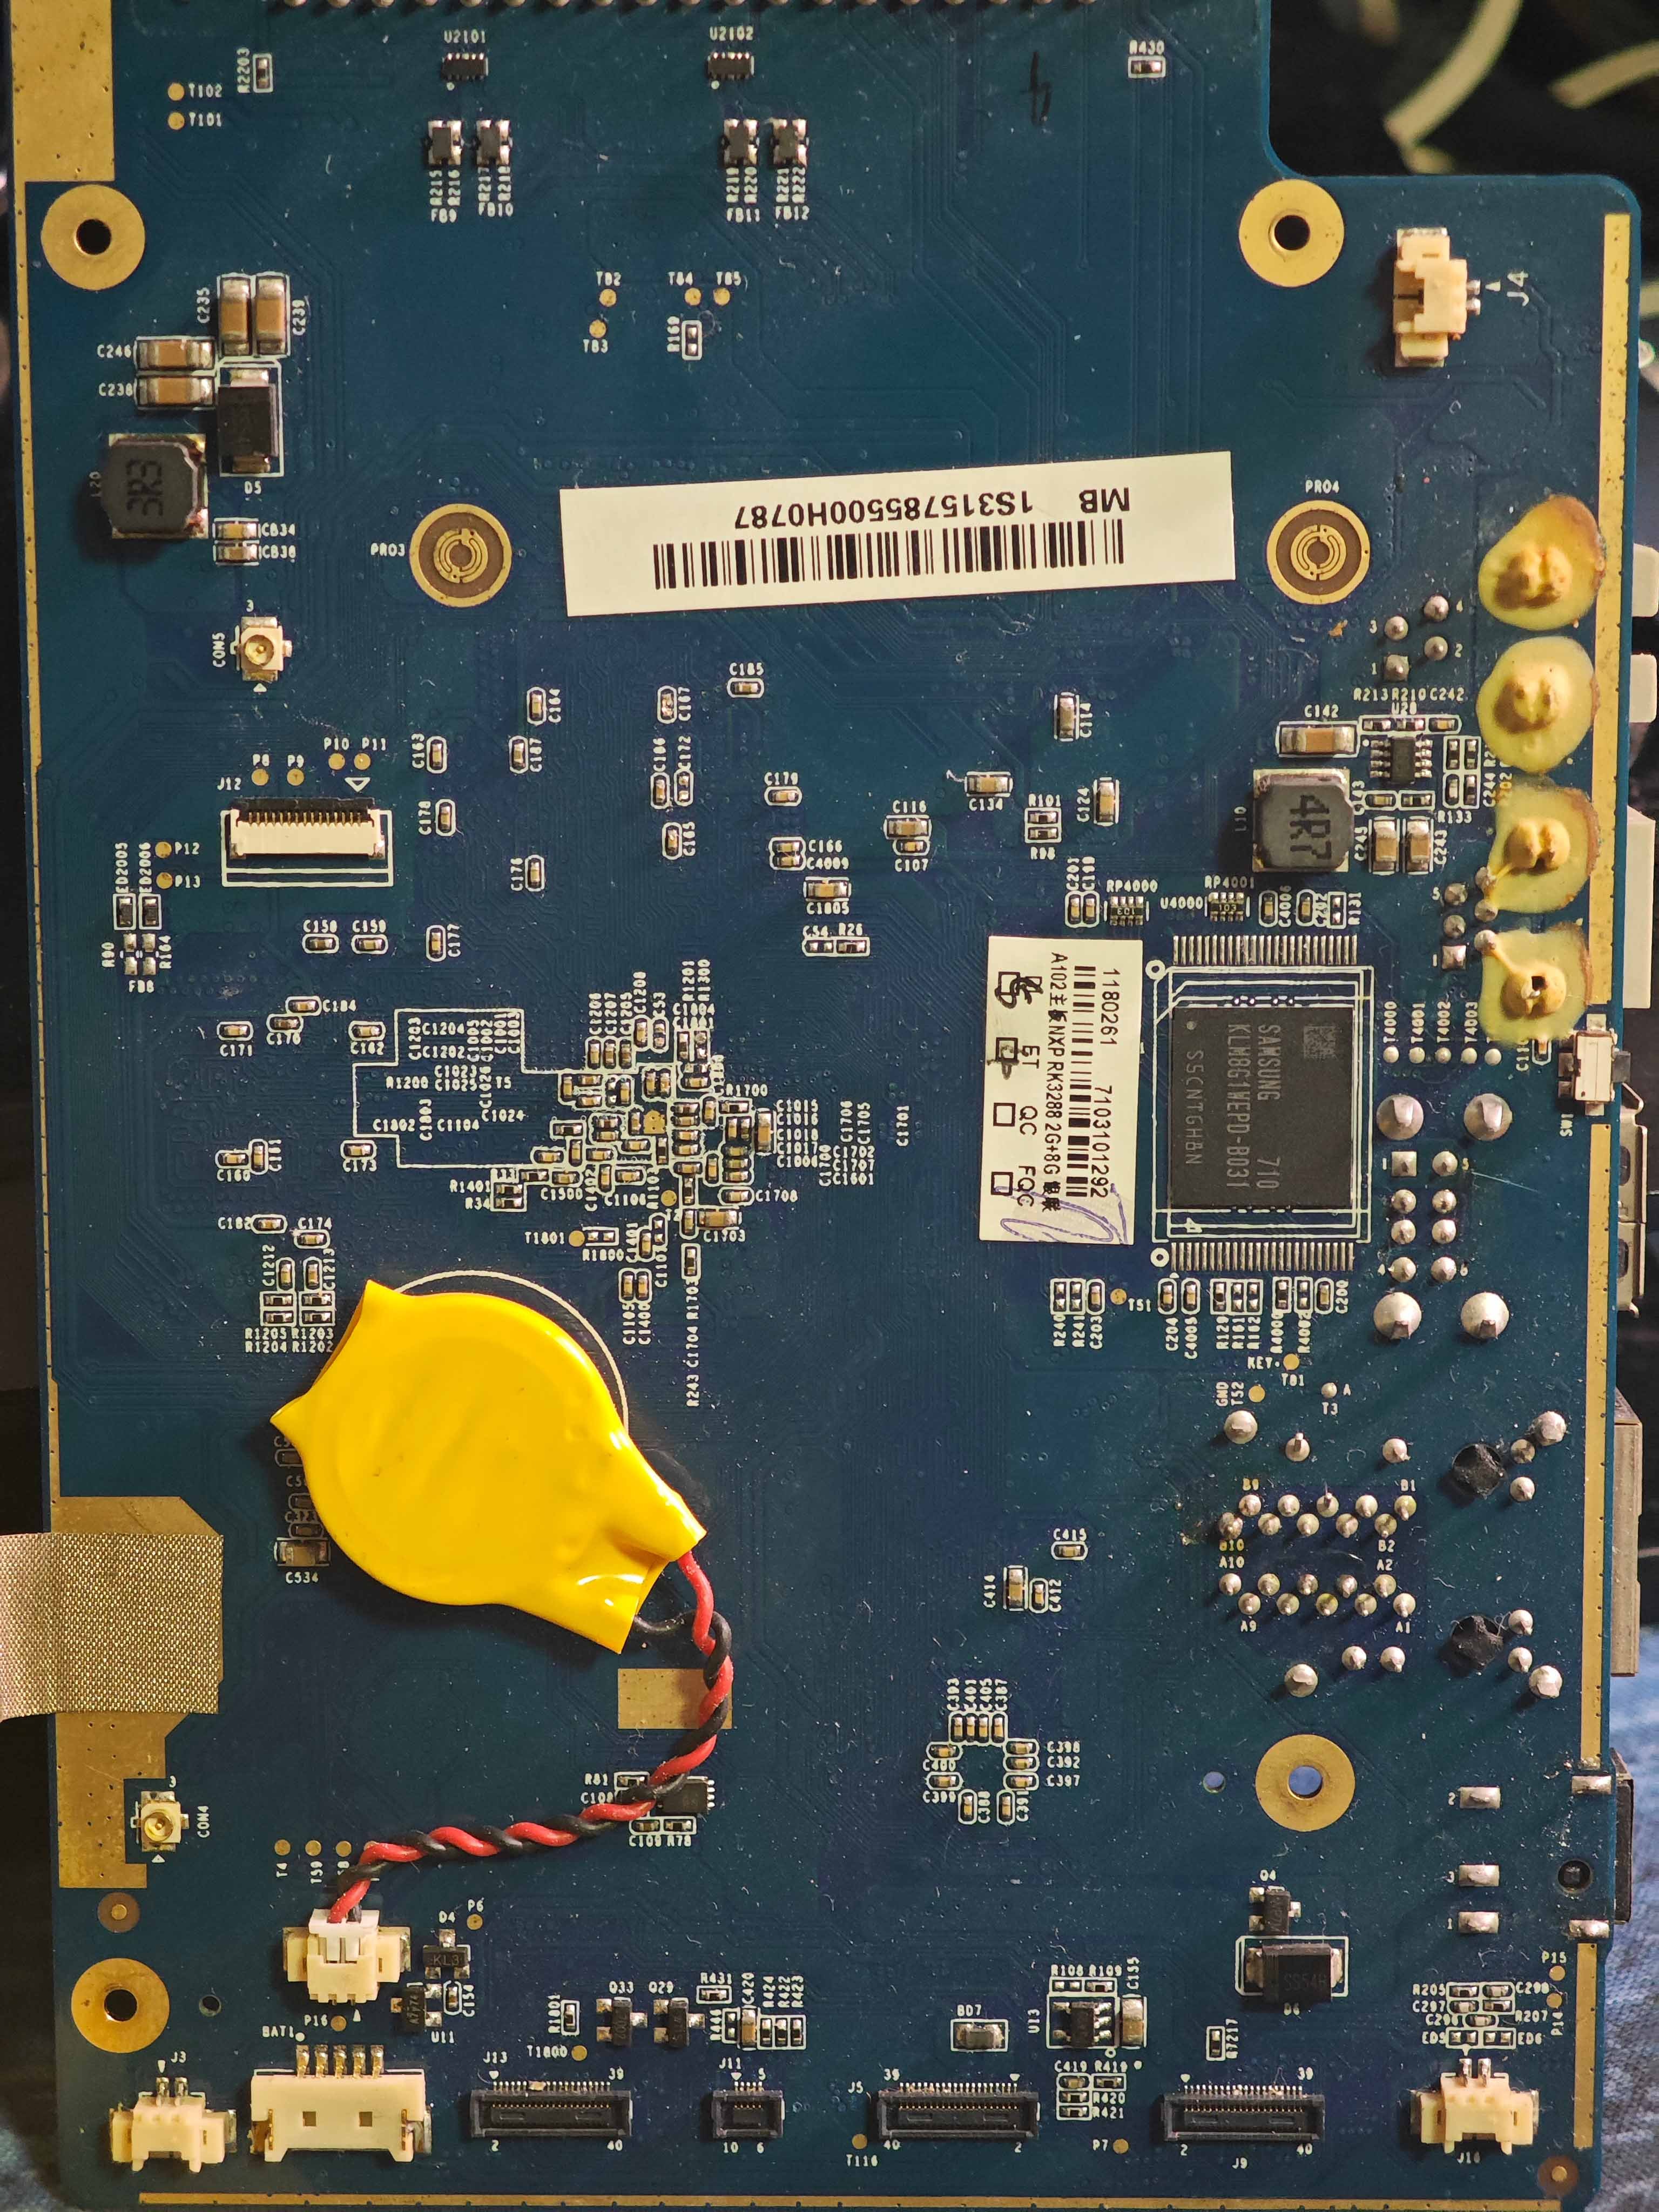
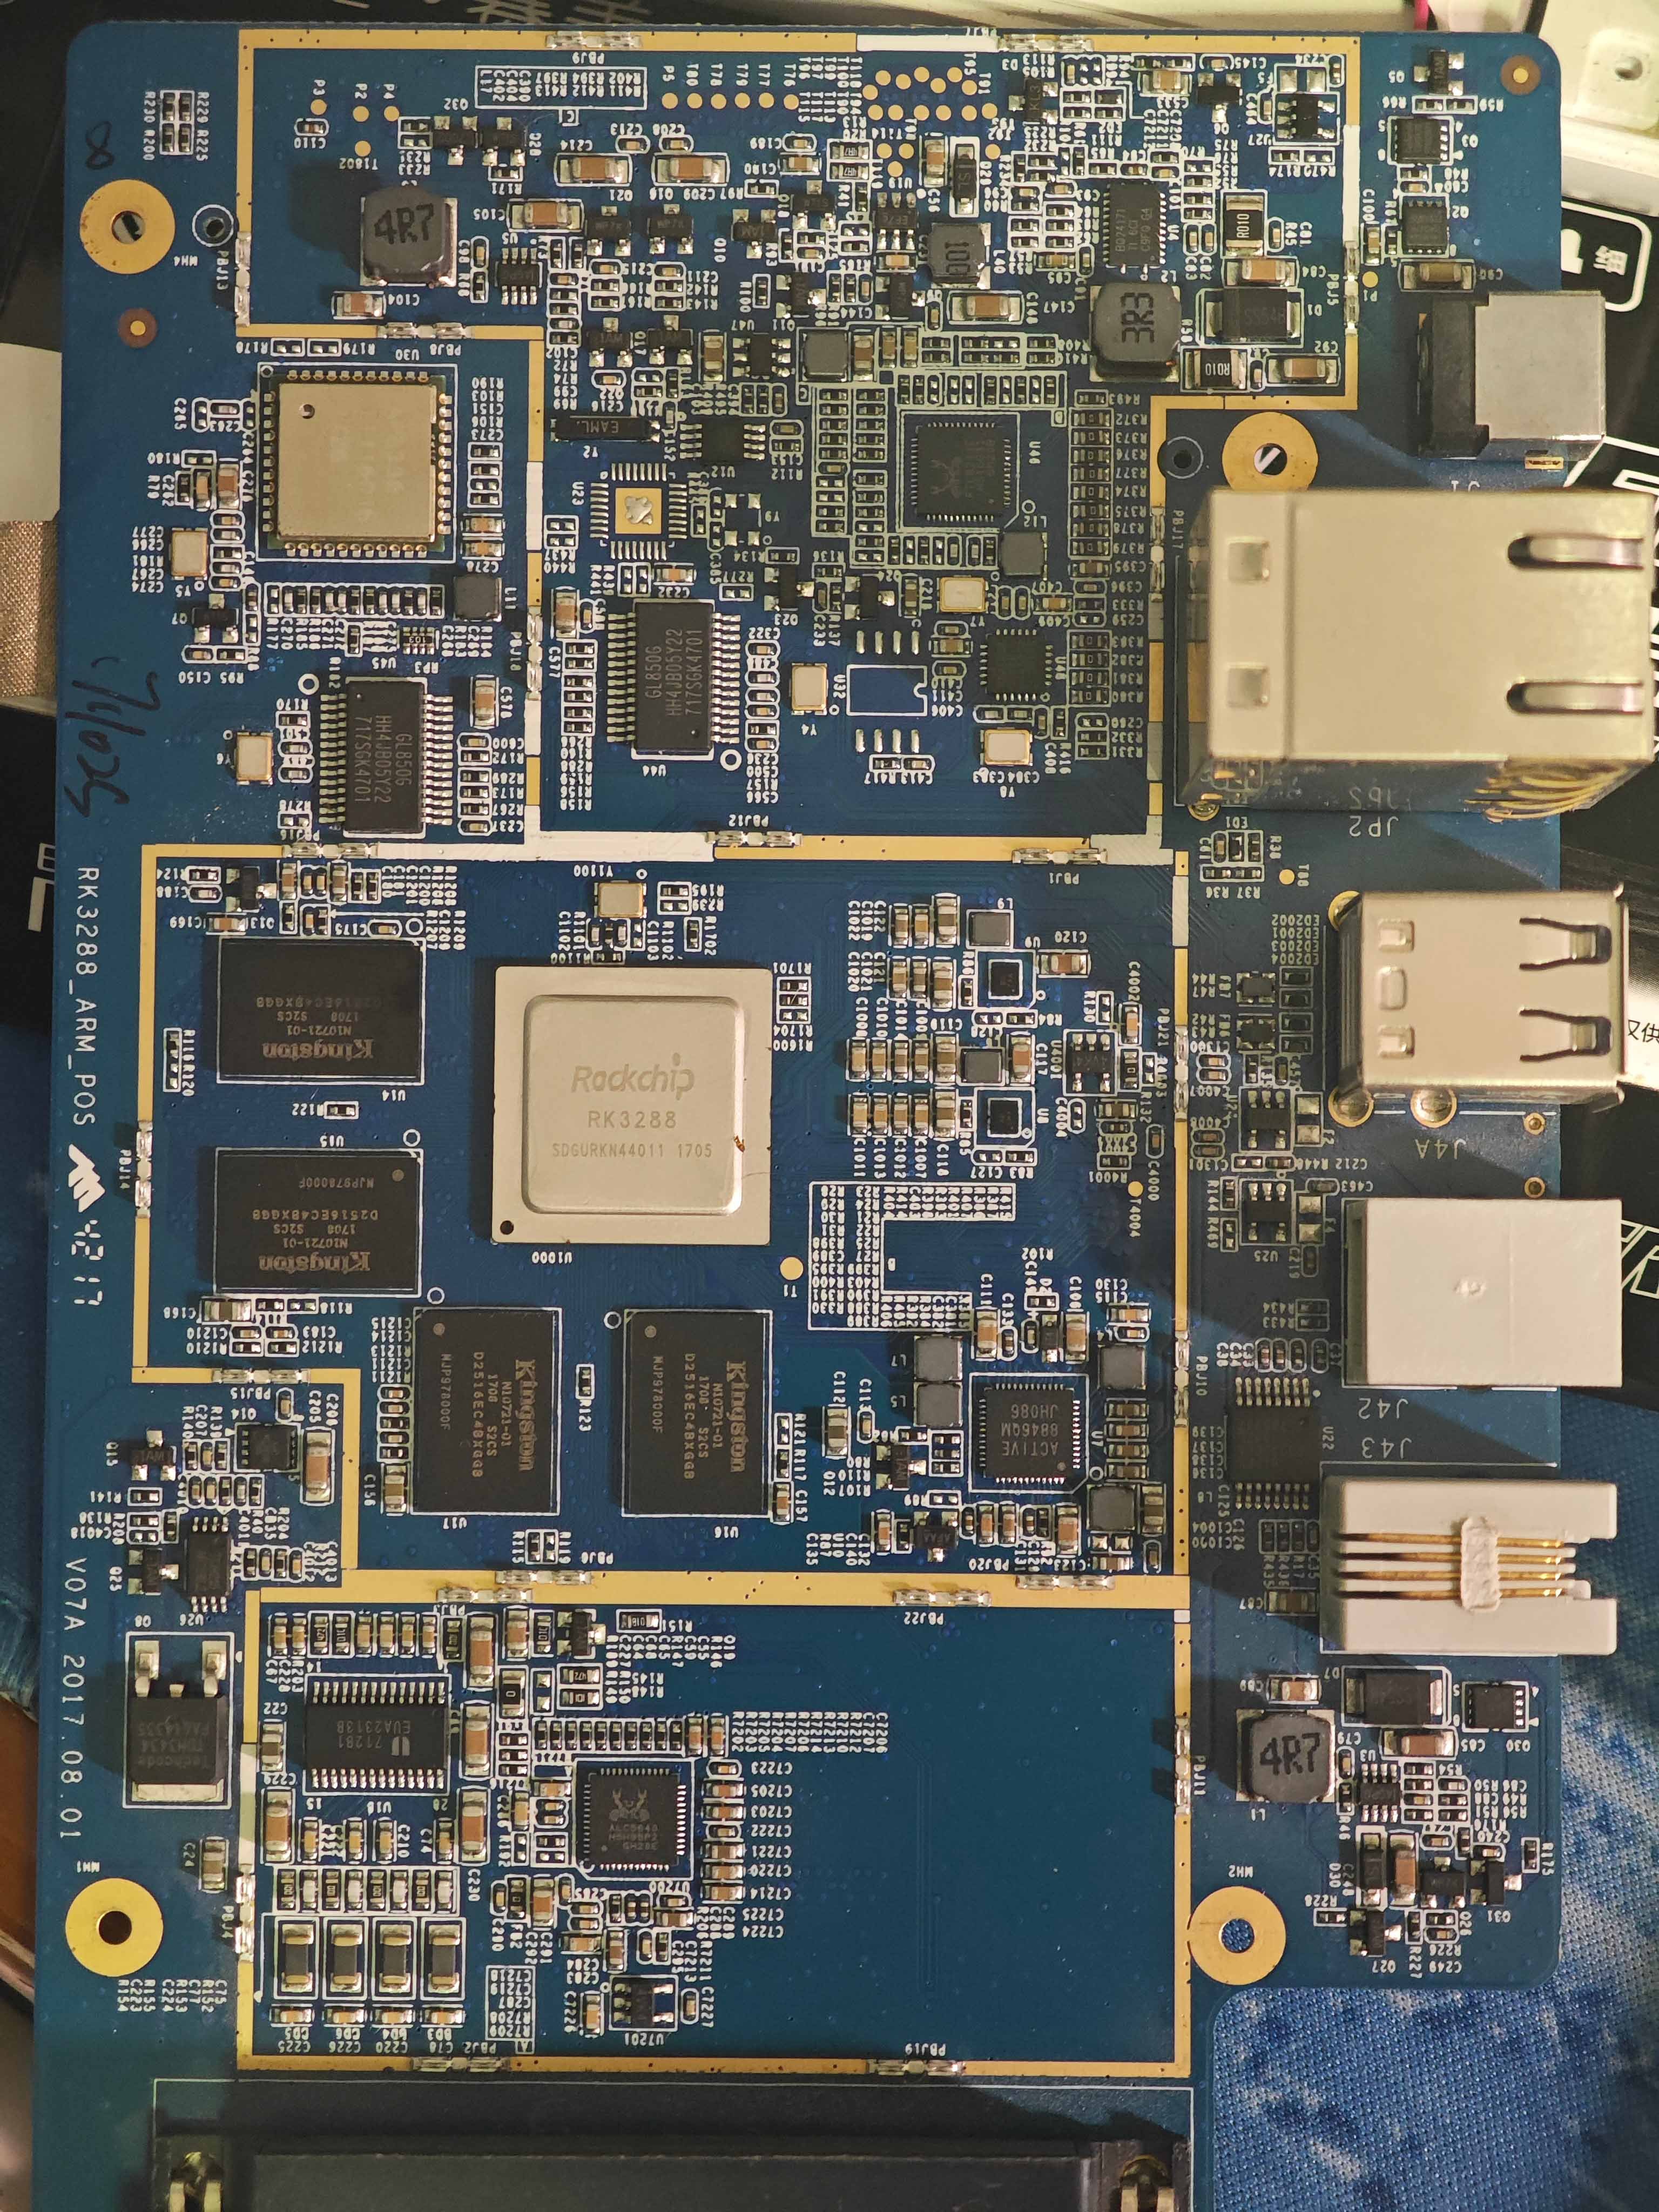
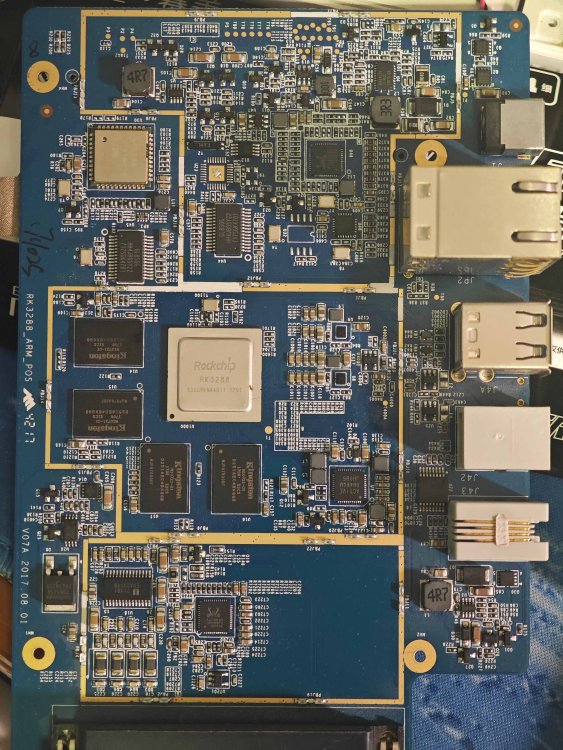
 Hello everyone, I have an old POS machine that uses the Rockchip RK3288 processor. It has a 1920x1080 screen and works fine, but I don’t have any root or bootloader unlock permissions. I would like to flash Armbian on it and make better use of the device. So far I’ve tried: ADB access (only recovery available) Tried using adb reboot bootloader, but the device just powers off Identified some test points like KEY, T3, T2, T52, T51, but not sure which one is for MaskROM shorting Found no physical recovery button, only a reset and power button There might be a UART port, but I’m not sure 👉 Can someone please help me: Identify which test points or pads I can short to enter MaskROM mode Locate a possible UART debug port on the board Any advice for dumping original firmware or unlocking bootloader I've attached front and back photos of the mainboard. Any suggestions or experience with RK3288 boards are greatly appreciated! Thank you 🙏
- Last week
-
 FYI: I managed to fix my eMMC again, I found a working spl_loader bin file to flash with rkdeveloptool. See the following post for details:
 -
Can't flash Armbian to EMMC on Orange Pi 5B
Matthijs Kooijman replied to sns1081's topic in Rockchip
To add a datapoint: In the past, I've been succesfully installing to eMMC using `armbian-install` using an Armbian 24.2.1 Jammy image. IIRC I had to change the `ftdfile=` line in `/boot/armbianEnv.txt` (as documented at https://www.armbian.com/orangepi-5/) but it otherwise worked right away. Now recently I have been playing with newer bootloaders and images and kernels (in order to fix an issue where a reboot hangs), and in that process I updated the U-boot on the eMMC, which caused booting from eMMC to fail, and when booting from SD card, I no longer have the eMMC device so I cannot fix this (I think this might be exactly what @sns1081 describes in the first post of this topic). I've been trying to fix this (see this post for details), but on my previous attempt I could not get `rkdeveloptool` to work: it kept giving "Write LBA failed!" errors on on the `wl` command. I suspected this was because I needed the `db` (download bootloader) command first to download and run a bootloader to then handle the `wl` command, but I could not find the right spl_loader file. But with this thread (and in particular this post by @Andrius Vainorius) offered a filename I could google and then found it here: https://dl.radxa.com/rock5/sw/images/loader/rock-5b/release/ With that, at least the db and wl commands work: ❯ sudo ~/bin/rkdeveloptool db ~/Downloads/rk3588_spl_loader_v1.15.113.bin Downloading bootloader succeeded. ❯ sudo ~/bin/rkdeveloptool wl 0 some_img.img Write LBA from file (100%) For this, I cannected USB-C cable to the J11 USB connector in the middle, powered up via the USB-C connector in the corner and pressed the maskrom button on powerup. Note that it did not seem to be necessary to have the rkdeveloptool and the images to write in the same directory, as suggested by others here. Note that the the "some_img.img" is an image I lifted from an SD-card with Armbian 24.2.1 Jammy, so it is not the original clean image, but it does have the same stuff on it. Just the above commands recovered my board: It can boot from eMMC again and the /dev/mmcblk0 eMMC device is available again (both when booting from eMMC and when booting from SD). Analyzing why eMMC was broken before, I compared the serial output from the broken and fixed cases. The main difference is here seems to be the u-boot SPL version. AFAIU, this is what happens: Some ROM bootloader boots, which loads U-boot SPL from eMMC U-boot SPL checks SD-card and then eMMC to load the main U-boot Maybe there is another bootloader stage involved (between ROM and SPL, since there is some serial output before SPL shows up that is different between both cases). Here's a diff of the serial output between both cases (up to the moment where U-boot runs and no more interesting differences appear): --- old-opi5.txt 2025-07-02 21:20:08.631329154 +0200 +++ old-opi5-emmc-fixed.txt 2025-07-02 23:01:17.982196616 +0200 @@ -1,26 +1,24 @@ -üDDR d5483af87d cym 23/11/23-16:15:24,fwver: v1.15 +þDDR V1.11 f1474cf52f cym 23/05/09-11:02:36 LPDDR4X, 2112MHz channel[0] BW=16 Col=10 Bk=8 CS0 Row=16 CS1 Row=16 CS=2 Die BW=16 Size=2048MB channel[1] BW=16 Col=10 Bk=8 CS0 Row=16 CS1 Row=16 CS=2 Die BW=16 Size=2048MB channel[2] BW=16 Col=10 Bk=8 CS0 Row=16 CS1 Row=16 CS=2 Die BW=16 Size=2048MB channel[3] BW=16 Col=10 Bk=8 CS0 Row=16 CS1 Row=16 CS=2 Die BW=16 Size=2048MB Manufacturer ID:0x1 -CH0 RX Vref:29.3%, TX Vref:22.8%,21.8% -CH1 RX Vref:28.9%, TX Vref:20.8%,21.8% +CH0 RX Vref:28.5%, TX Vref:23.8%,22.8% +CH1 RX Vref:29.3%, TX Vref:20.8%,20.8% CH2 RX Vref:29.3%, TX Vref:22.8%,21.8% -CH3 RX Vref:27.9%, TX Vref:20.8%,20.8% +CH3 RX Vref:26.7%, TX Vref:21.8%,21.8% change to F1: 528MHz change to F2: 1068MHz change to F3: 1560MHz change to F0: 2112MHz out U-Boot SPL board init -U-Boot SPL 2017.09 (Feb 25 2025 - 08:48:59) -sfc cmd=9fH(6BH-x4) -unrecognized JEDEC id bytes: ff, ff, ff -unknown raw ID ff ff ff -Trying to boot from MMC2 -spl: partition error +U-Boot SPL 2017.09 (Feb 09 2024 - 18:56:36) +unknown raw ID 0 0 0 +unrecognized JEDEC id bytes: 00, 00, 00 +Trying to boot from MMC1 Trying fit image at 0x4000 sector ## Verified-boot: 0 ## Checking atf-1 0x00040000 ... sha256(7efcd01a0f...) + OK @@ -29,7 +27,7 @@ ## Checking atf-2 0xff100000 ... sha256(1163474a5b...) + OK ## Checking atf-3 0x000f0000 ... sha256(da90adf3a4...) + OK Jumping to U-Boot(0x00200000) via ARM Trusted Firmware(0x00040000) -Total: 304.579/460.237 ms +Total: 245.95 ms INFO: Preloader serial: 2 NOTICE: BL31: v2.3():v2.3-589-g3389cfdda:derrick.huang @@ -42,11 +40,10 @@ INFO: valid_cpu_msk=0xff bcore0_rst = 0x0, bcore1_rst = 0x0 INFO: system boots from cpu-hwid-0 INFO: idle_st=0x21fff, pd_st=0x11fff9, repair_st=0xfff70001 -ERROR: dfs get fsp_params[0] error, 0xfead0004 != 0xfead0003 -ERROR: dfs get fsp_params[1] error, 0x1111 != 0xfead0003 -ERROR: dfs get fsp_params[2] error, 0x0 != 0xfead0003 -ERROR: dfs get fsp_params[3] error, 0x60241520 != 0xfead0003 -ERROR: loader&trust unmatch!!! Please update trust if need enable dmc +INFO: dfs DDR fsp_params[0].freq_mhz= 2112MHz +INFO: dfs DDR fsp_params[1].freq_mhz= 528MHz +INFO: dfs DDR fsp_params[2].freq_mhz= 1068MHz +INFO: dfs DDR fsp_params[3].freq_mhz= 1560MHz INFO: BL31: Initialising Exception Handling Framework INFO: BL31: Initializing runtime services WARNING: No OPTEE provided by BL2 boot loader, Booting device without OPTEE initialization. SMC`s destined for OPTEE will return SMC_UNK @@ -67,18 +64,8 @@ CR: M/C/I Using default environment -no mmc device at slot 1 -Card did not respond to voltage select! -do_rkimg_test: dev_desc is NULL! mmc@fe2c0000: 0, mmc@fe2e0000: 1 -Card did not respond to voltage select! -PCIe-0 Link Fail - -Device 0: unknown device -Card did not respond to voltage select! -switch to partitions #0, OK -mmc0 is current device -Bootdev(scan): mmc 0 +Bootdev(atags): mmc 0 MMC0: Legacy, 52Mhz PartType: EFI DM: v2 Since in both cases, the main U-boot (Feb 09 2024) runs from the SD-card, I suspect that the U-boot SPL (or the preceding bootloader, if any) is somehow involved in setting up the eMMC properly, and the new one does not do the setup properly (or otherwise messes something up). Next things I could try are: Flash a recent Armbian image (different version/flavors) to eMMC using rkdeveloptool and see if any of those produce a working system/eMMC. Figure out how the boot process *really* works and what parts of the eMMC are loaded in what order and how Compare a working and broken armbian image (in the areas that contain bootloader-stuff) and swap out some of these parts to see what is the part that breaks it. However, my main issue is fixing reboots on the older armbian system we are using, so I might not get around to the above anytime soon (OTOH, it seems the newer U-boot SPL actually fixes the reboot issue, so that could motivate me to see if we can upgrade to the new u-boot version without losing eMMC). -
I did so, but openvfd still doesn't work and can't compile.
-
This partnership ensures customers can build embedded products with long-term maintenance viability that will meet the challenges of tomorrow, such as compliance with the CRA, all built on proven Toradex platforms and upstream-first software. View the full article
-
I meant to say "armbian", my apologies
-

Efforts to develop firmware for H96 MAX V56 RK3566 8G/64G
xuandat09 replied to Hqnicolas's topic in Rockchip CPU Boxes
Dear all, How can i auto login h96max armbian without input user name&password. Every time i turn on the box, i have to enter the user name&password. I don't want to do that the same to windows OS Thank you,