Search the Community
Showing results for 'UUID does not exist'.
-
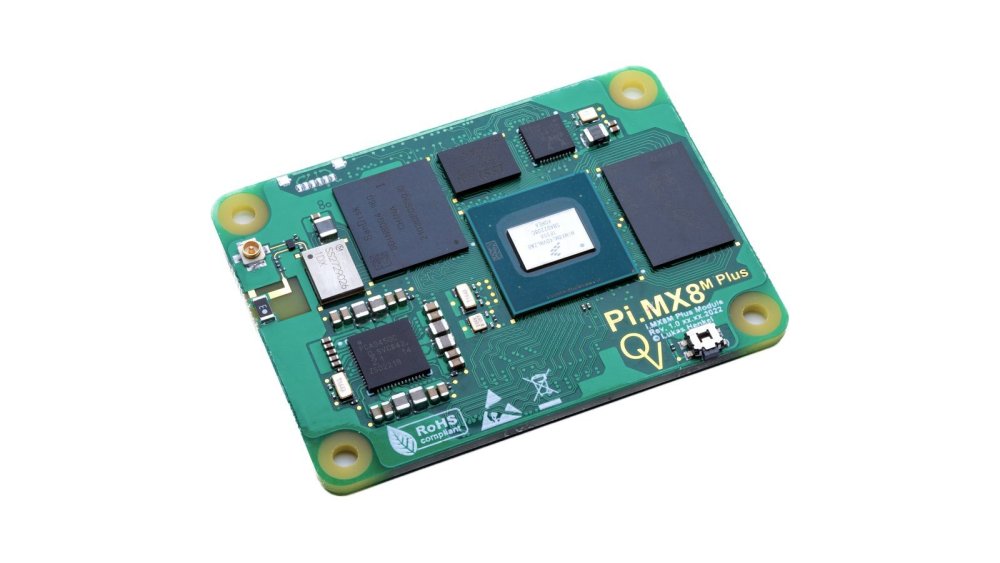
Unreleased open hardware board in CM4 footprint https://www.crowdsupply.com/ov-tech-gmbh/pi-mx8-module - SOC: NXP i.MX 8M Plus - NXP guarantees production of the chip for 10 years. - 4x A53 cores at up to 1.8 GHz / 1x M7 core at up to 700 MHz - 1 GB/2 GB/4 GB/8 GB LPDDR4 system memory - Vivante GC7000UL GPU - Gigabit Ethernet PHY supporting IEEE 1588v2 and SyncE - PCIe Gen3 1x1 Interface - Optional eMMC with 8 GB/16 GB/32 GB - Optional 2.4 GHz & 5 GHz Wi-Fi + Bluetooth 5.2 (Murata LBEE5PK2BC) - Optional Coral Edge TPU connected via PCIe - Two CSI-2 interfaces, one with 4-lane and one 2-lane width Some open hardware carrier boards exist such as Twisted fields CanBUS/ Robotics Piunora Camera, Qwiic, Arduino pinout Jkiv Gigabit, uSD Will cluster RobertLukan dual camera, 40 pin header Wiretrustee SATA/ NAS Mirko PC 2x HDMI, 2x Camera, M.2, uSD, 40pin tkircher camera, Qwiic, M.2, HDMI, uSD Others I plan to use this thread to document the hardware and other related efforts to support IMX8 hardware, intending to add Armbian support for this board. So far I have found: - https://github.com/Joshua-Riek/ubuntu-apalis-imx8 - https://github.com/TechNexion-customization/ubuntu-tn-imx/tree/master?tab=readme-ov-file#technexion-ubuntu-lts-image-builder
-
Members, I have a question, because I can't find any documentation about what is broken or not. Why does /dev/rga not exist in my armbian install? I need it for my FFmpeg rkmpp config.
-
Gents, installed Armbian Bullseye successfully to my Banana Pi M2 Berry. In second step i moved the OS to my attached 2,5 WD RED Sata Harddrive. This was easily possible with the command "sudo nand-sata-install". But now, i see that my /var/log is full, because its located in ZRAM. root@BananaPiM2Berry:/etc/systemd/system# df -h Filesystem Size Used Avail Use% Mounted on udev 431M 0 431M 0% /dev tmpfs 100M 11M 90M 11% /run /dev/sda1 687G 1,3G 651G 1% / tmpfs 500M 0 500M 0% /dev/shm tmpfs 5,0M 4,0K 5,0M 1% /run/lock tmpfs 500M 0 500M 0% /tmp /dev/mmcblk0p1 1,7G 1,3G 385M 77% /media/mmcboot /dev/zram1 49M 48M 0 100% /var/log tmpfs 100M 0 100M 0% /run/user/1000 As you can see i hve more than 650 GB avail in my root parttiion on /dev/sda1. But how can i setup /var/log to wirte on /dev/sda1 ? i believed to find it in /etc/fstab, but its not there. # <file system> <mount point> <type> <options> <dump> <pass> tmpfs /tmp tmpfs defaults,nosuid 0 0 UUID=7fe45d82-d362-438a-9b7a-baa3678fcab4 /media/mmcboot ext4 defaults,noatime,commit=600,errors=remount-ro,x-gvfs-hide 0 1 /media/mmcboot/boot /boot none bind 0 0 UUID=614c4feb-de66-4b2c-a046-ce72aaf2e600 / ext4 defaults,noatime,commit=600,errors=remount-ro,x-gvfs-hide 0 1 Right now, the device is unuseable, i cant even install system updates, since no more logs can be written. Since i have so much storage avail on my HDD, i wonder how to move /var/log there... Greatings Schlotze
-
 I booted the RC from 1/20/2024, set the ftdfile to rc3588s-orangepi-5b.dtb in armbianEnv.txt, and rebooted: no wifi or bluetooth. The hci0 and wlan0 devices are not present. They both work on the Linux 5.10 kernel. My armbianEnv.txt: -------------------------- verbosity=1 bootlogo=true overlay_prefix=rockchip-rk3588 fdtfile=rockchip/rk3588s-orangepi-5b.dtb rootdev=UUID=38eb4cb5-0503-4a0a-900f-7a5167517a20 rootfstype=ext4 overlays=sata1 sata2 usbstoragequirks=0x2537:0x1066:u,0x2537:0x1068:u
 -
Hi, Using the image Armbian_23.5.0-trunk.181_Rock-5b_lunar_edge_6.3.1.img I get this error at boot: Begin: Mounting root file system ... Begin: Running /scripts/local-top ... done. Begin: Running /scripts/local-premount ... Scanning for Btrfs filesystems done. Begin: Waiting for root file system ... Begin: Running /scripts/local-block ... done. done. Gave up waiting for root file system device. Common problems: - Boot args (cat /proc/cmdline) - Check rootdelay= (did the system wait long enough?) - Missing modules (cat /proc/modules; ls /dev) ALERT! UUID=6a70cc68-5120-4343-887c-ca90fd2188f9 does not exist. Dropping to a shell! The SD card is working fine when using the Armbian_23.02.2_Rock-5b_jammy_legacy_5.10.110 image.
-
I just want to add a few comments to this whole dtb overlay discussion. First I want to thank all of you involved in this discussion. You all have different view points and I think are tackling a very difficult problem to which there is no perfect solution. What comes out of this discussion should be applied to the other soc families as well, as they all suffer from some form of this issue as there is no standard in place that works for all use cases well. From what I have seen, good minds are thinking this through and I expect a good result to follow. The reason I am commenting at all, is because in my role as forum moderator, the basic question: "How do I enable feature x on my board" is one of, if not the most commonly asked question by end users of the forum. And when the answer is 'just write a dtb overlay', you have lost 95% of those users as they do not have the skills/knowledge to do that. The status of the dtb overlay's across Armbian supported and community maintained boards is poor. There is no standardization from family to family or board to board. And no testing of what does exist to ensure that it works. Now I'm not saying that all of this needs to be solved in what comes out of this design discussion. I'm just saying from my perspective as a moderator that this is an area that can use some attention, and in doing so, please try to make the end result usable by the typical end user of an sbc, trying to do common things. I realize also that I'm saying this when I only use these boards as servers and don't personally need any of the functionality the overlays provide. But as a forum moderator, I see the mismatch between what is being done and some common use cases that end users are looking for.
-
 On my odroid hc2 with armbian/bullseye I found some of the logs (both in /var/log and /var/log.hdd) empty, while they should have some contens (i.e. afpd.log, kern.log, user.log, ...). The empty files all have the timestamp of a run of armbian-ramlog at a recent reboot. In armbian-ramlog.log I found this for the run that created the empty files: rsync: [receiver] write failed on "/var/log/journal/0d4b1c13b9a14b6d9c746402b7d7ef6f/user-1000@0005d37f46f9961b-23c015a66b68d086.journal~": No space left on device (28) rsync error: error in file IO (code 11) at receiver.c(378) [receiver=3.2.3] rsync: [sender] write error: Broken pipe (32) Seems that journal has become too big to fit on the log/ramdisk. That is strange, as I defined a maximum of 20MB for the journal and the ramdisk has 50MB. I guess this is what happened: When syncing to sd armbian-ramlog uses rsync without --delete. So if some older files have been already delete by journald (because of the 20 MB limit) on the ramdisk, they will still stay in the log on sd. Therefore the journal on the sd will become bigger and bigger. Which is not a problem because there is plenty of space on the sd. However, when rebooting everything is copied from the sd to the ramdisk. Including the bloated journal. Thus the ramdisk is full and additional files will not fit (see error message from rsync). I think in this case rsync just creates empty files and that is the reason for my empty logs. And on next sync the empty files are copied back to sd so both versions are empty. There is another potential problem I see in the implementation of armbian-ramlog: on reboot only recent files (so no *.gz or *.[0-9]) are copied to ramdisk. After som runtime logrotate will rotate the logs and create new *.gz or *.[0-9]. However, these might already exist on the sd. They will be overwritten when the logs are written back to sd. So you loose old logs. I think both problems are due to the fact that simple rsync is used without --delete and without copying even the old files to the ramdisk. To overcome these problems I see two ways: use rsync --delete and dont exclude *.gz and *.[0-9]. Then the ramdisk holds all logs and when copying to sd nothing is lost. But this may requier a bigger ramdisk dont use rsync but use an overlay fs instead. I found this discussion on the topic. The described solution looks superior to me than what we are using now: https://unix.stackexchange.com/questions/424341/mount-var-logs-as-tmpfs-with-help-of-overlayfs-to-save-changes-sometimes What do you think about it? Would it make sense to use an overlay fs? I am not that deep into linux hacking and therefore are not sure if I would be able to implement it in a nice way. But I would like to support this process and do some tasks. Regards, jba
 -
 prepare-host: check_host_has_enough_disk_space(): don't check if dir does not exist; fixes #5246 prepare-host: check_host_has_enough_disk_space(): don't check if dir does not exist; fixes #5246 View the full article
 -
@pixdrift I built an image for the zero3 from your repository and I am not having any difficulties with the overlays. If you think it is the overlays that are causing your boot problems you can try putting your system drive on another machine and removing the overlays line in: sysadmin@orangepizero3:~$ more /boot/armbianEnv.txt verbosity=1 bootlogo=false console=both disp_mode=1920x1080p60 overlay_prefix=sun50i-orangepizero2-3 rootdev=UUID=8b58b731-6024-4fbe-bd3e-c784b3b9a449 rootfstype=ext4 overlays=i2c3 ir otg-host spi1-cs0-spidev uart5 usbstoragequirks=0x2537:0x1066:u,0x2537:0x1068:u Armbian-config creates and modifies this line when you enable/disable overlays. If that resolves the problem try adding overlays one at a time. I would suggest this order: i2c3 ir spi1-cs0-spidev uart5 otg-host
-
Hi, I am struggling to get the second NIC (1Gbit) to work. The wireless and first NIC (100Mbit) works All NIC's connected I am using Armbian 22.11.0-trunk Bullseye root@rockpi-e:~# ifconfig -a eth0: flags=4098<BROADCAST,MULTICAST> mtu 1500 ether 9a:9c:84:a1:77:63 txqueuelen 1000 (Ethernet) RX packets 0 bytes 0 (0.0 B) RX errors 0 dropped 0 overruns 0 frame 0 TX packets 0 bytes 0 (0.0 B) TX errors 0 dropped 0 overruns 0 carrier 0 collisions 0 device interrupt 41 eth1: flags=4163<UP,BROADCAST,RUNNING,MULTICAST> mtu 1500 inet 10.150.1.153 netmask 255.255.255.0 broadcast 10.150.1.255 ether 9a:9c:84:a1:77:83 txqueuelen 1000 (Ethernet) RX packets 511 bytes 40303 (39.3 KiB) RX errors 0 dropped 0 overruns 0 frame 0 TX packets 154 bytes 14296 (13.9 KiB) TX errors 0 dropped 0 overruns 0 carrier 0 collisions 0 device interrupt 42 lo: flags=73<UP,LOOPBACK,RUNNING> mtu 65536 inet 127.0.0.1 netmask 255.0.0.0 inet6 ::1 prefixlen 128 scopeid 0x10<host> loop txqueuelen 1000 (Local Loopback) RX packets 0 bytes 0 (0.0 B) RX errors 0 dropped 0 overruns 0 frame 0 TX packets 0 bytes 0 (0.0 B) TX errors 0 dropped 0 overruns 0 carrier 0 collisions 0 wlx60fb004c1ad0: flags=4163<UP,BROADCAST,RUNNING,MULTICAST> mtu 1500 inet 192.168.86.37 netmask 255.255.255.0 broadcast 192.168.86.255 inet6 fe80::87c1:1dc5:ab7:6e70 prefixlen 64 scopeid 0x20<link> ether 60:fb:00:4c:1a:d0 txqueuelen 1000 (Ethernet) RX packets 4101 bytes 919466 (897.9 KiB) RX errors 0 dropped 0 overruns 0 frame 0 TX packets 747 bytes 336966 (329.0 KiB) TX errors 0 dropped 0 overruns 0 carrier 0 collisions 0 root@rockpi-e:~# root@rockpi-e:~# nmcli connection show NAME UUID TYPE DEVICE Wired connection 2 2824d9e9-002b-3206-a9e3-56101ea54125 ethernet eth1 mesh 0f22274b-554b-47b6-899e-2ae5e1ec9e1a wifi wlx60fb004c1ad0 Armbian ethernet f8b4ca43-7e6f-464a-ab38-9c8744b0dc16 ethernet -- Wired connection 1 c7d498a6-cbdd-3daa-b1fe-c71c23dc7e70 ethernet -- root@rockpi-e:~# root@rockpi-e:~# root@rockpi-e:~# nmcli connection up c7d498a6-cbdd-3daa-b1fe-c71c23dc7e70 Error: Connection activation failed: The device could not be readied for configuration Hint: use 'journalctl -xe NM_CONNECTION=c7d498a6-cbdd-3daa-b1fe-c71c23dc7e70 + NM_DEVICE=eth0' to get more details. root@rockpi-e:~# root@rockpi-e:~# journalctl -xe NM_CONNECTION=c7d498a6-cbdd-3daa-b1fe-c71c23dc7e70 + NM_DEVICE=eth0 Journal file /var/log/journal/f5dd17308a32431b9d72c3f4257db559/system@488569ec21fd40be8b54f2a0c0f5271d-0000000000000001-0005ec5fc6f64b22.journal is truncated, ignoring file. Dec 21 17:36:07 rockpi-e NetworkManager[622]: <info> [1671640567.3994] device (eth0): state change: disconnected -> prepare (reason 'none', sys-iface-state: 'managed') Dec 21 17:36:07 rockpi-e NetworkManager[622]: <info> [1671640567.4061] device (eth0): state change: prepare -> config (reason 'none', sys-iface-state: 'managed') Dec 21 17:36:07 rockpi-e NetworkManager[622]: <info> [1671640567.4106] device (eth0): state change: config -> failed (reason 'config-failed', sys-iface-state: 'managed') Dec 21 17:36:07 rockpi-e NetworkManager[622]: <warn> [1671640567.4252] device (eth0): Activation: failed for connection 'Wired connection 1' dmesg show: [ 1519.182778] rk_gmac-dwmac ff540000.ethernet eth0: stmmac_open: Cannot attach to PHY (error: -19) [ 1540.887807] rk_gmac-dwmac ff540000.ethernet eth0: no phy at addr -1 [ 1540.887850] rk_gmac-dwmac ff540000.ethernet eth0: stmmac_open: Cannot attach to PHY (error: -19) Anyone know how to solve it?
-
Dear Community, I want to build a custom FirmWare for Banana Pi M2 Berry, im currently using the BPI-M2-Ultra Firmware, cuz no BPI-M2-Berry FirmWare exist. What do I need for building for my SBC(BPI-M2-Berry) ? I want to use my SBC as a LTE-Router/ Mesh-Repeater and want to pre-install some necessary packages, the device need. I want to build a Dashboard for Administrate the Device. Maybe I'll use electron + reactjs, or would it be better to use php for it? Greetz BlackLeakz
-
 Full root filesystem encryption on an Armbian system (new, fully rewritten, replaces my earlier tutorial on this topic) MMGen (https://github.com/mmgen) This tutorial provides detailed, step-by-step instructions for setting up full root filesystem encryption on an Armbian system. The disk can be unlocked remotely via SSH or the serial console, permitting unattended bootup. An automated script that performs the same steps, saving you much time and effort, can be found at https://github.com/mmgen/mmgen-geek-tools Note that unlike my earlier tutorial all steps are performed within a running Armbian system. The tutorial is known to work with the following board/image combinations: Orange Pi PC2 Debian Buster mainline / Ubuntu Bionic and Focal legacy RockPi 4 Debian Buster mainline / Ubuntu Bionic and Focal legacy RockPro 64 Ubuntu Focal mainline Odroid HC4 Debian Buster mainline / Ubuntu Focal mainline You may have success with other boards/images too. If so, please post the details below (or open an issue in the mmgen-geek-tools Github repository), and I’ll add your board to the list. Requirements: A SoC with a running, upgradeable and Internet-connected Armbian system A blank Micro-SD card and USB card reader, or, alternatively, a blank eMMC installed on the board The ability to edit text files and do simple administrative tasks on the Linux command line Step 1 - Preliminaries All steps in this tutorial are performed as root user on a running Armbian system (the “host”). The encrypted system (the “target”) will be created on a blank micro-SD card. If your board has an eMMC not currently in use, the system can be created on it instead. Architecture of host and target (e.g. 64-bit or 32-bit ARM) must be the same. For best results, the host and target hardware should also be identical or similar. Building on a host with more memory than the target, for example, may lead to disk unlocking failure on the target. If you’re building the target system for the currently running board and with the currently running image, which is the recommended approach, the two preceding points will be a non-issue. Packages will be installed using APT, so the host machine must be Internet-connected and its clock correctly set. Step 2 - Upgrade your system and install the cryptsetup-bin package # apt update && apt upgrade # apt install cryptsetup-bin Step 3 - Get and unpack the latest Armbian image for your board Create your build directory: # mkdir armbenc-build && cd armbenc-build Download the Armbian image of your choice for your board, place it in this directory and unpack: # xz -dv *.img.xz Step 4 - Create mount directories and set up the loop mount Create the mount directories: # mkdir -p mnt boot root Determine your first free loop device: # losetup -f Associate the image file with the loop device name displayed by the previous command. This will be '/dev/loop0' in most cases, but if your output was different, substitute that for '/dev/loop0' in the following steps. # losetup -P /dev/loop0 *.img Examine the disk image using fdisk on the loop device: # fdisk -l /dev/loop0 The output should look something like this: Device Boot Start End Sectors Size Id Type /dev/loop0p1 32768 3489791 3457024 1.7G 83 Linux Make a note of the start sector (32768 in this case). You’ll need this value in the steps below. Now mount the loop device: # mount /dev/loop0p1 mnt Step 5 - Copy the boot loader to the SD card Insert the blank micro-SD card and card reader into a USB port. Determine the SD card’s device name using 'dmesg' or 'lsblk'. We’ll assume it to be '/dev/sda', since that’s the most likely case. If your device name is different, substitute it for '/dev/sda' in the the following steps. For an eMMC, the device name will probably be '/dev/mmcblk1'. WARNING: if '/dev/sda' refers to some other storage device, running the following commands unchanged will destroy data on that device, so always remember to substitute the correct device name!!! The best way to eliminate this danger is to disconnect all unused storage devices on the board before proceeding further. Copy the image’s boot loader to the SD card, using the Start sector value from Step 4 as the argument for 'count': # dd if=$(echo *.img) of=/dev/sda bs=512 count=32768 Step 6 - Partition the SD card # fdisk /dev/sda At the fdisk prompt, create a new DOS disk label with the 'o' command. Use the 'n' command to create a primary partition of size +200M beginning at the same Start sector as the disk image. Type 'p' to view the partition table, which should now look something like this: Device Boot Start End Sectors Size Id Type /dev/sda1 32768 442367 409600 200M 83 Linux Use 'n' again to create another primary partition beginning one sector after the first partition’s end sector and filling the remainder of the card. Type 'p' once more to view the partition table: Device Boot Start End Sectors Size Id Type /dev/sda1 32768 442367 409600 200M 83 Linux /dev/sda2 442368 30636031 30193664 14.4G 83 Linux Ensure that the first partition’s Start sector matches that of the disk image (32768 in this example) and that the second partition’s Start sector is one greater than the End sector of the first (442368 and 442367, respectively, in this example). If you’ve made a mistake, use 'd' to delete a partition and start again. Once everything looks correct, type 'w' to write the partition table to disk. Step 7 - Copy the system to the SD card The following commands will create a filesystem on the SD card’s boot partition and copy the boot partition data from the image file to it. Don’t forget to substitute the correct device name if necessary. If you’re building the system on an eMMC, the boot partition device is likely to be '/dev/mmcblk1p1' instead of '/dev/sda1'. # mkfs.ext4 /dev/sda1 # or '/dev/mmcblk1p1', for an eMMC target # e2label /dev/sda1 CRYPTO_BOOT # mount /dev/sda1 boot # cp -av mnt/boot/* boot # (cd boot; ln -s . boot) Create the encrypted root partition. When prompted for a passphrase, it’s advisable to choose an easy one like 'abc' for now. The passphrase can be changed later with the 'cryptsetup luksChangeKey' command (type 'man cryptsetup' for details) once your encrypted system is up and running. # cryptsetup luksFormat /dev/sda2 # or '/dev/mmcblk1p2', for an eMMC target Activate the encrypted root partition and create a filesystem on it: # cryptsetup luksOpen /dev/sda2 rootfs # enter your passphrase from above # mkfs.ext4 /dev/mapper/rootfs Mount the encrypted root partition and copy the system to it: # mount /dev/mapper/rootfs root # (cd mnt && rsync -a --info=progress2 --exclude=boot * ../root) # sync # be patient, this could take a while # mkdir root/boot # touch root/root/.no_rootfs_resize Unmount the boot partition and image and free the loop device: # umount mnt boot # losetup -d /dev/loop0 Step 8 - Prepare the target system chroot # BOOT_PART=($(lsblk -l -o NAME,LABEL | grep CRYPTO_BOOT)) # ROOT_PART=${BOOT_PART%1}2 # ROOT_UUID="$(lsblk --nodeps --noheadings --output=UUID /dev/$ROOT_PART)" # BOOT_UUID="$(lsblk --noheadings --output=UUID /dev/$BOOT_PART)" # cd root # mount /dev/$BOOT_PART boot # mount -o rbind /dev dev # mount -t proc proc proc # mount -t sysfs sys sys Copy '/etc/resolv.conf' and '/etc/hosts' so you’ll have a working Internet connection within the chroot: # cat /etc/resolv.conf > etc/resolv.conf # cat /etc/hosts > etc/hosts If you’re using non-default APT repositories, you may need to copy their configuration files as well so that 'apt update' and 'apt install' will use them inside the chroot. Note that you can only do this if the host and target systems have the same distro/version. If that’s not the case, you’ll have to edit the target files by hand. # cat /etc/apt/sources.list > etc/apt/sources.list # cat /etc/apt/sources.list.d/armbian.list > etc/apt/sources.list.d/armbian.list If you’re using an apt proxy, then copy its configuration file too: # cp /etc/apt/apt.conf.d/*proxy etc/apt/apt.conf.d/ Step 9 - Edit or create required configuration files in the target system Perform the editing steps below using a text editor of your choice: Edit 'boot/armbianEnv.txt' so that the 'rootdev', 'console' and 'bootlogo' lines read as follows. If you’ll be unlocking the disk via the serial console, then use 'console=serial' instead of 'console=display'. Note that enabling the serial console will make it impossible to unlock the disk from the keyboard and monitor, though unlocking via SSH will still work: rootdev=/dev/mapper/rootfs console=display bootlogo=false Edit 'etc/initramfs-tools/initramfs.conf'. If your board will have a statically configured IP, add the following line to the end of the file, substituting the correct IP in place of 192.168.0.88: IP=192.168.0.88:::255.255.255.0::eth0:off If the board will be configured via DHCP, then edit the DEVICE line as follows: DEVICE=eth0 If host and target systems are both Debian buster, you may wish add some key modules to the initramfs to avoid a blank display at bootup time. The easiest way to do this is to add all currently loaded modules as follows: # lsmod | cut -d ' ' -f1 | tail -n+2 > etc/initramfs-tools/modules Retrieve the SSH public key from the remote unlocking host and copy it to the target: # mkdir -p etc/dropbear-initramfs # rsync yourusername@remote_machine:.ssh/id_*.pub etc/dropbear-initramfs/authorized_keys If you want to unlock the disk from more than one host, then edit the authorized_keys file by hand, adding the required additional keys. Create 'etc/crypttab': # echo "rootfs UUID=$ROOT_UUID none initramfs,luks" > etc/crypttab Create 'etc/fstab': # echo '/dev/mapper/rootfs / ext4 defaults,noatime,nodiratime,commit=600,errors=remount-ro 0 1' > etc/fstab # echo "UUID=$BOOT_UUID /boot ext4 defaults,noatime,nodiratime,commit=600,errors=remount-ro 0 2" >> etc/fstab # echo 'tmpfs /tmp tmpfs defaults,nosuid 0 0' >> etc/fstab Create the dropbear configuration file: # echo 'DROPBEAR_OPTIONS="-p 2222"' > etc/dropbear-initramfs/config # echo 'DROPBEAR=y' >> etc/dropbear-initramfs/config If the target is Ubuntu bionic, then a deprecated environment variable must be set as follows: # echo 'export CRYPTSETUP=y' > etc/initramfs-tools/conf.d/cryptsetup Set up automatic disk unlock prompt. Performing this optional step will cause the disk password prompt to appear automatically when you log in remotely via SSH to unlock the disk. Using your text editor, create the file 'etc/initramfs-tools/hooks/cryptroot-unlock.sh' with the following contents: #!/bin/sh if [ "$1" = 'prereqs' ]; then echo 'dropbear-initramfs'; exit 0; fi . /usr/share/initramfs-tools/hook-functions source='/tmp/cryptroot-unlock-profile' root_home=$(echo $DESTDIR/root-*) root_home=${root_home#$DESTDIR} echo 'if [ "$SSH_CLIENT" ]; then /usr/bin/cryptroot-unlock; fi' > $source copy_file ssh_login_profile $source $root_home/.profile exit 0 Save the file and execute the command: chmod 755 'etc/initramfs-tools/hooks/cryptroot-unlock.sh' Step 10 - Chroot into the target system, install packages and configure Now chroot into the encrypted system. All remaining steps will be performed inside the chroot: # chroot . Install the cryptsetup package and the dropbear SSH server: # apt update # echo 'force-confdef' > /root/.dpkg.cfg # apt --yes install cryptsetup-initramfs dropbear-initramfs # for a buster or focal image # apt --yes install cryptsetup dropbear-initramfs # for a bionic image # rm /root/.dpkg.cfg Make sure everything was included in the initramfs (all three commands should produce output): # lsinitramfs /boot/initrd.img* | grep 'usr.*cryptsetup' # lsinitramfs /boot/initrd.img* | grep dropbear # lsinitramfs /boot/initrd.img* | grep authorized_keys Your work is finished! Exit the chroot and shut down the board: # exit # halt -p Insert your freshly written SD card into the board’s main SD slot (or, if the target is an eMMC, just remove the SD card from that slot) and reboot. Unlock the disk by executing the following command on your remote unlocking machine, substituting the correct IP address if necessary: $ ssh -p 2222 root@192.168.0.88 If you performed step 9.10 above, the disk password prompt should appear automatically after login. If not, you must enter the command 'cryptroot-unlock'. You may also unlock the disk from the target board’s console if you wish. Note, however, that certain disk images (RockPi 4 buster mainline, for example) might give you a blank display at startup, so you’ll have to enter your disk password “blindly”. This bug will hopefully be fixed in the future. If all went well, your root-filesystem encrypted Armbian system is now up and running!
 -
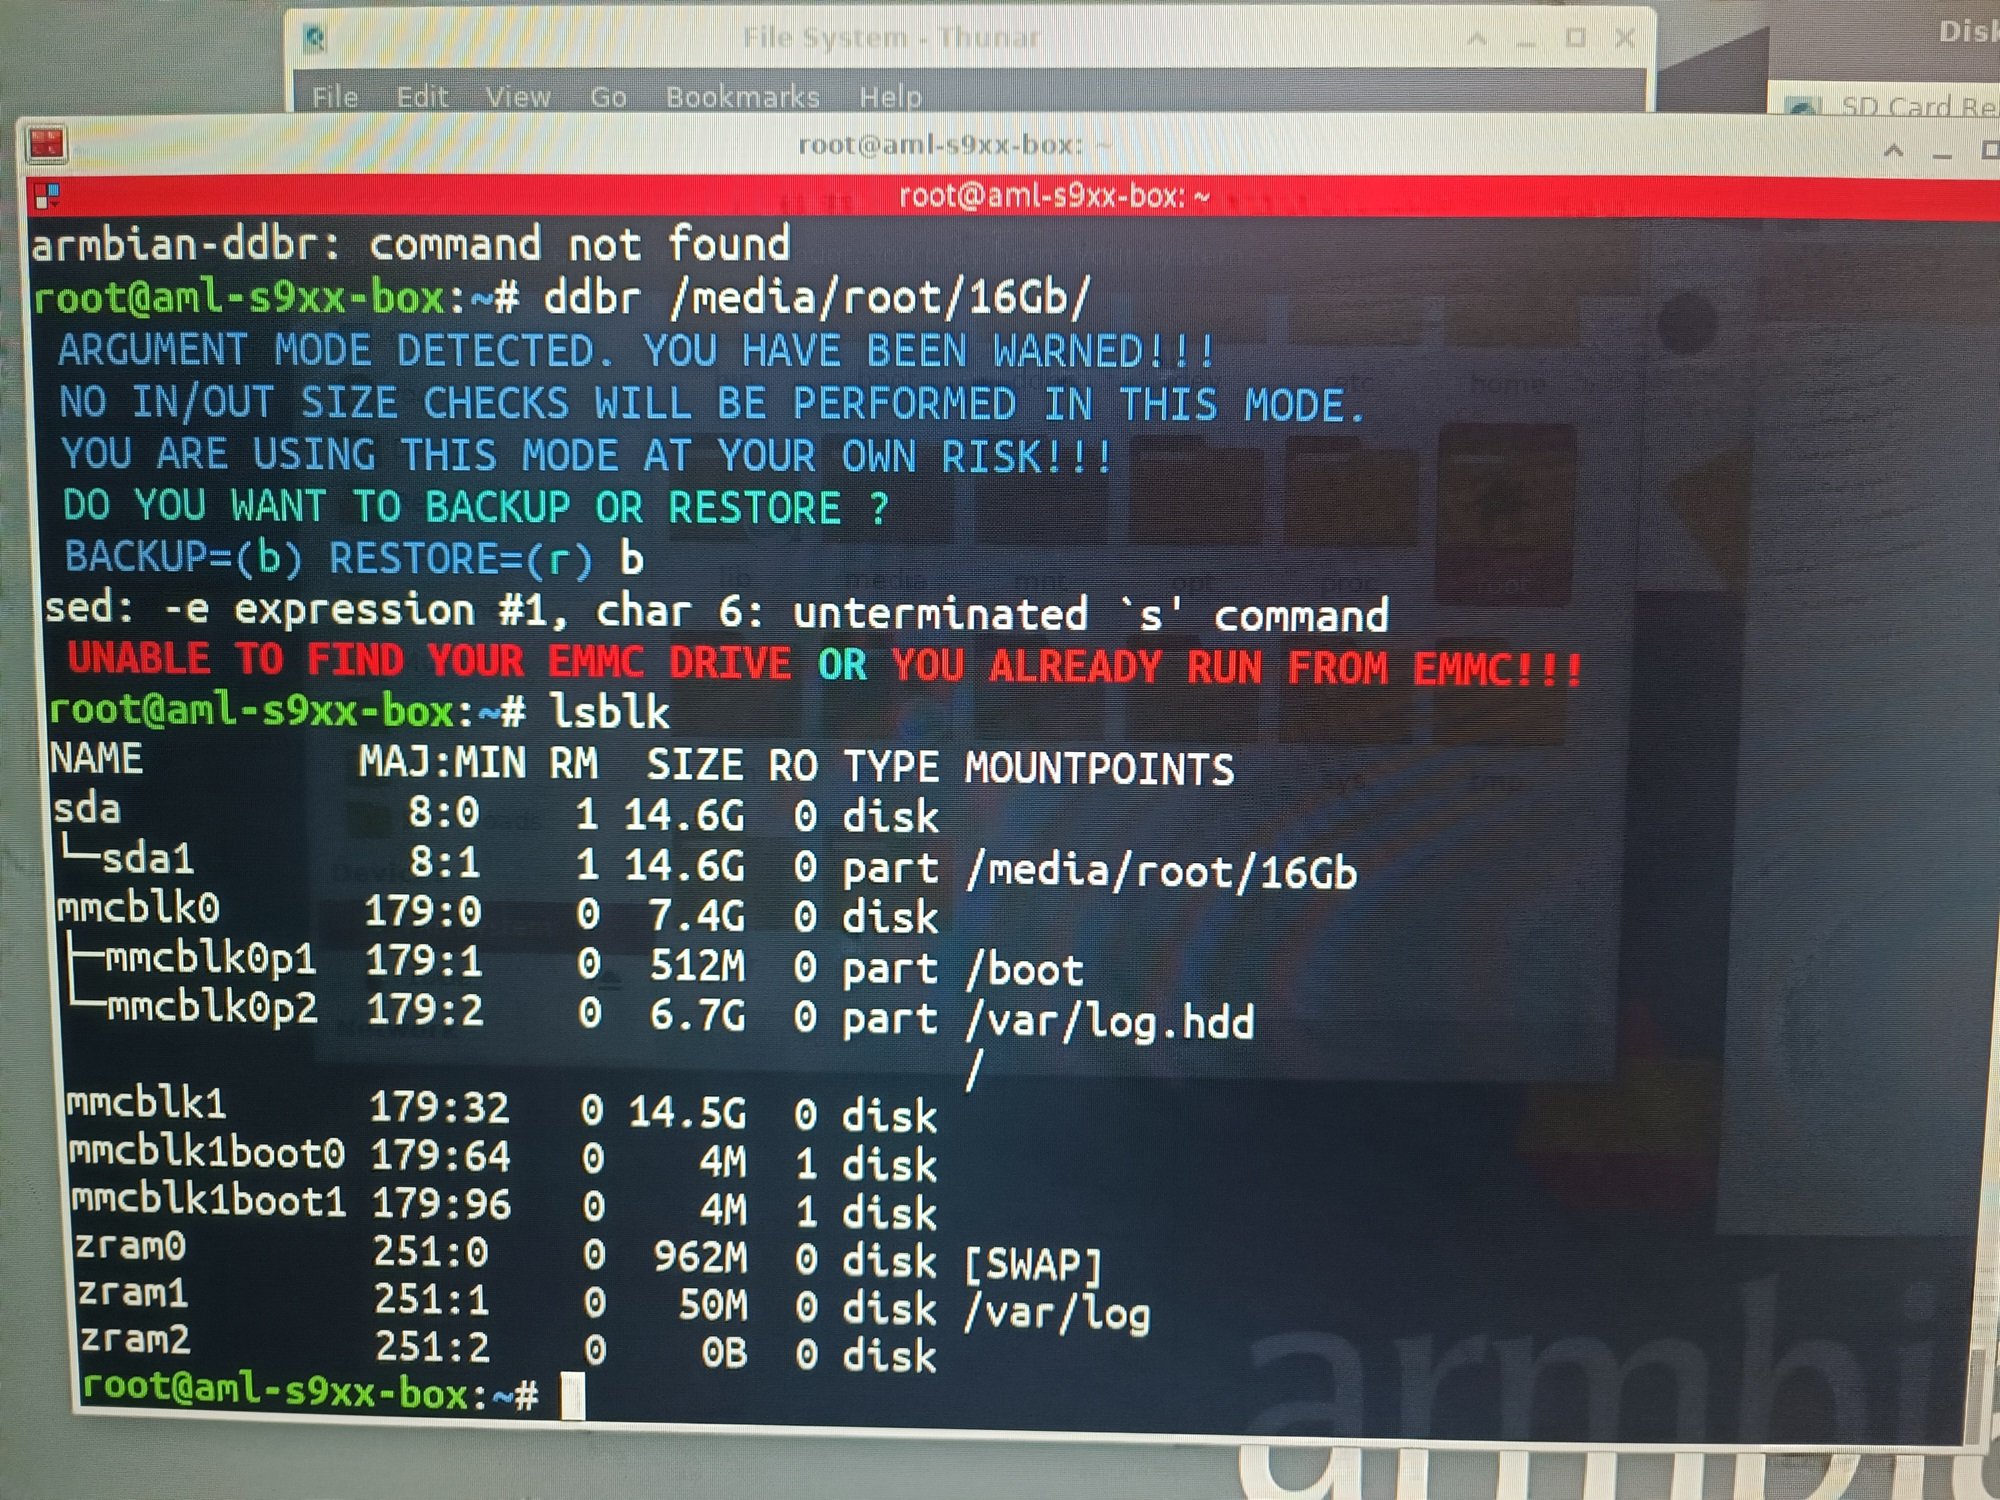
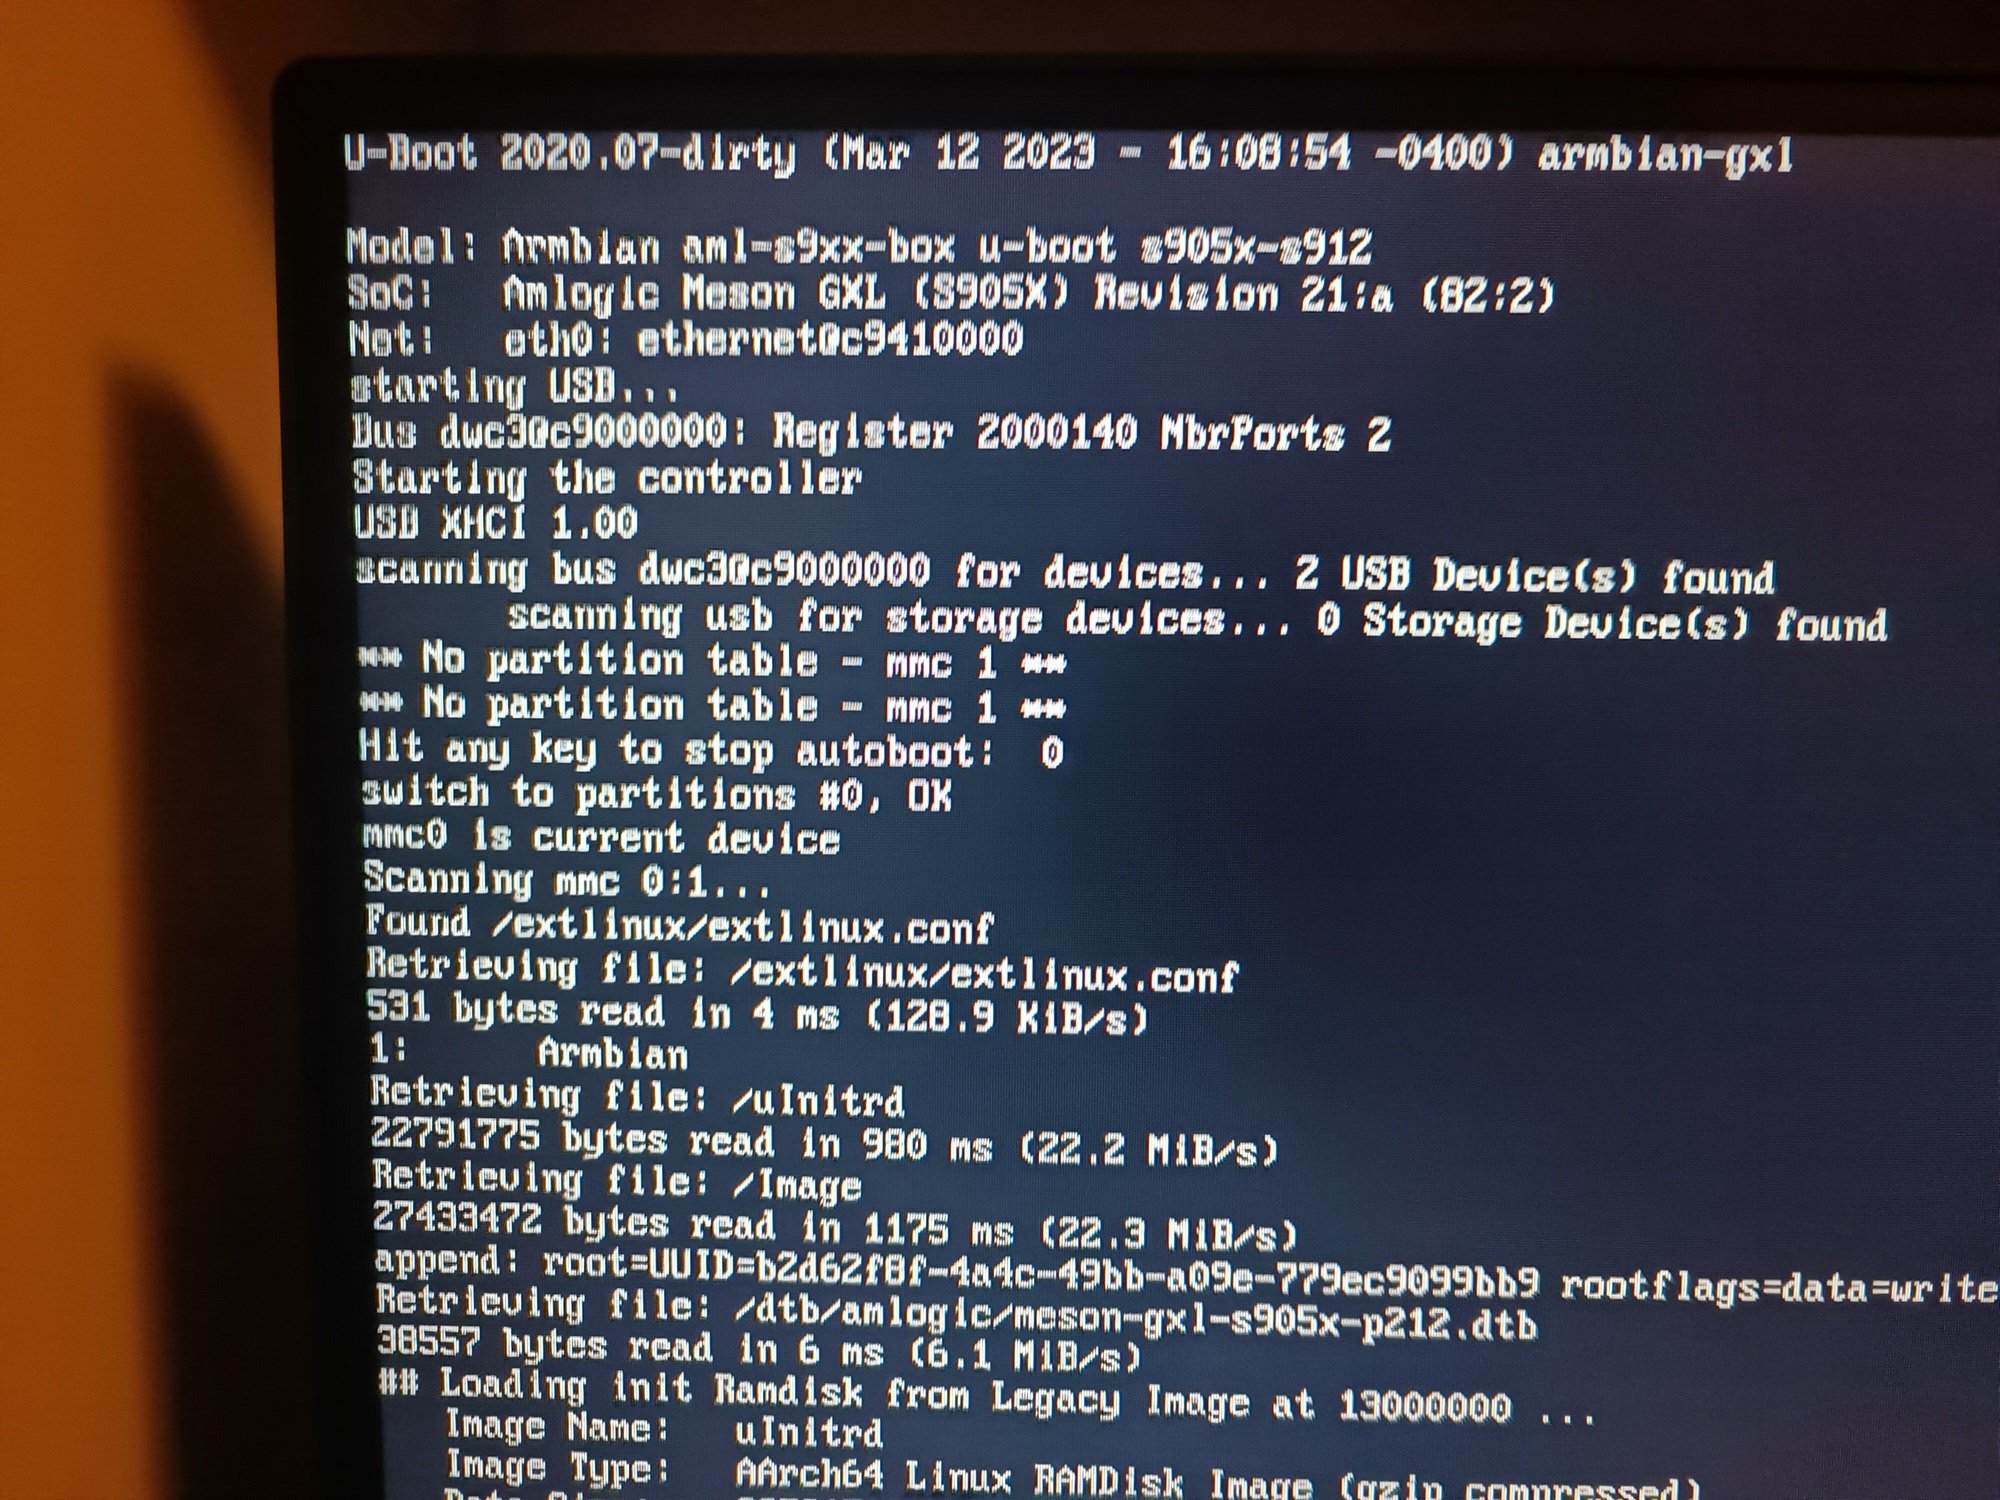
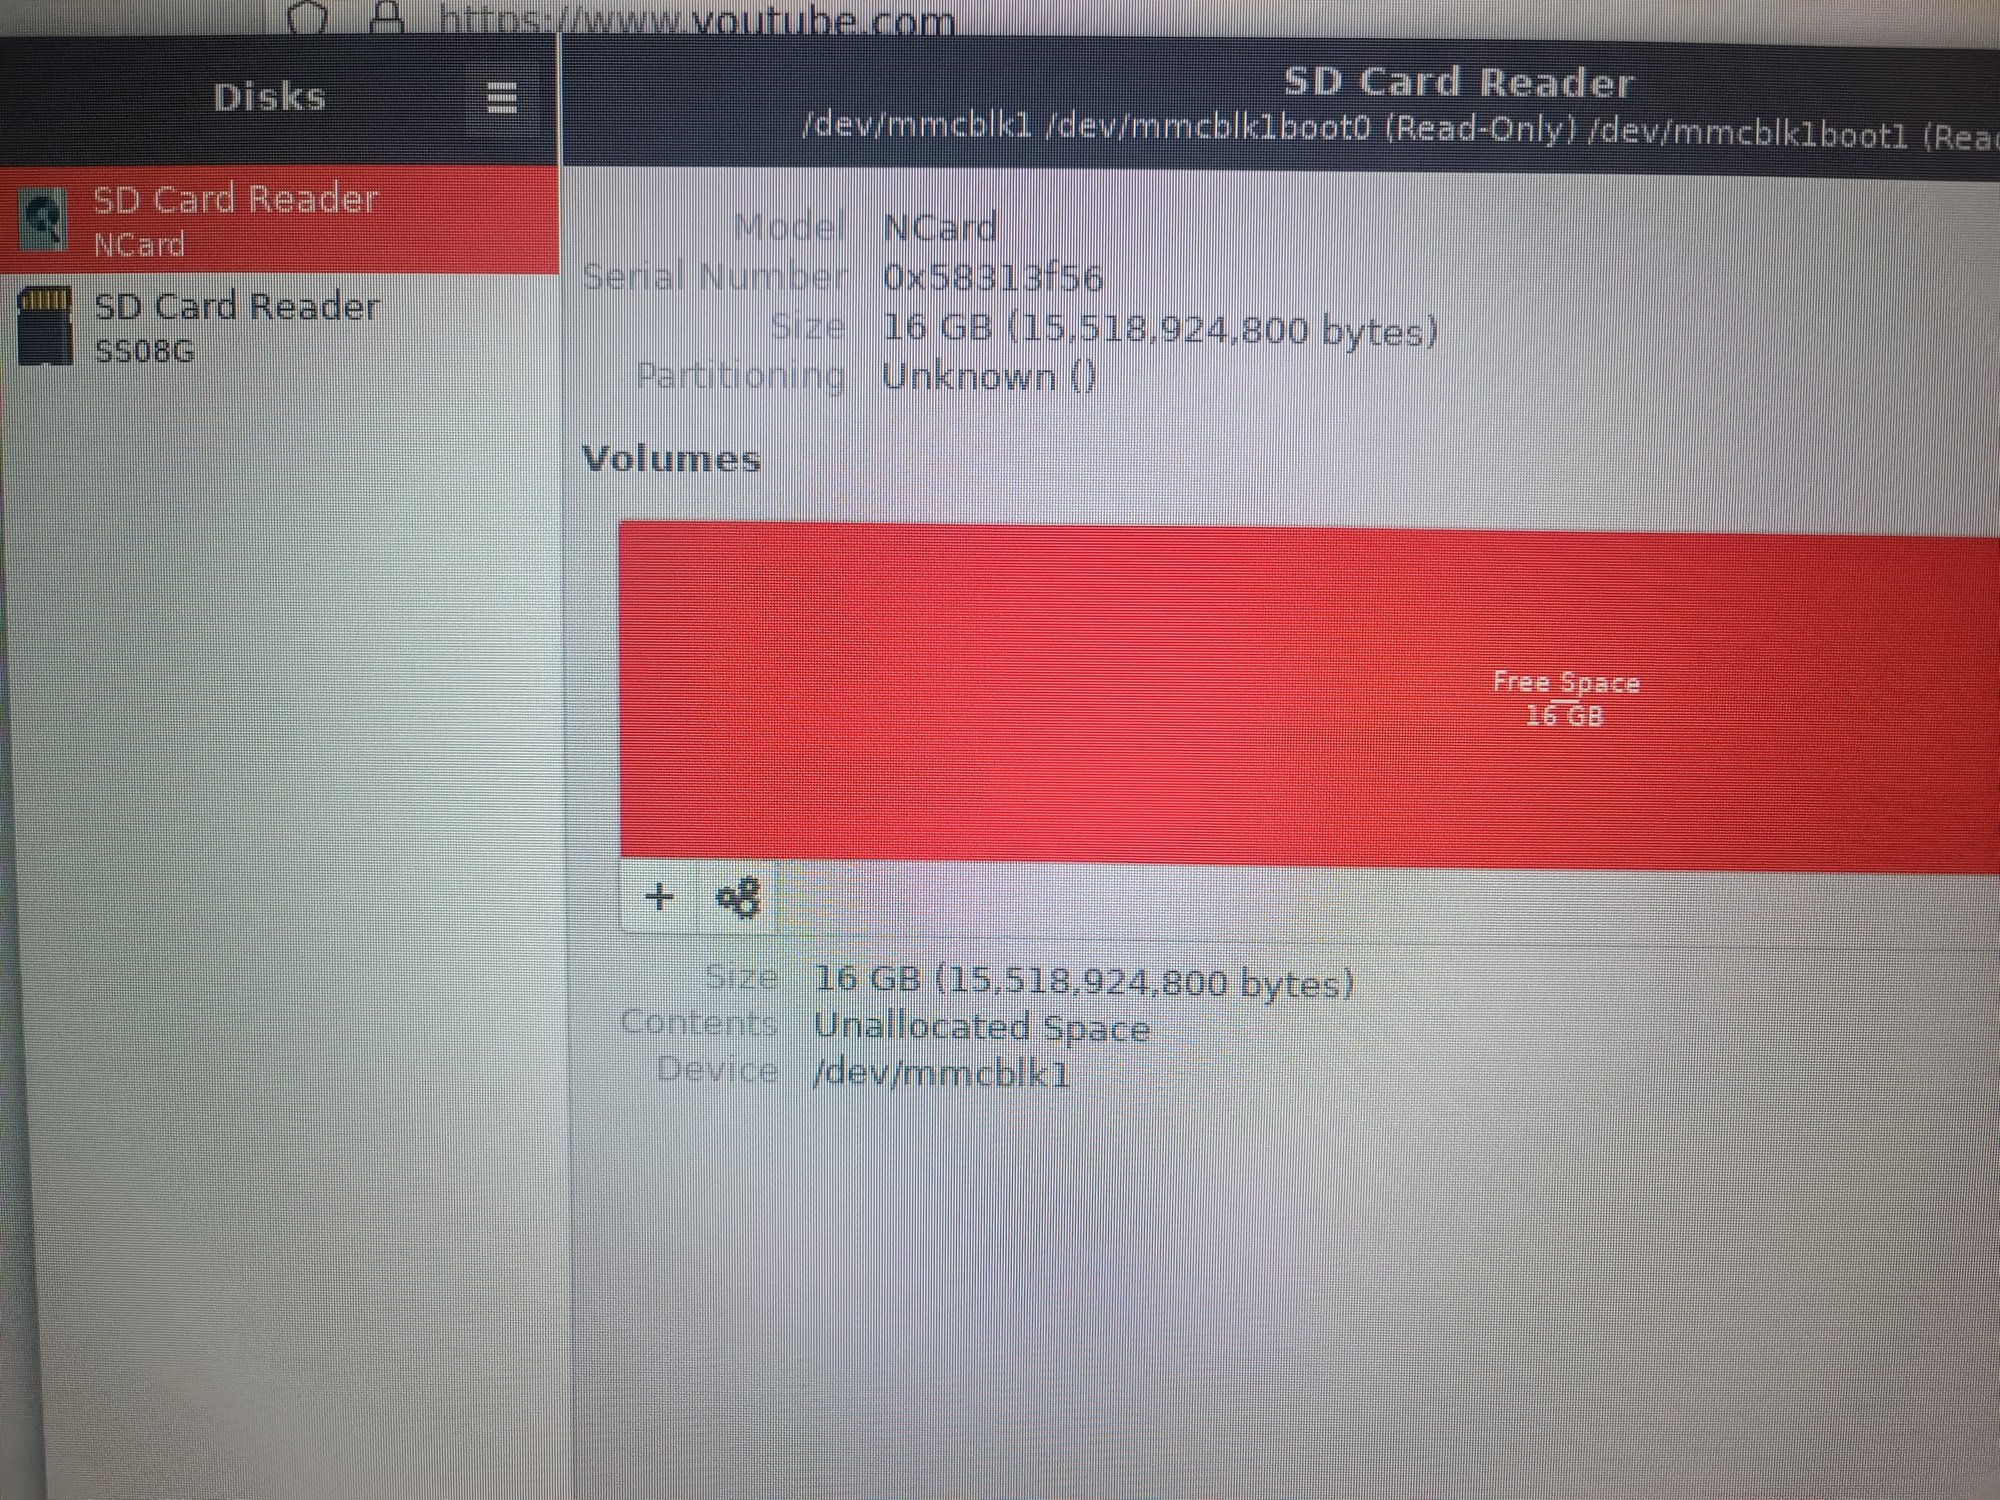
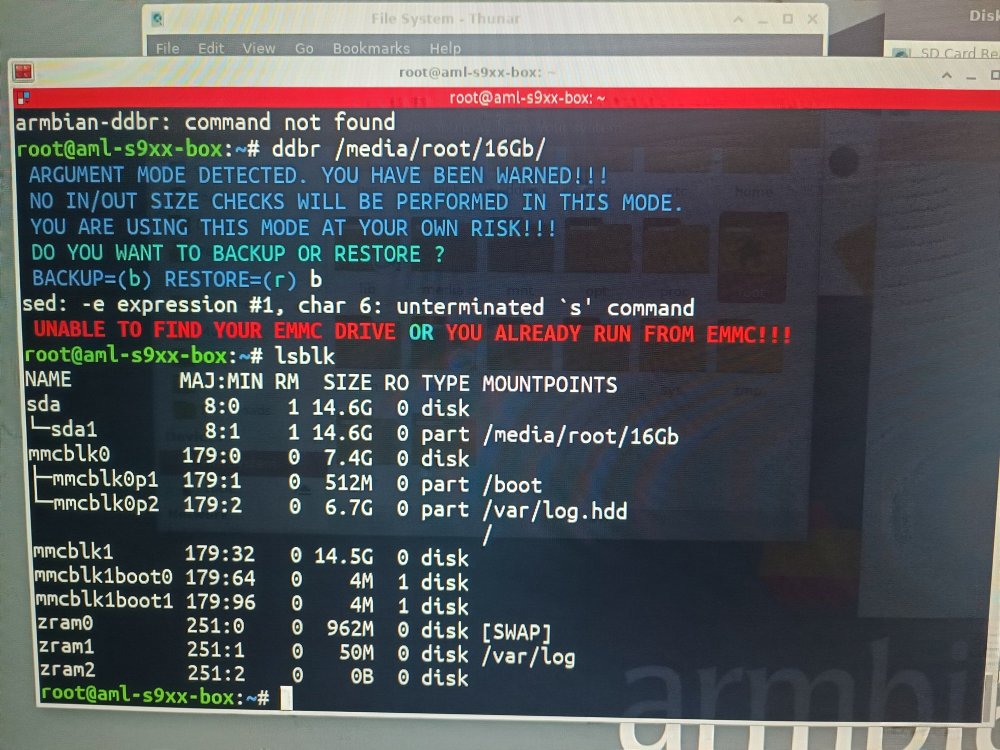
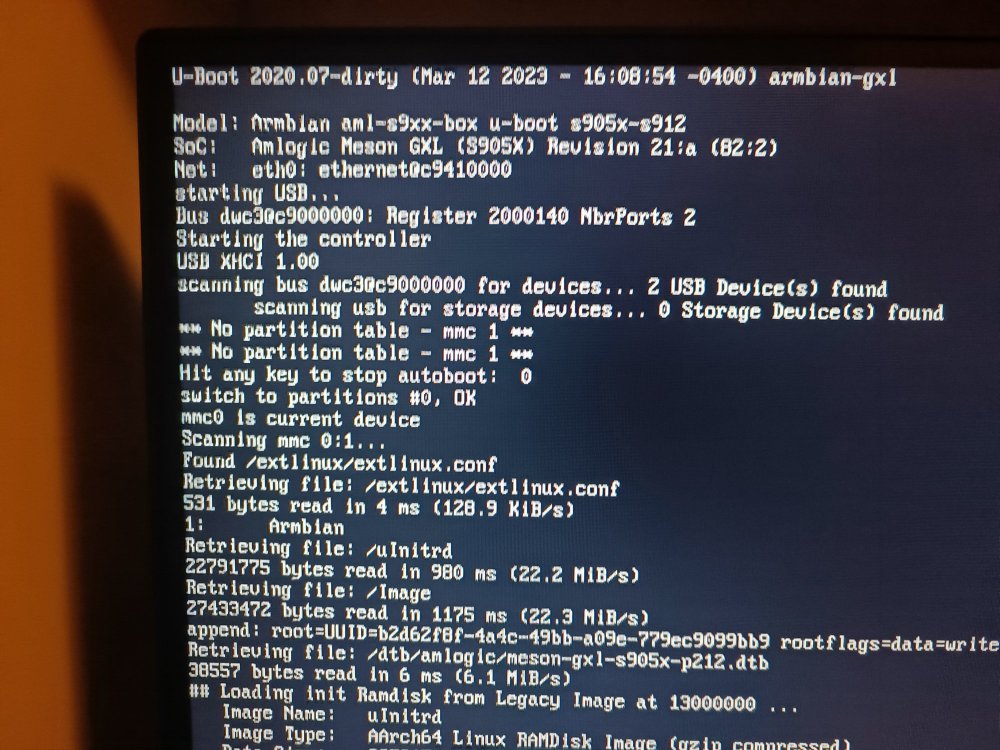
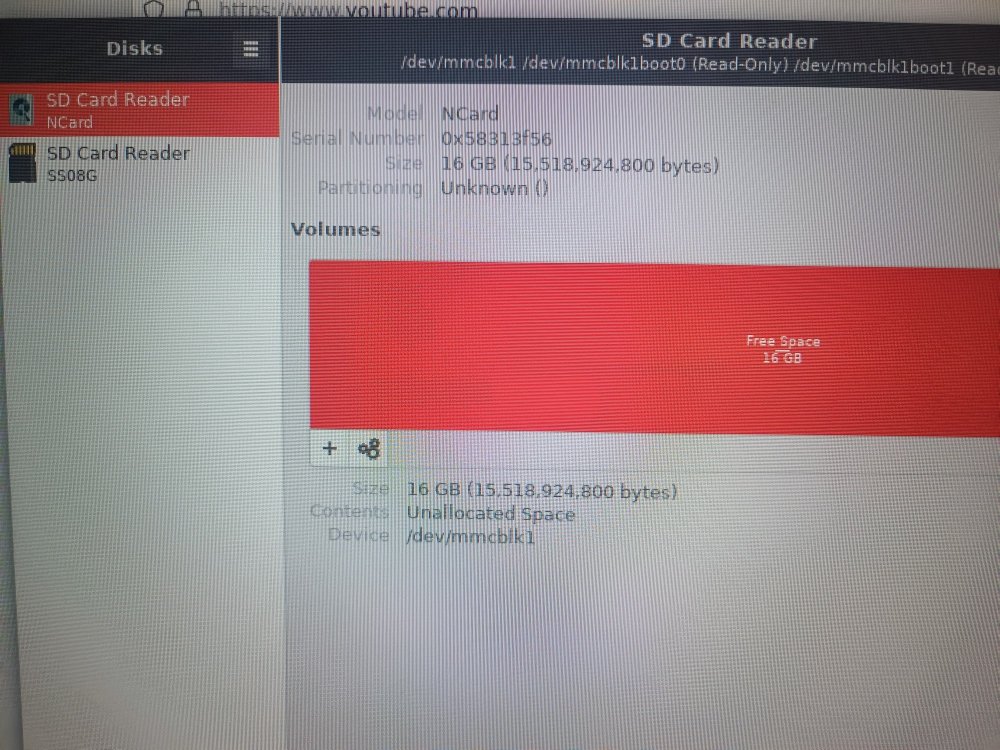
 Hi, I want to make step by step and I am reading all post that I can't, but I have not information about this. I can use linux commands, but I am a newbie. I have download and flash a micro sd as this links steps (I think there are the same what I have read in several posts here: https://i12bretro.github.io/tutorials/0269.html Firmware donwloaded from https://forum.armbian.com/topic/17106-installation-instructions-for-tv-boxes-with-amlogic-cpus (https://es.sbcmirror.org/dl/aml-s9xx-box/archive/) This one: Armbian_23.11.1_Aml-s9xx-box_bookworm_current_6.1.63_xfce_desktop.img.xz Checked SHA256 And flash Boot is ok with armbian. Yesterday I had problem to boot in android after taking off the micro sd card, but today I was preparing to record you some photos and .... android boots, so no problem here. So next step is backup android partition just in case. I have a Mini MXIII-II with 2gb and 16gb emmc S905X So, as my sd card is only 8gb, I plug a 16gb usb to my tv box. This is my situation: 1. u-boot correctly choosen 2. extlinux/extlinux.conf is this: LABEL Armbian LINUX /Image INITRD /uInitrd #FDT /dtb/amlogic/meson-gxbb-p200.dtb FDT /dtb/amlogic/meson-gxl-s905x-p212.dtb #FDT /dtb/amlogic/meson-gxl-s905w-tx3-mini.dtb #FDT /dtb/amlogic/meson-gxm-q200.dtb #FDT /dtb/amlogic/meson-g12a-x96-max.dtb #FDT /dtb/amlogic/meson-g12b-odroid-n2.dtb append root=UUID=b2d62f8f-4a4c-49bb-a09e-779ec9099bb9 rootflags=data=writeback console=ttyAML0,115200n8 console=tty0 rw no_console_suspend consoleblank=0 fsck.fix=yes fsck.repair=yes net.ifnames=0 splash plymouth.ignore-serial-consoles 3. Some information of my boot with the armbian sd card: ddbr doesn't detect emmc, but I think that I can see it in lsblk: mmcblk1, can't I? I am newbie, so probably I need something about mount or something like that? Or there is also something wrong in extlinux.conf (append root line?) ? Thanks a lot for your support. After I can make the backup, I will try to install from SD card to EMMC. Then I will solve the problem about audio. I understand that once I have "linux" installed in emmc I can boot with any bootable usb drive, update drivers, and so on, isn't it?
-
Ok, i do have one, but not a vim4. I have a vim 3. But armbian doesnt install on a vim3 as far as i can tell. No applicable or verified instructions exist for installing it there. I would like a working vim board with armbian. So maybe a vim4 is my only choice. I have not seen the screen work outside of android that came with it. On an edge V or vim 3 with any mainline distro. But it is expected to work? I will have to buy a vim4 to try.
-
 The latest version Bookworm cannot start up when use udisk Perhaps the latest version of the kernel does not support USB drive startup。 The name of image is "Armbian_23.8.0-trunk.71_Aml-s9xx-box_bookworm_edge_6.4.2.img" The log is as follows: scanning bus 0 for devices... 2 USB Device(s) found scanning usb for storage devices... 1 Storage Device(s) found Found /extlinux/extlinux.conf Retrieving file: /extlinux/extlinux.conf reading /extlinux/extlinux.conf 522 bytes read in 28 ms (17.6 KiB/s) 1: Armbian Retrieving file: /uInitrd reading /uInitrd 22828930 bytes read in 679 ms (32.1 MiB/s) Retrieving file: /Image reading /Image 27617792 bytes read in 802 ms (32.8 MiB/s) append: root=UUID=deeabe18-1741-4611-8a5a-3581d9f4f77b rootflags=data=writeback console=ttyAML0,115200n8 console=tty0 rw no_console_suspend consoleblank=0 fsck.fix=yes fsck.repair=yes net.ifnames=0 splash plymouth.ignore-serial-consoles Retrieving file: /dtb/amlogic/meson-g12a-u200.dtb reading /dtb/amlogic/meson-g12a-u200.dtb 72501 bytes read in 41 ms (1.7 MiB/s) [rsvmem] get fdtaddr NULL! rsvmem - reserve memory Usage: rsvmem check - check reserved memory rsvmem dump - dump reserved memory rsvmem check failed ## Loading init Ramdisk from Legacy Image at 03080000 ... Image Name: uInitrd Image Type: AArch64 Linux RAMDisk Image (gzip compressed) Data Size: 22828866 Bytes = 21.8 MiB Load Address: 00000000 Entry Point: 00000000 Verifying Checksum ... OK active_slot is <NULL> Unknown command 'store' - try 'help' No dtbo patitions found load dtb from 0x1000000 ...... ERROR: Did not find a cmdline Flattened Device Tree load dtb from 0x0 ...... ERROR: Did not find a cmdline Flattened Device Tree Could not find a valid device tree SCRIPT FAILED: continuing... ** Bad device usb 1 ** ** Bad device usb 2 ** ** Bad device usb 3 ** card out ** Bad device mmc 1 ** Failed to mount ext2 filesystem... ** Unrecognized filesystem type ** odroidn2#
 -

The latest version Bookworm cannot start up when use udisk
billhu199 replied to stonetv's topic in Amlogic CPU Boxes
Same issue. Mine is also a similar g12a device. I tested from 23.8.1 - 23.11.1 and all have problems. But works fine on my gxl device. G12A:BL:0253b8:61aa2d;FEAT:E0F83180:2000;POC:F;RCY:0;EMMC:0;READ:0;0.0; bl2_stage_init 0x01 bl2_stage_init 0x81 hw id: 0x0000 - pwm id 0x01 bl2_stage_init 0xc1 bl2_stage_init 0x02 L0:00000000 L1:00000703 L2:00008267 L3:04000000 S1:00000000 B2:00002000 B1:e0f83180 TE: 96329 BL2 Built : 14:02:05, Nov 23 2020. g12a g966c864 - gongwei.chen@droid11-sz Board ID = 1 Set cpu clk to 24M Set clk81 to 24M CPU clk: 1200 MHz Set clk81 to 166.6M eMMC boot @ 0 sw8 s board id: 1 Load FIP HDR DDR from eMMC, src: 0x00010200, des: 0xfffd0000, size: 0x00004000, part: 0 fw parse done PIEI prepare done 00000000 emmc switch 1 ok ddr saved addr:00016000 Load ddr parameter from eMMC, src: 0x02c00000, des: 0xfffd0000, size: 0x00001000, part: 0 00000000 emmc switch 0 ok fastboot data verify result: 255 Cfg max: 12, cur: 1. Board id: 255. Force loop cfg LPDDR4 probe LPDDR4_PHY_V_0_1_22-Built : 15:59:30, May 25 2020. g12a gb6bfa83 - gongwei.chen@droid11-sz ddr clk to 1176MHz dmc_version 0000 Check phy result INFO : End of CA training INFO : End of initialization INFO : Training has run successfully! Check phy result INFO : End of initialization INFO : End of read enable training INFO : End of fine write leveling INFO : End of read dq deskew training INFO : End of MPR read delay center optimization INFO : End of Write leveling coarse delay INFO : End of read delay center optimization INFO : Training has run successfully! Check phy result INFO : End of initialization INFO : End of MPR read delay center optimization INFO : End of write delay center optimization INFO : End of read delay center optimization INFO : End of max read latency training INFO : Training has run successfully! 1D training succeed Check phy result INFO : End of initialization INFO : End of 2D read delay Voltage center optimization INFO : End of 2D read delay Voltage center optimization INFO : End of 2D write delay Voltage center optimization INFO : End of 2D write delay Voltage center optimization INFO : Training has run successfully! soc_vref_reg_value 0x 00000024 00000024 00000026 00000025 00000024 00000027 00000026 00000025 00000024 00000025 00000025 00000024 00000026 00000025 00000025 00000026 00000025 00000027 00000027 00000024 00000026 dram_vref_reg_value 0x 00000060 2D training succeed auto size-- 65535DDR cs0 size: 1024MB DDR cs1 size: 1024MB DMC_DDR_CTRL: 00e0001bDDR size: 2048MB cs0 DataBus test pass cs1 DataBus test pass cs0 AddrBus test pass cs1 AddrBus test pass non-sec scramble use zero key ddr scramble enabled 100bdlr_step_size ps== 447 result report boot times 1Enable ddr reg access 00000000 emmc switch 3 ok Authentication key not yet programmed get rpmb counter error 0x00000007 00000000 emmc switch 0 ok Load FIP HDR from eMMC, src: 0x00010200, des: 0x01700000, size: 0x00004000, part: 0 Load BL3X from eMMC, src: 0x00078200, des: 0x01768000, size: 0x000dac00, part: 0 BL33 CHK: 0x000000ff ADDR 017a7170 Load FIP HDR from eMMC, src: 0x00010200, des: 0x01700000, size: 0x00004000, part: 1 00000000 emmc switch 1 ok Load BL3X from eMMC, src: 0x00078200, des: 0x01768000, size: 0x000dac00, part: 1 0.0;M3 CHK:0;cm4_sp_mode 0 [Image: g12a_v1.1.3394-7d43064d5 2020-05-07 15:37:06 gongwei.chen@droid11-sz] OPS=0x70 ring efuse init 28 0c 70 00 01 15 11 00 00 09 35 38 39 41 48 50 [1.072094 Inits done] secure task start! high task start! low task start! boot bl31 NOTICE: BL31: v1.3(release):079690f10 NOTICE: BL31: Built : 16:11:33, Nov 8 2021 NOTICE: BL31: G12A normal boot! NOTICE: BL31: BL33 decompress pass ERROR: Error initializing runtime service opteed_fast U-Boot 2015.01 (Dec 30 2021 - 18:08:05) DRAM: 2 GiB Relocation Offset is: 76e3b000 mmu cfg end: 0x80000000 mmu cfg end: 0x80000000 spi_post_bind(spifc): req_seq = 0 register usb cfg[0][1] = 0000000077f387e8 NAND: get_sys_clk_rate_mtd() 292, clock setting 200! bus cycle0: 6,timing: 7 NAND device id: 0 ff ff ff ff ff No NAND device found!!! nand init failed: -6 get_sys_clk_rate_mtd() 292, clock setting 200! bus cycle0: 6,timing: 7 NAND device id: 0 ff ff ff ff ff No NAND device found!!! nand init failed: -6 MMC: aml_priv->desc_buf = 0x0000000073e2bd90 aml_priv->desc_buf = 0x0000000073e2e0d0 SDIO Port B: 0, SDIO Port 😄 1 co-phase 0x2, tx-dly 0, clock 400000 co-phase 0x2, tx-dly 0, clock 400000 co-phase 0x2, tx-dly 0, clock 400000 emmc/sd response timeout, cmd8, cmd->cmdarg=0x1aa, status=0x1ff2800 emmc/sd response timeout, cmd55, cmd->cmdarg=0x0, status=0x1ff2800 co-phase 0x2, tx-dly 0, clock 400000 co-phase 0x2, tx-dly 0, clock 40000000 [set_emmc_calc_fixed_adj][875]find fixed adj_delay=20 init_part() 297: PART_TYPE_AML [mmc_init] mmc init success Amlogic multi-dtb tool GZIP format, decompress... Multi dtb detected Multi dtb tool version: v2 . Support 3 dtbs. aml_dt soc: g12a platform: u212 variant: 2g dtb 0 soc: g12a plat: u212 vari: 1g dtb 1 soc: g12a plat: u212 vari: 2g dtb 2 soc: sm1 plat: ac213 vari: 2g Find match dtb: 1 start dts,buffer=0000000073e30920,dt_addr=0000000073e30920 get_partition_from_dts() 92: ret 0 Amlogic multi-dtb tool Single dtb detected parts: 18 00: logo 0000000000800000 1 01: recovery 0000000001800000 1 02: misc 0000000000800000 1 03: dtbo 0000000000800000 1 04: cri_data 0000000000800000 2 05: param 0000000001000000 2 06: boot 0000000001000000 1 set has_boot_slot = 0 07: rsv 0000000001000000 1 08: metadata 0000000001000000 1 09: vbmeta 0000000000200000 1 10: tee 0000000002000000 1 11: vendor 0000000014000000 1 12: odm 0000000008000000 1 13: system 0000000050000000 1 14: product 0000000008000000 1 15: cache 0000000040000000 2 16: backup 0000000040000000 2 17: data ffffffffffffffff 4 init_part() 297: PART_TYPE_AML eMMC/TSD partition table have been checked OK! crc32_s:0x1577dad == storage crc_pattern:0x1577dad!!! crc32_s:0xee152b83 == storage crc_pattern:0xee152b83!!! crc32_s:0x79f50f07 == storage crc_pattern:0x79f50f07!!! mmc env offset: 0x47400000 In: serial Out: serial Err: serial board_late_init: boardid = 0x1 reboot_mode=normal [store]To run cmd[emmc dtb_read 0x1000000 0x40000] _verify_dtb_checksum()-3476: calc eef30c2, store eef30c2 _verify_dtb_checksum()-3476: calc eef30c2, store eef30c2 dtb_read()-3691: total valid 2 update_old_dtb()-3672: do nothing Amlogic multi-dtb tool GZIP format, decompress... Multi dtb detected Multi dtb tool version: v2 . Support 3 dtbs. aml_dt soc: g12a platform: u212 variant: 2g dtb 0 soc: g12a plat: u212 vari: 1g dtb 1 soc: g12a plat: u212 vari: 2g dtb 2 soc: sm1 plat: ac213 vari: 2g Find match dtb: 1 amlkey_init() enter! [EFUSE_MSG]keynum is 4 vpu: driver version: v20190313 vpu: detect chip type: 8 vpu: clk_level default: 7(666667000Hz), max: 7(666667000Hz) vpu: clk_level in dts: 7 vpu: vpu_power_on vpu: set_vpu_clk vpu: set clk: 666667000Hz, readback: 666666667Hz(0x100) vpu: set_vpu_clk finish vpu: vpu_module_init_config vpp: vpp_init vpp: vpp osd2 matrix rgb2yuv.............. hdr_func 4, hdr_process_select 0x1 cvbs: cpuid:0x28 vdac_gsw_init: 0x0 cvbs: find clk_path: 0x0 cvbs: find performance_pal config cvbs: find performance_ntsc config hpd_state=0 do_hpd_detect: hdmimode=1080p60hz do_hpd_detect: colorattribute=rgb,8bit Saving Environment to aml-storage... mmc env offset: 0x47400000 Writing to MMC(1)... done aml_config_dtb 633 aml_config_dtb 663 co_phase = <0x00000003> caps2 = "??"_CAP2_HS200" status = "disabled" status = "okay" Net: dwmac.ff3f0000amlkey_init() enter! amlkey_init() 71: already init! [EFUSE_MSG]keynum is 4 wipe_data=successful wipe_cache=successful upgrade_step=2 reboot_mode:::: normal ext4logoLoadCmd=ext4load mmc 1:${logoPart} ${logoLoadAddr} ${ext4LogoPath} 6220854 bytes read in 180 ms (33 MiB/s) [imgread]load bmp from ext4 part okay bmp pixel: 24 [OSD]load fb addr from dts:/meson-fb [OSD]set initrd_high: 0x7f800000 [OSD]fb_addr for logo: 0x7f800000 [OSD]load fb addr from dts:/meson-fb [OSD]fb_addr for logo: 0x7f800000 [OSD]VPP_OFIFO_SIZE:0xfff01fff [CANVAS]canvas init [CANVAS]addr=0x7f800000 width=5760, height=2160 [OSD]osd_hw.free_dst_data: 0,719,0,575 [OSD]osd1_update_disp_freescale_enable vpp: vpp_matrix_update: 2 cvbs_performance_enhancement cvbs_config_hdmipll_g12a cvbs_set_vid2_clk vdac_enable: 1, module_sel:0x8 hdr_packet vpp: hdr_policy = 1 vpp: Rx hdr_info.hdr_sup_eotf_smpte_st_2084 = 0 amlkey_init() enter! amlkey_init() 71: already init! [EFUSE_MSG]keynum is 4 [KM]Error:f[key_manage_query_size]L515:key[oemkey] not programed yet Command: bcb uboot-command Start read misc partition datas! BCB hasn't any datas,exit! time_out = 7a120 key[0] = b8471420 key[1] = b847ff00 key[2] = 6699dd22 key[3] = 66994cb3 irkey - irkey <timeout> <key1> ...<keyN> - maximum value of N: 10 Usage: irkey - No additional help available. Hit Enter or space or Ctrl+C key to stop autoboot -- : 0 card out (Re)start USB... USB0: USB3.0 XHCI init start Register 3000140 NbrPorts 2 Starting the controller USB XHCI 1.10 scanning bus 0 for devices... 2 USB Device(s) found scanning usb for storage devices... init_part() 282: PART_TYPE_DOS 1 Storage Device(s) found reading s905_autoscript 537 bytes read in 23 ms (22.5 KiB/s) ## Executing script at 01020000 start amlogic old u-boot ## Error: "bootfromsd" not defined card out ** Bad device mmc 0 ** reading boot_android ** Unable to read file boot_android ** card out ** Bad device mmc 0 ** reading u-boot.ext 740080 bytes read in 68 ms (10.4 MiB/s) ## Starting application at 0x01000000 ... U-Boot 2015.01-dirty (Aug 14 2020 - 19:56:34) DRAM: 2 GiB Relocation Offset is: 76eec000 spi_post_bind(spifc): req_seq = 0 register usb cfg[0][1] = 0000000077f83f48 MMC: aml_priv->desc_buf = 0x0000000073edc7c0 aml_priv->desc_buf = 0x0000000073edeb00 SDIO Port 😄 0, SDIO Port B: 1 Using default environment In: serial Out: serial Err: serial vpu: error: vpu: check dts: FDT_ERR_BADMAGIC, load default parameters vpu: driver version: v20190313 vpu: detect chip type: 8 vpu: clk_level default: 7(666667000Hz), max: 7(666667000Hz) vpu: clk_level = 7 vpu: vpu_power_on vpu: set_vpu_clk vpu: set clk: 666667000Hz, readback: 666666667Hz(0x100) vpu: set_vpu_clk finish vpu: vpu_module_init_config vpp: vpp_init vpp: g12a/b osd1 matrix rgb2yuv .............. vpp: g12a/b osd2 matrix rgb2yuv.............. vpp: g12a/b osd3 matrix rgb2yuv.............. cvbs: cpuid:0x28 cvbs_config_hdmipll_g12a cvbs_set_vid2_clk co-phase 0x3, tx-dly 0, clock 400000 co-phase 0x3, tx-dly 0, clock 400000 co-phase 0x3, tx-dly 0, clock 400000 emmc/sd response timeout, cmd8, status=0x1ff2800 emmc/sd response timeout, cmd55, status=0x1ff2800 co-phase 0x3, tx-dly 0, clock 400000 co-phase 0x1, tx-dly 0, clock 40000000 aml_sd_retry_refix[983]:delay = 0x0,gadjust =0x2000 [mmc_startup] mmc refix success [mmc_init] mmc init success Failed to mount ext2 filesystem... ** Unrecognized filesystem type ** Failed to mount ext2 filesystem... ** Unrecognized filesystem type ** movi: not registered partition name, logo movi - Read/write command from/to SD/MMC for ODROID board Usage: movi <read|write> <partition|sector> <offset> <address> [<length>] - <read|write> the command to access the storage - <offset> the offset from the start of given partiton in lba - <address> the memory address to load/store from/to the storage device - [<length>] the size of the block to read/write in bytes - all parameters must be hexa-decimal only [OSD]check dts: FDT_ERR_BADMAGIC, load default fb_addr parameters [OSD]set initrd_high: 0x3d800000 [OSD]fb_addr for logo: 0x3d800000 [OSD]check dts: FDT_ERR_BADMAGIC, load default fb_addr parameters [OSD]fb_addr for logo: 0x3d800000 [OSD]VPP_OFIFO_SIZE:0xfff01fff [CANVAS]canvas init [CANVAS]addr=0x3d800000 width=5760, height=2160 cvbs: outputmode[1080p60hz] is invalid vpp: vpp_matrix_update: 2 set hdmitx VIC = 16 config HPLL = 5940000 frac_rate = 1 HPLL: 0x3b3a04f7 HPLL: 0x1b3a04f7 HPLLv1: 0xdb3a04f7 config HPLL done j = 6 vid_clk_div = 1 hdmitx phy setting done hdmitx: set enc for VIC: 16 enc_vpu_bridge_reset[1319] rx version is 1.4 or below div=10 Net: dwmac.ff3f0000MACADDR:02:00:00:11:15:01(from chipid) Hit Enter or space or Ctrl+C key to stop autoboot -- : 0 (Re)start USB... USB0: USB3.0 XHCI init start Register 3000140 NbrPorts 2 Starting the controller USB XHCI 1.10 scanning bus 0 for devices... 2 USB Device(s) found scanning usb for storage devices... 1 Storage Device(s) found Found /extlinux/extlinux.conf Retrieving file: /extlinux/extlinux.conf reading /extlinux/extlinux.conf 532 bytes read in 29 ms (17.6 KiB/s) 1: Armbian Retrieving file: /uInitrd reading /uInitrd 15122788 bytes read in 878 ms (16.4 MiB/s) Retrieving file: /Image reading /Image 27433472 bytes read in 1579 ms (16.6 MiB/s) append: root=UUID=b134c113-5cbe-4ccc-ab4a-6c24dde01dd3 rootflags=data=writeback console=ttyAML0,115200n8 console=tty0 rw no_console_suspend consoleblank=0 fsck.fix=yes fsck.repair=yes net.ifnames=0 splash plymous Retrieving file: /dtb/amlogic/meson-g12a-u200.dtb reading /dtb/amlogic/meson-g12a-u200.dtb 72240 bytes read in 43 ms (1.6 MiB/s) [rsvmem] get fdtaddr NULL! rsvmem - reserve memory Usage: rsvmem check - check reserved memory rsvmem dump - dump reserved memory rsvmem check failed ## Loading init Ramdisk from Legacy Image at 03080000 ... Image Name: uInitrd Image Type: AArch64 Linux RAMDisk Image (gzip compressed) Data Size: 15122724 Bytes = 14.4 MiB Load Address: 00000000 Entry Point: 00000000 Verifying Checksum ... OK active_slot is <NULL> Unknown command 'store' - try 'help' No dtbo patitions found load dtb from 0x1000000 ...... ERROR: Did not find a cmdline Flattened Device Tree load dtb from 0x0 ...... ERROR: Did not find a cmdline Flattened Device Tree Could not find a valid device tree SCRIPT FAILED: continuing... ** Bad device usb 1 ** ** Bad device usb 2 ** ** Bad device usb 3 ** card out ** Bad device mmc 1 ** Failed to mount ext2 filesystem... ** Unrecognized filesystem type ** odroidn2# -
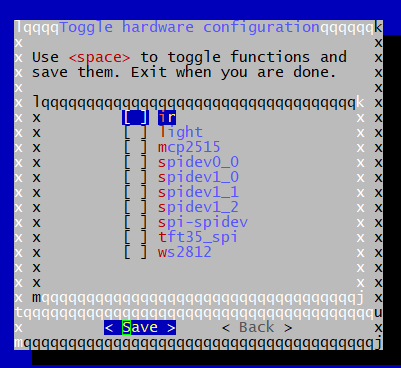
The situation with the overlays is more confusing than I originally anticipated. I assumed that the zero2 overlays would have been in good working order. I should know better than to assume anything! Would someone with an orangepizero2 please test the overlay function to see what works and does not. Use armbian-config -> System -> Hardware and turn on all options. Reboot and check the console boot log to see which overlays load or fail. It looks like the bigtreetech-cb1board created the overlay for sun50i-h616 (/kernel/archive/sunxi-6.7/patches.armbian/arm64-dts-overlay-sun50i-h616-bigtreetech-cb1.patch). However not all SBCs that use the h616 SOC implement the same features. The current sun50i-h616 overlays have implementations for ws8212, tft3, mcp and light, none of which exist on orangepizero2/3. The spi overlays might work as well as the ir. There is no overlay to enable i2c3 or add host function to usbotg. New SBCs that use the h618 SOC will probably implement different features than the zero2/3. The zero2 (h616) and the zero3 (h618) implement the same i/o features. My current thoughts are to implement a new set of overlays for the orangepizero2/3, which have identical i/o. Then both boards then need to be pointed to the new overlays with an overlay_prefix in the board config. I would start with the overlays from the Zunlong distribution for orangepizero3. I would appreciate feedback before I go charging off in the wrong direction (again).
-
Yes, u-boot-s905x-s912 is correct for an s905w based board. Your original post said u-boot-s905x2-s912 which doesn't exist
-
This does not change the current boot order and requires additional hardware. Hardware used in my testing: BananaPi BPI-CM4IO Baseboard with BPI-CM4 Module Mini PCI-E PCI Express to SATA 3.0 Dual Ports Adapter Converter Hard Drive Extension Card https://a.co/d/0G679qW Kingston 120GB A400 SATA 3 2.5" Internal SSD https://a.co/d/fB2qf3r External power supply for Hard Drive 2.5" 3.5" https://www.ebay.com/itm/114620135743 bananapi: ~ $ lspci 00:00.0 PCI bridge: Synopsys, Inc. DWC_usb3 / PCIe bridge (rev 01) 01:00.0 SATA controller: ASMedia Technology Inc. ASM1062 Serial ATA Controller (rev 02) bananapi: ~ $ sudo blkid /dev/mmcblk1p1: LABEL="EMMC" UUID="67ea5c62-c9cb-498e-91ff-3e60d71bd1ab" BLOCK_SIZE="512" TYPE="xfs" PARTUUID="0a8751c2-01" /dev/sda2: LABEL="ROOTFS" UUID="39d23eae-ba3a-4b28-acba-8f45ff8eed1c" BLOCK_SIZE="512" TYPE="xfs" PARTUUID="e6053ca6-02" /dev/sda1: LABEL="BOOT" UUID="d540a625-98a8-4c73-a5a3-7a905d5bbb98" BLOCK_SIZE="4096" TYPE="ext4" PARTUUID="e6053ca6-01" /dev/zram0: UUID="ee6d34f4-fda2-4207-8dc9-b8a4b83cd759" TYPE="swap" bananapi: ~ $ lsblk NAME MAJ:MIN RM SIZE RO TYPE MOUNTPOINTS sda 8:0 0 111.8G 0 disk ├─sda1 8:1 0 508M 0 part /boot └─sda2 8:2 0 111.3G 0 part / mmcblk1 179:0 0 14.6G 0 disk └─mmcblk1p1 179:1 0 14.6G 0 part mmcblk1boot0 179:32 0 4M 1 disk mmcblk1boot1 179:64 0 4M 1 disk zram0 253:0 0 1G 0 disk [SWAP] Checklist: [ ] My code follows the style guidelines of this project [ ] I have performed a self-review of my own code [ ] I have commented my code, particularly in hard-to-understand areas [ ] I have made corresponding changes to the documentation [X] My changes generate no new warnings [ ] Any dependent changes have been merged and published in downstream modules View the full article
-
I'm assuming this is as typo, since that file doesn't exist.
-
armbianmonitor can not upload for whatever reason so here is the output from armbianmonitor -U armbianmonitor.log bruno@orangepione:~$ less /boot/armbianEnv.txt verbosity=1 bootlogo=false console=both disp_mode=1920x1080p60 overlay_prefix=sun8i-h3 rootdev=UUID=2f506a90-a24d-4930-a5bb-8d61ce45629a rootfstype=ext4 overlays=usbhost0 usbhost1 usbhost2 usbhost3 usbstoragequirks=0x2537:0x1066:u,0x2537:0x1068:u
-
I think the overlay files for zero2 and zero3 can be the same as the hardware layout is identical. Zero2w is different. I have put together and tested 3 overlay files, - enable i2c3 - enable spi1 and create spidev - change usbotg to host I could use the i2c3 and spi1 overlays to fix the PH5 duplication if it will not be done in sun50i-h616.dtsi. Usb2 and 3 are already enabled and work without further changes. I am still looking into uart5 to determine what is required. Ir is another item to look at. Then there is sound which has output on the header. But since sound is not yet working that will have to wait. All these overlays currently exist in the Zunlong image. After @Gunjan Gupta showed me how to build an overlay I am now able to reverse engineer the Zunlong dtbos and create dts/dtbo for Armbian.
-
I *think* some pins / IOs etc are disabled in dts, in part as these days pins has multiple (alternate) functions (e.g. gpio / i2c / uart / spi / usb etc). I'm not too sure if say the same pin is enabled for gpio and i2c that if they'd conflict with each other as in that in practice it would only be one of the function i2c or gpio that is valid. the device tree compiler dtc has become pretty common and used these days it shouldn't be too difficult for anyone to edit the dts file (e.g. change that status from 'disabled' to 'okay' and re-compile that into its dtb file, then reboot. some non-armbian examples are like: https://mjoldfield.com/atelier/2017/03/rpi-devicetree.html ^ in fact even without the dts file, it is possible to take the dtb file and convert that to a dts file, make the edits and recompile that back to the edited dtb file. other examples: https://www.udoo.org/forum/threads/manually-editing-device-tree-dts-files.21600/ https://www.emcraft.com/som/vf6/controlling-gpio-from-linux dtsi are includes, so that those common things get included as common templates, and the differences changes are updated in the final dts file for the board. I think boot loaders like uboot may be possible to choose different dts/dtb file etc on the boot prompt command line, but I'm not sure how nor have i tried that. more interesting reading about device tree, https://elinux.org/images/a/a3/Elce2013-petazzoni-devicetree-for-dummies.pdf it is invented originally for the beagle bone black, in fact it exist earlier, subsequent to that these days device tree has become a linux standard practice especially for single board computers. Computers used to have standard features e.g. drives, keyboard, mouse, usb and that practically they are 'all the same'. then came single board computers 'revolution' and there are 'capes' and FPGAs (hardware is software ! change the program and hardware changes !), and that GPIO pins are pin-muxed, so today hardware is *configurable*. e.g. if you place a led on a board, it can be physically wired to any of the gpio pins, and you can further wire it as LOW = ON (sink), or HIGH = ON (source). but that as an 'alternate' function e.g. a led, you may even configure PWM and blink patterns and/or events for the leds. that that is still a gpio pin, but that the function changes by simple virtue of the context. it is a led. https://elinux.org/images/1/19/Dynamic-dt-keynote-v3.pdf https://cdn-learn.adafruit.com/downloads/pdf/introduction-to-the-beaglebone-black-device-tree.pdf https://elinux.org/images/e/e2/Engaging_Device_Trees_0.pdf https://ofitselfso.com/BeagleNotes/AboutTheDeviceTree.pdf https://elinux.org/Device_Tree_Usage
-
The overlay_prefix in armbianEnv.txt is not defined so I added overlay_prefix=sun50i-h616. Then I get: I was hoping that i2c3 would be there, but only the following exist. Who decides what goes into the overlays? root@orangepizero3:/boot# ls -al dtb-6.7.0-rc7-edge-sunxi64/allwinner/overlay/sun50i-h616* -rwxr-xr-x 1 root root 4203 Jan 4 13:23 dtb-6.7.0-rc7-edge-sunxi64/allwinner/overlay/sun50i-h616-fixup.scr -rwxr-xr-x 1 root root 268 Jan 4 13:23 dtb-6.7.0-rc7-edge-sunxi64/allwinner/overlay/sun50i-h616-ir.dtbo -rwxr-xr-x 1 root root 512 Jan 4 13:23 dtb-6.7.0-rc7-edge-sunxi64/allwinner/overlay/sun50i-h616-light.dtbo -rwxr-xr-x 1 root root 339 Jan 4 13:23 dtb-6.7.0-rc7-edge-sunxi64/allwinner/overlay/sun50i-h616-mcp2515.dtbo -rwxr-xr-x 1 root root 661 Jan 4 13:23 dtb-6.7.0-rc7-edge-sunxi64/allwinner/overlay/sun50i-h616-spidev0_0.dtbo -rwxr-xr-x 1 root root 661 Jan 4 13:23 dtb-6.7.0-rc7-edge-sunxi64/allwinner/overlay/sun50i-h616-spidev1_0.dtbo -rwxr-xr-x 1 root root 661 Jan 4 13:23 dtb-6.7.0-rc7-edge-sunxi64/allwinner/overlay/sun50i-h616-spidev1_1.dtbo -rwxr-xr-x 1 root root 661 Jan 4 13:23 dtb-6.7.0-rc7-edge-sunxi64/allwinner/overlay/sun50i-h616-spidev1_2.dtbo -rwxr-xr-x 1 root root 808 Jan 4 13:23 dtb-6.7.0-rc7-edge-sunxi64/allwinner/overlay/sun50i-h616-spi-spidev.dtbo -rwxr-xr-x 1 root root 616 Jan 4 13:23 dtb-6.7.0-rc7-edge-sunxi64/allwinner/overlay/sun50i-h616-tft35_spi.dtbo -rwxr-xr-x 1 root root 272 Jan 4 13:23 dtb-6.7.0-rc7-edge-sunxi64/allwinner/overlay/sun50i-h616-ws2812.dtbo
-
 Hello, After successfully installed and booted Armbian 23.02.2 Jammy from SD card on Odroid M1, I ran armbian-install script with using option "boot from SD, system on SSD" to move system to SSD. The process finished successfully, see the logs from armbianmonitor (taken before reboot): https://paste.armbian.com/folivedane After reboot, system failed to boot automatically from SSD due to error: [ 13.766854] 8644d43f-c78d-4586-ab61-14dfa2e740ea: Can't open blockdev [ 13.774855] systemd[1]: Starting Rule-based Manager for Device Events and Files... [ 13.781860] systemd[1]: media-mmcboot.mount: Mount process exited, code=exited, status=32/n/a [ 13.781889] systemd[1]: media-mmcboot.mount: Failed with result 'exit-code'. [ 13.783141] systemd[1]: Failed to mount /media/mmcboot. [ 13.785392] systemd[1]: Dependency failed for /boot. It asked for root password to go to maintenance mode. I found, boot failed because of wrong entry in /etc/fstab: root@odroidm1:~# cat /etc/fstab # <file system> <mount point> <type> <options> <dump> <pass> tmpfs /tmp tmpfs defaults,nosuid 0 0 8644d43f-c78d-4586-ab61-14dfa2e740ea /media/mmcboot ext4 defaults,noatime,commit=600,errors=remount-ro,x-gvfs-hide 0 1 /media/mmcboot/boot /boot none bind 0 0 UUID=832c2ac5-7666-4725-a85f-c8a015d9995a / ext4 defaults,noatime,commit=600,errors=remount-ro,x-gvfs-hide 0 1 as you can see there is missing "UUID=" before uuid string for /media/mmcboot entry. After I fixed this problem by mounting /media/mmcboot and /boot (bind mount) manually and exited from maintenance mode it booted OK. I collected another armbianmonitor logs after boot, see: https://paste.armbian.com/qohidenowu When the broken line is fixed in the /etc/fstab: UUID=8644d43f-c78d-4586-ab61-14dfa2e740ea /media/mmcboot ext4 defaults,noatime,commit=600,errors=remount-ro,x-gvfs-hide 0 1 system is booting normally. The same issue is present also when I used image Armbian 23.02.2 Bullseye Could you fix this bug, please? I think problem in nand-sata-install script (line 371). Thanks in advance!