
All Activity
- Past hour
-
 Well I tried everything to make it work, including switching from PoE to a proven USB power supply, nothing worked. The only thing that worked is flashing back the latest Radxa bullseye image with 5.10.110 kernel, and upgrading to bookworm. I have a lot of errors at boot, so I might consider updating the kernel at some point, but I have absolutely no idea how to do that without flashing a new image. Considering 5.10.110 is the last kernel available from Radxa, I think I'm stuck... I suppressed the radxa apt in the sources.list as there is no bookworm apt, only bullseye. Could I still use the bullseye radxa apt with a bookworm debian? [ 59.024477] ramoops ramoops: failed to locate DT /reserved-memory resource [ 59.084556] fiq_debugger fiq_debugger.0: IRQ fiq not found [ 59.084581] fiq_debugger fiq_debugger.0: IRQ wakeup not found [ 59.084597] fiq_debugger_probe: could not install nmi irq handler [ 60.711536] rockchip-usb2phy ff770000.syscon:usb2-phy@e450: IRQ index 0 not found [ 60.714528] rockchip-usb2phy ff770000.syscon:usb2-phy@e460: IRQ index 0 not found [ 60.723981] rkvdec_init:1230: failed on clk_get clk_hevc_cabac [ 60.724074] mpp_rkvdec ff660000.rkvdec: shared_video_hevc_cabac is not found! [ 60.724090] rkvdec_init:1261: No hevc cabac reset resource define [ 60.746975] rockchip-vop ff8f0000.vop: missing rockchip,grf property [ 60.747264] rockchip-vop ff900000.vop: missing rockchip,grf property [ 60.750685] no ATF memory for init [ 60.763340] no ATF memory for init [ 60.767736] rk_gmac-dwmac fe300000.ethernet: cannot get clock clk_mac_speed [ 61.067311] vcc_cam: failed to get the current voltage: -EPROBE_DEFER [ 61.067671] vcc_mipi: failed to get the current voltage: -EPROBE_DEFER [ 61.090893] vcc_sdio: unsupportable voltage range: 3300000-3000000uV [ 61.094146] rockchip-dmc dmc: Failed to get ddr_leakage [ 61.094884] rockchip-dmc dmc: could not find power_model node [ 61.099683] rksfc_base v1.1 2016-01-08 [ 61.695258] rockchip-pcie f8000000.pcie: PCIe link training gen1 timeout! [ 61.695324] rockchip-pcie f8000000.pcie: deferred probe failed [ 69.217783] rk-multicodecs es8316-sound: ASoC: Property 'rockchip,audio-routing' does not exist or its length is not even [ 69.309154] rk-multicodecs es8316-sound: ASoC: Property 'rockchip,audio-routing' does not exist or its length is not even [ 69.456788] debugfs: File 'Left Hp mixer' in directory 'dapm' already present! [ 69.456983] debugfs: File 'Right Hp mixer' in directory 'dapm' already present! [ 69.457046] debugfs: File 'HPCP L' in directory 'dapm' already present! [ 69.457078] debugfs: File 'HPCP R' in directory 'dapm' already present! [ 69.457127] debugfs: File 'HPVOL L' in directory 'dapm' already present! [ 69.457157] debugfs: File 'HPVOL R' in directory 'dapm' already present! [ 70.938277] udc fe800000.usb: failed to start radxa-otgutils: -19 [ 81.008640] ieee80211 phy0: brcmf_escan_timeout: timer expired [ 89.540144] hdmi-audio-codec hdmi-audio-codec.5.auto: hdmi_codec_startup doesn't support capture [ 89.540187] hdmi-audio-codec hdmi-audio-codec.5.auto: ASoC: error at snd_soc_dai_startup on i2s-hifi: -22 [ 89.540706] hdmi-audio-codec hdmi-audio-codec.5.auto: hdmi_codec_startup doesn't support capture [ 89.540728] hdmi-audio-codec hdmi-audio-codec.5.auto: ASoC: error at snd_soc_dai_startup on i2s-hifi: -22 [ 89.541174] hdmi-audio-codec hdmi-audio-codec.5.auto: hdmi_codec_startup doesn't support capture [ 89.541195] hdmi-audio-codec hdmi-audio-codec.5.auto: ASoC: error at snd_soc_dai_startup on i2s-hifi: -22 [ 6419.589939] hdmi-audio-codec hdmi-audio-codec.5.auto: hdmi_codec_startup doesn't support capture [ 6419.589981] hdmi-audio-codec hdmi-audio-codec.5.auto: ASoC: error at snd_soc_dai_startup on i2s-hifi: -22 [ 6419.590499] hdmi-audio-codec hdmi-audio-codec.5.auto: hdmi_codec_startup doesn't support capture [ 6419.590521] hdmi-audio-codec hdmi-audio-codec.5.auto: ASoC: error at snd_soc_dai_startup on i2s-hifi: -22 [ 6419.590978] hdmi-audio-codec hdmi-audio-codec.5.auto: hdmi_codec_startup doesn't support capture [ 6419.591003] hdmi-audio-codec hdmi-audio-codec.5.auto: ASoC: error at snd_soc_dai_startup on i2s-hifi: -22
 -

Help wanted to test a new OpenVFD alternative
Jean-Francois Lessard replied to Jean-Francois Lessard's topic in Amlogic meson
@dale looking at the openvfd_x98h.dtso file you shared, openvfd uses these pins: openvfd_gpio_clk = <&pio 2 7 0>; openvfd_gpio_dat = <&pio 2 2 0>; openvfd_gpio_stb = <&pio 2 12 0>; So you should try with their equivalent: mosi-gpios = <&pio 2 2 GPIO_ACTIVE_HIGH>; /* mosi is the same as openvfd_gpio_dat */ sck-gpios = <&pio 2 7 GPIO_ACTIVE_HIGH>; /* sck is the same as openvfd_gpio_clk */ cs-gpios = <&pio 2 12 GPIO_ACTIVE_LOW>; /* cs is the same as openvfd_gpio_stb */ -

Help wanted to test a new OpenVFD alternative
dale replied to Jean-Francois Lessard's topic in Amlogic meson
Hi, thanks for checking. I check dmesg -T | grep spi_gpio and see the error spi_gpio spi: probe with driver spi_gpio failed with error -22. Also the /sys/class/leds is empty. Do you think the gpio pins are not correct? Below are current gpio pins I try this time mosi-gpios = <&pio 2 11 GPIO_ACTIVE_HIGH>; /* PC11 = data */ sck-gpios = <&pio 2 12 GPIO_ACTIVE_HIGH>; /* PC12 = clock */ cs-gpios = <&pio 7 5 GPIO_ACTIVE_LOW>; /* PH5 = strobe/latch */ - Today
-

H3 cedrus video acceleration, device tree problem?
robertoj replied to schunckt's topic in Allwinner sunxi
That will definitely make you not get hardware accelerated video Make sure to follow the 3 commands to install the custom repo, its certificate and higher priority: sudo wget http://apt.undo.it:7242/apt.undo.it.asc -O /etc/apt/trusted.gpg.d/apt.undo.it.asc . /etc/os-release && echo "deb http://apt.undo.it:7242 $VERSION_CODENAME main" | sudo tee /etc/apt/sources.list.d/apt.undo.it.list $ echo -e "Package: *\nPin: release o=apt.undo.it\nPin-Priority: 600" | sudo tee /etc/apt/preferences.d/apt-undo-it sudo apt update Then check that the new custom dpkgs are available for install/upgrade apt list ffmpeg-whatever Here's how I force install a specific version: sudo apt install packagename=nn.nn.n -
Thanks, all's clear I might be such random person lol. However it would need either a lot of time or information delivered when it has been broken; open code is nice but there are too many kernel versions and distributions. That matter would need some deeper conversation. I think you was the person managing this area so maybe you know where to search the issue to correct it or you know the person who might know. I'm affraid I found the reason of long image generation time: my laptop fans are to silent today and it might be the reason...
-
 Thinking about a better automated option to revert (e.g. just power off like @The Tall Man suggested) while still not touching uboot or even lower level layers the initrd might be an option based on the current setup. I assume we have very little probability for kernel+initrd load problems. Most issues will probably occur after the rootfs was mounted and handover. Integrating additional scripts inside the initrd could be used to auto revert the symlink in case of failure. Before we are going to reboot we place a status file inside the boot partitions boot directory that we just updated. For this first reboot we call this testboot1. When the new system boots up initrd script checks for this file and renames it to testboot2. If the system boots up correctly or can be accessed remotely /boot/testboot2 is deleted. But if the initrd script sees a testboot2 file during its boot process it knows something went wrong. It then changes the /boot symlink to the other boot folder deletes testboot2 and reboots instead of handing over to the rootfs. If the new system got stuck after it handed over to the rootfs the initrd script should have renamed the file to testboot2 already and a hard restart should revert. This hard reset could probably also be fully automated if the SBC has a hardware watchdog. If the watchdog module is integrated in the initrd it could set it to a reasonable value. The watchdog is then only disabled or changed to normal operation once the system is reliable working or if disabled via remote access. This concept would build on top of what exist. Any community member could choose to test the idea and implement management scripts. I guess everything can be done in bash/sh. It could also lead to a new armbian package: simpleAB which is not perfect but might be enough for many. It would not need many uboot or architectural changes. I guess it also works for all armbian supported devices? But as @Igor already said. One needs to invest.
 -

H3 cedrus video acceleration, device tree problem?
laibsch replied to schunckt's topic in Allwinner sunxi
"apt policy ffmpeg" FTW ;-) apt also has a command-line option to force the installation of a particular package version. To automate this, you can put a file under /etc/apt/preferences.d/ -
This is not recommended as its not controlled environment. It might work, but no warranties. HDMI output is broken in general (on this particular SoC) regardless of variant, desktop, cli, minimal. Its known bug, but we currently don't have anyone maintaining Allwinner A20 series so its up to random person to fix this. Code is open, so anyone can. Then it should be o.k. since HDMI output is not needed.
-
Thank you for your work, @dg4gg8cb9s
-

Efforts to develop firmware for H96 MAX M9 RK3576 TV Box 8G/128G
Hqnicolas replied to Hqnicolas's topic in Rockchip CPU Boxes
This is an H96Max Factory default work around, no TV box device really turn off, it's the way the factory deal with the "remote control" power on function, the device is always waiting for a IR remote control to trigger. You can find a way around it on the pmic section from DTS. Thats a problem caused by BOM of materials in the factory, they start to use a new wifi card because of chip shortages. You can work around it using this method -

H3 cedrus video acceleration, device tree problem?
Ryzer replied to schunckt's topic in Allwinner sunxi
This is built on an old kernel 5.10 and would probably need a fair bit of work to get up to date. Last repo I came across with support for the old cedar driver was kernel 6.1 but I have not found anything more recent than this. Have you not created the configuration file as mentioned: It still looks to me like the packaged version of ffmpeg is being installed rather than from the custom repo. Notice that there is no option listed for v4l2-request. I had problems connecting and had to temporarily switch from my wifi to mobile in order to install the packages. -
-
My setting was without docker and I was not using it. I was observing shell output, and because I selected version without desktop (on which HDMI could affect) while there were some desktop components additions during script processing. Small remark: I use sbc as server with good quality server 1TB 2,5"drive.
-
YY3568 - Can't erase eMMC to boot from SD card
Hqnicolas replied to fss-hacks's topic in Rockchip CPU Boxes
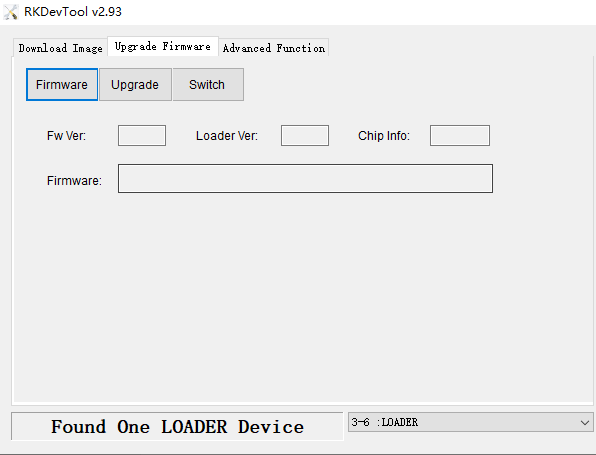
You will need to flash an android "Update image" first, into EMMC, to go back to factory defaults. https://wiki.youyeetoo.com/en/YY3568/unpack https://drive.google.com/drive/folders/11BrqafnkEyFaM-D0gaPFhrmnRM47JAEU MaskRom mode upgrade firmware First of all, make sure that you have entered the MaskRom upgrade mode, and then perform the following firmware upgrade operations. Upgrade firmware in loader mode Open the AndroidTool tool, the board enters the upgrade mode, and a LOADER device will be found on the AndroidTool. Then perform the following upgrade firmware operation.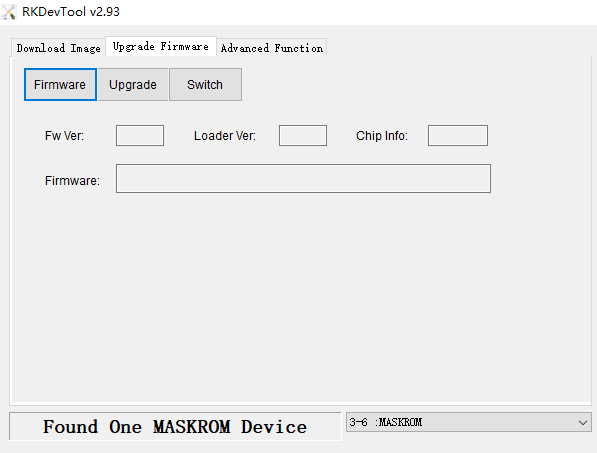
-
Works well on my side - could not reproduce (with Docker based compilation), but however there is a (common to a20 boards) problem with HDMI output while boards otherwise works.
-
Efforts to develop firmware for H96 MAX V56 RK3566 8G/64G
Hqnicolas replied to Hqnicolas's topic in Rockchip CPU Boxes
From @fevangelou 1. Install the "rkdeveloptool" tool first, as instructed in: https://docs.radxa.com/en/zero/zero3/low-level-dev/rkdeveloptool?host-os=debian sudo apt-get update sudo apt-get install -y libudev-dev libusb-1.0-0-dev dh-autoreconf pkg-config libusb-1.0 build-essential git wget git clone https://github.com/rockchip-linux/rkdeveloptool cd rkdeveloptool autoreconf -i ./configure make -j $(nproc) sudo cp rkdeveloptool /usr/local/sbin/ At the time of writing, this installed version 1.32. If you installed "rkdeveloptool" from Ubuntu's repos, it would install version 1.0 which may work, but let's be on the safe side here... 2. Connect and boot the device to loader/maskrom mode 2.1 While pressing the reset button (back/right) with a pin, connect the USB 2.0 port (back/left) and the power cable. Gotta be careful here not to miss the reset button pressing while connecting the cables. 2.2 Use the rkdeveloptool tool to identify the device and the mode it is on ("loader" or "maskrom"). $ rkdeveloptool ld ...should show the connected device if point 2.1 was successful - e.g. on my 8GB RAM device it printed this: DevNo=1 Vid=0x2207,Pid=0x350a,LocationID=304 Loader Or after I had already flashed Armbian, it would show: DevNo=1 Vid=0x2207,Pid=0x350a,LocationID=304 Maskrom (If you installed "rkdeveloptool" from Ubuntu's repo, the command is "rkdeveloptool list" if I recall correctly - every other "rkdeveloptool" command following though is the same) Now grab the latest release of Armbian for this device. At the time of writing it was: https://github.com/armbian/community/releases/download/25.11.0-trunk.106/Armbian_community_25.11.0-trunk.106_H96-tvbox-3566_bookworm_current_6.12.44_minimal.img.xz (the name of the device is on the filename) Extract the included .img file with (sudo apt install xz-tools): $ unxz Armbian_community_25.11.0-trunk.106_H96-tvbox-3566_bookworm_current_6.12.44_minimal.img.xz 2.2.1 If in "loader" mode (see the last part of the command's output above), simply flash Armbian directly. E.g. $ sudo rkdeveloptool wl 0x0 Armbian_community_25.11.0-trunk.106_H96-tvbox-3566_bookworm_current_6.12.44_minimal.img (if you attempt to flash the attached bootloaders, you'll get a "device not supported" error - Armbian already contains a bootloader) 2.2.2 If in "maskrom" mode (e.g. if you are re-flashing Armbian), flash the bootloader first: # For the 8GB RAM device use the attached (in this post) H96-MAX-8gb-MiniLoaderAll.bin file $ sudo rkdeveloptool db H96-MAX-8gb-MiniLoaderAll.bin # For the 4GB RAM device use the attached (in this post) H96-MAX-4gb-MiniLoaderAll.bin file $ sudo rkdeveloptool db H96-MAX-4gb-MiniLoaderAll.bin ...and then re-flash Armbian as you did the first time: $ sudo rkdeveloptool wl 0x0 Armbian_community_25.11.0-trunk.106_H96-tvbox-3566_bookworm_current_6.12.44_minimal.img 2.3 Reboot the device with: $ sudo rkdeveloptool rd Done! If all goes well, once you reboot the device you will be asked to set a root password and optionally a sudo user. Rebooting afterwards you should now be greeted with: _ _ _ _ _ /_\ _ _ _ __ | |__(_)__ _ _ _ __ ___ _ __ _ __ _ _ _ _ (_) |_ _ _ / _ \| '_| ' \| '_ \ / _` | ' \ / _/ _ \ ' \| ' \ || | ' \| | _| || | /_/ \_\_| |_|_|_|_.__/_\__,_|_||_|_\__\___/_|_|_|_|_|_\_,_|_||_|_|\__|\_, | |___| |__/ v25.11 rolling for h96-tvbox-3566 running Armbian Linux 6.12.44-current-rockchip64 Packages: Debian stable (bookworm), possible distro upgrade (trixie) Updates: Kernel upgrade enabled and 2 packages available for upgrade Support: for advanced users (rolling release) IPv4: (LAN) 192.168.1.10 (WAN) 1.2.3.4 Performance: Load: 3% Uptime: 2 min Memory usage: 2% of 7.50G CPU temp: 40°C Usage of /: 3% of 57G Commands: Configuration : armbian-config Upgrade : armbian-upgrade Monitoring : htop Last login: Sat Aug 30 12:47:54 2025 Key points: - If you do this the first time, it's obviously a matter of just flashing the latest Armbian image directly. - You don't need to open the device or compile Armbian. -
 @djurny Sorry for the super late response. Here the answers on your questions: ls -Failh /dev/rtc* 457 lrwxrwxrwx 1 root root 4 Mar 7 01:56 /dev/rtc -> rtc0 107 crw------- 1 root root 253, 0 Mar 7 01:56 /dev/rtc0 542 crw------- 1 root root 253, 1 Mar 7 01:56 /dev/rtc1 ls -Failh /sys/class/rtc/ total 0 3926 drwxr-xr-x 2 root root 0 Jan 1 1970 ./ 10 drwxr-xr-x 63 root root 0 Jan 1 1970 ../ 8295 lrwxrwxrwx 1 root root 0 Jan 1 1970 rtc0 -> ../../devices/platform/soc/1f00000.rtc/rtc/rtc0/ 21463 lrwxrwxrwx 1 root root 0 Sep 3 23:18 rtc1 -> ../../devices/platform/soc/1c2ac00.i2c/i2c-0/0-0068/rtc/rtc1/ egrep -- . /sys/class/rtc/*/name /sys/class/rtc/rtc0/name:sun6i-rtc 1f00000.rtc /sys/class/rtc/rtc1/name:rtc-ds1307 0-0068 dmesg | egrep -i -- 'rtc' [ 1.042165] sun6i-rtc 1f00000.rtc: registered as rtc0 [ 1.042235] sun6i-rtc 1f00000.rtc: setting system clock to 1970-01-01T00:00:04 UTC (4) [ 1.774229] sun4i-drm display-engine: [drm] Cannot find any crtc or sizes [ 1.776966] sun4i-drm display-engine: [drm] Cannot find any crtc or sizes [ 19.347508] rtc-ds1307 0-0068: registered as rtc1 sudo hwclock --rtc=/dev/rtc0 # per default this is the H2+ built-in RTC 2025-09-03 23:32:07.935209+10:00 ==> date set to Australia (Tasmania) sudo hwclock --rtc=/dev/rtc1 # per default this is going to be the I2C RTC 2000-01-02 15:51:14.147878+11:00 ==> ?????????? So, I clearly don't understand the system. What do I want? Just the right time when connected to a wireless network. (If not available, my system switches to being an Access Point) If my system is acting as an Access Point, the date and time needs to be correct to, that's why I thought I need an RTC module. If not needed, how do I get the right time when my system operates as an Access Point. Thanks for helping
 -
 Hey there. Thanks for the detailed tutorial. I tried following it to install Armbian Trixie minimal on my Raspberry Pi 5's nVME (I'm on a headless setup with SSH access). The SD card that boots and runs the system so far is also an Armbian Trixie minimal installation. Apparently nobody has confirmed the instructions to work for that device / setup in this thread yet. So far I also have failed. After following through all steps my device wouldn't connect via ethernet (the LEDs didn't even blink). For simplifying things and rule out a source for possible mistakes, I then repeated the whole process without encrypting the drive, again without much success. Here's what I suspect to be the problem: The Armbian minimal image for the Raspberry family comes already with two partitions: a boot partition with a number of .dtb files for each device of the Raspberry family a "root" partition with all other files Device Boot Start End Sectors Size Id Type /dev/loop0p1 8192 532479 524288 256M b W95 FAT32 /dev/loop0p2 532480 3088383 2555904 1.2G 83 Linux I suspect it to boot in a different way than the image in the example, which seems to directily have all the files which I find in my second partition of the image. So, what I tried was to just create two partitions, mimicing the ones on the Image: Device Boot Start End Sectors Size Id Type /dev/nvme0n1p1 8192 532479 524288 256M b W95 FAT32 /dev/nvme0n1p2 532480 3907029167 3906496688 1.8T 83 Linux I would then just copy the contents of each partition respectively. But even that wouldn't boot the way it did with the SD card. Of course I could just use dd to copy the image to the 2TB nVME but that would take forever (20 h aprox.) and it wouldn't result in an encrypted system. My questions are: Is it even possible to use the way of copying boot files and contents in this tutorial to achieve a bootable nVME? If the image for the Raspi family relies on its own boot partition will I ever be able to use it for decrypting an encrypted drive before booting from it at all? Can I use it for both, booting the device and decrypting the drive, or would that be principally impossible? I'll be happy for any help for making it work or hint if the described procedure cannot work for my setup. Tonight I'll also join an install party and might have the opportunity to plug a screen to my Raspi and see if it gives hints during the boot sequence. EDIT: I think I understand now that this script is probably only for SD cards …
 -
@Nick AHow to use your code repository(https://github.com/NickAlilovic/build) to add a 1.5GB RAM patch.
-
Here it is: https://paste.armbian.com/ququgojasu
-
Hi again, It took some time but finally I was able to take a look at it myself. It seems to me that the original kernel patch from @brentr is still a working solution as the affected kernel code didn't change in the current kernel. So by applying the original patch, 10mpbs Ethernet started working again on my Rockpi S. I'm not able I created PR #8575 - Fixes regression of failing 10Mbit built-in Ethernet in Rockpi S to add the patch again. I hope, that's ok as I'm lacking experience in this field so please apologize if I missed something, I just want to help and improve 🙂 Cheers,
-

Self-build minimal image for RockPI-S too big
dg4gg8cb9s replied to dg4gg8cb9s's topic in Radxa Rock Pi S
Thank you all, I appreciate your patience! 🙏 I'm not sure on how deep I should go here. I started to learn about the process to address the problem that 10mpbs ethernet not is not working on my Rockpi S and I now know enough to deal with this problem. So my feeling is to not go further but focus on the functional problem to solve it 😉 Thanks again! -

mxq pro 4k 5g allwinner h313 can't sd card boot
Ducdanh Nguyen replied to Ducdanh Nguyen's topic in Allwinner CPU Boxes
@SteeMani also did some commands prompted by chatgpt since it said it was manufactored by allwinner also related to cortex-a53, aida64 said it too, so i doubt that mine are using a allwinner h313 chip -
mxq pro 4k 5g allwinner h313 can't sd card boot
Ducdanh Nguyen replied to Ducdanh Nguyen's topic in Allwinner CPU Boxes
@Nick Aalright, ill do it -
 Collabora is headed to Amsterdam. Meet us at Booth A63 in Hall 14 as we showcase GStreamer Analytics combined with ML, hardware-accelerated video decoding in Dante Studio using GStreamer, remote rendering for standalone XR, and more! View the full article


