Hqnicolas
-
Posts
705 -
Joined
-
Last visited
Content Type
Forums
Store
Crowdfunding
Applications
Events
Raffles
Community Map
Everything posted by Hqnicolas
-

Efforts to develop firmware for H96 MAX V56 RK3566 8G/64G
Hqnicolas replied to Hqnicolas's topic in Rockchip CPU Boxes
Pull Request was approved today on Github we can now clone from main. git clone https://github.com/armbian/build.git The H96-max Files can be fount at https://github.com/hqnicolas/ArmBoardBringUp -
Efforts to develop firmware for H96 MAX V56 RK3566 8G/64G
Hqnicolas replied to Hqnicolas's topic in Rockchip CPU Boxes
I don't have time to test wifi, if you be the wifi guy, please use this method to fix the wifi power management or communication: the process will be: compare two decompiled DTS. The old that wifi work and the new 6.6 without wifi and use it to fix the Board bring UP file RK3566-firefly-roc-pc = DTS Kernel 6.2 RK3566-h96max = DTS Kernel 6.6 rk3566-firefly-roc-pc.dtsrk3566-h96max.dts -
Efforts to develop firmware for H96 MAX V56 RK3566 8G/64G
Hqnicolas replied to Hqnicolas's topic in Rockchip CPU Boxes
at kernel 6.6 your wifi work? how? I think wifi was wrong.... thats the current DTS: You can Use it to compare with the original DTB -> DTS file and figure out any error on This DTS file that bring board UP -
Efforts to develop firmware for H96 MAX V56 RK3566 8G/64G
Hqnicolas replied to Hqnicolas's topic in Rockchip CPU Boxes
I dont know about overlays I have uploaded new bluetooth images to drive @pocosparc https://forum.armbian.com/topic/28895-efforts-to-develop-firmware-for-h96-max-v56-rk3566-8g64g/?do=findComment&comment=187569 -
Efforts to develop firmware for H96 MAX V56 RK3566 8G/64G
Hqnicolas replied to Hqnicolas's topic in Rockchip CPU Boxes
I dont wanna take this risks with drivers, you can create a Github Pull Request to armbian too. your wifi was working? dont need any fix? i think you wont need to change DTB anymore, just need the kernel 6 binary to brcm4335 -
Efforts to develop firmware for H96 MAX V56 RK3566 8G/64G
Hqnicolas replied to Hqnicolas's topic in Rockchip CPU Boxes
I'm uploading all bluetooth updated images again sudo apt-get install device-tree-compiler you can: dtc -I dtb -O dts rk3566-h96-tvbox.dtb -o rk3566-h96-tvbox.dts edit the DTS file to work with wifi and reverse it: dtc -I dts -O dtb -o rk3566-h96-tvbox.dtb rk3566-h96-tvbox.dts apply it on device i think you will need to find the brcmfmac4335-sdio.firefly,rk3566-roc-pc.bin for kernel 6.6 it was working on 6.2 -
Efforts to develop firmware for H96 MAX V56 RK3566 8G/64G
Hqnicolas replied to Hqnicolas's topic in Rockchip CPU Boxes
I'm trying to figureout what you change on DTS to edit the Github PR in that way. Just add: dma-names = "tx\0rx"; as you can see: https://github.com/hqnicolas/build/blob/9d0d690fe33a022c302ac538c4ecdd3dcacb482d/patch/kernel/archive/rockchip64-6.6/overlay/rockchip-rk3568-hk-uart1.dts#L12 Other boards have the same patch and I copy it: https://github.com/hqnicolas/build/blob/main/patch/kernel/archive/rockchip64-6.6/dt/rk3566-h96-tvbox.dts about the file, I just add it to the wifi external patch: Wifi Driver: https://drive.google.com/file/d/1B1LmAylalETcnBEWiPiJHL0MjK5xlIV4/view?usp=sharing -
Efforts to develop firmware for H96 MAX V56 RK3566 8G/64G
Hqnicolas replied to Hqnicolas's topic in Rockchip CPU Boxes
This is how @ning enable the LED and InfraRed https://github.com/zhangn1985/linux-stable/commit/eb97929f95b1af3257b74528159a5d55a6409bba Nice @pocosparc Now I know why this device has an battery controller enabled, that's a tablet project I don't want to add pré-compiled files to a linux repo, This way, Wifi fix will need to be an unnoficial patch. I think this patch can be applyed by PR on armbian I just Soldered the SDCard Slot -
Efforts to develop firmware for H96 MAX V56 RK3566 4G/32G
Hqnicolas replied to Hqnicolas's topic in Rockchip CPU Boxes
@Antonio Cahuana Don't need anymore, @ning Build the JianPian Tv-Box and I use it to Bring the board UP on Kernel 6.6 -
Rupa X88 Pro 13 - RK3528 board with images
Hqnicolas replied to fedes_gl's topic in Rockchip CPU Boxes
I'm thinking about buyng an RK3528 Shit box, but X88 pro 13 just have 10/100M Ethernet RJ45 port -
Efforts to develop firmware for H96 MAX V56 RK3566 8G/64G
Hqnicolas replied to Hqnicolas's topic in Rockchip CPU Boxes
########################### EMMC: V1.2 & V1.3 Release Version ########################### @ning Thank you for your Job! I'm bring this H96MAX Board UP based on your BoardConfig! Board Bring UP! Releases: https://github.com/armbian/community/releases PR: https://github.com/armbian/build/pull/6494 https://github.com/armbian/build/pull/7746 Repo: https://github.com/hqnicolas/build/tree/main Wifi Driver: https://drive.google.com/file/d/1B1LmAylalETcnBEWiPiJHL0MjK5xlIV4/view?usp=sharing BootLoader: H96-MAX-8gb-MiniLoaderAll.bin H96-MAX-4gb-MiniLoaderAll.bin 8gb RAM SDCard = Tested 8gb RAM Emmc = Tested Kernel Versions: edge: 6.12.6, 2024-12-21 longterm: 6.6.27, 2024-04-13 longterm: 6.1.86, 2024-04-13 How to flash: Same as V1.1 -
Efforts to develop firmware for H96 MAX V56 RK3566 8G/64G
Hqnicolas replied to Hqnicolas's topic in Rockchip CPU Boxes
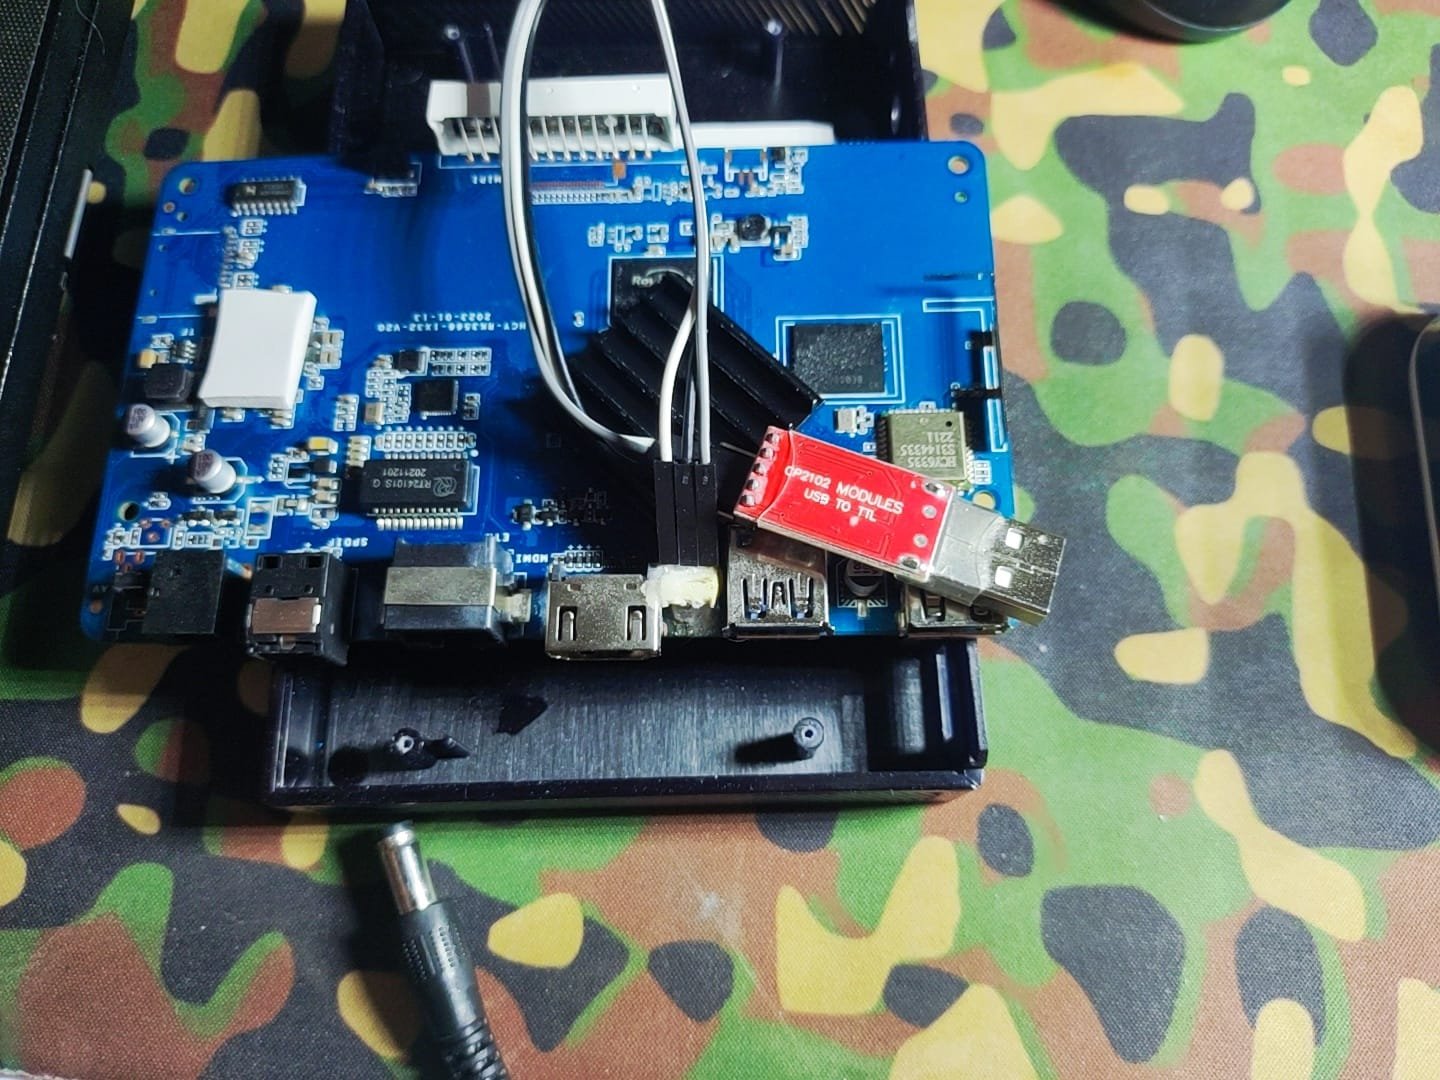
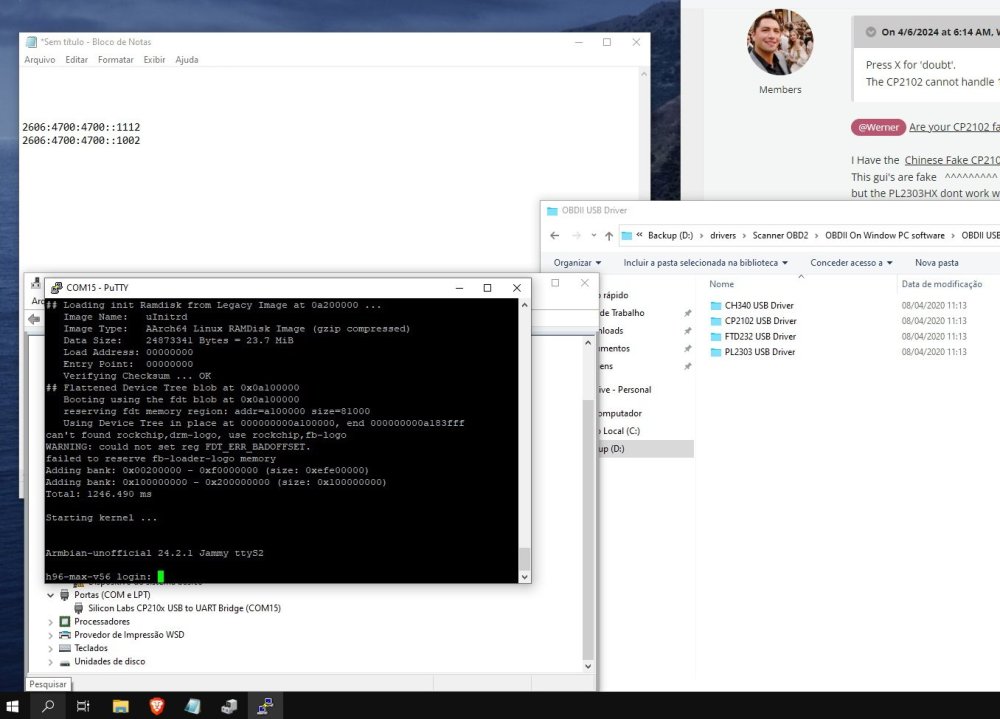
@Werner I haven't gone crazy yet, my debug was done by Chinese CP2102 This is the driver that I'm Using and for Terminal I was using https://putty.org/
-
20USD 4GRAM RK3528 host (cheap dq08 tvbox)
Hqnicolas replied to fensoft's topic in Rockchip CPU Boxes
I have done the internal EMMC armbian and I dont trust this EMMC too... -
20USD 4GRAM RK3528 host (cheap dq08 tvbox)
Hqnicolas replied to fensoft's topic in Rockchip CPU Boxes
@fensoft congratulations for your work, please stop acting like you dont live in society. Just do it in a PR. Or Compile 30x backdoor images to US. -
Efforts to develop firmware for H96 MAX V56 RK3566 8G/64G
Hqnicolas replied to Hqnicolas's topic in Rockchip CPU Boxes
I have never succeded with any video or NPU drivers on this device, this is a dark spot that you can shine. This is weird, looks like a backdoor or somebody enable all of them on kernel We need to doit.... They don´t have it, this chinese factorys just copy and past PCB, they all use the same android software because they dont know how this device works. it´s weird what I have seen this factorys copying. https://www.instagram.com/reel/C5gRnT8P34b/?igsh=ZmkyMW54a3R2Nnpy rk3566-firefly-roc-pc.dtbrk3566-firefly-roc-pc.dts This is the JianPian TV BOX You give me an idea, You can use the JianPian DTB as a base to take in byte values (&gpio) Take this as a basis: https://github.com/armbian/build/blob/main/config/boards/jp-tvbox-3566.tvb and take this as a basis: https://github.com/armbian/build/blob/main/patch/kernel/archive/rockchip64-6.6/dt/rk3566-jp-tvbox.dts @ning have tested our DTB file on JianPian device, you will just need to change the LAN, USB and bluetooth and wifi pins based on our DTB 0x8e as you can see here: https://forum.armbian.com/topic/31887-jianpian-rk3566-tv-box-8g32g-develop-log/?do=findComment&comment=176492 by this way you can enable this board on armbian repo. -
Efforts to develop firmware for H96 MAX V56 RK3566 8G/64G
Hqnicolas replied to Hqnicolas's topic in Rockchip CPU Boxes
Can you be the first to run video drivers on this device? https://developer.arm.com/downloads/-/mali-drivers/bifrost-kernel https://docs.mesa3d.org/download.html https://docs.mesa3d.org/drivers/panfrost.html I use it as a server without video render. But some users ask for video acceleration. -
Efforts to develop firmware for H96 MAX V56 RK3566 8G/64G
Hqnicolas replied to Hqnicolas's topic in Rockchip CPU Boxes
TL2102 just handle 921600 with just 7 or 8 data bits only. absolutely the market is flooded with fake Chinese! i have tested: 2102 300bps ~ 1MBps and 2104 300 bps ~ 2Mbps But now Firefly and many customers have found in actual use that the actual baud rate of many CH340s on the market cannot reach 1.5Mbps, which causes a lot of trouble in the development process -
Efforts to develop firmware for H96 MAX V56 RK3566 8G/64G
Hqnicolas replied to Hqnicolas's topic in Rockchip CPU Boxes
@Werner Are your CP2102 fake? I Have the Chinese Fake CP2102 and it works at 1.5M baud rate This gui's are fake ^^^^^^^^^ and this CP2102 works at 1.5M baud rate but the PL2303HX dont work with anithing is an absolute wast of metal Prolific PL2303 have fake versions to The Serial UART to USB looks like the TV-Box Market -
Efforts to develop firmware for H96 MAX V56 RK3566 8G/64G
Hqnicolas replied to Hqnicolas's topic in Rockchip CPU Boxes
Please, Use a debug Tool TTL UART Baud rate: 1500000 Data bit: 8 Stop bit: 1 Parity check: none Flow control: none ☑️ CP2104 TTL Tested the original one! ☑️ CP2102 TTL Tested the chinese fake one!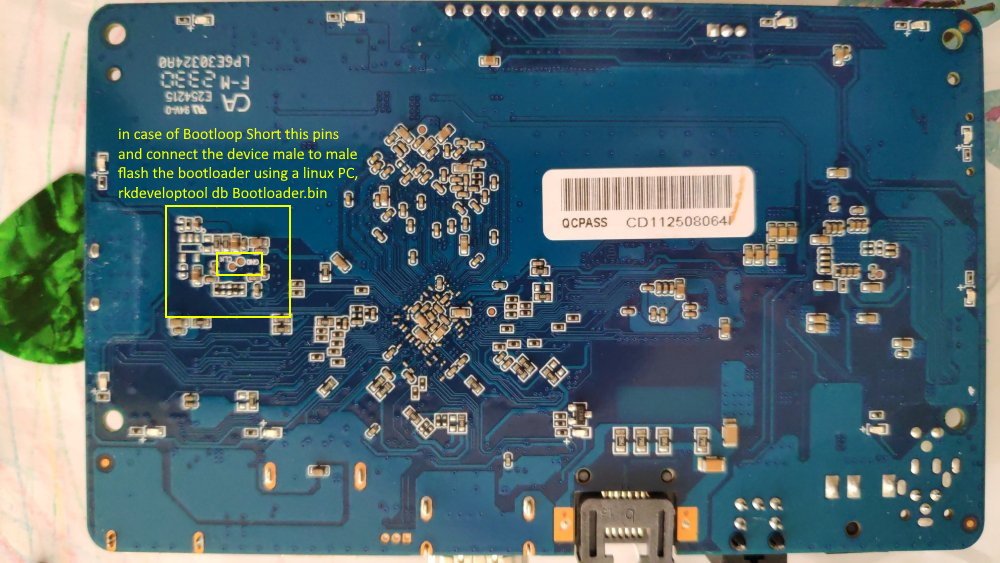
-
Efforts to develop firmware for H96 MAX V56 RK3566 8G/64G
Hqnicolas replied to Hqnicolas's topic in Rockchip CPU Boxes
you can burn the android image from https://disk.yandex.ru/d/F29OpGlUWmyfKA?w=1 and in the worst case you can short the EMMC CLK pins "next post image" Rockchip devices are unbrickable unless you short the power supply or EMMC got out of TBW Forgot Windows 11 you need the Junkyard 10 I think you need to swith the device mode before dump memory (i did it by trial and error) nice it's a dump. RK3318 is the same as RK3328 RK3568 is the same as RK3566 you can swap firmwares between them only the socket and a drilled hole on plastic case with SD card you can archive better results! Thank's for the board images, I dont have patience to disassemble it again I think you be the gui that will bring the Video driver and RKNPU2 to armbian -
Efforts to develop firmware for H96 MAX V56 RK3566 8G/64G
Hqnicolas replied to Hqnicolas's topic in Rockchip CPU Boxes
Male to male USB A YEP Follow the last post i did here.... dont put nothing that need backup inside that chinese dogshit box if you did, you can follow this post and this post -
Efforts to develop firmware for H96 MAX V56 RK3566 4G/32G
Hqnicolas replied to Hqnicolas's topic in Rockchip CPU Boxes
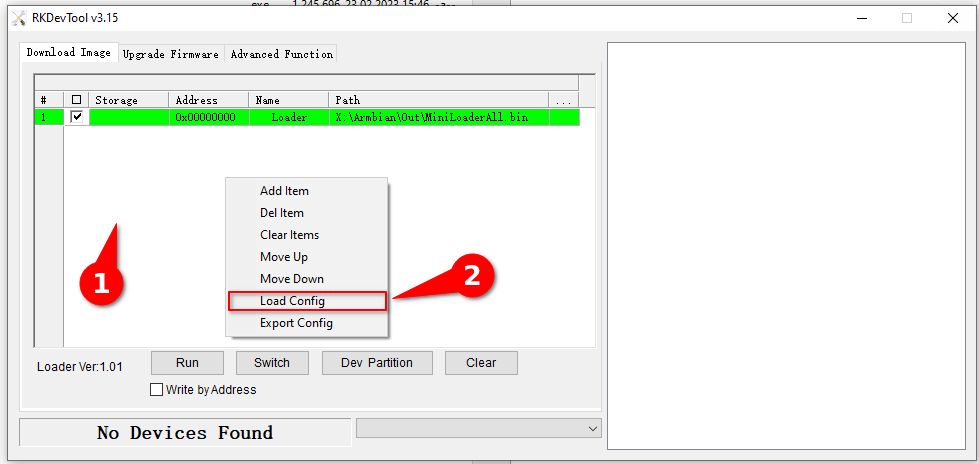
🏆 Become a sponsor, help to add other boards in armbian standart, you don't need to be a programmer to help the community, just need a copy of the ARM BOARD and a x86 computer to compile new versions. ########################### EMMC: V1.1 HZDM Release Version ########################### If you like what you see here and want to help: Donate Armbian the like button only costs a few dollars. Armbian Needs you help! # Tested on 4gb 32gb version (04/04/2024) If you given up of Armbian Linux on your H96MAX RK3566 TV box Think Again and again and again and again, because: @hzdm updated armbian Build configuration: V1.1 HZDM original Build Armbian Tutorial: #START# On Linux: 1 - Follow the Build Armbian instructions if it doesnt Build your image as espected rm -rf build git clone --depth 1 --branch v24.02 https://github.com/armbian/build try again and again and again and again 2 - Download H96MAX Armbian Build Config (Original Source) 3 - Copy the h96-max-v56 directory to build/packages/blobs/ directory 4 - Copy the h96-max-v56.conf file to the build/config/boards/ directory 5 - Run the image build ./compile.sh On Windows: 6 - Download the Armbian.cfg file to RKDevTool (Original Source) 7 - Drop it on RKDevTool 8 - Shutting down H96 MAX. 9 - Press the Reset button. 10 - Turn on the H96 MAX. 11 - Wait until The message "Found One MASKROM Device" or "Found One LOADER Device" should appear. (1) 12 - Mark all 2 sections with check marks (2) 13 - Open 2 files for each section (3) 14 - Check "Write by Address" (4). 15 - Press the "Run" button (5). The download will start. When the message "Download image OK" appears, the download is finished (6). 16 - H96 MAX will automatically reboot. Done. Alternative: On Linux OS rkdeveloptool db MiniLoaderAll.bin # If this is not your first time flashing with this firmware, an error may appear here\. It\'s not a big deal rkdeveloptool wl 0x0 Your_Armbian_Image-trunk_H96-max-v56_jammy_current_6.1.62.img rkdeveloptool rd And because a malware was discovered in the XZ library from Edge trixie and Edge sid I came here again to remove and ReBuild all afected images. Ubuntu: One of the most popular Linux distributions is not affected as its xz version is the older 5.4 version. No updates are required. Debian Linux: No stable versions of the distribution were affected. but compromised packages were part of test, unstable and experimental versions. Users must update xz-utils. Read more: CVE-2024-3094 Video drivers: https://developer.arm.com/downloads/-/mali-drivers/bifrost-kernel https://docs.mesa3d.org/download.html https://docs.mesa3d.org/drivers/panfrost.html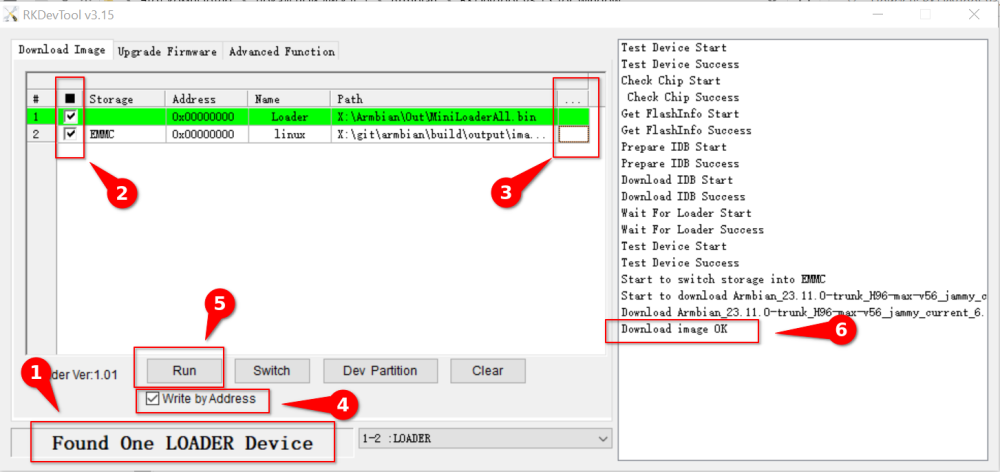

-
Tanix TX66 RK3566 4GB/32GB 8K 2.4/5WIFI 1GiB BT USB2/3 SD IR SPDIF
Hqnicolas replied to realcam's topic in Rockchip CPU Boxes
you can ise Artificial inteligence use iA software like: Microsoft Autogen Studio Devika chat gpt -
Efforts to develop firmware for H96 MAX V56 RK3566 8G/64G
Hqnicolas replied to Hqnicolas's topic in Rockchip CPU Boxes
🏆 Become a sponsor, help to add other boards in armbian standart, you don't need to be a programmer to help the community, just need a copy of the ARM BOARD and a x86 computer to compile new versions. ########################### EMMC: V1.1 HZDM Release Version ########################### If you like what you see here and want to help: Donate Armbian the like button only costs a few dollars. Armbian Needs you help! If you given up of Armbian Linux on your H96MAX RK3566 TV box Think Again and again and again and again, because: @hzdm updated armbian Build configuration: V1.1 HZDM original Build Armbian Tutorial: #START# On Linux: 1 - Follow the Build Armbian instructions if it doesnt Build your image as espected rm -rf build git clone --depth 1 --branch v24.02 https://github.com/armbian/build try again and again and again and again 2 - Download H96MAX Armbian Build Config (Original Source) 3 - Copy the h96-max-v56 directory to build/packages/blobs/ directory 4 - Copy the h96-max-v56.conf file to the build/config/boards/ directory 5 - Run the image build ./compile.sh On Windows: 6 - Download the Armbian.cfg file to RKDevTool (Original Source) 7 - Drop it on RKDevTool Boot, MiniLoaderAll: H96-MAX-8gb-MiniLoaderAll.bin H96-MAX-4gb-MiniLoaderAll.bin 8 - Shutting down H96 MAX. 9 - Press the Reset button. 10 - Turn on the H96 MAX. 11 - Wait until The message "Found One MASKROM Device" or "Found One LOADER Device" should appear. (1) 12 - Mark all 2 sections with check marks (2) 13 - Open 2 files for each section (3) 14 - Check "Write by Address" (4). 15 - Press the "Run" button (5). The download will start. When the message "Download image OK" appears, the download is finished (6). 16 - H96 MAX will automatically reboot. Done. Alternative: On Linux OS rkdeveloptool db MiniLoaderAll.bin # If this is not your first time flashing with this firmware, an error may appear here\. It\'s not a big deal rkdeveloptool wl 0x0 Your_Armbian_Image-trunk_H96-max-v56_jammy_current_6.1.62.img rkdeveloptool rd And because a malware was discovered in the XZ library from Edge trixie and Edge sid I came here again to remove and ReBuild all afected images. Ubuntu: One of the most popular Linux distributions is not affected as its xz version is the older 5.4 version. No updates are required. Debian Linux: No stable versions of the distribution were affected. but compromised packages were part of test, unstable and experimental versions. Users must update xz-utils. Read more: CVE-2024-3094 Video drivers: https://developer.arm.com/downloads/-/mali-drivers/bifrost-kernel https://docs.mesa3d.org/download.html https://docs.mesa3d.org/drivers/panfrost.html
-
Tanix TX66 RK3566 4GB/32GB 8K 2.4/5WIFI 1GiB BT USB2/3 SD IR SPDIF
Hqnicolas replied to realcam's topic in Rockchip CPU Boxes
This board have SD CARD READER!!!!!!! Use the SD card to test DTB files!!!! just drop in replace DTB and boot again Use TTL UART to debug e go Keep pushing bro