Search the Community
Showing results for 'uart rts'.
-
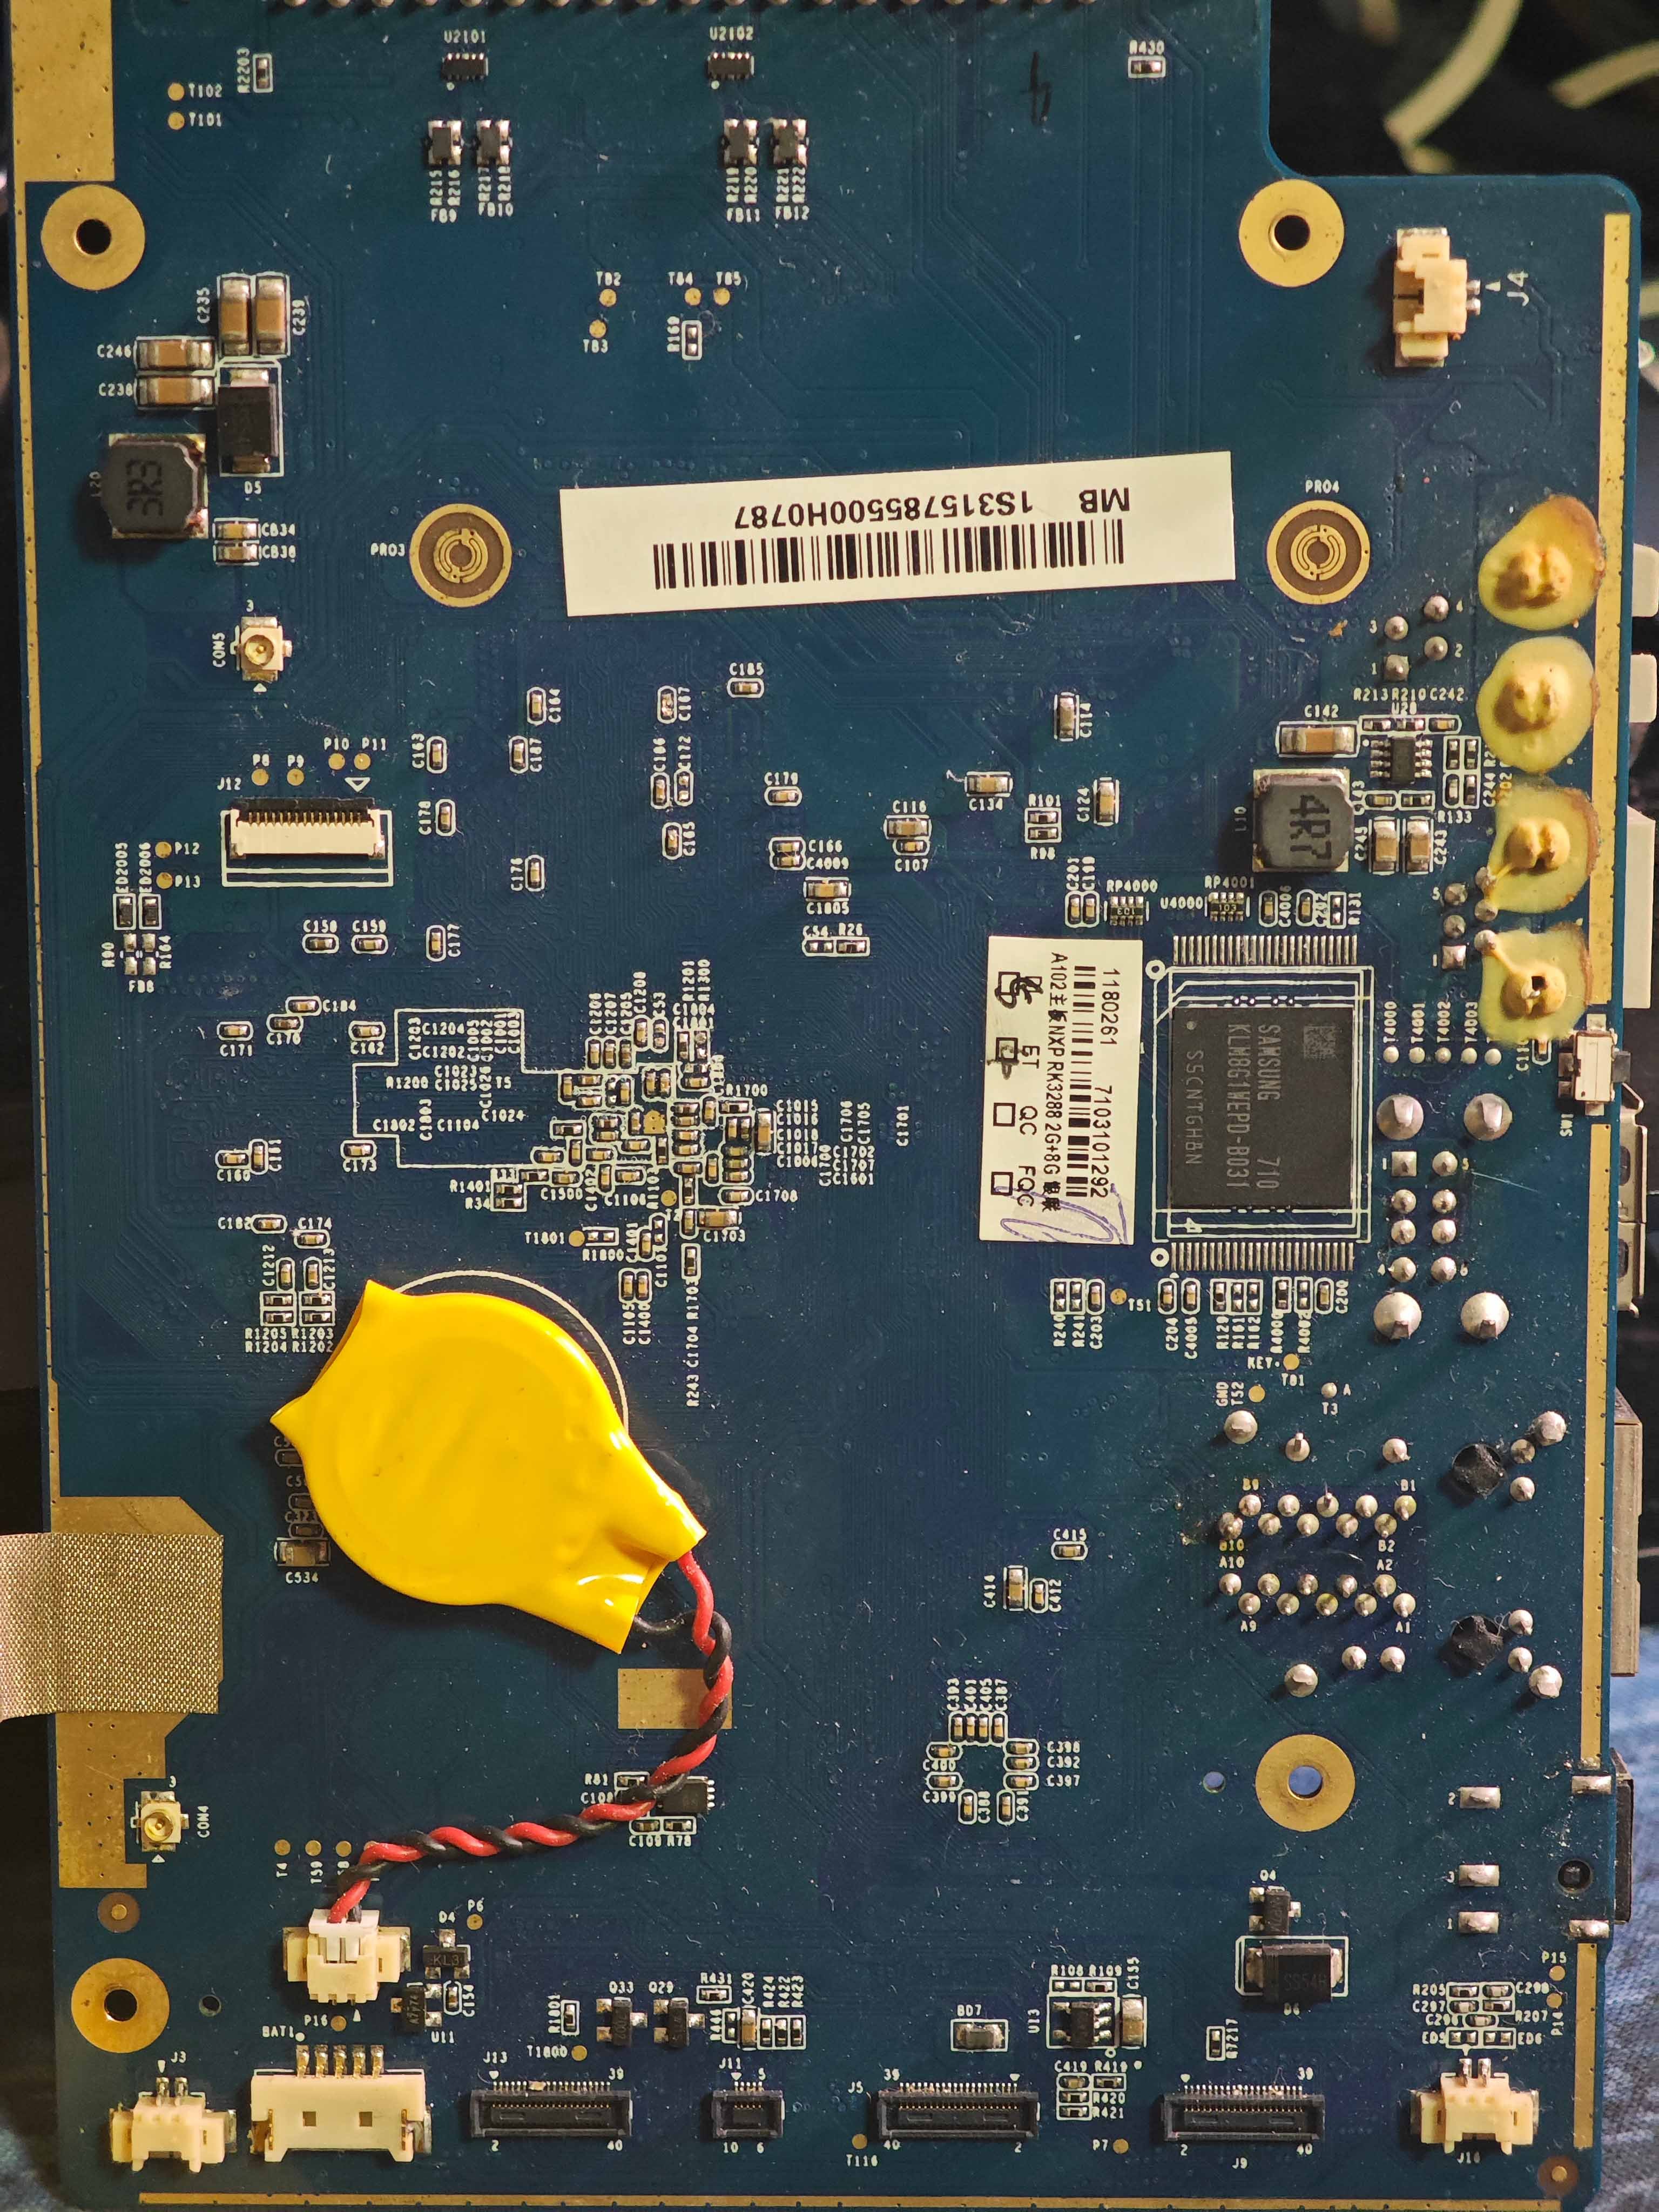
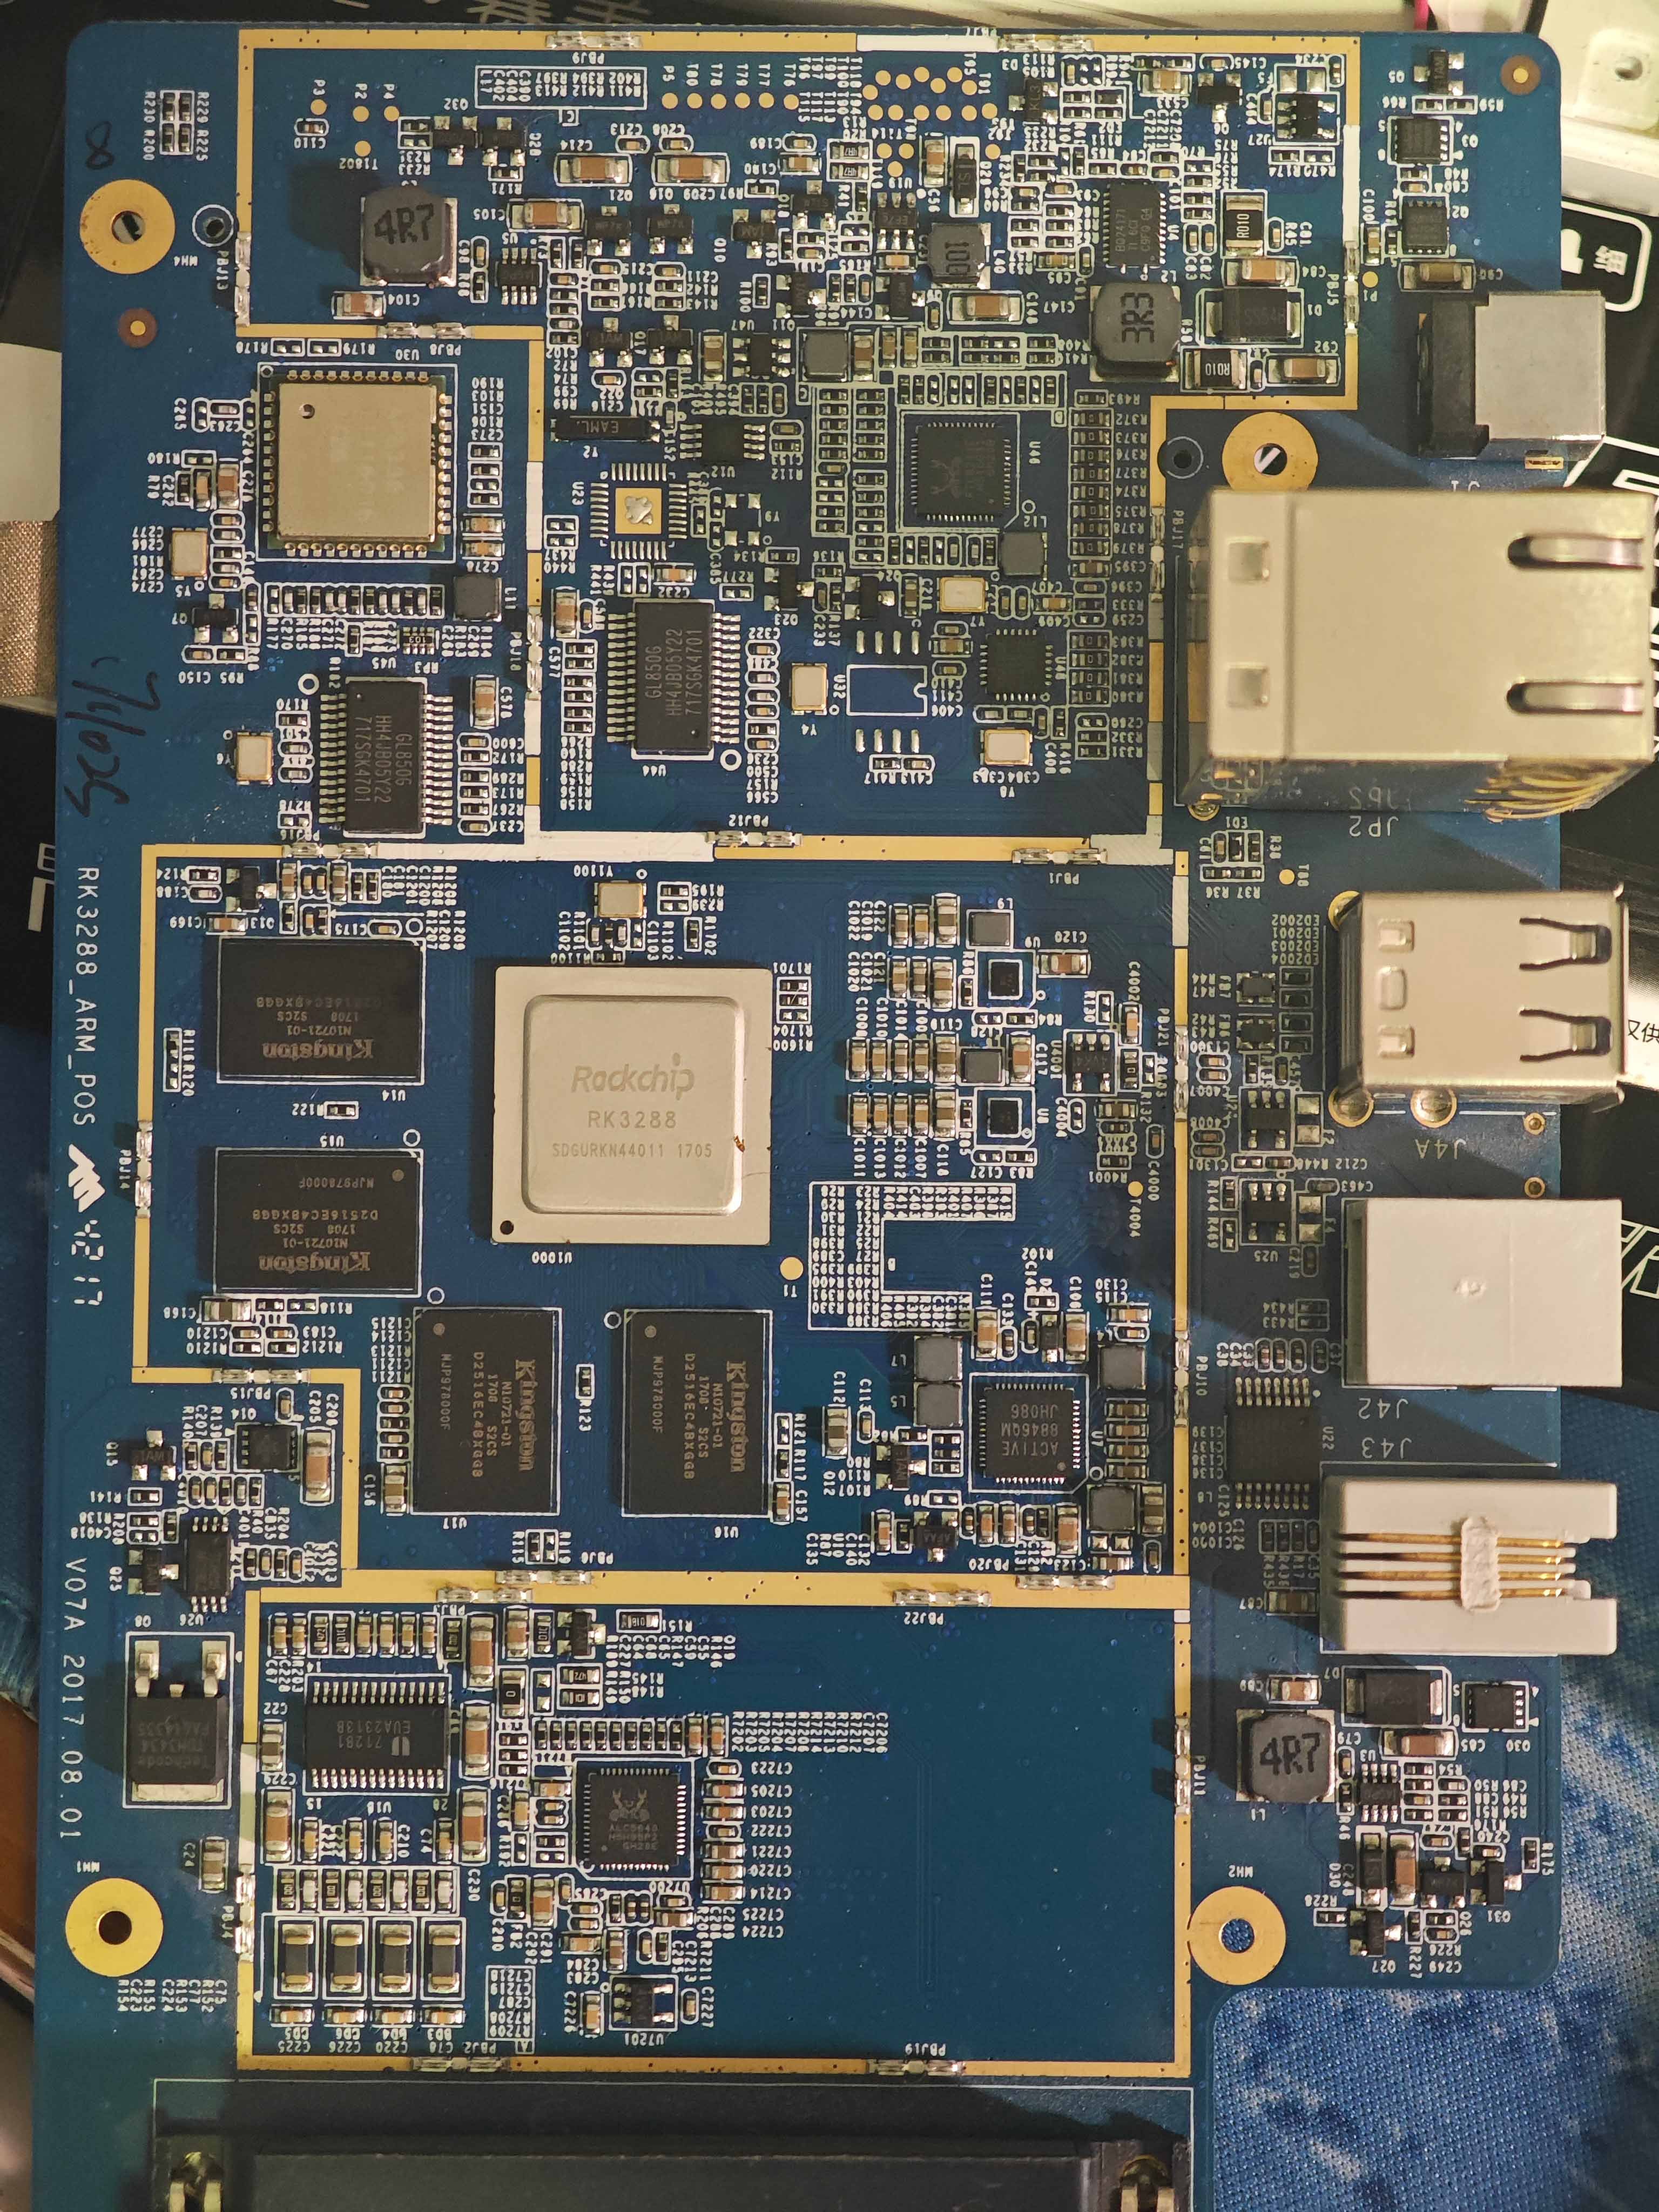
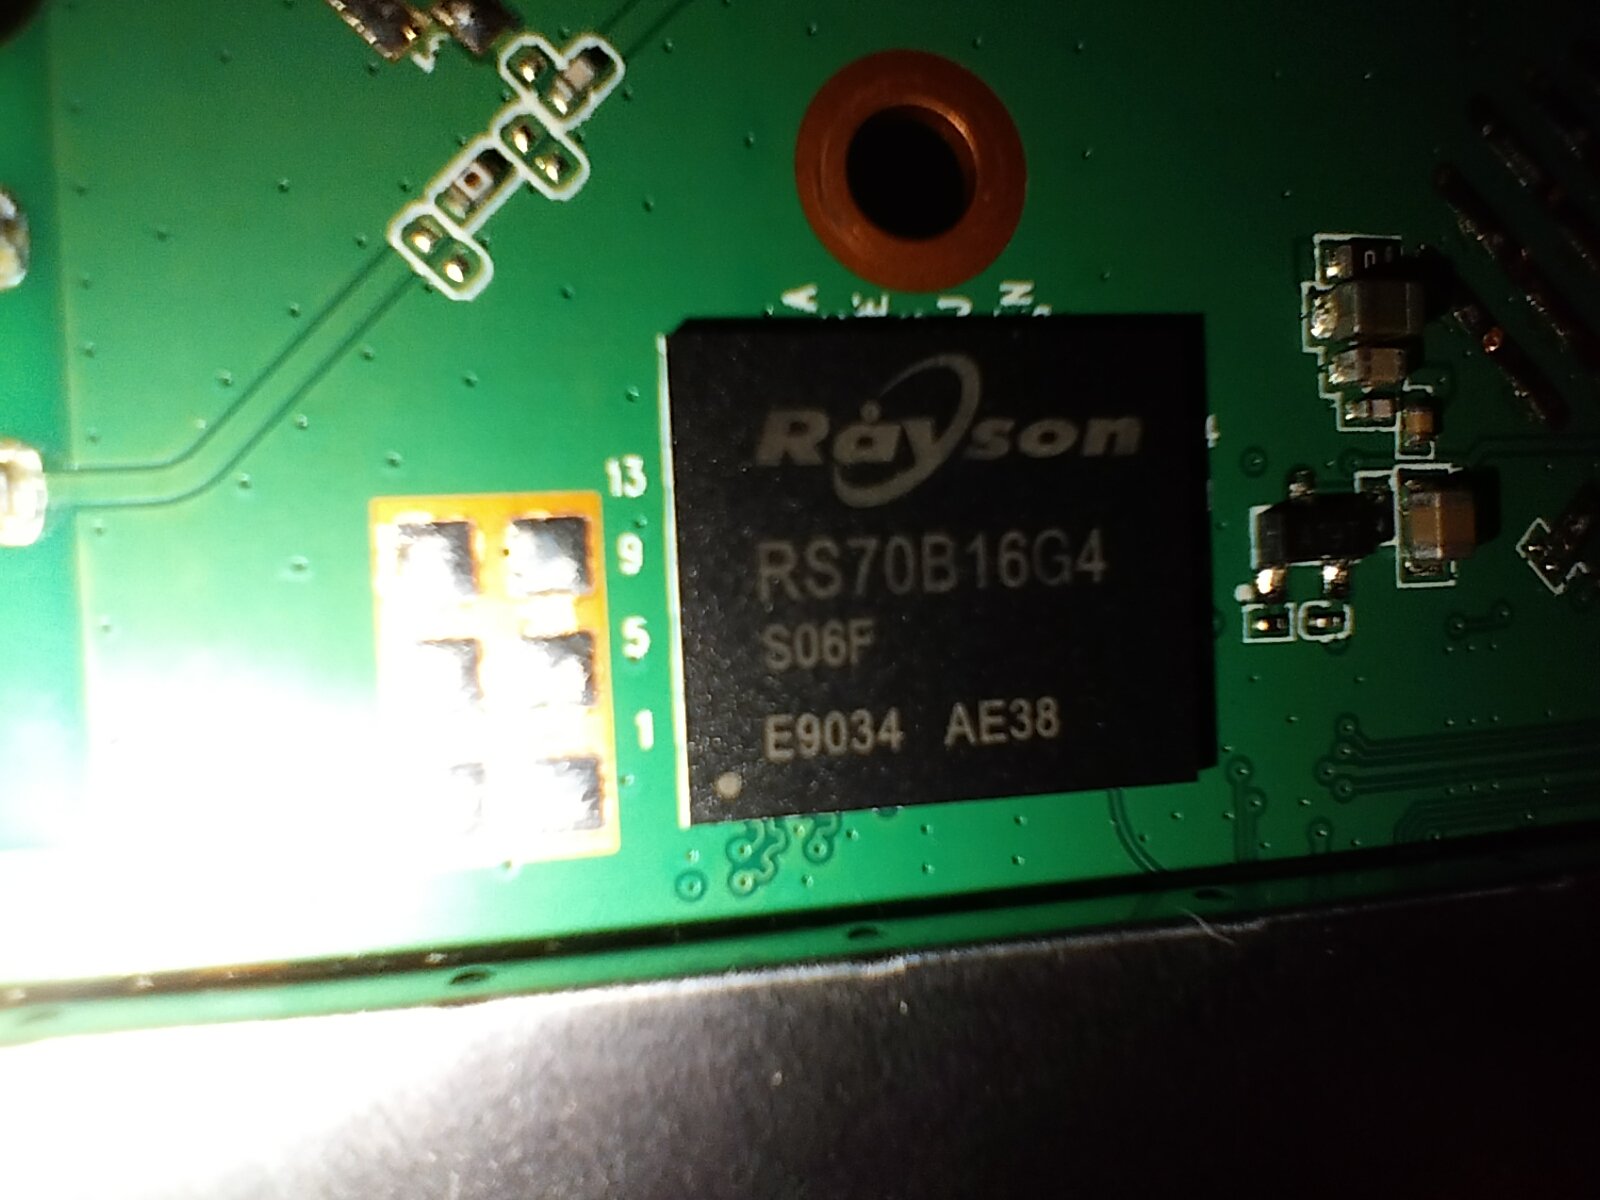
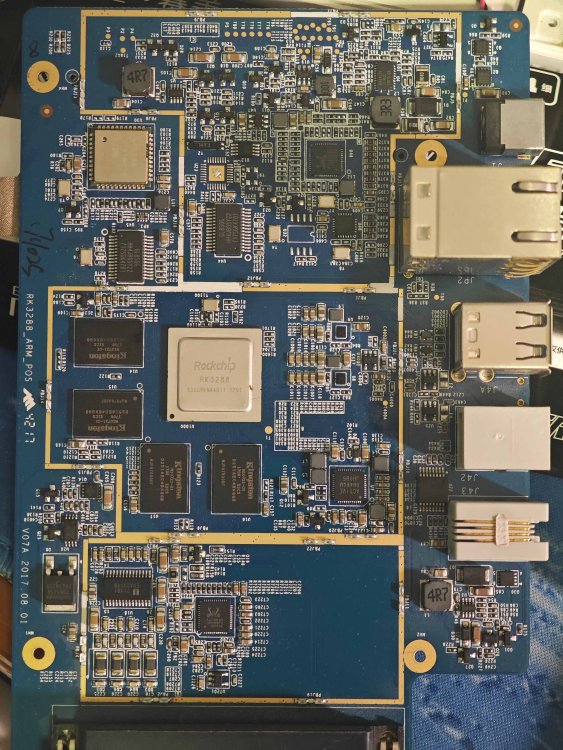
 Hello everyone, I have an old POS machine that uses the Rockchip RK3288 processor. It has a 1920x1080 screen and works fine, but I don’t have any root or bootloader unlock permissions. I would like to flash Armbian on it and make better use of the device. So far I’ve tried: ADB access (only recovery available) Tried using adb reboot bootloader, but the device just powers off Identified some test points like KEY, T3, T2, T52, T51, but not sure which one is for MaskROM shorting Found no physical recovery button, only a reset and power button There might be a UART port, but I’m not sure 👉 Can someone please help me: Identify which test points or pads I can short to enter MaskROM mode Locate a possible UART debug port on the board Any advice for dumping original firmware or unlocking bootloader I've attached front and back photos of the mainboard. Any suggestions or experience with RK3288 boards are greatly appreciated! Thank you 🙏
-
 Hi everyone, i have uptabte armbian from 23.05 to 24.1 (stable relase update) in my nano pi neo air, but arter update i cant connect to device via com port from micro usb. (no avalible devices, when i connect nanopi to my PC) How i can fix it? Armbian-config? P.S. I also soldering external usb-uart and to the nano and i see that update was sucsessful, device steel working.
 -
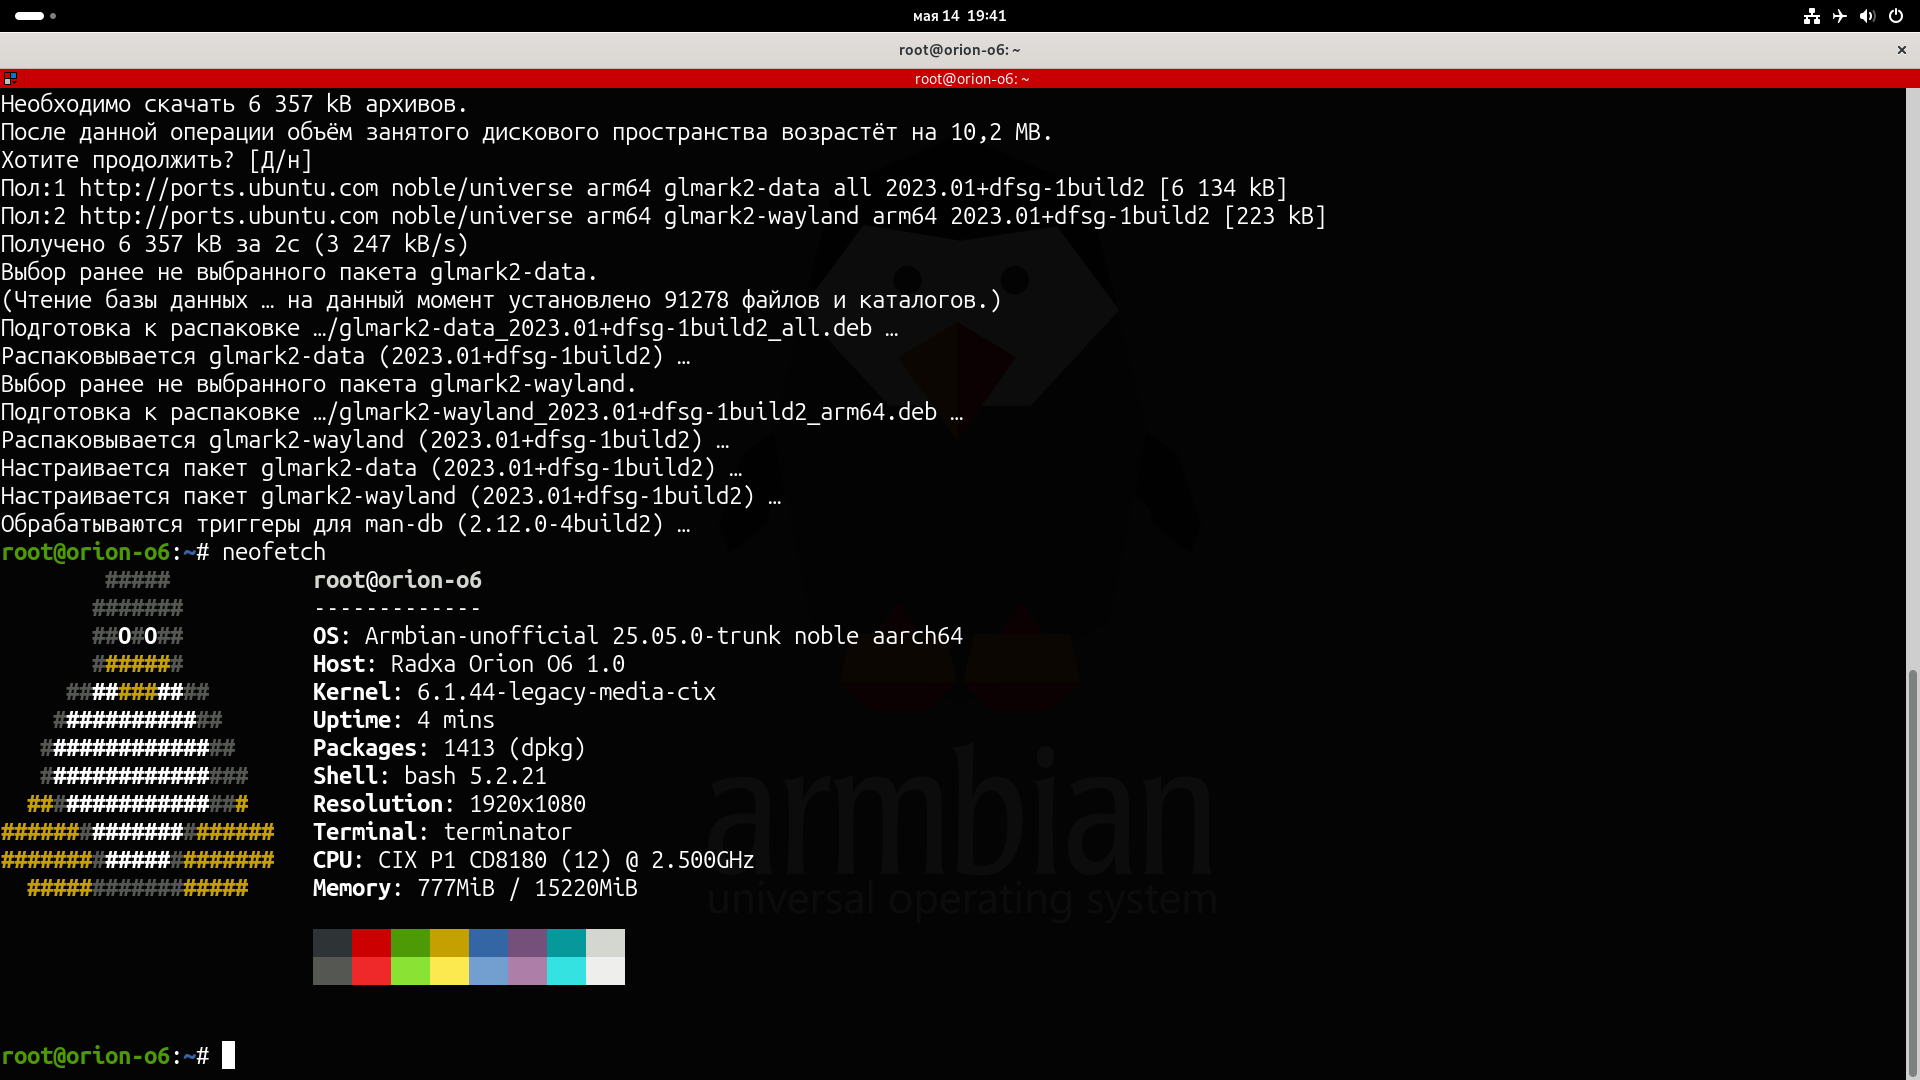
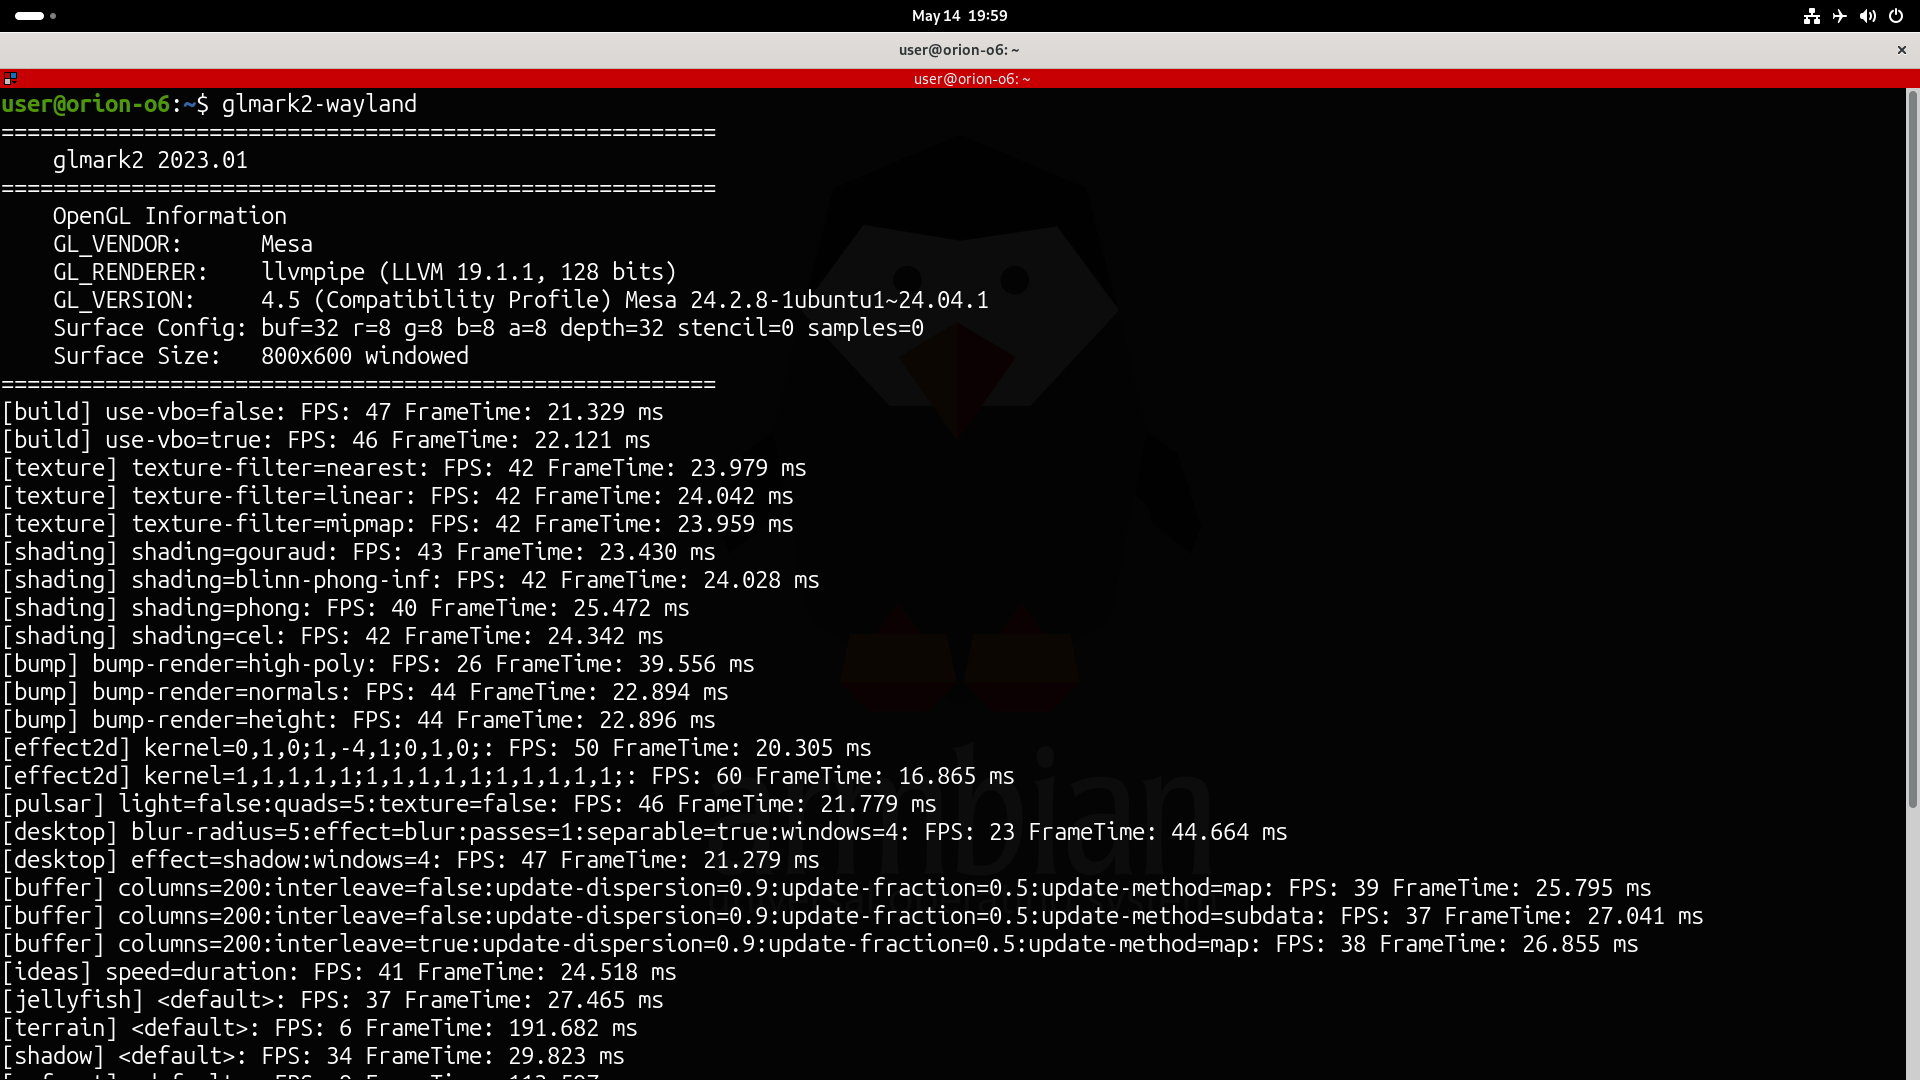
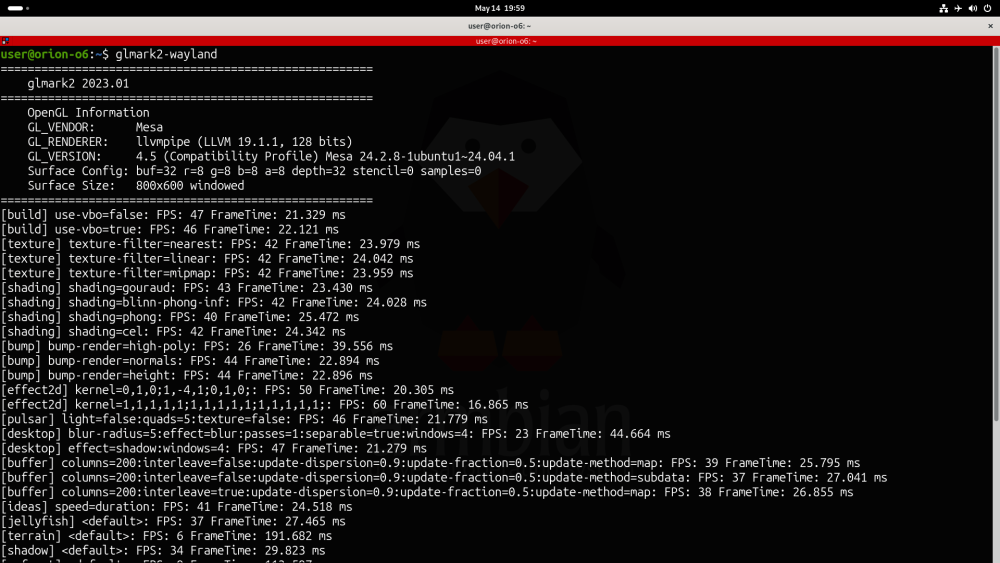
The alpha version of Armbian images for Orion O6 is available. To launch, burn to a USB flash drive, connect to Orion O6 and turn on the power (installation on NVMe has not yet been verified). The system starts automatically. Important. Image output to the monitor works only in graphical mode (in images with DE). Console output currently only works in UART, so you need a UART console or SSH connection for initial startup. Launching the desktop and displaying the image on the screen can take 30-80 seconds, depending on the speed of the media. https://disk.yandex.ru/d/gedMM0eLiURrjA Armbian-unofficial 25.05.0-trunk Noble ttyAMA2 orion-o6 login: root Password: _ _ _ __ __ _ _ _ /_\ _ _ _ __ | |__(_)__ _ _ _ ___ _ _ _ _ ___ / _|/ _(_)__(_)__ _| | / _ \| '_| ' \| '_ \ / _` | ' \___| || | ' \/ _ \ _| _| / _| / _` | | /_/ \_\_| |_|_|_|_.__/_\__,_|_||_| \_,_|_||_\___/_| |_| |_\__|_\__,_|_| v25.05 rolling for Orion O6 running Armbian Linux 6.1.44-legacy-media-cix Packages: Ubuntu stable (noble) Support: DIY (custom image) IPv4: (LAN) 192.168.1.47 (WAN) 185.213.138.150 Performance: Load: 21% Up time: 0 min Memory usage: 4% of 14.86G CPU temp: 32°C Usage of /: 40% of 14G storage/: 1% of 253M RX today: 6 MiB Commands: Configuration : armbian-config Monitoring : htop root@orion-o6:~# Disk /dev/ram14: 40 MiB, 41943040 bytes, 81920 sectors Units: sectors of 1 * 512 = 512 bytes Sector size (logical/physical): 512 bytes / 4096 bytes I/O size (minimum/optimal): 4096 bytes / 4096 bytes Disk /dev/ram15: 40 MiB, 41943040 bytes, 81920 sectors Units: sectors of 1 * 512 = 512 bytes Sector size (logical/physical): 512 bytes / 4096 bytes I/O size (minimum/optimal): 4096 bytes / 4096 bytes Disk /dev/nvme0n1: 238.47 GiB, 256060514304 bytes, 500118192 sectors Disk model: MTFDHBA256TCK-1AS1AABHA Units: sectors of 1 * 512 = 512 bytes Sector size (logical/physical): 512 bytes / 512 bytes I/O size (minimum/optimal): 512 bytes / 512 bytes Disklabel type: gpt Disk identifier: E146202C-4719-46E5-B98F-3B8E899D01FD Device Start End Sectors Size Type /dev/nvme0n1p1 2048 206847 204800 100M EFI System /dev/nvme0n1p2 206848 239615 32768 16M Microsoft reserved /dev/nvme0n1p3 239616 499049968 498810353 237.9G Microsoft basic data /dev/nvme0n1p4 499050496 500115455 1064960 520M Windows recovery environment Disk /dev/sda: 14.32 GiB, 15376000000 bytes, 30031250 sectors Disk model: Ultra Fit Units: sectors of 1 * 512 = 512 bytes Sector size (logical/physical): 512 bytes / 512 bytes I/O size (minimum/optimal): 512 bytes / 512 bytes Disklabel type: gpt Disk identifier: AC0DE29F-BE91-413F-B3A6-7A9DF368C41D Device Start End Sectors Size Type /dev/sda1 8192 532479 524288 256M EFI System /dev/sda2 532480 30031216 29498737 14.1G Linux root (ARM-64) Disk /dev/zram0: 7.43 GiB, 7979745280 bytes, 1948180 sectors Units: sectors of 1 * 4096 = 4096 bytes Sector size (logical/physical): 4096 bytes / 4096 bytes I/O size (minimum/optimal): 4096 bytes / 4096 bytes


-
DISCLAIMERS (PLEASE READ): Everything you can find in this thread (binaries, texts, code snippets, etc...) are provided AS-IS and are not part of official Armbian project. For this reason not people from Armbian project nor myself are responsible for misuse or loss of functionality of hardware. THIS POST explains very well the troubles with TV Boxes and why they are not suitable for everyone Please don't ask about support or assistance in other non-community forums nor in the official Armbian github repository, instead post your questions in this thread, in the TV Boxes forum section (hardware related) or in the Peer-to-peer support section (general linux/software related). Following the recent thread on LibreElec forum about an unofficial image for rk3229 devices, I would like to make public the work made by me and @fabiobassa about bringing rk322x support to armbian. The project is now in -> mainline Armbian <- development fork -> here <- This first page and the last 3 or 4 pages of the thread are enough to get up to date with recent developments. Many useful experiences are scattered through the thread, but the most important things are collected here in the first page, so please read it carefully! Mainline kernel is fully supported and will receive most support in the future. Legacy kernel 4.4 is deprecated, but is kept around only for special purposes. What works: Should boot and work flawlessy on all boards with RK3228a, RK3228b and RK3229, with either DDR2 and DDR3 memories. Mainline u-boot Proprietary OPTEE provided as Trusted Execution Environment (needed for DRAM frequency scaling) All 4 cores are working Ethernet Serial UART (configured at 115200 bps, not 1.5Mbps!) Thermals, CPU and DRAM frequency scaling OTG USB 2.0 port (also as boot device!) EHCI/OHCI USB 2.0 ports MMC subsystem (including eMMC, SD and sdio devices) Hardware video acceleration NAND is available only on legacy kernel. To fully boot from NAND, use the Multitool and its steP-nand installation (instructions are below) Various WIFI over SDIO are supported (SSV6051P, SSV6256P, ESP8089, Realtek chips, etc...), ssv6256p driver is available only on legacy kernel Full GPU acceleration U-boot boot order priority: first the sdcard, then the USB OTG port and eventually the internal eMMC; you can install u-boot (and the whole system) in the internal eMMC and u-boot will always check for images on external sdcard/USB first. Unbrick: Technically, rockchip devices cannot be bricked. If the internal flash does not contain a bootable system, they will always boot from the sdcard. If, for a reason, the bootable system on the internal flash is corrupted or is unable to boot correctly, you can always force the maskrom mode shorting the eMMC clock pin on the PCB. Here there is the procedure, but you can also google around if you get stuck on a faulty bootloader, the technique is pretty simple and requires a simple screwdriver. There are however some unfortunate cases (expecially newer boards) where shorting the eMMC clock pin is difficult or impossibile, like eMMC or eMCP BGA chips with no exposed pins. In those cases pay double attention when burning something on the internal eMMC/eMCP and always test first the image from the sdcard to be sure it works before burning anything on eMMC/eMCP. Some useful links with pins, pads or procedures for some boards: Generic procedure for boards with non-BGA eMMC MXQPRO_V71 - eMCP H20 - eMCP ZQ01 - eMCP NAND vs eMMC vs eMCP difference: RK3228 and RK3229 tv boxes comes with three different flash memory chips: eMMC, NAND and eMCP. It does not depend upon the market name of the tv box and neither the internal board; manufacturers put whatever they find cheaper when they buy the components. NAND chip is just the non-volatile memory eMMC chip contains both the non-volatile memory plus a controller. eMCP chip contains the non-volatile memory, a controller for the non-volatile memory (like eMMC), but also contains a bank of DDR SDRAM memory on the same physical chip. The difference is very important, because eMMC and eMCP are far easier to support at various levels: the controller deals with the physical characteristics of the non-volatile memory, so the software has no to deal with. NAND chips instead are harder to support, because the software is required to deal with the physical characteristics and non-standard things that depends upon the NAND manufacturer. If you have a NAND chips you're unlucky because mainline kernel currently cannot access it, but also because you need special care and instructions explained later. You can discover if you have a NAND, eMMC or eMCP chip looking on the board are reading the signature on the flash memory chip. The Multitool (see later) also can detect which chip you have onboard: the program will warn you at startup if you have a NAND chip. NAND bootloader upgrade: IMPORTANT: don't do this is you have an eMMC or eMCP; skip this paragraph if you are unsure too! For very expert people who are having issues when (re)booting images, there is the chance to upgrade the bootloader on NAND. The NAND bootloader is nothing else than a regular idbloader (see official rockchip documentation) but contains some bits to correctly access the data on your flash memory. Upgrading requires to erase the existing flash content, in the worst case will require you to follow the Unbrick procedure above or restore an older but more compatible bootloader. If you are not mentally ready to overcome possible further issues, don't do this! The detailed instructions and the binaries are available at this post Multimedia: Mainline kernel: 3D acceleration is provided by Lima driver and is already enabled. Hardware video decoding: https://forum.armbian.com/topic/19258-testing-hardware-video-decoding-rockchip-allwinner/ Deprecated legacy kernel: multimedia features, like OpenGL/OpenGL ES acceleration, hardware accelerated Kodi, ffmpeg and mpv you can take a look to this post An effective tutorial from @Hai Nguyen on how to configure a box as a hi-quality music player using an USB audio card, and controlling it via remote control is available in this post Brief explanation about kernel naming: current kernel is the mainline LTS kernel version, most maintained and tested. This is the suggested version for production devices. If you don't know what to pick, pick this. legacy kernel (version 4.4) is provided by manufacturer; it is deprecated, unmaintained and not suggested. edge kernel is the development mainline kernel version, with experimental features and drivers; usually stable but perhaps suitable for production devices. You can switch from one kernel flavour to another using armbian-config or manually via apt. Installation (via SD card): Building: You can build your own image follow the common steps to build armbian for other tv boxes devices: when you are in the moment to choose the target board, switch to CSC/TVB/EOL boards and select "rk322x-box" from the list. Download prebuilt images from the following links: Archive builds (GPG-signed) - https://imola.armbian.com/dl/rk322x-box/archive/ SUGGESTED - Nightly built from trunk each week by Armbian servers (GPG-signed) - https://github.com/armbian/community Old images provided by me (unsigned and outdated) - https://users.armbian.com/jock/rk322x/armbian/stable Archived/older images: https://armbian.hosthatch.com/archive/rk322x-box/archive/ Multitool: The Multitool is a small but powerful tool to do quick backup/restore of internal flash, but also burn images and general system rescue and maintenance via terminal or SSH. Compressed images will be uncompressed on fly. Multitool - A small but powerful image for RK322x TV Box maintenance (instructions to access via network here) Quick installation instructions on eMMC: Build or download your preferred Armbian image and a copy of the Multitool; Burn the Multitool on an SD card; once done, place the Armbian image in images folder of the SD card NTFS partition; Plug the SD card in the TV box and plug in the power cord. After some seconds the blue led starts blinking and the Multitool appears; OPTIONAL: you can do a backup of the existing firmware with "Backup flash" menu option; Choose "Burn image to flash" from the menu, then select the destination device (usually mmcblk2) and the image to burn; Wait for the process to complete, then choose "Shutdown" from main menu; Unplug the power cord and the SD card, then replug the power cord; Wait for 10 seconds, then the led should start blinking and HDMI will turn on. The first time the boot process will take a couple of minutes or more because the filesystem is going to be resized, so be patient and wait for the login prompt. On first boot you will be asked for entering a password for root user of your choice and the name and password for a regular user Run sudo rk322x-config and select your board characteristics to enable leds, wifi chips, high-speed eMMC, etc... Run sudo armbian-config to configure timezone, locales and other personal options Congratulations, Armbian is now installed and configured! Despite the procedure above is simple and reliable, I always recommend to first test that your device boots Armbian images from SD Card. Due to the really large hardware variety, there is the rare chance that the images proposed here may not boot. If a bad image is burned in eMMC, the box may not boot anymore forcing you to follow the unbrick section at the top of this post. Quick installation instructions on NAND: Build or download your preferred Armbian image and a copy of the Multitool; Burn the Multitool on an SD card; once done, place the Armbian legacy kernel image in images folder of the SD card NTFS partition; Plug the SD card in the TV box and plug in the power cord. After some seconds the blue led starts blinking and the Multitool appears; OPTIONAL: you can do a backup of the existing firmware with "Backup flash" menu option; Choose "Burn Armbian image via steP-nand" from the menu, then select the destination device (usually rknand0) and the image to burn; Wait for the process to complete, then choose "Shutdown" from main menu; Unplug the power cord and the SD card, then replug the power cord; Wait for 10 seconds, then the led should start blinking and HDMI will turn on. The first time the boot process will take a couple of minutes or more because the filesystem is going to be resized, so be patient and wait for the login prompt. On first boot you will be asked for entering a password for root user of your choice and the name and password for a regular user Run sudo rk322x-config and select your board characteristics to enable leds, wifi chips, etc... Run armbian-config to configure timezone, locales and other personal options Congratulations, Armbian is now installed! Alternative: you can install the bootloader in NAND and let it boot from SD Card or USB: Download a copy of the Multitool and burn it on an SD card; Plug the SD card in the TV box and plug in the power cord. After some seconds the blue led starts blinking and the Multitool appears; RECOMMENDED: make a backup of the existing firmware with "Backup flash" menu option; Choose "Install Jump Start for Armbian" menu option: the Jump Start uses the internal NAND to boot from external SD Card or external USB Stick; Follow the general instructions to boot from SD Card below, skip the first erase eMMC step. Quick installation instructions to boot from SD Card: If you are already running Armbian from eMMC, skip to the next step. Instead if you are running the original firmware you need to first erase the internal eMMC; to do so download the Multitool, burn it on an SD Card, plug the SD Card and power the TV Box. Use "Backup flash" if you want to do a backup of the existing firmware, then choose "Erase flash" menu option. Build or download your preferred Armbian image; Uncompress and burn the Armbian image on the SD Card; Plug the SD Card in the TV Box and power it on; Wait for 10 seconds, then the led should start blinking and HDMI will turn on. The first time the boot process will take a couple of minutes or more because the filesystem is going to be resized, so be patient and wait for the login prompt; On first boot you will be asked for entering a password for root user of your choice and the name and password for a regular user Run sudo rk322x-config and select your board characteristics to enable leds, wifi chips, high-speed eMMC or NAND, etc... Run armbian-config to configure timezone, locales and other personal options, or also to transfer the SD Card installation to internal eMMC; Congratulations, Armbian is running from SD Card! A note about boot device order: With Armbian also comes mainline U-boot. If you install Armbian or just the bootloader in the eMMC or the Jump Start on internal NAND, the bootloader will look for valid bootable images in this order: External SD Card External USB Stick in OTG Port Internal eMMC Installation (without SD card, board with eMMC) If you have no sd card slot and your board has an eMMC, you can burn the armbian image directly on the internal eMMC using rkdeveloptool and a male-to-male USB cable: Download your preferred Armbian image from Armbian download page and decompress it. Download the rk322x bootloader: rk322x_loader_v1.10.238_256.bin Download a copy of rkdeveloptool: a compiled binary is available in the official rockchip-linux rkbin github repository. Unplug the power cord from the tv box Plug an end of an USB Male-to-male cable into the OTG port (normally it is the lone USB port on the same side of the Ethernet, HDMI, analog AV connectors) while pressing the reset microbutton with a toothpick. You can find the reset microbutton in a hole in the back of the box, but sometimes it is hidden into the AV analog jack Plug the other end of the USB Male-to-male cable into an USB port of your computer If everything went well, run lsusb: you should see a device with ID 2207:320b Run sudo rkdeveloptool rd 3 (if this fails don't worry and proceed to next step) Run sudo rkdeveloptool db rk322x_loader_v1.10.238_256.bin Run sudo rkdeveloptool wl 0x0 image.img (change image.img this with the real Armbian image filename) Unplug the power cord Done! Installation (without SD card, board with NAND) If you are in the unfortunate case you can't use an SD card for installation and your board has a NAND chip, you still have an option to use the quick Multitool installation steps via USB. Obtain a copy of rkdeveloptool: a compiled binary is available in the official rockchip-linux rkbin github repository. Unplug the power cord from the tv box Plug an end of an USB Male-to-male cable into the OTG port (normally it is the lone USB port on the same side of the Ethernet, HDMI, analog AV connectors) while pressing the reset microbutton with a toothpick. You can find the reset microbutton in a hole in the back of the box, but sometimes it is hidden into the AV analog jack Plug the other end of the USB Male-to-male cable into an USB port of your computer If everyting went well, using lsusb you should see a device with ID 2207:320b Run sudo rkdeveloptool wl 0x4000 u-boot-main.img (download u-boot-main.img.xz , don't forget to decompress it!) Unplug the power cord Now you can follow the instructions on how to install on eMMC/NAND via SD card, just use instead an USB stick to do all the operations and plug it into the USB OTG port. Once you reboot, USB OTG port will be used as a boot device. NOTE: NAND users without SD slot may be unhappy to know that it will be difficult to do extra maintenance with Multitool in case something breaks in the installed Armbian system: installing u-boot-main.img makes the installed system unbootable because it is missing the NAND driver. Alternative backup, restore and erase flash for EXPERTS: These backup, restore and erase flash procedures are for experts only. They are kept here mostly for reference, since the Multitool is perfectly able to do same from a very comfy interface and is the suggested way to do maintenance. Backup: Obtain a copy of rkdeveloptool: a compiled binary is available in the official rockchip-linux rkbin github repository. If you prefer, you can compile it yourself from the sources available at official rockchip repository Unplug the power cord from the tv box Plug an end of an USB Male-to-male cable into the OTG port (normally it is the lone USB port on the same side of the Ethernet, HDMI, analog AV connectors) while pressing the reset microbutton with a toothpick. You can find the reset microbutton in a hole in the back of the box, but sometimes it is hidden into the AV analog jack Plug the other end of the USB Male-to-male cable into an USB port of your computer If everyting went well, using lsusb you should see a device with ID 2207:320b change directory and move into rkbin/tools directory, run ./rkdeveloptool rfi then take note of the FLASH SIZE megabytes (my eMMC is 8Gb, rkdeveloptool reports 7393 megabytes) run ./rkdeveloptool rl 0x0 $((FLASH_SIZE * 2048)) backup.data (change FLASH_SIZE with the value you obtained the step before) once done, the internal eMMC is backed up to backup.data file Restore: first we have to restore the original bootloader, then restore the original firmware. Running rkdeveloptool with these switches will accomplish both the jobs: ./rkdeveloptool db rk322x_loader_v1.10.238_256.bin Downloading bootloader succeeded. ./rkdeveloptool ul rk322x_loader_v1.10.238_256.bin Upgrading loader succeeded. ./rkdeveloptool wl 0x0 backup.data Write LBA from file (100%) Download here: Erase the flash memory: clearing the internal eMMC/NAND memory makes the SoC look for external SD Card as first boot option. If there isn't any suitable SD Card, the SoC enters maskrom mode, which can then be used for full eMMC/NAND access using rkdeveloptool. This is perfectly fine if your box has an eMMC flash memory. NOTE: In case you have a NAND flash memory this option is however discouraged. The original bootloader contains some special parameters to correctly access the data. Clearing the flash memory will probably garbage the NAND data and restoring the bootloader may require some special instructions. Obtain a copy of rkdeveloptool: a compiled binary is available in the official rockchip-linux rkbin github repository. If you prefer, you can compile it yourself from the sources available at official rockchip repository Unplug the power cord from the board Plug an end of an USB Male-to-male cable into the OTG port (normally it is the lone USB port on the same side of the Ethernet, HDMI, analog AV connectors) while pressing the reset microbutton with a toothpick. You can find the reset microbutton in a hole in the back of the box, but sometimes it is hidden into the AV analog jack Plug the other end of the USB Male-to-male cable into an USB port of your computer If everyting went well, using lsusb you should see a device with ID 2207:320b run ./rkdeveloptool ef and wait a few seconds once done, the internal eMMC is erased and the device will boot from the sdcard from now on Partecipation and debugging: If you want to partecipate or need help debugging issues, do not hesitate to share your experience with the installation procedure of the boxes. In case of issues and missed support, provide as many as possible of these things is very useful to try and bring support for an unsupported board: some photos of both sides of the board. Details of the eMMC, DDR and Wifi chips are very useful! upload the device tree binary (dtb) of your device. We can understand a lot of things of the hardware from that small piece of data; and alternative is a link to the original firmware (you can do a full backup with the Multitool); dmesg and other logs (use armbianmonitor -u that automatically collects and uploads the logs online) attach a serial converter to the device and provide the output of the serial port; Critics, suggestions and contributions are welcome! Credits: @fabiobassa for his ideas, inspiration, great generosity in giving the boards for development and testing. The project of bringing rk322x into armbian would not have begun without his support! Justin Swartz, for his work and research to bring mainline linux on rk3229 (repository here) @knaerzche for his great contribution to libreelec support and mainline patches @Alex83 for his patience in testing the NAND bootloader upgrade procedure on his board @Jason Duhamell for his generous donation that allowed researching eMCP boards and esp8089 wifi chip
-
@Benedito Portela you are a long term user on this forum to don't know that debugging is a MUST !!!!!!! And you have such WONDERFULL uart pads, even with names ( tx rx gnd) ... why don't you use them and let all of us know what going in your box ??😇 😉
-
I'm, using one of those CH340 based usb-uart dongles https://www.aliexpress.com/w/wholesale-usb-uart-ch340.html but that normally most usb-uart dongles would work https://www.aliexpress.com/w/wholesale-usb-uart.html just make sure to check that it has / uses 3.3V io levels. Not 5V io levels as that may damage the processor (cpu / soc) for the pins connection review the user manual http://www.orangepi.org/html/hardWare/computerAndMicrocontrollers/service-and-support/Orange-Pi-Zero-3.html it is the 3 pins labelled Debug TTL UART on their board photo http://www.orangepi.org/img/zero3/0627-zero3 (6).png --- off-topic: for these small boards, I've basically stopped running them with an LCD monitor and keyboard as I find it a hassle as I'm using a desktop PC and trying to share the monitor. I mostly use them 'headless' using the usb-uart port. And in fact, after you setup the network appropriately e.g. set a static IP address or install avahi, the usb-uart console is no longer needed for static (fixed) IP address it is covered in the networking guide https://docs.armbian.com/User-Guide_Networking/ for avahi (MDNS) > apt install avahi-daemon avahi-utils edit /etc/avahi/avahi-daemon.conf [publish] publish-workstation=yes you can find the board on the ethernet over MDNS e.g. https://github.com/hrzlgnm/mdns-browser and you can ssh into the board over the network, e.g. using putty https://www.putty.org/
-
as I've not been running X11, I can't really help with this, but among the things, check the logs during X startup (normally /var/log/*), that could lead to the cause. note also that more recently, the display systems are running wayland rather than X11. that could cause xfce etc to fail if it is expecting an X11 based setup it is also recommended to bootup in the uart console (debug) port using a usb-uart dongle. - the benefits are numerous, the boot messages are mostly presented - it provides you with a console to login and check things while the system is running e.g. to login and check dmesg and other logs - essential especially when re-wiring network configuration
-
DISCLAIMER (PLEASE READ): everything you can find in this thread (binaries, texts, code snippets, etc...) are provided AS-IS and are not part of official Armbian project. For this reason not people from Armbian project nor myself are responsible for misuse or loss of functionality of hardware. Please don't ask about support or assistance in other non-community forums nor in the official Armbian github repository, instead post your questions in this thread, in the TV Boxes forum section (hardware related) or in the Peer-to-peer support section (general linux/software related). Thank you! This thread is to give stable and mature long-term range support to rk3318/rk3328 found in many tv boxes in Armbian project as Community Supported Configuration (CSC). The current work is mainlined into Armbian project, but your mileage may vary; most recent developments live on my personal fork on github -> here <- Important notes: is just a personal opinion, but apparently widely supported, that rk3318 chip is not an official rockchip part. They probably are scrap rk3328 parts which have not passed conformance tests but are sold anyway to tv boxes manufacturers. They don’t reach the same operating frequency of the rk3328, have much higher leakage currents (and thus higher temperatures) and often the boards they are installed on are low quality with low quality components, in fact a very very common issue is the eMMC failure due to bad parts and bad soldering. So said, I personally suggest not to buy any rk3318 tv box, but instead find a properly supported SBC (Single Board Computer) if you need a reliable product. In the unfortunate case you already have such product, this thread may help you have some fun with them. What works: • Works on RK3318 and RK3328 TV boxes with DDR3 memories • Mainline u-boot • Mainline ATF provided as Trusted Execution Environment • All 4 cores are working • Ethernet • Serial UART (configured at stock 1.5Mbps) • Thermals and frequency scaling • OTG USB 2.0 port (also as boot device!) • EHCI/OHCI USB 2.0 ports and XHCI USB 3.0 ports • MMC subsystem (including , SD and sdio devices) • Hardware video acceleration (fully supported via RKMPP on legacy kernel, support via hantro and rkvdec kernel driver on mainline) • Various WIFI over SDIO are supported • Full acceleration on legacy kernel and mainline kernel • U-boot boot order priority: first the sdcard, then the USB OTG port and eventually the internal ; you can install u-boot (and the whole system) in the internal and u-boot will always check for images on external sdcard/USB first. Unbrick: Technically, rockchip devices cannot be bricked. If the internal flash does not contain a bootable system, they will always boot from the sdcard. If, for a reason, the bootable system on the internal flash is corrupted or is unable to boot correctly, you can always force the maskrom mode shorting the clock pin on the PCB. The procedure is explained here for rk322x, but for rk3318/28 is the same. In most of the rk3318/28 boards, shorting the clock pin is difficult or impossible because eMMC are BGA chips with no exposed pins. Pay double attention when burning something on the internal flash memory and always test first the image booting from the sdcard to be sure it works before burning anything in internal flash. This is a list of posts where forum users have been able to spot the eMMC clock pin to trigger the maskrom mode: H96 Max+ (board signature: RK3318_V1.4) by @Gausus X88 PRO 10 (board signature: X88_PRO_B) by @mathgaming HK1 Max (board signature YX_RK3318) by @Constantin Gatej Ninkbox N1 Max RK3318 by @enigmasphinx Partecipation and debugging: If you want to partecipate or need help debugging issues, do not hesitate to share your experience with the installation procedure of the boxes. In case of issues and missed support, provide as many as possible of these things is very useful to try and bring support for an unsupported board: some photos of both sides of the board. Details of the eMMC, DDR and Wifi chips are very useful! upload the device tree binary (dtb) of your device. We can understand a lot of things of the hardware from that small piece of data; and alternative is a link to the original firmware (you can do a full backup with the Multitool); dmesg and other logs (use armbianmonitor -u that automatically collects and uploads the logs online) attach a serial converter to the device and provide the output of the serial port; Multimedia: Mainline kernel: 3D acceleration is provided by Lima driver and is already enabled. Hardware video decoding: https://forum.armbian.com/topic/19258-testing-hardware-video-decoding-rockchip-allwinner/ Legacy kernel: If you need multimedia features, like OpenGL/OpenGL ES acceleration, hardware accelerated Kodi, ffmpeg and mpv you can take a look to this post Installation (via SD card): Building: You can build your own image follow the common steps to build armbian for other tv boxes devices: when you are in the moment to choose the target board, switch to /TVB/ boards and select "rk3318-box" from the list. Prebuilt images: Nightly stables - built from trunk by Armbian servers and GPG-signed: https://github.com/armbian/community Multitool: Multitool - A small but powerful image for RK3318/RK3328 TV Box maintenance. Download it from here Quick installation instructions on eMMC: Build or download your preferred Armbian image and a copy of the Multitool; Burn the Multitool on an SD card; once done, place the Armbian image in images folder of the SD card NTFS partition; Plug the SD card in the TV box and plug in the power cord. After some seconds the blue led starts blinking and the Multitool appears; OPTIONAL: you can do a backup of the existing firmware with "Backup flash" menu option; Choose "Burn image to flash" from the menu, then select the destination device (usually mmcblk2) and the image to burn; Wait for the process to complete, then choose "Shutdown" from main menu; Unplug the power cord and the SD card, then replug the power cord; Wait for 10 seconds, then the led should start blinking and HDMI will turn on. The first time the boot process will take a couple of minutes or more because the filesystem is going to be resized, so be patient and wait for the login prompt. On first boot you will be asked for entering a password for root user of your choice and the name and password for a regular user Run rk3318-config to configure the board specific options Run armbian-config to configure timezone, locales and other personal options Congratulations, Armbian is now installed! Despite the procedure above is simple and reliable, I always recommend to first test that your device boots Armbian images from SD Card. Due to the really large hardware variety, there is the rare chance that the images proposed here may not boot. If a bad image is burned in , the box may not boot anymore forcing you to follow the unbrick section at the top of this post. Quick installation instructions to boot from SD Card: If you are already running Armbian from eMMC, skip to the next step. Instead if you are running the original firmware you need to first erase the internal flash; to do so download the Multitool, burn it on an SD Card, plug the SD Card and power the TV Box. Use "Backup flash" if you want to do a backup of the existing firmware, then choose "Erase flash" menu option. Build or download your preferred Armbian image; Uncompress and burn the Armbian image on the SD Card; Plug the SD Card in the TV Box and power it on; Wait for 10 seconds, then the led should start blinking and HDMI will turn on. The first time the boot process will take a couple of minutes or more because the filesystem is going to be resized, so be patient and wait for the login prompt; On first boot you will be asked for entering a password for root user of your choice and the name and password for a regular user Run rk3318-config to configure the board specific options Run armbian-config to configure timezone, locales and other personal options, or also to transfer the SD Card installation to internal ; Congratulations, Armbian is running from SD Card! Tutorial - How to install Armbian on your TV Box (by @awawa) : https://www.hyperhdr.eu/2022/01/tv-box-mania-i-part-x88-pro-10.html A note about boot device order: With Armbian also comes mainline U-boot. If you install Armbian, the bootloader will look for valid bootable images in this order: External SD Card External USB Stick in OTG Port Internal The Multitool does not boot / How to burn image directly on eMMC: Some boards have the sdcard attached to an auxiliary (called also sdmmc_ext or external) controller which is not the common one. Forum findings declare that those boards are not able to boot from sdcard with stock firmware and they neither do in maskrom mode: the stock firmware always boots even if you put the multitool on sdcard. In such case, burning images directly on eMMC is the only way to have a working Armbian installation. You can follow these instructions by @fabiobassa to burn images directly on eMMC: https://forum.armbian.com/topic/17597-csc-armbian-for-rk3318rk3328-tv-box-boards/?do=findComment&comment=130453 Notes and special hardware: Script to change DDR memory frequency here Wireless chip AP2734, SP2734, HY2734C and similars: they are clones of AmPAK AP6334 which is combo wifi + bluetooth of broadcom BCM4334/B0 chips. You may need a special nvram file, instructions by @paradigman are here Critics, suggestions and contributions are welcome! Credits: @fabiobassa for his ideas, inspiration, great generosity in giving the boards for development and testing. The project of bringing rk3318 into armbian would not have begun without his support! @hexdump for his precious support in early testing, ideas and suggestions @MX10.AC2Nfor his patience in testing mxq-rk3328-d4 board support All the rockhip64 maintainers at Armbian project who have done and do most of the work to support the platform
-

CSC Armbian for RK3318/RK3328 TV box boards
Artem Kochegizov replied to jock's topic in Rockchip CPU Boxes
Hello! I try to flash my H96Max on RK3318 but i cannot load armbian. After success flash armbian to emmc i remove sd and nothing, nothing load and nothing in uart port, only red led light and thats all. Здравствуйте! Я пытаюсь прошить свой H96Max на RK3318, но не могу загрузить armbian. После успешной прошивки armbian на emmc я извлекаю SD-карту, и ничего, ничего не загружается и ничего не отображается в последовательном порту, только красный светодиод и всё. when i'm load from sd multitool i get this log from uart i'm try to find u-boot on my h96max emmc and nothing, first 100bytes empty. Where i can get u-boot? LoadLog.txt -
So I'm trying to connect with a UART cable from my PC to the board (OPI3LTS). Here's what I did so far: In desperation, I double checked every connection, to no avail. My devices are powered separately, so only the RX and TX cable are connected, and they are crossed as they should. Set up permissions: sudo chmod 666 /dev/ttyUSB0 Add user to dialout: sudo adduser <user> dialout Install minicom: Set up minicom with the correct address: /dev/ttyUSB0 Set up the correct baud rate (115200 in this case) Turn off flow control Tried connecting via "screen", minicom and putty, all of them just show me a black CLI I can't write in. Help? 🥲
-
 Dear Community, I'll build a Developer Team specially for Banana Pi Boards!" GPIO Libarys I started updating/modifing the old GPIO-Libarys, so they can be used on the latest builds! I want to build a Team, for GPIO-Libary Development, for porting these Libarys: WiringPi-Node WiringPi-PHP WiringPi-Perl WirinigPi-Ruby gpiozero rpi-gpio Updating and modifying these: RPi.GPIO BPI-WiringPi2-Python BPI-WiringPi2 At the end, all currently working GPIO Libarys are: luma.oled RPi.GPIO BPI-WiringPi BPI-WiringPi2 BPI-WiringPi2-Python Armbian Build System for Banana Pi I started building the build-system for full banana pi support! Anyone who would like to join the developer-team, just pn me, post in this thread, or contact me on github or discord!" I created a GIthub-Organisation for this project and a Discord Server. A Domain & VPS Server is commin Monday!" Goals: Support ONLY for Banana Pi Boards Board Determiner Script which exports Board-Infos, required by gpio-libs (usual located at: /var/lib/bananapi) APT-Mirror Archive Hosted by our project-teams vps-server! ( Mirror stores all latest gpio-libarys we specially build for using on latest builds and other packages we'll develope in future) Added APPGROUPS: Pentesting, TV-Box, Server-Side, Game Desk & Development Revised menu for selecting extensions and other additional items Revised config menu Adding additional build options A Web-Based Project-Server Hosted Build-System will be build and available on the project-page, where you can build images remotely, according to you settings made in the WebInterface, with live progress & build-log + downloading compressed own image-release. A publish option will be added to, where you can upload your builded image to any Cloud/Storage we provide. Revised device trees According to APPGROUPS and Enabled Extensions: I2C, SPI, UART are enabled in the gpio_develope extension, and all requirements for gpio-programming are pre-installed, the gpio libs are pre-installed too. If you have some Ideas, what we could add or which wishes we can make true, just reply in this post, or contact us. Github Organisation Discord greetz, hexzhen3x7
 -
I'm new to the Orange Pi 4 LTS. I work SBC's headless and have installed using UART many times on RP Zero's, BananaPi's and most recently on a RockPro64. However, I am not sure if I should be using. Is there another set of UART pins besides the "debug ins"? Booted the image on an sdcard connected to the debug pins and just got 8 lines of this stuff <��6v��Ή9�.�����goO
-
@robertoj there are some 'old' stuff that may not be fully relevant but still useful this gist likely helps: https://gist.github.com/ag88/de02933ba65500376d1ff48e504b1bf3 an 'old' post: Note that currently in the minimal image netplan is set to systemd-networkd https://docs.armbian.com/User-Guide_Networking/#minimal-images I'm less familiar with systemd-networkd, though it is possible to setup the network fully with it. What i did currently, is to update netplan config as above to use NetworkManager After that I use NetworkManger to setup a bridge adding the ethernet interface. https://gist.github.com/ag88/de02933ba65500376d1ff48e504b1bf3 . However, I actually make NetworkManager *unmanage* the Wifi interface, because i'm using hostapd. I'm using hostapd mainly because in journalctl logs, there is an entry for every host/client that connects. I'm not sure about how to do the same with Network Manager. hostapd also supports elaborate RADIUS authentication if one wants to go the distance. Then I install and configure hostapd as described in the gist, and during startup, hostapd actually patch the wifi interface into the bridge that is setup with NetworkManager.. The configuration for wifi AP is completely done in hostapd.conf as described in the gist. I'm using a bridge as DHCP is managed from my gateway router, hence I did not run a separate DHCP server instance in Orange Pi Zero 3 itself. An alternative setup is to setup NAT (network address translation) on the Orange Pi Zero 3 and to run a DHCP server on the Orange Pi Zero 3 itself. I think NAT approach is 'more common' I'm using hostapd, but I think without hostapd, it is also possible to setup an AP using NetworkManager alone. i.e. to let Network Manager manage the Wifi interface, and configure it as an AP. The benefit here is that Network manager woulld likely manage the DHCP and NAT as well all from Network Manager configurations. As I'm doing everything from the command line, I used NetworkManager cli (nmcli) for all the network manager configuration tasks. Note that while messing with networking, it is necessary to work in the serial debug console using a usb-uart dongle. i.e. bootup and login as root using a usb-uart dongle to the 3 'debug' pins for the serial console.
-
 Hi Gents, I would like to ask for your help or tips and tricks in the following problem... Basically to keep the long story short, I have a custom board with RK3566 and 2 GB of RAM, 32 GB Samsung emmc on it ... basically if you are familliar it is a Linxdot Helium miner which has some problems with the onboard Lora module. I had tried to flash using RKDevTool a few Debian version that I found for Rk3566 but not all of them worked properly. All the time I was able to reflash it by using RKDevTool by pressing the button while I powered up the board but after flashing the Armbian minnimal for Orange Pi3B I can't use the RKDevTool anymore, it is simply not seeing the board anymore (No device found). I have an UART 3.5mm Jack type port, I had a homemade cable so I was able to create the user at the first boot, I am able to log in, but there is no HDMI, the ethernet port is no recognized, WiFi also not recognized, I am plug in a USB Flash stick and I am not seeing it in the lsblk command output, so basically I have now a very basic board. (I know, I am stupid, but I was thinking that I can't damage it because the RKDevTool was working fine under all previous circumstances). My question would be, if there is any possibility somehow to restore the functionality to be able to boot it in MaskMode for the RKDevTool or any other solution to make at least the Ethernet and USB ports to work? There are no other button, just 2, one reset and one user button on it. All the time I had to keep pressed the user button in order to be detected by the RK tool. There are no jumpers on the board (at least I can't find them) which I can short to stop the emmc from booting or similar things Many thanks in advance ! The booting process: ▒▒▒DDR V1.18 f366f69a7d typ 23/07/17-15:48:58 ln LP4/4x derate en, other dram:1x trefi ddrconfig:15 DDR4, 324MHz BW=32 Col=10 Bk=4 BG=2 CS0 Row=16 CS=1 Die BW=16 Size=2048MB tdqss: cs0 dqs0: 192ps, dqs1: 144ps, dqs2: 96ps, dqs3: 96ps, change to: 324MHz clk skew:0x8d change to: 528MHz clk skew:0x8d change to: 780MHz clk skew:0x8d change to: 1056MHz(final freq) clk skew:0x8d PHY drv:clk:37,ca:37,DQ:37,odt:139 vrefinner:50%, vrefout:61% dram drv:34,odt:120 cs 0: the read training result: DQS0:0x3c, DQS1:0x39, DQS2:0x36, DQS3:0x3b, min : 0x7 0xa 0xb 0x8 0x2 0x4 0x4 0x2 , 0x3 0x7 0x1 0x4 0x4 0x6 0x8 0x2 , 0x5 0x6 0x3 0x6 0x2 0x1 0x2 0x4 , 0x8 0x6 0x6 0x0 0x5 0x8 0x9 0x6 , mid :0x24 0x27 0x28 0x25 0x1f 0x21 0x21 0x1f ,0x21 0x23 0x1e 0x22 0x22 0x23 0x24 0x1f , 0x21 0x23 0x20 0x22 0x1f 0x1d 0x1f 0x21 ,0x26 0x23 0x23 0x1d 0x22 0x26 0x26 0x23 , max :0x42 0x45 0x46 0x43 0x3c 0x3e 0x3f 0x3c ,0x3f 0x40 0x3b 0x40 0x40 0x40 0x41 0x3d , 0x3e 0x40 0x3e 0x3f 0x3c 0x3a 0x3d 0x3e ,0x44 0x40 0x41 0x3a 0x40 0x44 0x44 0x41 , range:0x3b 0x3b 0x3b 0x3b 0x3a 0x3a 0x3b 0x3a ,0x3c 0x39 0x3a 0x3c 0x3c 0x3a 0x39 0x3b , 0x39 0x3a 0x3b 0x39 0x3a 0x39 0x3b 0x3a ,0x3c 0x3a 0x3b 0x3a 0x3b 0x3c 0x3b 0x3b , the write training result: DQS0:0xa6, DQS1:0xa0, DQS2:0x99, DQS3:0x99, min :0x8c 0x92 0x90 0x8f 0x88 0x89 0x8a 0x89 0x8f ,0x85 0x89 0x84 0x89 0x89 0x8b 0x8b 0x85 0x85 , 0x84 0x85 0x84 0x85 0x83 0x81 0x83 0x85 0x82 ,0x7f 0x7d 0x7c 0x7a 0x81 0x81 0x82 0x7e 0x7e , mid :0xa8 0xab 0xab 0xa9 0xa1 0xa4 0xa3 0xa2 0xa9 ,0x9f 0xa2 0x9e 0xa3 0xa2 0xa3 0xa4 0x9f 0x9f , 0x9e 0x9e 0x9f 0xa0 0x9c 0x9b 0x9a 0x9c 0x9d ,0x9b 0x97 0x97 0x95 0x9a 0x9c 0x9c 0x9a 0x99 , max :0xc5 0xc5 0xc7 0xc3 0xbb 0xc0 0xbc 0xbb 0xc4 ,0xba 0xbb 0xb8 0xbd 0xbb 0xbc 0xbe 0xba 0xb9 , 0xb9 0xb8 0xba 0xbb 0xb6 0xb5 0xb2 0xb4 0xb8 ,0xb7 0xb2 0xb3 0xb0 0xb3 0xb7 0xb6 0xb6 0xb5 , range:0x39 0x33 0x37 0x34 0x33 0x37 0x32 0x32 0x35 ,0x35 0x32 0x34 0x34 0x32 0x31 0x33 0x35 0x34 , 0x35 0x33 0x36 0x36 0x33 0x34 0x2f 0x2f 0x36 ,0x38 0x35 0x37 0x36 0x32 0x36 0x34 0x38 0x37 , out U-Boot SPL 2023.10-rc4-armbian (Feb 10 2024 - 01:24:45 +0000) Trying to boot from MMC1 ## Checking hash(es) for config config-1 ... OK ## Checking hash(es) for Image atf-1 ... sha256+ OK ## Checking hash(es) for Image u-boot ... sha256+ OK ## Checking hash(es) for Image fdt-1 ... sha256+ OK ## Checking hash(es) for Image atf-2 ... sha256+ OK ## Checking hash(es) for Image atf-3 ... sha256+ OK ## Checking hash(es) for Image atf-4 ... sha256+ OK ## Checking hash(es) for Image atf-5 ... sha256+ OK ## Checking hash(es) for Image atf-6 ... sha256+ OK INFO: Preloader serial: 2 NOTICE: BL31: v2.3():v2.3-607-gbf602aff1:cl NOTICE: BL31: Built : 10:16:03, Jun 5 2023 INFO: GICv3 without legacy support detected. INFO: ARM GICv3 driver initialized in EL3 INFO: pmu v1 is valid 220114 INFO: dfs DDR fsp_param[0].freq_mhz= 1056MHz INFO: dfs DDR fsp_param[1].freq_mhz= 324MHz INFO: dfs DDR fsp_param[2].freq_mhz= 528MHz INFO: dfs DDR fsp_param[3].freq_mhz= 780MHz INFO: Using opteed sec cpu_context! INFO: boot cpu mask: 0 INFO: BL31: Initializing runtime services WARNING: No OPTEE provided by BL2 boot loader, Booting device without OPTEE initialization. SMC`s destined for OPTEE will return SMC_UNK ERROR: Error initializing runtime service opteed_fast INFO: BL31: Preparing for EL3 exit to normal world INFO: Entry point address = 0xa00000 INFO: SPSR = 0x3c9 U-Boot 2023.10-rc4-armbian (Feb 10 2024 - 01:24:45 +0000) Model: Rockchip RK3566 OPi 3B DRAM: 2 GiB PMIC: RK8090 (on=0x40, off=0x00) Core: 338 devices, 32 uclasses, devicetree: separate MMC: mmc@fe2b0000: 1, mmc@fe2c0000: 2, mmc@fe310000: 0 Loading Environment from nowhere... OK In: serial@fe660000 Out: serial@fe660000 Err: serial@fe660000 Model: Rockchip RK3566 OPi 3B Net: eth0: ethernet@fe010000 Hit any key to stop autoboot: 0 Card did not respond to voltage select! : -110 ** Booting bootflow 'mmc@fe310000.bootdev.part_1' with script Boot script loaded from mmc 0:1 204 bytes read in 12 ms (16.6 KiB/s) 8023386 bytes read in 204 ms (37.5 MiB/s) 35062272 bytes read in 767 ms (43.6 MiB/s) 166117 bytes read in 54 ms (2.9 MiB/s) Working FDT set to a100000 Failed to load '/boot/dtb/rockchip/overlay/rk35xx-fixup.scr' Unknown command 'kaslrseed' - try 'help' Moving Image from 0x2080000 to 0x2200000, end=4420000 ## Loading init Ramdisk from Legacy Image at 0a200000 ... Image Name: uInitrd Image Type: AArch64 Linux RAMDisk Image (gzip compressed) Data Size: 8023322 Bytes = 7.7 MiB Load Address: 00000000 Entry Point: 00000000 Verifying Checksum ... OK ## Flattened Device Tree blob at 0a100000 Booting using the fdt blob at 0xa100000 Working FDT set to a100000 Loading Ramdisk to 7c71d000, end 7cec3d1a ... OK ERROR: reserving fdt memory region failed (addr=0 size=0 flags=0) ERROR: reserving fdt memory region failed (addr=0 size=0 flags=0) Loading Device Tree to 000000007c68c000, end 000000007c71cfff ... OK Working FDT set to 7c68c000 Starting kernel ... Armbian_community 24.5.0-trunk.6 Bookworm ttyFIQ0 orangepi3b login:
-
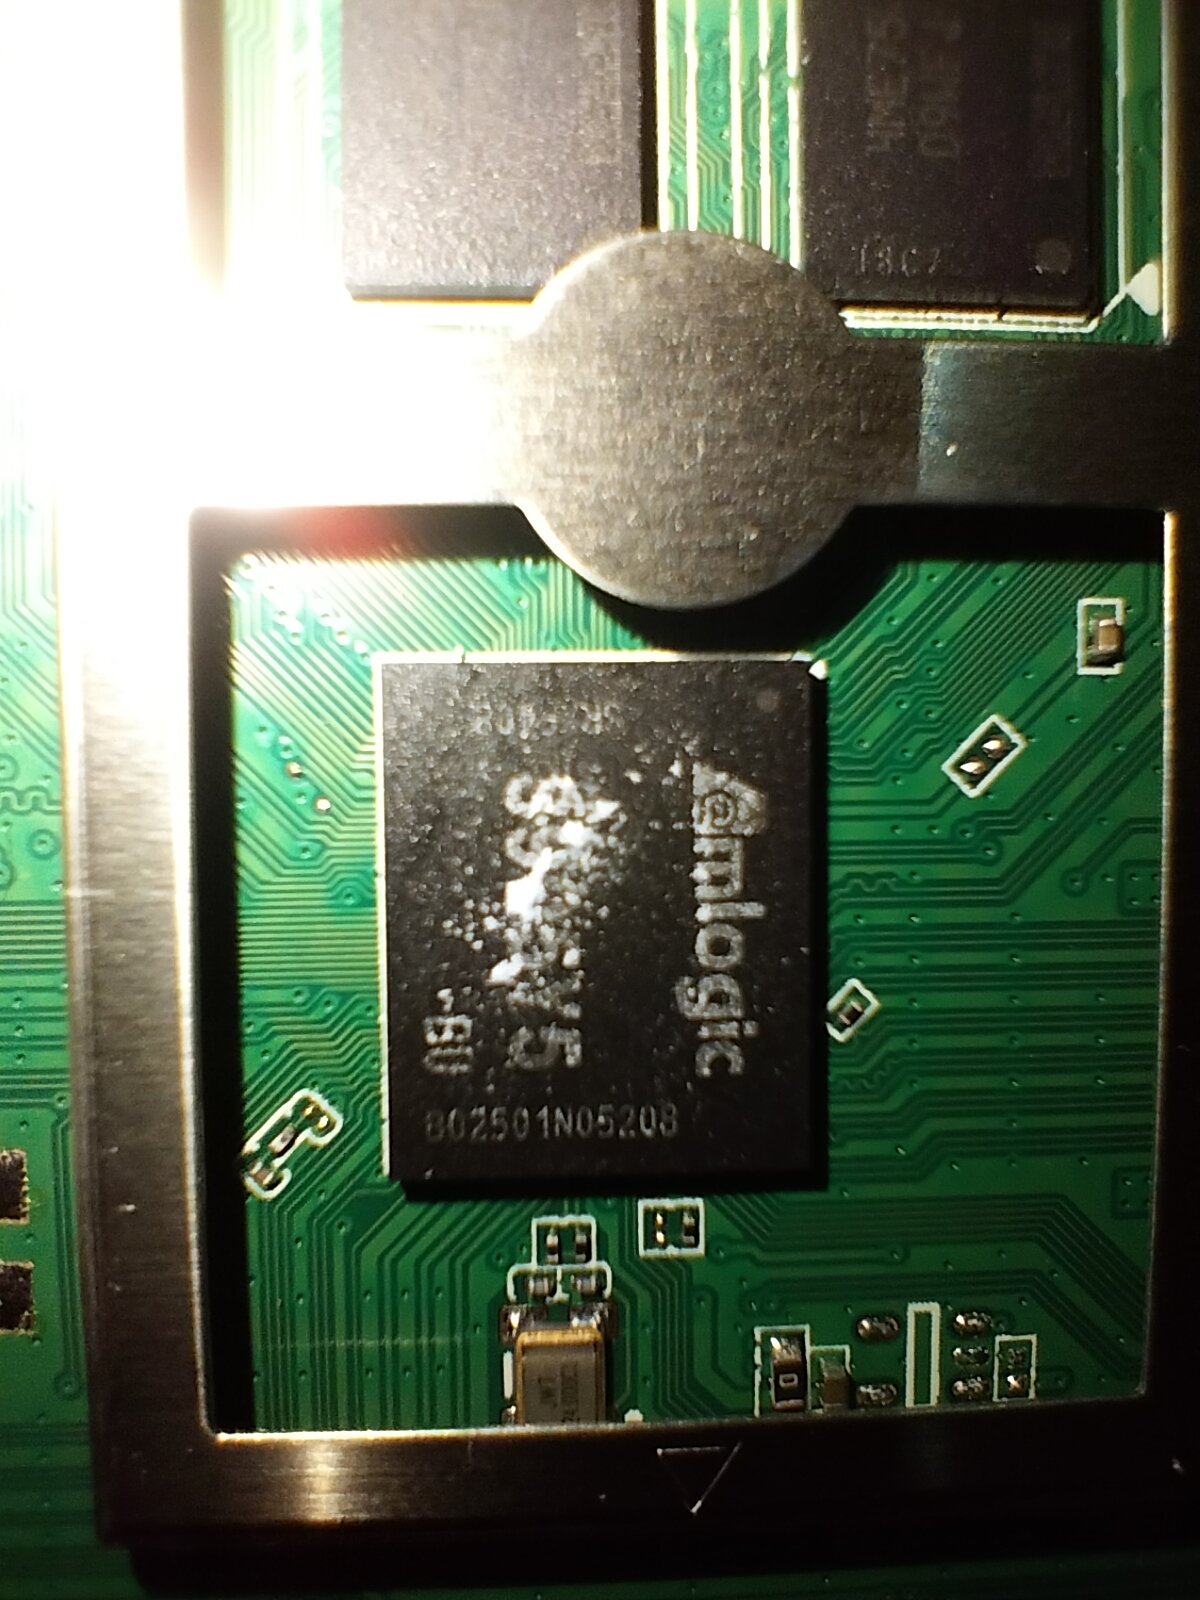
I happen to have got a Android tv box with a s905Y5 processor. I got this by a tv subscription from a company airtel in India. I unsubscribed from the subscription and my tv box is completely useless. it asks money for watching youtube!!!. I am extremely frustrated from this approach by this company so please help me save this from getting into e-waste. From my research i found that it runs android 14 with a custom launcher which checks for the subscription and a locked down kernel/bootloader which checks for signatures before boot. I came to know these from the uart output. I also found that it is basically a customised version of this box https://www.videostrong.com/products-show/vt9201-s905y5-aiot-solution

-
 Hello, I'm trying to get Armbian (Ubuntu 24.10 XFCE Desktop) running on a retro game stick device with the following specs: CPU: Amlogic S905M RAM: 8 GB Samsung (2x K4B4G1646B) Storage: Samsung 128 GB MicroSD (new, flashed via balenaEtcher) Ports: 1x USB-A, 1x MicroSD slot, 1x MicroUSB power (possibly supports OTG), 1x HDMI male output Original firmware: EmuELEC (working fine from factory SD card) What I tried: Flashed Armbian Ubuntu 24.10 (from debmfc GitHub) to the SD card Tried box=s905_generic in the config file Replaced dtb.img with several DTBs, including: meson-gxbb-p200.dtb meson-gxbb-p201.dtb meson-gxbb-xtmqbox.dtb Performed toothpick method to boot from SD card Green LED turns on, but: No HDMI output CPU stays cold, no signs of booting USB devices receive no power No blinking, no UART logs (I don’t have serial access yet) It feels like the CPU doesn’t even begin to initialize Linux – maybe it doesn't load the u-boot from the SD at all? Any idea what else I can try? Is there a minimal verified Armbian image known to boot on S905M-based TV sticks? Do I need to trigger multiboot somehow? Could this be a special bootloader variant? Could I use the original EmuELEC SD and inject Armbian files into it? Any help or known working image would be greatly appreciated. Thanks in advance!
 -

Bluetooth doesn't appear after boot very often in Orange Pi 2W
sminder replied to sminder's topic in Orange Pi Zero 2
4 of 5 times works well then failed. bt_boot_fail_05.txt Could you explaint it to me what you suggest to do? As I see you tried to set logic level on PH1 pin on CPU. In accordance with schematic this pin is connected to debug UART (RX) signal and doesn't affect on wireless chip. So I don't understand what you try to do. One more thing is BT and WiFi are in one chip, WiFi works well every time. As I understand the issue doesn't affect the chip itself otherwise WiFi wouldn't work either. -

Bluetooth doesn't appear after boot very often in Orange Pi 2W
IBV replied to sminder's topic in Orange Pi Zero 2
Ok, if you want we can try one more thing. According to AI, the correct way to always enable the bluetooth is to do it via a custom overlay, which is not done. First, remove the bt-gpio.service, it does not help: sudo sytemctl disable bt-gpio.service sudo rm /etc/systemd/system/bt-gpio.service sudo systemctl daemon-reload Then, create the custom overlay file /boot/overlay-user/bt_enable_ph1.dts with the following content: /dts-v1/; /plugin/; &pio { bt_en_pin: bt_en_pin { pins = "PH1"; function = "gpio_out"; bias-pull-up; output-high; }; }; &uart0 { pinctrl-names = "default"; pinctrl-0 = <&uart0_pins>; status = "okay"; }; &wcn_bt { compatible = "wcn,bt"; uart = <&uart0>; enable-gpios = <&pio 7 1 GPIO_ACTIVE_HIGH>; // PH1 = GPIO 225 status = "okay"; }; Then we can try to compile and install it: sudo armbian-add-overlay /boot/overlay-user/bt_enable_ph1.dts Then activate it in /boot/armbianEnv.txt, add the following line: user_overlays=bt_enable_ph1 If all works well try to reboot and see what happens. -
On an OrangePi-5b, `apt-get update` a few days ago updated the kernel, and now bluetooth no longer works. What's the proper way to downgrade the kernel to whatever I had before? (armbian-config shows way too many options)? Better yet, get it working again? bluetoothctl does not see the controller at all, and dmesg gives the following: $ dmesg|grep -i bluetoo [ 2.796188] Bluetooth: Core ver 2.22 [ 2.796203] NET: Registered PF_BLUETOOTH protocol family [ 2.796206] Bluetooth: HCI device and connection manager initialized [ 2.796211] Bluetooth: HCI socket layer initialized [ 2.796214] Bluetooth: L2CAP socket layer initialized [ 2.796220] Bluetooth: SCO socket layer initialized [ 3.925419] [BT_RFKILL]: bluetooth_platdata_parse_dt: get property: uart_rts_gpios = 122. [ 3.925433] [BT_RFKILL]: bluetooth_platdata_parse_dt: get property: BT,reset_gpio = 102. [ 3.925438] [BT_RFKILL]: bluetooth_platdata_parse_dt: get property: BT,wake_gpio = 22. [ 3.925590] input: bt-powerkey as /devices/platform/wireless-bluetooth/input/input5 [ 23.055720] Bluetooth: HCI UART driver ver 2.3 [ 23.055728] Bluetooth: HCI UART protocol H4 registered [ 23.055730] Bluetooth: HCI UART protocol BCSP registered [ 23.055731] Bluetooth: HCI UART protocol ATH3K registered [ 23.055769] Bluetooth: HCI UART protocol Three-wire (H5) registered [ 23.055873] Bluetooth: HCI UART protocol Intel registered [ 23.055911] Bluetooth: HCI UART protocol Broadcom registered [ 23.055921] Bluetooth: HCI UART protocol QCA registered [ 23.055922] Bluetooth: HCI UART protocol AG6XX registered [ 23.057998] Bluetooth: hci0: sending frame failed (-49) [ 23.058029] Bluetooth: hci0: Opcode 0x1003 failed: -49 [ 23.177045] Bluetooth: BNEP (Ethernet Emulation) ver 1.3 [ 23.177063] Bluetooth: BNEP filters: protocol multicast [ 23.177077] Bluetooth: BNEP socket layer initialized
-

Armbian for an old Allwinner A10 tablet
thewiseguyshivam replied to thewiseguyshivam's topic in Allwinner sunxi
Thank you so much for the detailed description of the patching process. I got back to this after a week and finally decided to solder a serial connection to the tablet main board and check whether the device boots up at all. After wiring the UART terminals, I used a Raspberry Pi Pico as a USB to serial converter (https://github.com/Noltari/pico-uart-bridge) and used PuTTY on Windows to get the serial console. To my pleasant surprise, armbian does boot! Couple of things that I see during the boot: BUG: Bad page state in process (ate-utmp) pfn:7a7b5 BUG: Bad page state in process dpkg-query pfn:79dc7 BUG: Bad page state in process armbian-hardwar pfn:78727 BUG: Bad page state in process NetworkManager pte:7842718f pmd:7f90e831 addr:b576a000 vm_flags:00000075 anon_vma:00000000 mapping:c22eb7c0 index:a file: libgvfsdbus.so fault:filemap_fault mmap:ext4_file_mmap [ext4] read_folio:ext4_read_folio [ext4] And then it boots to the terminal. On entering root as username and 1234 as password, it tells me my credentials are not correct. Next step for me is to try your kernel patch and check if I can get the display to work, and then try to see what I can do to log into the system. Really appreciate the help and will keep this topic updated, Shivam -
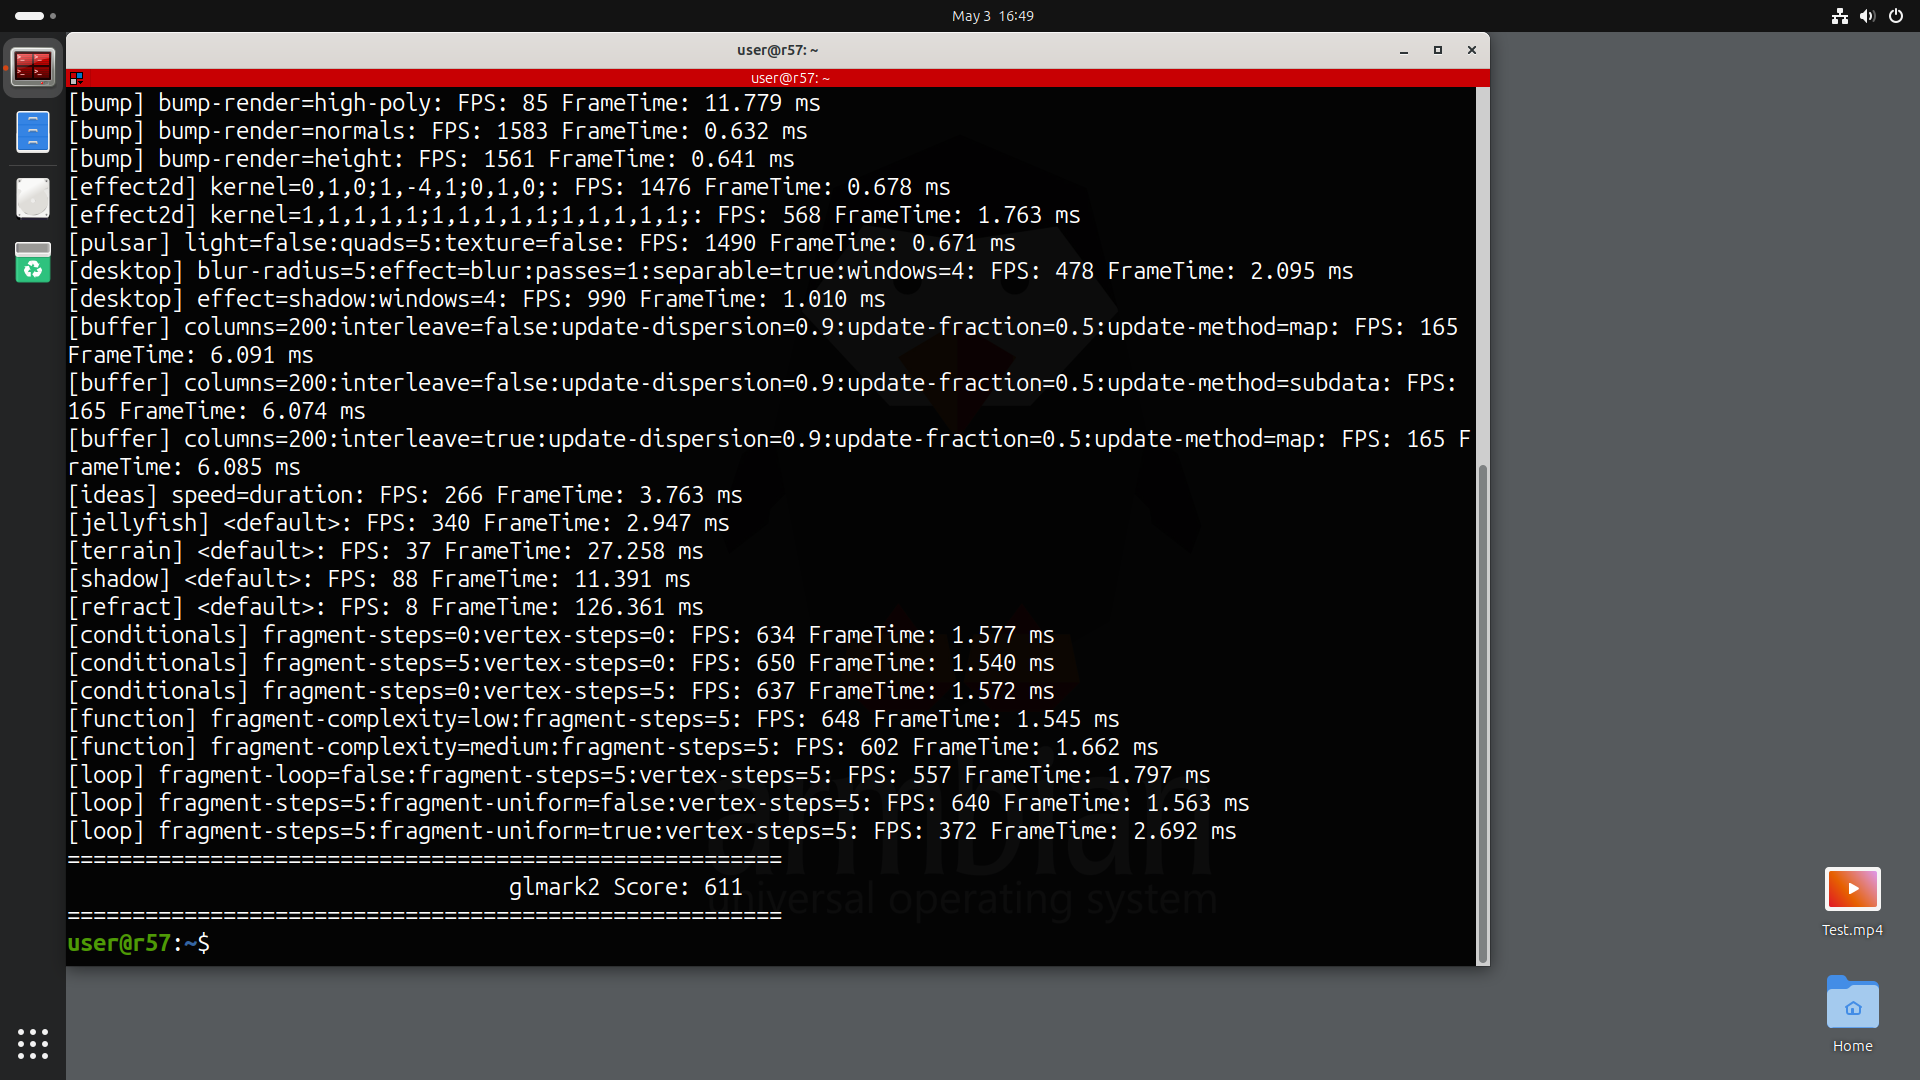
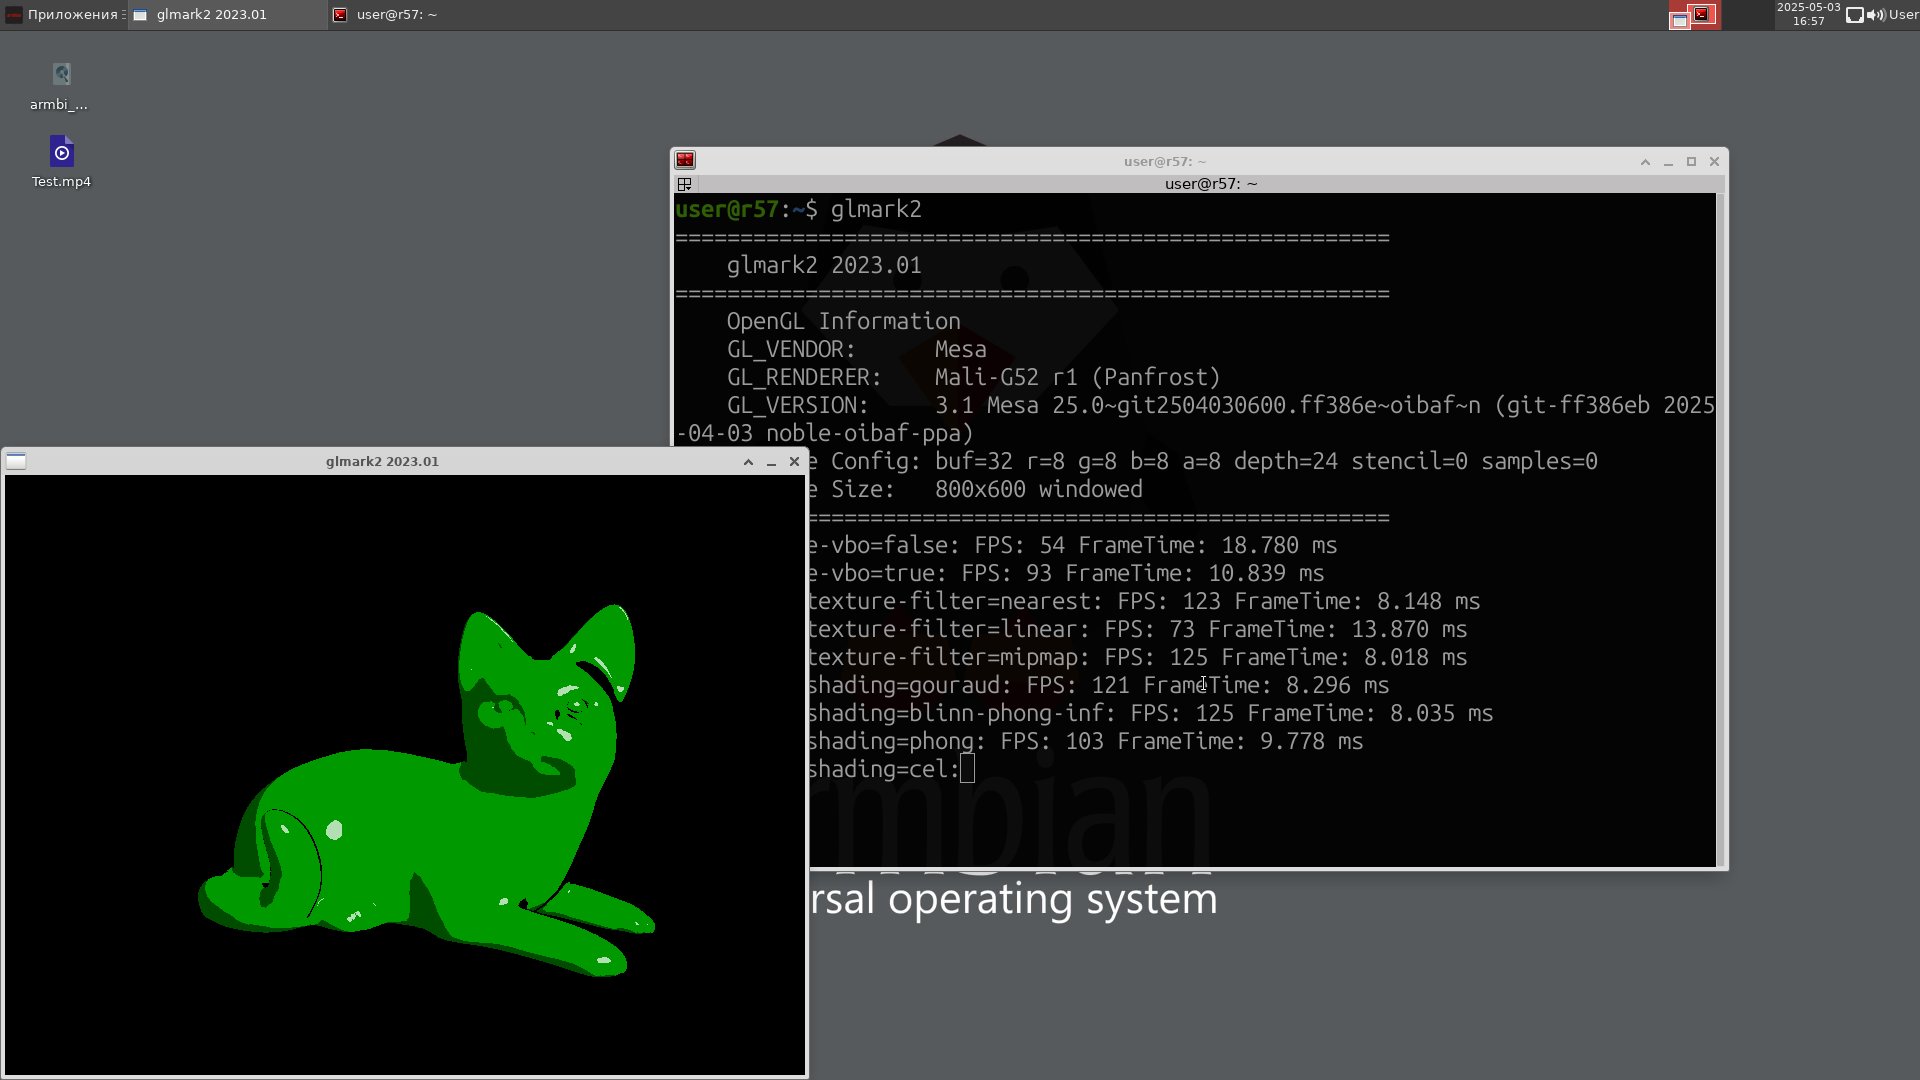
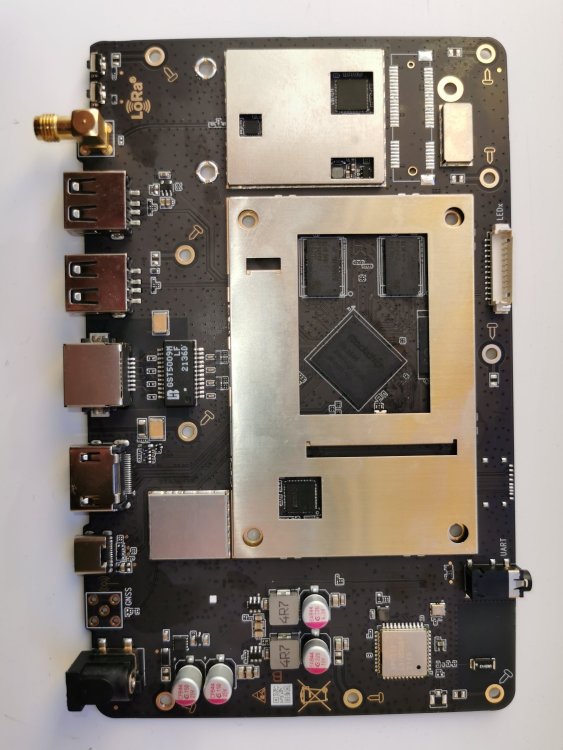
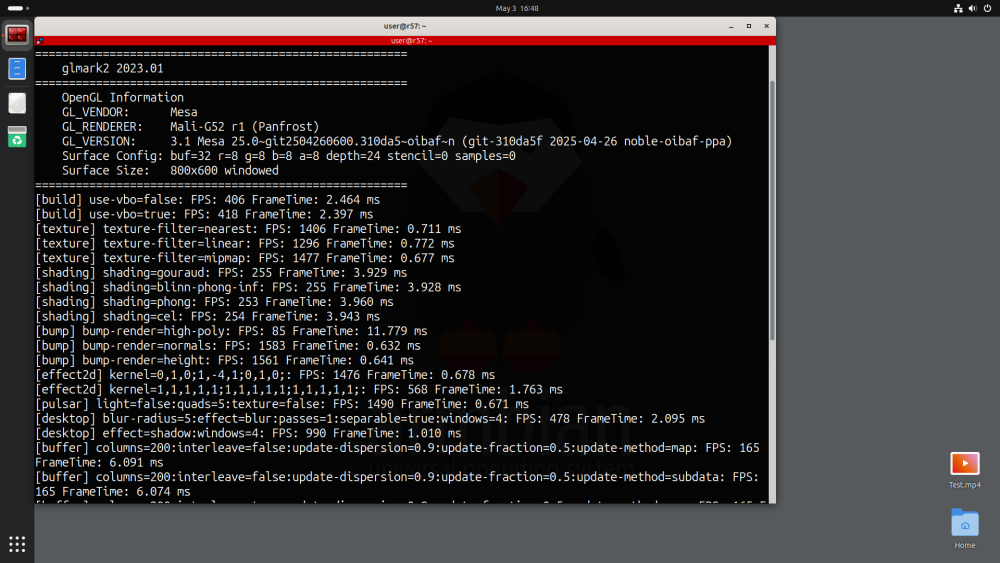
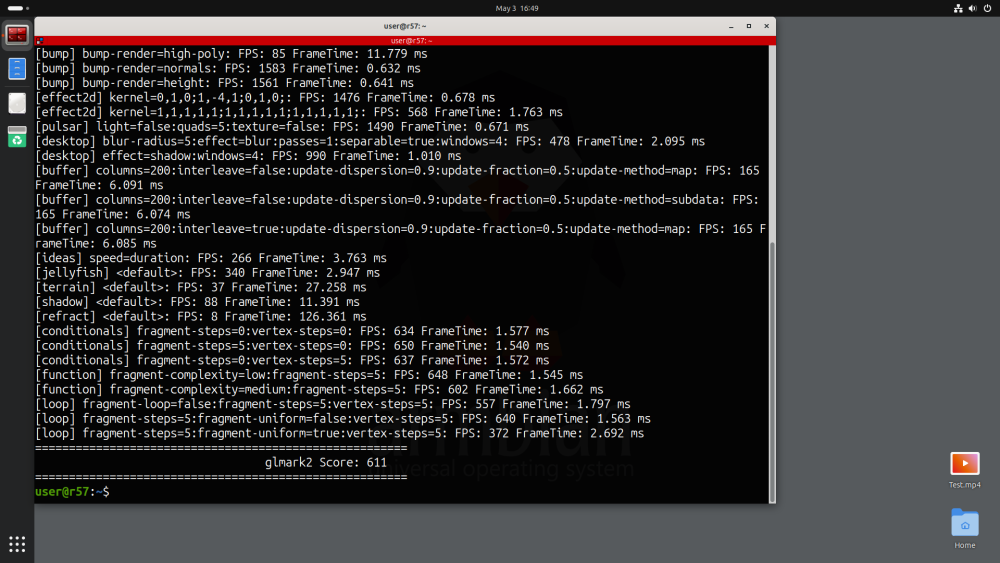
The alpha version of Armbian images for R57 with kernel edge 6.15 is now available Kernel is powered by HW panfrost acceleration on Gnome (wayland) and on XFCE (x11). Please note that in this version, the primary settings are enabled on the UART console, and to use the keyboard, you need to log in as ROOT with the password 1234 https://disk.yandex.ru/d/1M9FUcTqn5kEOw offtopic Libreelec for Mekotronics R57 https://forum.libreelec.tv/thread/20823-unofficial-le-for-rk356x-rk3328-rk3399-rk3588-s-rk3576/?postID=199809#post199809 Armbian 25.04 Noble ttyS0 r57 login: root Password: ____ ____ _____ | _ \| ___|___ | | |_) |___ \ / / | _ < ___) |/ / |_| \_\____//_/ Welcome to Armbian 25.04 Noble with bleeding edge Linux 6.15.0-rc1-station-m3-p No end-user support: built from trunk System load: 23% Up time: 2 min Memory usage: 14% of 3.81G IP: 192.168.1.28 Usage of /: 36% of 14G [ 8 security updates available, 15 updates total: apt upgrade ] Last check: 2025-05-03 16:41 [ General system configuration (beta): armbian-config ] root@r57:~# neofetch -------- █ █ █ █ █ █ █ █ █ █ █ OS: Armbian (25.04) aarch64 ███████████████████████ Host: Blueberry RK3576 EDGE V10 Board ▄▄██ ██▄▄ Kernel: 6.15.0-rc1-station-m3-p ▄▄██ ███████████ ██▄▄ Uptime: 2 mins ▄▄██ ██ ██ ██▄▄ Packages: 1509 (dpkg) ▄▄██ ██ ██ ██▄▄ Shell: bash 5.2.21 ▄▄██ ██ ██ ██▄▄ Resolution: 1920x1080 ▄▄██ █████████████ ██▄▄ Terminal: /dev/ttyS0 ▄▄██ ██ ██ ██▄▄ CPU: (8) @ 2.208GHz ▄▄██ ██ ██ ██▄▄ Memory: 786MiB / 3900MiB ▄▄██ ██ ██ ██▄▄ ▄▄██ ██▄▄ ███████████████████████ █ █ █ █ █ █ █ █ █ █ █ root@r57:~#

-
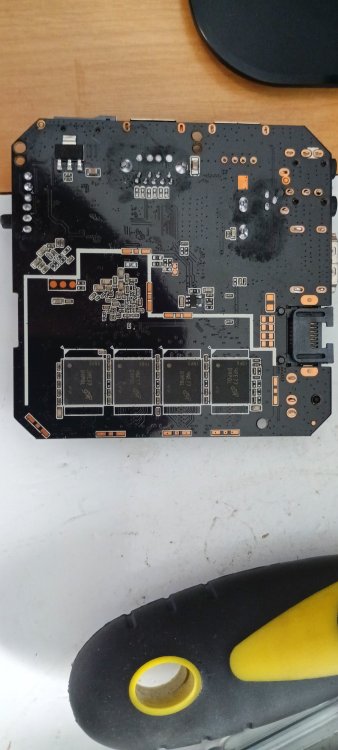
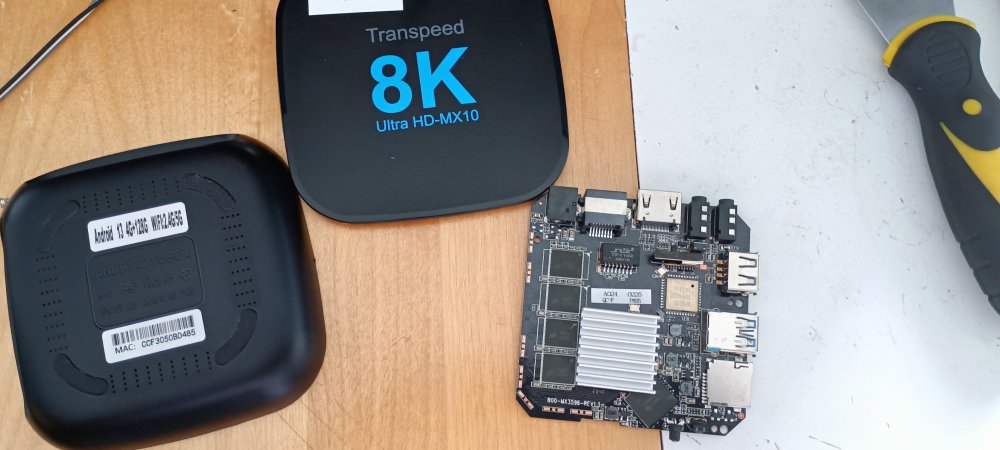
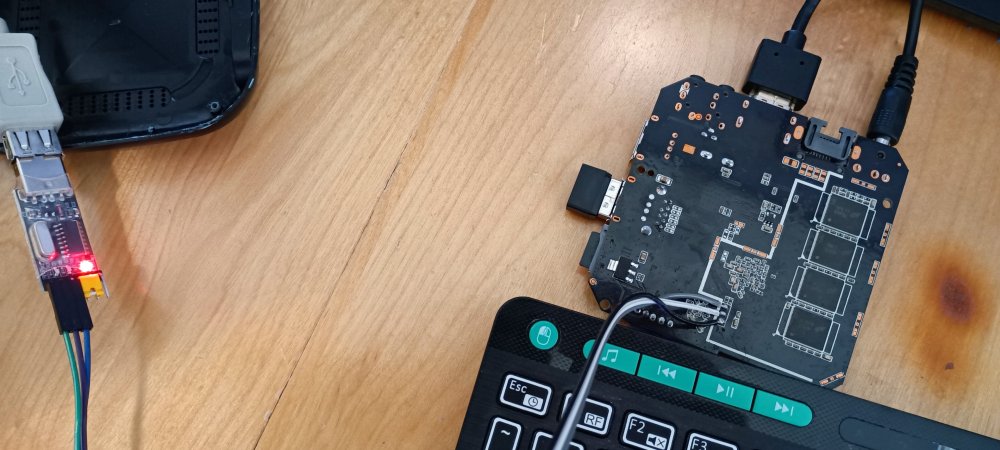
 Purchase Link This should be a fun one. Bought the 4GB/128GB variant. AP6330 Wifi Stock software is a really, really bad Android TV port. Looks like a Google Pixel 5 image that has had RK3528 support hacked into it. Some parts report the device as Pixel 5, others MX10. RKdumper wouldn't work. Wifi is hardcoded to China region in the kernel commandline, so wifi doesn't work in North America. Boots into a setup wizard that can't be closed, and forces an internet connection. Since wifi is broken out of the box, had to use ethernet to get past the setup wizard. Transpeed does not have a website or offer stock firmware. The vendor I purchased it from refused to supply a stock image. Image was pre-rooted, so used ethernet+adb to adb pull the entire flash chip. Unfortunately the Android partitions appear to be encrypted and only show gibberish directory names. Was able to use extract-dtb on one of the raw binary partitions to get the stock DTB, which is all I cared about anyway. It is pretty close to an existing one in Armbian (rk3528-demo1-lp4-v10) Located and soldered the tiny UART pads without destroying the box. Tried my different garbage clone USB UART adapters to find one that could handle RockChip 1.5 megabit over serial, fake CH340G did the job, fake CP2102 would not. May the best fake product win! Followed @Hqnicolas guidance from this thread and used the hinlink-h28k trunk release with 5.10 kernel as a base, and changed the dtb referenced in armbianenv to the stock android DTB extracted from the device, and of course it would not boot. Lots of errors, kernel panics on UART, errors from SD reader. Changed to Kernel 6.1 base hinlink-h28k image, and tried rk3528-demo1-lp4-v10.dtb, that one almost boots but doesn't see the SD card so can't mount root filesystem. Began DTB surgery, added pieces of the SD card initialization from the factory DTB to the rk3528-demo1-lp4-v10.dtb, got it to boot. Black USB port dead, Blue USB port working. No HDMI output on console (only UART) but does load XFCE when the GUI autostarts. Will keep slicing and dicing DTB to gain functions. Will need to drop in proper NVRAM file to get AP6330 working as I've had to do on other boards. //rk3528-demo1-lp4-v10.dts SD Not Detected mmc@ffc30000 { compatible = "rockchip,rk3528-dw-mshc\0rockchip,rk3288-dw-mshc"; reg = <0x00 0xffc30000 0x00 0x4000>; interrupts = <0x00 0x85 0x04>; max-frequency = <0x8f0d180>; clocks = <0x02 0x198 0x02 0x197 0x7a 0x01 0x7a 0x02>; clock-names = "biu\0ciu\0ciu-drive\0ciu-sample"; fifo-depth = <0x100>; resets = <0x02 0x2a9>; reset-names = "reset"; rockchip,use-v2-tuning; status = "disabled"; phandle = <0x10e>; }; //Factory DTB - SD reader stuck Busy, can't select voltage etc. mmc@ffc30000 { compatible = "rockchip,rk3528-dw-mshc\0rockchip,rk3288-dw-mshc"; reg = <0x00 0xffc30000 0x00 0x4000>; interrupts = <0x00 0x85 0x04>; max-frequency = <0x8f0d180>; clocks = <0x02 0x198 0x02 0x197 0x68 0x01 0x68 0x02>; clock-names = "biu\0ciu\0ciu-drive\0ciu-sample"; fifo-depth = <0x100>; resets = <0x02 0x2a9>; reset-names = "reset"; rockchip,use-v2-tuning; //status = "disabled" status = "okay"; bus-width = <0x04>; cap-mmc-highspeed; cap-sd-highspeed; disable-wp; pinctrl-names = "default"; pinctrl-0 = <0x6d 0x6e 0x6f 0x70>; rockchip,default-sample-phase = <0x5a>; supports-sd; sd-uhs-sdr12; sd-uhs-sdr25; sd-uhs-sdr50; sd-uhs-sdr104; phandle = <0xff>; }; //Combo that works enough to boot mmc@ffc30000 { compatible = "rockchip,rk3528-dw-mshc\0rockchip,rk3288-dw-mshc"; reg = <0x00 0xffc30000 0x00 0x4000>; interrupts = <0x00 0x85 0x04>; max-frequency = <0x8f0d180>; //clocks = <0x02 0x198 0x02 0x197 0x7a 0x01 0x7a 0x02>; clocks = <0x02 0x198 0x02 0x197 0x68 0x01 0x68 0x02>; clock-names = "biu\0ciu\0ciu-drive\0ciu-sample"; fifo-depth = <0x100>; resets = <0x02 0x2a9>; reset-names = "reset"; rockchip,use-v2-tuning; //status = "disabled"; //from stock dtb status = "okay"; bus-width = <0x04>; //cap-mmc-highspeed; //cap-sd-highspeed; disable-wp; pinctrl-names = "default"; pinctrl-0 = <0x6d 0x6e 0x6f 0x70>; //rockchip,default-sample-phase = <0x5a>; supports-sd; //sd-uhs-sdr12; //sd-uhs-sdr25; //sd-uhs-sdr50; //sd-uhs-sdr104; //end from stock dtb phandle = <0x10e>; }; rk3528-transpeed-8k-ultra-hd-mx10.dts
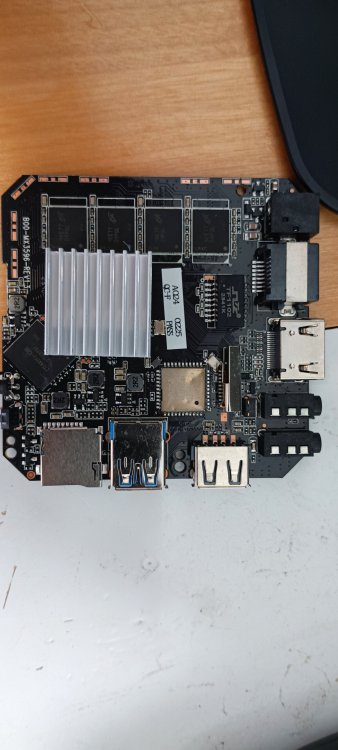
-
 I have resolved the problem with UART communication - was soldering point between TX and capacitor on board, so after desoldering connection through UART works. Armbian does not boot from USB via flash-drive, but when writing it to SDCard - I see start of the system, but it hungs on "Starting kernel" Adding boot logs: DDR V1.05 4bit PCB 2eef4a672d huan.he 23/04/14-10:58:56 LP4/4x derate disable, other dram:1x trefi ddrconfig:15 DDR3, 324MHz BW=32 Col=11 Bk=8 CS0 Row=16 CS=1 Die BW=16 Size=4096MB tdqss: cs0 dqs0: 626ps, dqs1: 482ps, dqs2: 723ps, dqs3: 723ps, change to: 324MHz clk skew:0x64 change to: 528MHz clk skew:0x64 change to: 666MHz clk skew:0x64 change to: 786MHz(final freq) clk skew:0x64 PHY drv:clk:50,ca:28,DQ:40,odt:145 vrefinner:50%, vrefout:50% dram drv:34,odt:60 cs 0: the read training result: DQS0:0x5b, DQS1:0x51, DQS2:0x53, DQS3:0x53, min : 0x6 0x13 0x10 0x10 0x10 0x2 0x1 0x6 , 0x8 0x8 0x4 0x3 0x5 0x4 0x2 0x2 , 0x7 0x5 0x1 0x6 , 0x2 0x10 0x10 0x3 0x13 0x5 0x12 0x6 , mid 0x2f 0x2f 0x29 0x29 0x2b 0x2a 0x29 0x27 , 0x2a 0x32 0x2e 0x29 0x3b 0x2c 0x39 0x2d , max :0x56 0x65 0x60 0x5f 0x62 0x52x50 0x50 0x4d , 0x4d 0x5a 0x54 0x56 0x57 0x4c 0x4f 0x54 ,, range:0x50 0x52 0x50 0x4f 0x52 0x50 0x50 0x4e ,0x4e 0x4e 0x4b0x50 0x4c 0x51 0x4f 0x47 0x4e 0x4e ,0x4c 0x4f 0x50 0x4c 0x51 0x4: DQS0:0xa2, DQS1:0x94, DQS2:0xac, DQS3:0xac, min :0x83 0x8ab 0x7a 0x79 0x78 0x74 0x73 0x73 0x73 0x79 , 0x8f 0x96 0x95 0x96 0x8d 0x98 0x90 0x97 0x92 0x93 , mid :0x9d 0xa5 0xa2 0xax94 0x92 0x90 0x8e 0x8d 0x8c 0x95 , 0xa8 0xaf 0xab 0xac 0xa9 0xb4 0xab 0xb1 0xad 0xb0 , max :0xb8 0xc1 0xbb 0xbb 0xbd 0 0xac 0xa9 0xa8 0xa6 0xb1 , 0xc1 0xc9 0xc4 0xc7 0xc6 0xbdd0 0xc6 0xcc 0xc9 0xce , range:0x35 0x37 0x31 0x32 0x35 0x36 0x0x36 0x35 0x33 0x38 , 0x32 0x33 0x31 0x36 0x32 0x2f 0x37 0x35 0x37 0x3b , out U-Boot SPL board init U-Boot SPL 2017.09-g0fbedd0675-230404 #zyf (Apr 11 2023 - 09:25:18) unknown raw ID 0 0 0 unrecognized JEDEC id bytes: 00, 00, 00 Trying to boot from MMC2 No misc partition spl: partition error Trying fit image at 0x4000 sector ## Verified-boot: 0 ## Checking atf-1 0x00080000 ... sha256(2493d19c1e...) + OK ## Checking uboot 0x00200000 ... sha256(01c15fcf12...) + OK ## Checking fdt 0x00308958 ... sha256(2867f75977...) + OK ## Checking atf-2 0xfe48d000 ... sha256(8ce3689111...) + OK ## Checking atf-3 0xfe490000 ... sha256(bc35c9ef85...) + OK Jumping to U-Boot(0x00200000) via ARM Trusted Firmware(0x00080000) Total: 334.426 ms INFO: Preloader serial: 0 NOTICE: BL31: v2.3():v2.3-679-geda1f5ce4:cl, fwver: v1.17 NOTICE: BL31: Built : 23:57:18, Dec 20 2023 INFO: rk_otp_init finish! INFO: ARM GICv2 driver initialized INFO: nonboot_cpus_off: clst_st=0xc0e, core_st=0xe1e0 boot_cpu=0 INFO: dfs].freq_mhz= 786MHz INFO: dfs DDR fsp_param[1].freq_mhz= 324MDR fsp_param[3].freq_mhz= 666MHz INFO: idle_st=0x0, pd_st=0xask: 1 INFO: rk_otp_init finish! INFO: RK3528 SoC (0x101) INFO: BL31: Initializing runtime services WARNING: No OPTE provided by BL2 boot loader, Booting device without OPTEE init Error initializing runtime service opteed_fast INFO: BL31: dress = 0x200000 INFO: SPSR = 0x3c9 U-Boot 2017.09-armbian-2017.09-S3264-Pda90-H7573-V3999-Bb703-R448a (May 13 2025 - 12:27:23 +0300) Model: Rockchip RK3528 Evaluation Board MPIDR: 0x80000000 PreSerial: 0, raw, 0xff9f003.9 GiB Sysmem: init Relocation Offset: f9a58000 Relocation fdt: f79fa630 - f79fecd8 CR: M/C/I Using default environment DM: v2 no mmc device at slot 1 mmc@ffbf0000: 0, mmc@ffc30000: 1 (SD) Bootdev(atags): mmc 1 MMC1: Legacy, 52Mhz PartType: EFI No misc partition boot mode: None FIT: No boot partition Failed to load DTB, ret=-19 No valid DTB, ret=-22 Failed to get kernel dtb, ret=-22 Model: Rockchip RK3528 Evaluation Board MPIDR: 0x80000000 rockchip_set_serialno: could not find efuse/otp device CLK: (sync kernel. arm: enter 600000 KHz, init 1200000 KHz, kernel 0N/A) apll 600000 KHz gpll 1188000 KHz cpll 996000 KHz dpll 393000 KHz ppll 10KHz clk_100m 99600 KHz clk_150m 148500 KHz clk_200m 198KHz clk_400m 396000 KHz clk_500m 498000 KHz clk_600m 59clk_ppll_125m 125000 KHz No misc partition Net: No ethernet found. Hit key to stop autoboot('CTRL+C'): 0 Could not find misc partition ANDROID: reboot reason: "(none)" Not AVB images, AVB skip android_image_load_by_partname: Can't find part: boot Android image load failed Android boot failed, error -1. ## Booting FITFIT: No boot partition FIT: No fit blob FIT: No FIT image Unknown command 'bootrkp' - try 'help' switch to partitions #0, OK mmc1 is current device Scanning mmc 1:1... Found U-Boot script /boot.scr 3906 bytes read in 23 ms (165 KiB/s) ## Executing script at 00c00000 Boot script loaded from mmc 1:1 176 bytes read in 18 ms (8.8 KiB/s) 6460789 bytes read in 563 ms (10.9 MiB/s) 28610568 bytes read in 2345 ms (11.6 MiB/s) 102238 bytes read in 289 ms (344.7 KiB/s) Trying kaslrseed command... Info: Unknown command can be safely ignored since kaslrseed does not apply to all boards. Unknown command 'kaslrseed' - try 'help' Fdt Ramdisk skip relocation No misc partition ## Loading init Ramdisk from Legacy Image at 0a200000 ... Image Name: uInitrd Image Type: AArch64 Linux RAMDisk Imagd) Data Size: 6460725 Bytes = 6.2 MiB Load Address: 0OK ## Flattened Device Tree blob at 0x08300000 Booting using the fdt blob at 0x08300000 reserving fdt memory region: addr=8300000 size=7f000 Using Device Tree in place at 0000000008300000, end 0000000008381fff WARNING: could not set reg FDT_ERR_BADOFFSET. ## reserved-memory: ramoops@110000: addr=110000 size=e0000 Adding bank: 0x00200000 - 0xfc000000 (size: 0xfbe00000) Total: 4660.229/5052.326 ms Starting kernel ... I think that MMC1 is sdcard, MMC2 is internal EMMC, so uboot is loaded from MMC1 sdcard (it has different version compared to standard boot), but the output is different compared to standard boot: Some suspicious data in log: MMC1: Legacy, 52Mhz PartType: EFI No misc partition FIT: No boot partition Failed to load DTB, ret=-19 No valid DTB, ret=-22 Failed to get kernel dtb, ret=-22 rockchip_set_serialno: could not find efuse/otp device Net: No ethernet found. I have full access to EMMC with all partitions and initial data to extract if needed. Will appreciate if someone could point me to custom armbian build steps for this board and suggest next steps. (https://gist.github.com/fensoft/1ff3ef81ab2bd9ed9364a564aa2cbcd5?permalink_comment_id=5576642#file-build-sh is what I tried and it does not work)
 -
that should be 1500000 (one more zero). Note a lot of uart connectors can't handle this high of a speed. There are many threads in the forums discussing specific ones that are able to reach that speed.
-
I installed U-Boot in the Orange Pi 5's SPI memory, connected via UART via the CH340G adapter (the power switch is lost). The speed is 1500,000 baud, 8n1. Connected TX-RX, RX-TX, GND-GND. After starting the board, I see the logs, but I can't enter anything at all. When I change the power supply, the input works, but it enters incomprehensible characters instead of the usual ones. When installing the EDK2-RK3588, there was no such problem on the same power supply and adapter. How can I fix the UART input?