Search the Community
Showing results for 'change to the beta repository'.
-
DISCLAIMER (PLEASE READ): everything you can find in this thread (binaries, texts, code snippets, etc...) are provided AS-IS and are not part of official Armbian project. For this reason not people from Armbian project nor myself are responsible for misuse or loss of functionality of hardware. Please don't ask about support or assistance in other non-community forums nor in the official Armbian github repository, instead post your questions in this thread, in the TV Boxes forum section (hardware related) or in the Peer-to-peer support section (general linux/software related). Thank you! This thread is to give stable and mature long-term range support to rk3318/rk3328 found in many tv boxes in Armbian project as Community Supported Configuration (CSC). The current work is mainlined into Armbian project, but your mileage may vary; most recent developments live on my personal fork on github -> here <- Important notes: is just a personal opinion, but apparently widely supported, that rk3318 chip is not an official rockchip part. They probably are scrap rk3328 parts which have not passed conformance tests but are sold anyway to tv boxes manufacturers. They don’t reach the same operating frequency of the rk3328, have much higher leakage currents (and thus higher temperatures) and often the boards they are installed on are low quality with low quality components, in fact a very very common issue is the eMMC failure due to bad parts and bad soldering. So said, I personally suggest not to buy any rk3318 tv box, but instead find a properly supported SBC (Single Board Computer) if you need a reliable product. In the unfortunate case you already have such product, this thread may help you have some fun with them. What works: • Works on RK3318 and RK3328 TV boxes with DDR3 memories • Mainline u-boot • Mainline ATF provided as Trusted Execution Environment • All 4 cores are working • Ethernet • Serial UART (configured at stock 1.5Mbps) • Thermals and frequency scaling • OTG USB 2.0 port (also as boot device!) • EHCI/OHCI USB 2.0 ports and XHCI USB 3.0 ports • MMC subsystem (including , SD and sdio devices) • Hardware video acceleration (fully supported via RKMPP on legacy kernel, support via hantro and rkvdec kernel driver on mainline) • Various WIFI over SDIO are supported • Full acceleration on legacy kernel and mainline kernel • U-boot boot order priority: first the sdcard, then the USB OTG port and eventually the internal ; you can install u-boot (and the whole system) in the internal and u-boot will always check for images on external sdcard/USB first. Unbrick: Technically, rockchip devices cannot be bricked. If the internal flash does not contain a bootable system, they will always boot from the sdcard. If, for a reason, the bootable system on the internal flash is corrupted or is unable to boot correctly, you can always force the maskrom mode shorting the clock pin on the PCB. The procedure is explained here for rk322x, but for rk3318/28 is the same. In most of the rk3318/28 boards, shorting the clock pin is difficult or impossible because eMMC are BGA chips with no exposed pins. Pay double attention when burning something on the internal flash memory and always test first the image booting from the sdcard to be sure it works before burning anything in internal flash. This is a list of posts where forum users have been able to spot the eMMC clock pin to trigger the maskrom mode: H96 Max+ (board signature: RK3318_V1.4) by @Gausus X88 PRO 10 (board signature: X88_PRO_B) by @mathgaming Ninkbox N1 Max RK3318 by @enigmasphinx Partecipation and debugging: If you want to partecipate or need help debugging issues, do not hesitate to share your experience with the installation procedure of the boxes. In case of issues and missed support, provide as many as possible of these things is very useful to try and bring support for an unsupported board: some photos of both sides of the board. Details of the eMMC, DDR and Wifi chips are very useful! upload the device tree binary (dtb) of your device. We can understand a lot of things of the hardware from that small piece of data; and alternative is a link to the original firmware (you can do a full backup with the Multitool); dmesg and other logs (use armbianmonitor -u that automatically collects and uploads the logs online) attach a serial converter to the device and provide the output of the serial port; Multimedia: Mainline kernel: 3D acceleration is provided by Lima driver and is already enabled. Hardware video decoding: https://forum.armbian.com/topic/19258-testing-hardware-video-decoding-rockchip-allwinner/ Legacy kernel: If you need multimedia features, like OpenGL/OpenGL ES acceleration, hardware accelerated Kodi, ffmpeg and mpv you can take a look to this post Installation (via SD card): Building: You can build your own image follow the common steps to build armbian for other tv boxes devices: when you are in the moment to choose the target board, switch to /TVB/ boards and select "rk3318-box" from the list. Prebuilt images: Archived images - built by Armbian servers and GPG-signed: https://imola.armbian.com/dl/rk3318-box/archive/ Nightly stables - built from trunk by Armbian servers and GPG-signed: https://github.com/armbian/community Stables provided by me (unsigned): https://users.armbian.com/jock/rk3318/ Multitool: Multitool - A small but powerful image for RK3318/RK3328 TV Box maintenance. Download it from here Quick installation instructions on eMMC: Build or download your preferred Armbian image and a copy of the Multitool; Burn the Multitool on an SD card; once done, place the Armbian image in images folder of the SD card NTFS partition; Plug the SD card in the TV box and plug in the power cord. After some seconds the blue led starts blinking and the Multitool appears; OPTIONAL: you can do a backup of the existing firmware with "Backup flash" menu option; Choose "Burn image to flash" from the menu, then select the destination device (usually mmcblk2) and the image to burn; Wait for the process to complete, then choose "Shutdown" from main menu; Unplug the power cord and the SD card, then replug the power cord; Wait for 10 seconds, then the led should start blinking and HDMI will turn on. The first time the boot process will take a couple of minutes or more because the filesystem is going to be resized, so be patient and wait for the login prompt. On first boot you will be asked for entering a password for root user of your choice and the name and password for a regular user Run rk3318-config to configure the board specific options Run armbian-config to configure timezone, locales and other personal options Congratulations, Armbian is now installed! Despite the procedure above is simple and reliable, I always recommend to first test that your device boots Armbian images from SD Card. Due to the really large hardware variety, there is the rare chance that the images proposed here may not boot. If a bad image is burned in , the box may not boot anymore forcing you to follow the unbrick section at the top of this post. Quick installation instructions to boot from SD Card: If you are already running Armbian from eMMC, skip to the next step. Instead if you are running the original firmware you need to first erase the internal flash; to do so download the Multitool, burn it on an SD Card, plug the SD Card and power the TV Box. Use "Backup flash" if you want to do a backup of the existing firmware, then choose "Erase flash" menu option. Build or download your preferred Armbian image; Uncompress and burn the Armbian image on the SD Card; Plug the SD Card in the TV Box and power it on; Wait for 10 seconds, then the led should start blinking and HDMI will turn on. The first time the boot process will take a couple of minutes or more because the filesystem is going to be resized, so be patient and wait for the login prompt; On first boot you will be asked for entering a password for root user of your choice and the name and password for a regular user Run rk3318-config to configure the board specific options Run armbian-config to configure timezone, locales and other personal options, or also to transfer the SD Card installation to internal ; Congratulations, Armbian is running from SD Card! Tutorial - How to install Armbian on your TV Box (by @awawa) : https://www.hyperhdr.eu/2022/01/tv-box-mania-i-part-x88-pro-10.html A note about boot device order: With Armbian also comes mainline U-boot. If you install Armbian, the bootloader will look for valid bootable images in this order: External SD Card External USB Stick in OTG Port Internal The Multitool does not boot / How to burn image directly on eMMC: Some boards have the sdcard attached to an auxiliary (called also sdmmc_ext or external) controller which is not the common one. Forum findings declare that those boards are not able to boot from sdcard with stock firmware and they neither do in maskrom mode: the stock firmware always boots even if you put the multitool on sdcard. In such case, burning images directly on eMMC is the only way to have a working Armbian installation. You can follow these instructions by @fabiobassa to burn images directly on eMMC: https://forum.armbian.com/topic/17597-csc-armbian-for-rk3318rk3328-tv-box-boards/?do=findComment&comment=130453 Notes and special hardware: Script to change DDR memory frequency here Wireless chip AP2734, SP2734, HY2734C and similars: they are clones of AmPAK AP6334 which is combo wifi + bluetooth of broadcom BCM4334/B0 chips. You may need a special nvram file, instructions by @paradigman are here Critics, suggestions and contributions are welcome! Credits: @fabiobassa for his ideas, inspiration, great generosity in giving the boards for development and testing. The project of bringing rk3318 into armbian would not have begun without his support! @hexdump for his precious support in early testing, ideas and suggestions @MX10.AC2Nfor his patience in testing mxq-rk3328-d4 board support All the rockhip64 maintainers at Armbian project who have done and do most of the work to support the platform
-
 🏆 Become a sponsor, help to add other boards in armbian standart, you don't need to be a programmer to help the community, just need a copy of the ARM BOARD and a x86 computer to compile new versions. If you like what you see here and want to help: Donate Armbian the like button only costs a few dollars. Armbian Needs you help! H96 MAX V56 RK3566 8gb Ram SD-Card unofficial images: Tutorial SD-Card Version v0.5 DEBIAN12 BETA unofficial Tutorial SD-Card Version v0.5 ARMBIAN23 BETA unofficial H96 MAX V56 RK3566 8gb EMMC Chainloader to mainline HotnikQ unofficial images: Tutorial EMMC Version V0.7 ARMBIAN23 BETA unofficial H96 MAX V56 RK3566 8gb EMMC Mainline Boot Hzdm unofficial images: Tutorial EMMC Version v0.8 ARMBIAN unofficial Armbian 23.08.0 Jammy Kernek 6.2 Desktop v0.8 Beta unofficial H96 MAX V56 RK3566 8gb EMMC Mainline Boot Hzdm unofficial images: Tutorial EMMC Version v0.9 ARMBIAN BETA unofficial Debian 12 BookWorm Kernel 6.2 Server v0.9 unofficial Beta Armbian 23.11 Jammy Kernel 6.2 Server v0.9 unofficial Beta Debian 12 BookWorm Kernel 6.2 Desktop v0.9 unofficial Beta Armbian 23.11 Jammy Kernel 6.2 Desktop v0.9 unofficial Beta H96 MAX V56 RK3566 8gb EMMC Chainloader to mainline HotnikQ unofficial images: Tutorial EMMC Version v1.0 ARMBIAN unofficial Armbian 23.11.0 Server Kernel 6.2 Minimal V1.0 unofficial Armbian 23.11.0 Desktop Kernel 6.2 Gnome V1.0 unofficial Debian 12 BookWorm Kernel 6.2 Server Minimal v1.0 unofficial Debian 12 BookWorm Desktop Kernel 6.2 Gnome v1.0 unofficial H96 MAX V56 RK3566 8gb EMMC Hzdm Mainline Boot Custom unofficial images: Tutorial Build Your own Armbian EMMC unofficial image Armbian 23.11.0 Server Minimal Kernel 6.2 Custom unofficial Build Armbian 23.11.0 Desktop Cinnamon Kernel 6.2 Custom unofficial Build Armbian 23.11.0 Desktop XFCE Kernel 6.2 Custom unofficial Build Armbian 23.11.0 Server Standart Kernel 6.2 Custom unofficial Build H96 MAX V56 RK3566 EMMC Raspiblitz HotnikQ unofficial images: Tutorial Build Raspiblitz on EMMC Armbian Bullseye unofficial Armbian 23.11.0 Debian Bullseye Kernel 6.1.54 Custom unofficial Build Armbian_Raspiblitz Debian Bullseye kernel 6.1.54 Backup unofficial H96 MAX V56 RK3566 8gb EMMC Hzdm Mainline Boot unofficial images: Tutorial Build Your own V1.1 Armbian EMMC unofficial image Armbian 24.2.1 Server Minimal V1.1 Custom Kernel 6.2 unofficial Build Armbian 24.2.1 Desktop Gnome V1.1 Custom Kernel 6.2 unofficial Build Debian 12 BookWorm Server Minimal v1.1 Kernel 6.2 Custom unofficial Build Debian 12 BookWorm Desktop Gnome v1.1 Kernel 6.2 Custom unofficial Build H96 MAX V56 RK3566 8gb EMMC Ning Mainline Kernel: Tutorial Build Your own V1.2 & V1.3 Armbian EMMC official image Armbian Desktop Gnome kernel The Latest official Debian BookWorm Server Kernel Minimal The Latest official Software description: V0.5 = @armbian The Armbian SD card image "Compiled From Armbian Project" V0.8 = @hzdm Project with Mainline Bootloader "Boot the 64gb Emmc Armbian with Mainline Rockchip" V0.9 = @hzdm Release Mainline Bootloader "Boot the 32gb and 64gb Emmc Armbian with Mainline Rockchip" V1.0 = @hotnikq The Armbian SD card inside the Android Legacy Rockchip Image "Two Original Glued Images: Android boot for Linux" V1.2 = @ning Release Device Tree and Bootloader to longterm 6.6.27 Kernel "Boot with Mainline Rockchip" V1.3 = @Hqnicolas Github PR Enable h96 Rk3566 TV-Box device for Kernel 6.8 Video drivers: https://developer.arm.com/downloads/-/mali-drivers/bifrost-kernel https://docs.mesa3d.org/download.html https://docs.mesa3d.org/drivers/panfrost.html Wifi Driver: https://drive.google.com/file/d/1B1LmAylalETcnBEWiPiJHL0MjK5xlIV4/view?usp=sharing Or Just Live install Wifi Driver: cd /lib/firmware/brcm/ sudo wget https://github.com/CoreELEC/brcmfmac_sdio-firmware-aml/raw/master/firmware/brcm/fw_bcm4335b0_ag.bin sudo ln -s fw_bcm4335b0_ag.bin brcmfmac4335-sdio.h96-TVbox,rk3566.bin sudo reboot now nmcli dev wifi Topic description: This topic aims to demonstrate the path taken to the Armibian EMMC solution. In our path we create a lot of ready-to-use ROM files, some users burn an use this images without learning with the Linux compilation process. the name of the topic is efforts but that's no effort at all, you should try compile your own images. Device Capability Test: Using Rockchip SoCs NPU. Drivers: https://github.com/rockchip-linux/rknpu2 User Guide: https://github.com/rockchip-linux/rknpu2/blob/master/doc/Rockchip_RKNPU_User_Guide_RKNN_API_V1.4.0_EN.pdf OpenCV: https://opencv.org/blog/2022/11/29/working-with-neural-processing-units-npus-using-opencv/ A discussion on Reddit: https://www.reddit.com/r/OrangePI/comments/12b3jmj/accessing_the_npu_on_the_orange_pi/ Transformers models: https://github.com/usefulsensors/useful-transformers Usage: https://www.crowdsupply.com/useful-sensors/ai-in-a-box/ Usage: https://youtu.be/pN8mKZ5wpdQ
 -
Efforts to develop firmware for H96 MAX V56 RK3566 8G/64G
Hqnicolas replied to Hqnicolas's topic in Rockchip CPU Boxes
Today I manage to Start Kernel Rockchip Legacy 5.10 ubuntu-24.04-beta-preinstalled-desktop-arm64-orangepi-3b.img.xz The system starts but after reboot it crashes. This is the error LOG on BOOT DTS+DTB=510(to develop): https://drive.google.com/file/d/1weNysgsmMXu5rf47mmdnhqovtGnVS3mU/view?usp=sharing rk3566-rk817-tablet-k108(decompiled).dts rk3566-rk817-tablet-k108.dts rk3566-rk817-tablet-k108.dtb -

Moving from Micro SD to NVME SSD (Orange Pi 5)
igelkotten replied to Markus Braun's topic in Orange Pi 5 / 5B
@Markus Braun edit: I have an orange pi 5 plus! I have mine booting without any SD card. I sadly don't recall whatever guide I followed but I am pretty sure I had to toogle nvme booting somwhere in armbian-config or some command that updated the bootloader on the opi5+ This is my /boot/armbianEnv.txt verbosity=1 bootlogo=true overlay_prefix=rockchip-rk3588 fdtfile=rockchip/rk3588-orangepi-5-plus.dtb rootdev=UUID=4578f871-5c8a-406a-87bd-be8562b1f8bf rootfstype=ext4 usbstoragequirks=0x2537:0x1066:u,0x2537:0x1068:u my /etc/fstab look like this UID=4578f871-5c8a-406a-87bd-be8562b1f8bf / ext4 defaults,noatime,commit=600,errors=remount-ro 0 1 UUID=dce8fefd-ace9-468e-8695-55071f59094f /boot ext4 defaults,commit=600,errors=remount-ro 0 2 tmpfs /tmp tmpfs defaults,nosuid 0 0 [... nfs and other irrelevant junk] Did you change your fstab before running dd so it reflects the UUID of the the nvmes /boot disk? or change it to /dev/nvme... blabla ? I will be getting a new opi5+ in a week or two with an nvme so I will need to revisit these steps anyway. Let me know if I can check something on my side. -
I've noticed that some system images will start the OrangePi with 4:2:2 output on HDMI instead of 4:4:4. This causes artifacts, especially when there's white text on a red background. What's the interface or method to change this? Does this have to be done via U-Boot or can it be done in userspace?
-
AFAIK, to get fully working 4:4:4 modes, there is the need to import some "experimental" patches that are floating in the rockchip kernel mailing list. The patches have been tested a lot by libreelec users on various rockchip platform (32 bit rockchip device like rk322x and rk3288 already have them merge in), but have been judged "too complicated to maintain" for rockchip64 repository. You can see the last attempt here and the previous attempt here, useful to get the points of the discussion.
-
Hey Efe, Thank you for your help. Cannot believe that I downloaded the wrong Armbian image. With the Armbian_24.2.1_Orangepi5-plus_jammy_legacy_5.10.160_gnome-amazingfated_desktop.img.xz, I managed to boot into the setup CLI, although it is very "flashy". The monitor turns off and on again every 2 seconds. After setting up, it says "Starting desktop environment..", and goes black from there. The flashy CLI helped me figure out the reason. I am using ultra wide screen with 5120 x 1440 resolution. After changing to standard 2k resolution, I can boot into the desktop without any issue. Once I am in, I can change the resolution in settings to 5120 x 1440. I think the initial Linux configurations cannot understand weird aspect ratio. I tried 2k resolution with Joshua Riek image that I failed to boot before and it worked normally this time. Because Joshua Riek uses GUI first-boot screen, I went immediately to black screen instead of "flashy CLI".
-

Helios64 u-boot does not build anymore after we bumped to 2022.07
BipBip1981 replied to Igor's topic in Rockchip
...and i reproduce twice same freeze with cryptosetup to unlock my raid... freeze network... access usb is ready... but terribely slow... i tape my login and password and i waiting... but no response... picocom v3.1 port is : /dev/ttyUSB0 flowcontrol : none baudrate is : 1500000 parity is : none databits are : 8 stopbits are : 1 escape is : C-a local echo is : no noinit is : no noreset is : no hangup is : no nolock is : no send_cmd is : sz -vv receive_cmd is : rz -vv -E imap is : omap is : emap is : crcrlf,delbs, logfile is : none initstring : none exit_after is : not set exit is : no Type [C-a] [C-h] to see available commands Terminal ready helios64 login: root Password: I type CTRL-C and... ^C _ _ _ _ __ _ _ | | | | ___| (_) ___ ___ / /_ | || | | |_| |/ _ \ | |/ _ \/ __| '_ \| || |_ | _ | __/ | | (_) \__ \ (_) |__ _| |_| |_|\___|_|_|\___/|___/\___/ |_| Welcome to Armbian-unofficial 24.2.1 Bookworm with Linux 6.6.29-current-rockchip64 No end-user support: built from trunk System load: 3% Up time: 11 min Local users: 2 Memory usage: 7% of 3.77G IP: 10.0.0.155 CPU temp: 41°C Usage of /: 46% of 14G RX today: 53.8 MiB [ General system configuration (beta): armbian-config ] Web console: https://helios64:9090/ You have no mail. I type CTRL-C ^C And no prompt.... full freeze or lost control I back to ENABLE=true MIN_SPEED=408000 MAX_SPEED=1200000 GOVERNOR=schedutil until you explain me where and how use your file -
Helios64 u-boot does not build anymore after we bumped to 2022.07
BipBip1981 replied to Igor's topic in Rockchip
Hello... and i'm crying... freeze today with raid10 srubbing during btrfs check... But something is strange... network ssh is dead... but access with usb cable to console is working but very very very extremely slow I have this and... waiting very long time to have prompt picocom v3.1 port is : /dev/ttyUSB0 flowcontrol : none baudrate is : 1500000 parity is : none databits are : 8 stopbits are : 1 escape is : C-a local echo is : no noinit is : no noreset is : no hangup is : no nolock is : no send_cmd is : sz -vv receive_cmd is : rz -vv -E imap is : omap is : emap is : crcrlf,delbs, logfile is : none initstring : none exit_after is : not set exit is : no Type [C-a] [C-h] to see available commands Terminal ready helios64 login: root Password: _ _ _ _ __ _ _ | | | | ___| (_) ___ ___ / /_ | || | | |_| |/ _ \ | |/ _ \/ __| '_ \| || |_ | _ | __/ | | (_) \__ \ (_) |__ _| |_| |_|\___|_|_|\___/|___/\___/ |_| Welcome to Armbian-unofficial 24.2.1 Bookworm with Linux 6.6.29-current-rockchip64 No end-user support: built from trunk System load: 183% Up time: 1 day 21:18 Local users: 3 Memory usage: 84% of 3.77G Zram usage: 34% of 5.88G IP: 10.88.0.1 10.0.0.155 CPU temp: 43°C Usage of /: 46% of 14G RX today: 52.5 MiB [ General system configuration (beta): armbian-config ] Web console: https://helios64:9090/ You have no mail. root@helios64:~# -
Hi, the device uses the PINs only, but not the spi protocol. It talks directly so the SX1278 via the PINs. This works in RaspberryPi standard images from scratch without any change (only disabling SPI). I don't know what you mean with "dtbo". I'm not a developer, only a user. Can you please give me some hints? Regards
-
DISCLAIMERS (PLEASE READ): Everything you can find in this thread (binaries, texts, code snippets, etc...) are provided AS-IS and are not part of official Armbian project. For this reason not people from Armbian project nor myself are responsible for misuse or loss of functionality of hardware. THIS POST explains very well the troubles with TV Boxes and why they are not suitable for everyone Please don't ask about support or assistance in other non-community forums nor in the official Armbian github repository, instead post your questions in this thread, in the TV Boxes forum section (hardware related) or in the Peer-to-peer support section (general linux/software related). Following the recent thread on LibreElec forum about an unofficial image for rk3229 devices, I would like to make public the work made by me and @fabiobassa about bringing rk322x support to armbian. The project is now in -> mainline Armbian <- development fork -> here <- This first page and the last 3 or 4 pages of the thread are enough to get up to date with recent developments. Many useful experiences are scattered through the thread, but the most important things are collected here in the first page, so please read it carefully! Mainline kernel is fully supported and will receive most support in the future. Legacy kernel 4.4 is deprecated, but is kept around only for special purposes. What works: Should boot and work flawlessy on all boards with RK3228a, RK3228b and RK3229, with either DDR2 and DDR3 memories. Mainline u-boot Proprietary OPTEE provided as Trusted Execution Environment (needed for DRAM frequency scaling) All 4 cores are working Ethernet Serial UART (configured at 115200 bps, not 1.5Mbps!) Thermals, CPU and DRAM frequency scaling OTG USB 2.0 port (also as boot device!) EHCI/OHCI USB 2.0 ports MMC subsystem (including eMMC, SD and sdio devices) Hardware video acceleration NAND is available only on legacy kernel. To fully boot from NAND, use the Multitool and its steP-nand installation (instructions are below) Various WIFI over SDIO are supported (SSV6051P, SSV6256P, ESP8089, Realtek chips, etc...), ssv6256p driver is available only on legacy kernel Full GPU acceleration U-boot boot order priority: first the sdcard, then the USB OTG port and eventually the internal eMMC; you can install u-boot (and the whole system) in the internal eMMC and u-boot will always check for images on external sdcard/USB first. Unbrick: Technically, rockchip devices cannot be bricked. If the internal flash does not contain a bootable system, they will always boot from the sdcard. If, for a reason, the bootable system on the internal flash is corrupted or is unable to boot correctly, you can always force the maskrom mode shorting the eMMC clock pin on the PCB. Here there is the procedure, but you can also google around if you get stuck on a faulty bootloader, the technique is pretty simple and requires a simple screwdriver. There are however some unfortunate cases (expecially newer boards) where shorting the eMMC clock pin is difficult or impossibile, like eMMC or eMCP BGA chips with no exposed pins. In those cases pay double attention when burning something on the internal eMMC/eMCP and always test first the image from the sdcard to be sure it works before burning anything on eMMC/eMCP. Some useful links with pins, pads or procedures for some boards: Generic procedure for boards with non-BGA eMMC MXQPRO_V71 - eMCP H20 - eMCP ZQ01 - eMCP NAND vs eMMC vs eMCP difference: RK3228 and RK3229 tv boxes comes with three different flash memory chips: eMMC, NAND and eMCP. It does not depend upon the market name of the tv box and neither the internal board; manufacturers put whatever they find cheaper when they buy the components. NAND chip is just the non-volatile memory eMMC chip contains both the non-volatile memory plus a controller. eMCP chip contains the non-volatile memory, a controller for the non-volatile memory (like eMMC), but also contains a bank of DDR SDRAM memory on the same physical chip. The difference is very important, because eMMC and eMCP are far easier to support at various levels: the controller deals with the physical characteristics of the non-volatile memory, so the software has no to deal with. NAND chips instead are harder to support, because the software is required to deal with the physical characteristics and non-standard things that depends upon the NAND manufacturer. If you have a NAND chips you're unlucky because mainline kernel currently cannot access it, but also because you need special care and instructions explained later. You can discover if you have a NAND, eMMC or eMCP chip looking on the board are reading the signature on the flash memory chip. The Multitool (see later) also can detect which chip you have onboard: the program will warn you at startup if you have a NAND chip. NAND bootloader upgrade: IMPORTANT: don't do this is you have an eMMC or eMCP; skip this paragraph if you are unsure too! For very expert people who are having issues when (re)booting images, there is the chance to upgrade the bootloader on NAND. The NAND bootloader is nothing else than a regular idbloader (see official rockchip documentation) but contains some bits to correctly access the data on your flash memory. Upgrading requires to erase the existing flash content, in the worst case will require you to follow the Unbrick procedure above or restore an older but more compatible bootloader. If you are not mentally ready to overcome possible further issues, don't do this! The detailed instructions and the binaries are available at this post Multimedia: Mainline kernel: 3D acceleration is provided by Lima driver and is already enabled. Hardware video decoding: https://forum.armbian.com/topic/19258-testing-hardware-video-decoding-rockchip-allwinner/ Deprecated legacy kernel: multimedia features, like OpenGL/OpenGL ES acceleration, hardware accelerated Kodi, ffmpeg and mpv you can take a look to this post An effective tutorial from @Hai Nguyen on how to configure a box as a hi-quality music player using an USB audio card, and controlling it via remote control is available in this post Brief explanation about kernel naming: current kernel is the mainline LTS kernel version, most maintained and tested. This is the suggested version for production devices. If you don't know what to pick, pick this. legacy kernel (version 4.4) is provided by manufacturer; it is deprecated, unmaintained and not suggested. edge kernel is the development mainline kernel version, with experimental features and drivers; usually stable but perhaps suitable for production devices. You can switch from one kernel flavour to another using armbian-config or manually via apt. Installation (via SD card): Building: You can build your own image follow the common steps to build armbian for other tv boxes devices: when you are in the moment to choose the target board, switch to CSC/TVB/EOL boards and select "rk322x-box" from the list. Download prebuilt images from the following links: Archive builds (GPG-signed) - https://imola.armbian.com/dl/rk322x-box/archive/ SUGGESTED - Nightly built from trunk each week by Armbian servers (GPG-signed) - https://github.com/armbian/community Old images provided by me (unsigned and outdated) - https://users.armbian.com/jock/rk322x/armbian/stable Archived/older images: https://armbian.hosthatch.com/archive/rk322x-box/archive/ Multitool: The Multitool is a small but powerful tool to do quick backup/restore of internal flash, but also burn images and general system rescue and maintenance via terminal or SSH. Compressed images will be uncompressed on fly. Multitool - A small but powerful image for RK322x TV Box maintenance (instructions to access via network here) Quick installation instructions on eMMC: Build or download your preferred Armbian image and a copy of the Multitool; Burn the Multitool on an SD card; once done, place the Armbian image in images folder of the SD card NTFS partition; Plug the SD card in the TV box and plug in the power cord. After some seconds the blue led starts blinking and the Multitool appears; OPTIONAL: you can do a backup of the existing firmware with "Backup flash" menu option; Choose "Burn image to flash" from the menu, then select the destination device (usually mmcblk2) and the image to burn; Wait for the process to complete, then choose "Shutdown" from main menu; Unplug the power cord and the SD card, then replug the power cord; Wait for 10 seconds, then the led should start blinking and HDMI will turn on. The first time the boot process will take a couple of minutes or more because the filesystem is going to be resized, so be patient and wait for the login prompt. On first boot you will be asked for entering a password for root user of your choice and the name and password for a regular user Run sudo rk322x-config and select your board characteristics to enable leds, wifi chips, high-speed eMMC, etc... Run sudo armbian-config to configure timezone, locales and other personal options Congratulations, Armbian is now installed and configured! Despite the procedure above is simple and reliable, I always recommend to first test that your device boots Armbian images from SD Card. Due to the really large hardware variety, there is the rare chance that the images proposed here may not boot. If a bad image is burned in eMMC, the box may not boot anymore forcing you to follow the unbrick section at the top of this post. Quick installation instructions on NAND: Build or download your preferred Armbian image and a copy of the Multitool; Burn the Multitool on an SD card; once done, place the Armbian legacy kernel image in images folder of the SD card NTFS partition; Plug the SD card in the TV box and plug in the power cord. After some seconds the blue led starts blinking and the Multitool appears; OPTIONAL: you can do a backup of the existing firmware with "Backup flash" menu option; Choose "Burn Armbian image via steP-nand" from the menu, then select the destination device (usually rknand0) and the image to burn; Wait for the process to complete, then choose "Shutdown" from main menu; Unplug the power cord and the SD card, then replug the power cord; Wait for 10 seconds, then the led should start blinking and HDMI will turn on. The first time the boot process will take a couple of minutes or more because the filesystem is going to be resized, so be patient and wait for the login prompt. On first boot you will be asked for entering a password for root user of your choice and the name and password for a regular user Run sudo rk322x-config and select your board characteristics to enable leds, wifi chips, etc... Run armbian-config to configure timezone, locales and other personal options Congratulations, Armbian is now installed! Alternative: you can install the bootloader in NAND and let it boot from SD Card or USB: Download a copy of the Multitool and burn it on an SD card; Plug the SD card in the TV box and plug in the power cord. After some seconds the blue led starts blinking and the Multitool appears; RECOMMENDED: make a backup of the existing firmware with "Backup flash" menu option; Choose "Install Jump Start for Armbian" menu option: the Jump Start uses the internal NAND to boot from external SD Card or external USB Stick; Follow the general instructions to boot from SD Card below, skip the first erase eMMC step. Quick installation instructions to boot from SD Card: If you are already running Armbian from eMMC, skip to the next step. Instead if you are running the original firmware you need to first erase the internal eMMC; to do so download the Multitool, burn it on an SD Card, plug the SD Card and power the TV Box. Use "Backup flash" if you want to do a backup of the existing firmware, then choose "Erase flash" menu option. Build or download your preferred Armbian image; Uncompress and burn the Armbian image on the SD Card; Plug the SD Card in the TV Box and power it on; Wait for 10 seconds, then the led should start blinking and HDMI will turn on. The first time the boot process will take a couple of minutes or more because the filesystem is going to be resized, so be patient and wait for the login prompt; On first boot you will be asked for entering a password for root user of your choice and the name and password for a regular user Run sudo rk322x-config and select your board characteristics to enable leds, wifi chips, high-speed eMMC or NAND, etc... Run armbian-config to configure timezone, locales and other personal options, or also to transfer the SD Card installation to internal eMMC; Congratulations, Armbian is running from SD Card! A note about boot device order: With Armbian also comes mainline U-boot. If you install Armbian or just the bootloader in the eMMC or the Jump Start on internal NAND, the bootloader will look for valid bootable images in this order: External SD Card External USB Stick in OTG Port Internal eMMC Installation (without SD card, board with eMMC) If you have no sd card slot and your board has an eMMC, you can burn the armbian image directly on the internal eMMC using rkdeveloptool and a male-to-male USB cable: Download your preferred Armbian image from Armbian download page and decompress it. Download the rk322x bootloader: rk322x_loader_v1.10.238_256.bin Download a copy of rkdeveloptool: a compiled binary is available in the official rockchip-linux rkbin github repository. Unplug the power cord from the tv box Plug an end of an USB Male-to-male cable into the OTG port (normally it is the lone USB port on the same side of the Ethernet, HDMI, analog AV connectors) while pressing the reset microbutton with a toothpick. You can find the reset microbutton in a hole in the back of the box, but sometimes it is hidden into the AV analog jack Plug the other end of the USB Male-to-male cable into an USB port of your computer If everything went well, run lsusb: you should see a device with ID 2207:320b Run sudo rkdeveloptool rd 3 (if this fails don't worry and proceed to next step) Run sudo rkdeveloptool db rk322x_loader_v1.10.238_256.bin Run sudo rkdeveloptool wl 0x0 image.img (change image.img this with the real Armbian image filename) Unplug the power cord Done! Installation (without SD card, board with NAND) If you are in the unfortunate case you can't use an SD card for installation and your board has a NAND chip, you still have an option to use the quick Multitool installation steps via USB. Obtain a copy of rkdeveloptool: a compiled binary is available in the official rockchip-linux rkbin github repository. Unplug the power cord from the tv box Plug an end of an USB Male-to-male cable into the OTG port (normally it is the lone USB port on the same side of the Ethernet, HDMI, analog AV connectors) while pressing the reset microbutton with a toothpick. You can find the reset microbutton in a hole in the back of the box, but sometimes it is hidden into the AV analog jack Plug the other end of the USB Male-to-male cable into an USB port of your computer If everyting went well, using lsusb you should see a device with ID 2207:320b Run sudo rkdeveloptool wl 0x4000 u-boot-main.img (download u-boot-main.img.xz , don't forget to decompress it!) Unplug the power cord Now you can follow the instructions on how to install on eMMC/NAND via SD card, just use instead an USB stick to do all the operations and plug it into the USB OTG port. Once you reboot, USB OTG port will be used as a boot device. NOTE: NAND users without SD slot may be unhappy to know that it will be difficult to do extra maintenance with Multitool in case something breaks in the installed Armbian system: installing u-boot-main.img makes the installed system unbootable because it is missing the NAND driver. Alternative backup, restore and erase flash for EXPERTS: These backup, restore and erase flash procedures are for experts only. They are kept here mostly for reference, since the Multitool is perfectly able to do same from a very comfy interface and is the suggested way to do maintenance. Backup: Obtain a copy of rkdeveloptool: a compiled binary is available in the official rockchip-linux rkbin github repository. If you prefer, you can compile it yourself from the sources available at official rockchip repository Unplug the power cord from the tv box Plug an end of an USB Male-to-male cable into the OTG port (normally it is the lone USB port on the same side of the Ethernet, HDMI, analog AV connectors) while pressing the reset microbutton with a toothpick. You can find the reset microbutton in a hole in the back of the box, but sometimes it is hidden into the AV analog jack Plug the other end of the USB Male-to-male cable into an USB port of your computer If everyting went well, using lsusb you should see a device with ID 2207:320b change directory and move into rkbin/tools directory, run ./rkdeveloptool rfi then take note of the FLASH SIZE megabytes (my eMMC is 8Gb, rkdeveloptool reports 7393 megabytes) run ./rkdeveloptool rl 0x0 $((FLASH_SIZE * 2048)) backup.data (change FLASH_SIZE with the value you obtained the step before) once done, the internal eMMC is backed up to backup.data file Restore: first we have to restore the original bootloader, then restore the original firmware. Running rkdeveloptool with these switches will accomplish both the jobs: ./rkdeveloptool db rk322x_loader_v1.10.238_256.bin Downloading bootloader succeeded. ./rkdeveloptool ul rk322x_loader_v1.10.238_256.bin Upgrading loader succeeded. ./rkdeveloptool wl 0x0 backup.data Write LBA from file (100%) Download here: Erase the flash memory: clearing the internal eMMC/NAND memory makes the SoC look for external SD Card as first boot option. If there isn't any suitable SD Card, the SoC enters maskrom mode, which can then be used for full eMMC/NAND access using rkdeveloptool. This is perfectly fine if your box has an eMMC flash memory. NOTE: In case you have a NAND flash memory this option is however discouraged. The original bootloader contains some special parameters to correctly access the data. Clearing the flash memory will probably garbage the NAND data and restoring the bootloader may require some special instructions. Obtain a copy of rkdeveloptool: a compiled binary is available in the official rockchip-linux rkbin github repository. If you prefer, you can compile it yourself from the sources available at official rockchip repository Unplug the power cord from the board Plug an end of an USB Male-to-male cable into the OTG port (normally it is the lone USB port on the same side of the Ethernet, HDMI, analog AV connectors) while pressing the reset microbutton with a toothpick. You can find the reset microbutton in a hole in the back of the box, but sometimes it is hidden into the AV analog jack Plug the other end of the USB Male-to-male cable into an USB port of your computer If everyting went well, using lsusb you should see a device with ID 2207:320b run ./rkdeveloptool ef and wait a few seconds once done, the internal eMMC is erased and the device will boot from the sdcard from now on Partecipation and debugging: If you want to partecipate or need help debugging issues, do not hesitate to share your experience with the installation procedure of the boxes. In case of issues and missed support, provide as many as possible of these things is very useful to try and bring support for an unsupported board: some photos of both sides of the board. Details of the eMMC, DDR and Wifi chips are very useful! upload the device tree binary (dtb) of your device. We can understand a lot of things of the hardware from that small piece of data; and alternative is a link to the original firmware (you can do a full backup with the Multitool); dmesg and other logs (use armbianmonitor -u that automatically collects and uploads the logs online) attach a serial converter to the device and provide the output of the serial port; Critics, suggestions and contributions are welcome! Credits: @fabiobassa for his ideas, inspiration, great generosity in giving the boards for development and testing. The project of bringing rk322x into armbian would not have begun without his support! Justin Swartz, for his work and research to bring mainline linux on rk3229 (repository here) @knaerzche for his great contribution to libreelec support and mainline patches @Alex83 for his patience in testing the NAND bootloader upgrade procedure on his board @Jason Duhamell for his generous donation that allowed researching eMCP boards and esp8089 wifi chip
-
Yesterday, I tried to use the digital IO in my opi zero3, with the Python GPIO package from https://opi-gpio.readthedocs.io/en/latest/ by Richard Hull It depends on having sysfs files in /sys/class/gpio/ My original opi zero has these files and it works, but my opi zero3 doesn’t have these files I learned that /sys/class/gpio is created if the linux kernel is configured with a specific option ON, as suggested in the documentation: https://github.com/rm-hull/OPi.GPIO https://linux-sunxi.org/GPIO Also, a developer has made a change on the opi.GPIO project to support opi zero3 https://github.com/rm-hull/OPi.GPIO/issues/79 I will have time to try this tomorrow... but I want to ask: is anyone using GPIO in its most basic way? As reference: I saw this older thread about zero3's GPIO... https://forum.armbian.com/topic/31493-how-to-enable-i2c3-on-orange-pi-zero-3/ It is using leebobby's "armbian" image, with raspi-config, and wiringpi Using my original opi-zero, I never needed to use armbian-config to enable basic gpio and the python opi.gpio just worked as documented Note: the opi.gpio only claims to support basic gpio, not i2c. Update: these are interesting potential solutions and discussions (but they are all from before there was armbian for opiz3) https://www.reddit.com/r/OrangePI/comments/16vfa4g/orange_pi_zero_3_gpio_python_library/ https://github.com/eutim/OPI.GPIO https://www.reddit.com/r/OrangePI/comments/16ioyri/gpio_python_library_for_orange_pi_zero_3/ https://www.reddit.com/r/OrangePI/comments/18iveo3/how_to_control_gpio_pins_in_android_orange_pi/
-
Efforts to develop firmware for H96 MAX V56 RK3566 8G/64G
Hqnicolas replied to Hqnicolas's topic in Rockchip CPU Boxes
i never seen this on linux..... I think @Kenneth Hidalgo have the answer to legacy linux: This is the Linux Legacy DTB from Kernel 4.19 rk3566-h96-max-linux-legacy.dtsrk3566-h96-max-linux-legacy.dtb To make this 4.19 dtb work with kernel 5.10 You will need to apply this patch: We can just use the legacy kernel device tree from 4.19 vendor kernel. Just some fixes are needed: 1, add these properties to node &gpu to support panfrost driver: 2, change RK_FUNC_1 to 1 because this is not defined in kernel 5.10 3, add &vp0 node to support video output: Example: https://github.com/ginkage/mirrors/commit/fbd247d4c52a11a74c2efbe276ebff7c27fc6da5 -
@im_chc AFAIK the loader firmwares around do not support anything else than sdcard and emmc, but I may wrong: I have never seen a rk322x device with SPI flash memory, so I can't bet on my affirmation. Perhaps you should have a look to the rockchip repository on github or search around to see if there is a rk322x loader for SPI memories.
-
There are only a few frequencies involved - at least on my board (see the transition tables in my other message in the parallel thread). Upping the voltage by 75mV - as you suggested - helped my board to get rid of remaining few occasional issues during the boot process ! I am measuring the combined power consumption of Helios64 and two 2.5G switches (together 12.66W idle) - it does not seem to be affected at all by that small change. Temperature reported by the Armbian welcome screen is 44 °C (ambient temp 19°C in the basement). Is the remaining crash - once a day on your Helios64 - positively affected by upping the voltage to 1.2V for all states ? If not it may be caused by something else. Edit: I am currently testing 6.6.29 using a modified dtb (L2, hs400, opp up by 75mV)
-
@BipBip1981I agree and I did not plan on doing it on my own. But phone repair shops have skilled technicians who can do it. Still, the need to replace a hardware component is a wild guess. At this point, I was merely saying that I was ready to test a hardware change on my board to find out if the problem was a hardware issue. In the end, I believe that if we better understand what is wrong, be it the hardware, we might even be able to work around such a hardware shortcoming in software. I would not suggest messing with the hardware to test if it works better except if you are ready to lose the board. But mine is so unstable (probably due to my raid10 setup inherited from the helios4) that I could barely use it for years. So it is a matter of either testing if I can get it stable or buying a new NAS and sending this helios64 to the trash. I hope to be able to tell you a good governor/frequency but I need to test more. At least the most reliable frequencies without voltage quirks for the big cpu seemed to be the lowest 408000 and the highest 1800000. So you might want to force the "userspace" governor and "1800000" as a frequency.
-
Efforts to develop firmware for H96 MAX V56 RK3566 8G/64G
Hqnicolas replied to Hqnicolas's topic in Rockchip CPU Boxes
I have downloaded a 4k video sample and use the celluloid and mpv media player that came with armbian. it also don't work, keep using 100% CPU i think this is an kernel problem celluloid depends on mpv which depends on ffmpeg Jock made a fix to v4l2 https://forum.armbian.com/topic/32449-repository-for-v4l2request-hardware-video-decoding-rockchip-allwinner/ This seems to be discontinued. it was fun while it lasted 🙂 testing now: sudo apt-get install armbian-config sudo armbian-config # SYSTEM # FREEZE sudo add-apt-repository ppa:liujianfeng1994/panfork-mesa sudo add-apt-repository ppa:liujianfeng1994/rockchip-multimedia sudo apt update sudo apt dist-upgrade sudo apt install mali-bifrost-firmware rockchip-multimedia-config sudo apt install libv4l-rkmpp -y sudo apt install v4l-utils -y sudo apt install ffmpeg -y sudo apt install glmark2-es2-wayland -y Will also try kernel 5.10 https://monka.systemonachip.net/r58-mini/Armbian_23.05.0-trunk_r58-mini_jammy_legacy_5.10.110.AFM.img.xz It has wayland GPU blob + panfork GPU driver + VPU acceleration + box64/86 and wine preïnstalled. from https://monka.systemonachip.net/ I think I will need to compile an legacy kernel to this device, since this fixes are linked to rk3588 (untested) (think we need a specific dtb) I made this file to compile Armbian Legacy: https://drive.google.com/file/d/1e_WJg_XzIEJ1__nabM9tSGutCAu-JzKz/view?usp=sharing
-
I have a RasPi 4b, I'm trying to understand how the device tree is modified so I can use the methodology eventually for a board that has a CM4 on it. So from a virgin clone of the build repo: ./compile.sh BOARD=rpi4b BRANCH=edge RELEASE=bookworm BUILD_MINIMAL=yes KERNEL_CONFIGURE=no KERNEL_GIT=full install image on SD card and boot the device, go through Armbian-setup. All well and good, then varify device tree used for the boot: cat /proc/device-tree/model gets me a: Raspberry Pi 4 Model B Rev 1.5 OK so now lets modify the device tree: ./compile.sh BOARD=rpi4b BRANCH=edge RELEASE=bookworm BUILD_MINIMAL=yes KERNEL_CONFIGURE=no KERNEL_GIT=full kernel-patch When the build pauses, we open another terminal and change the device tree file (note in the build log below I had modified all the CM4 device tree files): sudo nano ./arch/arm/boot/dts/broadcom/bcm2711-rpi-4-b.dts Only change is to modify the model line with a marker, like my initials, new line is: model = "Raspberry Pi 4 Model B AJW"; close editor, and hit enter to restart the build, then copy resulting patch file to: userpatches/kernel/archive/bcm2711-6.7/0010-simple-device-tree.patch rebuild as before, then burn new image to SD card and retest the device tree model, but no change is apparent. So how do you change the device tree for a RasPi 4? log-build-e9849e69-98be-4710-b3be-e05a30285a44.log
-

Orangepi 3 LTS upgrade from Armbian 23.11.1 to 24.2.1 fails
Igor replied to Timo12357's topic in Allwinner sunxi
Bookworm is latest stable. You can only upgrade to unstable ... which is not recommended for production. You could upgrade kernels, but we don't provide them anymore for bullseye. That is correct. This is the list of packages per distribution: https://fi.mirror.armbian.de/apt/content.html Bullseye only has some files, probably by mistake. It should be just empty as its not supported anymore. Change tags in armbian.list from bullseye to bookworm and update. Should be fine .... at least as far as from Armbian perspective. We can't vouch for packages that are coming from Debian repository as they might come into some conflicts between each other. This is the problem we observe on older releases and have no capacity nor wish to address. -
@ag123, @c0rnelius, and anyone else that has interest in sound on these devices. I have been able to put together a patch that enables audio for H161/H618 devices. So far only audio on HDMI works. Analog audio is still generating an error on startup. The patches were taken from a git repository by warpme: https://github.com/warpme/minimyth2/tree/master/script/kernel/linux-6.6/files , and probably came from the Zunlong SDK. A lot of the code was written by Allwinner. @pixdrift generated a version of the patches for Armbian and I continued to work on them. I have built a few images and have a git repository if anyone would like to test, particularly on boards other than orangpizero3, on which I have tested. zero3 desktop: https://drive.google.com/file/d/1jIMTIqKc6y_uuG7lRyXXhIWQ_fvo0XgI/view?usp=drive_link zero3 server: https://drive.google.com/file/d/1r-yn-ooeYoz1yROEJ-yx01_KhErKN_p8/view?usp=drive_link zero2 server: https://drive.google.com/file/d/1XQ9zzw_Bz-rZancDWuzGwMjHHn_4U8SE/view?usp=drive_link repository: https://github.com/stephengraf/armbian_build_sg.git There is another repository mentioned in the Armbian Forum: https://github.com/NickAlilovic/build If anyone has interest and skills to debug the analog audio, the dmesg errors are: [ 7.125509] ahub_dam-snd-soc-dummy-dai: substream ahub_dam-snd-soc-dummy-dai has no playback, no capture [ 7.125539] sunxi-snd-mach soc:ahub_dam_mach: ASoC: can't create pcm ahub_dam-snd-soc-dummy-dai :-22 [ 7.125780] sunxi-snd-mach: probe of soc:ahub_dam_mach failed with error -22
-

High temperatures after CSC 6.6 Kernel upgrade
RobArmbian replied to Khadas's topic in Orange Pi Zero
Same problem for me, I tried everything because my OpiZero became really hot. I thought it was the SD card or another problem... How to change the kernel without reinstalling everything? EDIT: sudo armbian-config > System settings > Other -
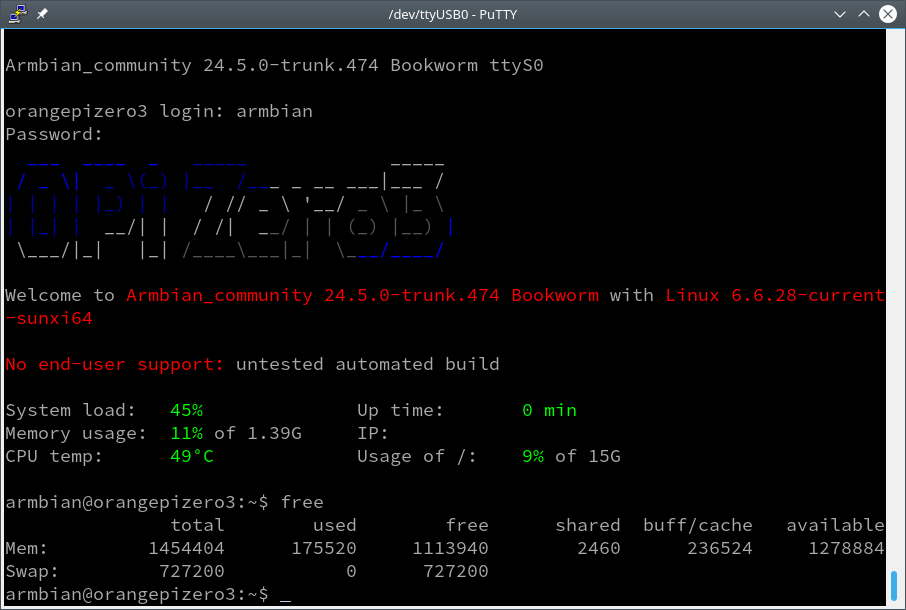
@voapilro @bjorn @Long-Johnny, all psst some fun stuff https://github.com/ag88/1.5GB_Fix_for_Armbian_on_OrangePiZero3/ ok that's the 2nd attempt to create a custom u-boot to boot Armbian on 1.5 GB OPi Zero 3 boards, do visit the repository for more info. first you can try that with the 'official' image https://www.armbian.com/orange-pi-zero-3/ but that this u-boot is build from mainline u-boot at the 2024.04 release https://gitlab.com/u-boot/u-boot and that it requires a working /boot/boot.scr or /boot/boot.cmd to boot linux. /boot/boot.scr or /boot/boot.cmd are the boot scripts that actually has u-boot commands which loads the kernel and dependencies and boot linux. if the boot drops you into a command shell, it could mean either that the /boot/boot.scr or /boot/boot.cmd is invalid or that it is using a *custom* u-boot and the /boot/boot.cmd, /boot/boot.scr uses or is expecting some variables that is not there in 'standard' mainline u-boot. I managed to boot to the Linux command prompt this time ! I'd just like to say that I took the Armbian Bookworm minimal image from the Armbian release web for Orange Pi Zero 3 Armbian_community 24.5.0-trunk.474 6.6.28 https://www.armbian.com/orange-pi-zero-3/ did my u-boot patch, run it on my 1.5 GB Orange Pi Zero 3 and it booted to the prompt! and just right now Here is a screenshot running from Orange Pi Zero 3 - 1.5 GB board tethered from usb-uart to debug console, I ran the command 'free' which shows that the total memory is 1.5GB how about that for a proof-of-concept without this u-boot 'patch' u'd get 'stuck' at the boot reporting 2GB seen on the usb-uart debug console for the 1.5GB board. men I feel like celebrating, now Armbian runs on 'all variants' of Orange Pi Zero 3 - 1 GB / 1.5 GB (with this hack) / 2 GB / 4GB
-
Helios64 u-boot does not build anymore after we bumped to 2022.07
BipBip1981 replied to Igor's topic in Rockchip
Hi, To my side, it's too complex and risky for me to change hardware components on Helios64. I prefer for my case of uses change CPU Freq and Governor for less performance but stable inside take risk of damage my board by change components. Have a good day -

How to compile a kernel with CONF_SCHEDSTATS=y?
going replied to Stefanita Vilcu's topic in Advanced users - Development
The developers of Armbian have signed their own impotence with this. They cannot or do not want to add support for creating an additional package with debugging symbols. If we look at simple scripts for creating debian packages directly in the kernel source codes, we will see that the debugging package is created automatically when the configuration option is selected: CONFIG_DEBUG_INFO The only way is to change the script of the build system itself by removing these lines and adding 10 lines to the script to create a debugging package. With respect to all free software developers. Leonid. -
 Hi, I am running Armbian 23.02.2 Bookworm with Linux 5.15.93-sunxi on OrangePi PC Plus. When I say sudo apt update, I get this output: Nap:6 http://imola.armbian.com/apt bokworm Release 404 Not Found [IP: 93.103.15.56 80] Branje seznama paketov ... Narejeno E: The repository 'http://apt.armbian.com bokworm Release' does not have a Release file. N: Updating from such a repository can't be done securely, and is therefore disabled by default. N: See apt-secure(8) manpage for repository creation and user configuration details. N: Repository 'Debian bookworm' changed its 'non-free component' value from 'non-free' to 'non-free non-free-firmware' N: More information about this can be found online in the Release notes at: https://www.debian.org/releases/bookworm/armhf/release-notes/ch-information.html#non-free-split Can anyone help?